Continental Refrigerator AWS-10 User manual

Automatic
Watering System
Instruction
Manual
This special watering kit contains everything you need to water up to 10 potted plants automatically.
The kit contains 10 metres of vinyl tubing, that can be cut to the desired length and a timer that can
be adjusted to alter the frequency and length of time plants are watered.
Set Up:
1. Fill a bucket with water; insert the pole into the water (as shown in Fig. 1 – Point 10)
and hook the unit onto the side of the bucket (as shown in Fig. 1 – Point 1).
2. Determine the number of potted plants that you need to water (up to a maximum of 10).
3. Open one of the water outlet caps on the watering unit and insert one end of the tubing into it
(see Fig. 1 – Point 8). Please note that you may need to cut the end of the tubing at a slight
angle to do this.
4. un the other end of the tubing to the potted plant you wish to water and with a pair of scissors, cut
off enough length to comfortably reach the soil of the plant (see Fig. 1 – Points 6 & 7). Secure the tube
in place with one of the pegs (See Fig. 2). epeat this process for as many other plants as you wish to
water. Please note that the flow range will very according to how many tubes you have connected to
the unit at any one time (please see the reference table at the end of these instructions).
Important Notes:
• The unit will not function, unless the detector
unit on the bottom of the pole is fully
immersed in water.
• If the unit beeps, you need to replace the
batteries, or add more water to the bucket.
To switch off the warning sound, press the
“POWE ” button to turn the unit off and then
press the “POWE ” button to turn the unit
back on.
• Before use, consult the reference table at the
end of these instructions to determine how
many tubes you will need for each of your
pot/pots.
• Make sure that any unused connector slots
are closed with the caps.
•Normally only one tube is required per plant.
1
3
9
5
8
10
4
6
7
A
B
C
hour
Day
min
Sec
2
0.1 20
24
BATT.
WATER
POWER SET TEST UP+ DOWN-
BUZ ZER
Fig 1:
Fig 3:
Fig 2:
Programming Instructions:
Important note: Once programmed, the unit will run for an indefinite period of time until the water runs out,
or you remove the watering system from the water.
1. emove the battery compartment from the cradle, Unscrew the battery compartment with a Phillips
screwdriver and insert 4 AA batteries (not included) (see Fig. 1 – Point 3)
2. Press the “POWE ” button until you reach the “Day” icon on the LCD display (see Fig. 3)
and use the “UP” or “DOWN” buttons (see Fig. 3) to set watering time frequency
(from 0.1 to 30 days).
Example: If you wante to set the unit to run 5 times a ay, you woul nee to set the frequency to 0.2 (1/0.2=5). If
alternatively you wante to set the watering system to run twice a ay you woul nee to set the frequency to 0.5 ays
(1/0.5=2). Please refer to the watering table for further examples.
3. Press the “SET” button again until you reach the “Sec” icon and press the “UP” or “DOWN” buttons (see
Fig. 3) to set a watering time (from 1 second to 99 seconds).
Example: If you wante to set a 20 secon watering uration, you woul simply nee to select 20. Alternatively if you
wante to select a 30 secon uration, you woul simply nee to select 30.
Please refer to the watering table for further examples (Fig. 3).
4. Press the “TEST” button for he first watering, and then it will enter into automatic running status as
programmed.
If you press the “POWE ” button first, then press the “TEST” button, the automatic default running time
is 30 seconds and the frequency time is 0.1 days.
5. LCD Display
A. When the battery power is low, a battery symbol will display and flash on the LCD screen, and the
unit will beep to remind you to change the battery.
B. When the water levels in the bucket are low, a water droplet symbol will be displayed on the LCD
screen, and the unit will alert you that you need to add more water to the bucket.
The watering volume is not only a result of programming, but is also affected by the voltage of the
batteries. The reference table below shows flow range versus watering running time, to allow you to
decide how many tubes per pot that you need, and to select a suitable sized pot/pots.
Reference table: (When the running time is 30 seconds, the range of tube reference table)
Length of Tubes an Flow range for each tube V (ml/s)
tube (cm) 12345678910
50 6.5 6.3 6.2 5.8 5.5 5.3 4.9 4.7 4.4 4.0
100 4.8 4.7 4.5 4.4 4.4 4.3 4.0 3.7 3.5 3.3
150 3.5 3.4 3.4 3.1 3.0 3.0 2.9 2.8 2.8 2.7
Sample of possible watering settings:
Desire watering setting Watering frequency Running time setting
(Day icon on isplay) (Sec icon on isplay)
Water once a day 30 seconds per day 1.0 30
Water twice a day for 20 seconds 0.5 20
Water every second day for 60 seconds 2 60
Water once a week for 60 seconds each time 7 60
This shows the
watering frequency
time in hours
This shows the
watering frequency
in minutes
Low battery
flashing symbol
Watering frequency unning time
Description of Parts
1LCD display
2Buzzer
3Connector slot
4Down button
5Up button
6Test button
7Set button
8Power button
1 x watering timer unit
(pump included)
1 x 10 metre length
of vinyl tubing
10 stainless steel
spring pegs
Package Contents
1
2
3
4
65
87
AWS-10
AWS10Instructions_AWS10Instructions 13-02-01 1:07 PM Page 1

Cette trousse d’arrosage spéciale contient tout ce dont vous avez besoin pour arroser automatiquement
jusqu’à dix pots de fleurs. Cette trousse contient un tube en vinyle de dix mètres de long qui peut être coupé
à la longueur voulue et une minuterie qui peut être réglée pour modifier la fréquence et la durée d’arrosage
des plantes.
Assemblage :
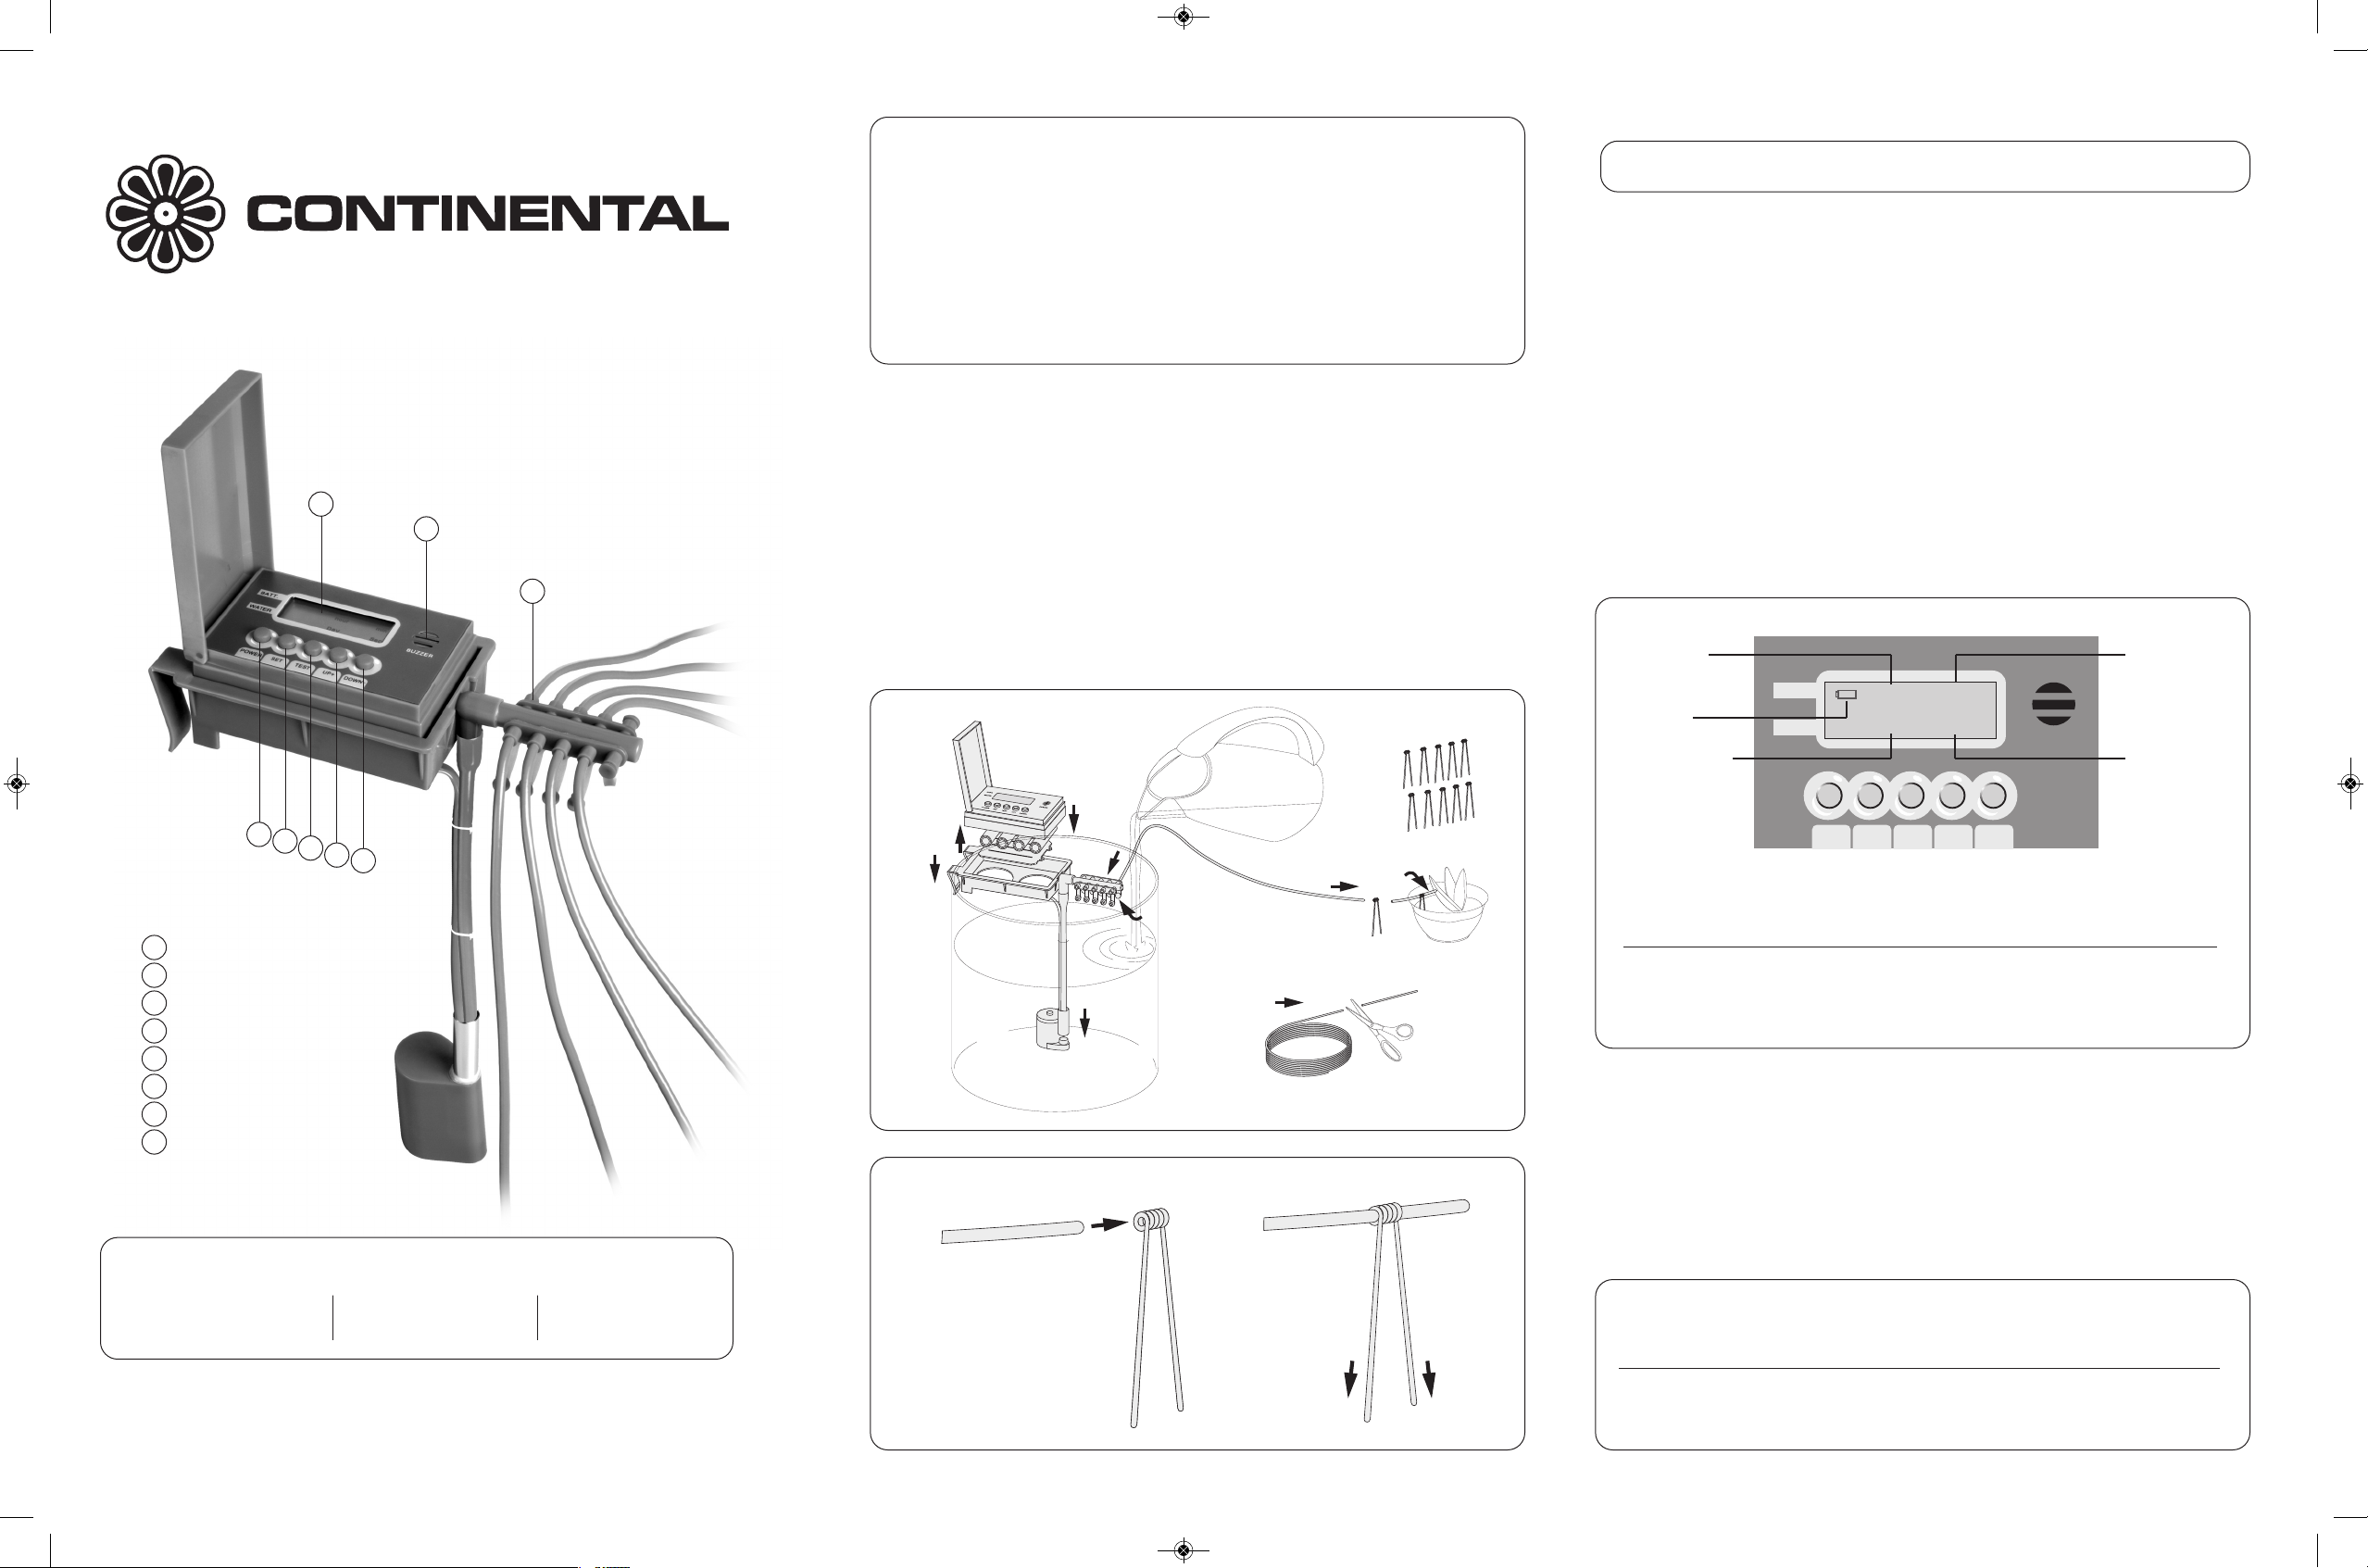
1. emplissez un sceau d’eau, insérez la tige dans l’eau (comme illustré à la Fig. 1 – Point 10), puis accrochez l’unité
sur le côté du sceau (comme illustré à la Fig. 1 – Point 1)
2. Déterminez le nombre de plantes en pot que vous souhaitez arroser (jusqu’à un maximum de dix).
3. Ouvrez l’un des capuchons de sortie d’eau sur l’unité d’arrosage et insérez une extrémité du tube dans le
capuchon (voir la Fig. 1 – Point 8). Veuillez noter que vous devrez peut-être couper l’extrémité du tube un peu en
biais pour ce faire.
4. Apportez l’autre extrémité du tube jusqu’à la plante que vous souhaitez arroser et avec une paire de ciseaux,
coupez une longueur suffisante de tube pour atteindre la terre de la plante (voir la Fig. 1 – Points 6 et 7). Fixez le
tube bien en place à l’aide de l’un des pics (voir la Fig. 2). épétez ce processus pour toutes les plantes que vous
souhaitez arroser. Veuillez noter que le débit variera selon le nombre de tubes que vous avez raccordés à l’unité à
la fois (veuillez consulter le tableau de référence à la fin de ces instructions).
Remarques importantes :
• L’unité ne fonctionnera pas, sauf si le détecteur
au bas de la tige est complètement submergé
dans l’eau.
• Si l’unité émet un signal sonore, vous devez
remplacer les piles ou ajouter de l’eau dans le
sceau. Pour arrêter le signal sonore, appuyez
sur le bouton « POWE » pour fermer l'unité, puis
appuyez de nouveau sur le bouton « POWE »
pour la remettre sous tension.
• Avant d’utiliser l’unité, consultez le tableau de
référence à la fin de ces instructions pour
déterminer de combien de tubes vous aurez besoin
pour chaque pot.
• Assurez-vous que les fentes de raccordement non
utilisées sont fermées à l’aide d’un capuchon.
•Normalement, vous n’avez besoin que d’un tube
par plante.
1
3
9
5
8
10
4
6
7
A
B
C
hour
Day
min
Sec
2
0.1 20
24
BATT.
WATER
POWER SET TEST UP+ DOWN-
BUZ ZER
Fig 1 :
Fig 3 :
Fig 2 :
Instructions de programmation :
Remarque importante : Une fois programmée, l’unité fonctionnera pendant une période indéfinie jusqu’à ce qu’il n’y ait
plus d’eau dans le sceau ou que vous retiriez le système d’arrosage de l’eau..
1. Enlevez le compartiment à piles du support. Dévissez le compartiment avec un tournevis Phillips et insérez quatre
piles AA (non incluses) (voir la Fig. 1 – Point 3).
2. Appuyez sur le bouton POWE jusqu’à ce que vous voyez l’icône de jour (Day) sur l’afficheur ACL (voir la Fig. 3) et
utilisez les boutons UP ou DOWN (haut ou bas) (voir la Fig. 3) pour configurer la fréquence d’arrosage (de 0.1 à
30 jours).
Exemple : Pour configurer l’unité afin ’arroser cinq fois par jour, vous evez configurer la fréquence à 0.2 (1/0.2=5). De même, si vous
voulez la configurer pour qu’elle fonctionne eux fois par jour, vous evez configurer la fréquence à 0.5 (1/0.5=2). Veuillez consulter le
tableau ’arrosage pour obtenir 'autres exemples.
3. Appuyez sur le bouton « SET » de nouveau jusqu’à ce que vous arriviez à l’icône de secondes (Sec), puis sur les
boutons « UP » ou « DOWN » (voir la Fig. 3) pour configurer la durée d’arrosage voulue (de 1 à 99 secondes).
Exemple : Si vous voulez établir une urée ’arrosage e 20 secon es, vous evez simplement sélectionner 20. De même, si vous
voulez sélectionner une urée e 30 secon es, vous evez simplement sélectionner 30. Veuillez consulter le tableau ’arrosage pour
obtenir 'autres exemples (Fig. 3).
4. Appuyez sur le bouton « TEST » pour le premier arrosage, puis le système passera automatiquement à l’état de
fonctionnement automatique tel que programmé.
Si vous appuyez sur le bouton « POWE » en premier, puis appuyez sur le bouton « TEST », la durée de
fonctionnement automatique par défaut sera de 30 secondes et la fréquence sera 0.1 jour.
5. Écran ACL
A. Lorsque les piles sont faibles, un symbole de pile s’affiche et clignote sur l’écran ACL. L’unité émet un signal
sonore pour vous rappeler de changer les piles.
B. Lorsque le niveau d’eau dans le sceau est bas, un symbole de goutte d’eau s’affiche sur l’écran ACL et l’unité
vous alerte qu’il est temps d’ajouter de l’eau dans le sceau.
Le volume d’arrosage n’est pas déterminé uniquement par le programme, mais aussi par le voltage des piles.
Le tableau de référence ci-dessous indique le débit vs la durée d’arrosage, pour vous permettre de décider du
nombre de tubes par pot dont vous avez besoin et de sélectionner un ou des pots de taille appropriée
Tableau de référence : (Lorsque la durée d’arrosage est de 30 secondes, voici le débit du tableau de référence du tube)
Longueur u Tubes et ébit pour chaque tube V (ml/s)
tube (cm) 12345678910
50 6,5 6,3 6,2 5,8 5,5 5,3 4,9 4,7 4,4 4,0
100 4,8 4,7 4,5 4,4 4,4 4,3 4,0 3,7 3,5 3,3
150 3,5 3,4 3,4 3,1 3,0 3,0 2,9 2,8 2,8 2,7
Exemple de configurations d’arrosage possibles :
Arrosage voulu Fréquence ’arrosage Paramètre e urée ’arrosage
(icône e jour affichée) (icône e sec. affichée)
Arroser 1 fois par jour 30 secondes par jour 1,0 30
Arroser 2 fois par jour pendant 20 secondes 0,5 20
Arroser aux 2 jours pendant 60 secondes 2 60
Arroser 1 fois par semaine pendant 60 secondes chaque fois 7 60
Cela indique la
fréquence d’arrosage
en heures
Cela indique la
fréquence d’arrosage
en minutes
Symbole clignotant
de pile faible
Fréquence d’arrosage Durée d’arrosage
Description des pièces
1
Afficheur ACL
2
Avertisseur sonore
3
Fente de raccordement
4
Bouton DOWN
5
Bouton UP
6
Bouton de test
7
Bouton de configuration
8
Bouton de mise sous tension
1 x minuterie d’arrosage
(pompe incluse)
1 x tube en vinyle de 10
mètres de long
10 pics à ressort en
acier inoxydable
Contenu de l’emballage
AWS-10
Manuel d’instructions
pour le système
d’arrosage
automatique
AWS10Instructions_AWS10Instructions 13-02-01 1:07 PM Page 2
Table of contents
Languages:
Popular Water System manuals by other brands

Invisible Structures
Invisible Structures Rainstore3 installation instructions

SpectraPure
SpectraPure RO Systems instructions

Aqua Cooler
Aqua Cooler AC-NNEBFPG Usage and Care Manual

HydroCare
HydroCare Dual Action Installation, use & care guide

Atmos
Atmos Aqua clean operating instructions

SHURflo
SHURflo 8025-933-399 Installation and operation manual