manuals.online logo
Brands
  1. Home
  2. •
  3. Brands
  4. •
  5. Converters.TV
  6. •
  7. Scale
  8. •
  9. Converters.TV 443 User manual

Converters.TV 443 User manual

Popular Scale manuals by other brands

KERN MCC-M operating instructions

KERN

KERN MCC-M operating instructions

Little Balance SB MECA 8113 user manual

Little Balance

Little Balance SB MECA 8113 user manual

Fitbit Zip Aria Wi-Fi Smart Scale user manual

Fitbit Zip

Fitbit Zip Aria Wi-Fi Smart Scale user manual

KERN MPU 250K100 operating instructions

KERN

KERN MPU 250K100 operating instructions

Steinberg Systems SBS-PF-200 user manual

Steinberg Systems

Steinberg Systems SBS-PF-200 user manual

Total TP2000 user guide

Total

Total TP2000 user guide

A&D HL-200i operating instructions

A&D

A&D HL-200i operating instructions

OHAUS Courier 3000 user guide

OHAUS

OHAUS Courier 3000 user guide

Scarlett SC-KS57P97 instruction manual

Scarlett

Scarlett SC-KS57P97 instruction manual

BASETech LS-40S operating instructions

BASETech

BASETech LS-40S operating instructions

SR Instruments SR Scales SR565i-H Operating and service manual

SR Instruments

SR Instruments SR Scales SR565i-H Operating and service manual

Gallet PEP 301ART instruction manual

Gallet

Gallet PEP 301ART instruction manual

AWS ZEO-50 user manual

AWS

AWS ZEO-50 user manual

Gima Glass Body Fat Analyzer Use and maintenance book

Gima

Gima Glass Body Fat Analyzer Use and maintenance book

Seca 374 user manual

Seca

Seca 374 user manual

EDLUND BBPZ-20 quick start guide

EDLUND

EDLUND BBPZ-20 quick start guide

TEC TEC SL59 SERIES owner's manual

TEC

TEC TEC SL59 SERIES owner's manual

Alecto ACW-40 user manual

Alecto

Alecto ACW-40 user manual

manuals.online logo
manuals.online logoBrands
  • About & Mission
  • Contact us
  • Privacy Policy
  • Terms and Conditions

Copyright 2025 Manuals.Online. All Rights Reserved.

HDMI Digital scaler with ultra
high bandwidth ID#443
Operation Manual
Introduction
Congratulations on your purchase of the HDMI Digital scaler with
ultra high bandwidth.
The HDMI Digital scaler with ultra high bandwidth is designed to
convert PC, SD, HD, and HDMI to Digital HDMI at a variety of
HDT and PC resolutions. It handles input and output at 205
MHz ultra high Bandwidth. The HDMI Digital scaler with ultra
high bandwidth has many great features to enhance video
performance and is ideal for use in professional large screen
presentations
Features • Both digital and analog inputs are format converted and
pixel re-scaled through the HDMI Digital scaler with ultra
high bandwidth. It outputs a big range of formats and
resolutions that will easily match the native resolution/
format of your display to ensure highest picture quality.
• Analog RGB Compliant input:
-Supports PC RGB input up to WUXGA @60Hz.
-Supports HDT RGB/YPbPr/YCbCr up to 1080p @60Hz.
• D I/HDCP/HDMI compliant input:
-Operates up to 165Mhz (Up to UXGA @60Hz)
• Supports digital PC RGB output up to WUXGA @60Hz.
• Supports digital HD output up to 1080p.
• Integrated 8-bit triple-ADC/PLL.
• Integrated D I/HDCP/HDMI compliant receiver.
• Dual high quality scaling engines.
• Dual 3-D motion video adaptive de-interlacers with
adaptive edge- oriented adaptive algorithm for smooth
low-angle edge.
• Automatic 3:2 pull-down & 2:2 pull-down detection and
recovery.
• The Proprietary Advanced Color Engine technology gives:
-Brilliant and fresh color.
-Intensified contrast and details.
- ivid skin tone.
-Sharp edge.
-Accurate and independent color control.
• 3D noise reduction.
• Operates through on-screen OSD menu control and remote
control.
Operating Functions
and Controls
Front Panel
1. Power: Press the button to turn ON or turn OFF (standby) the power of
the unit.
2. +/- button:
The buttons provide 3 functions
a. Input select ("+"): Press the "+" button repeatedly to select your
desired input source. The input sources are-toggled through in the
following sequence.
b. Auto Tune ("-"): Press the "2 button to carry out picture auto adjust for analog
inputs (component or PC). The HDMI Digital scaler with ultra high
bandwidth will fine tune the position (centering) and color of the output picture.
c. When in the O D menu mode: Press the +, - button to move up or
down the highlight bar to your desired parameter. Or once a parameter is
selected with MENU/Enter button, press the button to adjust setting value of
your selected parameter.
3. Menu/Enter: This button serves two purposes.
a. Press the button to bring up OSD main menu as shown in the
"OSD Operation".
b. To act as a "Enter" key to enter sub menu or to adjust setting value of the
selected parameter.
4. Input LED Indicators: When one of the LED illuminates its corresponding
source is being selected as input.
5. IR ensor: Infrared remote control sensor.
6. Audio L/R Input: Stereo audio input associated with component in.
7. Component Input: Connects this input connector to the Component
output connector of your source equipment using the enclosed 3RCA to
3RCA cable. The HDMI Digital scaler with ultra high bandwidth
accepts both interlaced component input (480i, 576i) and de-interlaced
progressive input (480p, 576p... 1080p).
The input range is 480i, 570i-1080i, 1080p.
Rear Panel
1. PC in: Connects this PC input connector to the VGA output of your
PC. The acceptable PC resolutions range from VGA-WUXGA.
2. PC audio in: Stereo audio input associated with PC in via 3.5mm phone
jack.
3. HDMI (DVI) in: Connect this HDMI input connector to the HDMI output
connector of your HDMI source equipment using certified HDM
cable. Or connect this HDMI input connector to the DVI output of
your DVI source equipment using DVI cable together with DVI to
HDMI adapter. The HDMI input resolution covers 480i-1080p, and VGA-
WUXGA.
4. AUX (DVI) audio in: This audio input should be used only when a DVI
source is connected to the HDMI input. The HDMI Digital scaler
with ultra high bandwidth will convert DVI and AUX audio input to
HDMI output.
5. This audio input can not be used when input is HDMI signal
6. HDMI out: Scaled digital HDMI output. Connect this output to the
HDMI or DVI input of your HD display.
7. Power jack: Connect to the 5V 2.6A DC power adapter.
Remote Control
1. Power: Press the button once to power on the HDMI Digital scaler
with ultra high bandwidth. Press again to enter standby mode.
2. Input: Press the button repeatedly to toggle through various input
sources as follows.
3. HD input: Press the button to directly select component input
4. PC input: Press the button to directly select PC input.
5. HDMI/DVI input: Press the button to directly select DVI (or HDMI)
input.
6. Output resolution:
elect buttons: Press any one of the button to directly
select output resolution. For other output resolutions that are not
covered by these buttons please enter Menu/Output page to select
them
7. .MENU: Press the button to bring up OSD main menu page.
8. Exit: Press the button to exit from a sub menu or main menu.
9. Up/Down/Left/Right: Press the Up/Down button to move the
highlight bar to your desired parameter during the OSD operation.
Press the Left/Right button to increase/ decrease the setting value of
a selected parameter.
10. OK (Enter): Press the button to confirm your selection.
11. Reset: Press the button to reset the unit's firmware setting to the
factory default value.
12. Auto Adjust: Press the button to optimize the position of the picture
(picture centering) on the screen.
Installation Input
Connection
The HDMI Digital scaler with ultra high bandwidth accepts
component, PC and DVI inputs. The formats supported by these
inputs are as follows
Component Input
− When connecting to a PC source use a 15-pin D-sub cable to connect the
output of a PC to the D-Sub input connector of the HDMI Digital scaler
with ultra high bandwidth.
− When connecting to a co ponent source (either SD or HD resolution)
use a 3RCA to 3RCA cable to connect the YPbPr or YCbCr output of a
DVD or Set Top Box to the Y-Cb/Pb-Cr/Pr input connector of the HDMI
Digital scaler with ultra high bandwidth.
− When connecting to a HDMI source, use a HDMI cable to connect the
HDMI output of a STB or DVD to the HDMI input connector of the
HDMI Digital scaler with ultra high bandwidth.
− When connecting to a DVI source, use a DVI cable to connect to the
DVI output of a DVI source, such as DVD or PC, on the one end.
And use a DVI to HDMI connector adapter to connect to the other end of
the DVI cable. The HDMI connector of the adapter is then connect to the
HDMI input of the HDMI Digital scaler with ultra high bandwidth.
The HDMI Digital scaler with ultra high bandwidth can auto atically
detect the input resolution of all three inputs. To switch fro one input
source to another just press the input button on the front panel ("+") or on
the re ote control.
Output Connection
The HDMI Digital scaler with ultra high bandwidth can output a
variety of PC, SD and HD resolutions in HDMI digital format.
The digital output supports the following resolutions, all in RGB
format. SD/HD 480i, 480p, 576i, 576p, 720p@50/60, 1080i@50/60,
1080p@50/60
PC VGA @60 / SVGA @60 / XGA @60 / SXGA @60 / WXGA@60
/ WSXGA / UXGA / WUXGA
When connecting to a HDMI display use a certified HDMI cable to connect
the HDMI output of the HDMI Digital scaler with ultra high bandwidth to the
HDMI input of your HDMI TV.
When connecting to a DVI display use a HDMI cable together with a HDMI
to DVI connector adapter to connect to the DVI input of your DVI display.
OSD Operation
After power on the unit, press the "menu" button will bring up the main menu as
follows
Use +, - button to move highlight bar to your desired parameter,
then press MENU/ENTER to enter into sub-menu of your selected
parameter.
Video (or PC): When Video is selected a sub menu as below
comes up.
Contrast
Brightness
Hue
Saturation
Sharpness
Picture Mode – - User
- Standard
- Vivid
- Movie
Scale – - Underscan
- Overscan
NR - - Low
- Middle
- High
- Off
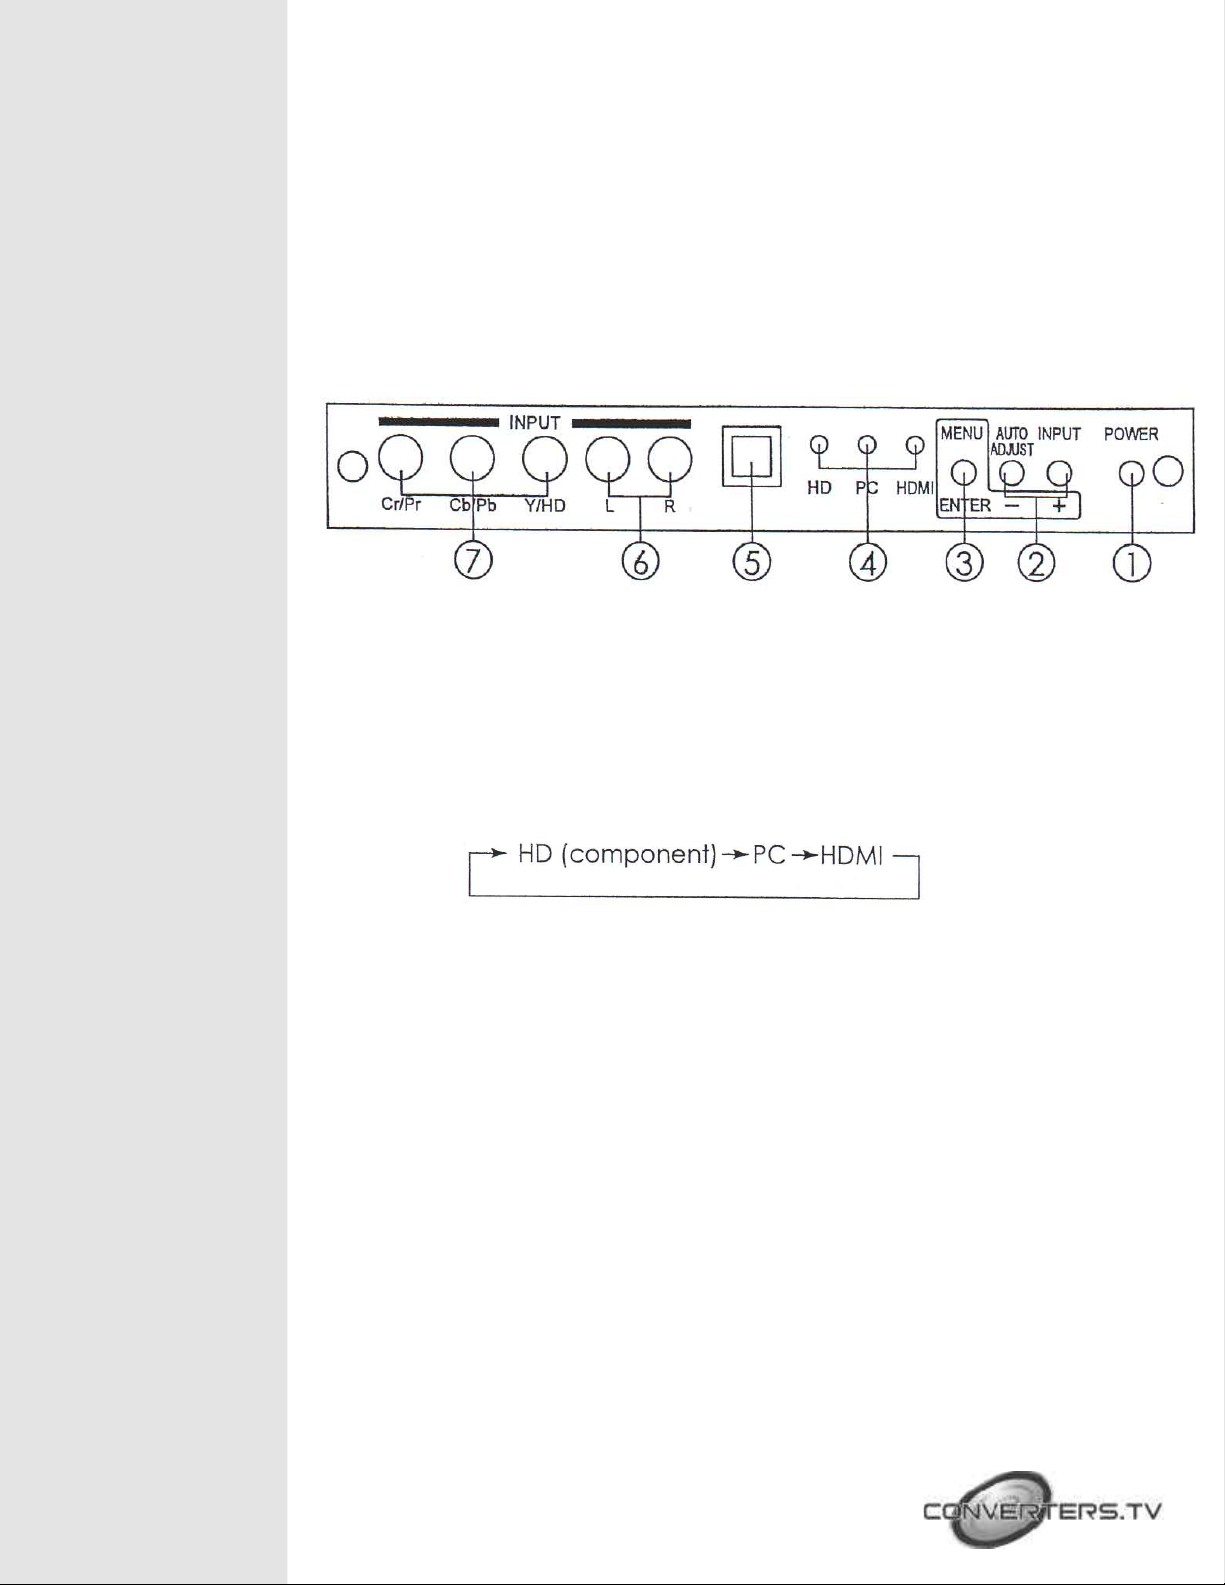
Note (PC): Available only when PC is selected as input.
To adjust picture quality, Use “+,-” to move the highlight bar to your
desired adjust item, press the Menu/Enter to confirm your selection.
At this point, the selected parameter will turn red, you can then use
“+,-” to increase or decrease the value of the parameter.
When adjustment is complete, press "Menu'' to leave the parameter.
Move the highlight bar to "Exit", then press Menu/Enter to exit.
Note: The "H-position" and "V-position" are only available when
component or PC input is selected. Neither are available when the
DVI input is selected.
Picture mode -there are 4 picture modes for customer to choose
from.
User: Select to adjust to your favorite setting and store it.
tandard: Standard factory default setting for optimal display in a
normal environment.
Vivid: High saturation picture for optimal display in a bright
room.
Movie: Picture for comfortable low brightness display in a dark
room.
cale: select overscan when input source is SD or HD video to
ensure no black band around screen border. Select underscan when
input source is PC signal to ensure full picture content fall within
screen border.
Noise Reduction: This function only works when input is analog
RGB or component. It will not work for DVI input. There are four
steps of Noise Reduction-Off, Low, Middle High. The Noise
Reduction will remove the noise that results from analog to digital
conversion and digital scaling processing.
H & V position To adjust for best horizontal and vertical position of
the picture in the screen.
Colour
User: Select to adjust to your favorite color te perature setting.