CLEANING & MAINTENANCE
CAUTION: Remove the battery before carrying out any
cleaning or maintenance. This will prevent you accidently
turning on the unit whilst cleaning it.
Check for any faults such as loose or damaged blades,
loose fittings, and worn or damaged components. If
necessary carry out any repairs before using the mower
again.
Check that covers and guards are correctly fitted, and are
not damaged in any way.
Clean the unit using a soft brush or cloth. Do not use
abrasive material to clean the product or immerse it in
water.
Do not pick up liquids or use on wet ground.
Do not use on concrete, tarmac or other rough surfaces.
Do not pick up pieces of string, stones or fabrics with the
mower.
Be aware of raised areas in lawns such as paving stones or
manhole covers that can damage the blades.
Clean the exterior of the machine thoroughly using a soft
brush or cloth. Do not use water, solvents or polish. Spray
the cutting cylinder and lower blade with a low viscosity
oil, such as a spray oil. Brush away any build-up of grass or
leaves on the blades.
STORAGE
Before storing, remove the battery. Turn the unit on its side
and clean the blade area. If grass cuttings are compacted
in the blade area, remove with a wooden or plastic
implement.
Remove all grass and debris, store the unit in a dry place,
out of the reach of children, and oil the blades.
Do not place other objects on top of the machine.
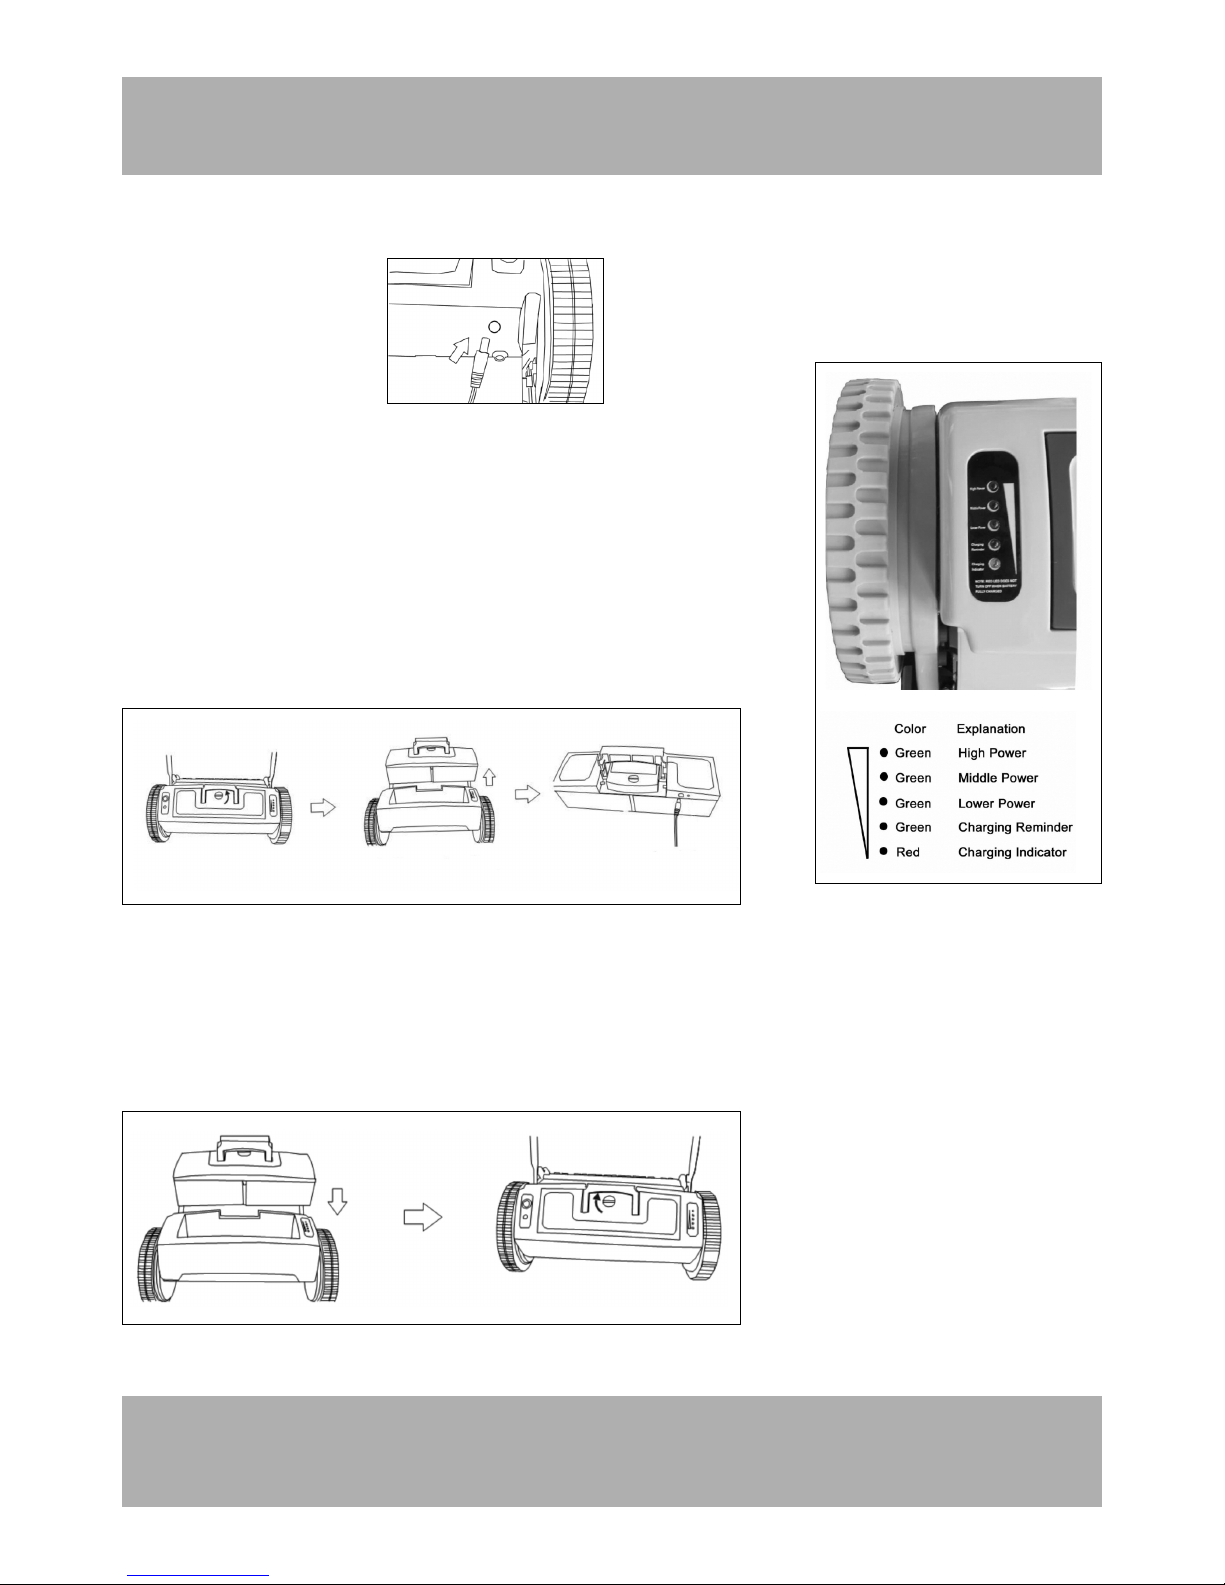
Always charge the battery after use, and every three
months if stored for a long period of time.
For storage in confined spaces the handles can be removed
from the mower.
Disconnect the power cord and flex the lower handles to
remove from the frame locating lugs.
Starting and Stopping
WARNING
Before starting the mower, check within the blade area for any foreign objects and remove
them.
Do not operate the mower on areas other than turf surfaces. The mower should be sitting on
its wheels on a level part of lawn before starting operation.
(1) To start the mower, first turn on the red on/off switch (13) on the Main unit to the ON
position, then press the safety button (2) with one hand and pull the starting lever (3)
back toward the handle grip with the other hand.
(2) To stop the unit, just release the lever (3), the motor will switch off, then turn off the
on/off switch (13) on the Main unit.
(3) The mower may be restarted at any time with the same procedure.
(4) The blades continue to rotate for a few seconds after the mower is switched off. Wait for
the blades to stop turning before clearing any grass or putting your hands near the
blades.
Reset Button ( to be used if and when you overload the motor)
The reset button (14) on the main body of the machine is to prevent any damage occurring
to the battery or the motor due to a current overload, such as from the blade jamming.
To restart the mower wait for a few seconds then press the reset button so that it is level
with the mower casing.
If you use the Reset button (14) then following actions are recommended:
(1) Do not force the unit to cut in thick or wet grass as this can overload the motor.
(2) Make a first cut with a high cutting height then make a second cut with a lower cutting
height. (See cutting height adjustment section on previous page).
(3) Push the unit more slowly.
(4) Check the blade is correctly adjusted so the grass is cutting cleanly.
(5) Clean the blades and remove any grass or objects that may be causing the mower to
stall.
Mowing
• To obtain a clean cut, push the unit in straight lines (passes) at a deliberate walking pace.
Overlap the passes to even the cut and to avoid any uncut strips.
• If you hear the motor in the unit change pitch dramatically while mowing, it may be
overloaded. Attempting to force the mower to cut may damage the motor.
• Check to see if the grass is very thick or long, a first cut with height set higher will help
reduce the load on the motor. (See Cutting Height Adjustment section).
• Push the unit more slowly when cutting thick, long, or wet grass.
• The area of cut depends on the lawn conditions, grass thickness, grass length, moisture
content, and height of cut.
• For the maximum area of cut it is recommended to cut the lawn more frequently, mow in
dry conditions, select a high cutting height, and walk at normal speed.
• Start mowing around the edges of the area to be mowed, then cut the central area in
strips.
Mowing using the grass catcher (supplied accessory)
The grass catcher (5) collects the clippings as it mows. It attaches at the grass catcher hooks
on the mower and by the strap to the mower handle. Mow using the same procedure as for
normal mowing.