Core LifeGlider User manual

USER MANUAL
LifeGlider® Personal Mobility Device
Welcome to the LifeGlider, a unique
ambulatory assistive device designed to permit
safe, upright, hands-free mobility and to reduce
falls. Please refer to this manual before using
your LifeGlider.

| 2 |
Components
The LifeGlider is provided as a single, pre-assembled unit comprised
of a metal frame with two hinged arms, four wheels, an integrated
padded seat, a security belt, a wheel lock, and hand grips.
HAND GRIP
SECURITY BELT
WHEEL LOCK
SEAT
HINGE
ADJUSTABLE LEGS
WHEELS

USER MANUAL
| 3 |
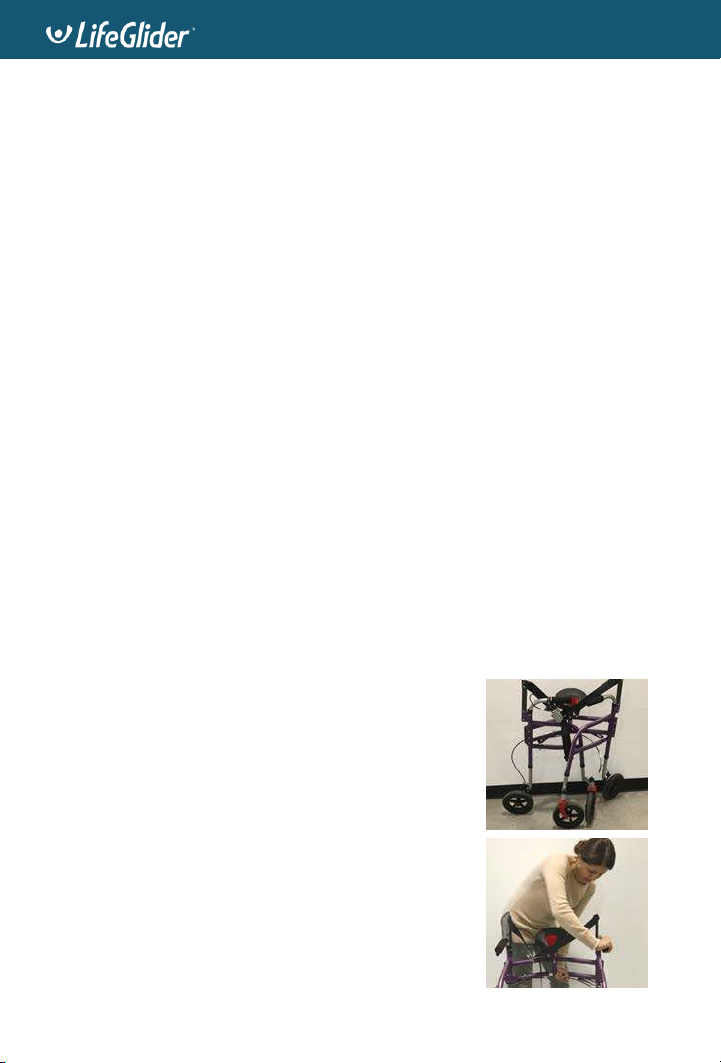
Who Can Use a LifeGlider?
The LifeGlider is intended to be used by people who struggle towalk
securely and confidently, and to allow mobility without extreme
fatigue or fear of falling. By securing the body’s center of gravity, the
LifeGlider encourages upright posture, helps restore proper gait, and
reinforces the user’s sense of balance and confidence. Unlike
a traditional walker, it can be used hands-free. It alleviates weight
from the legs, helping individuals with limited leg strength to walk
and carry out daily activities. The LifeGlider is intended for use by
individuals who:
•Are between 5' and 6'4" (1.52 – 1.93 meters), weighing up to 250
pounds* (113 kg).
•Can stand for approximately one minute (long enough to
fasten the security belt.)
•Possess sufficient cognitive function to follow instructions and
use the device safely.
The LifeGlider can also be used as part of a physical therapy or
rehabilitation program. Depending on the situation, a caregiver or
physical therapist can assist the user with getting into and out of the
device.
Anyone experiencing a loss of vision or motor coordination, severe
side effects of medications, or severe cognitive or profound
intellectual disabilities that require close supervision should not use
the LifeGlider. If you are not sure whether the LifeGlider is
appropriate for you, please consult your physician.
*This refers to TOTAL weight the device must support, so includes items
carried in the hands, in a bag, etc. Total weight should not exceed 250
pounds (113 kg).

| 4 |
Where Can I Use My LifeGlider?
The LifeGlider is intended to be used in ADA compliant interiorsand
on ADA compliant pathways. Ideal surfaces are dry, flat, smooth and
free of obstacles.
•In no case should the LifeGlider be used on or near stairs or
steep inclines, or to walk over high curbs. It is also not
intended for use on slippery or icy surfaces, or in snow,
sand, or water.
•When using the LifeGlider, do not significantly alter your
center of gravity - for example, by wearing a heavy
backpack or carrying heavy objects.
When Should I Use the LifeGlider?
Patients who need assistance and support walking and are over 18 years
of age can use the device as needed. Discontinue use if you feel
uncomfortable or fatigued. If you are not accustomed to extended
periods of upright mobility, consider starting with short periods of use
(e.g. 15 minutes) and gradually increasing your time in the LifeGlider as
your body adjusts. Keep in mind that your brain and muscles may need
some time to get used to a new way of moving.
Directions forUse
Unpacking and setting up: The LifeGlider is
provided in a folded position.
Unfold the sides by pulling outwards until you
hear the corner hinges click into place. Verify the
sides are in an open and locked position before
use.

USER MANUAL
| 5 |
Adjusting device height: Prior to use, adjust the
height of your LifeGlider to fit your body. When
properly adjusted, the padded seat should be
positioned comfortably just beneath your tail
bone.
To adjust the device height, identify the
adjustment button on the legs. Adjust one leg at a
time by pressing in firmly on the adjustment
button to release. Then slide the leg to the desired
height, and ensure the button fully protrudes
from hole corresponding to new height setting.
Make sure all legs are set to the same height.
Moving wheel lock from right side (default) to
left: The wheel lock is useful when getting into
or out of the LifeGlider, to prevent it from
rolling. If you wish to move the wheel lock
handle from the right side to the left, unscrew
the bolt holding it in place, move to the left
handle, and re-tighten the bolt.
Getting into the LifeGlider
Make sure the frame is fully open and all four
wheels are on the floor.
Use the wheel lock handle to lock the wheels,
and unbuckle the security belt so it hangs
down next to the seat.

| 6 |
Back into the LifeGlider and grip the handles to
keep steady. Wiggle back and center yourself
on the padded seat. The seat should be
positioned comfortably just beneath your tail
bone.
(Ensure proper seat position and if necessary,
adjust the device height before continuing.)
Place your feet flat on the ground, shoulder-
width apart. Buckle the security belt and
tighten it so it’s snug, but not pinched.
Check your position and feel some pressure on
your seat bones.
Take a moment to get comfortable in the device
until it feels right. Device height should be set
correctly, seat position should be comfortable,
and the belt should be snug and secure. You
know you’re in the proper position when you
can slightly bend your knees without feeling like
you are slipping down.
Lean forwards and backwards in a semi-seated
position, and adjust the security belt so you feel
balanced.* The seat should not be so high that
you must fully extend your legs or lock your legs
in order to touch the ground.
*Amputees are advised to be cautious as the
center of gravity may be slightly higher on the
torso due to the amputation.
When comfortable, slowly remove one hand
from the handgrip, then the other. Move or
swing your arms gently up and down.

USER MANUAL
| 7 |
Practice stepping in place: put your hands back
on the hand grips, then alternate raising your
feet one at a time.
To begin to walk forward, release the wheel
lock and take one small step forward, then
another, fully engaging your feet, from heel to
toe. Practice walking forward at your own
pace, with growing confidence and ease.
Getting Out of the LifeGlider
Find a safe place to dismount. If you will be
transitioning to another assistive device,
ensure it is within reach.
Use the wheel lock handle to lock the wheels, or
consider positioning the LifeGlider against a wall
to help prevent it from moving. Align your feet,
shoulder width apart. Your toes and heels
should be flat on the floor.
Hold the hand grip firmly with one hand, and
ensure you are balanced on your feet. Be prepared
to hold your weight on your feet and balance
independently of the device so that your body
doesn’t slouch forward as you unbuckle.
When ready, keep one hand on the hand grip
and use your other hand to unbuckle the
security belt.
Carefully transfer to your wheelchair, cane, or
other assistive device if needed.

Device Specifications and Maintenance
WARNING: No modification of this equipment is allowed.
Patent number: US 9,149,408 B2.
Dimensions:StandardDevice:Back of seat height range is 30"-35" (76.2
-88.9 cm) from floor.
TallDevice:Back of seat height range is 33"-40"
(83.8 - 101.6 cm) from floor.
Approximate Weight: Standard -17 lbs (7.5kg), Tall - 18 lbs (8kg)
If necessary, clean surfaces of the LifeGlider with a warm damp cloth
and mild soap only.
Warranty and Repairs
Using the LifeGlider in a manner inconsistent with its intended use voids
the warranty. The warranty does not cover damage caused by
mishandling or inappropriate use. If you experience problems with your
LifeGlider please contact your sales representative.
For More Information
For further assistance, please contact Core Mobility Solutions
or your local device distributor.
Customer Service:
U.S. 1-833-445-4337 (1-833-4GLIDER)
O.U.S +1-408-216-2251
Manufactured for:
Core Mobility Solutions,
Inc. 6341 San Ignacio
Avenue San Jose, CA 95119
USA
www.mylifeglider.com
| 8 |
© 2018 Core Mobility Solutions,
Inc.
264-00001-02 USER GUIDE, MLG - Rev
A
Table of contents
Popular Mobility Aid manuals by other brands

Shoprider
Shoprider Vienna S-UL7 user manual

Etac
Etac R82 High-low:xo user guide

Pressalit Care
Pressalit Care R7634 Mounting instruction

aidapt
aidapt VM862 Fixing and maintenance instructions

Pharmaquip Healthcare
Pharmaquip Healthcare RCN1101LBL manual

aidacare
aidacare Atlanta Operation manual & product specification

Harbor Freight Tools
Harbor Freight Tools 2969 Assembly and operating instructions

R82
R82 86112 Series Mounting instruction

Drive
Drive 750NB Assembly instructions

Invacare
Invacare Quick Release Caster Assembly and operating instructions

HEPRO
HEPRO Gripo user manual

ADAPT SOLUTIONS
ADAPT SOLUTIONS XL-SEAT installation manual