Cosmo Bio i-MyRun.N User manual

COSMO BIO CO., LTD.
Toyo-Ekimae Bldg., 2-20, Toyo 2-Chome,
Koto-ku, Tokyo 135-0016, Japan
Tel: +81-3-5632-9605
Fax: +81-3-5632-9614
i-MyRun.N Instruction Manual
Electrophoresis System
MyRunN/manual04.10.2810:48AMページ2

Declaration of Conformity and Safety
Standards
This product complies with the requirements
of Low Voltage
Directive (LVD) 73/23/EEC through the
harmonized standard EN 61010-1, 1993 + A1,
1992.
EMC Standards
This product complies with the requirements
of EMC Directive 89/336/EEC through the
harmonized standards EN 50081-1 (emission)
and EN 50082-1 (immunity).
The CE symbol and corresponding declaration
of conformity are valid for the instrument
when any of the following apply:
• used as a standalone unit
• connected to other CE-marked Cosmo Bio
Co., Ltd., instruments
• connected to other products
recommended or described in this manual
• used in the same state as delivered from
Cosmo Bio Co., Ltd., except for alterations
described in this manual.
Description Cat No.
Power Supply for i-MyRun IMR-201
Electrophorsis Tank for i-MyRun N IMR-301
Gel Casting System for i-MyRun N IMR-401
Support guide for Minigel (L&S) IMR-501
Terms and Conditions of Sale
All goods and services are sold subject to the
terms and conditions of sale of the company
within the Cosmo Bio Co., Ltd., group that
supplies them. A copy of these terms and
conditions is available on request.
Should you have any comments regarding this
product, we will be pleased to receive them at
the following address:
COSMO BIO CO., LTD.
Toyo-Ekimae Bldg., 2-20, Toyo 2-Chome, Koto-
ku, Tokyo, Japan 135-0016
*For more information refer to page 6
1
Important user information
Please read this entire manual to fully understand and safely use the IMR-201.
The Warning sign highlights an instruction that must be strictly followed in order to
avoid personal injury. Do not to proceed until the instructions are clearly
understood and all stated conditions are met.
WARNING!
Standard Components
MyRunN/manual04.10.2810:48AMページ3

2
1. Introduction
i-MyRun.N is a novel and innovative electrophoresis system including power supply, gel
electrophoresis tank, and gel casting system.
Power Supply:
The power supply (IMR-201) is a high-quality, high-precision, and safe power supply for
electrophoresis applications that require a maximum of 135 volts, 80 mA, and a timer is included.
Electrophoresis separations can be controlled by voltage and current. The IMR-201 automatically
switches over the control parameter according to the programmed limits and conductivity
variations in the system. Two electrophoresis units can be connected to the IMR-201 and run
simultaneously with the same programmed method. One program can be saved (last setting).
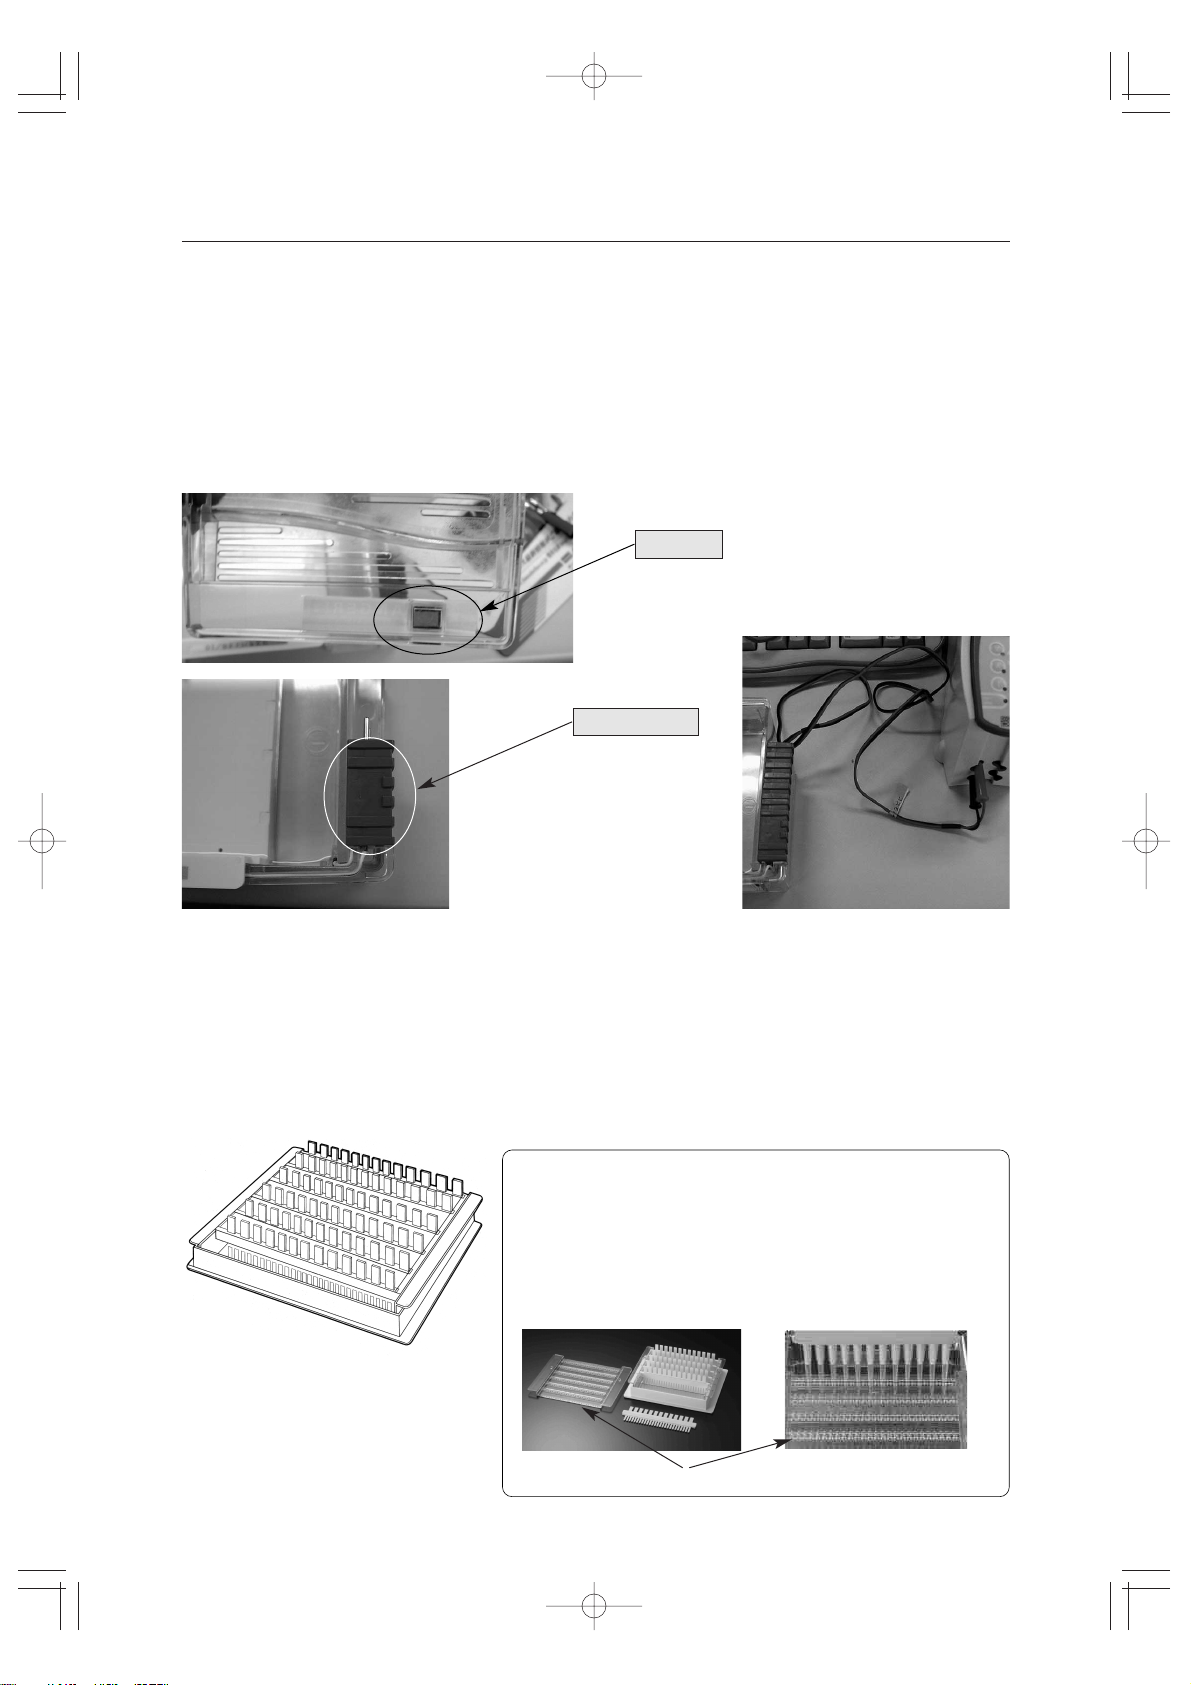
Gel Electrophoresis Tank:
The tank lid is equipped with slits to allow electrophoretic patterns to be easily observed and to
optimize heat dissipation. The tank and power supply are easily set up using one-touch
connectors. It is available to run the 96-well plate format, a maximum 156 samples, or the
maximum run length of 18.5 mm.
Gel Casting System:
The gel casting system (gel size: 124 (W) x 120 (L) mm) includes a unique UV transparent tray
(greater UV transparency for higher sensitivity), a sample loading guide for multichannel handling
of 6 combs and 26 wells (volume 9 µ
R). On the other hand, you can use 13 wells (volume of 18 µR)
if necessary.
2. Safety information
2.1 Safety precautions
Extreme caution should be exercised in the operation of this instrument as it can develop
sufficient voltage and current to produce a lethal shock.
To avoid any risk of injury, the instrument should only be operated by properly trained personnel
and always in accordance with the instructions provided.
Read this entire manual before using this power supply.
1. _This instrument is designed for indoor use only.
2. _The instrument must always be used with the protective earth lead of the power cord correctly
grounded at the mains outlet.
3. _To permit sufficient cooling, ensure that the vents in the rear and sides of the instrument are
not covered.
4. _Maximum relative humidity of 80% for temperatures up to 31°C decreasing to 50% relative
humidity at 40°C. Avoid condensation by letting the unit equilibrate to ambient temperature
when taking the power supply from a colder to a warmer environment.
5. _Keep the instrument as dry and clean as possible. Wipe regularly with a soft damp cloth. Let
the power supply dry completely before use. If exposed to moisture or condensation, unplug
the power supply until the instrument is dry.
6. _Use only undamaged electrical wire and equipment specified for the voltages you will use.
High voltage wires must meet the requirements of the IEC 1010-2-031:1993 electrical standard.
Any electrophoresis equipment connected to the power supply should meet the requirements
of the IEC 1010-1:1993 electrical standard.
7. _Note that the output is connected to the chassis/reference earth.
8. _Please contact Cosmo Bio if a problem occurs. (Never replace the fuse yourself.) Never open
the cover.
MyRunN/manual04.10.2810:48AMページ16

3
3. Unpacking and installation
Unpacking
1. _Introduction
Unpack and carefully examine the power supply, the electrophoresis chamber (tank), and the
gel casting system.
2. _Report any damage and save all packing materials if any part is damaged during transport.
3. _Do not attempt to use this apparatus if it is damaged.
4. _Do not attempt to use the apparatus in any of the following cases:
Buffer leaks from the main tank.
The electrophoresis tank safety cover is cracked.
5. _Place the apparatus close to its electrophoresis power supply. Make sure that this is a safe dry
location. Automatically select the appropriate voltage range, 100–120 or 220–240 V. Select the
appropriate mains cable and connect one end to the mains socket on the IMR-201 power
supply and the other end to an AC grounded outlet.
6. _Connection of the electrophoresis tank(s).
Connect the leads from the electrophoresis tank(s) (red to red and black to blue). The red lead
is the positive and the black is the negative.
2.2 Built-in safety features
The IMR-201 has been tested and complies with the IEC 61010-1 (EN 61010-1) electrical safety
standard.
1. _Functional earth leakage.
Should the power supply be connected to an electrophoresis unit that has a leakage path to
earth, the IMR-201 will detect this fault and the high voltage will be turned off.
2. _Start current check.
To ensure that the electrophoresis unit is connected correctly, the power supply verifies that
the resistance is not higher than the specified limit at a low safety voltage (< 40 V). If this
resistance is too high, the voltage is turned off. Too high a resistance can also be caused by
using buffers with extremely low conductivity. The high voltage is also turned off in this case
and an error message is shown. This function can be disabled to perform certain applications.
3. _Sudden load change detection.
This function prevents accidents under operating conditions due to a break in the electrical
circuit, such as a bad connection to the electrophoresis unit. The high voltage is turned off in
such an event.
Error messages are also shown on the display for sudden failures.
Use only undamaged electrical wire and equipment approved for the voltage you
will use.
Two electrophoresis units can be run simultaneously with the same program. Please
remember to double the limiting current and power if two electrophoresis units are
run at the same time. The voltage will be the same regardless of the number of
units.
WARNING!
MyRunN/manual04.10.2810:48AMページ5

Magnet
4
4. Operation
2. Gel Casting System
This set will produce one large gel.
Dimensions: 124 (W) x 28 (H) x 120 (L) mm
Combs can be positioned at A or B (A1 to A6 or B1 to B4)
Combs allow you to make slots of two different sizes: 18 µ
R(13 wells) or 9 µR(26 wells).
1. _Place the gel casting stand in a horizontal position.
2. _Install the gel casting plate on the gel maker (casting) stand.
Lead Switch
Sample loading Guide
Note: The Gel Casting System has a sample loading guide.
Loading samples is easy if you use this guide. (This guide is
available for use on six lanes (A1–A6).)
1. _Make the gels by using the 26-tooth comb on six lanes
(A1–A6)
2. _Set a gel (with gel casting plate) on the electrophoresis tank.
3. _Set the guide over the plate.
4. _Load the sample like the image.
1. Set up for the system
The power supply and electrophoresis tank have some of safety interlock systems. If you work
with the system, make sure of the following points.
1. _Put a buffer in this electrophoresis tank. (Suitable buffer concentration)
2. _Set the lid on the electrophoresis tank. The lid has a magnet and the magnet contacts the lead
switch.
If you remove the lid, the safety function will activate, and you will hear the beep.
Also make sure of some of the connections.
MyRunN/manual04.10.2810:48AMページ14

If you with to store gels you have prepared. Be sure to cover the gel with buffer. Store the gel at a
low temperature
7. _Holding the vertical portions of the plate remove the plate containing the gel from the stand.
8. _Place the gel casting plate on the gel bed in the centre of the electrophoresis tank.
9. _Place the gel casting plate in such way that the negatively charged DNA migrate in the
direction of the “+” marked on the electrophoresis tank (opposite the connector).
10. _Pour buffer in the electrophoresis tank to a level slightly (3 to 5 mm) above the gel surface.
It is important to keep the gel unit clean, particularly the gel-casting plate, and the combs. Do not
clean any part of the gel unit with organic solvents such as ethanol or acetone.
3. Power Supply Operation
Check the Quick Start Operation Manual.
1. _Insert the power supply connector into the electrophoresis tank.
5
Power switch
Power code
3. _Set the comb. Select a comb with the desired number of teeth.
4. _Allow the agarose to cool below 70°C before pouring.
5. _Pour the gel. For 4 mm thick gels, about 80 ml of agarose is required.
6. _After the gel has solidified completely, pour the buffer solution onto the gel to a level just
above the gel surface and gently draw out the comb.
Insert the comb into the hole to which the A
mark to the right of the gel casting tray is
attached if you need the same six-lane distance.
Insert the comb into the hole to which the B
mark to the left of the gel casting tray is
attached if you need the same four-lane
distance.
MyRunN/manual04.10.2810:48AMページ7

6
3. _Turn on the power on the back panel of the power supply.
If you want to run your gel at constant voltage:
1. _Select the voltage by using the key of the remote control.
2. _Adjust the voltage with the up and down key. Voltage can be selected as 35, 50, 75, 100,
135 V.
3. _Press the key.
4. _Select the running time by using the key. And adjust using the key up and down .
5. _Select the running time by using the key.
6. _Start the run using the key.
If you want to run at a constant ampere, apply the same procedures using the key instead
of (20, 30, 40, 50, 60, 70, or 80 mA can be selected).
This power supply keeps in memory the last voltage and/or current setting in memory.
1. _Switch on the main power.
2. _The display shows the last value of the selected and keys.
3. _Select , and adjust the running time by the selecting the key followed by .
4. _Select
If you do not wish to use the timer:
1. _After selecting the mode, select when “0” appears on the display.
2. _Select key. appears on the display.
You want to stop the electrophoresis:
Select and hold the key for two seconds, OFF appears on the display.
To start select the key.
If the timer is selected, it will automatically restart at the value before the electrophoresis was
stopped.
Do not forget to switch off the power supply when not in operation.
2. _Plug the power cord into the power outlet.
Mini gels (L)
Cat # IMR-403
Mini Gel Casting System
Note: The i-MyRun.N system has the mini gel support guide.
The guide can support two large gels or four small gels
(one large gel and two small gels) on this glide.
Mini gels (S)
MyRunN/manual04.10.2810:48AMページ12

Error message:
ERROR XX is displayed, and the power supply will stop when the current reaches the limit values.
Code 00: Current is too low.
Code 01: Current is too high.
4. Sample Loading
Gently load the samples into the well using a micropipette. Add small volumes of glycerol or
sucrose to the sample facilitate sample. The maximum loading volume of the f sample is about 18
µ
Rfor the 13 wells comb and 9 µRfor the 26 wells comb for the thick gel. If you use a
multichannel pipette, use the loading guide plate and follow one of the proposed patterns:
5. Migration
Place the cover on the electrophoresis tank. This will close the electrical circuit.
If the buffer temperature rises above 40°C during electrophoresis, turn off the power and either
dilute the running buffer or place i-MyRun in a cold room. Be aware that if the buffer
concentration is too high, the temperature will increase rapidly.
If you want to withdraw the agarose gel from the support, first cut the two small overhangs of
agarose located at the end of the gel.
Note: Refer to page 4.
6. Electrical Specification
Voltage from 100 to 240 VA, AC 50/60 Hz
Temperature of operation: from 0–40°C
Output constant voltage: 35, 50, 75, 100, 135
VDA Max 54 W or 400 mA
Output constant ampere: 20, 30, 40, 50, 60, 70, 80 mA max 24 W or 300 VG
5. Maintenance
Wipe the instrument regularly with a damp cloth. Let the instrument dry completely before use.
Otherwise, no user maintenance is necessary. All servicing should be entrusted to qualified
personnel
only. Please contact Cosmo Bio Co., Ltd., for more service information.
6. Environmental Condition
1. _Indoor use.
2. _Altitude up to 2000 m.
3. _Temperature 5°C to 40°C.
4. _Maximum relative humidity of 80% for temperature up to 31°C decreasing to 50% relative
humidity at 40°C.
5. _Pollution Degree 2 in accordance with IEC 664.
7
Warranty; One year
MyRunN/manual04.10.2810:48AMページ9
This manual suits for next models
1
Table of contents
Other Cosmo Bio Power Supply manuals
Popular Power Supply manuals by other brands

Matsusada Precision
Matsusada Precision VOL Series instruction manual

TDK-Lambda
TDK-Lambda RWS-B Series instruction manual

Omron
Omron S8VK-G Series instruction manual

Hama
Hama Universal Notebook Power Supply Operating instruction

MANGO POWER
MANGO POWER E quick start guide

Chamberlain
Chamberlain GPS1000 manual