CPcam CPC501 User manual

CPC504-AV1.0
6
Allthesafetyandoperatinginstructionsshouldbereadbeforeoperation.
Theimproperoperation may causepermanentdamage.
vWARNING
Wereservetherighttomakeimprovementstothedocumentation,softwareandfirmware
ofitsproductswithoutnotice.Inordertoprovideuserswithbetteroperationofthisproduct,
informationinthismanualisintendedtobeaccurateandreliable.However,weassume no
responsibilityforitsuse;norforanyinfringementsofrightsofthirdpartieswhichmayresult
from itsuse.

The lightning flashwitharrowheadsymbol, withinan equilateral
triangle, isintended toalert theusertothe presenceof uninsulated
"dangerousvoltage"withinthe product'senclosurethat maybeof
sufficient magnitude toconstitutearisk of electricshocktopersons.
The exclamation point withinan equilateraltriangleisintendedtoalert the
usertothe presenceof important operating andmaintenance-(servicing)
instructionsinthe literatureaccompanyingtheappliance.
Pleaseliftand placethisequipment gently.
Donot exposethisequipment todirect sunlight.
Donot usethisequipment nearwaterorincontact withwater.
Donot spill liquidof anykindon theequipment.
Donot blockthe ventilation holesat the top and bottomof theunit.
Installation shouldbemadebyqualified servicepersonnel.

vTABLEOFCONTENTS
1. PRODUCTINTRODUCTION
Features
Description
Precautions
Specifications
Packagecontent
Operating andinstallation
Connection
2. SITUATION SIMULATE
Situation simulate
STEP1: SETTHE PRESET
STEP2: SETSEQUENCE
STEP3: SETAUTO
.1
.. .3
.... .3
.. .... ..4
.... ...6
..... ...7
...... ..10
.. ..... ...12
.. .......12
.. ...... ... ...13
.. .... .. ... ....14

.. .... .. .. 15
.. ..... .. ... ...16
.... .. ... ... .. .. ....18
.. .... .. .... ... .. .....19
..... .. .. ... .. ....20
.... .. ... .... ....20
.... .. ... ..... ....21
.... .. .. ..... ....23
...... ... ..... ....25
.... .. ... ... .... ....27
.... .. ... ..... ....31
.... .. .. ... ..... ....22
3. DETAILEDMENU SETUP
Menu
EnterPT(Z)Menu ViaAP
Control Panel
Mainmenu
Mainoptions
AUTO
AUTOPAN
PRESET
PT(Z)HOTPOINT
SEQUENCE
CAMERA
SYSTEM
4. APPENDIX
Keypad
.... .. ... ... .... ....29

vProductintroduction
CPC501&502 Features
CompatiblewithIntelligentMutiplexingDVRs.
1/3"SonyCCD. .
OSD functionselect.
S/N ratiomorethan48dB(AGCoff)
16Presets
RS-485dataportforsurveillance application.
Onscreenmenu.
Note:Theusagelimitforthemotoris500million times.
1

CPC503&504 Features
CompatiblewithIntelligentMutiplexingDVRs.
1/3"SonyCCD.
480TVlinesofresolution.
Highsensitivityof1.5 Lux/F2.6
OSD functionselect.
3Xopticalzoom lens
S/N ratiomorethan48dB(AGCoff)
16Presets
RS-485dataportforsurveillance application.
Onscreenmenu.
Note:Theusagelimitforthemotoris500million times.
2

Description
ThisisacolorCCDpan/tilt/(zoom)camerawhichemploysa1/3"SonyCCD solid-state
imagingdevicewhichprovidesextremelylonglifeandhigh reliability. Thecamera
provides350ºPanRange,0º~90Tilt Range.
Don’tshootimagesthatareextremelybright(e.g.,lightsources, thesun, etc.)
forlongperiodsoftime.
Don’tuseorstorethecamerainthefollowingconditions:
(1)Extremelyhotorcoldplaces(operatingtemperature0ºCto40 ºC(=32 ºF
to104 ºF))
(2)Closetogeneratorsofpowerfulelectromagneticradiationsuchasradioor
TVtransmitters.
(3)Whereit issubjecttofluorescentlightreflections.
(4)Whereit issubjecttounstablelighting(flickering, etc.)conditions.
(5)Whereit issubjecttostrongvibration.
Precautions
3

Colorful/Normal/Light SelectColorGain
On/OffNAMirror
ATWWhiteBalance
Sharpness/Normal/Soft SelectSharpness
1/60 (1/50)to1/100,000 sec.ElectronicShutter
26.7º~80º80ºAngular FieldofView
4.2~12.7mm4mmFocalLength
F2.6(Wide)~4.3(Tele)F2,0Aperture
approx. 1s(Tele/Wide)inmanualmode-ZoomSpeed
1.5Lux/F2.61.5Lux/F2.61Lux/F2.00.5Lux/F2.0MinimumIllumination
Morethan48dB (AGCoff)Signal-to-NoiseRatio
1.0Vp-p, 75VideoOutput
480 TVlines420 TVlinesResolution
768(H)x494(V)<NTSC>/ 752(H)x582(V)<PAL>
510(H)x492(V)
<NTSC>/ 500(H)x
582(V)<PAL>
NumberofPixel
1/3"SonyHigh Resolution CCDimagesensorPick up Element
CPC504CPC503CPC502CPC501ModelNo.
Specifications
4

approx. 320g (0.66 lbs.)Weight
CPC504CPC503CPC502CPC501ModelNo.
Ø105 (D)x105 (H)mmDimensions
1ARegulatedCurrentConsumption
DC12VPowerSource
0C~40 C(32 F -104 F)
AmbientOperating
Temperature
pan/tilt, lens, 16 preset positions, home position
Controls
manual/sequentialposition
TiltMode
90 º
TiltRange
manual/sequentialposition/auto pan
PanMode
possible (inauto-panmode)
PanAngle Setting
350º
PanRange
preset ID, camera ID:up to 8 characters
CameraID
SEQ/AUTO PAN
AutoMode
MANUAL/AUTO-AutoFocus
3XOpticalZoom
(4.2~12.7mm)
3XOpticalZoom
(4.2~12.7mm)
CCTVLens(4,6,12mm)BoardLens(4,6,12mm)Lens
On/ OffBLC
On(low) / On(mid) / On(high) / Off
AGC
5
•Thismachineisonly compatible with DC12V 1Aregulatedadaptor.
•Thereissomenoise whenthemachineisstartworking.
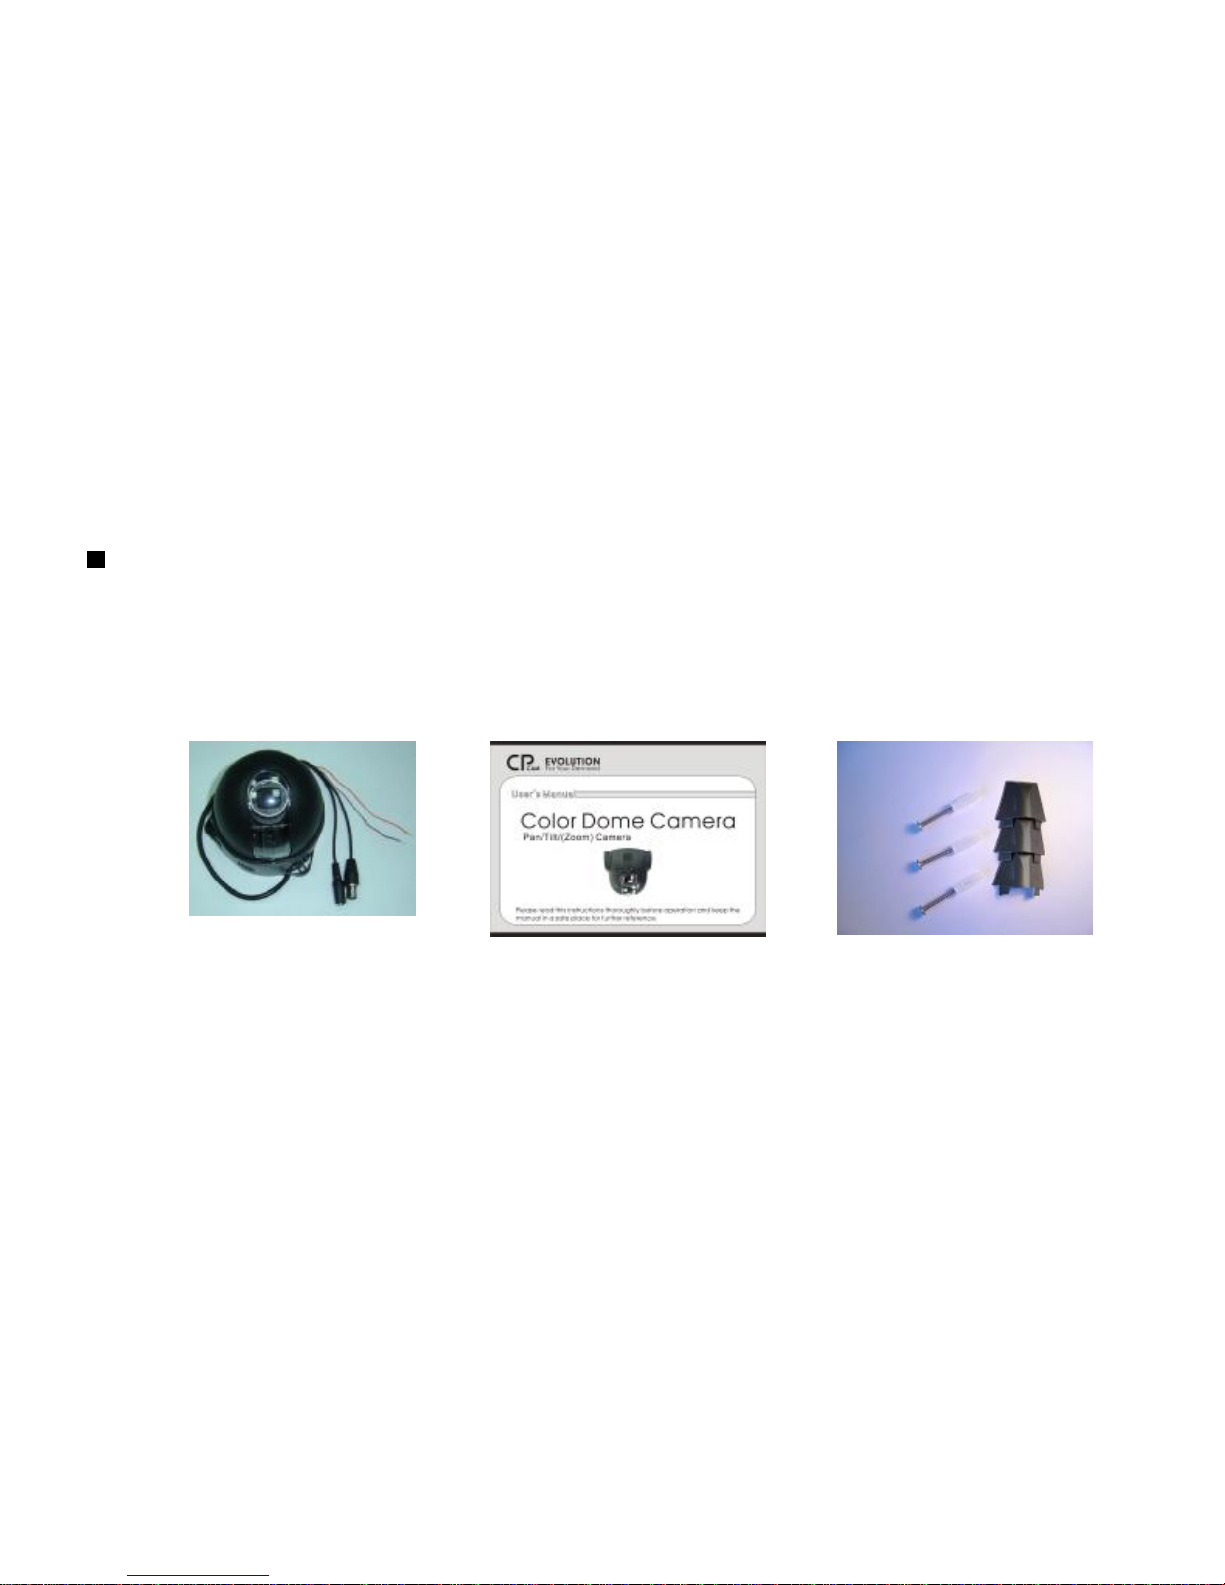
1.Camerax1withpower/videocableandsingleline(orangecolorx1,browncolorx1).
2.User’smanualx1.
3.Decorationcoverx3,screw x3,screw fasterx3.
PackageContent
PT(Z)Camera User’smanual ScrewsandDecoration covers
6

1. Cableroutingtotheattic(refertofigure1)
2.Putthecableontheindentation, andcutoff thethinborderwithnippersif
necessary;elseroutethecablealongthecircularsurface ofthescrewbase,then
placethecableintothecut.Routingthecableovertheceilingsurface (referto
figure2).
3. Screwthethree screwsintothethreeindividualscrewedbasestosticktoceiling.
4. Insertthethreedecorationcoversontothethree differentscrewedbases
(refertofigure3)
OperatingAndInstallation
Refertotheillustrationsbelowbeforeinstallingthecamera:
Figure 1 Cable routingtotheattic Figure 2 Cable routingoverthe ceilingsurface
7

Screw
Screwed
Base
Decoration
Cover
Figure3
Note:
1.Don’tinstall thecamerainthecorner,becausedoingsomaylimit thefunctionofthePT(Z).
2. Installationangle: ±15degreestoahorizontalsurface.
3.Don’tfastenthescrew withatorquegreaterthan2kg-cm,elsethebasemaydeform and
thenhamperthemovementofthePT(Z)
8
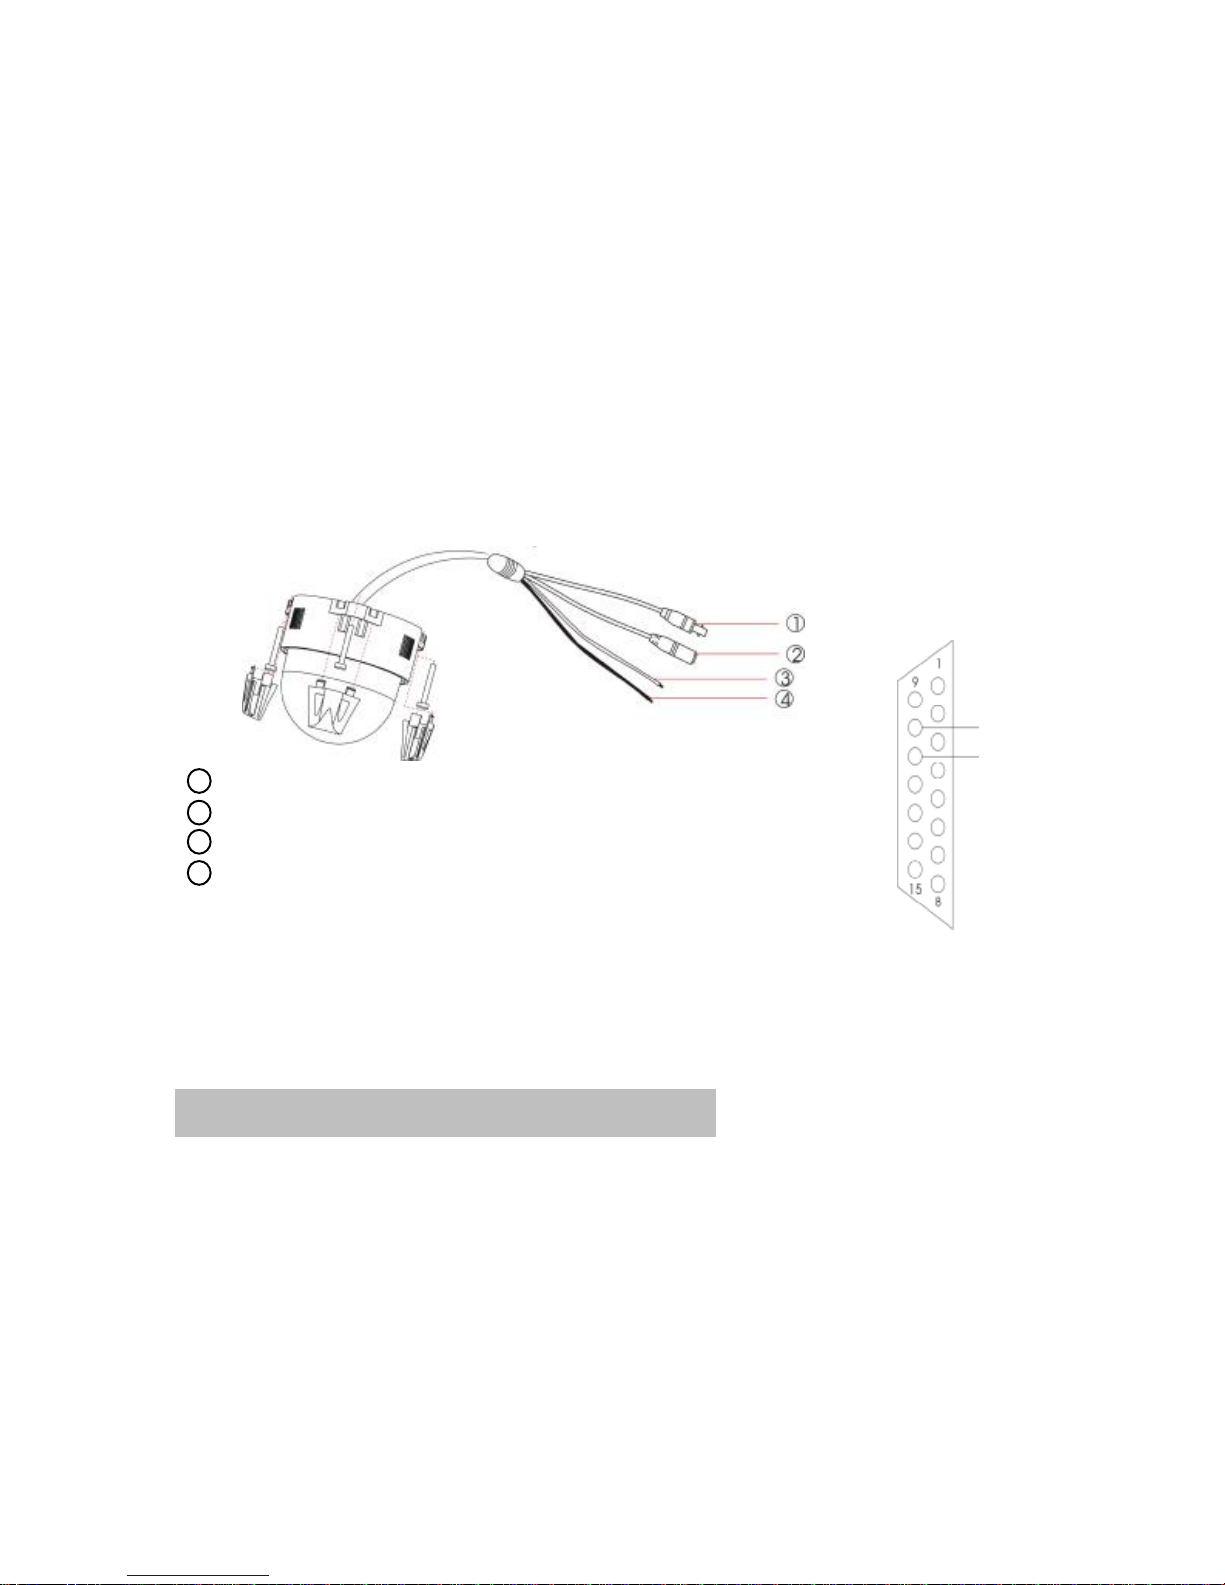
1VideoOutputConnector
2PowerCable
3RS485-B (orangecolorline)
4RS485-A(browncolorline)
RS485-B
RS485-A
Figure 4
Figure 5
I.M.DVR
5.ConnecttheVideoOutputConnectortoDVR’sVideoInput.
6.ConnectthePowerCabletoAdaptor.
7.Connect “RS485-A(browncolorline)”to11thapertureonDVR’sSub-DPlug.
8.Connect “RS485-B(orangecolorline)”to10thapertureonDVR’sSub-DPlug.
Note: Theusagelimit forthemotoris500million times.
9

Connection
PAN/TILT/(ZOOM)
PAN/TILT/(ZOOM)
I.M.DVR
MONITOR
Internet PC
10
vSITUATION SIMULATE
(anexampleforPT(Z)operation)
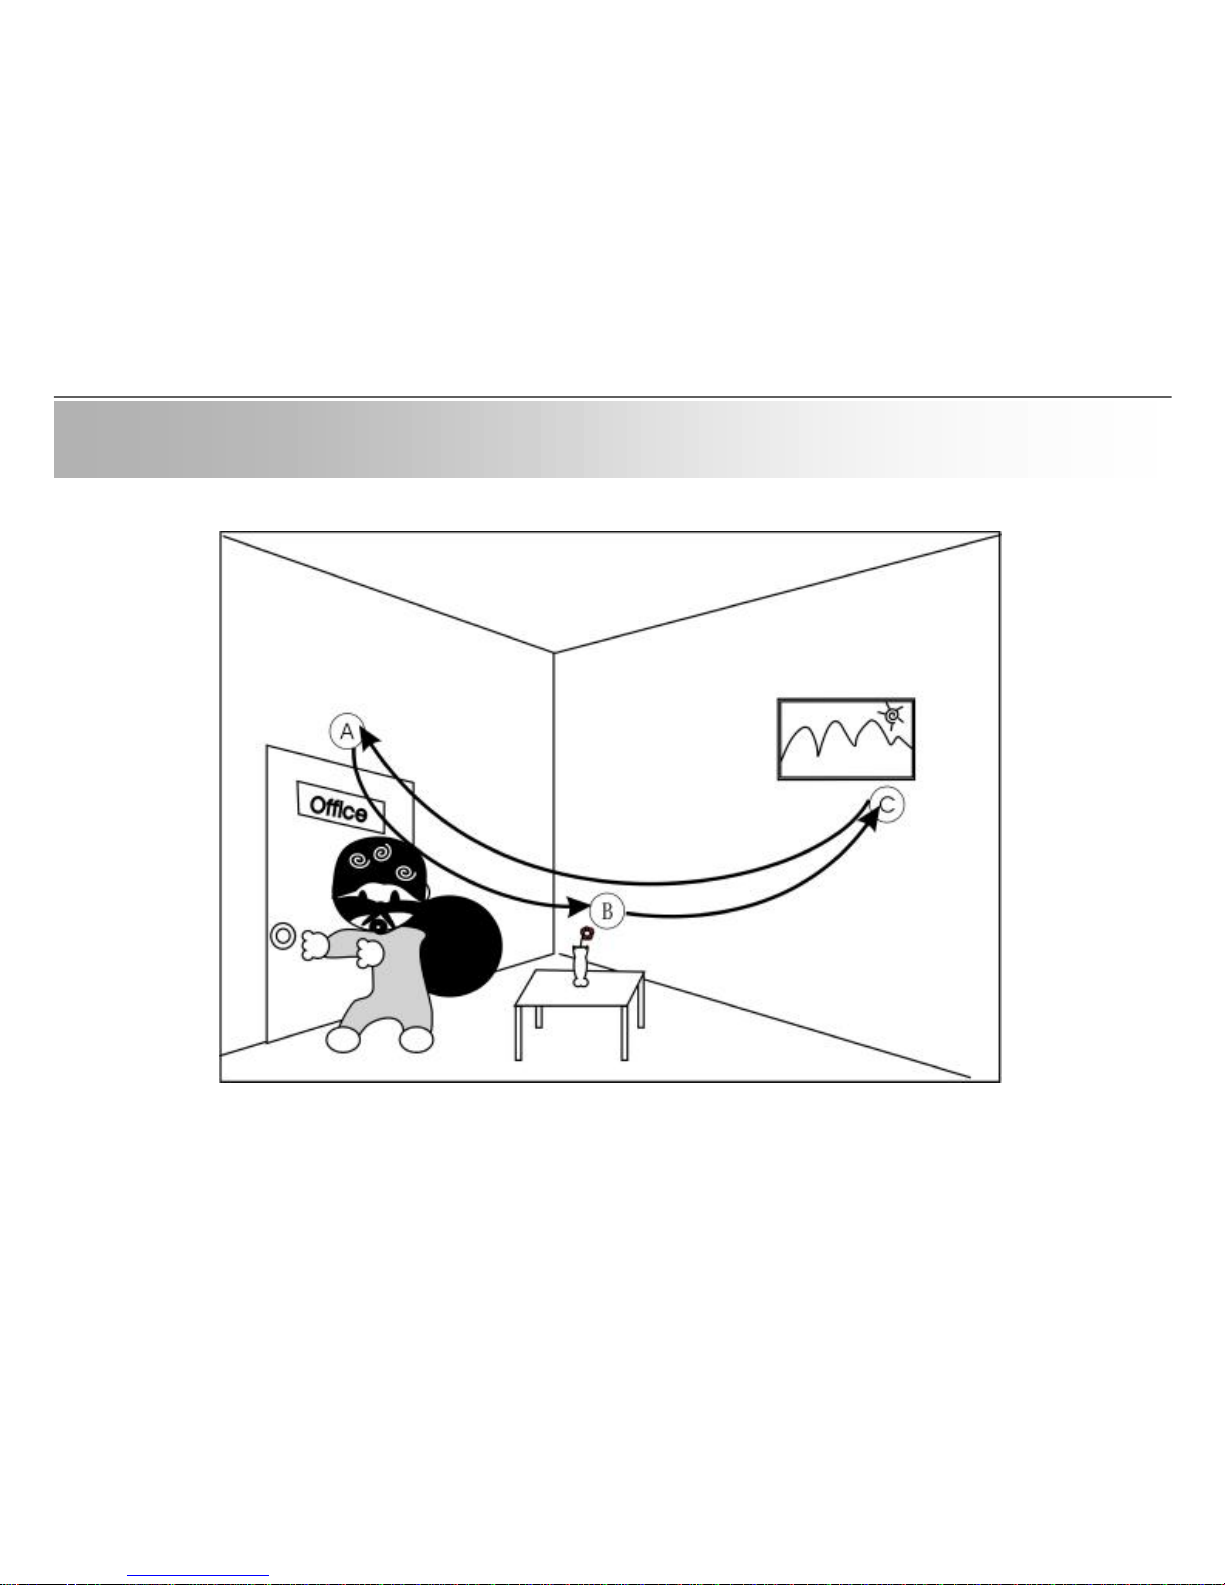
Figure6
11

Situationsimulate
Ifthereare3importantpointsyou wanttodetect, andweneedthecameratodetectthem
likethefigure6. (AàBàCàA).
ThespeedmovingfromAtoBisslow,fromBtoCisslow,andfrom CtoAisfast.
Whenit movestoA, you wantit tostayfor30 seconds. Whenit movetoBandC, you want
it tostayfor10 seconds.
1.Press “MENU”toenterthemainmenuandpress “ ” tomoveto “PRESET”function.
2.Press “ENTER”toenterthe “PRESET”function.
3.Choose “ADD”toaddthepresetandsetitsname.
4. Enter “MENU”toconfirm it andreturntothe “MENU”function.
STEP 1 : SETTHEPRESET
12
1.Press “ ” tomoveto “SEQUENCE”function.
2.Press “ENTER”toenterthe “SEQUENCE”function.
3.Choose “ADD”toaddthepreset.
4. MovethecursortoSPEED,andpress “”” ”tochoosethespeed.
5. MovethecursortoPRESET,andpress “”“ “tochoosethepreset,A, BorC.
(Itisbecausethatyou wanttosettheorderasA toBtoC,toAandback,3.)
STEP 2 : SETSEQUENCE
6. MovethecursortoSTAY, andpress “”” ”tochoosethestayingtime.
7. Enter “MENU”toconfirm it andreturntothe “MENU”function.
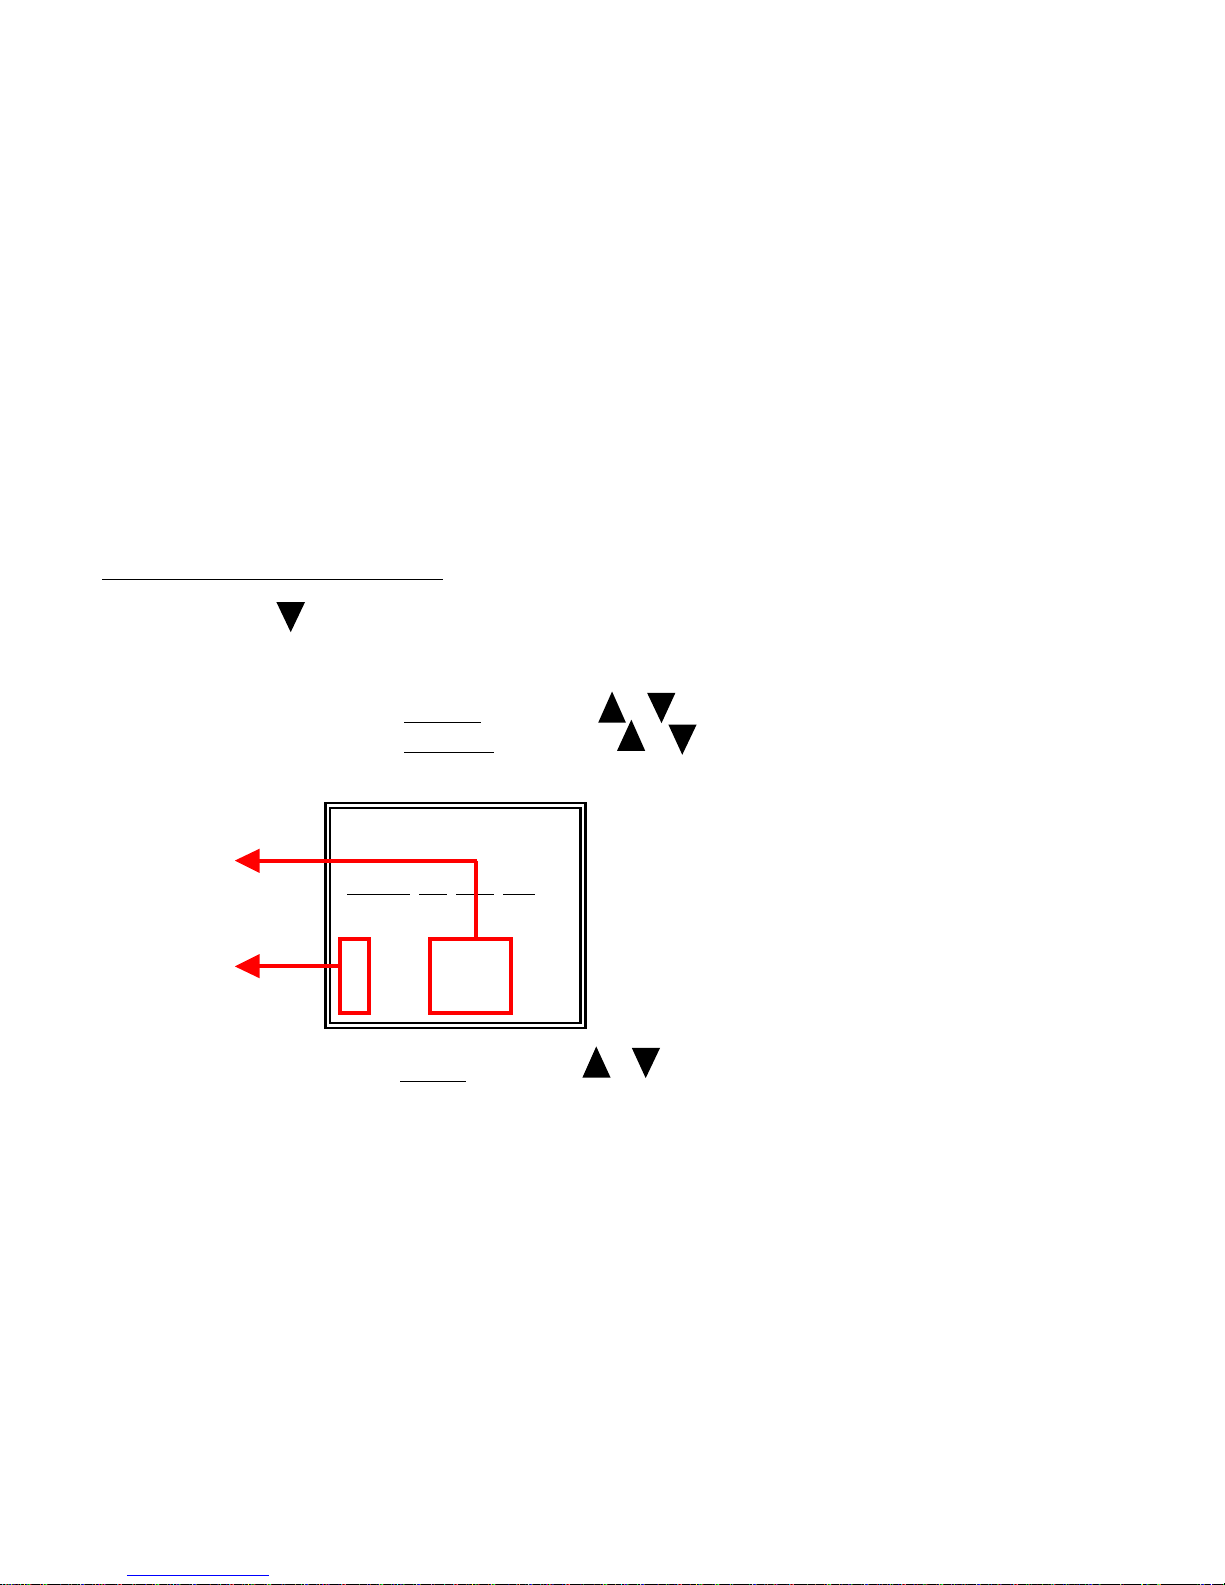
SEQUENCE
ADD INS EDIT DEL
SPEEDPRESETSTAY
01 : FAST01àA 30s
02 : SLOW02àB 10s
03 : FAST03àC 10s
Numberof
Sequence
Preset Number
andName •Thespeed01 isfast. Thismeansthat whenyouchangetoSEQUENCE
mode, camerawillmovetoA infast speed(becauseitisthe first order).
•Thespeed movefromA toB isslow.
13

1.Press “ ” tomoveto “AUTO”function.
2.Press “ ” or” ” tochangetheautomodefromAUTOPAN toSEQUENCE.
3.PressENTERorMENU toconfirm theselection.
4.Press “AUTO”buttontoswitchtoautomode.
STEP 3 : SETAUTO
Afterthesethreesteps, PT(Z)will operateasfigure6displays.
14
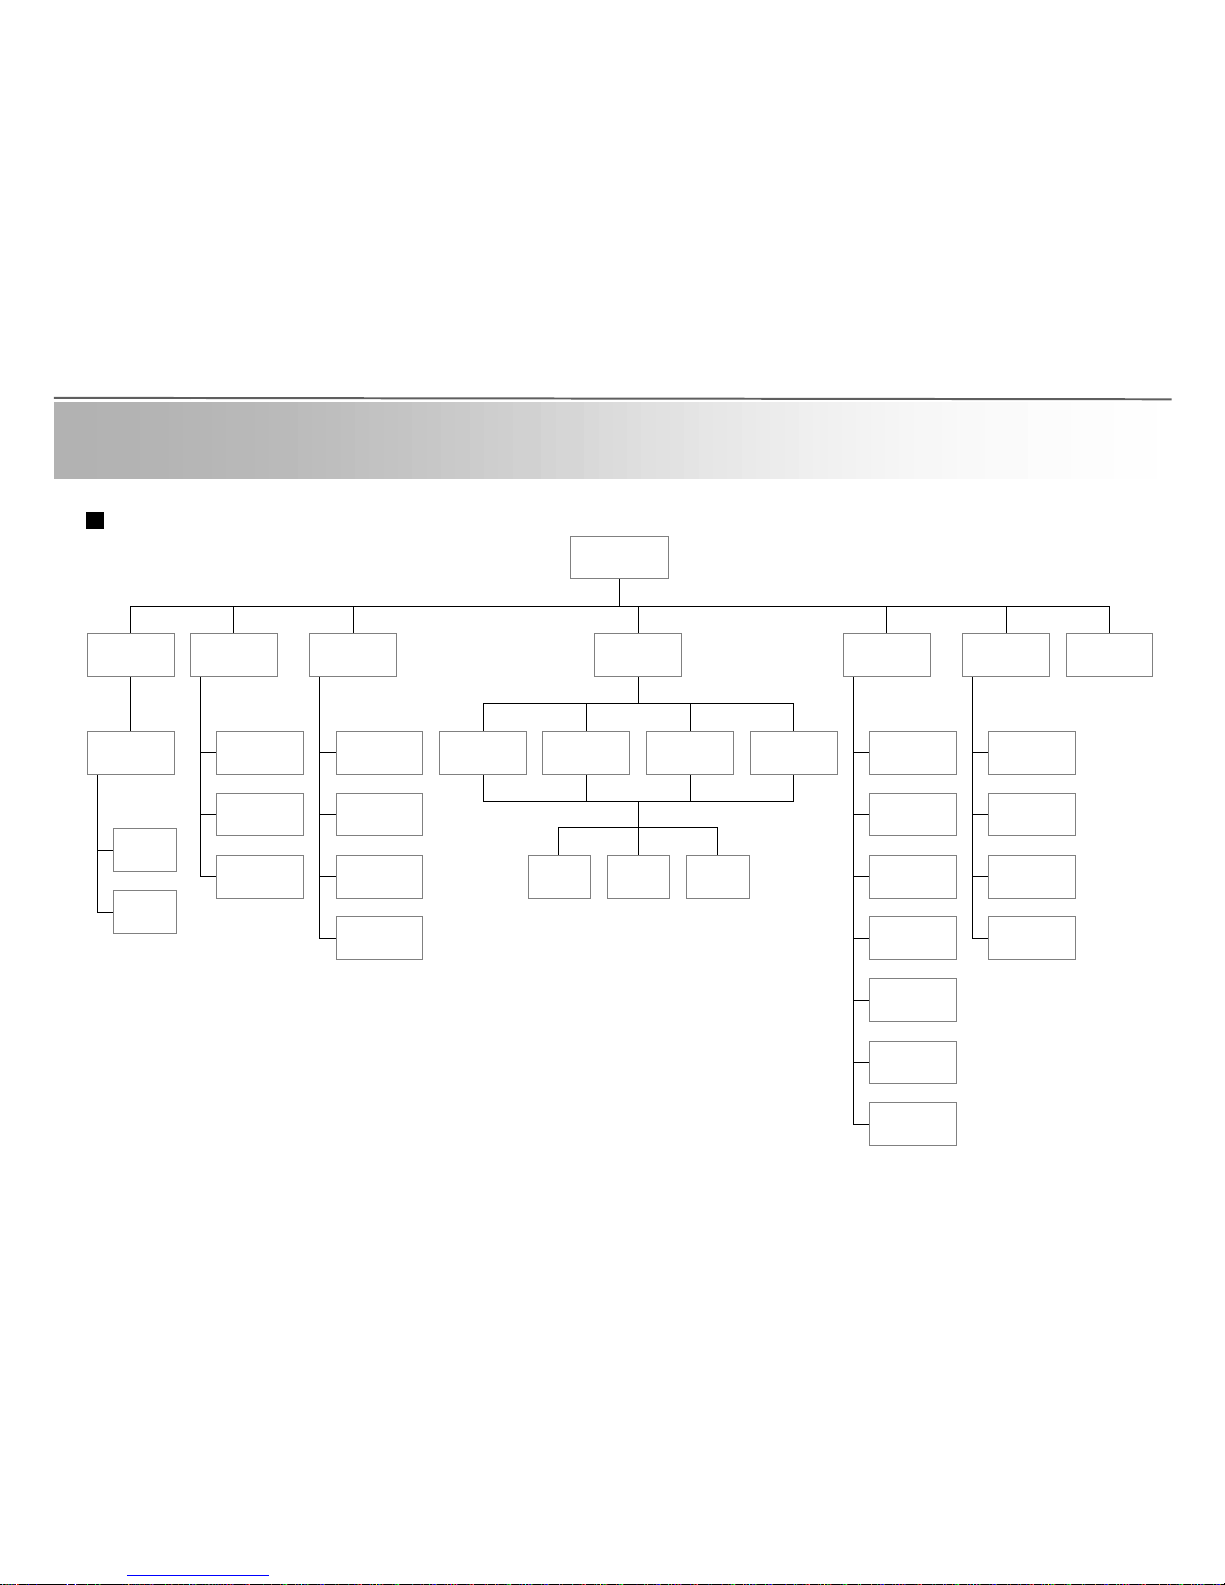
Menu
SEQUENCE
AUTOPAN
AUTOMODE
AUTO
SPEED
LEFT LIMIT
RIGHTLIMIT
AUTOPAN
ADD
INS
EDIT
DEL
PRESET
ADD INS EDIT DEL
SPEED PRESET STAY
SEQUENCE
BACKLIHT
AGC
BRIGHTNESS
SHARPNESS
COLOR
MIRROR
TITLE
CAMERA
TITLEDISPLAY
TITLE POSITION
PANTILTSPEED
SYSTEMRESET
SYSTEM HOME
MENU
NOTE:
CPC501—WithoutMirrorFunction
Howtouse APtocontrolthe PT(Z)will be describedbelow.
HowtodownloadAPisdescribedinthe user’smanualofthe I.M. DVR.
HowtosetI.D. isdescribedinthe user’smanualofthe I.M. DVR.
HowtocontrolPT(Z)byI.M. DVRisdescribedinAppendix.
15
vDETAILEDMENUSETUP
This manual suits for next models
3
Table of contents
Other CPcam Security Camera manuals


