manuals.online logo
Brands
  1. Home
  2. •
  3. Brands
  4. •
  5. ENFORCER
  6. •
  7. Security Camera
  8. •
  9. ENFORCER EV-2625-NKEQ User manual

ENFORCER EV-2625-NKEQ User manual

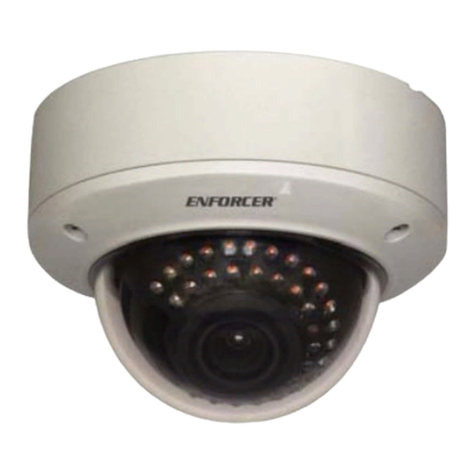
ENFORCER Vandal-Resistant WDR Dome Camera Manual ENFORCER Vandal-Resistant WDR Dome Camera Manual
• CheckthattheCCTVcameraispoweredup.
• Checkthatthemonitorispoweredup.
• Checkthatthevideocableconnectingthe camera tothemonitoris connected properly.
• Cleanthelens (using a soft, clean cloth).
• Checkthat the light sourceisadequate.
• Cleanthe dome.
• Ifthebacklightcontrol(BLC)DIPswitch is set to OFF,trysettingittoON.
• Checkthat the automaticelectronicshutter (AES) DIPswitch is turned OFF.
• Adjustthemonitor’scontrastknob.
• Changethe position of the camera.
• Ifmultiple cameras are used,makesurethe polarity ofthepowerconnections is consistent.
• (24VAC only) If more than one camera is attached to the same power source, adjust the
othercamera’slinelock sync. Thiscameracannot beadjusted.
• Changethepositionofthecamera.
• Checkthatthecorrectpowersupply is in use.
The screen is blank
The screen image is dim
The screen image is dark
The screen image has poor contrast
The screen image flickers
The screen image rolls
The screen image is distorted
The camera case is hot
TROUBLESHOOTING
ENFORCER
VIDEO
®
Flush or
Surface
Mount
WARNING: Incorrect mounting which leads to exposure to rain or moisture inside the enclosure could cause a
dangerous electric shock, damage the device, and void the warranty. Do not open the case of this device, as there are
no field-serviceable components inside.
FCC COMPLIANCE STATEMENT: Information to the user: This equipment has been tested and found to
comply with the limits for a Class Adigital device, pursuant to Part 15 of the FCC rules. These limits are designed to
provide reasonable protection against harmful interference when the equipment is operated in a commercial environ-
ment. This equipment generates, uses and can radiate radio frequency energy and, if not installed and used in
accordance with the instruction manual, may cause harmful interference to radio communications. Operation of this
equipment in a residential area is likely to cause harmful interference in which case the user will be required to correct
the interference at his own expense.
NOTICE: The information and specifications printed in this manual are current at the time of publication. However,
the SECO-LARM policy is one of continual development and improvement. For this reason, SECO-LARM reserves the
right to change specifications without notice. SECO-LARM is also not responsible for misprints or typographical errors.
Copyright © 2008 SECO-LARM U.S.A., Inc. All rights reserved. This material may not be reproduced or copied, in
whole or in part, without the written permission of SECO-LARM.
WARRANTY: All SECO-LARM products are warranted against defects in material and workmanship while used in
normal service for a period of one (1) year from the date of sale to the original consumer customer. Our obligation is
limited to the repair or replacement of any defective part if the unit is returned, transportation prepaid, to SECO-LARM.
For complete details regarding the SECO-LARM warranty, please contact SECO-LARM.
IMPORTANT:
Users and installers of this product are responsible for ensuring this product complies with all
national, state, and local laws and statutes related to monitoring and recording audio and video signals.
SECO-LARM will not be held responsible for the use of this product in violation of any current laws or statutes.
Wide Dynamic Range (WDR)
Vandal-Resistant Dome Camera
MANUAL
SECO-LARMSECO-LARM
SECO-LARMSECO-LARM
SECO-LARM®®
®®
®
WDR1208_IMUm.pmd
SECO-LARM®U.S.A., Inc.
16842MillikanAvenue,Irvine,CA 92606
Tel:800-662-0800 / 949-261-2999 Fax: 949-261-7326
Website:www.seco-larm.com
E-mail:sales
@
seco-larm.com
PIKPR1
®
8
EV-2625-NKEQ
The Series
ENFORCER Vandal-Resistant WDR Dome Camera Manual ENFORCER Vandal-Resistant WDR Dome Camera Manual
Table Of Contents
Features
· 1/3” Pixim DPS Image Sensor
· Wide Dynamic Range (WDR)
· 540 TV lines
· Digital Slow Shutter
·
On-screen display
·
Included remote control
Introduction ............................................... 2
Features .................................................... 2
OptionalAccessories ................................. 2
Specifications ............................................ 3
Dimensions ............................................... 3
CameraAssembly ..................................... 4
Before Starting .......................................... 4
Mounting Instructions (Surface or Flush)... 5
3-Axis GimbalAdjustment ......................... 6
Zoom and FocusAdjustment..................... 6
On-Screen Display .................................... 7
Camera Connections................................. 7
Troubleshooting......................................... 8
Warranty.................................................... 8
Introduction
TheENFORCEREV-2625-NKEQ Wide Dynamic Range (WDR)Camerais the solution to protect
areasin difficult lighting situations.Thecamera features a 1/3” Pixim DPS Image Sensor, a Digital
SlowShutter(DSS),and Digital Noise Reduction (DNR).Thecameraiseasilyadjustedthrough the
On-ScreenDisplay (OSD), which is controlled via a circuit-board inside the camera, or anincluded
remotecontrol.The EV-2625-NKEQ isdesignedwithvandal-resistant and weatherproofmaterials
makingitsuitable for use in nearly any condition.
Optional Accessories
· Easy adjustment of zoom and focus
· Service monitor port
· Vandal-resistant and weatherproof
· 360° triple-axis rotation
· Dual voltage 12VDC or 24VAC
· 2.8 ~ 11.0 mm varifocal lens
· Surface or flush mountable
Wall Mount Bracket
EV-260
W
M
Ceiling Mount Bracket
EV-260CM
2
On-Screen Display
Inside Camera
7
Setup
Key
Service monitor port for
included OSD remote control
Included Remote Control
OSD Controls
Set:Acess Menu Mode or confirm a selection
Up/Down: Move between selections
Left/Right: Change values of selection
OSD control keys
Camera Connections
OPower: 12VDC or 24VAC.
OUse the supplied service monitor adapter to connect to service monitor.
12VDC/24VAC
(non-polarized)
Service monitor
output adapter CCTV monitor
Service monitor
7.5”
ENFORCER Vandal-Resistant WDR Dome Camera Manual ENFORCER Vandal-Resistant WDR Dome Camera Manual
Model EV-2625-NKEQ
Dimensions
Surface Mount:
Flush Mount:
3
43/16” (70mm)
41/4”
(108mm)
113/16”
(46mm)
39/32” (83mm)
41/4”
(108mm)
39/32”
(83mm)
43/16” (70mm)
113/16”(46mm)
511/16”(145mm)
415/32”(113.5mm)
41/16”
(103mm)
11/4”
(32mm)
13/16”
(20mm)
2”
(51mm)
43/16”
(107mm) 2”
(51mm)
Image sensor
Resolution
Pickup elements
Lens
Wide dynamic range (WDR)
Digital slow shutter (DSS)
On-screen display (OSD)
Digital noise reduction
Sync
Shutter speed
Iris control
Gain control
White balance
Video output
S/N ratio
Powersource
Ambienttemperature
Minimum illumination
Power consumption @ 24VAC
Power consumption @ 12VDC
Weight
1/3" Pixim DPS Image Sensor
540 TV lines
720 x 540 pixels
2.8 ~ 11 mm varifocal, F1.2 DC auto iris
Maximum - 120dB
OFF, ON: 2x ~ 32x
Built-in
ON/OFF
Internal
1/60 sec.
DC auto iris
Auto
ATW /AWC / Manual
1 Vp-p composite output, 75 Ohms.
> 50dB (AGC off)
12/24VDC/AC(+/-10%)
14° ~ 122° F (-10° ~ 50° C)
0.4 Lux color, 0.08 Lux DSS ON
Max. 4.8VA
Max: 240mA
4 lbs. 6 oz. (2.0 kg)
6
3-Axis Gimbal Adjustment
1. Make any necessary adjustments to the horizontal and vertical angles of the camera itself while checking
the image in the video monitor.
2. Pull the zoom lever out and loosen it by turning it counter-clockwise. Slide the lever right or left depending
on how close the camera is to the protected area. After adjustments have been made, turn the lever
clockwise to tighten it, then push the lever back in.
3. Pull the focus lever out and loosen it by turning it counter-clockwise. Slide the lever right or left to bring the
protected area into focus.After adjustments have been made, turn the lever clockwise to tighten it, then
push the lever back in.
Zoom And Focus Adjustment
The 3-axis gimbal allows the camera to rotate 360° horizontally, 360° vertically and 60° tilt. Adjust the proper
angle as needed.
Axis-3
360°
Axis-3
screw
Axis-1
360°
Axis-2 Tilt
60°
Focus
adjustment
Zoom
adjustment
1. Axis-1: Turn axis-1 by hand for up to 360
degrees rotation.
2. Axis-2: Adjust axis-2 (tilt) up or down by hand.
3. Axis-3: Loosen the axis-3 screw to adjust the
3rd axis to the desired angle and then
tighten the screw.
Also Available from SECO-LARM
IMPORTANT: Make sure the focus and zoom levers are pushed back in after
adjustments are made. Failure to do so may cause damage to the dome.
Telephoto (T)
Wide(W)
Zoom
Far ( )
Near(N)
8
Focus
Specifications
DNR (Digital noise reduction)
EV-2615-NKEQ
- Ultra-low lux
(0.002 lux).
- On-Screen
Display (OSD).
WDR (Wide dynamic range)
EV-2625-NKEQ
- 1/3” Pixim DPS
image sensor.
- On-Screen
Display (OSD)
ENFORCER Vandal-Resistant WDR Dome Camera Manual ENFORCER Vandal-Resistant WDR Dome Camera Manual
Before Starting
1. Please read this manual carefully and keep it for future reference.
2. Use the camera within given temperature and electrical limits.
3.
Do not point the CCTV camera at the sun. Heat could damage the camera, even when not in use.
4. Do not mount the CCTV camera in areas exposed to radiation, strong magnetic fields, or strong
electrical signals.*
5. Do not drop the camera or subject it to strong vibrations.
* NOTE: Many video monitors produce strong electromagnetic fields close to the display CRT,
especially when the monitor is turned on or during de-Gaussing, which occurs
automatically with many monitors when the monitor is turned on.
4
Lens
Power input connector
12VDC/24VAC dual voltage
Video output
connector - BNC
Service monitor
port
Surface mount base
Mounting screws
(Phillips ST4x30)
Flush mount base
Assembly screws
Dome cover ring Safety strap
Assembly screw
(Torx M4x9)
Domecover
Camera control board
Alignment mark
Back conduit plug (1”)
Side conduit plug (1”)
(Phillips M4x10)
Camera Assembly
5
Mounting Instructions
1. Remove the dome cover by loosening 3 security screws with
supplied Torx wrench.
2. Mount the camera to ceiling or wall.
A. If surface mounting, see figure 1.
B. If flush mounting, see figure 2.
C.If mounting to electrical box, see figure 3 and 4.
Figure 1 - Surface Mount Figure 2 - Flush Mount
A. Use Guide Pattern on wall or ceiling.
B. Using four ST4x30 screws, mount surface base
to a sturdy surface.
C.Using four M4x10 screws, affix flush mount
base to surface base.
A. Use Guide Pattern on wall or ceiling.
B. Using four ST4x30 screws, affix flush mount
base to a sturdy surface.
Plastic
anchors
(if needed)
ST4x30
MX4x10
Torx M4x9
UNC8-32x0.75
(not included)
1”electrical
conduit
UNC8-32x0.75
(not included)
ST4x30
Figure 3 - Mounting to Electrical Junction Box
(with surface mount base) Figure 4 - Mounting to Electrical Junction Box
(flush mount)

Other ENFORCER Security Camera manuals

ENFORCER EV-1324C12 User manual

ENFORCER

ENFORCER EV-1324C12 User manual

ENFORCER EV-1026-N2GQ User manual

ENFORCER

ENFORCER EV-1026-N2GQ User manual

ENFORCER EV-2706-N3GQ User manual

ENFORCER

ENFORCER EV-2706-N3GQ User manual

ENFORCER EV-5105-N1SQ User manual

ENFORCER

ENFORCER EV-5105-N1SQ User manual

ENFORCER EV-6600-N2BQ User manual

ENFORCER

ENFORCER EV-6600-N2BQ User manual

ENFORCER EV-Y4201-A2SQ User manual

ENFORCER

ENFORCER EV-Y4201-A2SQ User manual

ENFORCER EV-C1303-NMGQ User manual

ENFORCER

ENFORCER EV-C1303-NMGQ User manual

ENFORCER EV-Y1201-A2WQ User manual

ENFORCER

ENFORCER EV-Y1201-A2WQ User manual

ENFORCER EV-Y1201-A2WQ User manual

ENFORCER

ENFORCER EV-Y1201-A2WQ User manual

ENFORCER EV-Y2501-A2WWQ User manual

ENFORCER

ENFORCER EV-Y2501-A2WWQ User manual

ENFORCER EV-1026-N2SQ User manual

ENFORCER

ENFORCER EV-1026-N2SQ User manual

ENFORCER Elite EV-2606-NJEQ User manual

ENFORCER

ENFORCER Elite EV-2606-NJEQ User manual

ENFORCER EV-Y6221-A3WQ User manual

ENFORCER

ENFORCER EV-Y6221-A3WQ User manual

ENFORCER EV-Y5105-N2SQ User manual

ENFORCER

ENFORCER EV-Y5105-N2SQ User manual

ENFORCER EV-Y2201-A2WQ User manual

ENFORCER

ENFORCER EV-Y2201-A2WQ User manual

ENFORCER EV-Y2201-AMWAQ User manual

ENFORCER

ENFORCER EV-Y2201-AMWAQ User manual

ENFORCER EV-Y6201-A3WQ User manual

ENFORCER

ENFORCER EV-Y6201-A3WQ User manual

ENFORCER EV-Y2501-AMWAQ User manual

ENFORCER

ENFORCER EV-Y2501-AMWAQ User manual

ENFORCER EV-2726-N3GQ User manual

ENFORCER

ENFORCER EV-2726-N3GQ User manual

ENFORCER ENFORCER EV-1626-NWGQ User manual

ENFORCER

ENFORCER ENFORCER EV-1626-NWGQ User manual

ENFORCER EV-1026-N2SQ User manual

ENFORCER

ENFORCER EV-1026-N2SQ User manual

ENFORCER EV-1223C12 User manual

ENFORCER

ENFORCER EV-1223C12 User manual

ENFORCER EV-4605-N3SQ User manual

ENFORCER

ENFORCER EV-4605-N3SQ User manual

ENFORCER EV-1026-N2SQ User manual

ENFORCER

ENFORCER EV-1026-N2SQ User manual

Popular Security Camera manuals by other brands

Sony SNCEB630B Specification sheet

Sony

Sony SNCEB630B Specification sheet

Avidsen HomeCam3 manual

Avidsen

Avidsen HomeCam3 manual

Axis P1343 user manual

Axis

Axis P1343 user manual

TP-Link Tapo C200 user guide

TP-Link

TP-Link Tapo C200 user guide

Bosch MIC IP ultra 7100i user manual

Bosch

Bosch MIC IP ultra 7100i user manual

Sony DynaView SSC-CR441 operating instructions

Sony

Sony DynaView SSC-CR441 operating instructions

advidia A-45 Quick setup guide

advidia

advidia A-45 Quick setup guide

iControl iCamera2 user guide

iControl

iControl iCamera2 user guide

Amcrest IP8M-2496E user manual

Amcrest

Amcrest IP8M-2496E user manual

Silent Witness SW001 manual

Silent Witness

Silent Witness SW001 manual

TRASSIR TR-D1250WD quick start guide

TRASSIR

TRASSIR TR-D1250WD quick start guide

Ganz ZC-PT series installation guide

Ganz

Ganz ZC-PT series installation guide

Bosch BasicDome G3B Series Specifications

Bosch

Bosch BasicDome G3B Series Specifications

Pco VC45 operating instructions

Pco

Pco VC45 operating instructions

Vivotek FD8131 specification

Vivotek

Vivotek FD8131 specification

Novus NVIP-2DN3030H/IR-1P user manual

Novus

Novus NVIP-2DN3030H/IR-1P user manual

Satir UTR user manual

Satir

Satir UTR user manual

Panasonic WV-SW390 Series operating instructions

Panasonic

Panasonic WV-SW390 Series operating instructions

manuals.online logo
manuals.online logoBrands
  • About & Mission
  • Contact us
  • Privacy Policy
  • Terms and Conditions

Copyright 2025 Manuals.Online. All Rights Reserved.