Crafstman 944.5291 81 User manual
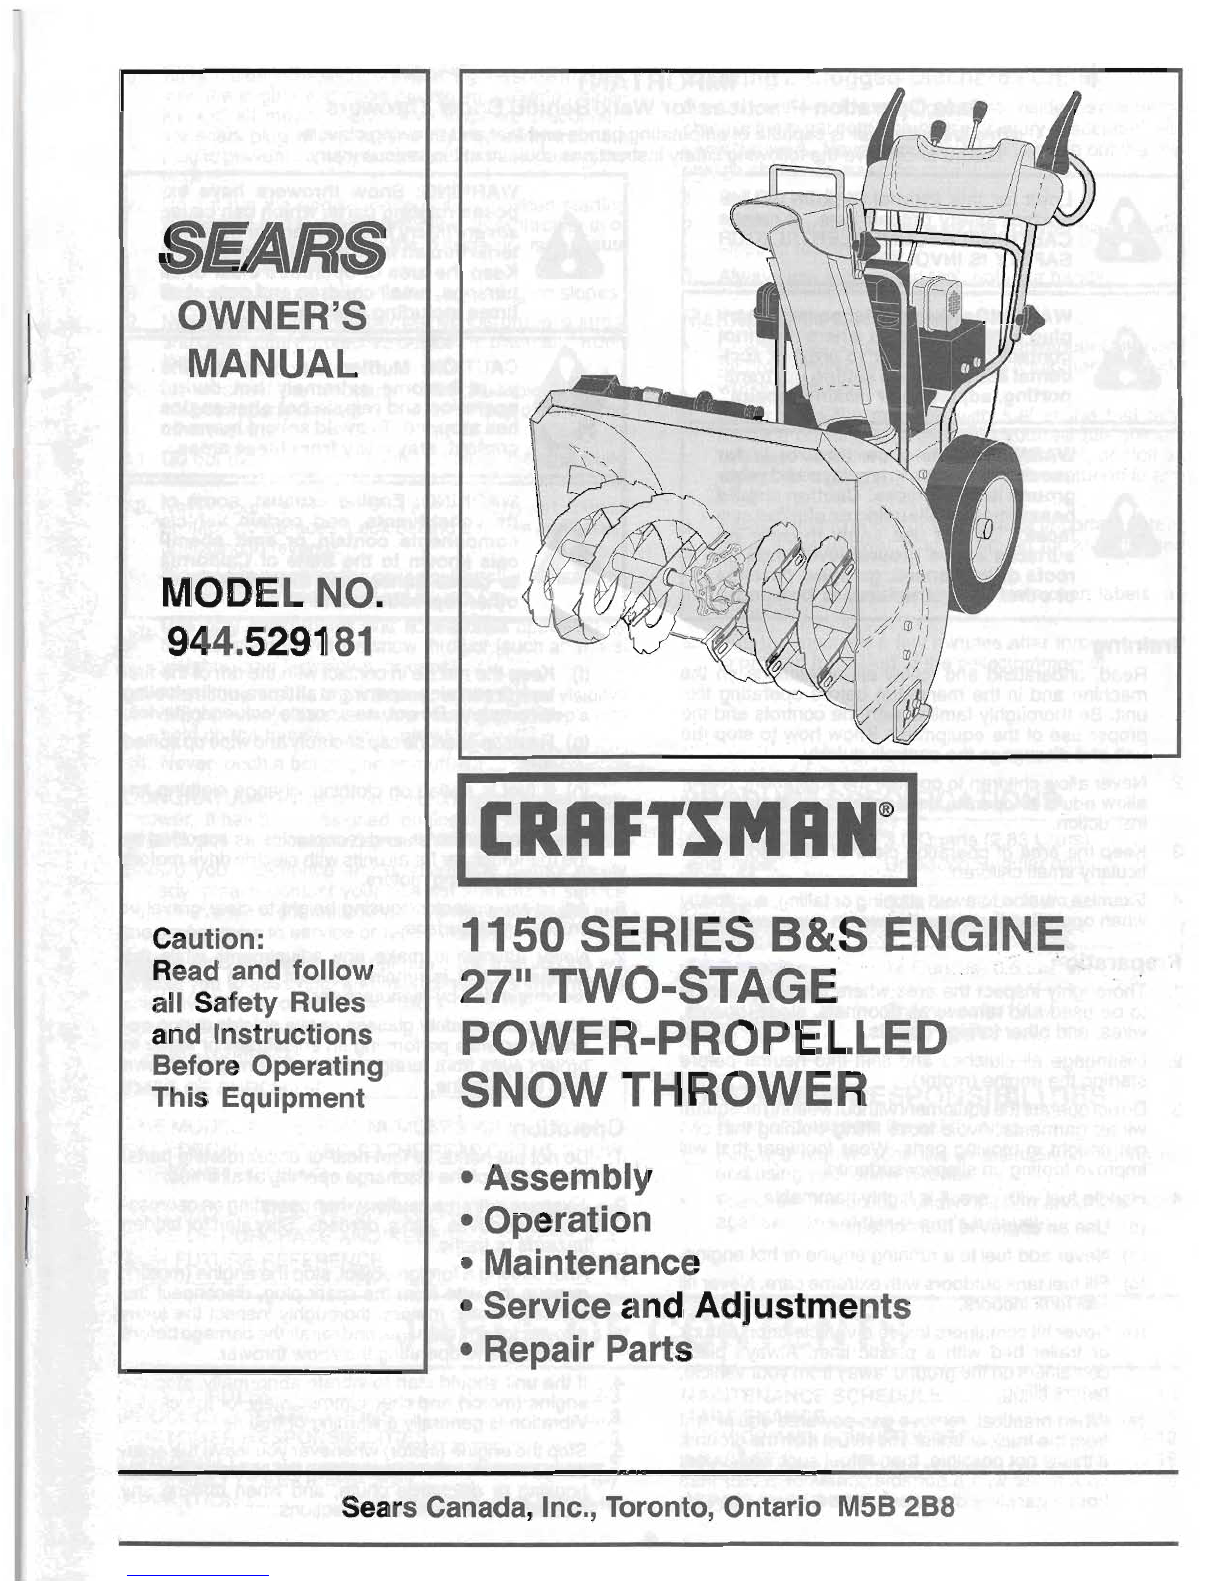
SRMS
OWNER'S
MANUAL
C-ILDEL
NO.
944.5291
81
Caution:
Read and follow
all Safety Rules
and Instructions
Before Operating
This Equipment
1150
SERIES B&S
ENGINE
27"
TI-.-0-STAGE
POWER-PROPELLED
SNOW TkB70WER
Assembly
Operation
Maintenance
Service and Adjustments
Repair Parts
Sears Canada, Inc., Toronto, Ontario
M5B
288
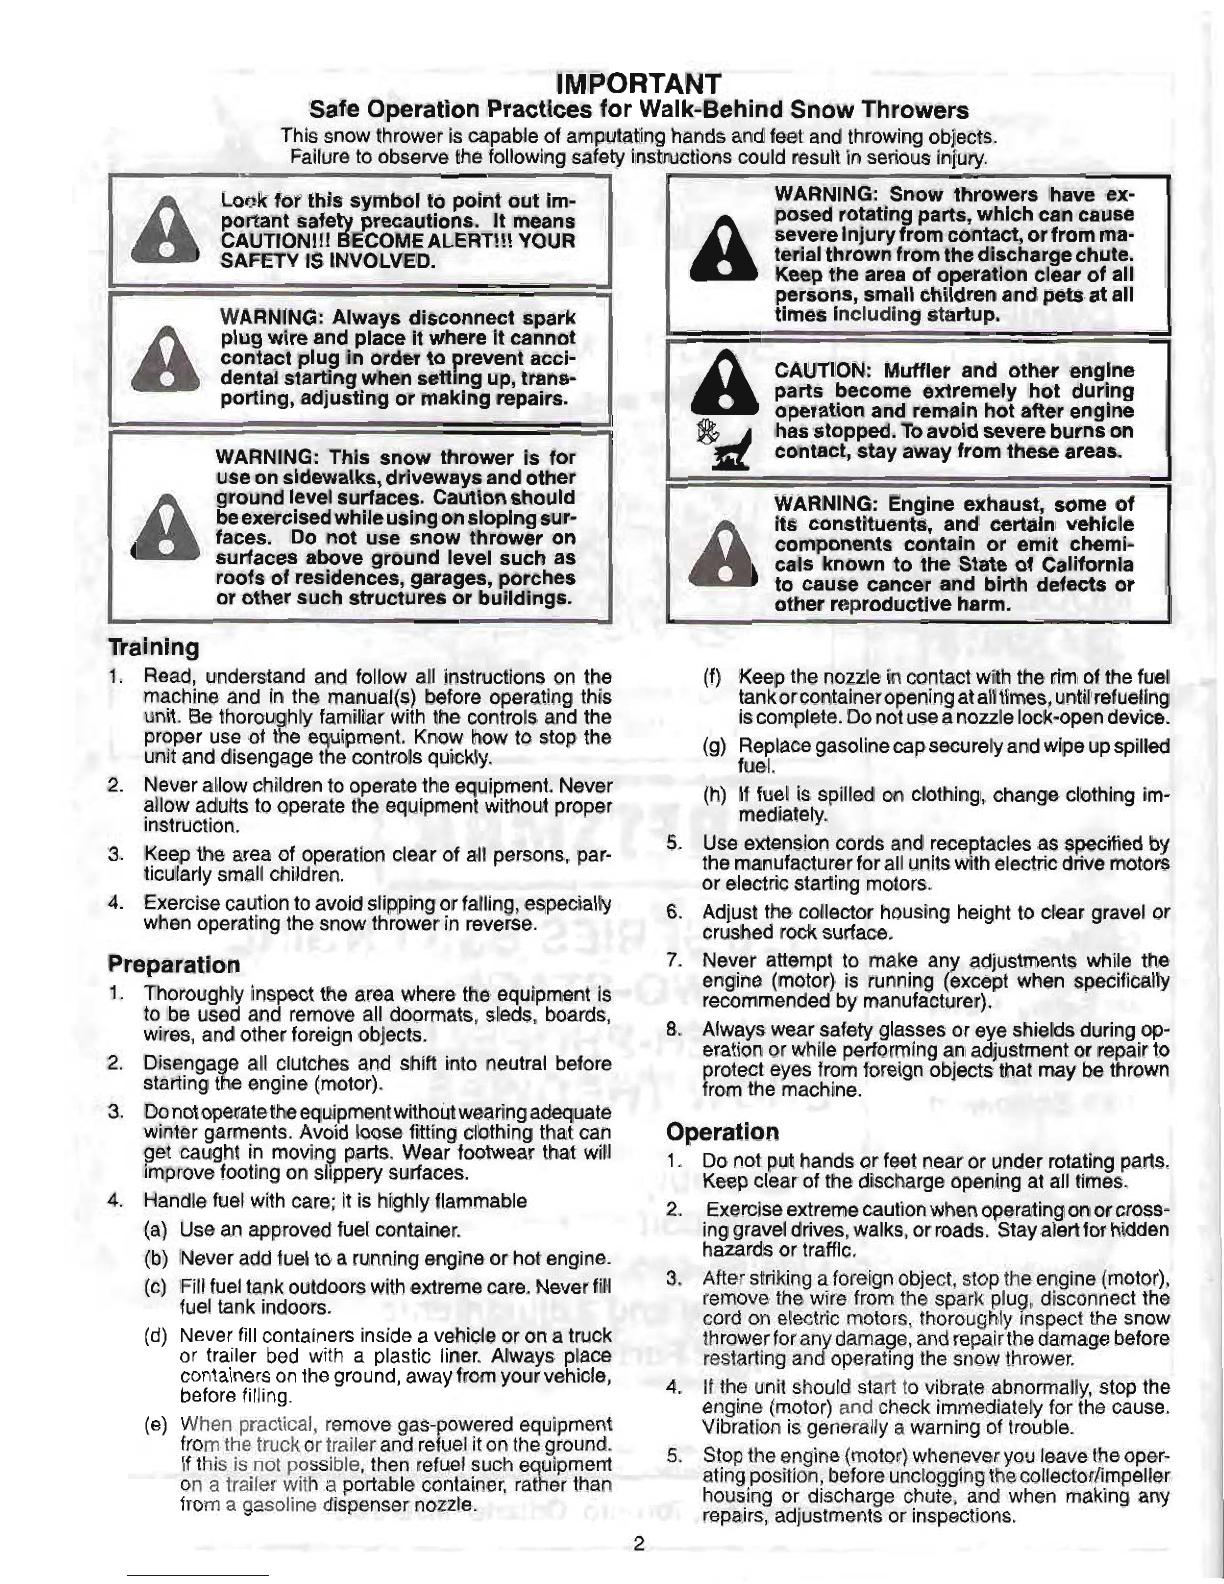
IMPORTANT
Safe Operation Practicesfor Walk-Behind Snow Throwers
This snow thrower is capable of amputatinghands and feet and throwingobjects.
Failureto observethe followingsafety instructionscould result in serious injury.
WARNING: Snow throwers have ex-
posed rotatingparts,which can cause
severeinjuryfromcontact,orfromma-
terialthrownfromthedischargechute.
Keepthe area of operation clear of all
persons,small children and petsat all
times includingstartup.
CAUTION: Muffler and other engine
parts become extremely hot during
operation and remainhot after engine
hasstopped.To avoidsevereburnson
WARNING: This snow thrower is for contact, stay away from these areas.
useonsidewalks,drivewaysandother
groundlevelsurfaces. Cautionshould
beexercisedwhileusingonslopingsur-
faces. Do not use snow thrower on
surfaces above ground level such as cals known to the State of California
roofsof residences, garages, porches to cause cancer and birth defects or
or other such structures or buildings.
Training
1.
Read, understand and follow all instructions on the (f) Keepthe nozzle incontactwith the rimof thefuel
machine and in the manual(s) before operating this tankorcontaineropeningatalltimes, untilrefueling
unit. Be thoroughly familiar with the controls and the iscomplete. Donotuseanozzlelock-opendevice.
proper use of the equipment. Know how to stop the
unit and disengagethe controls quickly. (g) Replacegasolinecapsecurelyandwipeupspilled
fuel.
2.
Neverallow childrento operatethe equipment. Never
allow adults to operate the equipment without proper (h) If fuel is spilled on clothing, change clothing im-
instruction. mediately.
3.
Keep the area of operation clear of all persons, par-
5.
Use extensioncords and receptaclesas specified by
titularly
small children. themanufacturerfor allunitswithelectricdrivemotors
or electricstarting motors.
4-
Exercisecaution to avoid slipping orfalling, especially
6.
Adjust the collector housing height to clear gravel or
when operatingthe snow thrower in reverse. crushed rock surface.
Preparation
7.
Never attempt to make any adjustments while the
engine (motor) is running (except when specifically
1.
Thoroughly inspectthe area where the equipment is recommendedby manufacturer).
to be used and remove all doormats, sleds, boards,
wires, and otherforeign objects.
8.
Always wear safety glasses or eyeshieldsduringop-
erationor while performingan adjustmentor repair to
2.
Disengage all clutches and shift into neutral before protecteyes fromforeignobjectsthat may bethrown
startingthe engine (motor). from the machine.
Donotoperatetheequipmentwithoutwearingadequate
winter garments. Avoid loosefitting clothing that can
get caught in moving parts. Wear footwear that will
improvefooting on slippery surfaces.
Handlefuel with care; it is highlyflammable
(a) Use an approvedfuel container.
(b) Neveradd fuel to a runningengineor hot engine.
(c) Fillfueltankoutdoorswith extremecare. Neverfill
fuel tank indoors.
(d) Neverfill containersinside avehicle or on atruck
or trailer bed with a plastic liner. Always place
containersontheground,awayfromyourvehicle,
beforefilling.
(e)
When
praclical.
remove
gas-powered
equipment
from
lhe
truck
or
trailer
and
refuel
it
on
theground.
If
this
is
not
possible,then
refuel
such equipment
on
a
trailer
with
a
portable
container, rather than
from
a
gasoline
dispenser
nozzle.
Operation
1.
Do not put handsor feet nearor under rotatingparts.
Keepclear of the dischargeopeningat all times.
2.
Exerciseextremecautionwhenoperatingonorcross-
inggraveldrives,walks,or roads. Stayalertfor hidden
hazardsor traffic.
3.
After
striking
a
foreign
object,
stop
the
engine (motor),
remove the wire from
the
spark
plug,
disconnectthe
cord
on
electric motors,thoroughly inspect the snow
throwerfor
any
damage,
andrepairthe
damage
before
restarting
and
operatingthe snow thrower.
4.
If the
unil
should
start
to
vibrate abnormally,
stop
the
engine (motor)
and
check immediately for the cause.
Vibration
is
generally
a
warning of trouble.
5.
Stop
the
engine(motor)whenever
you
leave
the
oper-
ating
position,beforeuncloggingthe collector/impeller
hous~ng
or discharge
chute,
and
when making
any
repairs,
adjustments
or inspections.
6.
Whencleaning,repairingorinspectingthesnowthrower,
Clearing a Clogged DischargeChute
stopthe engine and makecertainthe collector/impel-
ler
and all
moving
parts
have
stopped. Disconnect
Handcontactwiththerotatingimpellerinsidethedischarge
the spark plug wire and keepthe
wire
away
from
the chute-isthe mostCOh7mOn cause of injury associatedwith
plugto preventsomeonefrom accidentallystartingthe
S~-IOW
thr~wers.Never useyour handto clean out the dis-
engine. charge chute. To clear the chute:
-
7.
Do not run the engine indoors, except when starting
SHUT
THE
ENGINE
OFF!
the engineandfortransportingthe snowthrower inor
2.
Wait 10seconds to be sure the impeller blades have
out of the building. Open the outside doors; exhaust stopped rotating.
fumes are dangerous. 3. Always use a clean-out tool, not your hands.
8.
Exerciseextreme caution when operating on slopes.
9.
Neveroperatethesnowthrowerwithout properguards,
andother safety protectivedevices inplaceandwork-
ing.
10. Never direct the discharge toward people or areas
where propertydamage canoccur. Keepchildrenand
others away.
11. Do not overload the machine capacity by attempting
to clear snow at too fast a rate.
12.
Never operate the machine at high transport speeds
on slippery surfaces. Look behindand use care when
operating in reverse.
13. Disengagepowerto the collector/impellerwhen snow
thrower is transported or not in use.
14. Use only attachments and accessories approved by
the manufacturerof the snow thrower (such as wheel
weights, counterweights,or cabs).
15. Neveroperatethe snowthrowerwithoutgoodvisibility
or light.Always besure of yourfooting,andkeepafirm
holdon the handles.Walk; never run.
16. Nevertouch a hot engine or muffler.
CONGRATULATIONS
on your purchase of a new snow
thrower. It has been designed, engineeredand manufac-
turedtogivebestpossibledependabilityandperformance.
Should you experience any problem you cannot easily
remedy, please contact your nearest authorized service
center. We have competent,well-trained technicians and
the proper tools to service or repairthis unit.
Please readand retain this manual. The instructions will
enable you to assemble and maintainyour snow thrower
properly. Always observethe "SAFETY RULES".
PUMBER:
I
THE
MODEL
AND
SERIAL
NUMBERS
WILL
BE
FOUND^
ON
ADECALATACHEDTOTHE REAROFTHESNOW1
THROWER
HOUSING.
YOU SHOULD RECORDBOTHSERIAL NUMBER AND
DATE OF PURCHASE AND KEEP IN A SAFE PLACE
FOR FUTURE REFERENCE.
Maintenanceand Storage
1. Checkshear boltsandotherboltsat frequent intervals
for propertightnessto besuretheequipmentisinsafe
working condition.
2.
Never store the machine with fuel in the fuel tank
inside a buildingwhere ignition sources are present
such as hot water heaters, space heaters,or clothes
dryers. Allow the engine to cool before storing in any
enclosure.
3. Alwaysreferto operator'smanualfor importantdetails
if the snow thrower is to be stored for an extended
period.
4. Maintain or replace safety and instruction labels, as
necessary.
5. Run the machine a few minutes after throwing snow
to preventfreeze-up of the collector/impeller.
PRODUCT
-
SPECIFICATIONS
-
GasolineCapacity
3.0 Quarts (2,83Liters)
I
and Type:
UnleadedRegularonly
Oil Type
SAE 5W-30 or 10W-30
(API SG-SL):
SyntheticSAE 5W-30
[oil Capacity:
18Ounces (0,5 Liters)
I
Spark Plug:
Champion RJ19LM
Gap:
0.030"(0,762 mm)
-
CUSTOMER RESPONSIBILITIES
Readand observethe safety rules.
Follow a regular schedule in maintaining, caring for
and usingyour snow thrower.
Followthe instructionsunder"Maintenance"and"Stor-
age" sections of this owner's manual.
TABLE
OF
CONTENTS
........................................................
SAFETY RULES
2-3
PRODUCTSPECIFICATIONS
......................................
3
................................
CUSTOMER RESPONSIBILITIES
3
WARRANTY
..................................................................
4
ASSEMBLY
/
PRE-OPERATION
...............................
5-7
OPERATION
............................................................
8-1
3
MAINTENANCE SCHEDULE
.....................................
14
MAINTENANCE
.....................................................
14-1
5
...........................
SERVICEAND ADJUSTMENTS 16-18
...................................................................
STORAGE 19
................................................
TROUBLESHOOTING
20
REPAIR PARTS
.....................................................
22-42
3.l.
-~VL
L!
+
v
!W
.-
)-hi'
rc.
-ar&mQm
L
qm!
a
'
A
IT-
-
d
-
~..-lkhm
*'-
ICJI'BS~~!!T
-
-,
ps-F-
-.
!
%wd,q
m
I
%?T
'
coverage underthis warranty.
REPAIRS:
Repairshavea 90 day warranty. If the defectiveproductisstillwithinthe Warranty Period,then the new warranty is
90
days from the date of repairor to the end of the originalWarranty Period, whichever periodis longer.
DISCLAIMERS:
THE WARRANTIES AND REMEDIESCONTAINEDHEREINARE EXCLUSIVEAND IN LIEUOF ALL OTHER
WARRANTIES, WHETHER ORALOR WRllTEN (OTHER THAN AS STATED HEREIN), AND WHETHER EXPRESS, IMPLIED
OR STATUTORY, INCLUDINGBUT NOT LIMITEDTO ANY. THlSWARRANTY GIVESYOU SPECIFIC LEGAL RIGHTS, WHICH
MAY VARY FROM PROVINCETO PROVINCE.
INNO EVENTSHALL SEARS BE LIABLE FOR ANY INCIDENTAL,SPECIAL, INDIRECTOR CONSEQUENTIALDAMAGES,
WHETHER RESULTING FROM THE USE, MISUSE OR INABILITY TO USE THE PRODUCT OR FROM DEFECTS INTHE
PRODUCT. THE EXCLUSIONS INTHlS PARAGRAPHSHALL NOT APPLY INJURlSDlCATlONSWHERE APPLICABLELAW
DOES NOT ALLOW FOR THE EXCLUSIONOF INCIDENTALOR CONSEQUENTIALDAMAGES. INSUCH JURISDICTIONS,
THlS PARAGRAPHSHALL NOTAPPLY, BUTTHE REMAINING PROVISIONSOFTHlS DOCUMENTSHALL REMAINVALID.
SEARS retainsthe exclusive ri ht to repair or replacethe product or offer a full refundof the purchasepriceat its sole discretion.
SUCH
REMEDY
SHALL BE
Y~UR
SOLE
AND
EXCLUSIVE
REMEDY
FOR
ANY
BREACH
OF
WARRANTY.
T
In additional to complying with all suggested maintenance guidelines and instructions,
customers' obligations shall include but shall not be limitedto: operating the product in accordance with the owner's manual or
any additionalinstructionsor informationprovidedat the time of purchaseor insubsequent communicationstothe purchaserfrom
time to time, exhibit reasonablecare inthe use, operation, maintenance, general upkeep and storage of the product. Failureto
comply with these requirementswill void any applicable warranty.
I
T
I-:
The followinglistcontainsthe applicableWarranty Periodfor yourCraftsmanproduct
and isbased on a combinationof thetype of productor component andthe intendedandactual useof the productor component:
1.
90
DAYS:
Craftsman productsintendedfor use or actually used for commercial, institutional, professional or income-
,
producingpurposes
2. 2
YEARS:
Craftsman riding lawn mowers, yard and garden tractors, walk behind mowers, tillers, brush cutters,
snow blowers, handheld blowers, backpack blowers, hedge trimmers and electrical products for noncommercial,
nonprofessronal, non-institutronal,or non-income-producinguse, except for those componentswhich are part of engine
systems manufactured by third party engine manufacturersfor which the purchase has received an separate warranty
with product information suppliedat the time of purchase.
3.
1
YEAR:
Craftsman power cutters, stump grinders, pole pruners, gas chain saws, electric chain saws, trimmer
attachments, baggersandpolesaws for noncommercial, nonprofessional, non-institutional,or non-income-producinguse.
4.
90
DAYS:
All defective batteries,which will be replacedduring this 90-day Warranty Period.
5.
60
DAYS:
AdditionalWarranty Periodof 60 days will apply to adjustmentsand worn productsor componentsBUT DOES
NOT INCLUDE WEAR OR ADJUSTMENTS for products used for commercial, institutional, professional or income-
producing purposes. Wear items include but are not limitedto: belts, blades, tires, spark plugs, air filters, chains, shear
bolts, skid plates, scraper bars, drift cutters, ropes, tlnes, collection bagsand pulleys.
As the Warranty Periodrunsfrom the dateof purchaseand NOTfrom the datethat a product
IS
delivered,opened, assembledor
first used, please ensure duringthis time periodthat your roduct or component has been assembled and tested for correction
8
ally use it. laimsmadeaftertheWarranty Periodhas expiredwill not be honored.
Warranty coverage is conditioned uponthe originalpurchaser furnishing SEARS
rovider if applicable,with the originalsales receipt or other adequate written proof
n
of the product. In the event that the original purchaser is unable to provide a
company of the originalsales receipt,SEARS CANADA Inc. reservesthe rightto determine in its sole discretionwhat other written
proof of the originalpurchasedate and identificationof the product isacceptable.
1

a
PARTS PACKED SEPARATELY
IN
CARTON
(198563)
I
(1)
DISCHARGECHUTE
-------.----
I
---
SAFTEY IGNITION KEY
(S)
I
(193071)
(1)
LOCKNUT
318
1
(73800600)
,,,,,,----_I
--------------
1
1'
DCTRA
SHEAR
BOLTSAND
NVrs
I
I
(2)
SHEAR BOLTS
1/4-20
x
1-314 (2)
LOCKNUTS
I
I
(192090) 1/4-20
(73800400)
1
L--------------
,
(2)
FLAT WASHERS
1
(2)
CARRIAGE BOLTS
3/8-16
x
2.25
I
I
L
(2)
HANDLE KNOBS
ASSEMBLY
/
PRE-OPERATION
Readthese instructionsandthis manualinitsentirety
beforeyou attempt to assemble or operate your new
snowthrower. Readingtheentiremanualwill familiar-
izeyou with the unit,which willassistyou inassembly,
operation and maintenanceof the product.
Your newsnowthrower hasbeenassembledatthefactory
withthe exceptionof thosepartsleftunassembledforship-
pingpurposes.All partssuch as nuts,washers, bolts,etc.,
necessaryto completethe assembly have beenplaced in
the partsbag.To ensuresafeandproperoperationof your
snow thrower, all parts and hardwareyou assemble must
betightened securely. Usethe correct tools as necessary
to ensure proper tightness.
REMOVESNOW THROWER FROM CARTON
1.
Remove all accessible loose parts and parts boxes
from carton.
2.
Cutdown allfour cornersof carton and lay panelsflat.
3.
Removethetwo
(2)
screwssecuringtheaugerhousing
to the pallet.
4.
Removeallpackingmaterialsexceptplastictie
holding^
speed control rodto lower handle.
5.
Remove the two
(2)
plastic ties securing the upper
handleto the pallet.
6.
Remove snow thrower from carton and check carton
thoroughly for additional loose parts.
HOW TO SET UP YOUR SNOW THROWER
TOOL
BOX
(See Fig.
10)
A
toolbox is providedonyour snowthrower.Thetoolbox
is
locatedontopof the beltcover. Storetheextrashear bolts,
nutsandmulti-wrenchprovidedinpartsbaginthetoolbox.
5
ASSEMBLY
1
PRE-OPERATION
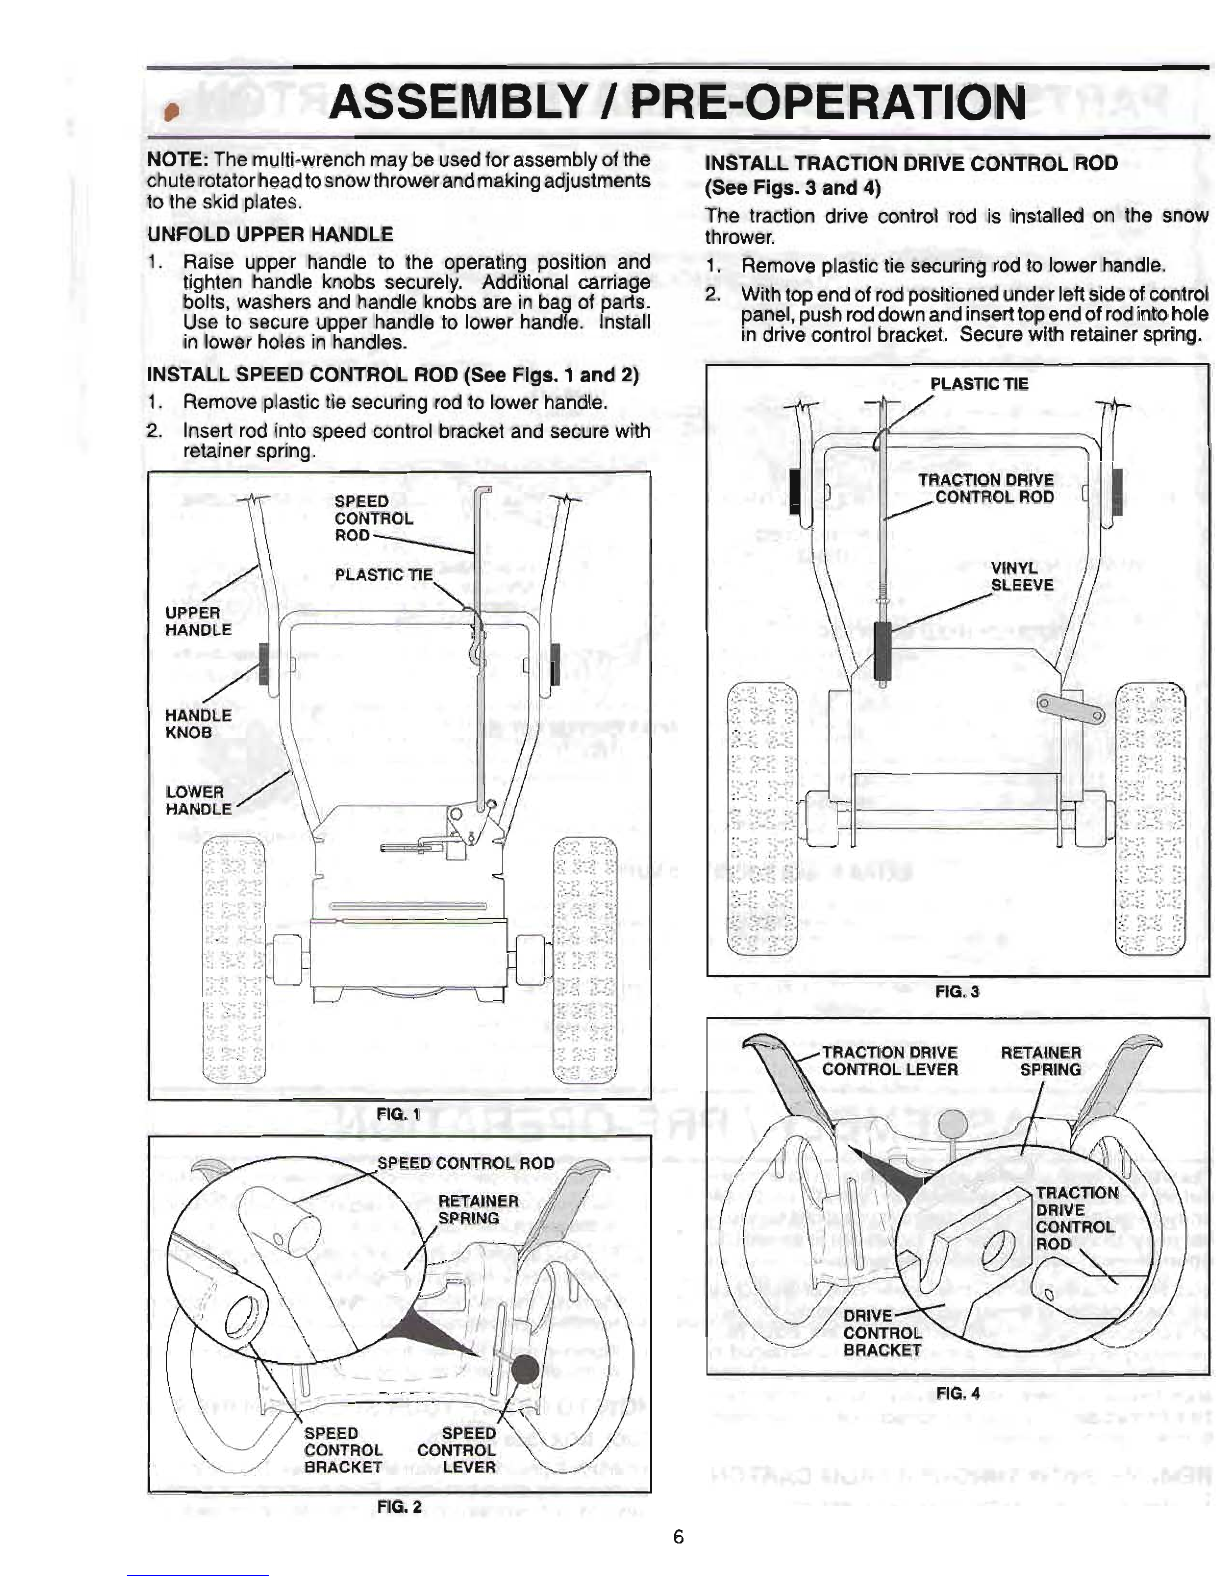
NOTE:
The multi-wrenchmay beusedfor assemblyof the
chuterotatorheadtosnowthrowerandmakingadjustments
to the skid plates.
UNFOLD UPPER HANDLE
.
Raise upper handle to the operating position and
tighten handle knobs securely. Additional carriage
bolts, washers and handle knobsare in bag of parts.
Use to secure upper handle to lower handle. Install
in lower holes in handles.
INSTALL SPEED CONTROL ROD (See Figs.
1
and
2)
1.
Removeplastic tie securing rodto lower handle.
2.
Insert rod into speed control bracketand secure witk,
retainer spring.
INSTALLTRACTION DRIVECONTROL ROD
(SeeFigs.
3
and
4)
The traction drive control rod is installed on the snow
thrower.
1.
Remove plastictie securing rodto lowerhandle.
2.
Withtop endof rodpositionedunderleftsideof control
panel,pushroddownandinserttopendof rodintohole
indrive control bracket. Secure with retainerspring.
PLASTICTIE
FIG.
3
FIG.
1
FIG. 4
r
ASSEMBLY
/
PRE-OPERATION
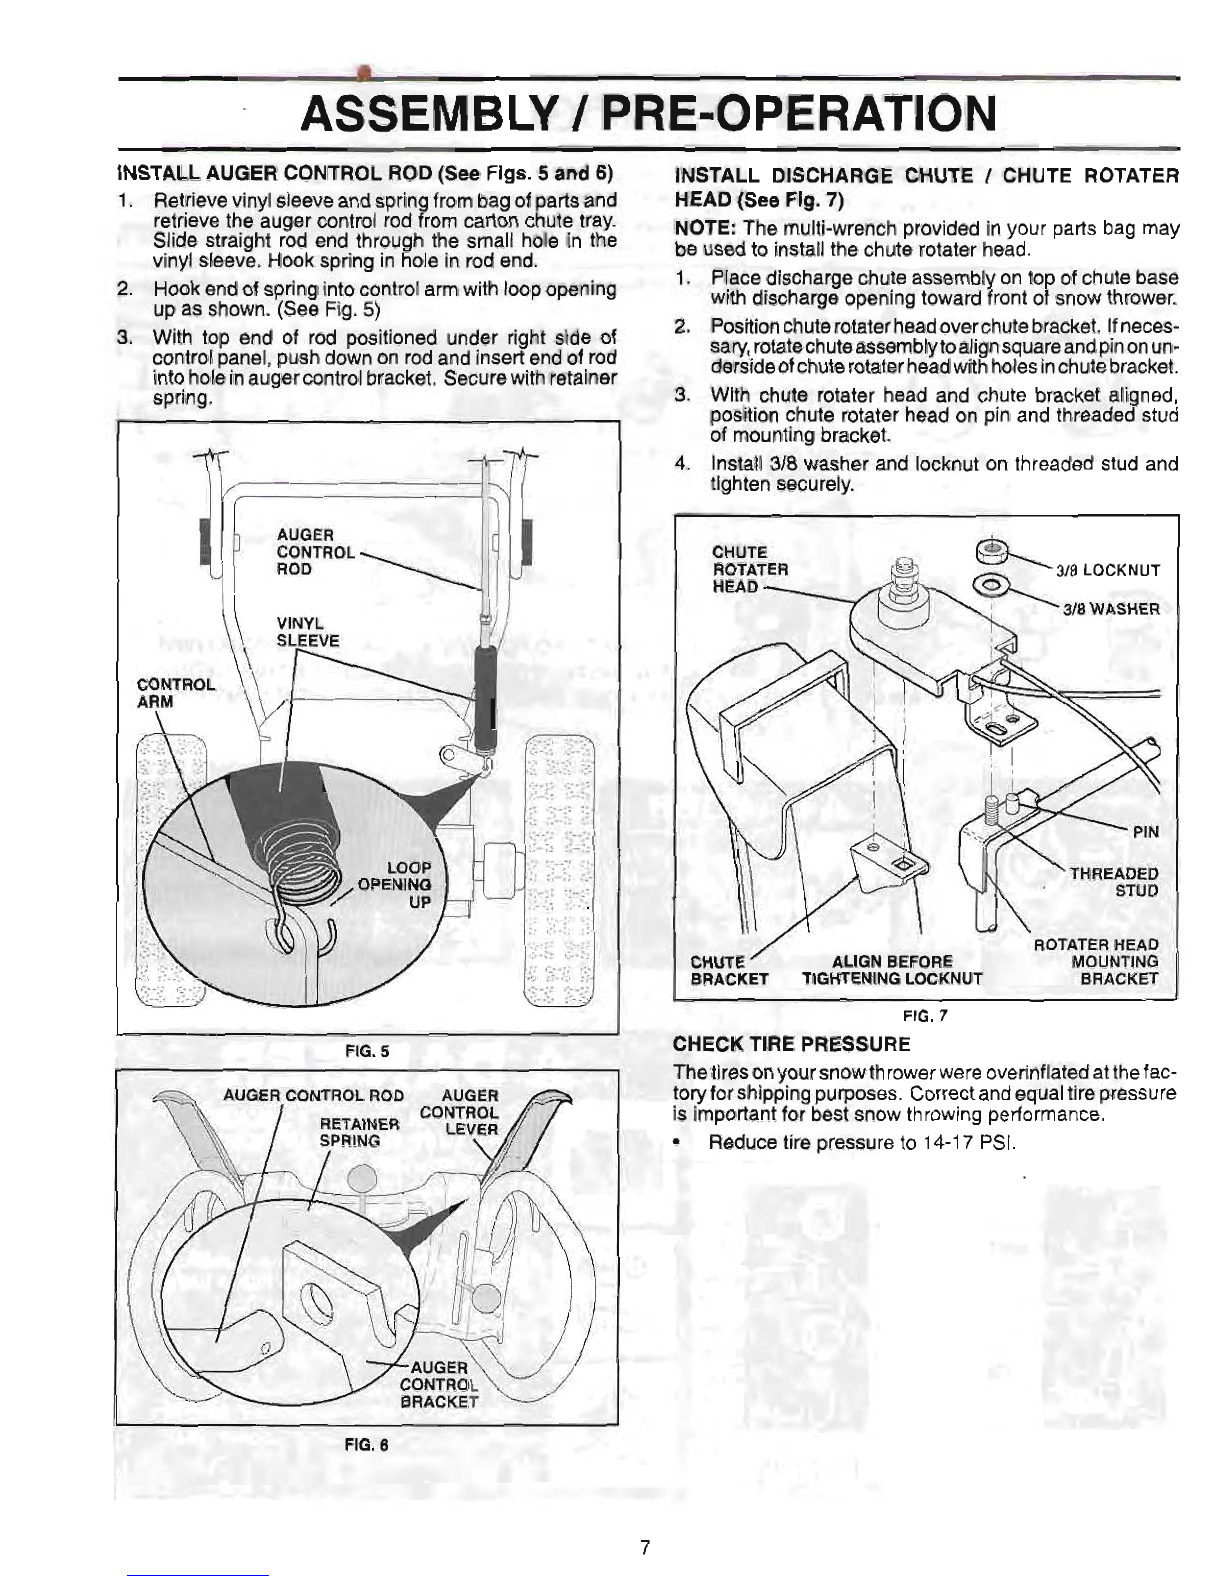
INSTALLAUGER CONTROL ROD (See
Figs.
5
and
6)
1. Retrievevinylsleeveandspringfrom bagof partsand
retrievethe auger control rod from carton chute tray.
Slide straight rod end through the small hole in the
vinyl sleeve. Hook spring in hole in rodend.
2.
Hookend of springintocontrolarmwith loopopening
up as shown. (See Fig.
5)
3.
With top end of rod positioned under right side of
controlpanel, pushdownon rodand insert endof rod
intoholeinaugercontrolbracket. Securewithretainer
spring.
FIG.
5
INSTALL DISCHARGE CHUTE
/
CHUTE ROTATER
HEAD(See
Fig.
7)
NOTE:
The multi-wrenchprovidedin your parts bag may
be usedto installthe chute rotater head.
1. Placedischargechuteassemblyon top of chute base
with discharge opening toward front of snow thrower.
2.
Positionchuterotaterheadoverchutebracket. Ifneces-
sary,rotatechuteassemblytoalignsquareandpinonun-
dersideofchuterotaterheadwithholesinchutebracket.
3.
With chute rotater head and chute bracket aligned,
positionchute rotater headon pin and threadedstud
of mountingbracket.
4. Install
318
washer and locknut on threaded stud and
tighten securely.
ROTATER
HEAD
CHUTE
/
ALIGN BEFORE
MOUNTING
BRACKET TIGHTENING LOCKNUT
BRACm
FIG.
7
CHECK TIRE PRESSURE
Thetiresonyoursnowthrowerwereoverinflatedatthefac-
toryforshippingpurposes. Correctandequaltirepressure
is importantfor bestsnow throwingperformance.
Reducetire pressure to 14-17PSI.
FIG.
6

DANGER
ENGINE
:
t
a
A+j
,
FA&
OR WARNING
ON
1!1
-~
.d
--...
.
SLOW CHOKE
PRIMER
:
READAND FOLLOW
ALL-SAFETY
INFORMATION
AND INSTRUCTIONSBEFORE
USE
OFTHIS PRODUCT.
-
.
OIL
FOR WAR^
REVERSE
KEEP
THESE
INSTRUCTIQNS
FW
FUTURE
REFERENCE
I
y
-
ILOCKAGES !MUST NOT BE
:LEARER OUT~NTIL THE ENGINE
IS SHUT
OFF^
AND THE CLEAN
OUT
TOOL MUST BE USED.
IGNITION
KEY.
INSERT
TO
START
.r
:.,
,
2
51-x.12
*
ANDRUN,
3
l~t**
,
.
.
,
-,
.!,-,,I,-
NEVER
ALLOW
CHILDREN
TO
OPERATE
SNOWTHROWERS.
KEEP 411SHIELDS AND GUAR
S
IN
PLACE
WHILE
OPERATING.
i
SHUT
OFF
ENGINE
AND
REMAI~
BEHIND
HANDLES UNTIL ALL MOVlG
ARTS
HAVE
STOPPED BEFORE UNCLOGGI
OR
SERVICING
UNIT.
It;
i
L
ENGAGED
SNOW
DISCHARGE TRACTION
DRIVE
CONTROL

.
.I.
-A
*
.
Our snow throwersconformto the standards of theAmerican NationalStandards lnstitrllo
Toolbox
-
used to store spgle shear bolts, locknuts and
ON
I
OFF
swltch
-
used
to
STOP
the engine.
wrench.
Drive speed control lever
-
used to select fdiatdor
Safety ignltlon key
-
must be insertedfor the engine to reversemotion and speed of snow thrower.
and
when
is
mactlondrivecontmilever.
usedto engagepower~m-
Electric
start
button
-
usedfor stattingstheengim
rn@~t~~
d.wwthrower.
Oe~oll(auxiliary) starter handle
-
usedfor sta&ng the
engine.
Primer
-
pumps additionalfuelfrom the carburetwto
the
Dlscha
cylinderfor usewhen startinga cold engine,
0.
*
*.
Chokecontrol
-
usedfor startinga cold engine.
Skldplate
-
used%
&just
height
af
sbabrer.bar
from
tk
ground.

T&xtp&rdon
Of
my
arrtruvthrow~rcan-~t~rrsult TheDIRECTIONInwMchsnowis
k
be
thrown
is
cantrolled
infareignobi- thrownintotheeym, which
bry
tha
dischwge
ah&
controllever.
can
resultinsevereeyedamage*
Always
wear
.
safety
glasses
or ayeahiekkwhileoperatin$
your snowtivower or pe*rming any adjust-
:ala,
mentsor repairs.We recommendstandardsafelyglasses
.
;
or
a
wideviaion safety mask worn over spwtacles.
HOW
TO
mE
YOUR
SNOW THROWER
Know
how
to
operate
all
controls before adding fuel
W-I
attemptingto starttheengine.
I-
STOPPlNOl
-
<
,=
*_
TRACTION DRIVE
-4
.
,{
-&a>-:
ReleasetractiondrivecontrolIw~rtostapthefowal'$
-
or reversemovernantof the snow thrower+
AUGER
-.
Releasetheaugercontral'M8wtwbMgsnow&.
F;
ENQINE
-.
4$,
n
@,',I,
Ir
Move ON
/
OFF
switch
to
'OFP-~WPI,
I
a:::
Remove (do not turn)
Wty
ignw
hy
to
pm~t
unauthorizedus$.
+,?
Ti,
FIG.
10
.
.t+
.
The DT$TANCE that snow isthroWn
b
cantmlfsd
by
the
-
NOTE:
Never usechoketo stop eng!mg
~$1
.
4'
position of the chute deflector. Set the deflector low to
4:.
&.&
throw snow
a
short distance; set the deflector higher
to
TO
USE CHOKE CONTROL
(8-
Fig,
9r-
'-
throw snow farther.
Thechokecontrolislocated
m
theerrgine, Usetheohoh
aontrol whenever you am starthg
a
cold
errgsne.
Do
not
u&eto
start
a
warm engine.
r-2
.
-
E
+*
To engagechoke, turn
knob
countcsrcl6bbiee.Slowly
turn
knah
clook~~Lato dldqw,
FIG,
9
'!
TO CONTROL SNOW DISCHARGE
(&XI
Figs.
10
81
11)
WARNING:
Snow
thr~m
have
ex-
flm
lncludlng
startup,
WARNlNG: If
tha
cffmhq
@h&e
or
auger
beuomecl
ge$,
8hWetsglrre
fi
~d~U~.Hm~~artstostop.
UY
the
clmn-outtoal, N
T
YQUR
HANDS,
to
unclog
the
chute
and#=
auger.
,
*
Tochangethedefl
-
flector to desired
. .
..
.
'
_1
.
..
.
.:
-
.
.
.
.'.-
.
+'
.,
.
.
...i;
i
'
:.
'.
,
2
<
;$~j,!?.$
.
.-
,
3-.
"'
'I.
_?
.
-
:
'
.!!,?*$
-
.
Y-
-
'
.,.
-
.
,.
!
/yr
:
s
..
.
'
.
2
:,.&.-
'
.
,'.
.j.
.
;.>:-
.$,
&-.
+'::>&?)
~2
-
+,':
.
-,=
,.'
.
.
,
?
.
>
.
..li
. .
-
1
OPERATION
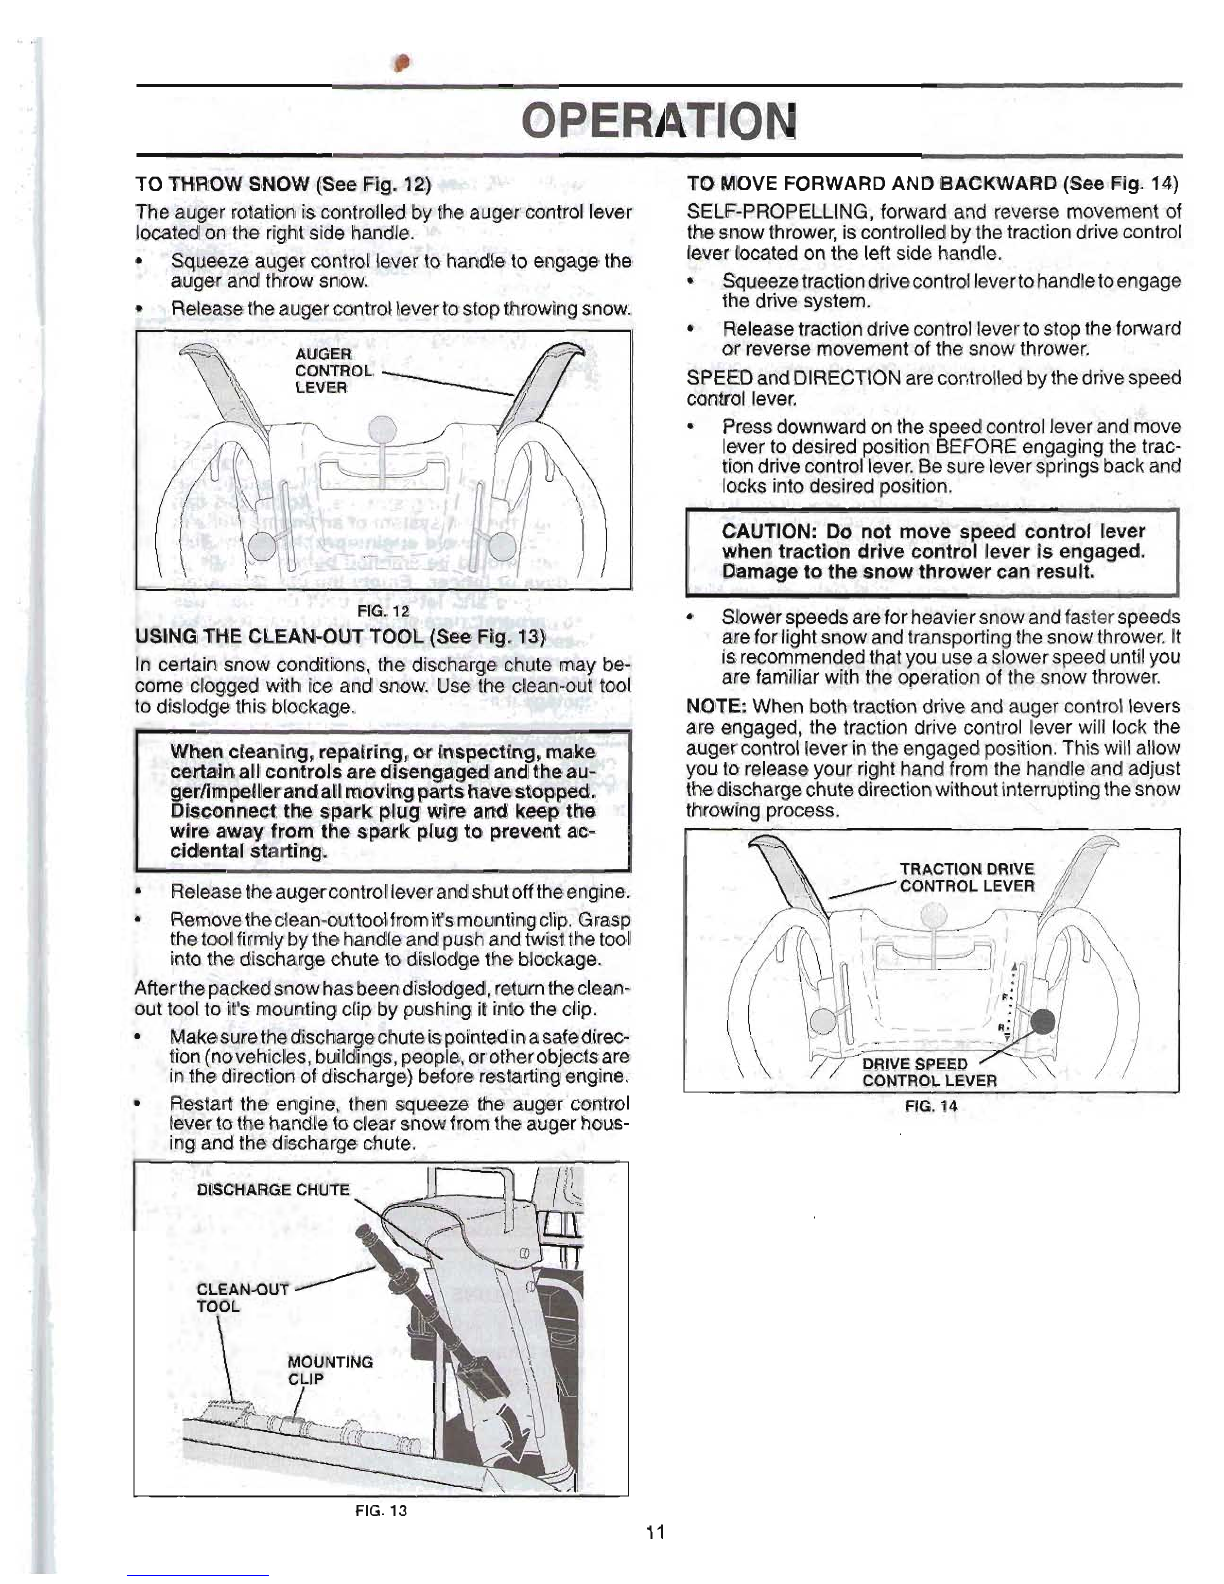
TO
THROW
SNOW
(See
mg.
I*=-)-
31;.
i3
The auger rotationiscontrolled
by
the auger eonfrollever
locatedon the rightside handle.
eeze auger controllever to handleto engagethe
er andthrow snow,
eleas ease
theaugercontrol
leverto
stop
throwingsnow.
WINO
TIlE
CLEANOUT
TOOL
(See
Flg.
13g:
In
mWBiM
snow
mndIrion~,
the dischargechute
may
be-
fame
GEpggeEcl
with
&!
and snow. Usethe clean-out tool
to
dislodge
this
blmkage.
Removetheclean-buttoolfromit'smnting
clip.
Grasp
thetool
firmly
by
the
handle
and
pushandtwistthetool
into
the
cfkclxGg8
chute
to,dlslddge
the
bbckqp.
~8~~~~6tf~1"1~bexn
dl
Jadg;ed,
Wumthed~n-
Out
WoI
b
k'L
mounting
clip
by
pushingit
Enta
theclip.
~wlr~~WtWq~-chuta'is
in*
in
asafe
die@
tion
(nevehwes,
buibgBI
pmpCkothwabliects
are
?ptha
dirtsc-th~af
dlmharga]
beSam
m&artlngsngine.
IbsWrt
&@
einginei
then
squwe
tba
auger'wntrol
lever
U
tlwhgndh&
clew
mew
%!;am
augpr
haws-
bg
and
the
dihatgs
chute.
-
FIG.
13
TO MOVE FORWARDAND BACKWARD (See
Flg.
14)
SELF-PROPELLING, forward and reverse movement of
thesnowthrower,iscontrolledbythetractiondrivecontrol
bverlocatedon the left side handle.
.
&queezetractiondrivecontrollevertohandletoengage
.
the drive system.
,
'Releasetractiondrivecontrollevertostoptheforward
arreverse movementof the snow thrower;
..
'
EDandDIRECTIONarecontrolledbythedrivespeed
Pressdownwardonthespeedcontrolleverand
m'W
leverto desired position
BEFORE
engagingthe trac-
tiondrivecontrollever.Besureleverspringsbackand
locks into desiredposition.
I
CAUTION: Do not move speed control lever
when tractlon drive coritrrrl lever is engaged.
Damageto the snow thrower can result.
Slowbrspeedsareforheaviersnowandfasterspeeds
arefor lightsnowandtransportingthesnowthrower. It
.Isrecommendedthatyou useaslowerspeeduntilyou
are familiar with the operationof the snow thrower.
NOTE:
When bothtraction drive and auger control levers
are engaged, the traction drive control lever will lock the
augercontrolleverintheengagedposition.Thiswill allow
you to releaseyour right handfrom the handleand adjust
thedischargechutedlrwtianwithoutiflsaxrupang
the
WQW
throwing process.
FIG.
-
.
..
\,
'
~
.
$
*.',
..
-
t.',;!.''
-
T:
.
iY'
.
. .
.
,
.
:\
,.
,
.
3.
:<.
/.
.
,
.I
:
.
..
.,
'.
.
+,
.
<,
,
:,.
-
1
.
.
.
1
,
..,<
~.
I;'
.
..i;
,
r
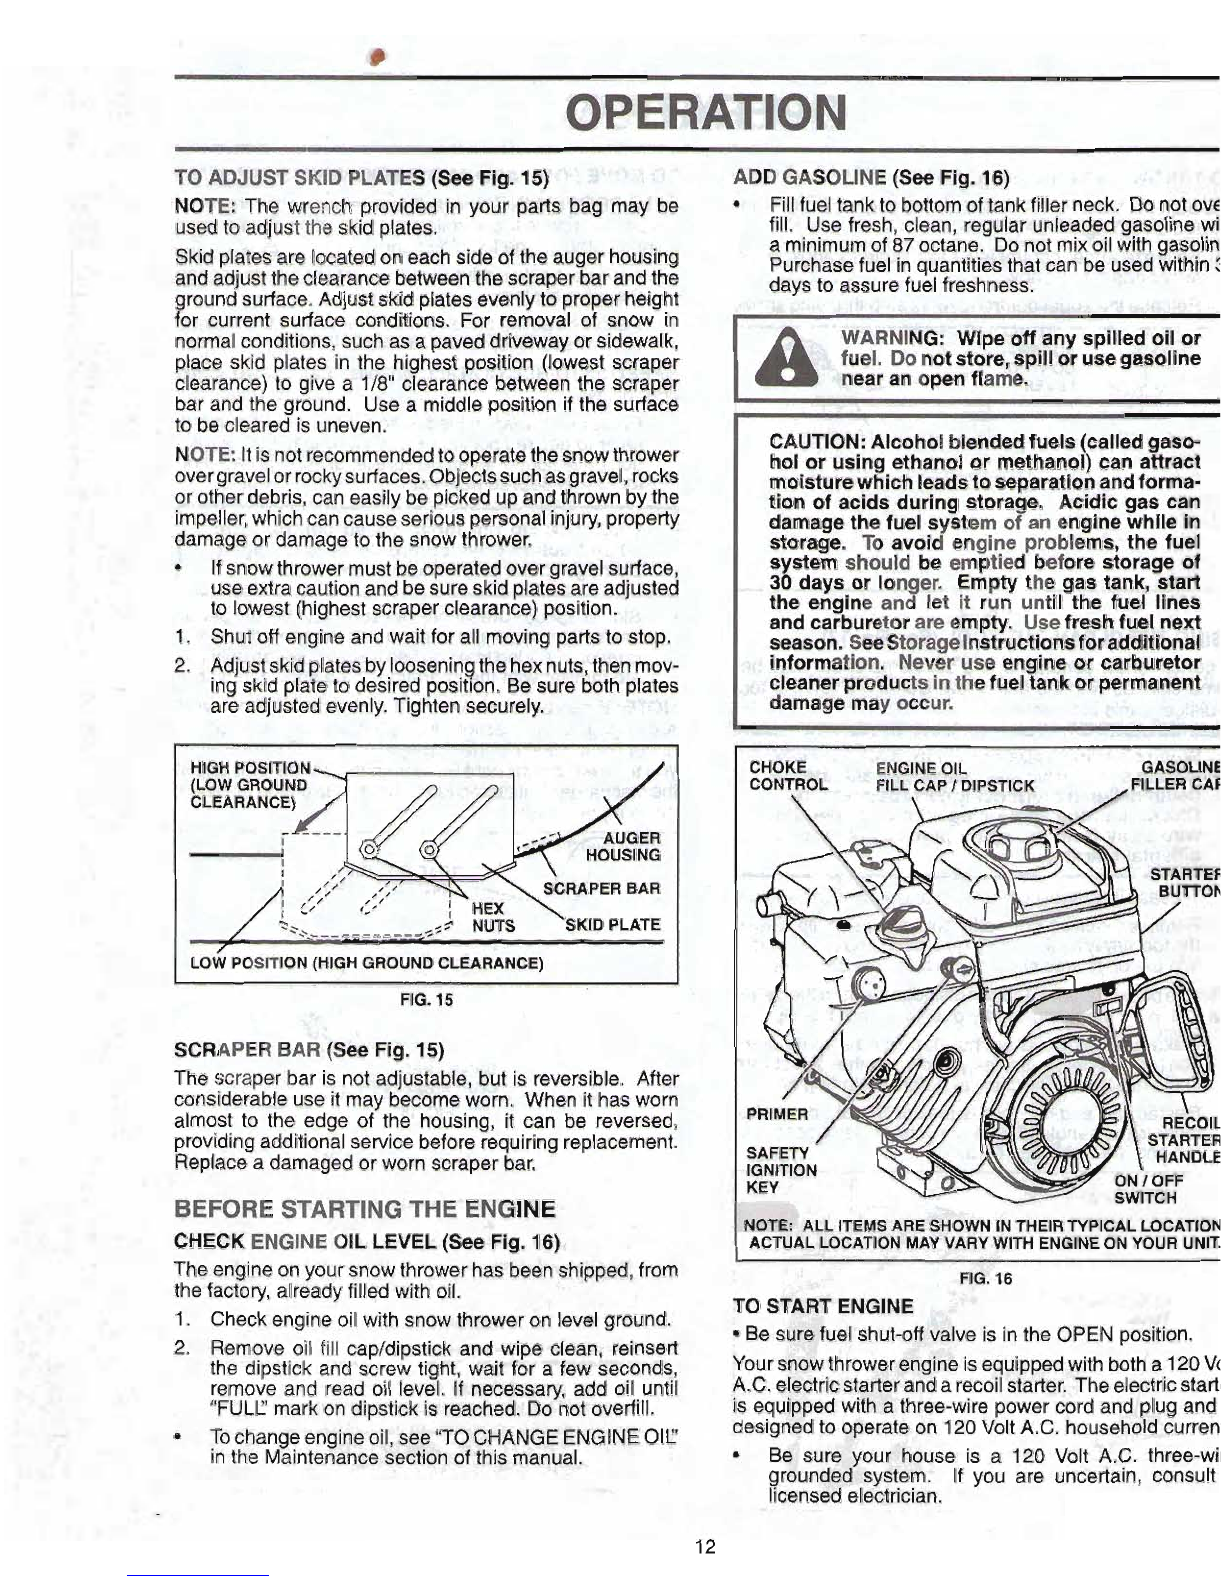
T6
AWWT
lMPl
PLATE@
FEg.
18)
3'-"'.
5
-
NOT&
Tha
wmflch
prov4#ad in your
p@rt$:
bag
rn@y
be
&&aJ
ta&]ust the skidphtaw
1-
..
,<
d
lldd
plat@
are locatedan
ea66'sid6;o?he
ad
'er
howlng
thecfmmmb@Wmn
soraper
%,
r
md
the
Adjust skidplates
f4~nly
to
properheight
gturrcant surfam ~~~fldition8,Far removal of onaw in
nsrmttll
conditbna, eu~h
arr
a
pavd
drlway
Br sidewalk,
plaoe skid plates in the hi hest poeition (bwest scraper
P
cler%ranoe)to give
a
118"
ceararrcebeweem thr acmpar
bar and the ground. Use
a
middle positionif
the
surface
io
becleared is uneven.
NOTE:
Itfsnotmcommenderd
b
oprratethesnowthrower
overgravelor rockysurfaces,Qbjectssuch
tar
gravt~l,rock8
other debris, can easily
be
pioked
up
and
thrownbythe
gpeller, whichcancauseseriouspcmonpl.iflljyry,
,.
propell)!
~mw@or damageto the snow thmwst'
mi,_
,
~,
-
;
:
If
@nowthrawer mustbeopmrad~~cmrgravel
ourtaw,
.are@
extraoautisn
md
besurer
rrksd
ptsatw
ara
adjuls-tsld
,
,
@
lowest (hiqhe~tscraper.
.
elerwanoe) pasition.
t,
@hutoffengine
ad
*Wail
mavinqpartsta$top.
P.
;
hdjustskidplatmby loownln
the
hex
nu$, lhenmov-
Ingskid pl& to deslrad
pmlt
9
on.
8e
sure both plates
me
adiusttad
ewnty*
Tiitgn
setcursrly,
-
.
..
).
')
'b
:-
.
i
.
,?
[
LOW
POSITION(HUHGROUND CLEARANCE)
I
P.
PIC%
tQ
SCRAPER BAR
(See
tsrg,
In
The scraper bar is not adjustable, But
is
reversible. ARer
considerable use it may b~c~mgtworn. When it has
warn
almost
to
the edge of the housing,
it
can be reversed,
providingadditionalservice beforerequiringreplammmt.
Replace
a
damaged or warn scraper bar.
BEFORE
8TARTlNG
THE
EElalJVE
CHECK
ENE;IiUE
QIL
LEVEL
($tm
Fig.
18)
The engineon your snow thrower hu,
b&shipp.&
horn
theOctary, alreadyfilledwith oil.
1.
Checkengine oilwith snow
thwww
on levelground.
2.
Remove oil
fill
cap/dipertick
Blnd
wipe
dm,
&met
the
dipstick and screw tight,
wait
for a
few
smmd$,
moveand read oil lavel.
It
rgr,
add
oil
until
"FUU
markon dipsdek
Is
m*d.
Ds
natov@flll.
Ta changeengineoil,
sea
TO
C.HANG€ENGINE011"
Sn
the Maintenance~srsettonof
this
manual.
ADD
GASOLINE
(8-
Fig.
16)
.
.
,
;:<
:
Q::
:
Fill
fueltankto bottom
of
tankfiller neckh-Donotover
fill.
Usefresh, clean, regular unleadedgasoline wi
aminimumof
87
octane. Do notmixoilwith gasalln
Purchasefuel inquantitiesthat can be usedwithin
f
daysto assurefuel freshness.
,,,.
,
,
.%
%.
&Lbd--
.J'%!
~!f*U;~i%3~-
*
a
WARNINO: Wipe off any spilledoilOK
fuel. Donotstore,spillorusegamline
nearan openflame.
CAUTION:
Alcoholblendedfuels(celled aso-
holor usingethanolor methanol)can a
?t
raot
moisturewhichleadstoseparationandforma-
tion of aclds during stora e. Acidic gas can
damage thefuel s stem o an enginewhlle in
J
P
storage. To avos engine problems, the fuel
system should beemptied beforestorage of
30
days or Ion er. Empty the gas tank, start
.-
the englne an
!
let
it
run until the fuel lines
andcarburetor are empty.
Use
fresh
fuel next.
season. Seestoragelnstructlons
for
additional68
information.
Never useengine or carbu~tor,,~
claraner productsinthefueltankorpermanen&@
damage may occur.
MQJEh
ALL
ITEMS
ARESHOWN INTHEIR TYPICAL LOCATION
ACTUAL LOCATIONMAY
VARY
WITH ENGINE
ON
YOUR UNIT.
I
--
-
---
-
-
-
---.+
!
-
~*
.>,
a,
.
~ra5a
TO
STAR7
ENGlM
-
..
..-
,
!
JC
4
Be
sure
fuel shut-offvalw is inthe
OPEN
position.
Your snowthrowerengineisequippedwith botha 120Vc
A.C.
electricstarterandarecoilstarter, Theelectricstart(
Is
equippedwith athree-wirepower cord and plug and
designedto operate on 120Volt
A.C.
householdcurrenj
Be sure your house is a 120 Volt
A.C.
threewi~
rounded spteim,
Lf
yau
are
uncertain, consult
knsed
-
electrician.

WARM
@CART
r
REWL
t3TMf3
kww
mhQke
tn
the
'GFP
the primesr.
OEWRR
8-TQPPINQ
Runthe csn@ne"forafwminutesto helpdry off any mois-
@WIT
-
ELECTRIC
STARTER
ture onthe engine.
"
.I
<
$..
ItataeH
Wt?lty
ignition
key
@kid
ta recoilstartcord into
IF
RE~~XJIL
STAR^
WA;S
~Q=N
R
ii
'OPY
'lot
*
me
key.
11
the recoil
ahulsr
RBs
Rmen
andwill notturntheengine,
'
t e
e&ra
sr%f@tyignitionk@y inamfeplace, pmceed
es
bIlows:
'&
L
Pieroe
ON
/
OFF swftch in "ONnposiiian.
1.
Graspthe recoilstarker handle
qnsl
gd~wlypullas muoh
S
Rota&
choke controlto "FULL"position. ropeoutof
the
starter
as wwiblei.
4
G?nmthe pawer
cord
ta
the
engine.
5. ~lq,lh.'&hwend
dlh,
power
cord
into
athnbhole
,
gt%m
t
ZO
&#
A.C,
#QTEt
Po net
me
primer
hen
staQg
gnginewith thrs
erlecttb
@tartar.
8.
Diwnmtthe
pow^
card
Qrdm
th@
r
WR
from
tbEmglina.
~u&the
o heto
wMn
u for
a
few
minutes.
&
HI
opt
tbwd~p
"B
uIIpweruntl
It
ha&remherdnorr&
oprat~
Rg
tomp~~.
P
WARM
START
-
ELECTRICSTARER
FollDW
$he
st@pe
abauja,
ka~ping
the choke cop1tml inthe
"OFF"
gosition,
COW
&ART
FEGQlL
STARTER
I.
Inaart
s-%If&&
igir1Itaon key to rwilstart Dord into
I
nitinnslot
unlit
Midcs.
O
NOTturn
th@M@.
AEtp
R
b
t ee~trafsclfityignirlan
by
in
a
FF
wbh
In'ON" pition.
mtmlto "FUUpatinn.
4.
Pursh
.tkQ
liRn@r
four
4)
timm
l
thr
ttmpembre is
6
blow
Ipfor
two
12)
mu
ntanprwstumta
between
1
5'
and
!if0
F.
Iftb~ratura
F8
abm
60aE
primhais
riot
rrmmry.
NOTE
Q&$;ptfmin-g'may
mum
flmdhg, pre\renBn@the
enghefrom
aath'lg
If
you
do
fbod
tbengin&,wait
r
ft?w
miinurn
hbre.&mmg
&I
&at
and
DCI
NOTpush the
Drirner.
b
F%iI
wl
starhw handls quicMy. Do not allow
$tartw
roper
ta
snap tmk.
6$
%
When
theenginestwts,W~~therecoi3~st@erh~ndls
:
ansl'slawly-methe choke controlto the
"(CZFF
pmb
-tian,
AllwT176m
*
crl
trx
warm upfor
a
few
minutehp.
Enghet
will
not
d
!$I
paweruntilit
has
n&hed
normalopera-
ingtcamgwatun.
2.
~ileasathe
rerwrv
starter.handie
and
let
it
snap beck
klgainstthe.%tartar.
If the(swi~(~i~Mill
hib
ta
start,
repeat me abwst.eps or
wr
th8:elmtri~$tarter.
SNOW
mmwi~lcz
nps
AJwaw.operate the sngWthmw@f With the engine at
fullthrc%lo.Fullthrottle offers
bad
perrfomanlc9.
h3Wsnow.
ummo
th
ro
,
to
adjust speed.
It
is
wiesand mreefficientto remove snow imme-
&ally ahr
iZ
1"alls.
th61bwttimet~re~av~~sntrw
k
theeiarly morning.
At
thistlme t& anow
IS
usudiljly
dry
and
ha&
nat
been
ex-
pwd
to
ffier
dimct sun and
warnu'ng
bmprsmtures.
SiigS1tIy overlap each succwsh path ta cs;nBufe
dl
snow will be removwl,
Ailjusttheskidplates
to
m
&r
h&i
htformrr&ntsnow
w~dttiono.
TO
&SST
d~
PLATE@
inthis
don
of
this
manual.
-
parextremelyheavy
srlaw,
revduQe
the,
width
of snow
lwt'mxd
by
cm~Mappimg
~~(IIV~Q~BP.
path and moving
sJuwly.
*
engtfio
rlm
andclear
of
snow duringuse.
This
wiU
Rip
air
fib*
and
exteMengine life.
Afbr~nawthmMng
15 cbmpWd,Jl~wanginato
run
for
afew minutedto meltsnow
md,
off.
Me
engine.
&m
the entire snow thrcrwr th@roughlyafter
each
use and wipe4
dry
so
it
is
ready
far
nequse.
WARNSPIIQ:
Do
nd
aperate
snow
a
thraww
kfwmth&rmndiBarmImpair
vls-
Iblllty.
Throwlng snow
during
;a-htmvy,
winds
e~ow8trom
an
Wind
yau
and
be
hazardmus
t~
the
mj&
opemtl~n
of
the
enow
thlawtar.

-
-
FILL
IN
DATES
GENERAL
REEOMIVIZWDATIONS
"'""
.
ti',
,
The warranty on this snow thrower does not cover items
thathavebeensubjectedtoo eratorabuseornegligence.
To receive full value from
8
e
warranty, operator must
maintainsnowthroweras instructedinthismanual. Some
adjustmentswill needto be made periodically
to
properly
maintainyour snow thrower.
1
.I
At least once a season, checkto
s&
i(
you'dh.$u~dmake
any of the adjuetmentsdescriiedin
the
Senrice
and Ad-
justment@
~sxl
of this manwal..
,.:
!
,?;
.
At leastonceayear, youdo&! replacethe+rk lug
your engine run better and last longer.
I:
and check belts for wear. A new spark plugwilt elp
Followthe maintenanceschedule
'in
this manual.
NOTE:
UseonlyOriginalEquipmentManufacturer(OEM)
partstosewicethisunit. FailuretodoSt5
can
musethe unit
todfuncticm
and
pmgt
a
rkk
Qf
injury
tothe opeatar.
'BJ
t,
1
"
.
,%:
L.
1
+$,*
USE.
.-
if-
A
*
1.
Check engine
OH
ImB
2.
Checkfor loosefastek&rs.
.
.I
YI
,
*
.
.i
J
r
.
',
.
-
,I
i
.
,
1..
;I
SNOW
THROWER
.
.
,.I'
Always observe
the
&&y
rule@ JprformiB$j any
*i
.Keep
tires
frw
af
maintenance.
.,I
:a
rubber.
"I{
,:T,
df
I
>.
TIRES
;
8
NOTE:
To seal
fire
punctures and prevent flat tires
dr
*
Maintainpro er air prmisure
in
bothtlrm to slow leaks, tire sealant may be purchased from yo
(1
4-1
7
RS.I!~'.
local parts deafer. Tire sealant also prevents tire dry
r
and corrosion.

.
,
.+
=-
-
..
?
BELTS
1
._
&
-
3.
-
:,
.%Ik,<..
*
-.
-
$0
CHANGE ENGINE
OIL
Checkbeltsfor deteriorationandwearafter every50hours Determinetemperature range an'licipated before ned
oil
of operation and replace
if
necessary. The belts are not change,AlloilmustmeetAPIserviceclassificationSG-SL.
adjustable. Replace belts
if
they begin to slip from wear.
Be
sure
snow
thrower
is
on
suhce.
(See
YO
REMOVE BELT COVER".in the Service and
Adjustments section of this manual)r Oilwill drain morefreely when warm
*
-
Thebeltson your snowthrowerareof specialconstruction
'
Catchoil ina suitable ~Qt~tainer.
2
andshouldbereplacedbyoriginalequipmentmanufacturer
NOTE:
The left side wheel may be removed f&$ !$now
(OEM)beltsavailablefromyournearestdealer.Usingother thrower for ~asieraccew to the oil drain plugand placeiz
than OEM beltscan cause persona or damage to ment
of
asuitable container,
The
unittllted, restingon the
the snow thfmar.
.
-
<.
frame with the left wheel removed, will help drain any oil
,I
+
r
trappedinsidethe engine. (See"TO REMOVEWHEELS*
inthe ServiceandAdjustments section of this manual).
1.
Removesafetyignitionkey anddiscmnedsparkplug
wire from spark plug and place wirewhere it cannot
come incontactwith plug.
2.
Clean areaaround drainplan
El3
#"lQrease. 3. Removedrainpluganddrainoilinasuitablecontainer.
..
4.
Installdrain plugand tightensecurely.
snow
5.
Wipe
off
anyspilladoilfromsnowthrower
and
engine.
on
$.
Installleftwheel(ifremovedfor drainingoil). Besureto
installklick ininto roperholeinwheelaxle(See
"TO
-REMOVE HEEL
!
"
inthqfienrlce
and
Adjustments
sectidn of this manual).
7.
Removeoilfillcap/dipstick.
~6
to
entertheenginer
--
8.
Reff
ll
engine withWIl9+1mugh"
st1
wkk'cW;,Four
slawly. Do not overfill. For ap roximatecapacity see
"PRODUCTsPEGIFIcATIoN~~sectionofthlsmanual.
ENGINE
on oil fill cap/elipstick for chwking level.
See engine manual. stickcap
Cs
ti htenedsecurely for accurate
oil at "FU
C'
lineon dipstick.
LUBRICATION
'
'
I
t@,'Wiie
off any spilled oil.
a
Useonly highquality de"tbr~eW
dl
rated
W~~API
se9%&
,
,
.
,
.
i
'
_,I-
..
classification SG-SL. Selecttheoil's SAEviscositygrade
.
>
accordingto your expectedoperatingtemperature. Insped
dd
replacecorroded'
.&
d
fire hazardandor damaga
,
.
SPARK
PLUGi:
Replacespark
plu~dthe
bagh-mingofeach
seas~n
oraRer
every
100
hoursof operation,whichey~rac~ursfirst. Spark
plug type and
gap
setting are show
[n
the "PRODUCT
SPECIFICATIONS"sectionof this mnuai.
CLEANING
'
,
.
*
IMPORTANT
Forbest perf~rm&tcrl;-
!keep
snow thrower
housingfree of any dirtor trash. CleanShe outsideof your
snow throwerafter each use.
NOTE
Alfhowgh multi-viscosityoils (5W30,
1
OW30
etc.)
improve
shfftrrg
in
coldweather, these multi-viscosityoils
will result
in
irrereasedoilconsumptionwhen usedabove
32°F.
Che* yausmgineoillevelmorefrequentlytoavoid
possWe
lengiw
damagefrom runninglawon oil.
Changethe
ujt
ef€er
every25 hours
of
operationor at least Keepfinishedsurfaces/wheelafreeofgasoline,oil,etc.
once a year if the smwthrower is not usedfor
25
hours We do not tw~mhendUdhg
a
gar-
to dean
inone year. yoursnowthrowerunlesstheelectricalsystem,muffler
and carburetorare covered
to
keep
water out. Water
Checkthecmkcaseoillevelbeforestarthgtheengine
and
h
engine can result in shortened
engin%-li%e,
aftereach ffve
(5)
hoursof continuoususe. Tighten oil
fill
$,
Cap
I
dipsticksecurely each
time
you
check
ttre
oii
tevd.
-
-
-,
.
_
a
t-
:
.
A.
.
WARNING:
Disconnect
spark
plug
wke
from
sparkplug
and
placewire
Here
it
cannot
came
In
contact
with
plug.
SERVICE
AND
AWUSTMENTS
To
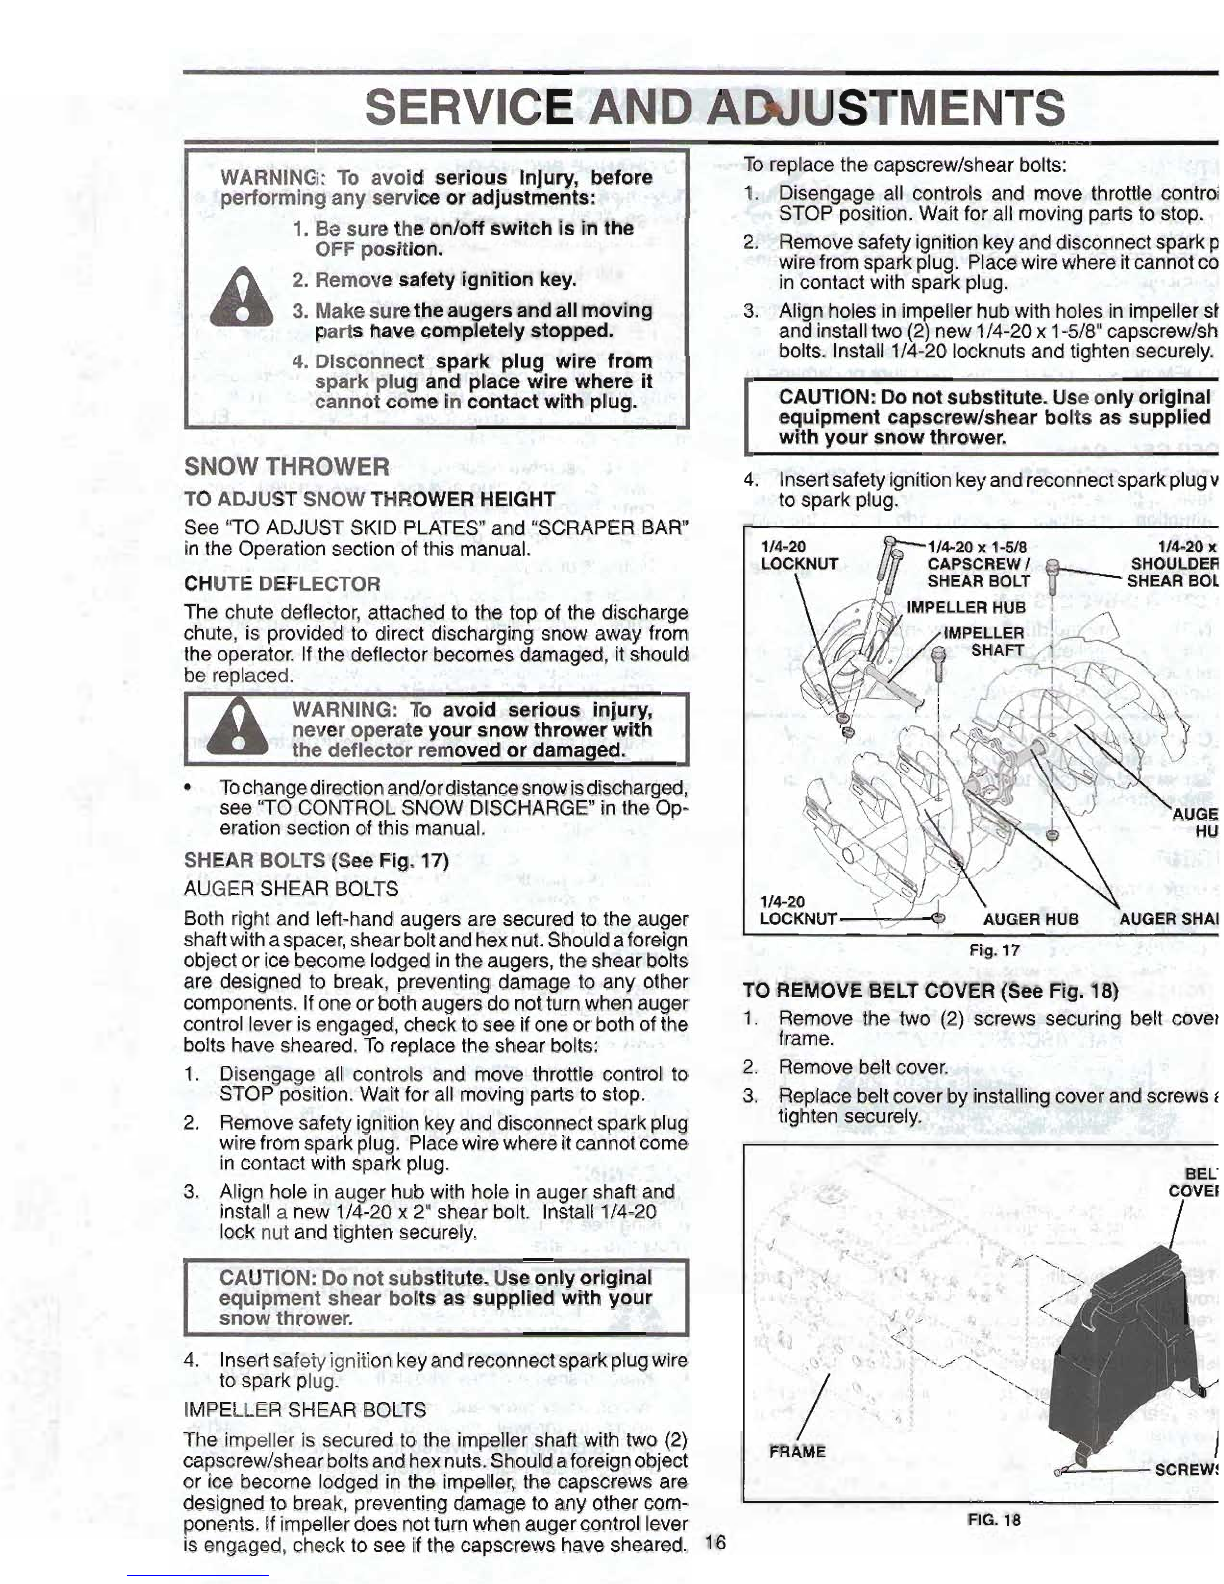
replacethecapscrewlshearbolts:
.
%
WARNlNGi: To avoid serious Injury, before
:-:I
!
performingany mrvtceor adjustmsnts:
p
3-
.t
1.
Disengage all controls and move throffle cbnirol
.
,
.
STOP position.Wait for all movingpartsto stop.
1.
Be
surethe
OM
swltch Istn thew
OFF position.
AIP
Removesafetyignitionkeyanddisconnectspark
p
.
wirefromsparkplug. Placewirewhere itcannotco
A
2.
Remove safety Ignitl~R%&y:~.
o'r'V
incontactwith spark plug.
-
-
.
;a.t,ir,.
yc.
1
1
3.
Makesuretheaugers
and
allmsvin$
.
,
parts havecompletelystopped.
!
I
4.
Disconnect spark plug wire
from';
;'
-I
spark plug and placewire where
#,
"
1
. cannot come
In
contactwith plug.
,
$'-
SNOWTHROWER
--
.
>,+~*.--~,a
i
TO ADJUST SNOW THRO
&&m
:
4.
fr
See TOADJUST SKID PLATES" and "SCRAPE?$.BAR"
inthe Operationsection of this manual.
..
.
,
,,
rCa
CHUTE DEFLECTOR
The chute deflector, attachedto the top of the discharge
chute, is provided to direct discharging snow away from
theoperator. If
the
deflector becomesdamaged,
it
should
.
,
be replaced.
WARNING: To avold serlous
tnju
the deflector removed or damaged.
3
never operateyour snow thrower wit
..
To changedirectionand/ordistancssnow
b
discharge&
-
-seeTOCONTROLSNOW DISCHARGE" inthe Op-
erationsection of this manual.
SHEAR BOLTS (See Fig.
17)
,
AUGER SHEAR BOLTS
4'.
,
.
Both right and left-handaugers are securedto the auger
shaftwithaspacer,shearboltandhexnut.Shouldaforeign
objector ice becomelodgedinthe augers,the shearbolts
are designed to break, preventing damage to any other
components. If one or bothaugersdo notturnwhen auger
controlleverisengaged,check to see if one or bothof the
bolts have sheared. To replacethe shear bolts:
1.
Disengage all controls and move throttle control
ta
STOP position.Wait for all movingpartsto stop..
*
2. Removesafety
i
nitionkeyanddisconnectsparkplui
wirefromsparkp
9
ug. Placewirewhere itcannotcoma
incontact with spark plug.
3.
Align holeinauger hub with holeinauger shaft andl
'
installa new 1/4-20
x
2" shear bolt. Install1/4-20
.
-
lock nut and tighten securely.
CAUTION: Do notsubstitute.Useonlyoriginal
equipment shear bolts as supplied with your
snaw thrower.
-
4. Insertsafetyignitionkeyandreconnectsparkplug
wtm
to
sparkplug.
lMPmSHEARBOLm
dig
'+'*;
'
%
-
.
i
The impelleris secured to theimpdkr
ahan
with two
(2)
capscrewiehearWts
4
hex
nub.
ShW
a
foreignobject
or ice become lodgedIn
the
impeller,
the capscrewsare
designedto bxeak, preventingdamage
to
any other com-
ponents. Ifimpellerdoesnotturnwhen augercontrollever
isengaged, check to see if the capscrews havesheared.
1'6
,.-$i-:
Align holesinim eller hub
~+KJ&S
fi~
-
andinstalltwo
(2y
new 1/4-20x
1
bolts. Install1/4-20locknutsam?
CAUTION: Do notsubstitute.
Use
only
ortginal
equipment capscfewlshear
bolts
as supplied
wRh your snow thrower.
4. In%erY~a1&yignNbn
key
and
reaxmeet
sparkplug
v
to spark plug.
,.-.
f
.I
.
.;
:
--
c:f
@.@crews securing belt
cowl
-
-
-<
.
2. Removebelt
-
A=,'
.+
*
3.
Replacebeltcover
by
installingcover andscrews
t
tightensecurely.
-w$
-
'*
RO.
18
SERVKE
AND-N$JUSTMENTS
,
WARNING: Belt replacementr ulres
,
separation
of
thesnow throwe%hile
:'I
1
separating
theauger
houslngfromthe
frame assembly,
It
Is important that
1
an assistant stand
in
the operating
e
asMan mdhold the snow thrower
.
andlea. Serious
personal
Injuryandl
4
I.
*,-
,
or damage to the
unit
muld
occur if
.)
I
the snow thrower should fall during
the belt changingprocess.
FRAM~
Aum
HOUStffi
-,
+
?'
4
TO
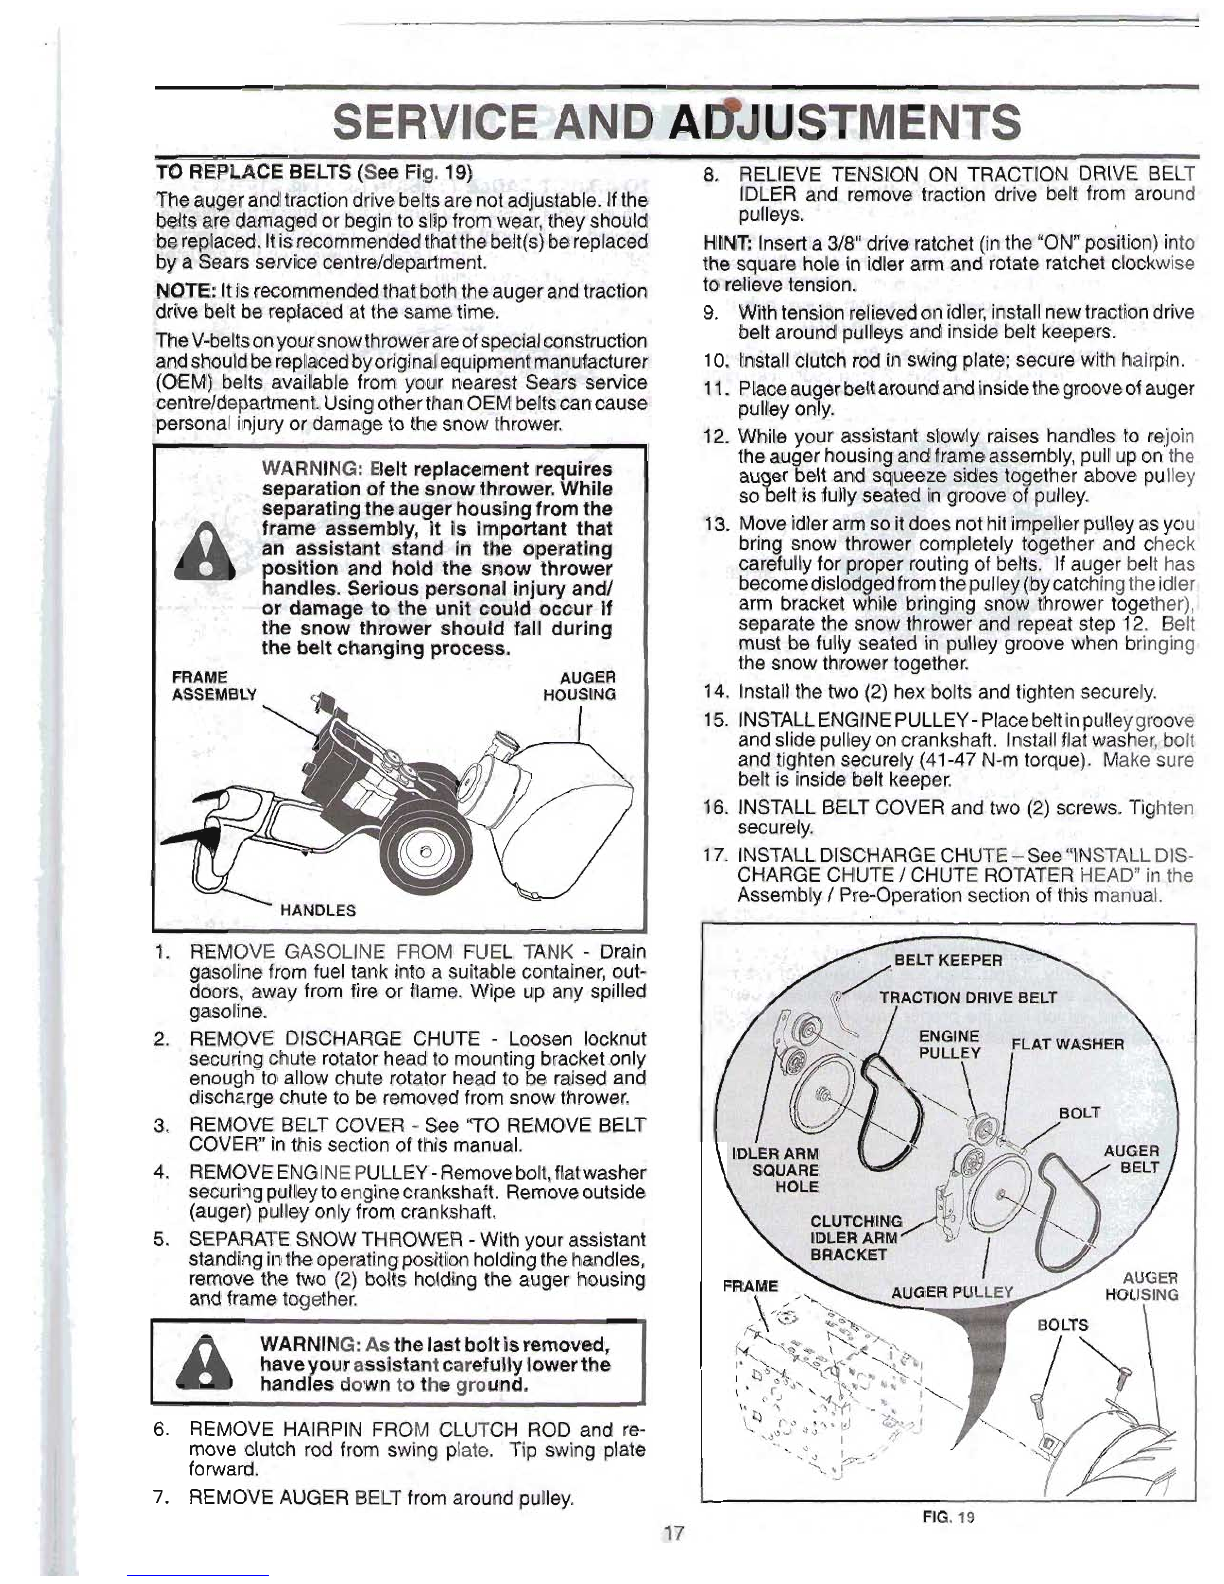
REPLACE BELTS
(See
Fig.
19)
:fie'
T
.
,d:ii~t
8.
RELIEVE TENSION ON TRACTION DRIVE BELT
Theaygerandtractiondrivebeltsarenotadjustable. Ifth$ IDLER and remove traction drive belt from around
beltsate
damagedor beginto slipfromwear, they shoukl pulleys.
Ire
replaoed.I1isrecommendedthatthebelt(s)bereplmdd
HINT
Inserta318" drive ratchet
(in
the
"ON
po~ition)~~
bha $ears service dentreldepartment.
'
"!I
the quarehole in idler arm and rotateratchet
clocWi
NOTE:
Itisrecommendedthatboththeaugerandtraction
raltevs
.
1
drivebeltbe replacedat thesametime.
8.
With
tensionrelieved
bn
Mer,ih€lgllne~Wac~kytWbe
TheV-beltsonyoursnowthrowerareofspet3Bl~truction beltaroundpulleysand inside belt keepers.
andshouldbereplacedbyoriginalequipmentmanufacturer
10,
Installclutch rodinwingplate; secure with hairpin.
(OEM) belts available from Your nearest Seat'S service 11. Placeau erbeltaroundandinsidethegrooveofauger
centreldepartment.UsingotherthanOEMbeltscancause pulley ony.
gersonalinjury ordamage to the snow thrower.
7
12. While your asl5-iant tslowly raises handles
to
rejoin
theau er housingandfmmts assbmbly,pullup on the
au er eltand squeeza
rides
to @herabove pulley
so
%
e12 isfully set~bd
in
grooveo
r
pulley.
13. Moveidlerarmso itgoesnothitirflprllerpmeyas
you!
bring snow thrwer completely together and check
carefullyfor praper routingof belts.
If
auger belt has
becomedislo edfromthepulleyfb catchingtheidler,
$,
\
arm bracket
w
Ele b'PinpingsnBw t rower together),;
separate the snwthrower and repeat step
12.
Beit
must be fully seated in
pullw
groove %hen bringiags
.
the snow throwertogether.
1.
REMOVE GASOLINE FROM FUEL TANK
-
Drain
gasoline from fuel tank into a suitable container, out-
doors, away from fire or flame. Wipe up any spilled
gasoline.
8.
,
REMOVE DISCHARGE CHUTE
-
Loosen locknd~
securingchute rotatorheadto mountingbracket only
enough
to
allow chute rotator headto be raised and
discharge chuteto be removedfrom snow thrower.
3. REMOVE BELT COVER
-
See "TO REMOVE BELT
COVER" inthis sectionof this manual.
4.
REMOVEENGINEPULLEY
-
Removebolt,flatwasher
securingpulleytoenginecrankshaft. Removeoutside
;
(auger) pulleyonly from crankshaft.
5.
SEPARATE SNOW THROWER
-
Withyour assistant
standingintheoperatingpositionholdingthehandles,
remove the two
(2)
bolts holding the auger housing
and frame together.
WARNING: As thelastboltisremoved,
our assistantcarefullylowerthe
down to the ground.
.
'6.
REMOVE HAIRPIN FROM CLUTCH ROD and re-
move clutch rod from swing plate. Tip swing plate
forward.
7.
REMOVE AUGER BELT
from
mud
m
FIG
19

SERVICE
AND
AbJUSTllTINTS
.
,
.
.
-4q
.&
TO
REMOVE
WHEELS
(Sm
Fig.
29&&
L',,.
ic
3fi
TO
ADJUST
CABLE
TENSION
Cfbe
Fig.
21)
I*
JS~
Removethe klik pinand removewheel from
axle.
.
Aqd
caMs
tension
by
turning
the
adjusterturn
hue
IMPORT&NT
Wheninstallingwheel, besure
to
use
the
Fa-
baa^
on
the
dmt hand
cahl@.
QrW
Ihe
long
nermostholeinaxleandthewheelhubhole. To disengage *gh*
and
turn
the short -On
to
lengthen
drivesystem from
the
wheels (for pushingartramporting
Adiustunt[l
cable
is
snug.
the snow thrower), remove klik pin from wheel hub and
insertpin intothe outermost hole in
axle
only.
NOTE:
To seal puncturesor preventflat tiree due to stow
leaks,tiresealant maybepurchasedfromyour localparts
dealer.Tiresealantalsoprevents
tire
dry
rot
andcorrosion.
KLlk
PEN
-
W'FeR
HOLE
I
i
HOLE
.
-
(;
3-
3
wHeeL
r
-.i;'
""
'"'
'
'
,
WHEELHUB
-
.
AG.20
.
-
'1-1
1
,
:q
:
.
ENGINE
t
r,
.,
,,
;.
.
+
br-
w-.
I
CARBURETOR
.
'"
'
.
+
,
,
.
.,
-
Your carburetor is not adjustabie. Engine performance
should not beaffectedat altitudes up to
2,134
meters. If
your engine does not operate properlydue
to
suspected
carburetor problems, take your snow throwm to
a
Sears
servlcecenter/department.
..
el
'
ENGlNE
SPEED.
I..
I
..~
-.
2%
Nevertamperwiththeenginegovernor,whichisfactoryset
for properenginespeed. Overspeedlngthe engineabove
the factory highspeed settingcan bedangerous and will
void the warranty. If you think the engine-governed high
speed needs adjudng,
contad
a
Sears service center1
department,which has the proper equipment
and
experi-
enceto make any necessatyadiustments.

Immedlatety prepare your snow thrower for storage at
Empty
the
fueltdnk
by
startingthe engineand
le$C:
theend of the season or if the unitwill not be usedfor
30
it
run
Clntil the fuellines and carburetorare empb
'
days or more.
,..
.
.
2
+
qv-j,
-
,
Never uee engimior barbuntor cleaner produ&hl
'
-
ltm
fueltank or permanentdamage may occur.
..
1-7
WARNING: Never store the snow
throwerwith gasolineInthetankinside
Usefreshfuelnext seasorr:e
a
a
buildingwhere fumee may reach an
&T€:
Fuelstabtlizerisanacceptablealternative in
mb
openflame, spark or pllot lightasona
imitingtheformationof fuel gum depositsduringstorage.
furnace, water heater,clothesdryer or
Addstabilizerto gasolineinfusltank or storagecontainer.
gasappliance. Allowtheenginetocool
Always follaw the mix ratiofound on stabilizer container.
beforestoring inany enclosure.
Run engine at least
10
minutes after adding stabilizer
to
I
allowthe stabilizer to reachthe carburetor. Do not empty
the gas tank and carburetor if usingfuel stabilizer.
ENGINE
OIL
.
-
Drainoil(withenginewarm) andreplacewithcleanBngine
oil. (See "ENGINE.
in4hel
,Maintenance section of
this
manual).
.(I
.
-
4
-
CYLINDER
X
.
._
4.
I
1.
Removespark plug.
I
t
,
2.
Pour oneounce
(29
ml)<of
bil
throughsparkplug
hob
intocylinder.
"'
,
,
uc
i?.
-
3:
Pullrecoilstad& handieslowly8fewtimestodistribute
,.*
L!-
'
!
'
,tCL
--**I
:jd
,.:I
UII.
:
4.
Replapyj~,~vysparkplug.
t"
OT'HER
'
6#
7,
.
.;is
Removesariignltlon'f&y'; stdie itina
$&
$a+
>:
st..
>I'
,
,
,
'
,
-
,
,
DOnot store gasolinefrom one ssasonto another.
ENGINE
;
-
--
-
I.
I
.
1-
-
-
.I
Replace our gasoline can
if
your cbn starts to
rust.
See engine manudl;~
:
.
...
.
,..&,
...
...
I
.
j:.f.
Rustan
dY
or dirt inyour gasolinewill cause problems.
FUEL SYSTEM
Ifpossible,storeyoursnow throwerindoorsandcover
it
to
protect itfrom dust and dirt.
IMPORTANT:
Itisimportantto preventgumdepositsfrom
.
,.
Cover
your
snow
thrower
with
a
suitable
pmtectiw
formingin essentialfuel system partssuch as carburetor
fuel
hose, or tank during storage,
AISO,
alcohol
blende&l-
'1
1
coverthatdoesnot retainmoisture.DOnot useplastia
fuels (called gasohol or using ethanol or methanol) can
,
Plasticcannot breathe, which allows condensation
to
attract moisturewhich leads to separation and formatior7 form and
will
cause your snow throwerto rust:
of acids during storage. Acidic gas can damage the fuel.
.
.,
IMPORTANT:
Nevercover snowthrowerwhilesagikexC
system of an engine while
in
storage, haustarea is still warm.

See
aaPrQ)~tWesectionInmanualunlessdirectedto a
SmiYrr
&milea
mflmant.
-
CAUSE
C0RRE;CPION
1.
Fuelshut-offvalve (if so
1.
Turn fuel shut-off
valve
to OPENposition.
equipped) inOFFpition.
2. Safety ignitionkey
2.
Insert
safety
mitionkey.
isnot inserted.
3.
Out of fuel.
3,
Fillfueltank with
fv;mh,
dam
gmdine.
4.
ThrottleinSTOPposition
4.
Movethrmleto
PAST
p68Mon
(or
ONDFFswitch is
OFF).
(or ONIOFF switch
ta
ON pmltion).
5. Choke
in
OFFpositi~n.
5.
Moveto
FULL
position.
6.
Primernotdepressed.
6.
Primeas instructedinthe Operation
s@Im
d
this maud
7. Engineisflooded. 7. Wait a few minutesbefore restar%'ng,DO NOTprime,
8.
Spark plugwire is
8.
Connectwire to spark plug.
disconneded,
9.
Badspark plug.
9.
Replacespark plug.
10.
Stalefuel.
10.
Emptyfuel tank
&
carburetor, refillwith fresh, clem@boEis
11.
Water infuel.
11.
Emptyfuel tank
&
carburetor, refillwith fresh, clean gawlir
Lossof power
1.
Spark plugwire loose.
2.
Throwingtoo much snow.
3.
Fueltank cap iscovered
with iceor snow.
4.
Dirtyor doggedmuffler.
1.
Reconnectspark plugwire.
2. Reducespeed and width of swath.
3.
Removeiceand snow on andaroundfueltank cap.
1
4.
Cleanor replacemuffler.
Engine idlesor
runsroughly
1.
Chokeisin FULLposition.
2.
Blockageinfuel Itne.
3.
Stale fuel.
4.
Waterinfuel.
5. Carburetorisinneedof
adjustment
~7
omrhaul.
1.
Movechoke to OFF position.
2.
Cleanfuel line.
3.
Emptyfuel tank
&
carburetor, refillwlth fresh, clean
gasdr
4.
Emptyfuel tank
&
carburetor, refillwith freeh, cleang$$oIi~
5. Contact aSearsservicecenterldepartment.
ExtxmsIve
1.
Lomeparkordamaged
1.
Tighten allfasteners. Replacedamagdparts.
If
vibratiof
vlbtation
augerscrr impeller. remains, contacta Sears service center/department.
Recoilstarter
Lossof traction
drlve
/
slowing
of drive speed
1.
Frozenrecoilstarter.
1.
See "IF RECOILSTARTER
HAS
FROZENn
inthe Opefationsectionof
Ws
manual.
1.
Drivebeltisworn.
1.
Check
/
replacedrive belt.
2.
Drivebelt isoff of pulley.
2.
Check
/
reinstalldrive belt.
3.
Frictiondrivewheel isworn.
3.
Contact a Sears servicecenter/department.
Auger beltisoff of pulley.
1.
Check
/
reinstallauger belt.
Auger belt isworn.
2.
Check
/
replaceauger belt.
3.
Cloggeddischargechute.
3.
Clean snow chute.
Augers
/
impellerjammed.
4.
Removedebris or foreign objectfrom augers
/
impeller.


