Cranborne Audio N22H User manual
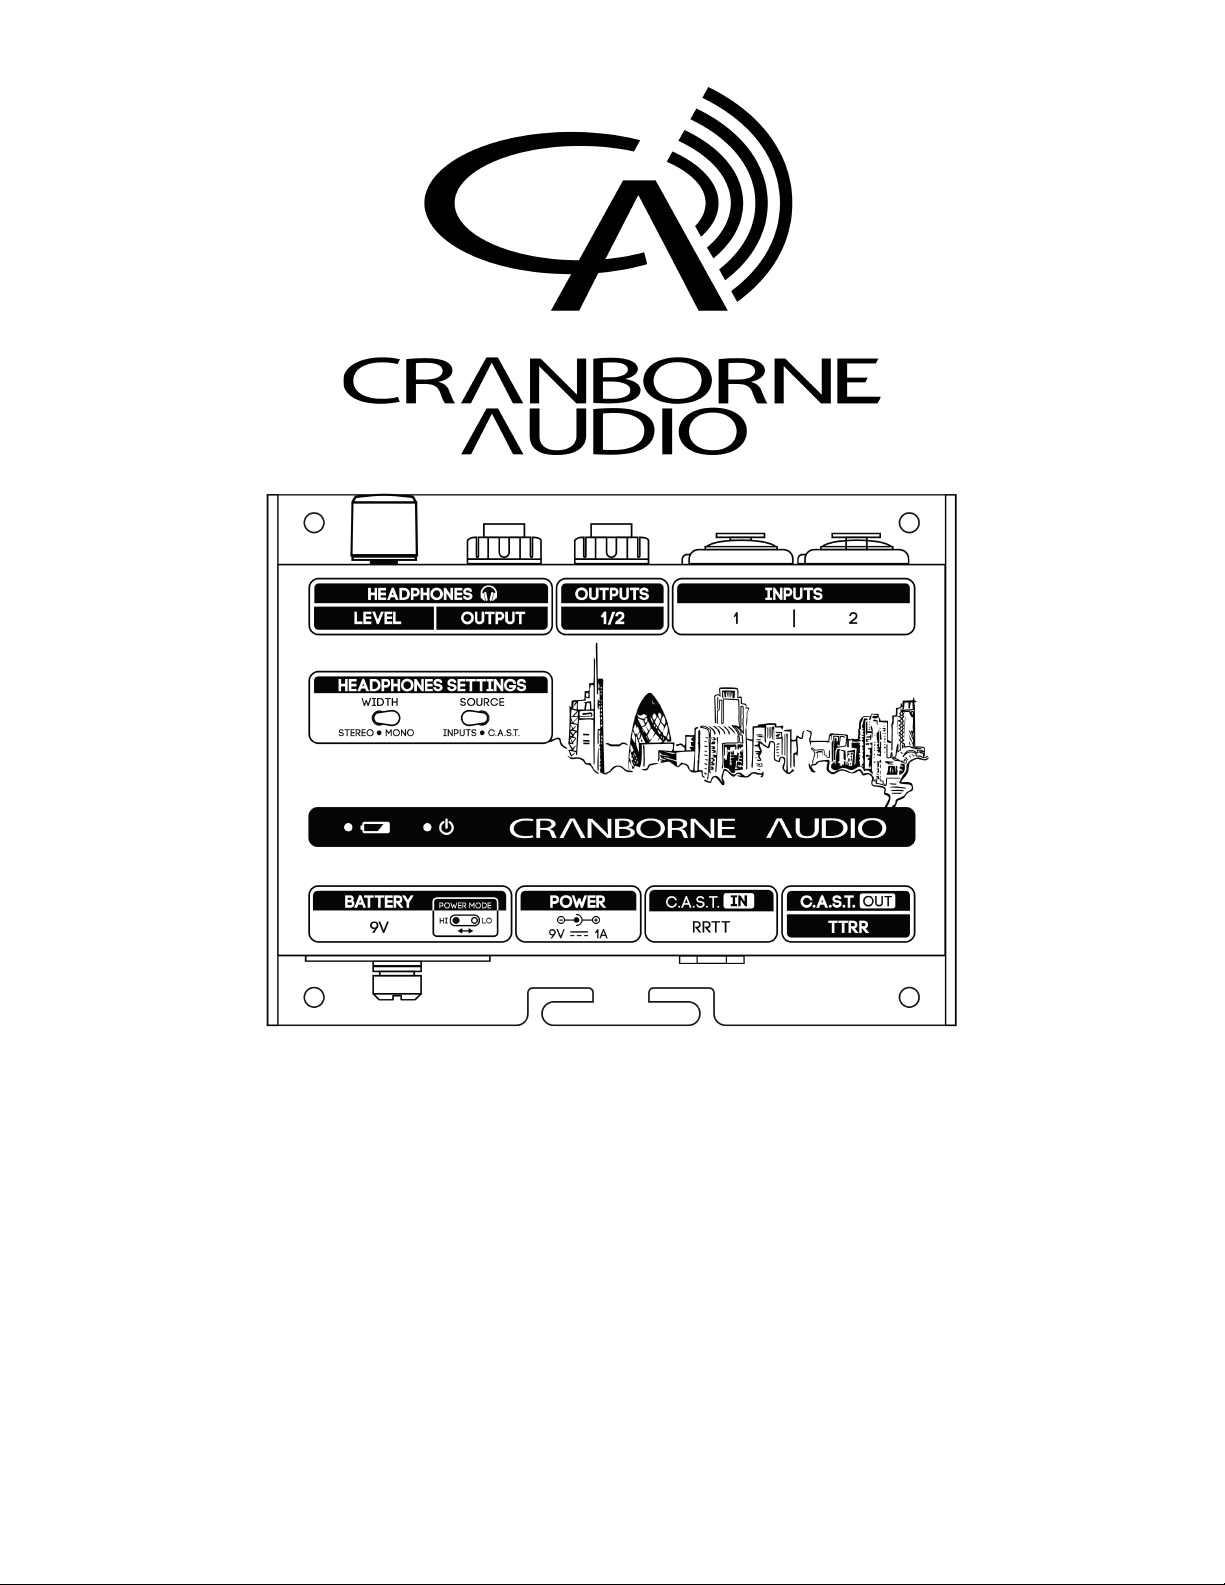
N22H - Reference-Grade Headphone Amplifier, Cat
5 Snake, and C.A.S.T. Breakout Box.
User Manual

Welcome to the family
Cranborne Audio represents a commitment by four product designers to build an audio brand
that does things the right way. We don’t take shortcuts. We don’t compromise. We don’t accept
“good enough.”
We’re just like you. We’re musicians. We’re audio engineers.
We make products that we want to use. We create, innovate, and design with passion, purpose,
and belief. We strive to design products that remain accessible, whilst offering the highest quality
and truly innovative new ways of working and achieving that sound that we all desire.
Cranborne Audio, for us, means so much more than metal boxes with components in them.
These are our labours of love that embody and demonstrate our demand for excellence. By
distilling what matters and putting our soul into these tools, we hope to help other people make
magic and express themselves, and in some way, become part of our Cranborne Audio family.
So welcome to the family. We care for our family. And we care about making your tracks, albums,
scores sound as good as they should.

Cranborne Audio N22H
Congratulations on your purchase of N22H and thank you for selecting Cranborne Audio to be a
part of your music creation process.
There is a lot of innovative technology packed into this unassuming little box! Not only is it a
powerful, reference-grade headphone amplifier based on the same design as our 500R8 and
500ADAT interfaces, it’s also a gateway to our powerful C.A.S.T. system that simplifies and expands
the headphone monitoring capabilities of your studio.
Headphone amplifiers are often overlooked. Many of us engineers are willing to invest significant
amounts of money on the latest and greatest headphones in the hope that it could be the silver
bullet to more accurate monitoring. However, all too often, it is the headphone amplifier itself that
fails to deliver. That inability to drive ‘those’ headphones properly, will only leave you wondering,
‘what’s missing?’.
When we designed the headphone amplifier in our flagship 500R8, we quickly realised that we
had something special. It’s low distortion, high power, and frequency linear performance ‘lifted
the veil’ on any set of headphones we used with it - our customers agreed.
Whether tracking with high-impedance, over-ear headphones or low-impedance, in-ear monitors,
N22H delivers maximum performance with a flick of a switch between high and low power
modes.
For maximum flexibility, your N22H can be powered in multiple ways with the included 9V DC
power supply or any guitar pedal power supply. Optionally, a 9 volt battery will provide up to 10
hours of operation during location recording.
It doesn’t stop there. We built our C.A.S.T. system into N22H to allow it to be positioned anywhere
in your recording space using a single, shielded Cat 5e, Cat 6, or Cat 7 cable. With a range of
330ft/100m, your N22H serves as the ideal solution for convenient headphone distribution, or as a
connectivity hub for mic/line sources as an all-analogue, Cat 5e snake.
N22H is the perfect tool for those who are building their studio around Cranborne Audio products
and need an unmatched audio distribution system in their studio and It’s ideal for those looking
to get a bit of Cranborne Audio’s renowned sound into their recording workflow in the form of a
reference-quality headphone amplifier. N22H packs a powerful feature set, and the highest
quality sound for a price you may not expect. For us, it’s the perfect reflection of everything a
Cranborne Audio product should be.
We hope you enjoy using it!

Contents
Getting started 6
Controls and Connectors 6
Package Contents 7
Power Supply 7
Powering Procedures 8
Power Supply 8
Battery 8
Using Simultaneous Battery and External Power Supply 9
Hardware Setup: Standalone Mode 10
Hardware Setup: C.A.S.T. 11
Feature Overview 12
Headphones Level Control [1] 12
Headphones Output [2] 12
Outputs [3] 13
Inputs [4] 14
Width Switch [5] 15
Source Switch [6] 15
C.A.S.T. 15
INPUTS 15
Battery Low Indicator [7] 16
Power Indicator [8] 16
Power Mode Switch [10] 17
Low Power Mode 17
High Power Mode 17
Changing Power Modes 17
C.A.S.T 19
Cable Requirements 19
C.A.S.T. Wiring 20
C.A.S.T. Warnings 21
Using C.A.S.T. with 48v Phantom Power 22
Application Guides 24
Standalone Reference-Grade Headphone Amplifier 24
Using N22H with Camden EC2 26
Remote Monitoring With N22H and N22 28
Daisy Chaining N22H 29
Real-World N22H Battery Life Tests 30
Audio Technica ATH-M50x (38Ω) 30
Shure SE215 (17Ω) 30

Battery Performance 30
Technical Specifications 31
Safety Information 33
General Safety 33
Power Safety 33
CE Certification 34
FCC Certification 34
RoHS Notice 34
Instructions for disposal of WEEE by end users in the European Union 34
Electromagnetic Compatibility 34
Environmental 34
Warning:
N22H’s Headphone Output is extremely loud! Prolonged exposure to loud music can
cause permanent hearing loss. Please exercise caution when using N22H and reduce
the Headphones Level Control [1] when listening for long periods of time.

Getting started
Controls and Connectors
[1] Headphones Level Control: Adjusts the volume of the
headphones output.
[8] Power Indicator: Lights Blue when N22H is Powered
On via battery or mains power.
[2] Headphones Output: Used for connecting headphones
to N22H. When using battery power, N22H automatically
powers on when headphones are connected to this ¼” jack.
[9] Battery Cover/Battery Compartment: Removable
cover for the 9V battery compartment and Power Mode
switch. Note: Only 9V batteries should be used.
[3] Outputs: Balanced, TRS outputs of the C.A.S.T. RR paths.
These Outputs are passive and do not require power to
operate.
[10] Power Mode Switch: Switches the headphone
output between Low and High Power modes.
Note: Only switch Power Modes when N22H is
Powered Off.
[4] Inputs: Combi jack inputs for connecting audio to the
C.A.S.T. TT paths. Also used for connecting stereo playback
during standalone operation. These analogue Inputs send
audio into the C.A.S.T. TT ports passively and do not require
power to operate.
[11] Power Inlet: Powers N22H’s headphone output
using the supplied 9V DC power supply. Battery is
disconnected internally when a DC supply is being used.
Note: When power inlet is used, N22H stays Powered
On.
[5] Width Switch: Adjusts the Width of the headphones
output between true Stereo or Mono.
[12] C.A.S.T. IN: Used to connect N22H to the C.A.S.T.
Output of another C.A.S.T.-enabled device.
Note: The C.A.S.T. IN port is covered using a Cat5
plug. Only remove this plug when N22H is to be used
with a C.A.S.T. OUT of another device.
[6] Source Switch: Selects the input source of N22H’s
headphone amplifier between the C.A.S.T. connections
[12/13] and Inputs 1-2 [4] for standalone operation.
[13] C.A.S.T. OUT: Used to connect N22H to the C.A.S.T.
IN of another C.A.S.T.-enabled device.
[7] Battery Low Indicator: Lights Red when internal power
drops below 6.8v.
Note: Duration between LED lighting Red and unit
powering off will vary from battery to battery and
headphones being used.
[14] Mic Stand Mount [Underside of N22H]:⅜” thread
mount used to fix N22H onto a mic stand or bracket.
Note: For mic stands with a larger thread, a 5/8"
male to 3/8" female screw thread adapter should be
used.

Package Contents
So now your N22H is out of it’s packaging, you’re probably itching to get it powered on and
making music! Before you get started, please read the sections below that will help guide you
through the process of getting your N22H setup, plugged in, and ready-to-use as quickly as
possible!
The following items can be found in the packaging alongside N22H:
- 9v DC power adapter - (Located in compartment below N22H)
- Quickstart Guide
Power Supply
The power adapter supplied with N22H is a 9v,DC,
500mA power supply with a centre-negative,2.1mm
barrel fitted on the end. This supply is the same type of
supply that is used to power many popular guitar pedals
and pedalboards such including isolated multi-output
power supplies, or inline daisy chain adapters.
Using 3rd party power supplies with N22H is supported
provided the supply is of the correct specification. We
recommend a supply with between 500mA and 1A of
available current.
Note:
Please only use the supplied power supply or
one that has the same power specifications.
Damage caused using an improper PSU with
incorrect polarity or voltage is not covered
under warranty.

Powering Procedures
Power Supply
Powering On - First, make sure any headphones are disconnected from N22H and the
Headphones Level Control [1] is reduced to minimum. Locate the 2.1mm barrel connector
on the end of the included 9v DC power supply and connect that to the Power Inlet [11].
Then, connect the plug of the power adapter to the socket on the wall.
N22H powers up automatically when the correct power requirements are detected at its
Power Inlet [11]. N22H is now ready for use and you may connect your headphones.
Powering Off - First, make sure any headphones are disconnected from N22H and the
Headphones Level Control [1] is reduced to minimum. Then disconnect the power supply
from the wall or switch off the power supply to your N22H.
Battery
Powering On - First, make sure any headphones are disconnected from N22H and the
Headphones Level Control [1] is reduced to minimum. Remove the Battery Cover [9] by
twisting the spring-loaded thumb screw anticlockwise and remove the cover to reveal the
9v battery fly lead. Carefully connect the Battery terminals to the push-fit battery
connector, tuck the loose leads back inside N22H, and locate the battery into the cavity.
Once the battery is secure and the fly lead is hidden away in N22H, refit the Battery Cover
[9] and tighten the thumb screw.
Note:
Please be careful when pulling on the battery fly lead when fitting the battery.
Excessive force on the connector could damage the wires of the connector or
PCB. When installing the battery, please ensure that the terminals are the
correct way around before push-fitting the battery. Attempting to connect the
wrong polarity could cause irreparable damage to N22H and is not covered
under warranty.
Lastly, connect your headphones to N22H’s Headphone Output [2] and N22H will power up
automatically. N22H is now ready for use.
Powering Off - First, make sure the Headphones Level Control [1] is reduced to minimum.
Carefully remove your headphones from the Headphone Output [2] and N22H will switch
off automatically when the headphone jack is removed.
Note:
Please follow the safe sequences above carefully in order to prevent any
unwanted pops or power spikes causing damage to N22H or downstream audio
components including speakers and headphones. Damage caused as a result of
incorrect procedures is not covered under warranty.

Using Simultaneous Battery and External Power Supply
Both the battery and external power supply can be connected to N22H at the same time without
causing any damage to the internal circuitry - just like a guitar pedal. The Power Inlet [11] takes
priority when connected to the mains and the internal battery will not drain when mains power is
connected.
If you’re operating with both Battery and External power supplies connected, when the Power
Inlet [11] is removed, N22H will default back to Battery power seamlessly without any drop out of
audio. The Power Inlet can then be reconnected and N22H will switch back to using external
power without any drop out of audio.
Note:
N22H does not support trickle-charging of rechargeable 9v batteries when installed.
Rechargeable batteries will need to be removed in order to be charged.
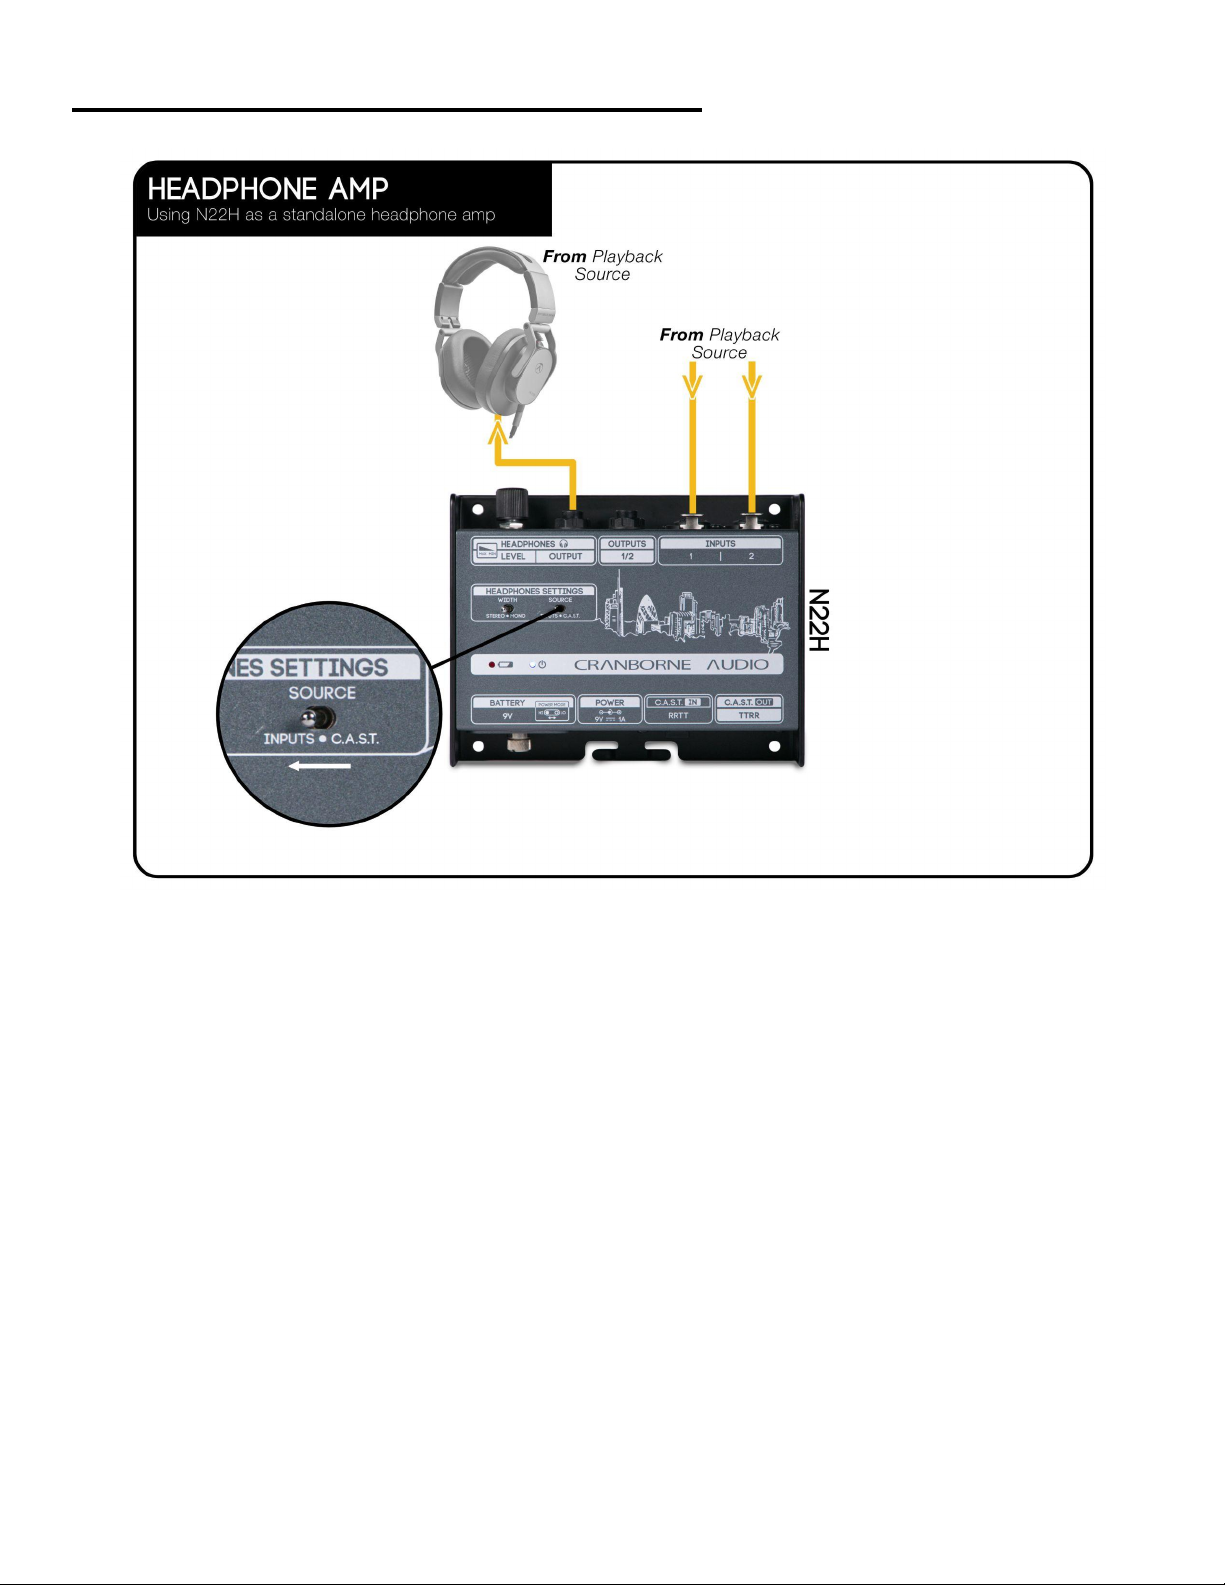
Hardware Setup: Standalone Mode
This hardware setup diagram will get N22H configured as a standalone, reference-quality
headphone amplifier for use with audio interfaces, mixers, and other line-level sources.
1) Connect your stereo playback source from an audio interface or similar into N22H’s combi
jack inputs [4].
i) For best performance, ensure that the playback source is a line-level output from an
audio interface or preamp.
2) Select the ‘Inputs’ option using the Source Switch [6].
3) Connect headphones to N22H’s Headphones Output [2].
i) If using battery power, the unit will power on automatically when headphones are
connected.
ii) If using mains power, N22H will power on automatically when power is detected.
Once connected, stereo line sources passed into N22H’s inputs will be sent directly through to the
headphone amplifier for reference-grade monitoring. Adjust Headphone Level [1] to taste.
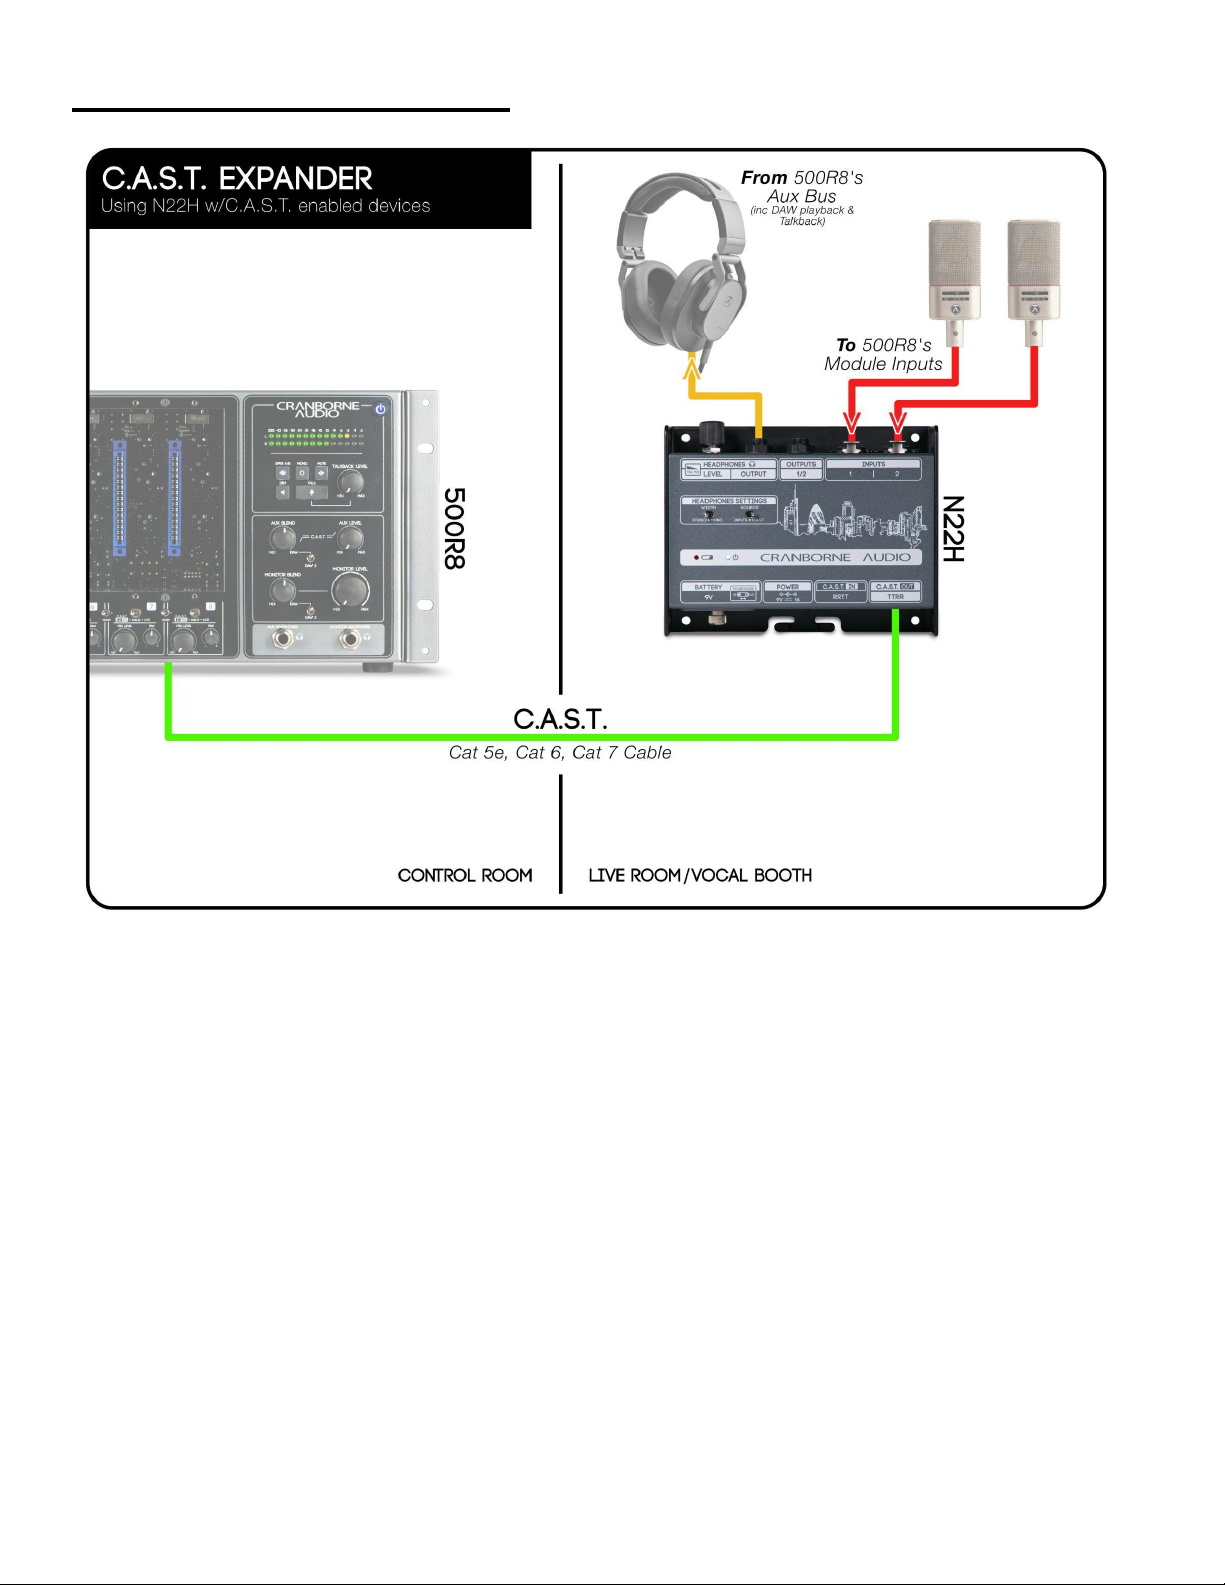
Hardware Setup: C.A.S.T.
This hardware setup diagram will get N22H connected within a C.A.S.T.-enabled system.
1) Connect N22H’s C.A.S.T. Output [13] to the C.A.S.T. Input of another C.A.S.T.-enabled device
using shielded Cat 5e, Cat 6, or Cat 7 cable.
2) Connect balanced Mic/Line sources to the combi jack inputs [4] of N22H.
3) Select the ‘C.A.S.T.’ input option using the Source Switch [6].
4) Connect headphones to N22H’s Headphone Output [2].
i) If using battery power, N22H will power on automatically when headphones are
connected.
ii) If using mains power, N22H will power on automatically when power is detected.
Once connected, Mic/Line sources connected to N22H will travel through the C.A.S.T. connection
and arrive at the inputs of the device for processing, whilst the mix created on the other C.A.S.T.
device arrives at N22H’s Headphone Output [2] for monitoring. Adjust the Headphone Level [1] to
taste.

Feature Overview
Headphones Level Control [1]
The Headphones Level Control [1] controls the overall level
of N22H’s Headphones Output. The level control features a
steep curve that prevents gain bunching with high or low
sensitivity headphones and allows for maximum
resolution across the range of the pot’s travel.
Warning:
N22H’s Headphone Output is extremely
loud! Prolonged exposure to loud music
can cause permanent hearing loss. Please
exercise caution when using N22H and
reduce the Headphones Level Control [1] when listening for long periods of time.
Headphones Output [2]
The Headphones Output [2] is used for connecting headphones to N22H’s headphone amplifier.
The connection is made by a ¼” TRS connector that is found on popular professional and
prosumer headphones. For consumer headphones or earbuds with smaller ⅛” connectors, you
can connect a suitable adapter to convert the ⅛” jack to a larger ¼” jack.
Splitters and headphone extenders can be used with N22H but please exercise caution when
connecting them to N22H as Improper connections can cause damage to the unit or degrade
N22H’s headphone performance.
Note:
Do not connect unbalanced ¼” TS cables such as guitar cables to N22H’s Headphones
Output. These connections could short the leg to ground and cause a spike in power
consumption. Any damage caused to the unit as a result of unsupported connections
is not covered under the Cranborne Audio warranty.

Outputs [3]
The Outputs [3] are TRS outputs that are used when
N22H is connected via C.A.S.T. These outputs receive
signal from the device connected at the other end of the
C.A.S.T. system.
N22H’s Outputs are always patched to the RR Input paths
of the C.A.S.T. connectors for remote patching and other
operations with C.A.S.T. enabled devices. They also work
passively and so do not require N22H to be powered on to
operate.
When the Source Switch [6] is set to ‘C.A.S.T.’, both the
headphone amplifier and Outputs [3] of N22H receive the
same signal from the C.A.S.T. system.
In the above diagram, the C.A.S.T. Output [14] of N22H is connected to the C.A.S.T. Input of an N22
using a shielded Cat 5e, Cat 6, or Cat 7 cable.
Audio connected to the inputs of N22 (or any other C.A.S.T. device) will arrive at N22H’s Outputs [3]
recording or patching elsewhere. N22H’s Outputs can accept balanced mic/line signals as well as
unbalanced line signals.

Inputs [4]
The Inputs [4] on N22H are used to connect audio from
an external device into the C.A.S.T. system or directly into
N22H’s headphone amplifier during standalone operation
(when the Source Switch [6] is set to ‘Inputs’).
Devices connected to N22H’s Inputs are always patched
to the TT Output paths of the C.A.S.T. connectors for
connectivity with other C.A.S.T.-enabled devices. The
Inputs on N22H send into the C.A.S.T. system passively
and do not require N22H to be powered on to operate.
N22H’s Inputs accept balanced mic/line signals as well as
unbalanced line signals from external devices. It can also safely pass 48v Phantom Power
depending on the devices used in the system. “Using C.A.S.T. with 48v Phantom Power”
In the above diagram, the C.A.S.T. Output [14] of N22H is connected to the C.A.S.T. Input of an N22
using a shielded Cat 5e, Cat 6, or Cat 7 cable. Audio connected to the Inputs [4] of N22H (or any
other C.A.S.T. device) will arrive at the connected N22’s Outputs recording or patching elsewhere.
N22H’s Inputs can accept balanced mic/line signals as well as unbalanced line signals.

Width Switch [5]
The Width Switch [5] toggles the stereo image of the
Headphones Output between true Stereo and a Mono
sum. This is useful for checking a mix for mono
compatibility during mixing, or when recording musicians
who prefer listening to a single headphone/earphone.
The Width Switch [5] only affects the Headphones Output
[2] and not the physical outputs of N22H.
Tip:
Switching the Headphones Output to Mono
could be desirable if the performer prefers to
only listen to one headphone/earphone when
they are performing. For example, many singers prefer to only monitor through a
single headphone/earphone so that they can better intonate during recording.
Switching to Mono ensures that they will hear all of the stereo information through a
single earphone.
Source Switch [6]
The Source Switch [6] determines the audio source for N22H’s Headphone Amplifier for C.A.S.T.
operation or standalone operation (when set to ‘Inputs’).
C.A.S.T.
The Source Switch [6] should be set to C.A.S.T. when N22H is being used as part of a C.A.S.T.
system. In this mode, the headphone amplifier will receive the audio signal incoming from C.A.S.T.
For example, if N22H’s C.A.S.T. Output [13] is connected to a C.A.S.T. Input of a Cranborne Audio
500R8, N22H’s headphone amplifier will monitor the Aux Mix and Talkback generated from the
connected 500R8.
INPUTS
The Source Switch [6] should be set to Inputs when N22H is being used as a standalone
headphone amplifier without C.A.S.T. In this mode, the headphone amplifier will receive the audio
signal incoming from the Inputs [4] of N22H.
For example, if N22H’s Inputs are connected to a line-level output source such as a keyboard,
mixer, or audio interface, switching the Source Switch [6] to Inputs allows the user to monitor
those line sources directly.
Tip:
The Source Switch [6] can be used to toggle between two different input sources
connected to N22H at the same time. In a live application, if N22H’s Inputs [4] are
connected to the outputs of a keyboard and the C.A.S.T. Output is connected to an N22
and mixer downstream, the performer can monitor their own IEM monitor mix from
C.A.S.T. or monitor the keyboard’s output directly using the Source Switch.
Battery Low Indicator [7]
The Battery Low indicator [7] offers a visual indication of
internal operating voltage. The LED lights up red when
the internal voltage drops below 6.8v.
With some batteries, it is possible that the LED may
flicker when the voltage is on the 6.8v threshold.
The Battery Low Indicator can also light up when N22H is
powered by an external 9v power source via the Power
Inlet [11] and the voltage requirements of the connected
headphones are too great. In these circumstances,
reducing the volume will prevent the power rails
dropping and improve sonic performance.
Note:
Actual remaining battery performance once the Battery Low Indicator is lit up may
vary depending on the battery type being used and its voltage performance. Some 9v
batteries can drop quickly below 6.8v and remain in use for a long time, whilst others
can stay above 6.8v for extended periods and then drop suddenly. Please see our
”Real World Battery Tests” for more information on real-world battery tests.
Power Indicator [8]
The Power Indicator [8] lights Blue when N22H is Powered On and ready for use.
When N22H is powered via an external power source via the Power Inlet [11], the Power Indicator
will light up indicating N22H is Powered On until the Power supply is switched off.
When N22H is powered via an internal 9v Battery, the Power Indicator will light up Blue indicating
N22H is Powered On only when headphones are inserted into the Headphones Output [2]. The
Power Indicator will turn off when headphones are removed from the Headphones Output.

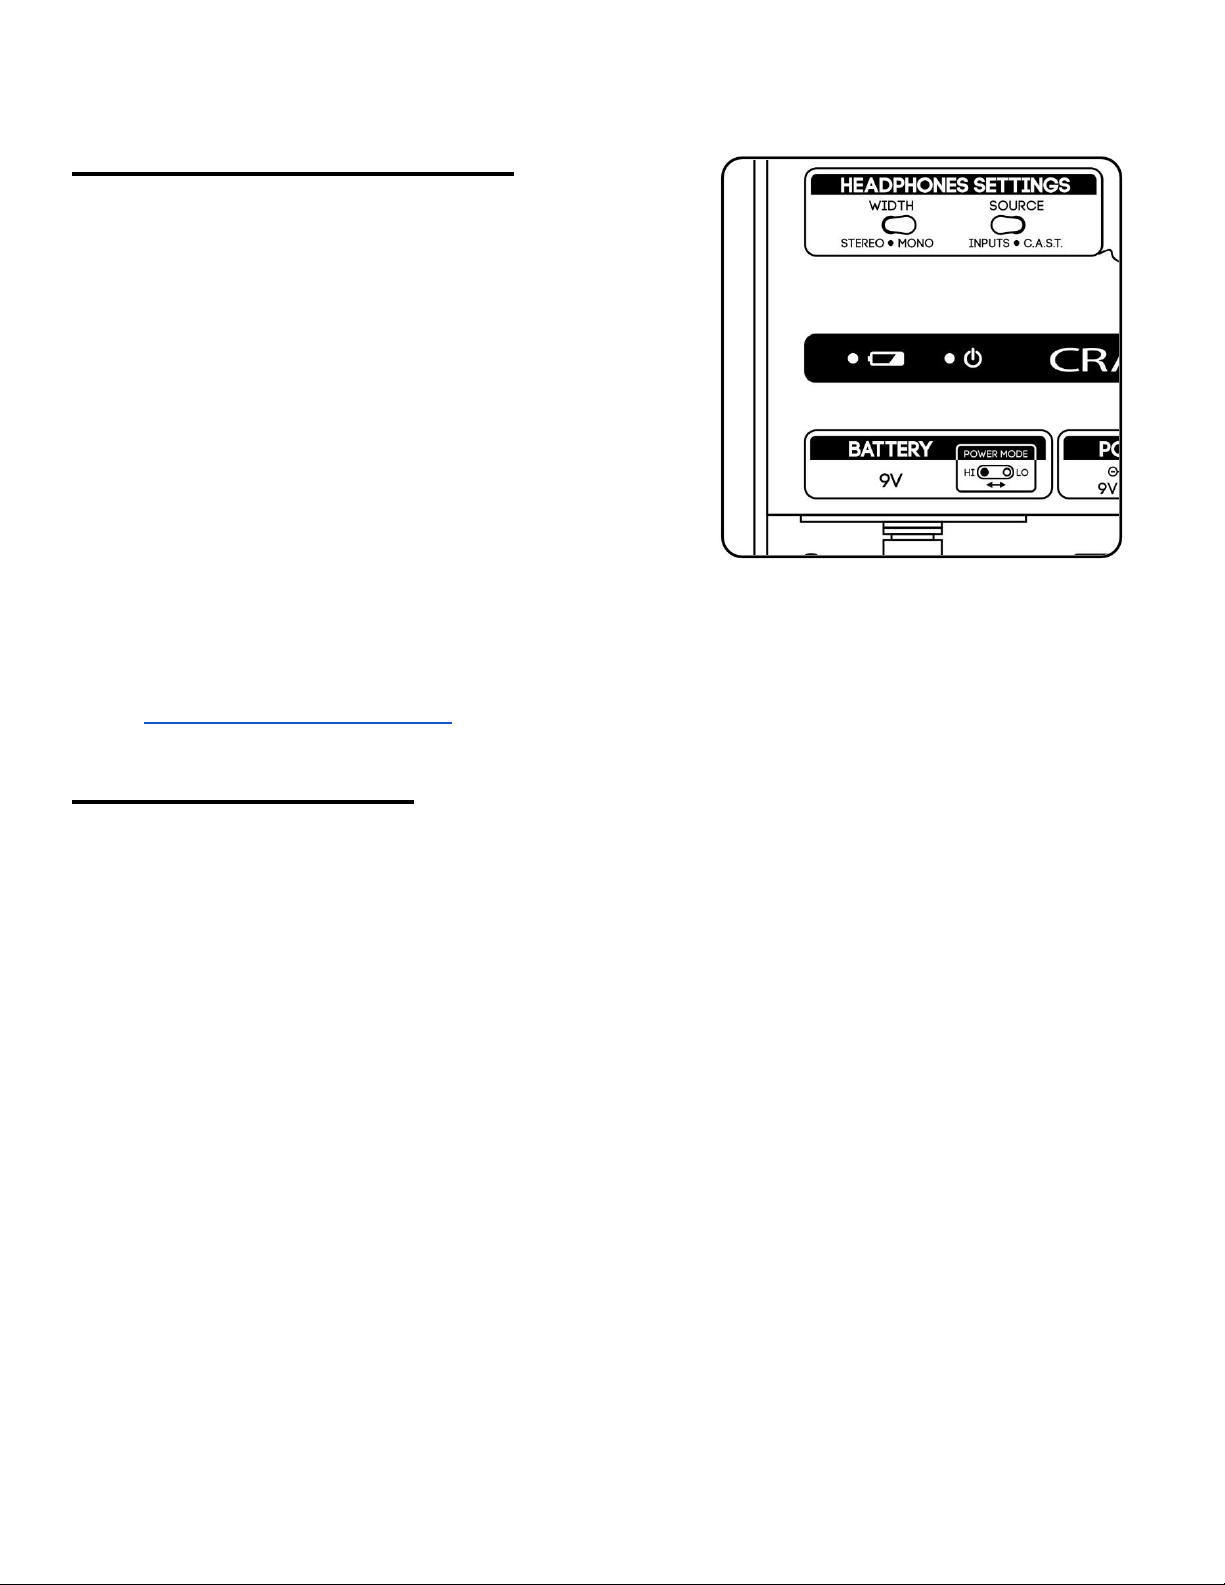
Power Mode Switch [10]
The Power Mode Switch [10] is accessible from underneath the Battery Compartment [9] and
toggles the internal Power Mode of N22H’s headphone amplifier between Maximum
Performance (High Power Mode) and Maximum Battery Life (Low Power Mode). Each power
mode also offers specific optimisations between best performance for high-impedance
headphones and low-impedance headphones.
Low Power Mode
Low Power Mode optimises N22H to achieve the longest
battery life and optimum volume range when using
low-impedance headphones and earphones. When
engaged, N22H’s current consumption is approximately
30mA idle (80mA peak) and you can achieve ~8+ hours of
battery life.
High Power Mode
High Power Mode optimises N22H to achieve the highest
headroom and maximum volume when using
high-impedance headphones and earphones. When
engaged, N22H’s current consumption is approximately
110mA idle (390mA peak) and you can achieve ~2 hours of
battery life.
Note:
Actual battery life will vary depending on battery type being used, headphone
impedance/sensitivity, source material and it’s frequency content, as well as overall
headphone volume.
Changing Power Modes
First, make sure any headphones are disconnected from N22H, the Headphones Level Control [1]
is reduced to minimum, and the Power Inlet [11] is disconnected.
Remove the Battery Cover [9] by twisting the spring-loaded thumb screw anticlockwise and
remove the cover. Use a fingernail, guitar pick, or the botched edge of the battery cover to move
the Power Mode switch to the correct position. Once the desired Power Mode is selected, ensure
the Battery wires are hidden away inside N22H, refit the Battery Cover and tighten the thumb
screw.
Warning:
Do not change the Power Mode whilst N22H is Powered On and in use. Please
follow the safe sequences above carefully in order to prevent any unwanted
pops or power spikes causing damage to N22H or downstream audio
components including speakers and headphones. Any damage caused to the
unit as a result of unsupported procedures is not covered under the Cranborne
Audio warranty.

Power Inlet [11]
The Power Inlet [11] on N22H is required to power N22H from the mains when battery power is not
required. N22H can be powered using the supplied power adapter, or any compatible 3rd party
power source commonly used for guitar pedals including multi-output isolated supplies.
Power Requirements - 9v, DC, 500mA (min), 2.1mm barrel
connector, centre-negative polarity.
C.A.S.T. Input [12]
The C.A.S.T. Input [12] is used to connect N22H to the
C.A.S.T. Output of another C.A.S.T.-enabled device.
The single C.A.S.T. connector transports 4 channels of
balanced analogue audio in both directions (2-In, 2-Out)
and each path is labelled as either a ‘Receive’ path (for
signals received by N22H) or ‘Transmit’ path (for signals
transmitted from N22H).
Note:
The C.A.S.T. Input [12] comes shipping with a
plastic RJ45 blocker to ensure that it is not
accidentally connected to the common C.A.S.T.
Input on 500R8 and 500ADAT rack. This blocker
should only be removed when N22H is to be
connected to another device’s C.A.S.T. Output.
C.A.S.T. Input (RRTT)
Receive (R)
Receive (R)
Transmit (T)
Transmit (T)
To Output 1
To HP Output L
To Output 2
HP Output R
From Input 1
From Input 2
C.A.S.T. Output [13]
The C.A.S.T. Output [13] is used to connect N22H to the C.A.S.T. Input of another C.A.S.T.-enabled
device.
The single C.A.S.T. connector transports 4 channels of balanced analogue audio in both directions
(2-In, 2-Out) and each path is labelled as either a ‘Receive’ path (for signals received by N22H) or
‘Transmit’ path (for signals transmitted from N22H).
C.A.S.T. Input (RRTT)
Transmit (T)
Transmit (T)
Receive (R)
Receive (R)
From Input 1
From Input 2
To Output 1
To HP Output L
To Output 2
HP Output R
C.A.S.T
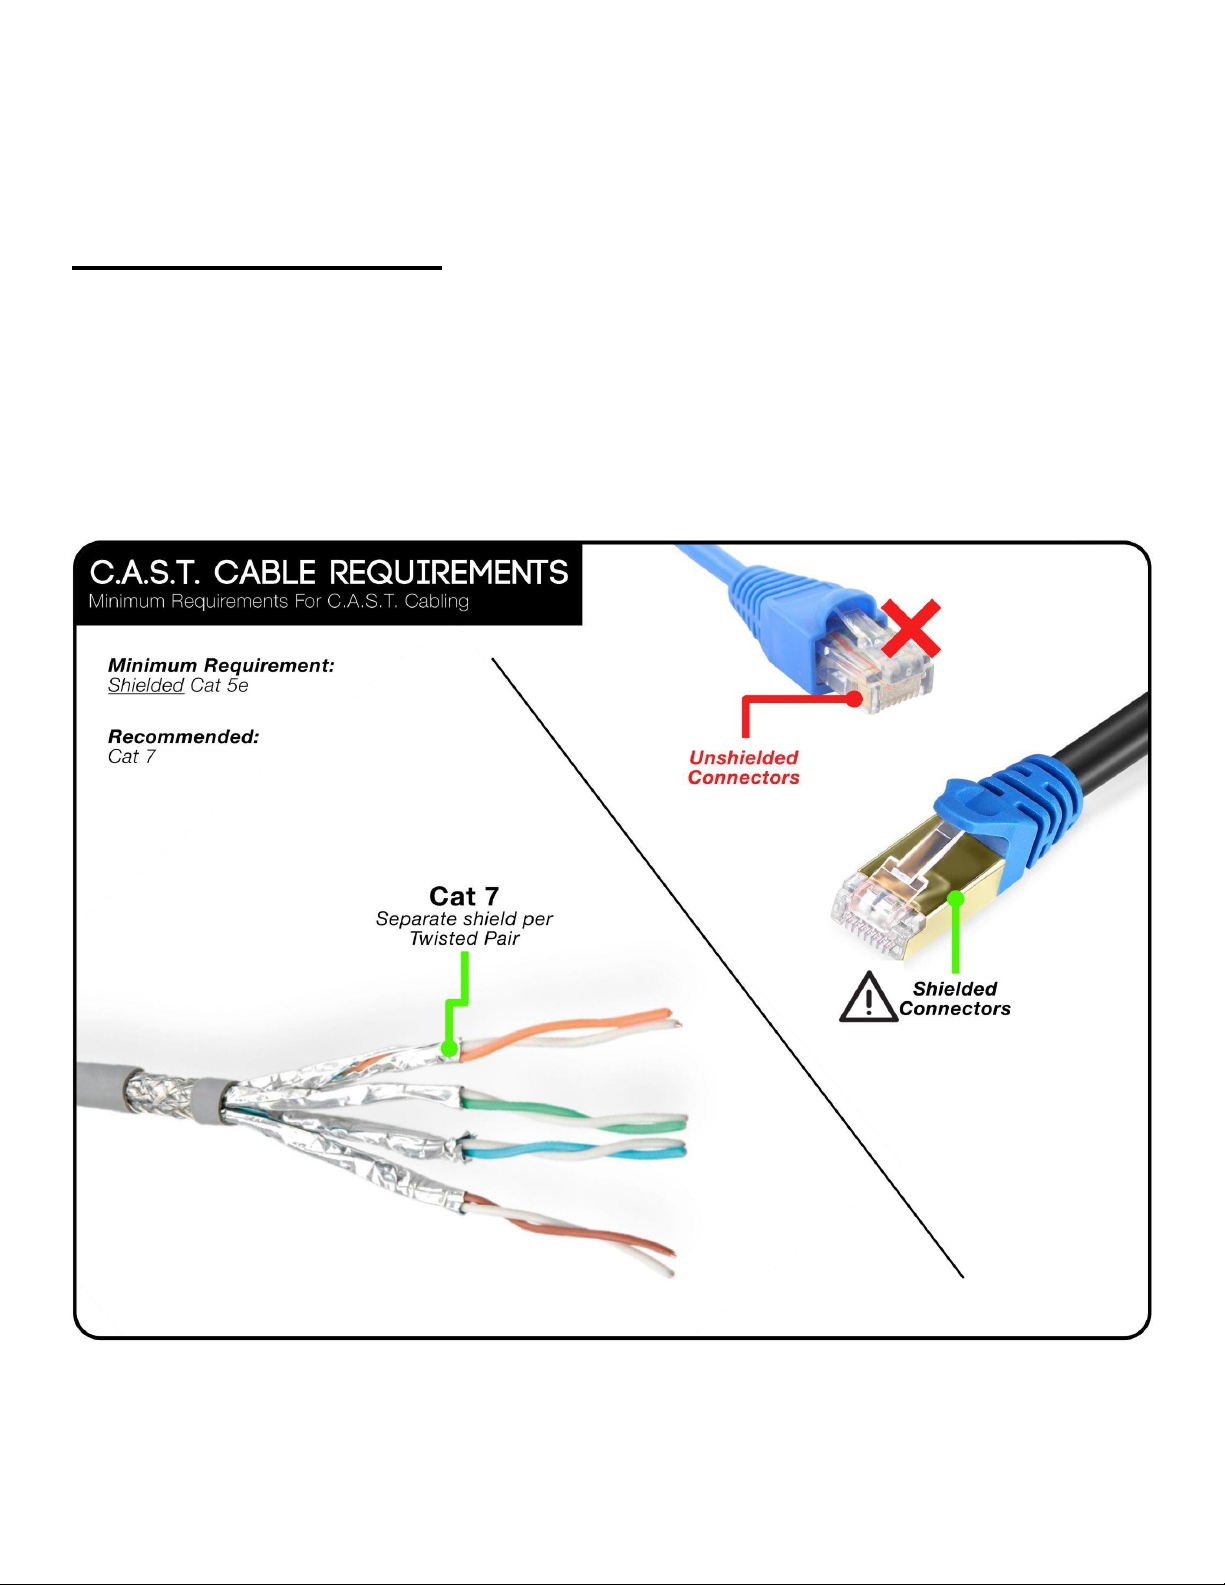
Cable Requirements
C.A.S.T. is a system that we use to transport balanced, analogue audio using standard network
cabling. Using a shielded Cat 5e, Cat 6, or Cat 7 cable instead of 4 XLRs allows you to not only
reduce cable spaghetti in your studio but also distribute audio around studios or stages using
affordable, readily available cabling whilst achieving the highest sonic results
Each C.A.S.T. connection on a Cranborne Audio product features unique optimisation to ensure
that the maximum signal integrity is transmitted over shielded Cat 5, Cat 6, and Cat 7 cables for
distances of up to 100m(330ft) without high-end roll-off and with very low-crosstalk.
Recommendation - For best possible performance over maximum distances, we
recommend using Cat 7 cables with robust connectors to ensure that the C.A.S.T.
connection is secure and will remain impervious to RF and crosstalk.
Minimum Requirement - As a minimum requirement, you can consider using Shielded Cat
5e or Cat 6 cabling provided that the cables and connectors themselves are fully shielded
and are not needed at distances above 20m.
Note:
Many Cat 7 cables are marketed as Cat 7 but feature plastic connectors on
either end. In order for C.A.S.T. to work correctly, the cable as well as the
connectors themselves need to be shielded. Cables with incorrect shielding will
not perform as expected and 48v Phantom Power will not pass through
correctly. Any damage caused to the unit as a result of unsupported cabling is
not covered under the Cranborne Audio warranty.
C.A.S.T. Wiring
Below is the wiring table that is used in both TTRR Output and RRTT Input paths of C.A.S.T.
Using this diagram, you are able to create your own C.A.S.T devices if desired.
TTRR
RRTT
Pin
Signal
Pin
Signal
1
C.A.S.T. IN 1-
1
C.A.S.T. OUT 1-
2
C.A.S.T. IN 1+
2
C.A.S.T. OUT 1+
3
C.A.S.T. IN 2-
3
C.A.S.T. OUT 2-
4
C.A.S.T. OUT 1-
4
C.A.S.T. IN1-
5
C.A.S.T. OUT 1+
5
C.A.S.T. IN 1+
6
C.A.S.T IN 2+
6
C.A.S.T. OUT 2+
7
C.A.S.T. OUT 2-
7
C.A.S.T. IN 2-
8
C.A.S.T. OUT 2+
8
C.A.S.T. IN 2+
Note:
Any equipment designed by users or 3rd parties that supports C.A.S.T. that has not
had our direct involvement cannot be guaranteed to work to our exacting
specifications and could suffer a loss in signal quality. Any damage caused to the unit
as a result of unsupported cabling made by the user is not covered under the
Cranborne Audio warranty.
Other manuals for N22H
1
Table of contents


