Craycle Hobby Ranger Sport User manual
© 2022 Craycle Hobby. Copies allowed for personal use only. Not for commercial use.
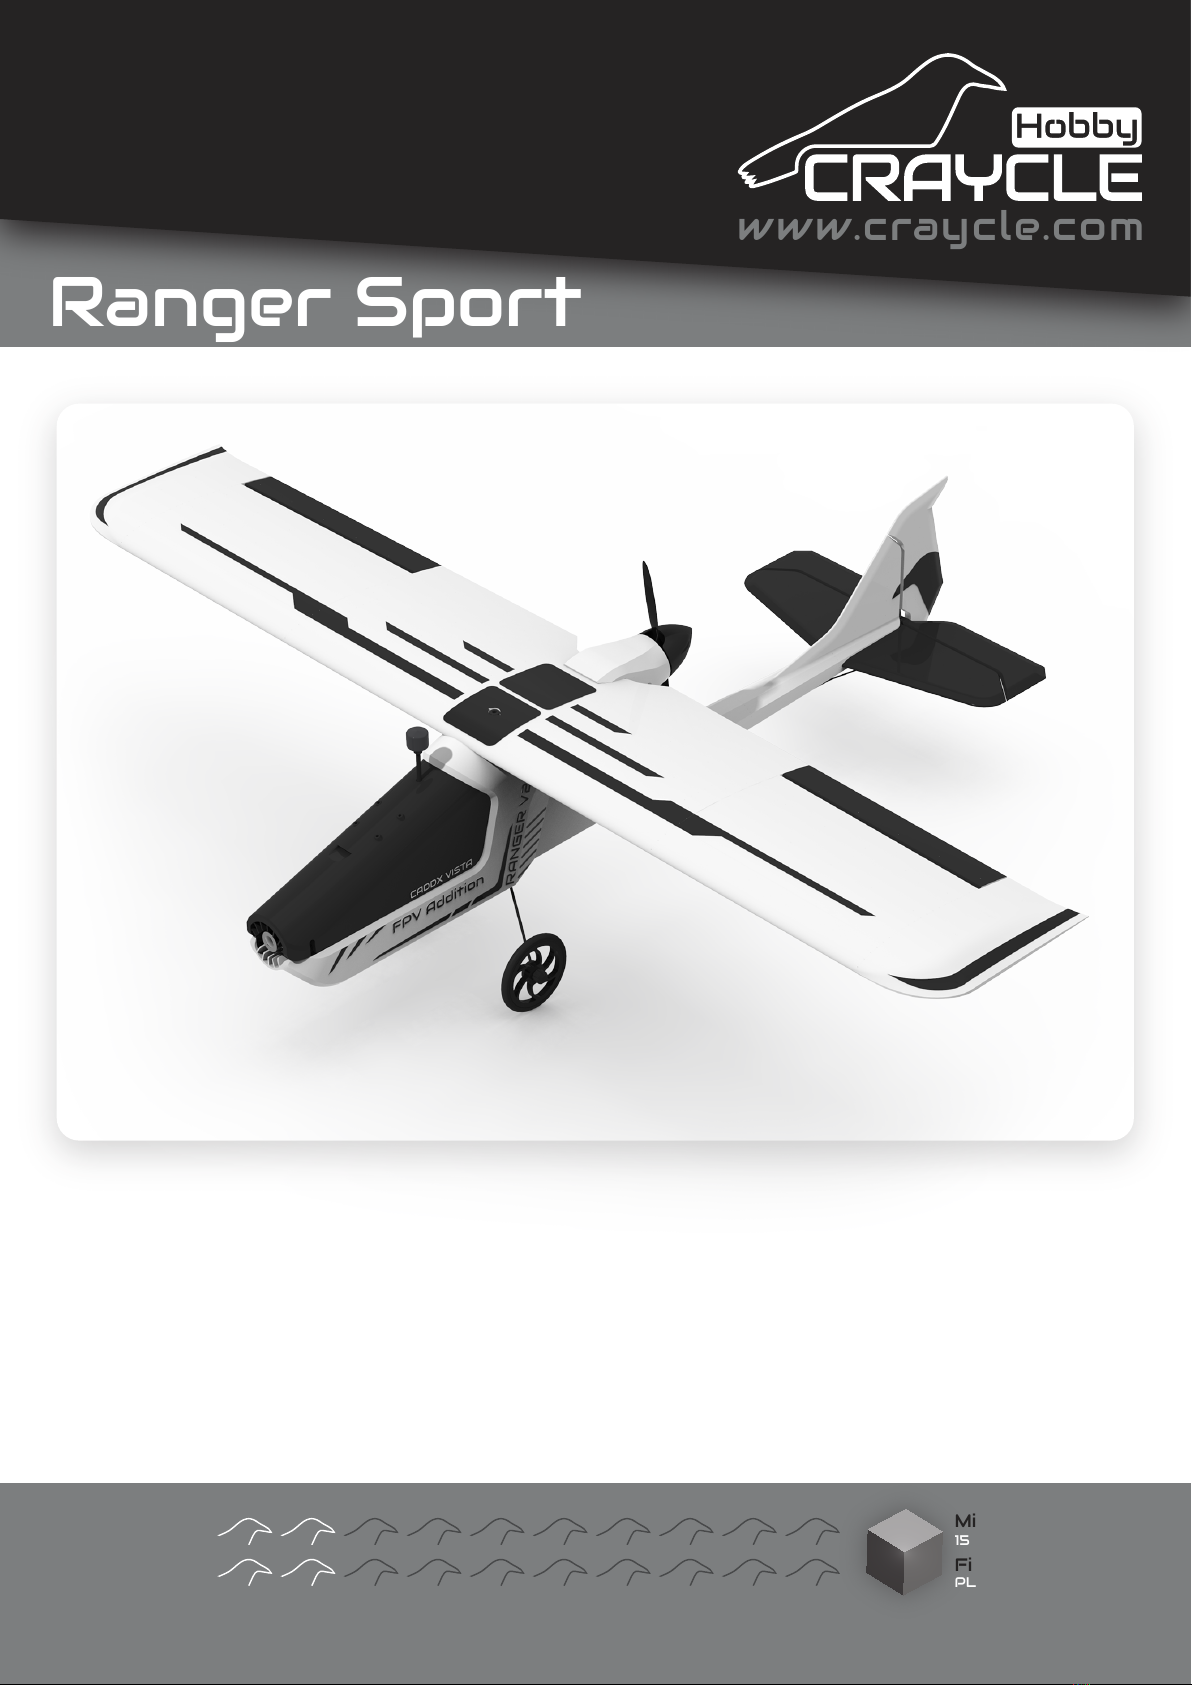
www.craycle.com
Ranger Sport
User Guide
Model Designed By: Cemal ÖZÇELİK
Model Version: 2.0
Release Date: 18.10.2022
Recommended Setup
Motor
Propeller
ESC
Servo
Battery
Analog/DJI/Vista FPV systems
: 2204/5/6 1500/2500 kv
: 5” - 2/3/4 Blade
: 15-30A
: 4 X 9 g
: 3s 850-2500 mAh
General Specifications
Length
Wingspan
Print Weight
Flying Weight
Wing Area
Wing Loading
Airfoil
23.4 inches
31.5 inches
11 oz.
17.6-22.9 oz.
: 575 mm
: 800 mm
: 311 g
: 500-650 g
: 11.1 dm2
: 49,4 g/dm2
: NACA 2412
Maker Skill
Pilot Skill
150*150*180 mm
Min. Printer Size
PLA - PetG - TPU
Filament
© 2022 Craycle Hobby. Copies allowed for personal use only. Not for commercial use.
Equipments
www.craycle.com
Optional EquipmentsNecessary Equipments
• Minimum 3ch Transmitter and Receiver.
• 2205 2300Kv Motor.
• 30A ESC.
• 4pcs 9grams Servo.
• 1500mAh 3S Lipo.
• 5” Propeller - 3 or 2 Blade.
• Medium CA Glue.
• Y cable for Aileron servos.
• 2pcs 2 mm screws for Motor mounting.
• M4x20 Imbus bolt and m4 nut for wing.
• Ø4x250 mm Carbon Rod.
• 2pcs 400, 2pcs 100xØ1,2mm Pushrods.
• PLA - TPU - PetG Filaments.
• Lazer Blade to clear printed parts.
• Adjustable Pushrod connectors.
• Strong Pliers to prepare landing gear.
• Z bend tool.
• Wheel Stoppers.
• Aileron Angle Meter
• Servo Tester.
• Servo Plug Connectors.
• Screw Driver set.
• Sprey Paint.
• Fiber Tape for leading edge of wings.
• Model stand.
• Lipo Bag.
• Lipo Alarm.
• Digital or Analog FPV System.
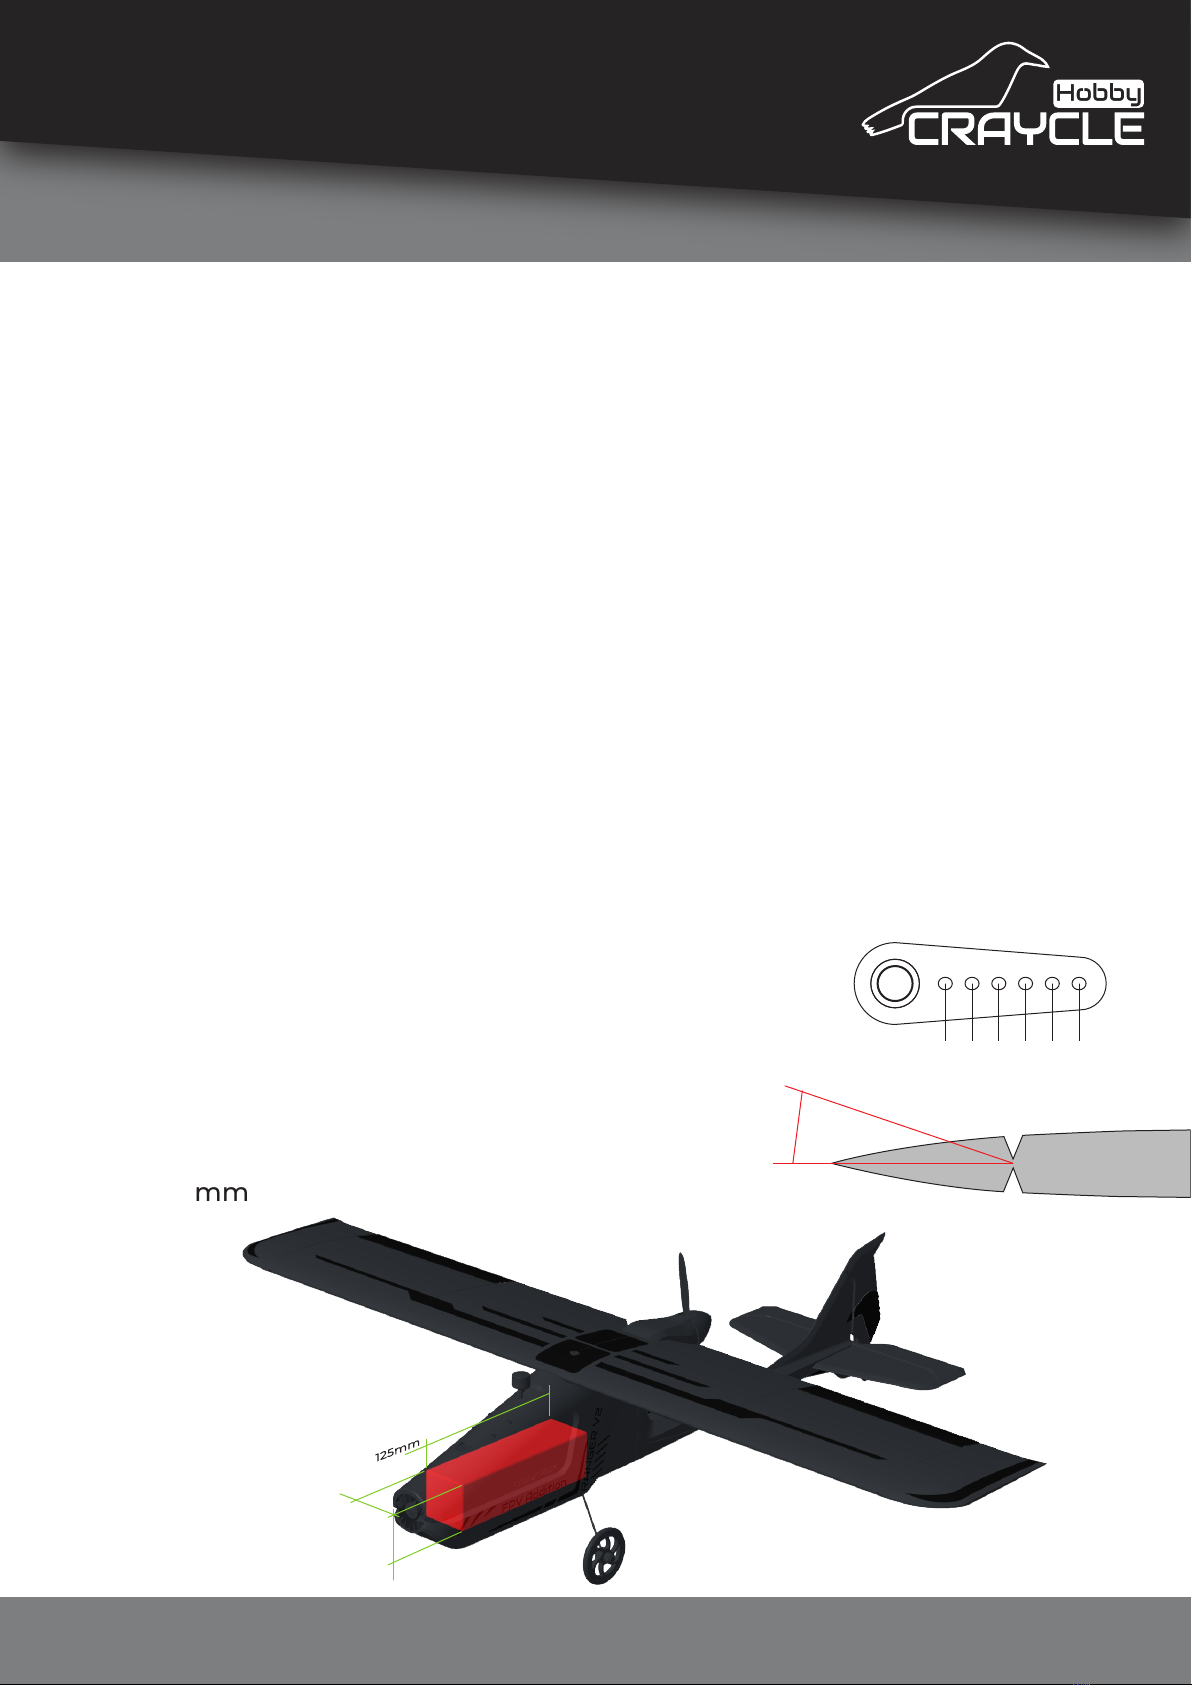
CG position
34,5mm from the Leading Edge. Middle of the filament tunnel.
Pushrods
You can use 1, 1.2 or 1.3mm spring wire or piano wire as well.
Ailerons: 100mm / Elevator: 400mm / Rudder: 400mm
Servo Horn Connection Holes ->
Ailerons: 5. hole / Elevator: 3. hole / Rudder: 3. hole
Flap Movements (X)
Ailerons: 9mm / Elevator: 13mm / Rudder: 6mm
Lipo House Dimensions
42x42x125mm
1 2 3 4 5 6
x
42mm
42mm
© 2022 Craycle Hobby. Copies allowed for personal use only. Not for commercial use.
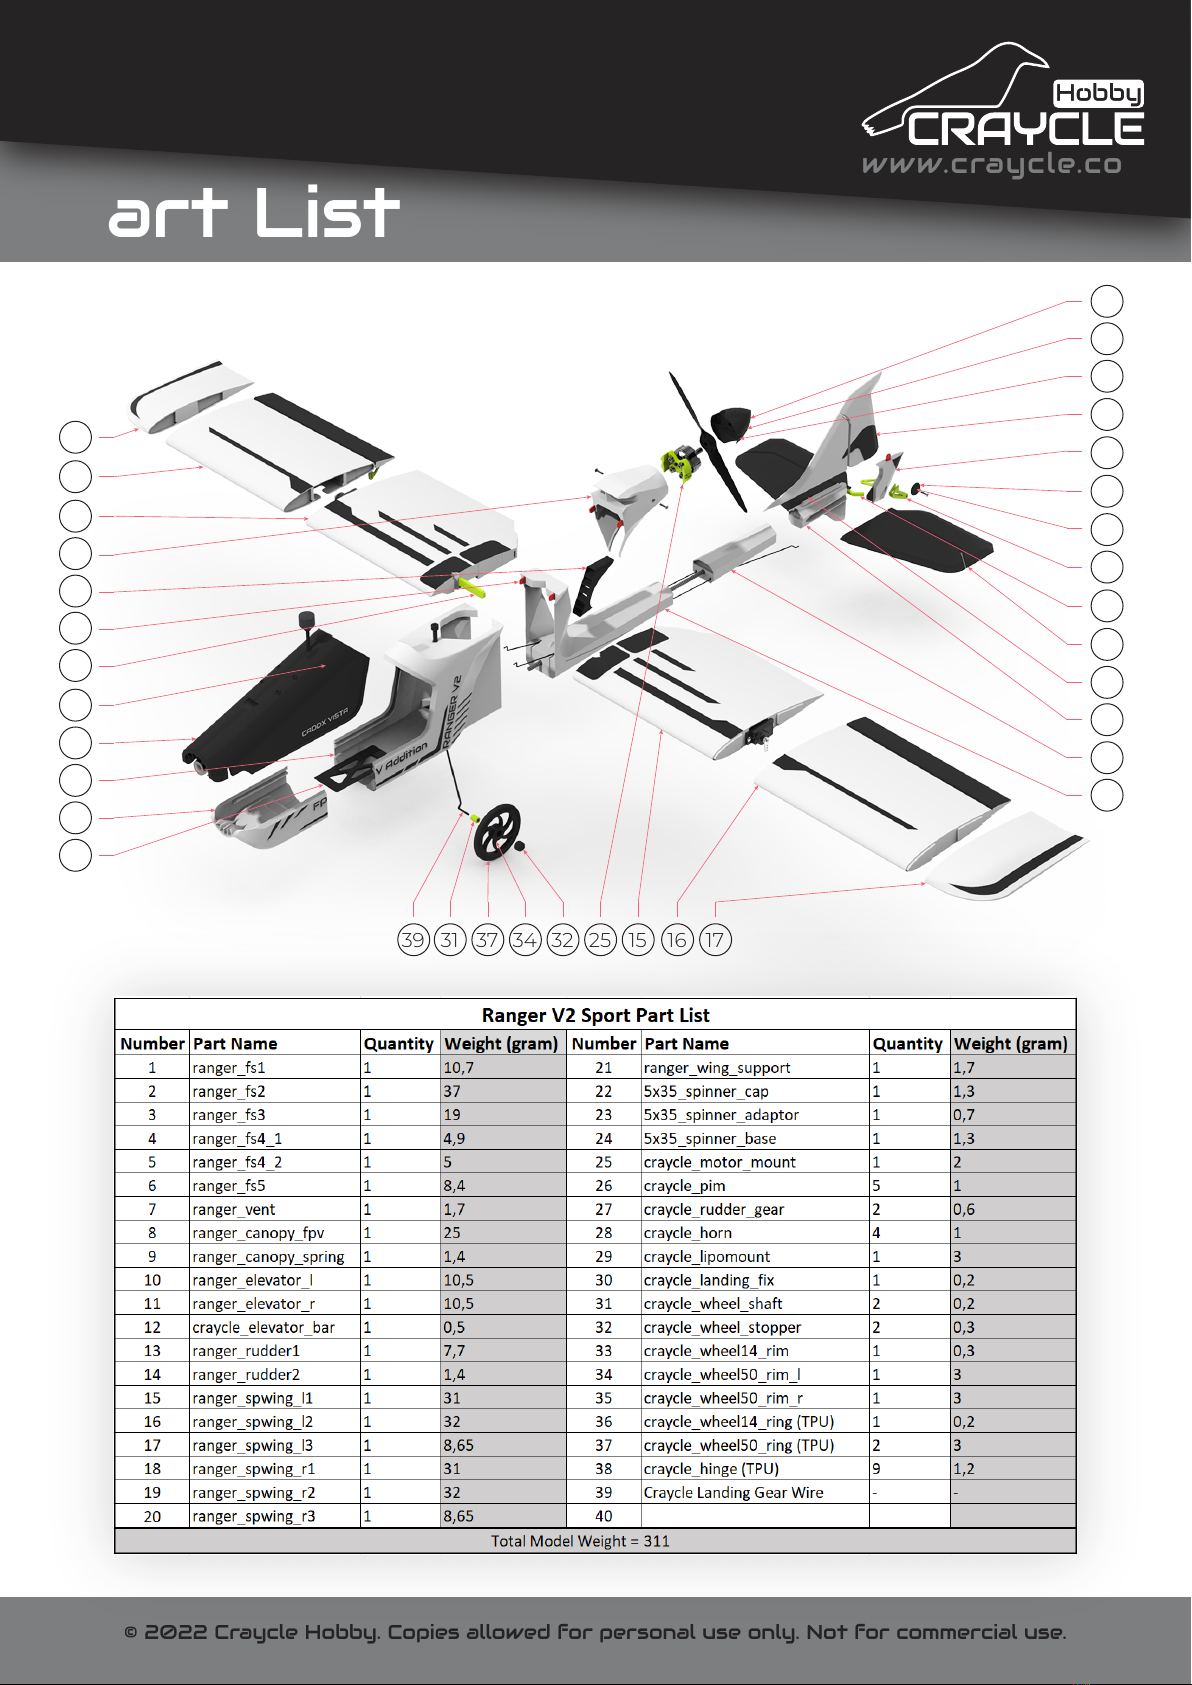
Part List
www.craycle.com
20
19
18
6
7
21
26
8
9
2
1
29
22
23
24
13
36
12
10
33
14
27
11
4
5
3
3139 37 34 32 25 15 16 17
© 2022 Craycle Hobby. Copies allowed for personal use only. Not for commercial use.
Assembly
www.craycle.com
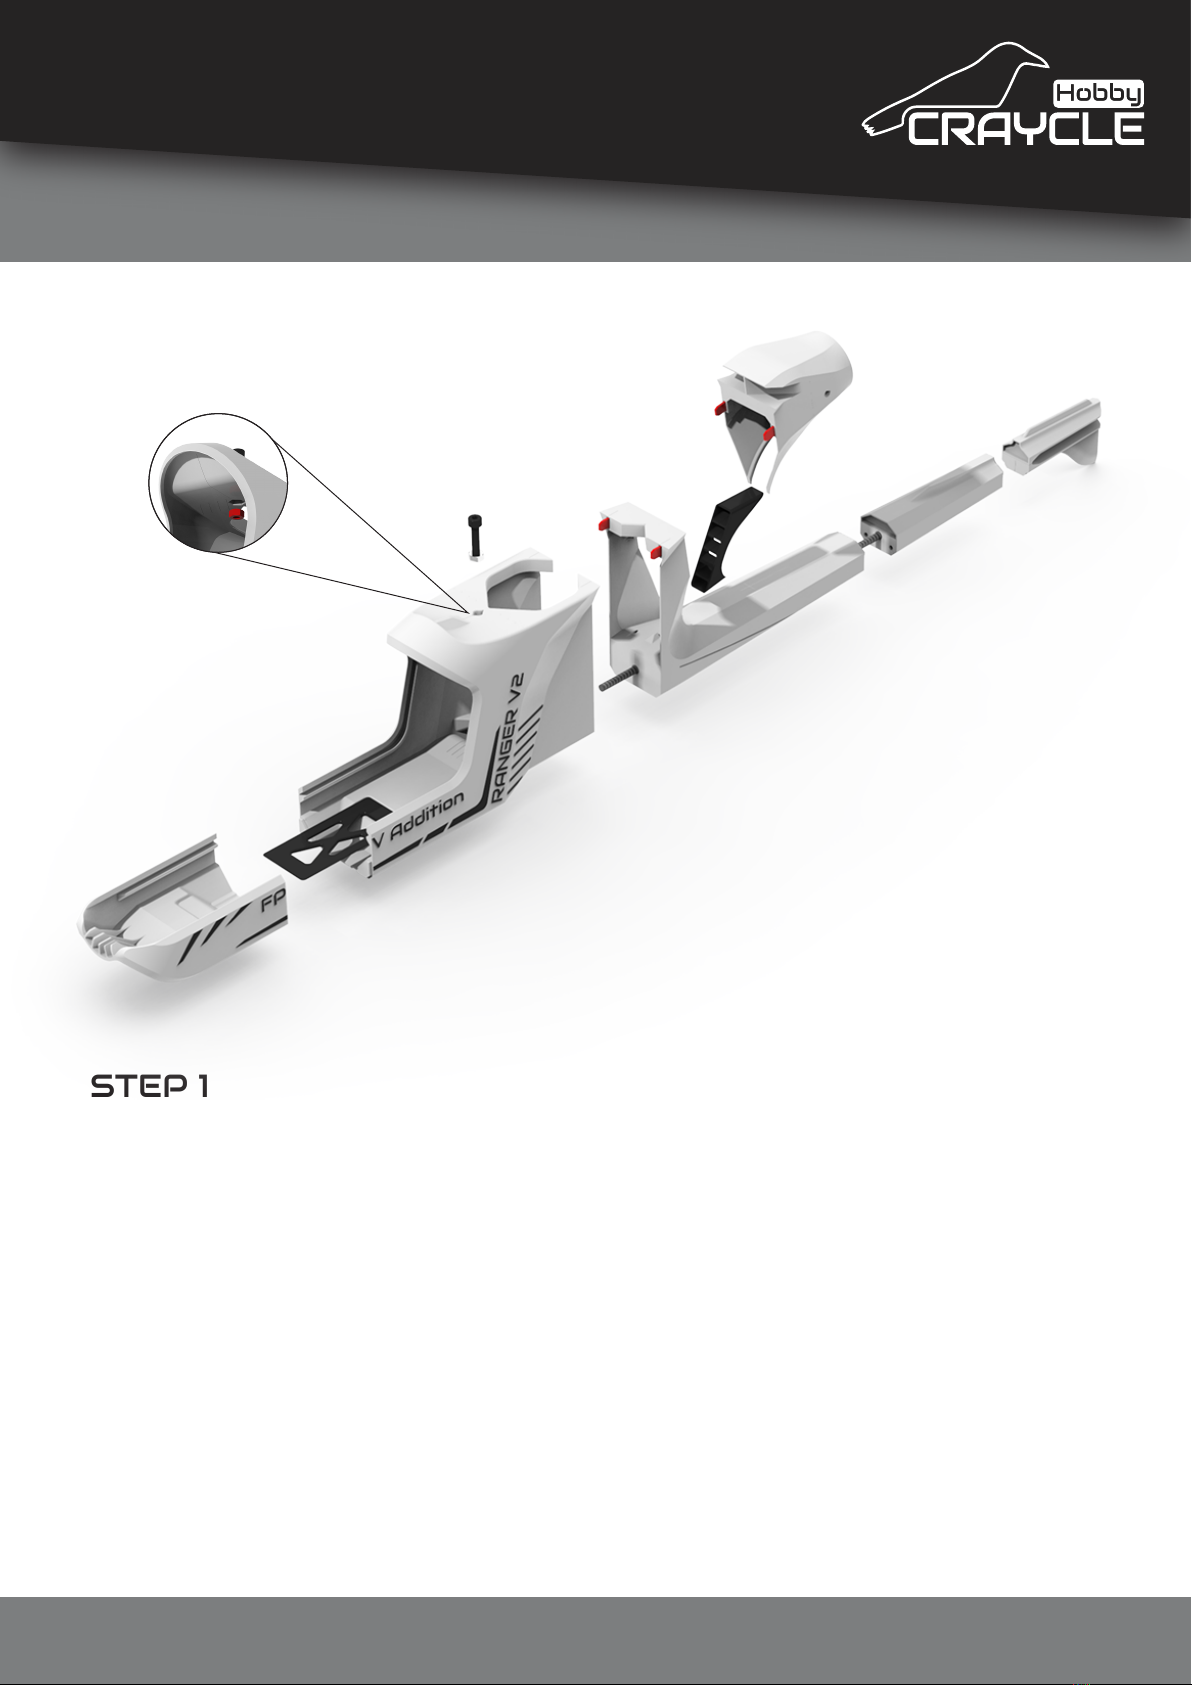
STEP 1
1) Glue the “fs3”, “fs5” parts together by inserting the “pim”
parts and then glue the “vent” part into its place.
2) Glue the m4 nut into its slot on the “fs2” and then glue the
“fs2” part to the FS3 by inserting the “pim” and Ø4x250 mm
carbon rod into its slots.
3) Glue the rest FS1, FS4_1 and FS4_2 parts together and than
glue the Lipo Mount part into its slot.
Never spray the accelerator directly onto the CA glue! Spray
onto the first part and then wait for 15 seconds to dry it. Then
you can apply glue onto the other part and put the parts
together for 5 seconds. Avoid excessive usage of glue.
1

© 2022 Craycle Hobby. Copies allowed for personal use only. Not for commercial use.
Assembly
www.craycle.com
STEP 2
Glue the “rudder1” and “rudder2” parts together by
inserting the “pim”.
Glue the rudder part onto its slot on the fuselage and
breake the rudder section from its tiny connections.
Glue the “elevator_l” and “elevator_r” parts onto its
slot on the fuselage and glue the “elevator_bar” part
into its slot on the elevator. And then brake the
elevator flap from its tiny connections.
Now we are ready to install TPU hinges. You can
print “hinge” model with TPU filament or you
can build CA hinges by using CA Hinge Maker
Tool which is free on craycle.com .
Be careful using CA accelerator and
avoid to sprey onto the
Hinge Slots.
2
© 2022 Craycle Hobby. Copies allowed for personal use only. Not for commercial use.
Assembly
www.craycle.com
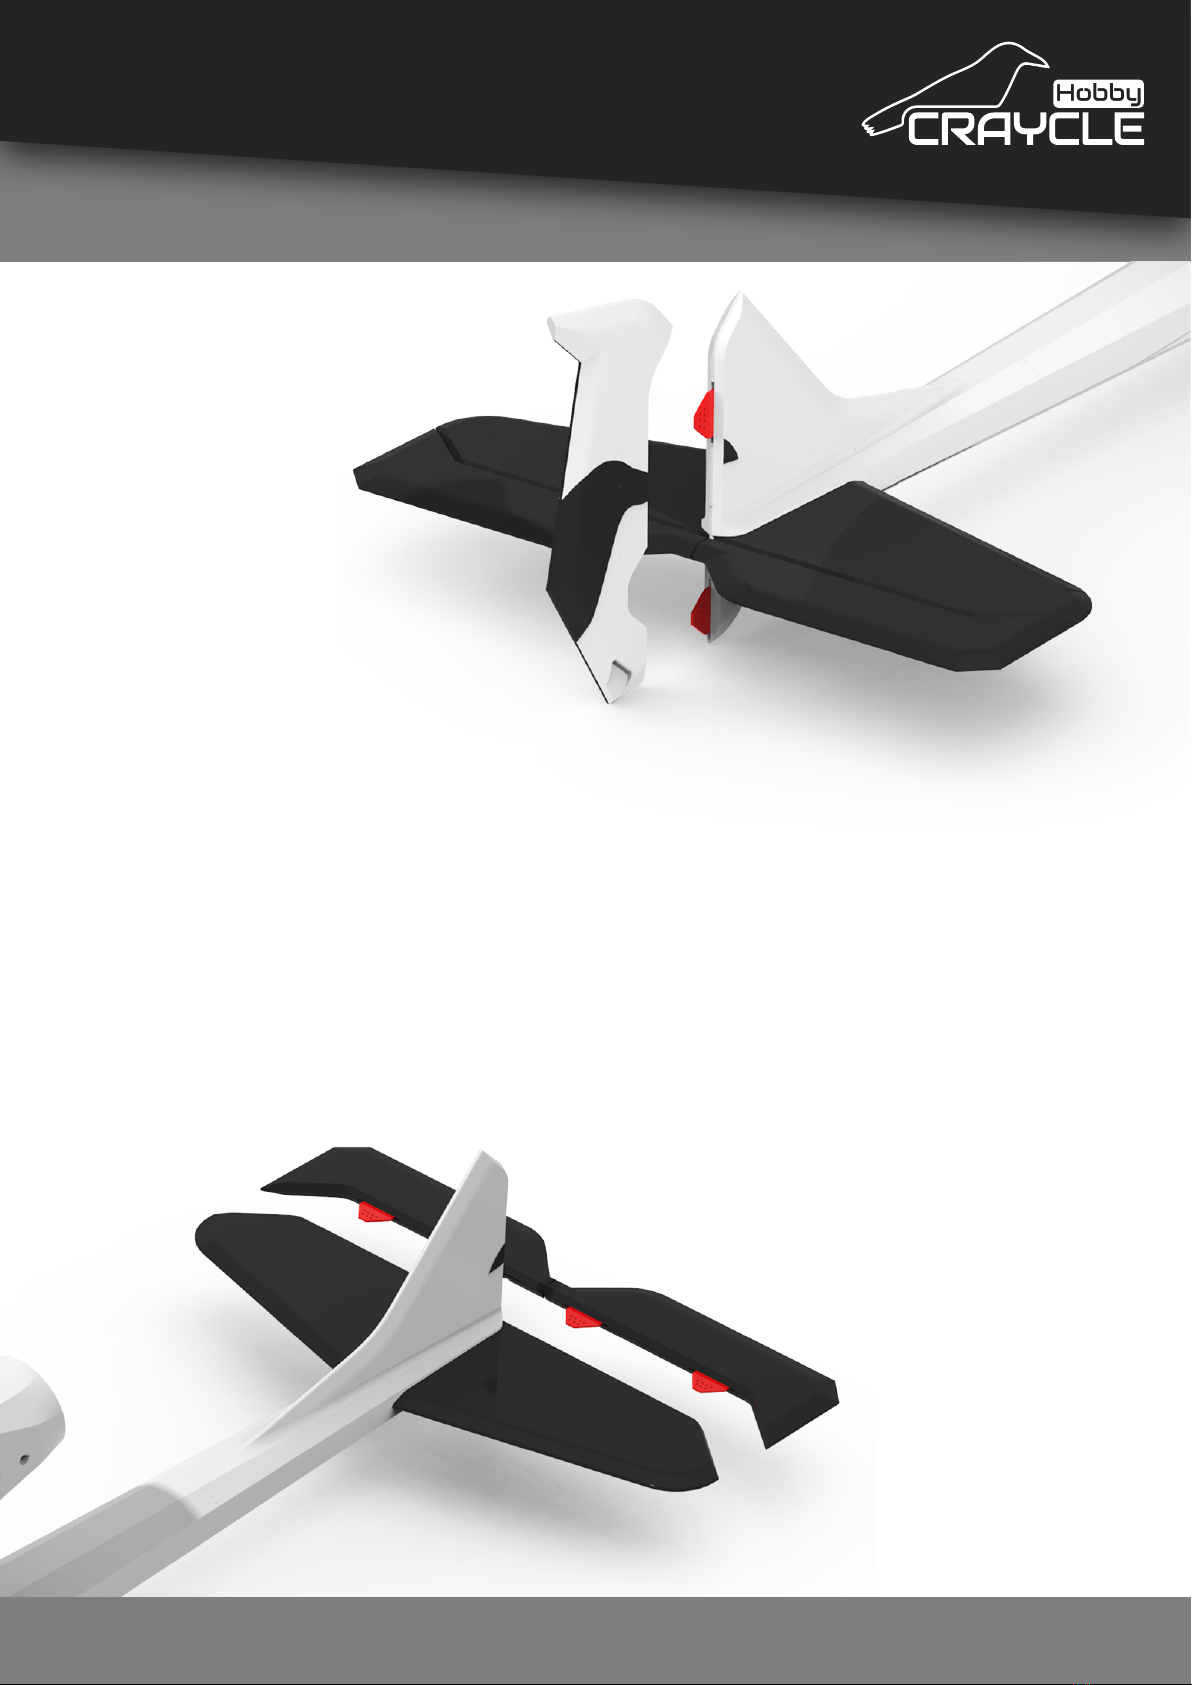
STEP 3
Reassemble and glue the Elevator using TPU or CA hinges that
you prepared and then glue the Rudder carefully into its hinge
slots.
Note: The CA accelerator sprayed to stick the elevator and
rudder parts may have contaminated the hinge slots! Take
your time, apply the glue onto the hinges in order and insert
into the hinge slots on the flaps first. (Rudder image is wrong,
elevator image is the true way to gluing hinges.)
3
© 2022 Craycle Hobby. Copies allowed for personal use only. Not for commercial use.
Assembly
www.craycle.com
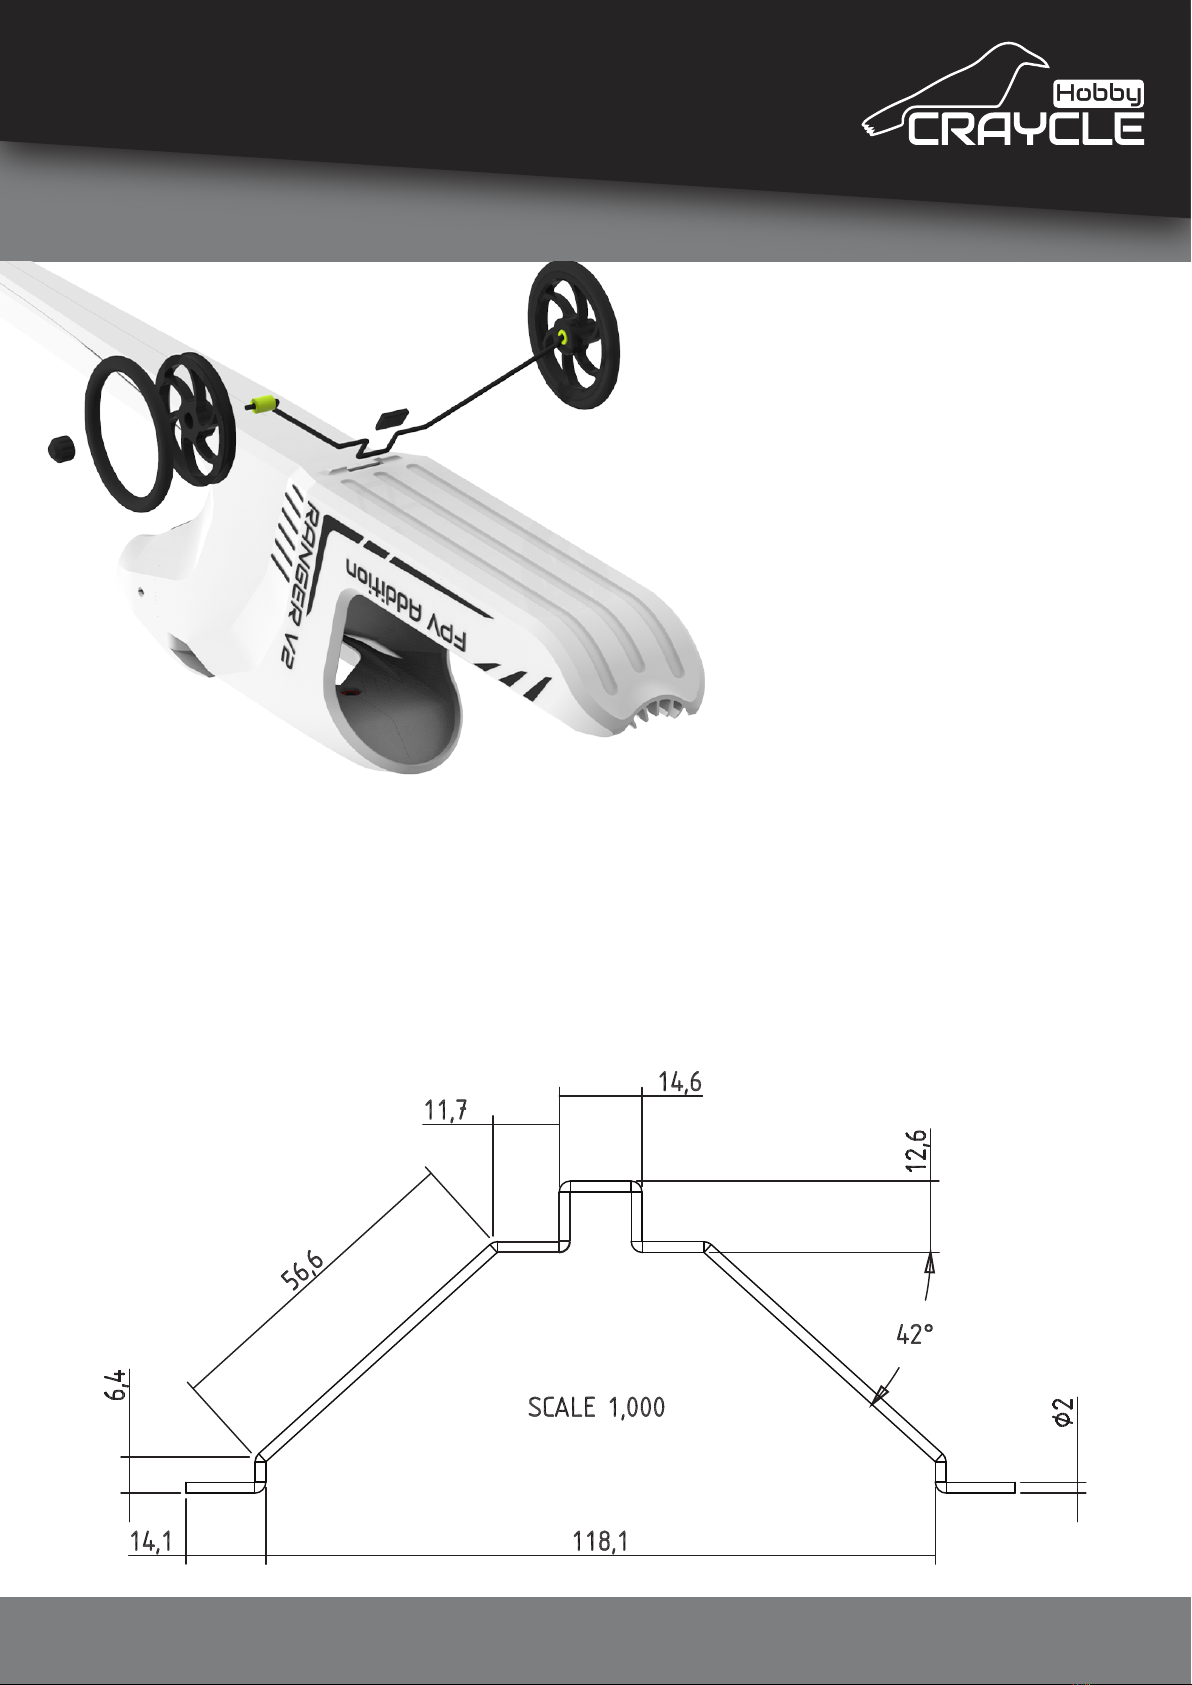
Insert the “shaft” into the “rim” and assemble the “ring” onto
the “rim” part. Shaft model should be printed with PetG
material with 90% flow in slicer settings. This way it works very
well onto the 2mm steel wire. PetG is stronger material so we
use this shaft as PetG to get more lifetime and stifness. (You
can make a clear hole in the “wheel35_rim” by drilling it with 2
mm drill bit.)
STEP 4
Prepare Craycle
Landing Gear by using
2mm steel wire. You
can use this page as a
template by printing
100% real scale or you
can also use the
dimensions below as
well.
Dimensions are in mm.
4

© 2022 Craycle Hobby. Copies allowed for personal use only. Not for commercial use.
Assembly
www.craycle.com
STEP 5
Glue the “rudder_gear” parts onto
its slots on the rudder. Assemble
the “rim” and “ring” parts together
and then install using 2 mm wire
to make clear shaft for
its little rear landing gear.
That's it! You have a rear landing
gear with the steering system.
Screw the Servos onto its brackets into the fuselage with its
screws. There are necessary holes in the fuselage.
Install the pushrods by sticking horns onto its slots on the flaps
for both rudder and elevator. You can also add pushrod
connectors on the servo arms to adjust flaps.
1 2
5

© 2022 Craycle Hobby. Copies allowed for personal use only. Not for commercial use.
Assembly
www.craycle.com
STEP 6
Now you are ready to install your electronics into the fuselage.
ESCs can pass from the motor house into the Fuselage so the
Motor and ESC can be soldered. Insert the “canopy_spring”
into its slot in the “canopy” and glue the ends of the canopy
spring. Currently 3 different FPV Canopy options are available;
Vista, AirUnit and Analog (29mm cameras). You can ask from
us for a new canopy designs for different FPV systems.
Caddx Vista DJI Air Unit Analog FPV
6
© 2022 Craycle Hobby. Copies allowed for personal use only. Not for commercial use.
Assembly
www.craycle.com
STEP 7
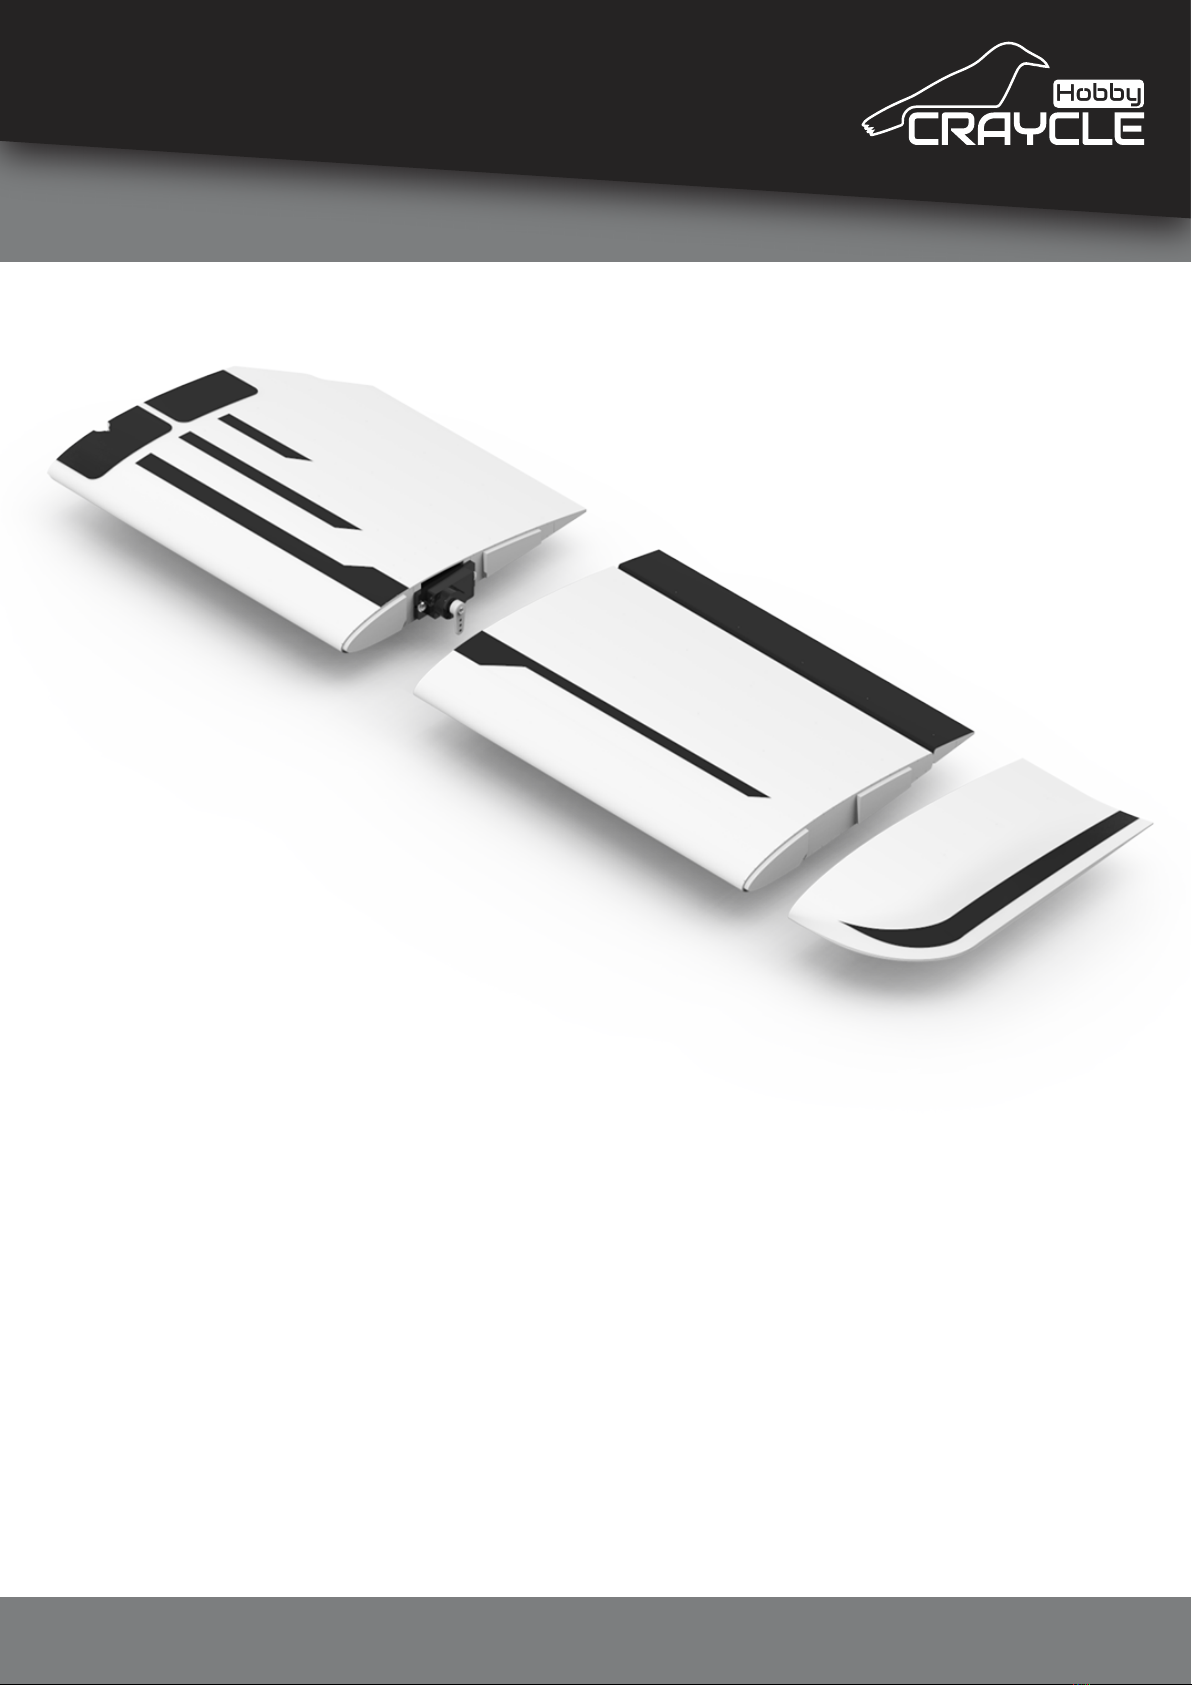
Screw the Servo Motor into its place on the “wing_l1” as shown
direction in image above. Make sure the Servo centered
connecting to a receiver or a servo tester and the servo arm is
mounted 90 degree to its body.
Now you can glue the “wing_l2” and “wing_l1” parts together.
And then glue the “wing_l3” part onto the “wing_l2”. Wings has
own inserts so you can fit the parts together well comfortably.
While assembling the wing parts together, you need to be sure
the wings are holded in a straight line (Hold the wings upside
down on the flat table). Same process goes for the right wing.
7

© 2022 Craycle Hobby. Copies allowed for personal use only. Not for commercial use.
Assembly
www.craycle.com
STEP 8
Prepare aileron as the same like rudder and elevator.
Install your pushrods with “craycle_horn” to its place. You can
use pushrod connectors on the horn to adjust aileron position.
Same process goes for the other wing.
Note: You can replace the Servo Motor at anytime by releasing
the Servo Hatch (Release by cutting its tiny connections).
Hatch is the Red Part in image below.
8

© 2022 Craycle Hobby. Copies allowed for personal use only. Not for commercial use.
Assembly
www.craycle.com
STEP 9
Now you are ready to assemble Wing Right and Left together.
Insert the “wing_support” and “pim” parts into its slots.
Pass through the Servo cables into them little gates shown as
black in image 1.
Gently apply the glue onto the wing, pim and support parts
and then bring the wings together on a flat table to make sure
the wing glued in a straigth line.
Be careful to not apply glue onto the Filament Tunnel under
the wing so you can insert the a filament piece along the wing.
Insert trough the filament piece into its tunnel all wing long
and apply the glue from the outside. This will make your wing
stronger. You can also stick the fiber tape onto the leading
edge to add more durability.
Now you can assemble the wing on the fuselage quickly using
M4x20 Imbus bolt.
1 2
9
© 2022 Craycle Hobby. Copies allowed for personal use only. Not for commercial use.
Epilogue
www.craycle.com
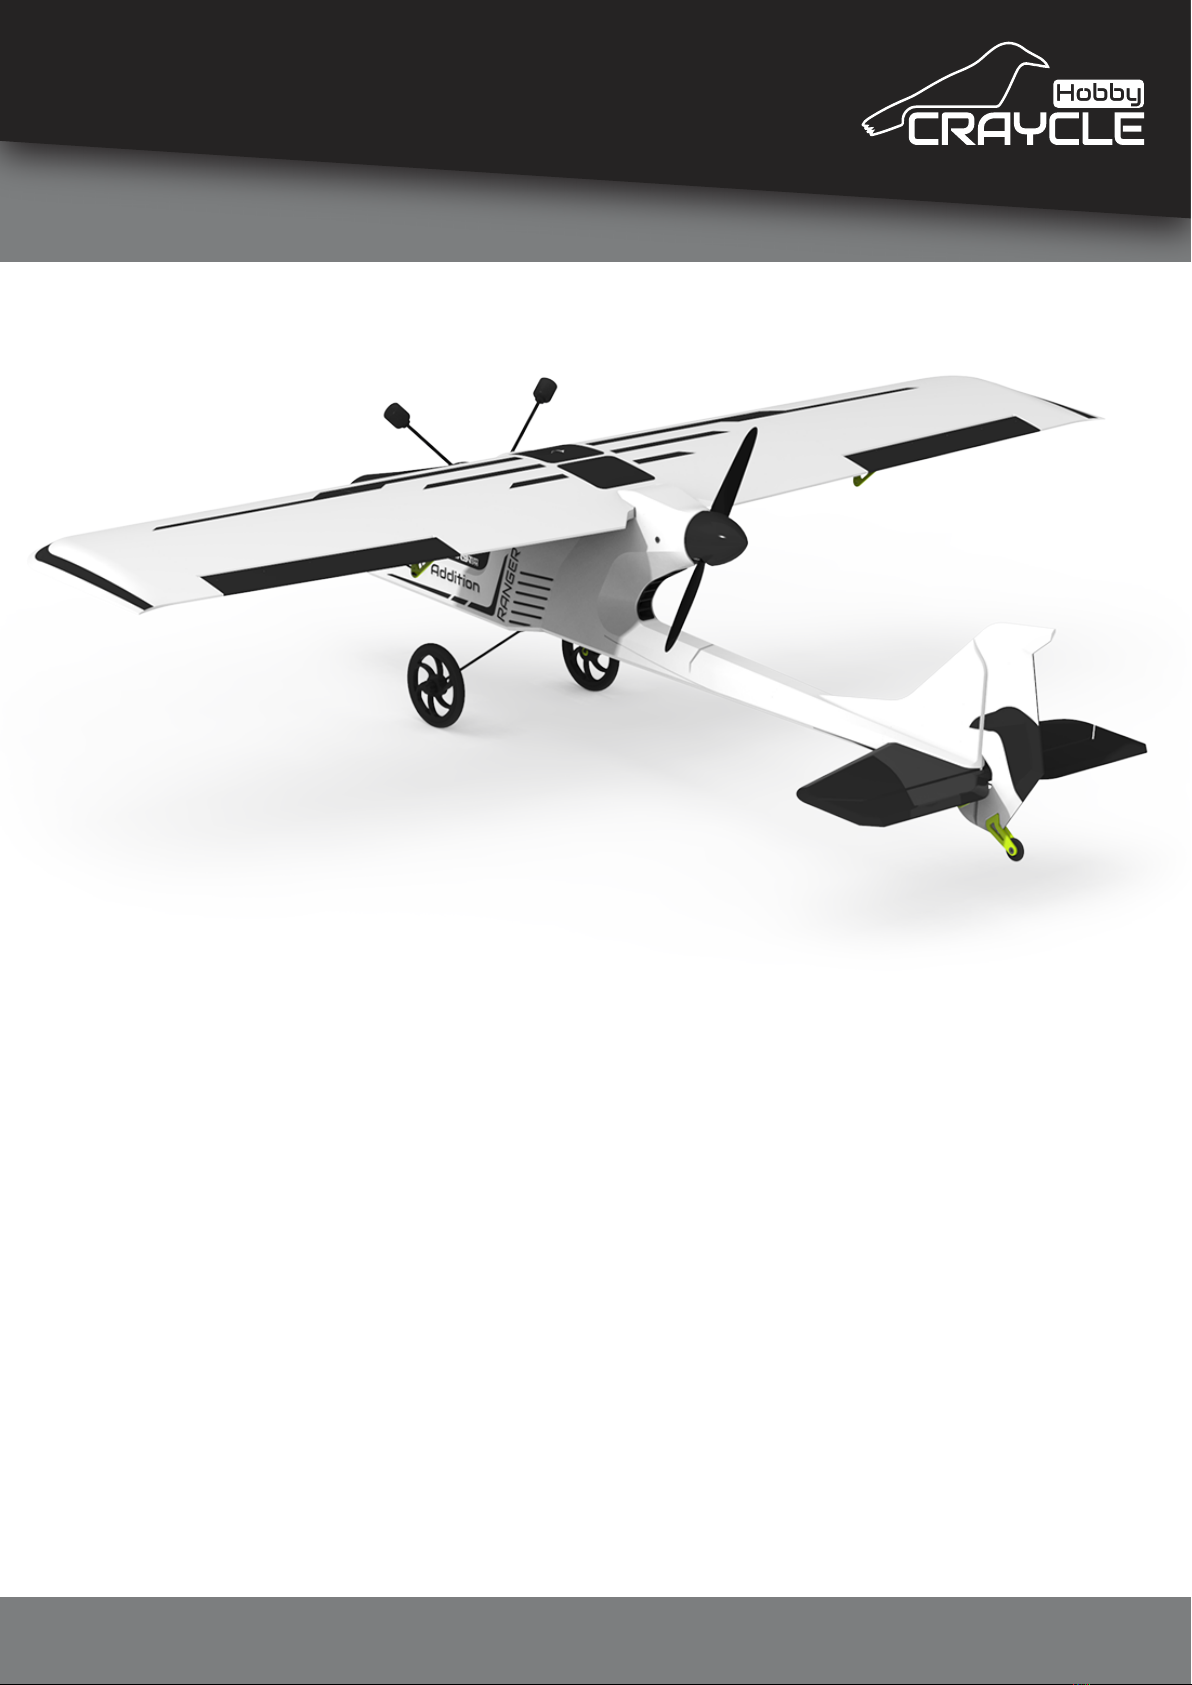
Ranger V2 is ready for the Maiden Flight!
Center of Gravity is 34,5 mm behind from the leading edge
(Filament tunnel is also the CG point of the model).
CG perfectly setted with FPV systems but if you haven’t yet,
you can add weight to make CG correct.
We are developing all our models by using Regular PLA to
provide accessibility. If you print this model with LW-PLA,
Ranger would be a Park Flyer. It’s not necessary for the sport
version but 3ch Trainer would fly easier for begginers.
Set a little trim up to elevators for the first flight.
You can also add Insta360 Go2 holder onto the wing to make
cinematic shots from the air.
10

© 2022 Craycle Hobby. Copies allowed for personal use only. Not for commercial use.
Free Version
www.craycle.com
What is Included?
Free version of Ranger V2 is almost the same with Sport
Version. Only the difference is 3ch Wing and Fs1, FS2 and
Canopy parts aren’t compatible with FPV gear. All other model
parts are exacly the same. Print Weight is 295 grams.
We are aiming to get more people into this hobby with our
Free Trainer model Ranger V2. So please let us know if there is
a confusing point in this guide for you. We will help you as
soon as possible and update the PDF if its necessary.
Welcome to the Craycle Community!
11
© 2022 Craycle Hobby. Copies allowed for personal use only. Not for commercial use.
Print Guide
www.craycle.com
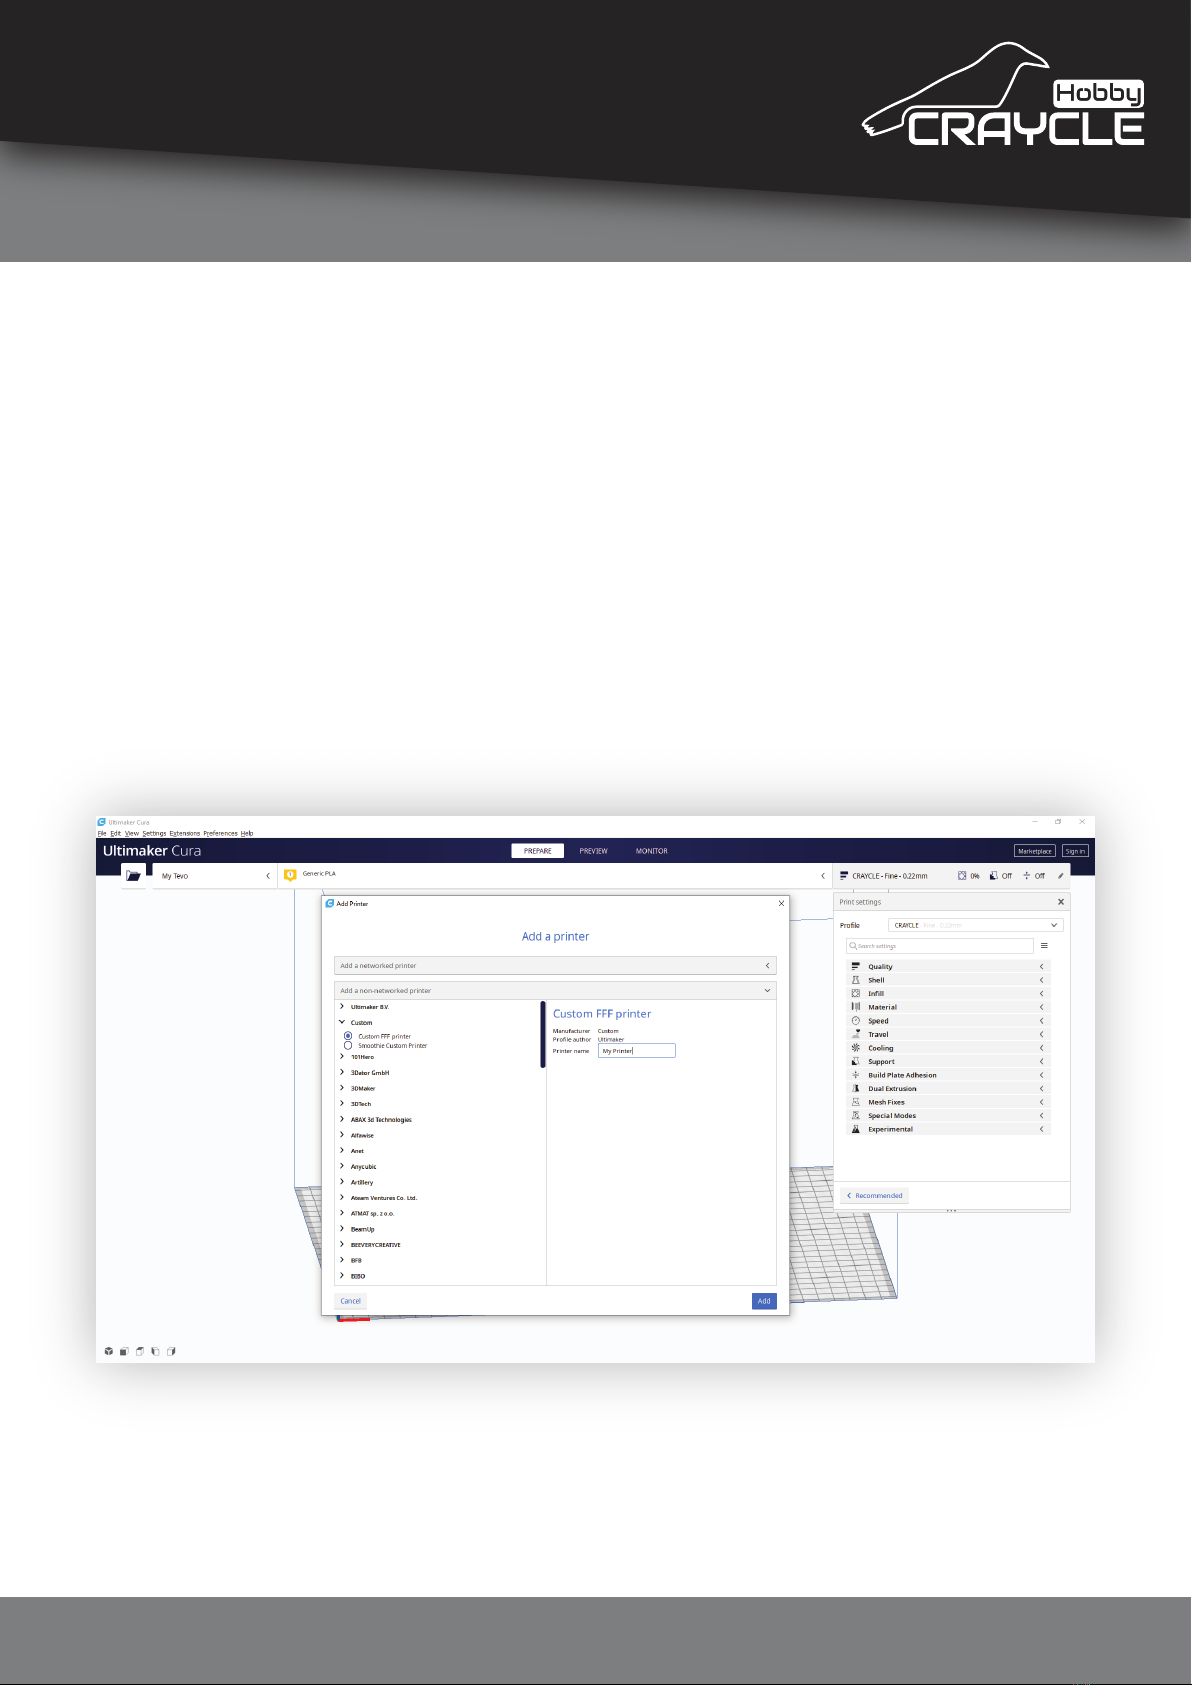
We have prepared printer profile on Cura Slicer for you. If you
have a Marlin XYZ type printer, you can print directly with
prepared gcodes as well. If you can’t use the gcodes don't
worry, just follow the instructions...
Download and install CURA Slicer on ultimaker.com.
When you open the program, you can find your own printer
from the printer list but if you are getting error on importing
curaprofile, you will need to create Custom Printer to import a
curaprofile succesfully.
Open the Add Printer window, select Custom FFF printer, type
your printer name and click to the add button for the next step
1

© 2022 Craycle Hobby. Copies allowed for personal use only. Not for commercial use.
Print Guide
www.craycle.com
Set your printer x, y, z dimensions. Heated Bed is necessary for
the wall printing.
Nozzle size has to be 0,4 mm. If you have a different size nozzle
then you have to change it with a 0,4 mm one.
Click the next button, your printer settings are ready!
2
© 2022 Craycle Hobby. Copies allowed for personal use only. Not for commercial use.
Print Guide
www.craycle.com
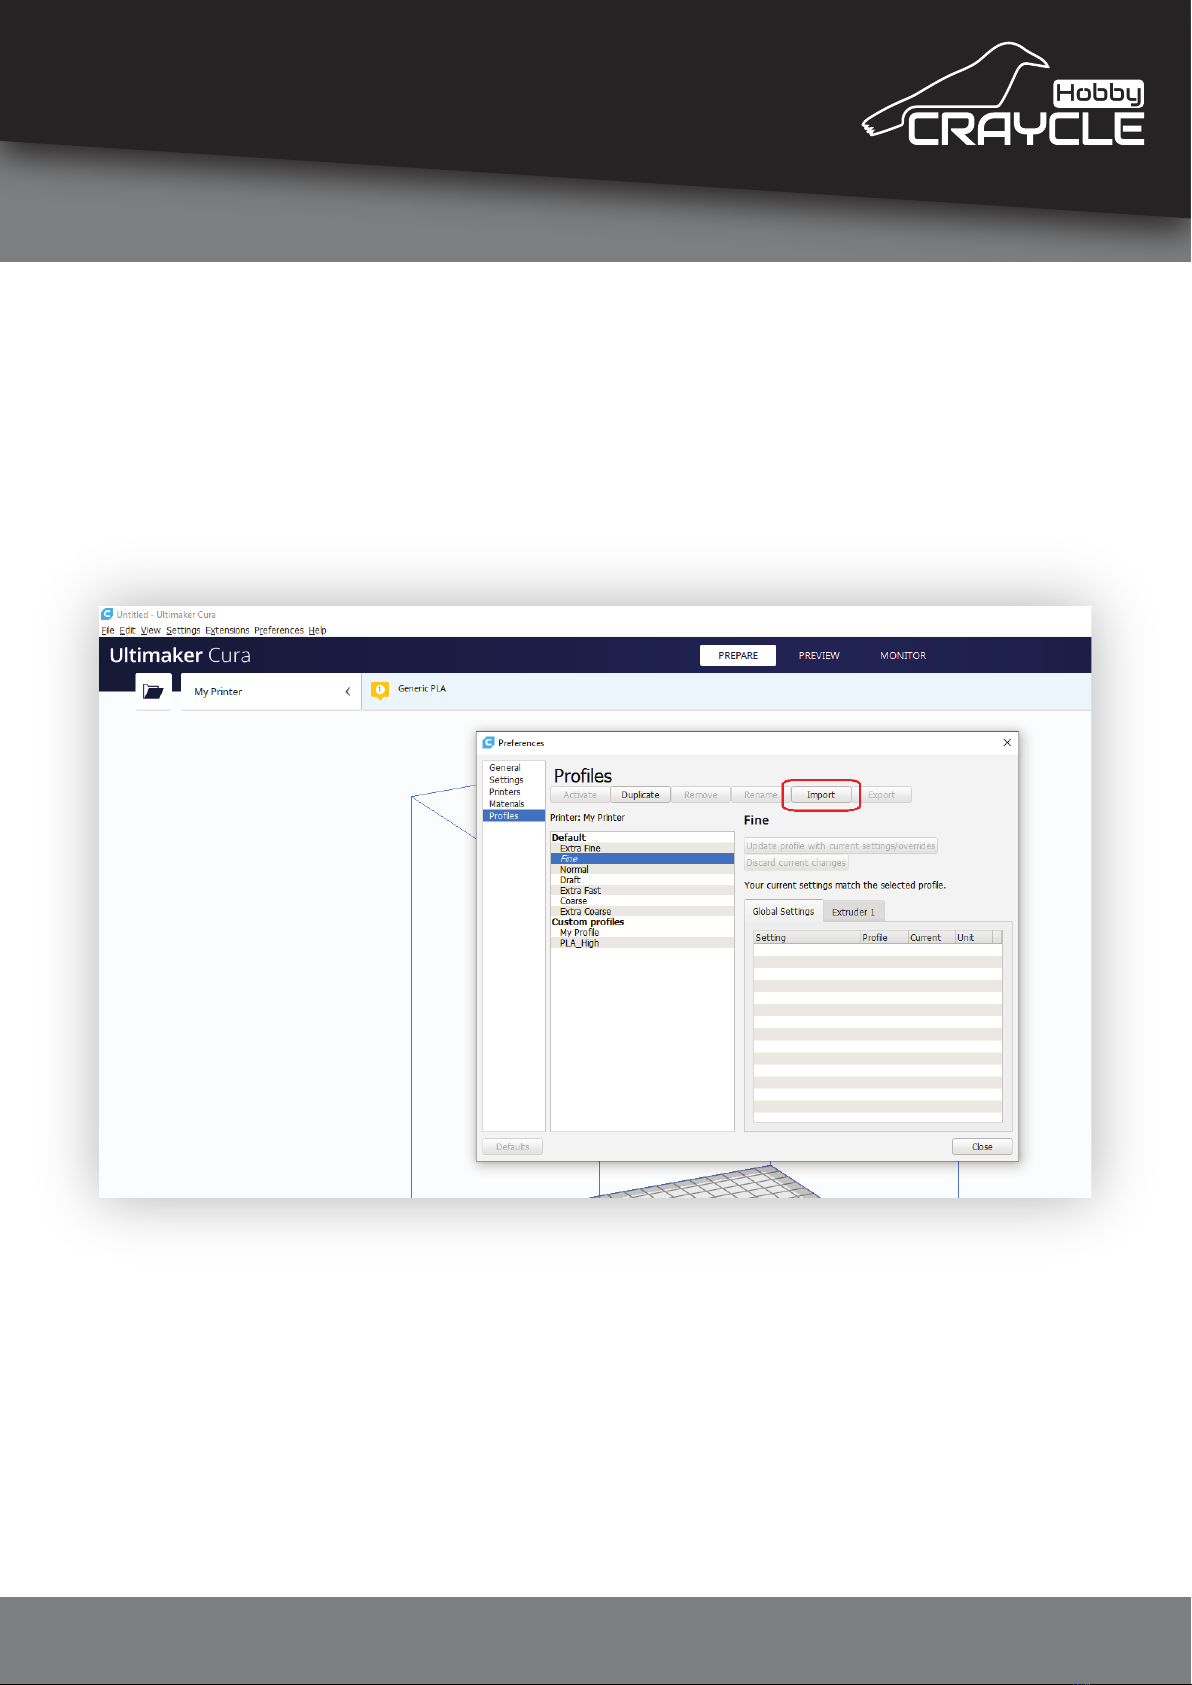
Next step is importing the “craycle.curaprofile”. Follow the
instructions.
Setting - Printer - Manage Printers => Click to the
Profiles on the left side.
You can see your custom and default profiles in this panel. We
are preparing the best print settings to our models for you and
you will be able to use these settings but you need to check
some settings for your printer first.
Click to the “Import” button and go to the next step.
3
© 2022 Craycle Hobby. Copies allowed for personal use only. Not for commercial use.
Print Guide
www.craycle.com
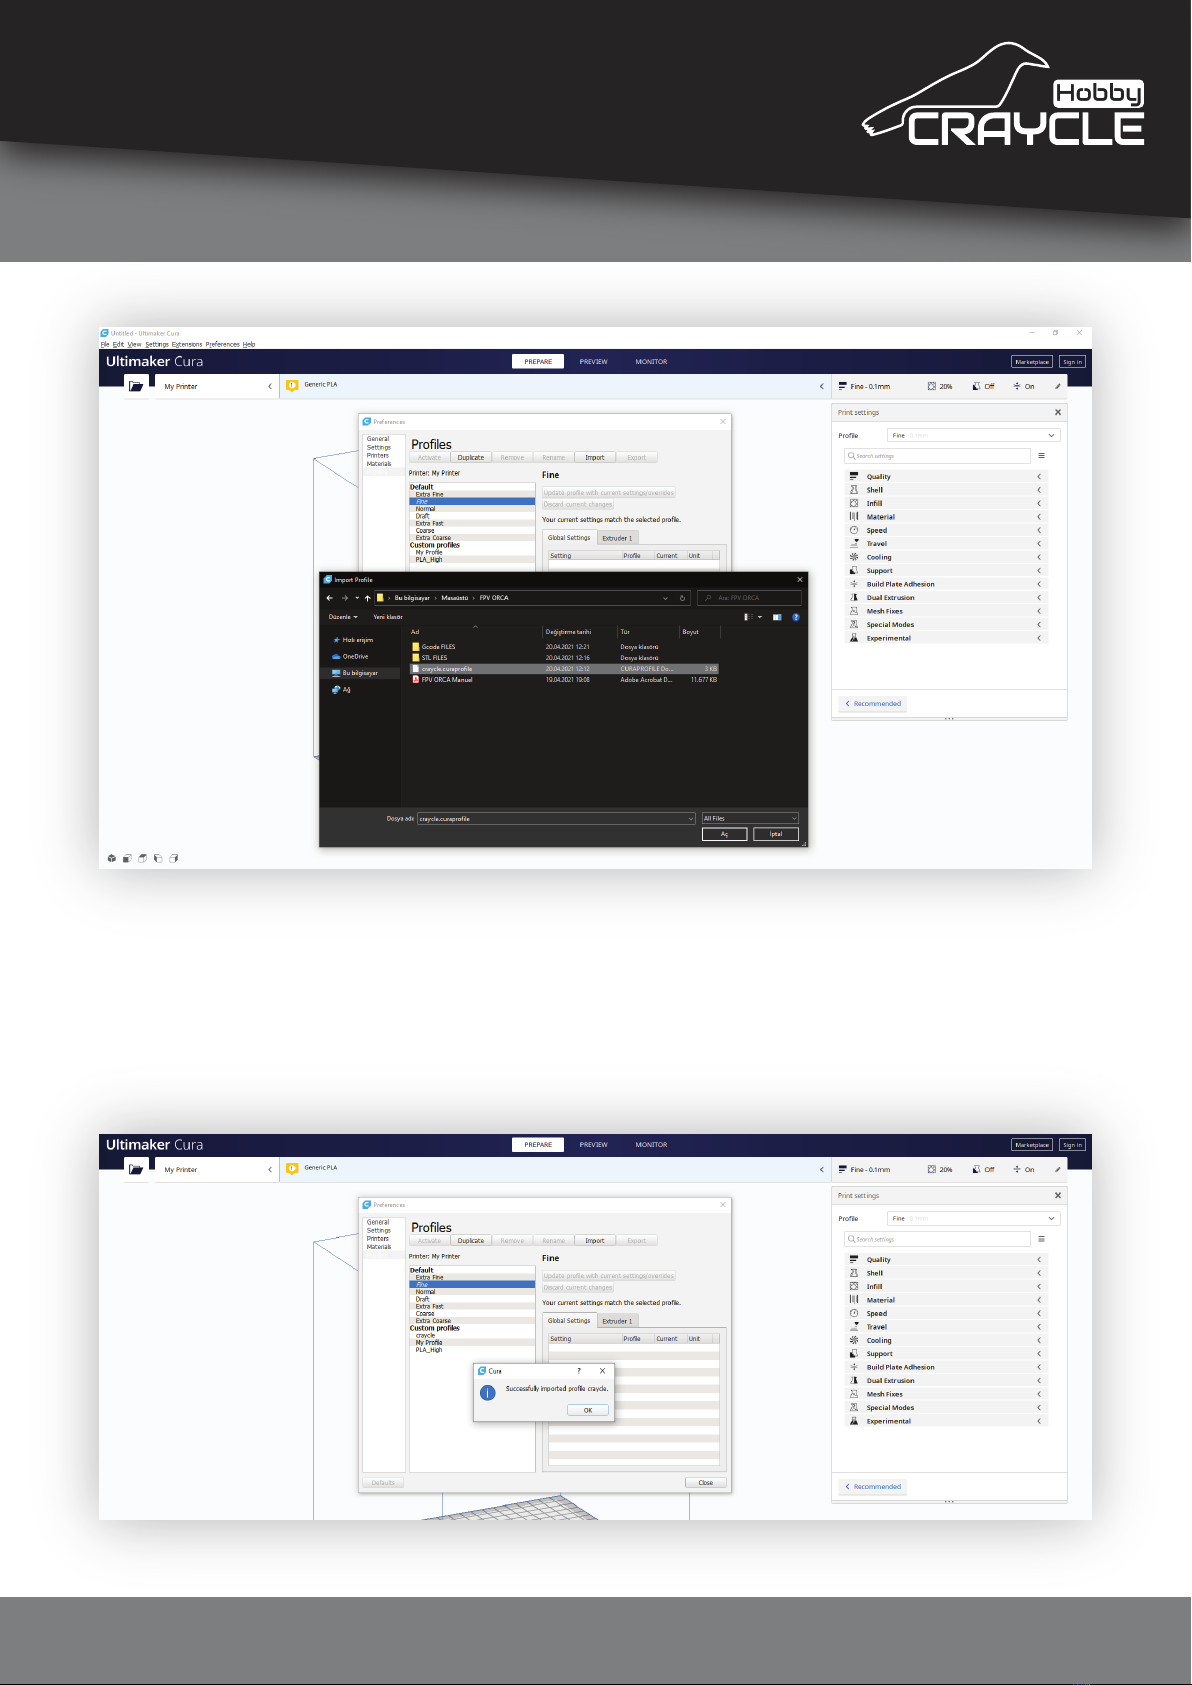
Select “crayce.curaprofile” and click to the open button. Now
you have the Craycle Profile! If you have an error in this step, you
need to create Custom Printer or update your Cura Slicer.
4

© 2022 Craycle Hobby. Copies allowed for personal use only. Not for commercial use.
Print Guide
www.craycle.com
The settings you should set according to your printer:
- Material Settings.
Printing Temperature
Buildplate Temperature
Flow (wall flow is important!)
- Travel Settings.
Retraction distance
Retraction speed
These settings might need adjustments according to your
printer or filament. You should print a wing part to test your
print quality. If your test print resulted in a succesful way then
you are ready to start the printing process for the rest of the
parts.
Note: 0,2 mm layer height is the best setting for the
Print Quality/Printing Time.
5
© 2022 Craycle Hobby. Copies allowed for personal use only. Not for commercial use.
Print Guide
www.craycle.com
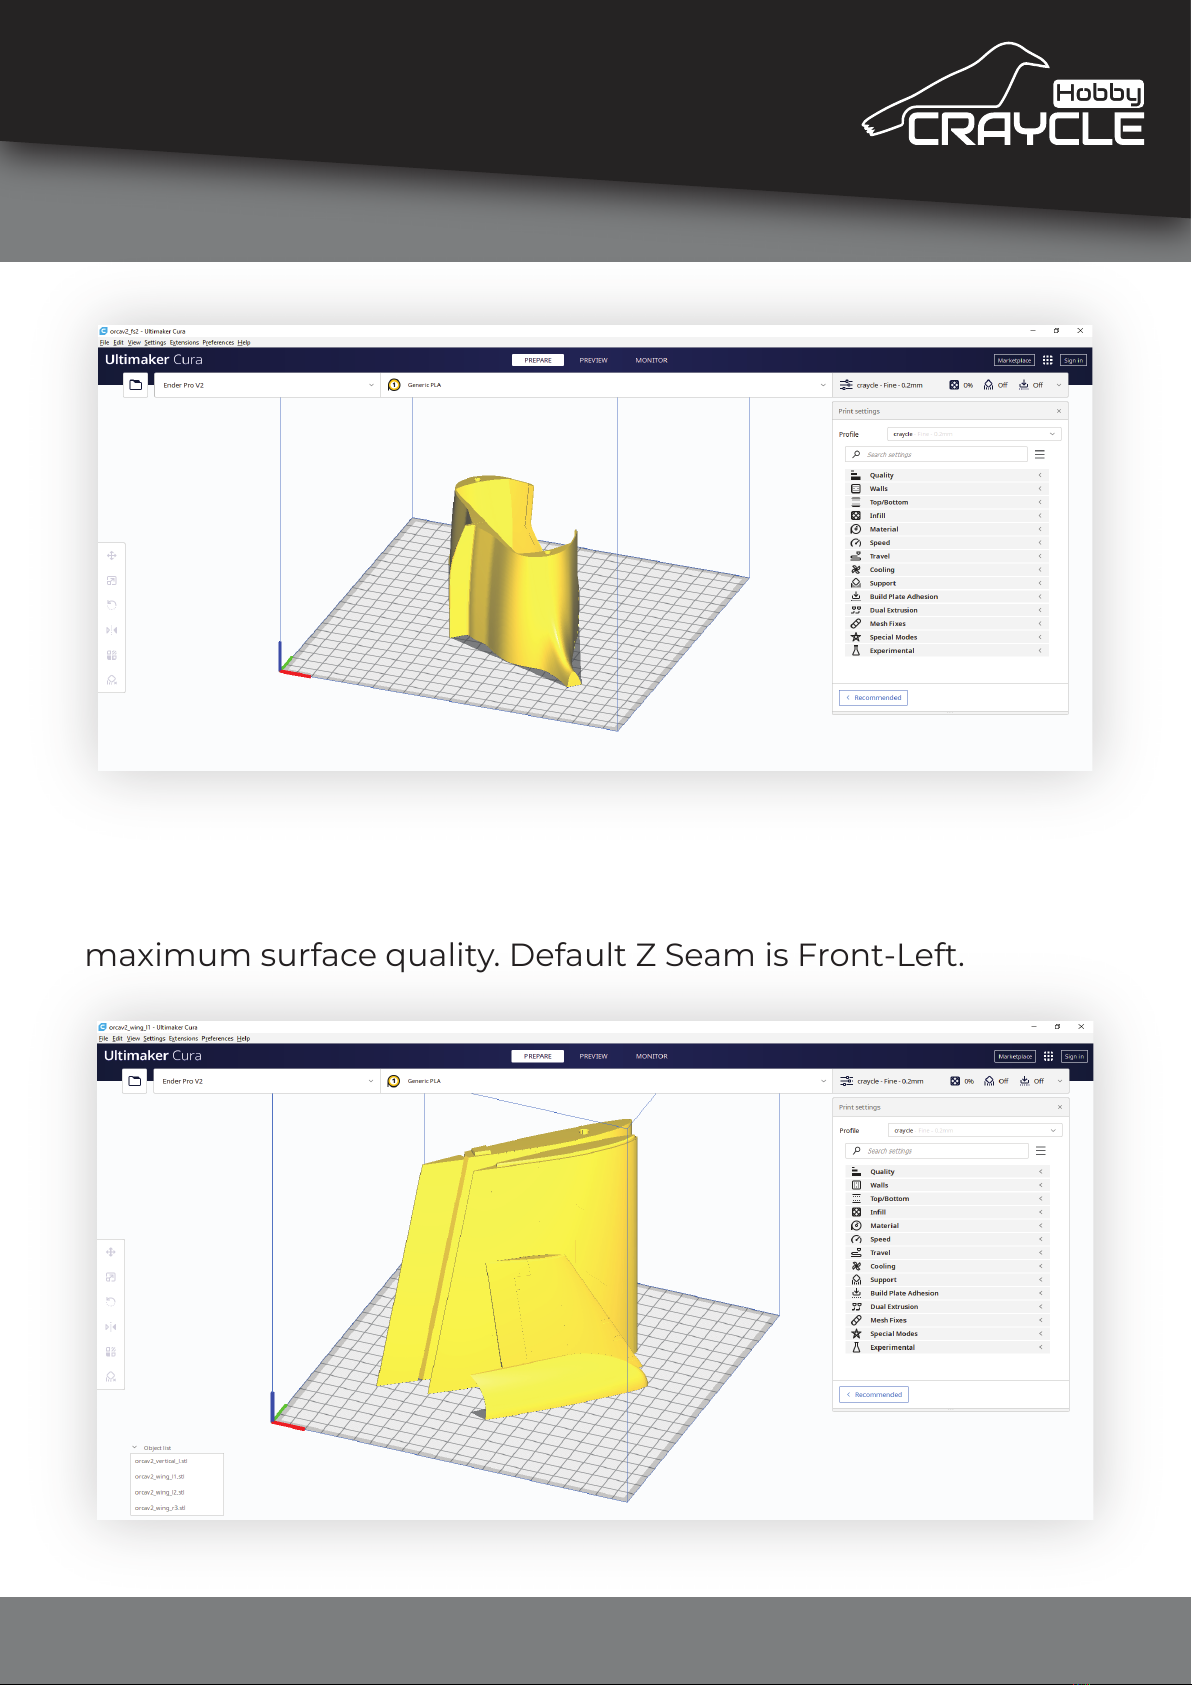
All parts are now pre-routed for Cura but if you want to print
several pieces together, orient the pieces at 45 degrees to the
bed. This way X and Y axis works coordinated and you can get
maximum surface quality. Default Z Seam is Front-Left.
6
Table of contents
Other Craycle Hobby Toy manuals


Popular Toy manuals by other brands

Mega Bloks
Mega Bloks First Builders Fast Tracks Rescue Team Assembly instructions

REVELL
REVELL Sd.Kfz.251/1 Ausf.B Assembly manual

THUNDER TIGER
THUNDER TIGER mini Titan E325 manual

marklin
marklin 37224 user manual

LaserPegs
LaserPegs PBI430B Power Block Model instructions

Hot Wheels
Hot Wheels BMG68 instructions


Carson
Carson POLICE TYRANN 230 GYRO 2.4 GHz instruction manual

WOOD HEROES
WOOD HEROES Catapult II Assembly manual

Blade
Blade CX user manual

Phoenix Model
Phoenix Model AT6-TEXAN instruction manual

Fisher-Price
Fisher-Price GRAVE DIGGER Monster Truck H0436 Owner's manual & assembly instructions

Eduard
Eduard Mask B-17G Flying Fortress manual