Craycle Hobby CraycleCub User manual

© 2022 Craycle Hobby. Copies allowed for personal use only. Not for commercial use.
www.craycle.com
CraycleCub
User Guide
Designed By: Cemal ÖZÇELİK
Version: 1.0
Date: 20.05.2022
Recommended Setup
Motor
Propeller
ESC
Servo
Battery
Analog/DJI/Vista FPV systems
: 2204/5/6 1500/2500 kv
: 5/6/7” - 2/3/4 Blade
: 15-30A
: 4 X 9 g
: 3s 850-2500 mAh
General Specifications
Length
Wingspan
Print Weight
Flying Weight
Wing Area
Wing Loading
Airfoil
20 inches
31.5 inches
8.46 oz.
15.8-19.4 oz.
: 510 mm
: 800 mm
: 240 g
: 450-550 g
: 9.16 dm2
: 49,1 g/dm2
: USA 35B
Maker Skill
Pilot Skill
180*180*180 mm
Min. Printer Size
Regular PLA
Filament

© 2021 Craycle Hobby. Copies allowed for personal use only. Not for commercial use.
Part List
www.craycle.com
17
16
15
6
27
2
26
22
20
19
18
10
28
11
24
7
4
8
9
5
12
13
25
14
231 3 21 30 32

© 2021 Craycle Hobby. Copies allowed for personal use only. Not for commercial use.
Assembly
www.craycle.com
STEP 1
Glue the "lipo_mount" part to "fs2", then glue the
"fs1-nose-fs2-fs3" parts together using CA glue. You can insert
the “cub_pim” parts (Ø3x12 mm) into the guiding holes for
each parts to facilitate assembly.
Never spray the accelerator directly onto the CA glue! Spray on
first piece and wait for 15 seconds to dry it. Then you can aply
glue on the other piece and put the pieces together.
Note: Avoid excessive use of glue.
1

© 2021 Craycle Hobby. Copies allowed for personal use only. Not for commercial use.
Assembly
www.craycle.com
STEP 2
Glue the "fs4" - “elevator_r” - “elevator_l” parts together. Take a
little piece of 2 mm steel wire and bend with the dimensions
(as milimeter) as below and glue into its slot under the
elevator. This wire will distribute all the force to both sides.
2 mm steel wire will also be required to make landing gear too.
1 2
2

© 2021 Craycle Hobby. Copies allowed for personal use only. Not for commercial use.
Assembly
www.craycle.com
STEP 3
Release the elevator flaps from the elevator by breaking it’s
tiny connections.
Reassemble and glue the flaps using TPU hinges or CA hinges
that you prepared by using Hinge Maker Tool (Free on
craycle.com).
Note: The CA accelerator sprayed to stick the elevator may
have contaminated the hinge slots! Take your time, apply the
glue onto the hinges one by one and insert into the slots on
the flap first.
3

© 2021 Craycle Hobby. Copies allowed for personal use only. Not for commercial use.
Assembly
www.craycle.com
STEP 4
Glue the "rudder1" and “rudder2” parts together by inserting
“cub_pim”.
Glue the rudder you prepared to the tail by inserting hinges
into it’s slots.
Note: The CA accelerator sprayed to stick the elevator may
have contaminated the hinge slots! Take your time, apply the
glue onto the hinges one by one and insert into the slots on
the rudder first.
4

© 2021 Craycle Hobby. Copies allowed for personal use only. Not for commercial use.
Assembly
www.craycle.com
STEP 5
Clean the little “rearbracket” parts and glue onto the slots on
the rudder. Assemble the “wheel14_rim” and “wheel14_ring”
parts together to get rear wheel.
Assemble the rear wheel to the rudder by using a 2 mm servo
mounting screw or something similar.
That's it! You have a rear landing gear with the steering system.
5
© 2021 Craycle Hobby. Copies allowed for personal use only. Not for commercial use.
Assembly
www.craycle.com
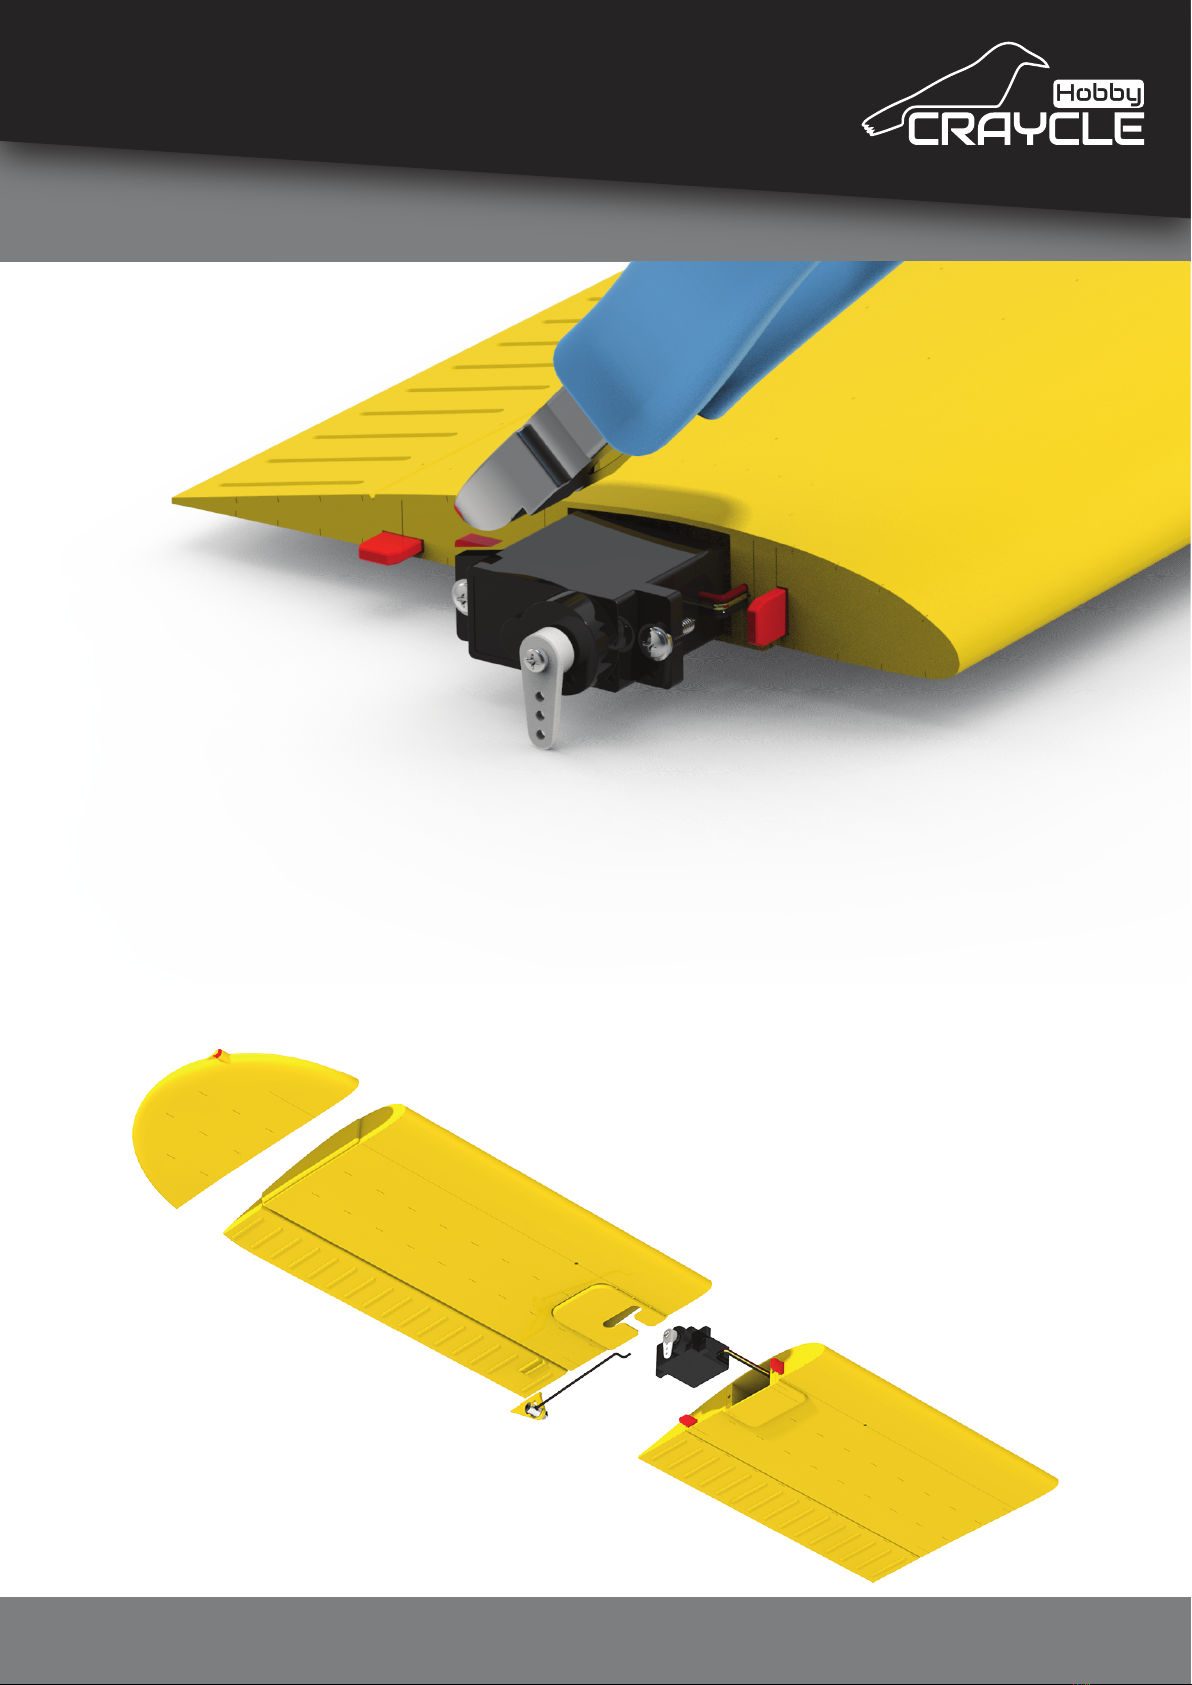
STEP 6
Take the servo as position as the same with the image above
and scew onto the “wing1” part. Also, you need to trim the
servo arm using cutting pliers as in the image above. Then you
can glue the “wing1”- “wing2” and “wing3” parts together by
inserting pims into the its slots. Be careful not to apply glue to
the servo and same process goes for the other side.
6

© 2021 Craycle Hobby. Copies allowed for personal use only. Not for commercial use.
Assembly
www.craycle.com
STEP 7
Insert the “wingspart” to the fuselage and glue it from the
inside of the fuselage (Make sure it is centered with the
reference lines on the wingspar).
Insert the servo cables to the fuselage. Assemble the wings to
the fuselage and glue them together. Hold the wings as
horizontal as possible during the gluing process. Wing
supports will align the wings as well.
Stick the tail that you prepared to the fuselage by inserting it’s
pim to facilate assembly.
7

© 2021 Craycle Hobby. Copies allowed for personal use only. Not for commercial use.
Assembly
www.craycle.com
STEP 8
In this step, take your time and do it right!
You need to be sure the wings are holded in a straight line
(Hold the model upside down on the flat table).
Then you can screw the “wingsupport” part by using 2 mm
screws (Servo mounting screws) into the holes on the wings
and fuselage.
When assembly is complete, turn the model over and check
the flatness of the wings.
8

© 2021 Craycle Hobby. Copies allowed for personal use only. Not for commercial use.
Assembly
www.craycle.com
STEP 9
Install your servos to the fuselage and prepare 2 pieces of 1,2
mm pushrods which is approximately 210 mm length.
You can make Z bend for the both side or use rod linkage to
make detachtable and facilate to set the flap positions.
For this model, the best way to mount the push rods is; Z-bend
is mounted on the outside, the push rod connectors are
mounted on the servo arms inside. In this way, connectors are
installed quick, it becomes possible to deassemble the wires,
and the objects that will create drag are reduced on the
outside.
You can use cheap 9 gram servos for this model becouse of it's
not required high sensitive on the control surfaces.
9
© 2021 Craycle Hobby. Copies allowed for personal use only. Not for commercial use.
Assembly
www.craycle.com
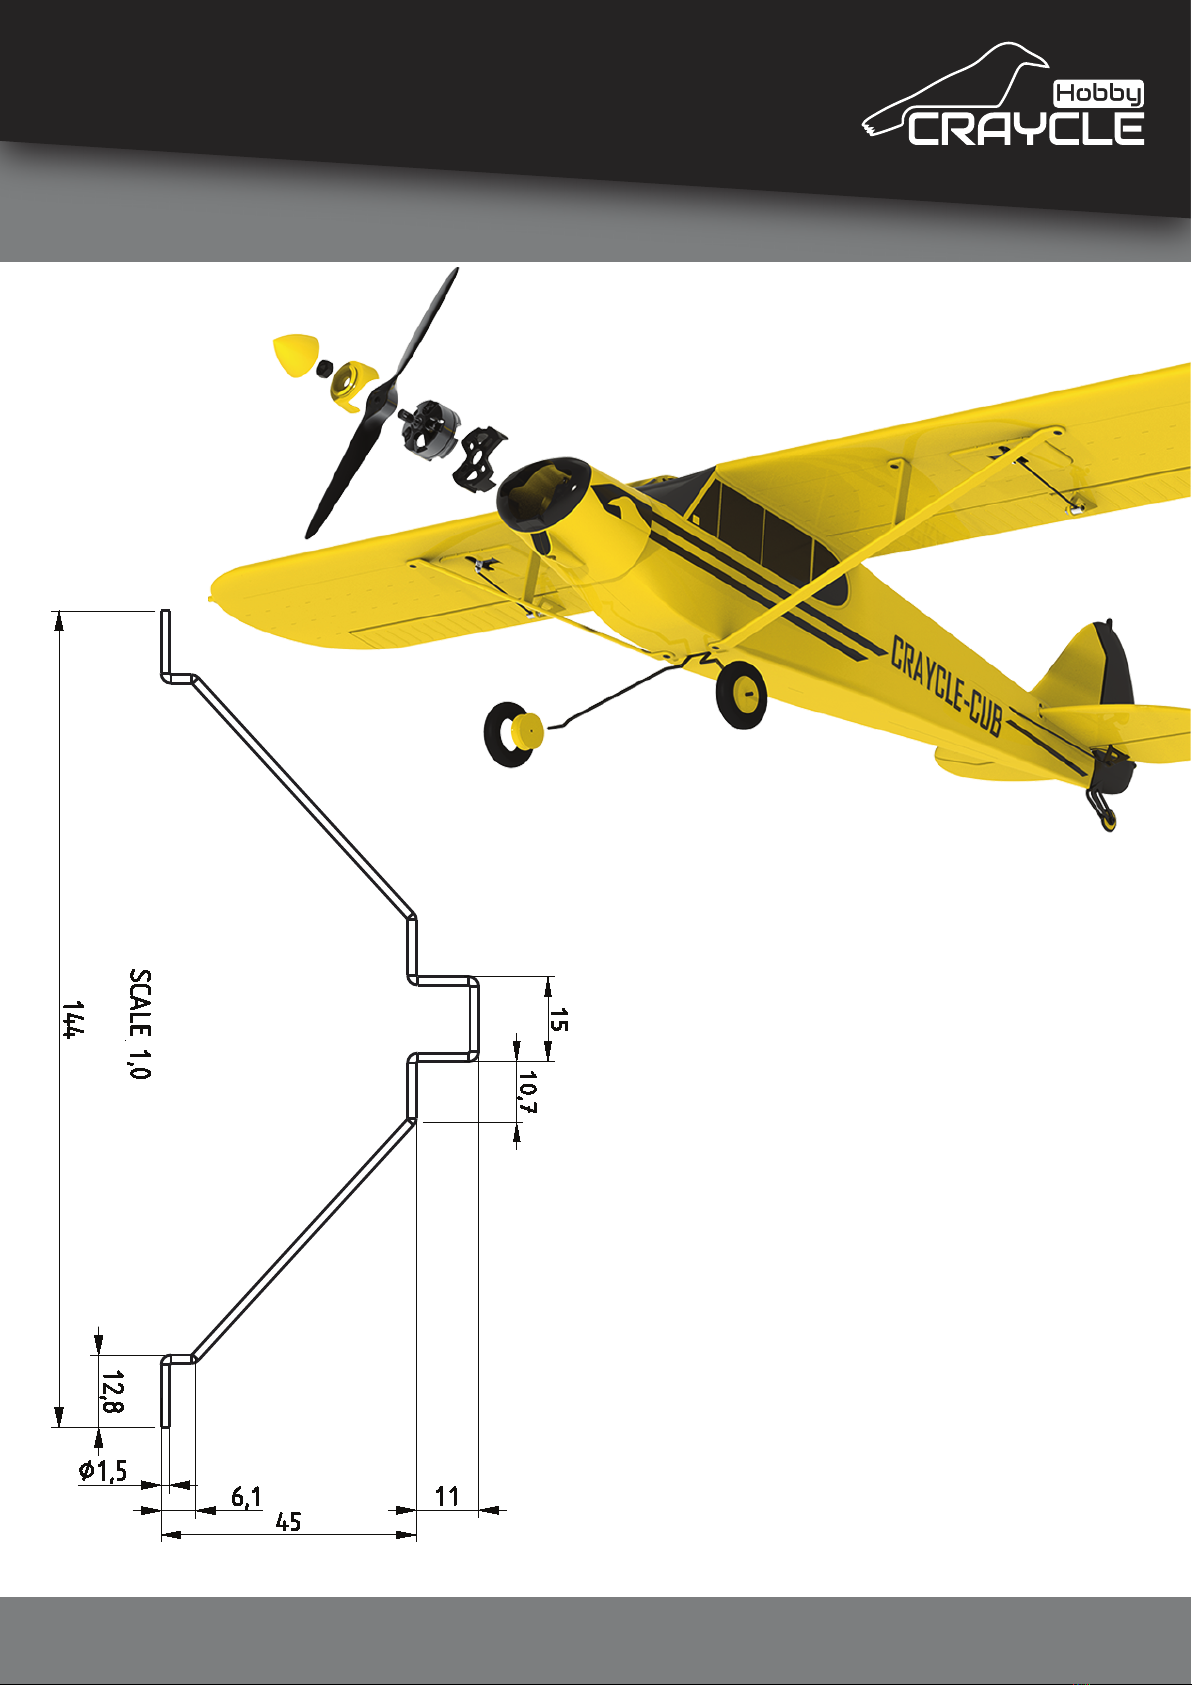
STEP 10
Prepare quick release landing
gear by using 2mm steel wire. You
can use this page by printing as
%100 scale and also you can use
the dimensions as mm.
Assemble the “wheel35_ring” and
“wheel35_rim” parts together and
install them onto the landing gear
that you prepared (You can make
a clear hole in the “wheel35_rim”
by drilling it with 2 mm drill bit.)
Glue the “spinner_adaptor” and
“spinner_base” parts together by
inserting 5 mm rod to make it
centered. Assemble the spinner,
motor and landing gear as shown.
10

© 2021 Craycle Hobby. Copies allowed for personal use only. Not for commercial use.
Assembly
www.craycle.com
STEP 11
Now you can install all your electronics. Make transmitter
settings (Use 40% Expo and set 11mm up 9mm down control
movement for ailerons and elevators for the maiden. Set 11mm
right and left for rudder ).
Glue the “lock_body” part into the “hatch1”. Assemble the
“lock_catch” part by using m3x8mm bolt (Comes with
brushless motors). Insert and stick the “cub_pim” parts
corresponding to the hatches into the fuselage (Red pims in
front of the wingspar.) Assemble the “hatch2” to the fuselage
by using 2 mm screws.
11
© 2021 Craycle Hobby. Copies allowed for personal use only. Not for commercial use.
Epilogue
www.craycle.com
Center of Gravity is 29,5 mm behind from the leading edge
(There is a marked point under the wing).
You can add extra weights into the “fs1” to make CG correct.
You can also print FS3 and all tail parts with LW-PLA to make
the rear lighter. You can also print this model completely LW
but it’s not necessary at all. We are developing all of our
models by using Regular PLA to provide accessibility.
We recommend 6” propellers for this model but if you want to
make a trainer model, the bigger propellers will make the
model slower in the air. So you can use 7” propellers to make a
park flyer.
12

© 2021 Craycle Hobby. Copies allowed for personal use only. Not for commercial use.
Epilogue
www.craycle.com
If there is a missing information in this guide, please let us
know to fix that. We are always continue to improve the model
after published. Usually this happens becouse of requests. For
this model, if you need a feature that will improve your user
experience to a good level please let us know by e-mail to
info@craycle.com and join the Beta System for next project.
Check Beta system details on craycle.com.
You will always able to reach this model’s updated versions for
free! Subscribe to our newsletter on craycle.com to get update
notifications.
Thank you for supporting us by building our models!
13

© 2021 Craycle Hobby. Copies allowed for personal use only. Not for commercial use.
Addons
www.craycle.com
DJI Air Unit - Caddx Vista - Analog FPV compatible hatches
and Flight Controller Mount are available on craycle.com.
We are aiming to define which system are most common by
separating this features! So it's never going to cost you too
much.
14

© 2021 Craycle Hobby. Copies allowed for personal use only. Not for commercial use.
Print Guide
www.craycle.com
We have prepared printer profile on Cura Slicer for you. If you
have a Marlin XYZ type printer, you can print directly with
prepared gcodes as well. If you can’t use the gcodes don't
worry, just follow the instructions...
Download and install CURA Slicer on ultimaker.com.
When you open the program, you can find your own printer
from the printer list but if you are getting error on importing
curaprofile, you will need to create Custom Printer to import a
curaprofile succesfully.
Open the Add Printer window, select Custom FFF printer, type
your printer name and click to the add button for the next step
1

© 2021 Craycle Hobby. Copies allowed for personal use only. Not for commercial use.
Print Guide
www.craycle.com
Set your printer x, y, z dimensions. Heated Bed is necessary for
the wall printing.
Nozzle size has to be 0,4 mm. If you have a different size nozzle
then you have to change it with a 0,4 mm one.
Click the next button, your printer settings are ready!
2

© 2021 Craycle Hobby. Copies allowed for personal use only. Not for commercial use.
Print Guide
www.craycle.com
Next step is importing the “craycle.curaprofile”. Follow the
instructions.
Setting - Printer - Manage Printers => Click to the
Profiles on the left side.
You can see your custom and default profiles in this panel. We
are preparing the best print settings to our models for you and
you will be able to use these settings but you need to check
some settings for your printer first.
Click to the “Import” button and go to the next step.
3

© 2021 Craycle Hobby. Copies allowed for personal use only. Not for commercial use.
Print Guide
www.craycle.com
Select “crayce.curaprofile” and click to the open button. Now
you have the Craycle Profile! If you have an error in this step,
you need to create Custom Printer or update your Cura Slicer.
4
Table of contents
Other Craycle Hobby Toy manuals


Popular Toy manuals by other brands

LeapFrog
LeapFrog Count-Along Basket & Scanner instruction manual

Majik
Majik CATCH FISHING CHALLENGE Assembly instructions

Xray
Xray M18 PRO instruction manual

Carrera RC
Carrera RC Neon Storm Assembly and operating instructions

Connoisseur Models
Connoisseur Models GWR Loriot M instructions

Mattel
Mattel Barbie V6826 instructions

Horizon Hobby
Horizon Hobby Flyzone Fokker D.VII instruction manual

IMC Toys
IMC Toys Baby Wow Megan Instructions for use

THE WORLD MODELS
THE WORLD MODELS EP-Sailor instruction manual

Fisher-Price
Fisher-Price Little People Motorized Big Top Train 72753 instructions

Fisher-Price
Fisher-Price Laugh & Learn manual

THE WORLD MODELS
THE WORLD MODELS Zero Fighter 60S instruction manual


