CRCBOX EX-16-8 User manual

Rack type digital mixer
EX16-8
O p e r a t i n g i n s t r u c t i o n
Press for fine
PUSH
AE S 50
PUSH
A B
16-CHANNEL 24-BIT FIREWIRE/USB AUDIO INTERFACE
US B 2 .0
-34 +10 +48V
GAIN/TRIM
CHANNEL LEVEL
MUTE
PFL
DISP /
DISP /
Min M ax
+10
+4
+2
0
-2
-4
-22
-38
-60
L R
-16
-7
CLIP
PFL
-34 +1 0
PHONES
EX-16-8
Professional Digital High Speed Interface Desk
1
3
2
4
HOME

Safe Use Matters
Before using the device, please read the instruction manual carefully
and follow the warnings about operation and use. The instruction
manual should be kept for future reference.
◆ The device can only use the power supply type marked in the manual.
◆ Attention should be paid to avoid the power cord being squeezed by heavy objects,
especially attention should be paid to the plug of the power cord, the outlet of the
device and the convenient socket, and avoid pulling or pumping the power cord.
◆ Can not be used near the water source, such as: bathtub, sink, kitchen sink, wash
basin, wet basement, swimming pool, etc.
◆ The device must be away from heat source.Examples: radiators, heating resistors,
stoves and other heating devices (including amplifiers).
◆ Care must be taken to prevent objects or water from falling into the inner core.If
dropped into metal or other conductive material, there is a risk of electric short circuit
inside the device.
◆ Because the machine memory has high voltage, non-electronic professional and
technical personnel, do not remove the casing, if the internal electronic parts are
abnormal contact, serious electric shock may occur
Reason.The company is not responsible for this incident.
◆ Do not use volatile solutions.Such as: alcohol, paint thinner, gasoline, volatile oil and
other wipe the shell, the use of clean dry cloth.
◆ In case of abnormal odor or smoke, cut off the power supply and pull out the plug
immediately, and contact the supplier or the nearest maintenance department for
maintenance service.
In pieces A.For safety, please disconnect the power switch and unplug the power plug.In
case of fire.
B.To prevent water, metal, flammable products or other foreign matter from falling into
the machine, so as to avoid electric shock and fire accident.In case of such an accident,
please cut off the power immediately.
Discontinue use.And with the company's service center or the purchase shop contact,
seeking maintenance services.
◆ Do not put the power plug under the machine or between other items;Do not set the
power supply in the place with frequent traffic, so as not to cause damage to the plug
An electric shock or fire accident occurs.
Warning:
Do not press the power plug under the machine or between other items;Do not
set the power in the personnel come
To frequent places to avoid electric shock or fire accidents caused by broken plugs.
!
1

Customers need to know
Dear customers,
Thank you for choosing this product!In order to ensure the safety of you and the machine, as
well as to enable you to fully enjoy the best product experience, be sure to read this manual
carefully before connection or operation, and please keep this manual for future reference after
reading.
Open-box inspection:
After unpacking, please first confirm whether there is any damage caused by transportation,
and connect the wire according to the requirements of this manual and test each function. If
there is any problem, please inform the sales department immediately.
Dear customers,
Note:
◆ When buying the machine, please check whether the bar code on the back plate of the case is
complete, and whether the random accessories are complete.
◆ Non-designated maintenance department opened the machine will not be within the scope of
the three packages.
◆ It is recommended that you keep the removed packaging materials and accessories for future
handling or maintenance.
!
directory
2
Start using····················································································································································· 4
Function of···················································································································································· 5
Input channel··············································································································································· 9
Digital channel··········································································································································· 10
Effect of channel········································································································································ 11
Feedback page············································································································································ 12
Output channel··········································································································································· 13
MP3 / sound playback and recording ···································································································· 14
Load/save······················································································································································ 15
System Settings·········································································································································· 16
Copy page····················································································································································· 16

The machine features
This product is a novel and unique multi-function digital mixer, with small size, light weight, full
function, intuitive and simple operation, quick response and many other advantages.
Custom layer, channel LINK, silent grouping, and Chinese system support make this product is
very suitable for live applications in live performances, conferences, schools, churches, cultural
halls, weddings, concerts, families, bands and other occasions.
1, 16 MIC/ LINE input 1 digital input: optical fiber/sound card, MP3
2, input channel audio and image adjustment
3, with feedback suppressor
4. MIC input gain adjustment (digital gain)
5. +48V phantom power supply (MIC channels can be opened and closed
independently)
6, Built-in noise door, pressure limiter, high and low pass, input 5-section parameter
balance, delay, sound and image balance adjustment of input channel
7. Quick copy of channel parameters
8, Input and output EQ ON/OFF
9, multi-function knob, direction button
10, each channel is equipped with multi-function menu, dumb voice and monitoring
11, 8 channels of signal output
12, output processing: high and low pass filtering, 11 section parameter equalization,
compressor, delay, phase
13. Digital recording function
14, Double row 3 color 12 level indicator light
15, built-in sound card (MP3, PC directly play music)
16. Four quick scene invocation modes and 20 scenes storage
17. Storage and fetching of user parameters (can be managed on PC)
18, Built-in two DSP effector 1, optical fiber input/output 1, multi-operating system
control software (IOS system, Android system, Windows system)
19, support wired network port adjustment (or external router wireless adjustment)
20, 4.3-inch 480*272 capacitive touch screen
21. Support 232 central control
22. Integrated automatic mixing function
3

Quick to use
01. When the mixer is turned off, select one MIC/ LINE input channel, plug in the microphone or CD player
and other external audio source to connect to the mixer, please make sure before connecting
Keep the access channel mute or push the physical push to the lowest position.
02. Power on the mixer and wait for the power on. Please use the power adapter provided by the original
manufacturer.
03. After starting the mixer, adjust the volume of the corresponding channel to the appropriate position,
and send the signal to the corresponding output.
4. Finally adjust the gain size.
05. If you are connected to a capacitive microphone or other device that requires power, turn on the
Phantom Power.
06. According to the demand of the signal source, the equalizer is used to enhance or weaken the
corresponding frequency band, and the compressor and threshold are used to control the dynamic
range.
07. Send input signals to each effector, output bus and main output.
8. Change the volume knob until the sound system produces the right amount of sound.
4
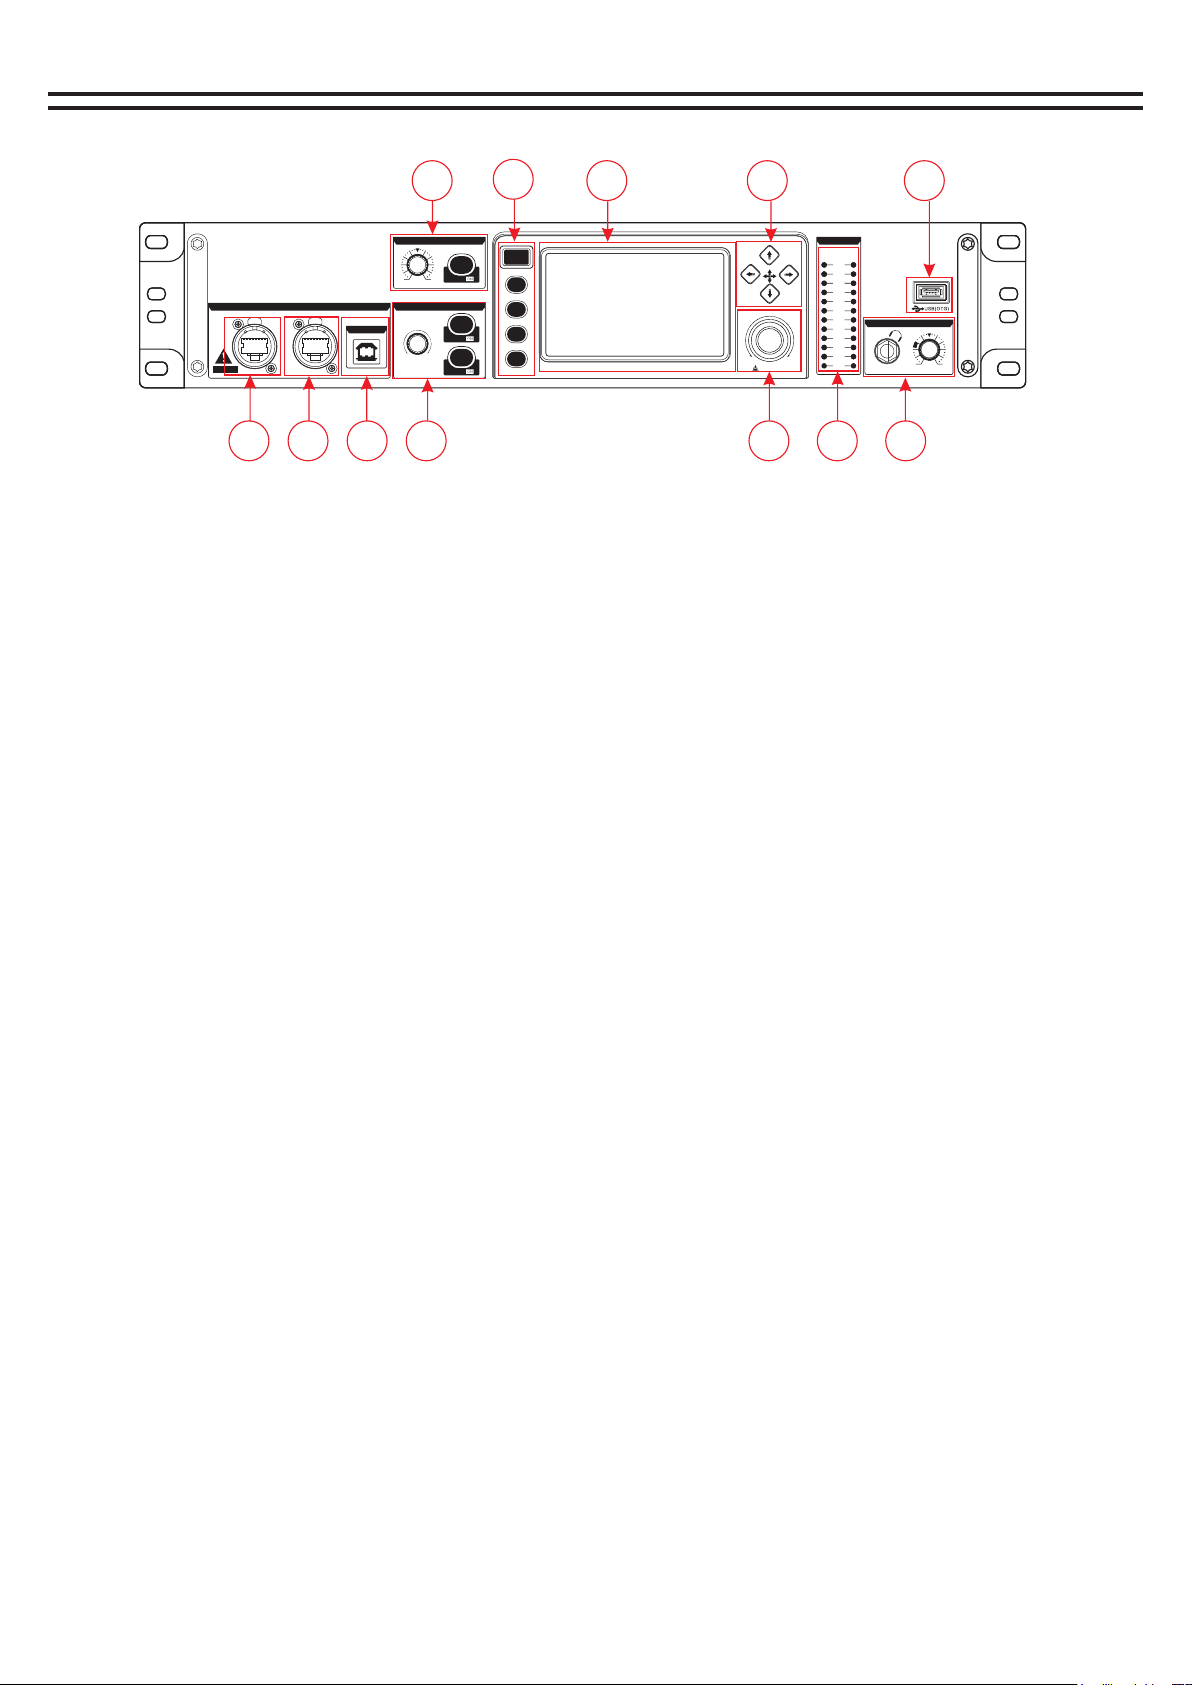
Features - Front panel
1. A2B network extension interface
The network cable is used to connect the mixer (with A2B interface) to realize the expansion of the
number of channels.
2. LINK: External router network cable connection control.
3, USB2.0: connect the computer software debugging and audio card audio input interface.
4, volume knob /PFL monitor key /MUTE MUTE key.
1), volume knob - control the current channel volume signal size.
2), PFL monitor key switch - when this button is pressed, the signal will be output from the listener and
earphone.
3) MUTE channel MUTE switch - When this button is on, you will not hear the channel signal.
5, Input channel gain /+ 48V switch.
1), Gain control
Adjust this knob to increase or decrease the input signal level.
2), 48V phantom power button
Long press the button for 3 seconds to turn on the 48V power supply of the current channel and light it,
indicating that the MIC jack has 48V voltage.
Note: Do not turn on the phantom power until you have connected the microphone.
6, Home button/scene quick call button.
1), Home button - channel selection.
Clicking Open will bring up the channel selection screen.
2) Quick scene call button
Click the corresponding button to quickly call up the first four modes of the scene mode.
7. 4.3-inch 480*272 capacitive high-definition touch screen
8, up, down, left, right selection keys.
9. Multi-function knob
Touch this knob to adjust the parameters with the display screen.
10, input and output monitoring signal indicator light.
11. Monitoring headphone jack/and monitoring knob
Insert the headset into this jack. It is recommended that the impedance of the headset be greater than
150oHM.Monitoring level knob This knob is used to control the monitoring signal level.
12, U-Disk: U DISK interface, MP3 audio input and system upgrade interface.
Pre ss for fi ne
PUS H
AE S50
PUS H
A B
16-C HA NNEL 24 -B IT FIRE WIRE/US B AUDIO INT ERFACE
US B 2.0
-34 +10 +48V
GAIN/TRIM
CHAN NE L LEVEL
MUTE
PFL
DISP/
DISP/
Min M ax
+10
+4
+2
0
-2
-4
-22
-38
-60
L R
-16
-7
CLI P
PFL
-34 +10
PHONES
EX-16-8
Professional Digital High Speed Interface Desk
1
3
2
4
HOME
1 2 3 4
567 8
910 11
12
1
1
2
2
3
5

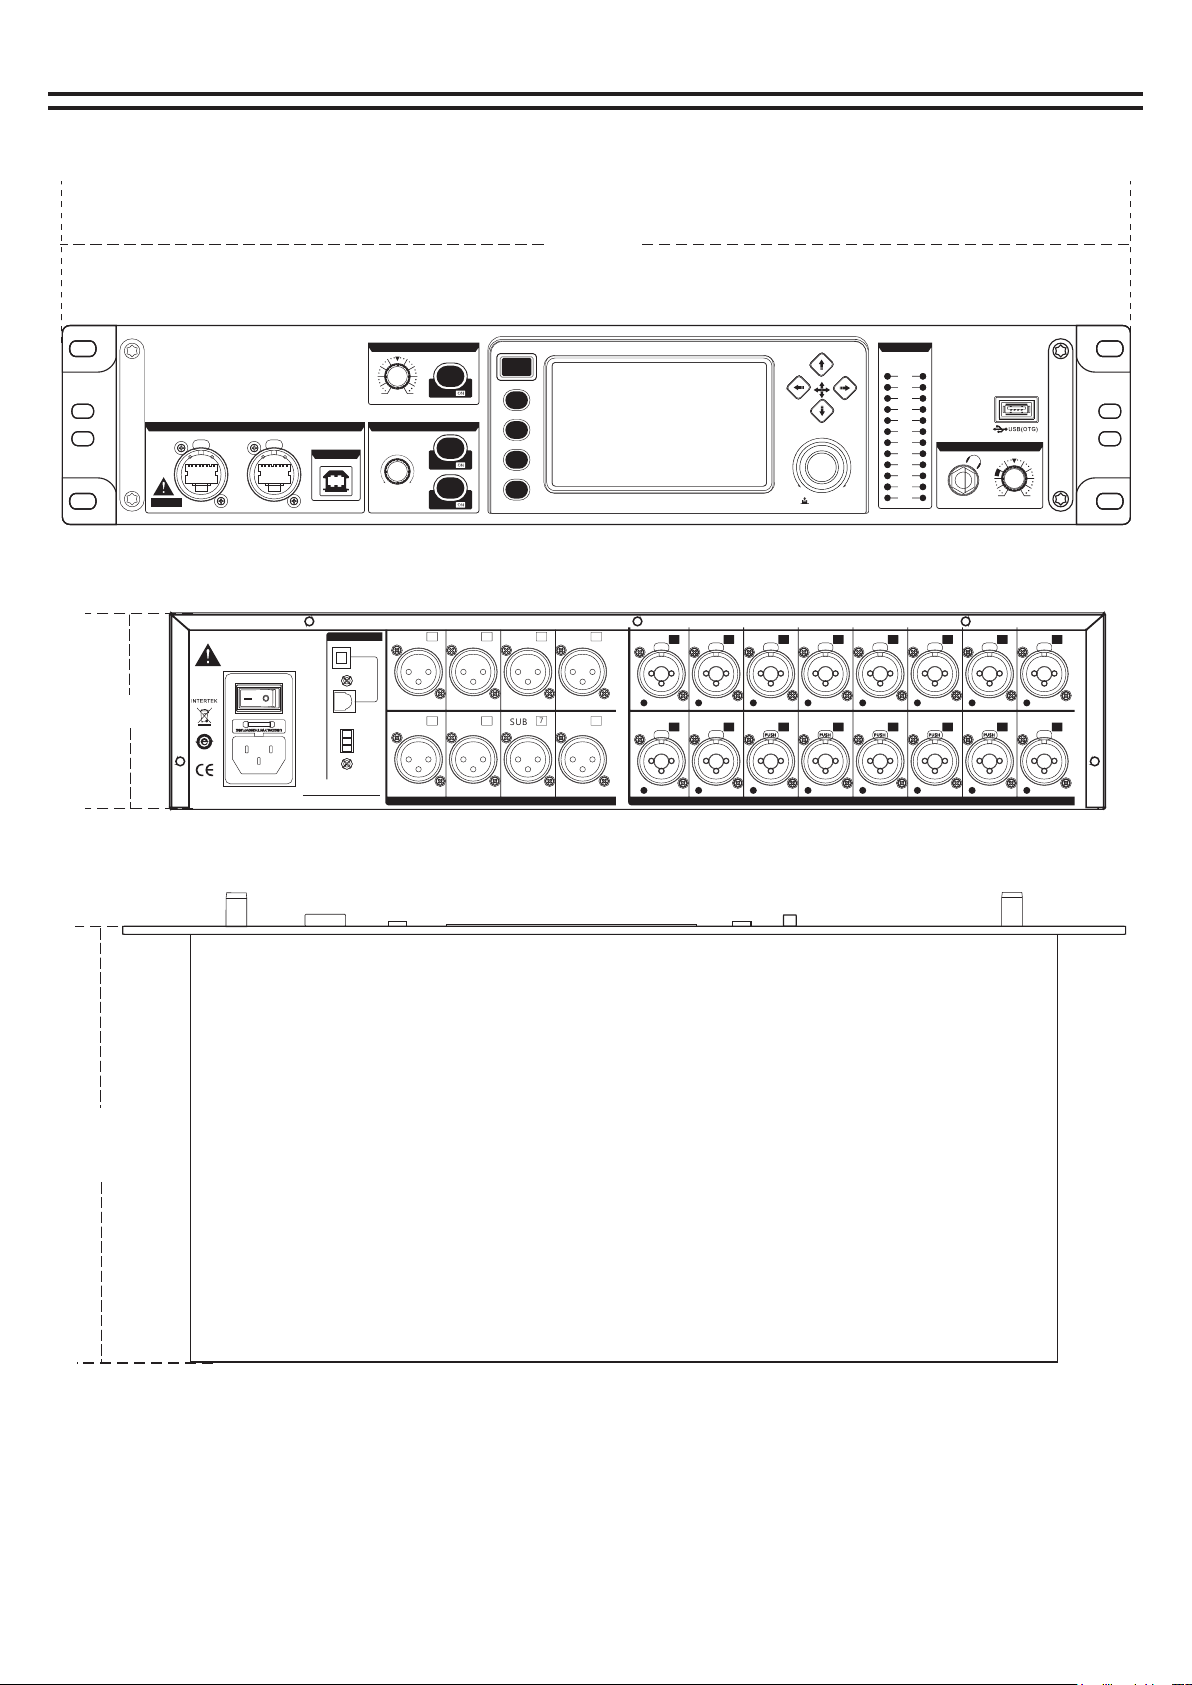
Features - later version
1. Power input port and switch
For 110V-220V power interface, the factory's matching power adapter must be used.
2. Optical fiber signal input/input/central control RS232
1) In port is optical fiber input, and OUT port is optical signal output.
1), central control RS232: external 232 central control device control connection.
3. Sub1-8 marshalling output
SUB1-8 marshals output signals to a power amplifier or other sound amplification system.
MIC/ LINE microphone input interface
All balanced input ports, 16 XLR sockets, can be connected to XLR line can also use 1/4"
TRS line is connected to audio signal source.
PUS HPUS HPUS HPUS HPUS HPUS HPUS HPUS H
PUS HPUS HPUS HPUS HPUS HPUS HPUS HPUS H
SUB 1SUB 2SUB 3SUB 4
SUB 5SUB 6SUB 7SUB 8
GND
485B
485A
IN
OUT
RS232
PO WER
MA INS I N PUT
90 / 250V AC ~ 47 -63 Hz
80W MAX T1. 5AL
SERIAL NO:
LINE
MIC LINE
MIC LINE
MIC LINE
MIC LINE
MIC LINE
MIC LINE
MIC LINE
MIC
LINE
MIC
LINE
MIC
LINE
MIC
LINE
MIC
LINE
MIC
LINE
MIC
LINE
MIC
LINE
MIC
48V
48V
48V
48V
48V
48V
48V
48V
48V
48V
48V
48V
48V
48V
48V
48V
INPUTSOUTPUTS
OPTI CAL 1 2 3 4 5 6 7 8
109 11 13 14 15
12 16
1 2 3 4
1
2
6
Function introduction - product size
Press for fi ne
PUSH
AE S 50
PUSH
A B
16-CHANNEL 24-BIT FIREWIRE/USB AUDIO INTERFACE
US B 2 . 0
-34 +10 +48 V
GAIN/TRIM
CHANNEL LEVEL
MUTE
PFL
DISP /
DISP /
Min Max
+10
+4
+2
0
-2
-4
-22
-38
-60
L R
-16
-7
CLIP
PFL
-34 +1 0
PHONES
EX-16-8
Professional Digital High Speed Interface Desk
1
3
2
4
HOME
480mm
PUS HPUS HPUS HPUS HPUS HPUS HPUS HPUS H
PUS HPUS HPUS HPUS HPUS HPUS HPUS HPUS H
SUB 1SUB 2SUB 3SUB 4
SUB 5SUB 6SUB 7SUB 8
GND
485B
485A
IN
OUT
RS232
PO W ER
MA I NS IN P UT
90 / 250V AC ~ 47-63H z
80W MAX T1.5AL
SERIAL NO:
LINE
MIC LINE
MIC LINE
MIC LINE
MIC LINE
MIC LINE
MIC LINE
MIC LINE
MIC
LINE
MIC
LINE
MIC
LINE
MIC
LINE
MIC
LINE
MIC
LINE
MIC
LINE
MIC
LINE
MIC
48V
48V
48V
48V
48V
48V
48V
48V
48V
48V
48V
48V
48V
48V
48V
48V
INPUTSOUTPUTS
OPTI CAL 1 2 3 4 5 6 7 8
109 11 13 14 15
12 16
100mm
100mm
Length, width and height: 480*290*100MM (length includes 6.35 input seat, width includes side plate,
height includes machine leg;Knobs not included)
8

Input channel
Enter the main page of input channel 1 by default.
The input channel page has noise gate, equalizer, voltage limiter,
and dispatch.
1, Gain: Gain/GAIN knob on the panel to control the size.
2, display the current channel signal level.
3. Copy key: Copy the parameters set by the current pass to other
input channels.
4, volume: through the volume knob on the panel to control the
current channel volume level size.
5. Touch the corresponding function area to enter the function
page.
6. Click Select or use the Up, Down, Left and Right buttons to
select the adjusted parameters and then pass
Multi-function knob to adjust.
7. Click the back button on the upper left corner of the function
page to return to the main page of the channel.
通道1
噪声门 均衡器 压限器 派送
-12dB
阀值
-12dB
阀值
高通类型 低 通类型
开 开 开
Bwo rt h- 12d B Bw or th- 12 dB
OUT1
OUT3
OUT5
OUT7
OUT2
OUT4
OUT6
OUT8
延时
0.0 ms
FX2
FX1
通道1
噪声门 COMP ON
0
0
-15
-15
-30
-30
-45
-45
-60
-60
-75
-75
-90
-90
-105
-105
-120
-120
-135
阀值
-135d B
启动时间
-135d B
保持时间
-135d B
释放时间
-135d B
通道1
均衡器 重置
EQ ON
通道1
压限器
0
0
-20
20
20(dB)
-20
-40
-40
-60
-60
-80
阀值
-135d B
压缩比例
1.00:1
保持时间
-135d B
释放时间
-135d B
(dB)
通道1
派送
延时
0.0m s
-24.0-24.0
FX1 FX 2
Channel main plane
Channel noise page
Channel equalizer page
Channel Limiter page
Channel sending page
20k
12
5k 10k
0
6
2k
-6
1k
-12
500200
-18
100
-24
5020
增益:
频率:
带宽:
类型:
LOW LOW -MID MID HI -MID HI
0.0 dB
80H z 250 Hz 100 0Hz 2 000 Hz
0.6 0 .6
PEQ PEQ P EQ
0.6 0.6 0 .6
120 00H z
0.0 dB 0.0 dB 0.0 dB 0. 0dB
PEQ P EQ
高通频率 :
高通类型 :
低通频率 :
低通类型 :
12 3 45
20H z
Bwo rth -12 dB
200 00H z
Bwo rth -12 dB
0.00
XY
0.00
XY
0.00
XY
0.00
XY
复制到 音量:-12dB
0.00
XY
复制到 音量:-12dB
复制到 音量:-12dB
复制到 音量:-12dB
复制到 音量:-12dB
COMP ON
1
2
34
9

Digital channel
Digital channel home page
The equalizer page
Pressure limiter page
数字通道
均衡器 派送
高通类型 低 通类型
开
Bwo rt h- 12d B Bw or th- 12 dB
压限器
-12dB
阀值
开
均衡器
数字通道
压限器
数字通道
音量:-12dB
音量:-12dB
音量:-12dB
OUT1 OUT 3
OUT5 OUT 7
OUT2 OUT 4
OUT6 OUT 8
20k
12
5k 10k
0
6
2k
-6
1k
-12
500200
-18
100
-24
5020
增益:
频率:
带宽:
类型:
LOW LOW -MID MID HI -MID HI
0.0 dB
80H z 250 Hz 100 0Hz 2 000 Hz
0.6 0 .6
PEQ PEQ P EQ
0.6 0.6 0 .6
120 00H z
0.0 dB 0.0 dB 0.0 dB 0. 0dB
PEQ P EQ
高通频率 :
高通类型 :
低通频率 :
低通类型 :
12 3 45
20H z
Bwo rth -12 dB
200 00H z
Bwo rth -12 dB
重置
COMP ON
EQ ON
0
0
-20
20
20(dB)
-20
-40
-40
-60
-60
-80
阀值
-135d B
压缩比例
1.00:1
保持时间
-135d B
释放时间
-135d B
(dB)
通道选择 系统设置
输入1
输入7
输入13
效果2
输出5
输入2
输入8
输入14
反馈
输出6
输入3
输入9
输入15
输出1
输出7
输入4
输入10
输入16
输出2
输出8
输入5
输入11
数字
输出3
MP3
输入6
输入12
效果1
输出4
模式
How do you get into the digital channel?
MP3 and sound card controls are controlled through
digital channels
1. Find the Home button on the panel and click to open
it. The channel selection page will appear.
2. Find the "number" button and click into the digital
channel.
数The word channel page has the equalizer, the pressure
limiter, the dispatch.
1. Touch the corresponding function area to enter the
function page.
2. Click Select or use the Up, Down, Left and Right
buttons to select the adjusted parameters and then pass
Multi-function knob to adjust.
3. Click the back button on the upper left corner of the
function page to return to the main page of the channel.
Channel selection page
10
Effect channel - effect mode
效果1
音量源
效果1
均衡器
20k
12
5k 10k
0
6
2k
-6
1k
-12
500200
-18
100
-24
5020
增益:
频率:
带宽:
类型:
LOW LOW -MID MID HI -MID HI
0.0 dB
80H z 250 Hz 100 0Hz 2 000 Hz
0.6 0 .6
PEQ PEQ P EQ
0.6 0.6 0 .6
120 00H z
0.0 dB 0.0 dB 0.0 dB 0. 0dB 20H z
Bwo rth -12 dB
200 00H z
Bwo rth -12 dB
PEQ P EQ
高通频率 :
高通类型 :
低通频率 :
低通类型 :
12 3 45
效果1
发送 开
-24.0
-24.0-24.0-24.0-2 4.0-24 .0-24.0-24.0-2 4.0
-24.0-24.0-24.0-24.0-24.0-24.0-2 4.0
OUT1
CH1 CH2 CH3 CH4 CH5 CH6 CH7 CH8
OUT2 OUT3 OUT4 OUT5 OUT6 OUT7 OUT8
Main page of effect
Effect volume source page
Displays the status of the input
channel sent to the current effect
Effect equalizer page
Effects user effects parameter page
The effect is sent to the output channel page
12
通道选择 系统设置
输入1
输入7
输入13
效果2
输出5
输入2
输入8
输入14
反馈
输出6
输入3
输入9
输入15
输出1
输出7
输入4
输入10
输入16
输出2
输出8
输入5
输入11
数字
输出3
MP3
输入6
输入12
效果1
输出4
模式
Channel selection page
How do I get into the effect channel?
1. Find the Home button on the panel and click to open it. The
channel selection page will appear.
2. Find the "Effect 1/2" button and click into the effect
channel.
效果1
音量源 均衡器 派送
高通类型 低 通类型
开
Bwo rt h- 12d B Bw or th- 12 dB OU T1
OUT 3
OUT 4
OUT 6
OUT 7
OUT 5
OUT 2
OUT 8
开
Wah-Wah
Auto Wah1
关
Distor tion
Distor ti on
关
Pitch-shift
Light Detlay
关
Reverb/Delay
Small Plate
关
Mod-FX
chorus
CH1
CH2
CH3
CH4
CH5
CH6
CH7
CH8
CH9
CH1 0
CH1 1
CH1 2
CH1 3
CH1 4
CH1 5
CH1 6
用 户- 1
音量:-12dB
音量:-12dB
音量:-12dB
音量:-12dB
重置
EQ ON
The effect channel page has volume source, equalizer, user
parameters, and dispatch.
1. Touch the corresponding function area to enter the function
page.
2. Click Select or use the Up, Down, Left and Right buttons to select
the adjusted parameters and then pass
Multi-function knob to adjust.
3. Click the back button on the upper left corner of the function
page to return to the main page of the channel.
Reverb/Delay
加载 保存
用户-1 用户-1
Wah- Wah Distortio Picth-shift Mod-FX
Type
LPF HP F
Fllter: 2000Hz
70.00%
0.00%
Auto Wah:
Resonance:
Reverb/Delay
加载 保存
用户-1 用户-1
Wah- Wah Distortio Picth-shift Mod-FX
Fllter:
1 / 2 Tone: 2000Hz
0
70.00%
50.00%
Fine one: Resonance:
Dry/Wet-Mix:
加载 保存
用户-1 用户-1
Wah- Wah Reverb/DelayDistortio Picth-shift Mod-FX
Type
Tub e1
Tub e2
Tub e3
Raw
Hype rboli c
Parb olic1
Parb olic2
PreGain: 5 0.0 0%
2000Hz
8000Hz
0.00%
50.00%
Fllter:
RC-LPF:
Resonanc e:
PostGain :
加载 保存
用户-1 用户-1
Wah- Wah Distortio Picth-shift Reverb/Delay Mod-FX
Reve rb Reve rb
Reverb/D ela y: Small Hall
50.00% 50. 00%
8000Hz 80
0.00Hz 3.40d B
102%
LevelRev: HDamp: LevelDel: 50.00%
0.00%
1500Hz
100ms
PreLP:
TimeDel:
TimeDel:
PreDelay : ToneF req:
PreHP: Tone:
TimeRev:
加载 保存
用户-1 用户-1
Wah- Wah Distortio Picth-shift Reverb/Delay Mod-FX
Paea metes R everb
Mod-FX chor us
6.90ms 5.0Hz
8000Hz 0%
14.00%50.00%
10.00%
DelTlme: Rate:
Level: 50.00%
PreHP: TremShap e:
Feedback : Dep th:
HDamp:
User Parameters Page
Set the parameters and click the user area, rotate the multi-function
knob to save to the user (1-20), select it and click "Save" to complete
the save.
Click the user area, rotate the multi-function knob and click the
loading area to call up the parameters of the user (1-20).
11

Feedback page
通道选择 系统设置
输入1
输入7
输入13
效果2
输出5
输入2
输入8
输入14
反馈
输出6
输入3
输入9
输入15
输出1
输出7
输入4
输入10
输入16
输出2
输出8
输入5
输入11
数字
输出3
MP3
输入6
输入12
效果1
输出4
模式
How do I get to the feedback page?
1. Find the Home button on the panel and click to open it. The
channel selection page will appear.
2. Find the "Feedback" button and click to enter the feedback.
反馈抑制
音量源 派送
反馈
CH1 CH2
SW
SW
SW
SW
SW
SW
CH3 CH4
CH5 CH6
CH7 CH8
CH11 CH12
CH13 CH14
CH15 CH16
CH9 CH10
OUT1
OUT2
OUT3
OUT4
OUT6
OUT7
OUT8
OUT5
1
2
3
4
5
6
自动
增益(dB ) 频率( Hz) 带宽
-60.00 3 4 60.0
-60.00 3 4 60.0
-60.00 3 4 60.0
-60.00 3 4 60.0
-60.00 3 4 60.0
-60.00 3 4 60.0
Use of feedback suppression:
Feedback can be automatically suppressed or manually suppressed.
Auto-suppression - select the channel that needs feedback suppression, click on
autosuppression to automatically feedback suppression channel signal.
Manual Suppression - Select the channel that needs feedback suppression, click "SW" on one of
1-6 to open it, then select the corresponding gain, frequency and bandwidth, and adjust the
parameters through the multi-function knob to feedback suppress the channel signal.
12

Output channel
Output channel home page
The equalizer page
Pressure limiter page
输出通道1
派送
均衡器
高通类型 低 通类型
开
Bwo rt h- 12d B Bw or th- 12 dB
压限器
-12dB
阀值
开
均衡器
数字通道
压限器
数字通道
音量:-12dB
音量:-12dB
音量:-12dB
0
0
20k
12
5k 10k
0
6
2k
-6
1k
-12
500200
-18
100
-24
5020
增益:
频率:
带宽:
类型:
LOW LOW -MID MID HI -MID HI
0.0 dB
80H z 250 Hz 100 0Hz 2 000 Hz
0.6 0 .6
PEQ PEQ P EQ
0.6 0.6 0 .6
120 00H z
0.0 dB 0.0 dB 0.0 dB 0. 0dB
PEQ P EQ
高通频率 :
高通类型 :
低通频率 :
低通类型 :
12 3 45
20H z
Bwo rth -12 dB
200 00H z
Bwo rth -12 dB
重置
COMP ON
EQ ON
0
0
-20
20
20(dB)
-20
-40
-40
-60
-60
-80
阀值
-135d B
压缩比例
1.00:1
保持时间
-135d B
释放时间
-135d B
(dB)
通道选择 系统设置
输入1
输入7
输入13
效果2
输出5
输入2
输入8
输入14
反馈
输出6
输入3
输入9
输入15
输出1
输出7
输入4
输入10
输入16
输出2
输出8
输入5
输入11
数字
输出3
MP3
输入6
输入12
效果1
输出4
模式
Channel selection page
How do I get into the output channel?
1. Find the Home button on the panel and click to open it. The
channel selection page will appear.
2. Find the "Output" button and click it to enter the output
channel.
复制到
复制到
复制到
延时
0.0m s
相位
The output channel page includes voltage limiter, equalizer,
and dispatcher.
1. Touch the corresponding function area to enter the
function page.
2. Click Select or use the Up, Down, Left and Right buttons to
select the adjusted parameters and then pass
Multi-function knob to adjust.
3. Click the back button on the upper left corner of the
function page to return to the main page of the channel.
13

Mp3/ sound card playback and recording
Play page
U盘
歌曲名字00.012132
文件1.4441131
文件2.454564564
文件3.46274646
文件4.79134
文件5.248643
文件6.156876216348
00:00/00:00
234
Learn about MP3 pages:
1. The directory area can be swiped up and down to turn pages.
2. This area is Last, Pause/Play, Next, Random/Single Loop/Sequence.
3, start recording and pause recording, recording will automatically appear the name of the recording
file.
4, stop (can stop playing or recording stop).
Note: MP3 and sound card playback options need to be switched in the digital channel
When recording, please set up the recording device in the main output page. If you need MP3 recording,
select MP3, and select USB for the sound card to record the signal
Is the main output signal, so the recording must ensure that the main output signal output is normal,
otherwise it will not record the sound
通道选择 系统设置
输入1
输入7
输入13
效果2
输出5
输入2
输入8
输入14
反馈
输出6
输入3
输入9
输入15
输出1
输出7
输入4
输入10
输入16
输出2
输出8
输入5
输入11
数字
输出3
MP3
输入6
输入12
效果1
输出4
模式
Channel selection page
How do I get to the MP3 page?
1. Find the Home button on the panel and click to open it. The
channel selection page will appear.
2. Find the "MP3" button and click into the MP3 page.
14

Load/save mode
加载/保存模式 加载/保存模式
本地磁盘 U盘
保存模式 保存模式
加载模式 加载模式
11
22
33
44
55
66
77
88
99
13 13
10 10
14 14
11 11
15 15
12 12
16 16
17 17
18 18
19 19
20 20
How to save user data:
1. Set parameter data such as input, output and effect, and enter the mode page.
2. There are altogether 20 scenes for the user to save. Click the scene number to be saved, and
then press the "Save Mode" button.
How to load user data:
1. Go to the loading/saving page, select the user to be loaded, and then click the "Load Mode"
button.
3. There are four buttons under the "Home" button in the control panel, where you can quickly
call up the first four users of user data, and then press "OK" on the screen to complete the call up
of user data.
User's USB disk data:
1, set the input, output, effect and other parameters, to load and save the page, click the U disk
symbol in the lower left corner to enter the U disk page (orange indicates there is a U disk
Insert).
2, press the save key, write the name after the completion of the virtual keyboard ENTE (Enter
key), and then press the confirm key can be saved to the U disk.
3, insert U disk will automatically identify.Load the user data from the U disk, and the blue area
is to select the current user data. After selecting it, press the Load button, and then you can
confirm it
To load user data to the current channel.
通道选择 系统设置
输入1
输入7
输入13
效果2
输出5
输入2
输入8
输入14
反馈
输出6
输入3
输入9
输入15
输出1
输出7
输入4
输入10
输入16
输出2
输出8
输入5
输入11
数字
输出3
MP3
输入6
输入12
效果1
输出4
模式
Channel selection page
How do I get to the load/save page?
1. Find the Home button on the panel and click to open it. The
channel selection page will appear.
2. Find the "Mode" button and click it to enter the
loading/saving page.
Local page U disk page
15
Load/save mode
系统设置
通道选择 系统设置
输入1
输入7
输入13
效果2
输出5
输入2
输入8
输入14
反馈
输出6
输入3
输入9
输入15
输出1
输出7
输入4
输入10
输入16
输出2
输出8
输入5
输入11
数字
输出3
MP3
输入6
输入12
效果1
输出4
模式
Channel selection page
How do I get to the load/save page?
1. Find the Home button on the panel and click to open it. The
channel selection page will appear.
2. Find the "Mode" button and click it to enter the
loading/saving page.
Network(网络) Language(语 言)
Automix
(自动 混音)
FactoryReset
(恢复 出厂 设置)
About
(关于 本机)
SoftwareUpdaye
(软件 更新)
16-8-2.3.9
1. Network: You can change the network IP address here.
2. Language: Here to modify the language, the machine supports Chinese language and English
language.
3, automatic mixing: in the case of multiple microphone, the use of the function to change the
microphone volume can be saved consistent.
4. Restore factory Settings: one key can be pressed to restore the machine parameters to the original
factory Settings.
5, about the machine: here you can view the machine model, kernel version number, application version
number, serial number of information.
6. Update: Software can be updated here.
Download the update software to the USB flash drive, then plug the USB flash drive into the mixer, click
the button to open the update, it will automatically recognize that the software will automatically
update, you need to wait.
16
Channel replication page
通道1复制到
通道1
通道9
通道15
通道2
通道10
通道16
通道3
通道11
通道4
通道12
通道5通道6
通道7
通道13
通道8
通道14
1. Set parameter data such as input, output and effect in the current channel, and then click open "Copy
to" area in the input or output channel to enter the copy page.
取消 复制
Table of contents


