Creative RIVA TNT2 Value User manual

Contents Introduction .................................................................................................................1
Preliminary step for Windows 95 users.......................................................................3
Installing Your Graphics Card.....................................................................................4
Installing Software.......................................................................................................6
Changing Settings......................................................................................................10
About Sonnetech Colorific/3Deep.............................................................................12
Getting More Information .........................................................................................14
Technical Specifications............................................................................................16
Troubleshooting.........................................................................................................20
Introduction The Graphics Blaster™RIVA TNT2™Value is a high quality 2D/3D/video graphics
accelerator card that is well suited for a wide variety of applications ranging from everyday
desktop use to gaming and entertainment.
Leveraging NVIDIA™’s RIVA TNT2 graphics controller, the Graphics Blaster RIVA TNT2
Value delivers high quality and performance. Its dual texture architecture can process 2 pixels
or textures per clock cycle; this enables developers to create special effects such as multi-
layered textures, bump mapping to simulate rough surfaces, and environmental mapping that
gives objects reflective properties. Developers can take advantage of advanced filtering modes
(including trilinear mipmapping and anisotropic filtering) with full scene anti-aliasing to create
realistic images that rival more expensive graphics workstations.
Graphics Blaster RIVA TNT2 Value
Installation Guide
GB_M64.fm Page 1 Monday, May 31, 1999 10:42 AM

2 Graphics Blaster RIVA TNT2 Value Installation Guide
The Graphics Blaster RIVA TNT2 Value provides outstanding 2D and video acceleration as
well and also supports software DVD decoders through hardware color and pixel format
conversion.
Serial and Model
Numbers Your card’s serial and model numbers can be found at the back of the card. We recommend
that you record the serial and model number below. This information will be useful in the
event that you need to contact our Technical Support staff for troubleshooting or your dealer
for warranty service.
Before You Begin The README file on the CD-ROM contains information not available at the time of printing.
Read the file before you continue. In addition, read the following:
❑Minimum System Requirements
❑Updating Drivers
Minimum System
Requirements ❑IBM®PC 100% compatible
❑Genuine Intel Pentium II, Pentium III, AMD-K6 or AMD-K6-2 processor running at
90 MHz or higher
❑32 MB RAM
❑15 MB free hard disk space
❑Vacant 32-bit AGP 1.0 expansion slot for Graphics Blaster RIVA TNT2 Value
❑VGA monitor
Table 1: Serial numbers and model numbers.
Hardware Product Codes Numbers
Graphics Blaster RIVA TNT2 Value Serial Number
Model Number
GB_M64.fm Page 2 Monday, May 31, 1999 10:42 AM

Graphics Blaster RIVA TNT2 Value Installation Guide 3
❑CD-ROM drive installed
❑Windows 95, Windows 98, Windows NT 4.0 (with Service Pack 3),
or Windows 2000 (when available)
Updating Drivers To download the latest drivers for Graphics Blaster RIVA TNT2 Value, visit Creative’s Web
site (refer to the Technical Support leaflet for details).
Preliminary step
for Windows 95
users
Since Windows automatically detects new hardware and starts the software installation
procedure upon startup, you should verify your Windows version number before installing the
graphics card.
To verify your Windows 95 version number
1. Click Start -> Settings -> Control Panel.
2. In the Control Panel window, double-click the System icon.
Your Windows 95 version number is displayed in the General tabbed page of the Systems
Properties dialog box.
3. Note the version number.
The following are the possible Windows 95 version numbers:
❑4.00.950 (Retail version)
❑4.00.950A (Retail version)
❑4.00.950B (OSR version 2 and 2.1)
❑4.00.950C (OSR version 2.5)
Check the appropriate box so that
you can refer to the Windows’
version number quickly during
the software installation process.
GB_M64.fm Page 3 Monday, May 31, 1999 10:42 AM

4 Graphics Blaster RIVA TNT2 Value Installation Guide
Installing Your
Graphics Card Figure 1 shows you the connectors on the Graphics Blaster RIVA TNT2 Value card.
To install the graphics
card 1. Switch off your computer and all peripheral devices.
2. Disconnect the power cord from the wall outlet.
3. Touch any metallic surface on your computer to discharge any static electricity.
4. Remove the computer cover.
5. Locate a free AGP expansion slot.
Figure 2 shows the various types of expansion slots.
6. Remove the metal plate from the AGP slot.
Keep the screw and metal plate for future use.
7. Align the bus connector of the graphics card with the
expansion slot.
Figure 1: The Graphics Blaster RIVA TNT2 Value card.
AGP bus connector
VGA Out connector
Connects to your monitor via a monitor cable.
Video Expansion connector
Connect to a video expansion board.
If you are replacing an existing
VGA card with Graphics Blaster
RIVA TNT2 Value, please
remember to remove the existing
VGA card.
Figure 2: Types of expansion slots.
An AGP slot
A PCI slot
An ISA slot
GB_M64.fm Page 4 Monday, May 31, 1999 10:42 AM

Graphics Blaster RIVA TNT2 Value Installation Guide 5
8. Press the card’s bus connector gently and evenly into the slot, making sure that the bus
connector comes into full contact with the slot. Then, secure the card to the computer casing
with a screw. See Figure 3 below.
9. Connect the monitor cable to the VGA Out connector of Graphics Blaster RIVA TNT2
Value, as shown in Figure 4.
10.Replace the computer cover and plug the power cord back into the wall outlet.
Figure 3: Securing the graphics card to the slot.
ii.Secure the card to the slot
with a screw.
i. Gently and evenly press the card’s
bus connector into the slot.
Warning: Do not force the graphics card
into place. If it does not fit properly, gently
remove it and try again.
If you are using a multi-
frequency monitor, you may need
a special 15-pin PS/2-compatible
adapter cable. If your multi-
frequency monitor allows you to
switch between ‘TTL’ and
‘analog’ operation modes, set the
switch to ‘analog’. For details,
refer to your monitor’s manual.
Figure 4: Connecting your VGA monitor to Graphics Blaster RIVA TNT2 Value.
VGA Out
connector
Graphics Blaster
RIVA TNT2 Value
VGA Monitor
cable
VGA monitor
GB_M64.fm Page 5 Monday, May 31, 1999 11:09 AM

6 Graphics Blaster RIVA TNT2 Value Installation Guide
Installing Software After installing the graphics card, you can install the software. The Graphics Blaster RIVA
TNT2 Value CD contains the following:
❑Drivers for Windows 95/98 (common to both)
❑Drivers for Windows NT 4.0
❑Creative Enhanced BlasterControl™for Windows 95/98 and Windows NT 4.0
❑Creative SoftMPEG for Windows 95/98
❑Sonnetech Colorific®/3Deep™for Windows 95/98 and Windows NT 4.0
This section is organized as follows:
❑To install in Windows 95 (Retail version)
❑To install in Windows 95 (OSR version 2.0 and later)
❑To install in Windows 98
❑To install in Windows NT 4.0 (Service Pack 3)
To install in
Windows 95
(Retail version)
1. Switch on your system.
Windows 95 automatically detects the
graphics card.
A New Hardware Found message box
appears, informing you that a display
adapter has been detected.
2. When a dialog box similar to Figure 5
appears, ensure that the Driver from disk
provided by hardware manufacturer
option is selected.
3. Click the OK button.
4. Insert the Graphics Blaster RIVA TNT2
Value CD into your CD-ROM drive.
Figure 5: Selecting the Driver from disk provided by
hardware manufacturer option.
GB_M64.fm Page 6 Monday, May 31, 1999 10:42 AM

Graphics Blaster RIVA TNT2 Value Installation Guide 7
5. In the Install From Disk dialog box, type D:\WINDOWS (where D: represents your
CD-ROM drive) and click the OK button.
6. If prompted to select drivers, click the Graphics Blaster RIVA TNT2 Value drivers.
The drivers are copied to your system.
7. When prompted to restart your system, click the Yes button.
8. After the system has restarted, proceed to install the applications. Click Start -> Run.
9. In the Run dialog box, type D:\WINDOWS\SETUP and click the OK button.
10.Follow the instructions on the screen to complete the setup.
If you do not install all the applications now, you can install them later.
To install in
Windows 95
(OSR version 2.0 and
later)
1. Switch on your system.
Windows 95 automatically detects the graphics card.
A New Hardware Found message box appears, informing you that a display adapter has
been detected.
2. When a dialog box similar to Figure 6
appears, click the Next button.
3. Click the Other Locations button when it
appears in the Update Device Driver
Wizard dialog box.
4. Insert the Graphics Blaster RIVA TNT2
Value CD into your CD-ROM drive.
5. In the Select Other Location dialog box,
type D:\WINDOWS (where D: represents
your CD-ROM drive) and click the OK
button.
6. In the Update Device Driver Wizard
dialog box, click the Finish button.
7. In the Insert Disk message box, click the OK button.
Figure 6: The Update Device Driver Wizard dialog box.
GB_M64.fm Page 7 Monday, May 31, 1999 10:42 AM

8 Graphics Blaster RIVA TNT2 Value Installation Guide
8. In the Copying Files dialog box, type D:\WINDOWS and click the OK button.
The drivers are copied to your system.
9. In the Update Device Driver Wizard dialog box, click the OK button.
10.When prompted to restart your system, click the Yes button.
11.After the system has restarted, proceed to install the applications. Click Start -> Run.
12.In the Run dialog box, type D:\WINDOWS\SETUP and click the OK button.
13.Follow the instructions on the screen to complete the setup.
If you do not install all the applications now, you can install them later.
To install in
Windows 98 1. Switch on your system.
Windows 98 automatically detects the graphics card.
AnAddNewHardwareWizardmessage boxappears,informing you thatadisplay adapter
has been detected.
2. When a dialog box similar to Figure 7
appears, select the option Display a list of
all the drivers in a specific location, so
you can select the driver you want.
3. Click the Next button.
4. Insert the Graphics Blaster RIVA TNT2
Value CD into your CD-ROM drive.
5. In the Models list box, click the Have Disk
button.
Figure 7: Selecting the option Display a list of all the
drivers in a specific location, so you can
select the driver you want.
GB_M64.fm Page 8 Monday, May 31, 1999 10:42 AM

Graphics Blaster RIVA TNT2 Value Installation Guide 9
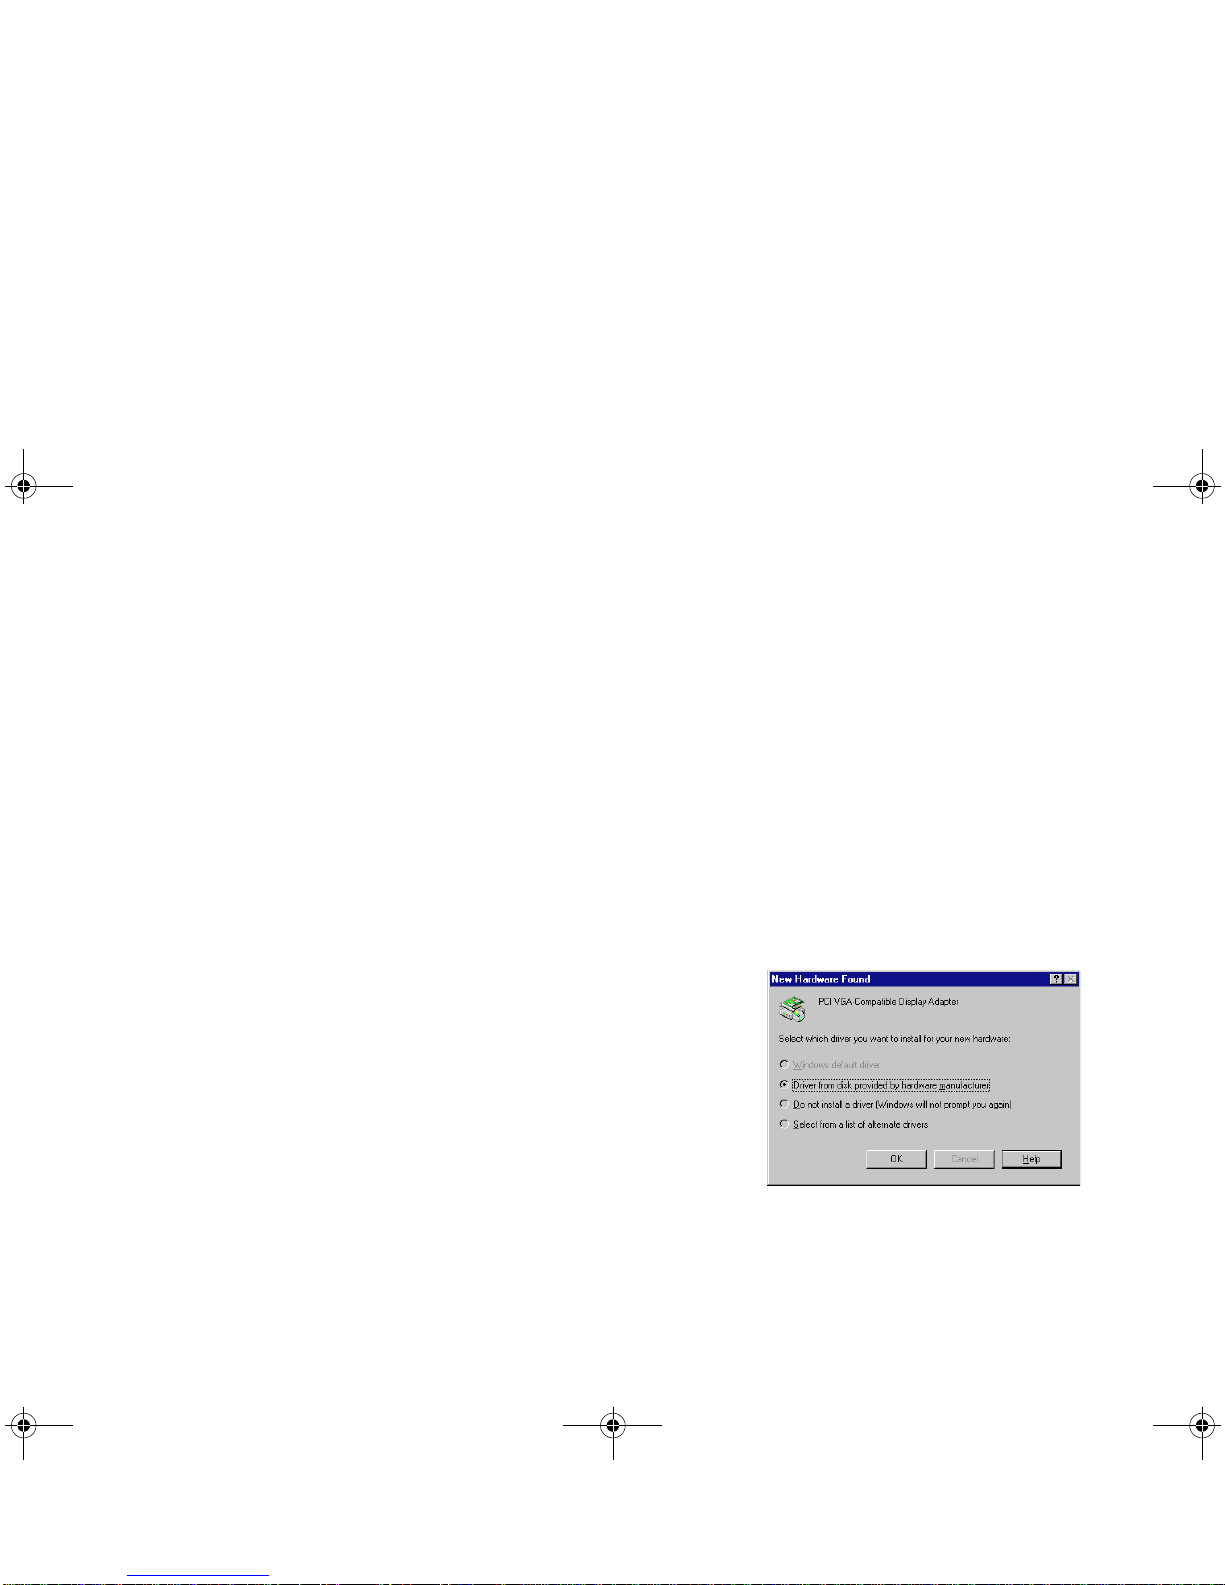
6. In the Install From Disk dialog box, type D:\WINDOWS (where D: represents your
CD-ROM drive) and click the OK button.
If you are installing Graphics Blaster RIVA TNT2 Value as a second or subsequent card to
make use of Windows 98’s multi-monitor capability, you will see an Update Driver
Warning message telling you that the driver you have selected may not work correctly. You
must click the Yes button to confirm that you want to use the selected driver. Otherwise, the
system will install the wrong driver and will not recognize the card as a Graphics Blaster
RIVA TNT2 Value card (for details, see “Windows 98 Multi-Monitor Display Problems” on
page 20).
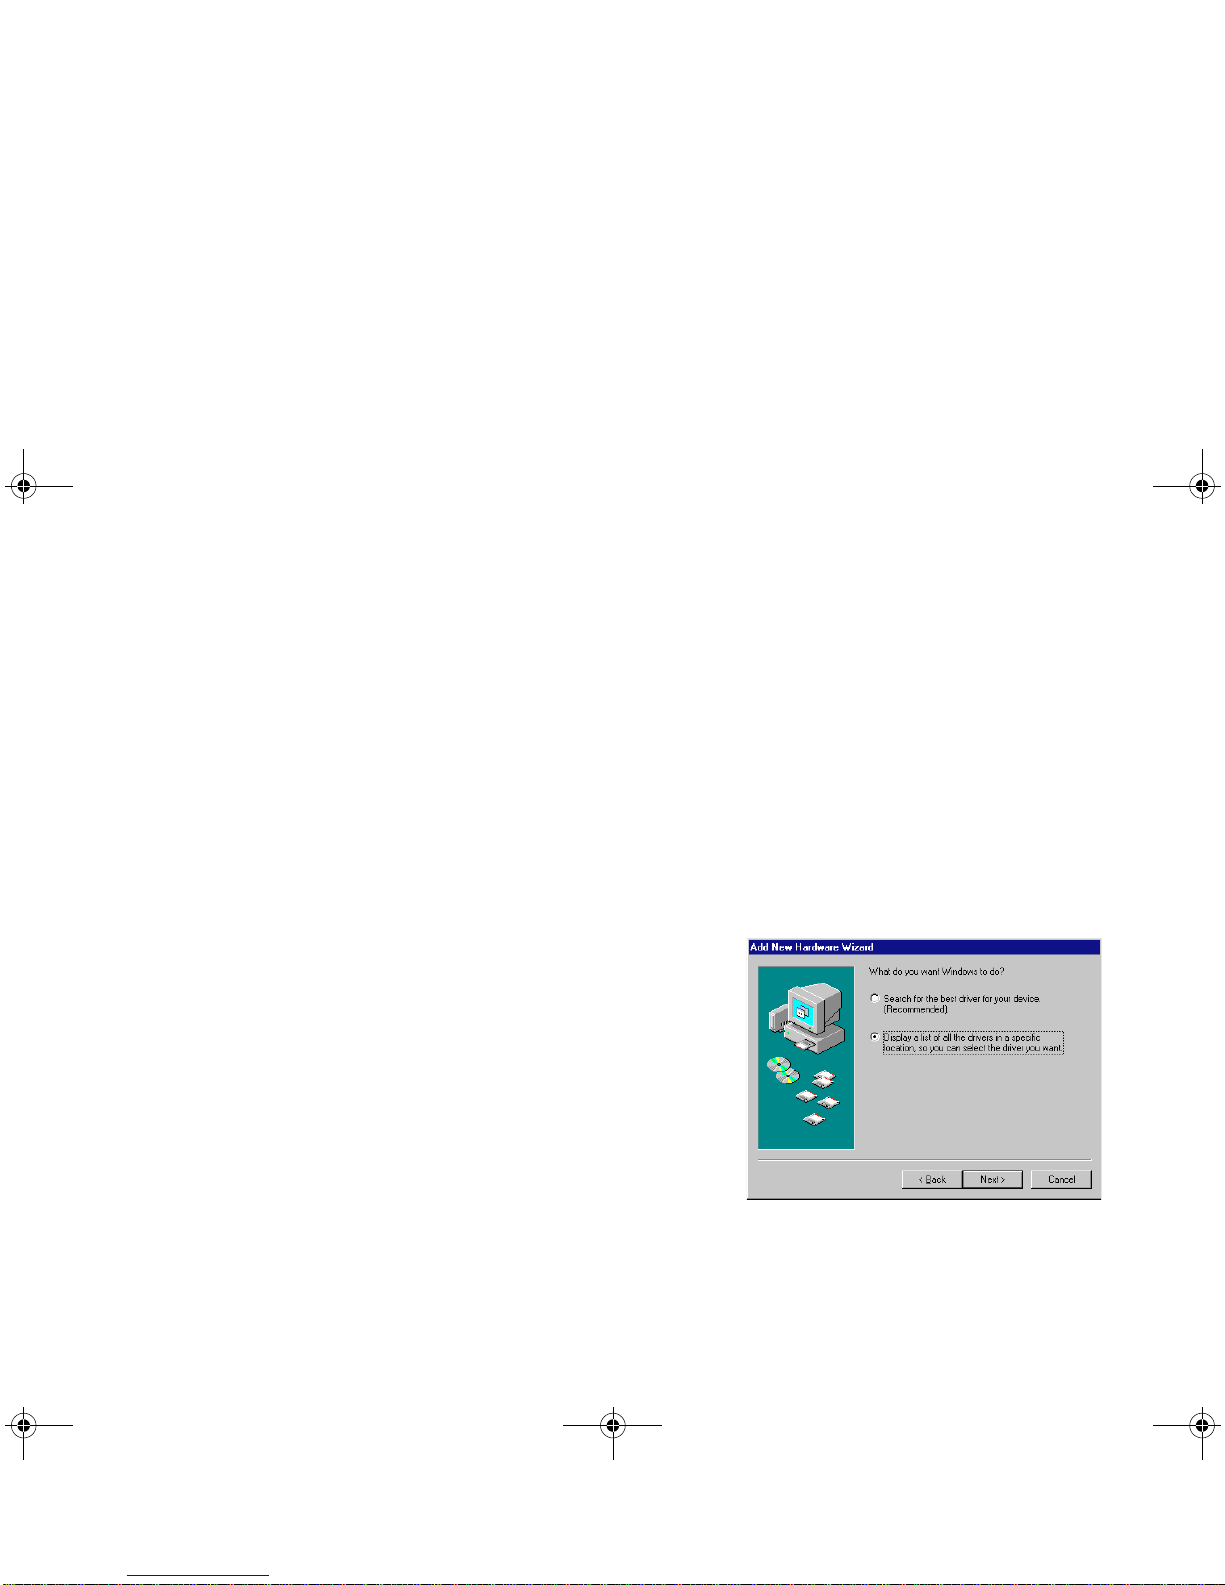
7. In the Models list box of the Select Device dialog box, make sure the Graphics Blaster
RIVA TNT2 Value entry is selected and click the OK button.
8. Click the Next button.
9. Click the Finish button.
The drivers are copied to your system.
10.When prompted to restart your system, click the Yes button.
11.After the system has restarted, proceed to install the applications. Click Start -> Run.
12.In the Run dialog box, type D:\WINDOWS\SETUP and click the OK button.
13.Follow the instructions on the screen to complete the setup.
If you do not install all the applications now, you can install them later.
To install in
Windows NT 4.0
(Service Pack 3)
1. Switch on your system.
2. Click Start -> Run.
3. In the Run dialog box, type D:\WINNT40\SETUP and click the OK button.
4. Follow the instructions on the screen to complete the setup.
If you do not install all the applications now, you can install them later.
5. If the Invalid Display Settings message box appears after your system has restarted, click
the OK button and change the display settings.
For details, see “To change the display settings in Windows NT 4.0” on page 10.
GB_M64.fm Page 9 Monday, May 31, 1999 10:42 AM

10 Graphics Blaster RIVA TNT2 Value Installation Guide
Changing Settings
To change the
display settings in
Windows NT 4.0
1. Right-click your desktop, and then click Properties on the shortcut menu.
2. In the Display Properties dialog box, click the Settings tab.
3. In the Desktop Area group box, move the slider to set the desired resolution.
4. In the Color Palette group box, select the desired color. Certain colors may not be available
for some display resolutions.
5. In the Refresh Frequency group box, select the desired refresh rate.
6. To test the settings, click the Test button, and then click the OK button.
When the Testing Mode dialog box re-appears:
• If the test bitmap is properly displayed, click the Yes button.
• If not, click the No button. A warning message will be displayed. Click the OK button
and repeat steps 3 through 6, changing one or more of the settings.
7. Click the OK button to close the Display Properties dialog box.
GB_M64.fm Page 10 Monday, May 31, 1999 10:42 AM

Graphics Blaster RIVA TNT2 Value Installation Guide 11
To change the
performance settings in
Windows 95/98 and
Windows NT 4.0
To do so in Windows 95 and Windows NT 4.0
1. Right-click your desktop, and then click Properties on the shortcut menu.
2. In the Display Properties dialog box, click the BlasterControl tab.
3. On the BlasterControl tabbed page, click the Tweak icon.
4. In the Tweak module, select the desired settings.
5. To specify additional settings for Graphics Blaster RIVA TNT2 Value, click the Advanced
Settings button.
6. Select the desired settings and click the OK button.
To see a brief description of an option or check box in the BlasterControl Tweak module,
right-click the item, and then click What’s This.
To do so in Windows 98
1. Right-click your desktop, and then click Properties on the menu that appears.
2. In the Display Properties dialog box, click the Settings tab.
3. On the Settings tabbed page, click the Advanced button.
4. In the Advanced Properties dialog box, click the BlasterControl tab.
5. Select the desired settings and click the OK button.
To see a brief description of an option or check box in the BlasterControl Advanced
module, right-click the item, and then click What’s This.
You can customize the settings of
your graphics card for optimal
performance with applications.
However, if your monitor display
exhibits pixel drop (that is,
pixels, usually white in color,
appear on the screen) or any
other abnormal behavior, revert
to the factory default settings (see
“Troubleshooting” on page 12.).
GB_M64.fm Page 11 Monday, May 31, 1999 10:42 AM

12 Graphics Blaster RIVA TNT2 Value Installation Guide
About Sonnetech
Colorific/3Deep
About Colorific Colorific®color management software is the industry-standard process for monitor-to-
monitor and monitor-to-printer color management. It gives you accurate, predictable color-
matching between your screen and printer or over the Internet by calibrating the colors on your
monitor. The software leads you through a series of simple choices about what you see on your
screen. From this information, Colorific builds a precise description of how your monitor
displays color, taking into account variable viewing conditions, monitor control settings, and
video card adjustments.
Running Colorific You should calibrate with Colorific before doing critical color work and whenever you change
monitor color settings.
To run Colorific in Windows 95, Windows 98 and Windows NT 4.0
1. Click the Colorific Control Panel icon in the taskbar.
The Display Properties dialog box appears.
2. Click the Colorific tab.
3. Click the Recalibrate button.
The Colorific calibration utility is opened.
4. Follow the instructions on the screen to complete the process.
About 3Deep 3Deep™is an exciting new tool (supporting Windows 95 and Windows 98) that allows gamers
to experience 3D games as the game developers intended. Only 3Deep can provide accurate
3D lighting and shading for 3D games because it adjusts the user’s monitor to match the game
developer’s monitor — not too dark and not washed out.
• If your monitor has a color
temperature control, adjust it
to 6500 K to get the best
results.
• When printing to an inkjet
printer, it is best to use special
coated paper.
GB_M64.fm Page 12 Monday, May 31, 1999 10:42 AM

Graphics Blaster RIVA TNT2 Value Installation Guide 13
3Deep uses Colorific’s technology (the industry standard for monitor calibration) to measure
the unique characteristics of each gamer’s display. No more dark games, and no more washed
out games when you increase the contrast of your monitor. The results are awesome 3D
lighting and shading effects. 3Deep is a consistent and high-quality solution for improving the
3D effect of your games!
Using 3Deep To use 3Deep to calibrate your monitor’s gamma value
1. Click Start -> Settings -> Control Panel.
2. In the Control Panel window, double-click the 3Deep icon.
3. On the 3Deep Control Panel, move the Tweak slider or click the Calibrate Display button.
4. Before playing a game, click Default System Gamma.
You can also display the 3Deep Control Panel by doing the following:
1. Right-click your desktop, and then click Properties on the shortcut menu.
2. In the Display Properties dialog box, click the 3Deep tab.
To uninstall Colorific in
Windows 95/98 and
Windows NT 4.0, and
3Deep in Windows
95/98
1. Right-click the Colorific Control Panel icon in the taskbar.
2. On the menu that appears, click Exit.
3. Click Start -> Settings -> Control Panel.
4. In the Control Panel window, double-click the Add/Remove Programs icon.
The Add/Remove Programs Properties dialog box appears with the Install/Uninstall
tabbed page displayed.
5. Select the entry Colorific For Windows from the list, and then click the Add/Remove
button.
6. After Colorific For Windows is removed, select the entry 3Deep from the list, and then
click the Add/Remove button.
GB_M64.fm Page 13 Monday, May 31, 1999 10:42 AM

14 Graphics Blaster RIVA TNT2 Value Installation Guide
Getting More
Information
For Graphics Blaster
RIVA TNT2 Value The Help file for Graphics Blaster RIVA TNT2 Value gives a brief introduction to the features
supported by this graphics card.
To open the Help file for Graphics Blaster RIVA TNT2 Value
Click Start -> Programs -> Creative -> Graphics Blaster RIVA TNT2 Value ->
Graphics Blaster RIVA TNT2 Value Help.
For Creative
BlasterControl The Help file for Creative BlasterControl shows you how to use the BlasterControl utility to
customize your screen resolution, color depth, and refresh rate in Windows.
To open the Help file for BlasterControl
Click Start -> Programs -> Creative -> BlasterControl Help.
For Help topics specific to a BlasterControl module
In the BlasterControl module you want, click the Help button.
For Creative SoftMPEG The Help file for Creative SoftMPEG teaches you how to use SoftMPEG to play Video CDs
and MPEG files.
To open the Help file for SoftMPEG
In Creative SoftMPEG, right-click the Video window, and then click Help on the menu that
appears.
GB_M64.fm Page 14 Monday, May 31, 1999 10:42 AM

Graphics Blaster RIVA TNT2 Value Installation Guide 15
For Colorific and
3Deep The Help file for Colorific contains the User’s Manual.
To open the Help file for Colorific
1. Click Start -> Programs -> Colorific.
The Colorific calibration utility is opened.
2. On the right-hand corner of the menu bar, click Help.
3. On the Help menu, click Help Contents.
To open the Help file for 3Deep
1. Click Start -> Settings -> Control Panel.
2. In the Control Panel window, double-click the 3Deep icon.
3. On the 3Deep Control Panel, click the Help button.
Technical Support for
Colorific and 3Deep Updated information about using Colorific and 3Deep can be obtained from Sonnetech’s Web
site at www.sonnetech.com/tech_support. If you cannot find the information you need from
GB_M64.fm Page 15 Monday, May 31, 1999 10:42 AM

16 Graphics Blaster RIVA TNT2 Value Installation Guide
Technical
Specifications
Architecture Highlights ❑64-bit wide graphics engine and frame buffer
❑16 MB SDRAM
❑250 million pixels/sec, bilinear filtered
3D Features ❑Optimized for Microsoft’s Direct3D API
❑Complete DirectX 6.x support
❑100% hardware triangle setup
❑Twin texel (TNT) 32-bit graphics pipeline
• 2 texture-mapped, lit pixels per clock
• Single pass multi-texturing support (DirectX 6.x and OpenGL ICD)
• Square and non-square texture support
❑TextureBlend support examples:
• Multi-texture
•Bumpmap
• Texture modulation
• Light maps
• Reflection maps
• Detail textures
• Environmental maps
• Procedural textures
• Sub-pixel accurate
GB_M64.fm Page 16 Monday, May 31, 1999 10:42 AM

Graphics Blaster RIVA TNT2 Value Installation Guide 17
❑Backend blend
• 32-bit ARGB rendering with destination alpha
• Point sampled, bilinear, trilinear and 8-tap
• Anisotropic filtering
❑Per pixel perspective correct texture mapping
•Fog
•Light
• Mipmapping
❑24-bit or 16-bit hardware Z-buffer (fixed or floating)
❑8-bit stencil buffer
❑Full scene anti-aliasing
2D Features ❑High performance 128-bit 2D/GUI/DirectDraw acceleration
• Accelerated primitives include BLT, indexed DIB color translation, transparent BLT,
stretch BLT, points, lines, polylines, polygons, fills, patterns, arbitrary rectangular
clipping and fast text rendering hardware font cache
• Pipeline optimized for multiple color depths including 32, 24, 16, 15, and 8 bits per
pixel
❑Fast 32-bit VGA/SVGA support
❑Multi-buffering (Double, Triple, Quad buffering) for smooth animation and video playback
Video Support ❑Video acceleration for DirectShow, MPEG-1, MPEG-2 and Indeo
❑X and Y smooth up and down scaling with filtering
❑Per-pixel color keying
❑Multiple video windows with hardware color space conversion and filtering (YUV 4:2:2
and 4:2:0)
❑Video port supports ITU-CCIR 565
GB_M64.fm Page 17 Monday, May 31, 1999 10:42 AM

18 Graphics Blaster RIVA TNT2 Value Installation Guide
Specifications ❑AGP 2X data transfer
❑VESA DDC 2B + DPMS
❑Single slot 2D, 3D graphics, and video accelerator
❑NVIDIA RIVA TNT2 Model 64 graphics engine
❑Integrated 300 MHz RAMDAC supporting up to 1920x1200 true color
❑MPEG-1, MPEG-2, and full-motion video acceleration/assistance
❑Full Plug and Play compliant
Drivers ❑Windows NT 4.0 and Windows 2000 (when available) display drivers
❑Windows 95 and Windows 98 display driver, DirectDraw, Direct3D, DirectVideo, ActiveX
❑OpenGL ICD for Windows 95 and Windows NT 4.0
❑VBE 3.0 compliant
Utilities ❑Creative Enhanced BlasterControl
❑Creative Enhanced SoftMPEG
❑Sonnetech Colorific/3Deep
Applications Supported ❑All Windows 95 applications, including DirectDraw and Direct3D games and applications
❑OpenGL applications under Windows 95 and Windows 98
GB_M64.fm Page 18 Monday, May 31, 1999 10:42 AM

Graphics Blaster RIVA TNT2 Value Installation Guide 19
Table 2: Refresh rates supported by different video modes
Refresh
Rates Number of Colors
Resolution 256 (8-bit) 64k (16-bit) 16.7 million (32-bit)
640x480 60, 70, 72, 75, 85, 100,
120, 140, 144, 150,
170, 200, 240
60, 70, 72, 75, 85, 100,
120, 140, 144, 150,
170, 200, 240
60, 70, 72, 75, 85, 100,
120, 140, 144, 150,
170, 200, 240
800x600 60, 70, 72, 75, 85, 100,
120, 140, 144, 150,
170, 200, 240
60, 70, 72, 75, 85, 100,
120, 140, 144, 150,
170, 200, 240
60, 70, 72, 75, 85, 100,
120, 140, 144, 150,
170, 200, 240
1024x768 60, 70, 72, 75, 85, 100,
120, 140, 144, 150, 170 60, 70, 72, 75, 85, 100,
120, 140, 144, 150, 170 60, 70, 72, 75, 85, 100,
120, 140, 144, 150, 170
1152x864 60, 70, 72, 75, 85, 100,
120, 140, 144, 150 60, 70, 72, 75, 85, 100,
120, 140, 144, 150 60, 70, 72, 75, 85, 100,
120, 140
1280x1024 60, 70, 72, 75, 85, 100,
120 60, 70, 72, 75, 85, 100,
120 60, 70, 72, 75, 85, 100
1600x1200 60, 70, 72, 75, 85 60, 70, 72, 75, 85 60, 70, 72, 75
1920x1080 60, 70, 72, 75, 85 60, 70, 72, 75, 85 60, 70, 72
1920x1200 60, 70, 72, 75 60, 70, 72, 75 —
The refresh rates shown in the
table are the highest obtainable
and are monitor-dependent.
Resolutions, pixel depths, and
refresh rates are also driver-
dependent and may not be
available for some applications
or operating systems.
GB_M64.fm Page 19 Monday, May 31, 1999 10:42 AM

20 Graphics Blaster RIVA TNT2 Value Installation Guide
Troubleshooting
System Hangs, Blank Screen
or Corrupted Display $IWHULQVWDOOLQJ*UDSKLFV%ODVWHU5,9$7179DOXHDQGVWDUWLQJ\RXUV\VWHPWKH
PRQLWRUGLVSOD\VDEODQNVFUHHQ
Solutions Try the following:
❑Switch off your system and wait a while before switching it on again.
❑Verify that any built-in VGA on your motherboard is disabled and that you
have removed any other video display card from your system.
❑Ensure that your Graphics Blaster RIVA TNT2 Value card’s bus connector is
fully inserted into the expansion slot. Ensure this by pressing it gently and
evenly into the slot.
❑Verify that the pins of your monitor’s VGA Input connector are not bent and
that the connector is properly connected to the VGA Out connector of
Graphics Blaster RIVA TNT2 Value.
Windows 98 Multi-Monitor
Display Problems 7KHPRQLWRUFRQQHFWHGWRWKHVHFRQGRUVXFFHVVLYH*UDSKLFV%ODVWHU5,9$717
9DOXHFDUGUHPDLQVEODQNHYHQWKRXJKWKHFDUGDQGLWVGULYHUVKDYHEHHQLQVWDOOHG
Cause If Graphics Blaster RIVA TNT2 Value’s drivers are not specified during the
software installation (see “To install in Windows 98” on page 8), the system
installs the second or successive Graphics Blaster RIVA TNT2 Value card as a
VGA card which does not support Windows 98’s multi-monitor feature.
Solution Update the device drivers to Graphics Blaster RIVA TNT2 Value’s drivers:
1. Right-click your desktop, and then click Properties on the shortcut menu.
2. In the Display Properties dialog box, click the Settings tab.
3. On the Settings tabbed page, click the Advanced Properties button.
4. In the Advanced Display Properties dialog box, click the Change button.
5. In the Select Device dialog box, click the Have Disk button.
GB_M64.fm Page 20 Monday, May 31, 1999 10:42 AM
Table of contents
Other Creative Video Card manuals