Creusen 9000 Series User manual

Gebruiksaanwijzing
Slijp- en polijstmachines serie 9000
standaard uitvoering.
INLEIDING
Deze Creusen machine is een Nederlands kwaliteitsproduct en zal wanneer goed onderhouden vele jaren
goede diensten bewijzen. Het verdient daarom aanbeveling deze gebruiksaanwijzing vóór ingebruikname
nauwkeurig te lezen en de instructies op te volgen.
Voor de beste resultaten adviseren wij u om alleen origineel Creusen toebehoren en/of onderdelen te
gebruiken.
De machines zijn geschikt voor het slijpen en polijsten van staal of gelijkwaardige materialen.
In deze handleiding worden de volgende pictogrammen gebruikt:
Duidt op mogelijk lichamelijk letsel of kans op beschadiging
van de machine indien de instructies in deze handleiding
worden genegeerd.
Geeft elektrische spanning aan.
EG-verklaring van overeenstemming voor machines
Creusen Finishing Solutions BV
Doctor Philipslaan 39
6042 CT Roermond
verklaart hiermede dat werkbankslijpmachines Creusen Industrial serie 9000
* voldoen aan de bepalingen van de machinerichtlijn 2006/42/EC
* voldoen aan de bepalingen van de volgende andere EG-richtlijnen
- Laagspanningsrichtlijn 2014/35/EC
- Electromagnetische verdraagzaamheid, EMC richtlijn 2014/30/EC
Naam: J.R.J. Pereira
Datum: 01-10-2018

Technische gegevens
Type
DS 9200
DS 9200
DS 9250
DS 9300
Spanning
230
1~
400 / 230
3~
400 / 230
3~
400 / 230
3~
Hz
50-60
50-60
50-60
50-60
Vermogen P1 Watt
900
1100
1500
1700
Toerental min-¹
2800/3400
2800/3400
2800/3400
1400/1700
Omtreksnelheid m/sec
30-36
30-36
37-44
22-26
Slijpschijf d1xbxd2 in mm
Korrel
200x25x20
36/80
200x25x20
36/80
250x30x20
36/80
300x40x25
36/60
Geluidsniveau dB (A)
60
60
65
65
Massa kg
24
24
38
51
Type
VSS 9200
VSS 9300
Spanning
400 / 230
3~
400 / 230
3~
Hz
50-60
50-60
Vermogen P1 Watt
1100
1700
Toerental min-¹
2800/3400
1400/1700
Omtreksnelheid m/sec
30-36
22-26
Slijpschijf d1xbxd2 in mm
Korrel
200x25x20
200x40x20
36/60
300x40x25
300x50x25
36/60
Geluidsniveau dB (A)
60
65
Massa kg
27
60
Type
DP 9200
DP 9200
DP 9300
DPC 9200
DPC 9200
DPC 9300
Spanning
230
1~
400 / 230
3~
400 / 230
3~
230
1~
400 / 230
3~
400 / 230
3~
Hz
50-60
50-60
50-60
50-60
50-60
50-60
Vermogen P1 Watt
900
1100
1700
900
1100
1700
Toerental min-¹
2800/340
0
2800/3400
1400/1700
2800/3400
2800/3400
1400/1700
Omtreksnelheid m/sec
30-36
30-36
22-26
30-36
30-36
22-26
Polijstschijf d1xd2 in mm
(niet standaard)
200x20
200x20
300x25
200x20
200x20
300x25
Geluidsniveau dB (A)
55
55
60
50
50
50
Massa kg
23
23
38
23
23
38
Machines voor andere spanningen en frequenties zijn op aanvraag leverbaar. Bovendien kunnen de 1~
machines afhankelijk van het land van bestemming voorzien worden van verschillende aansluitleidingen.
OPSTELLEN VAN DE SLIJPMACHINE
Stel de machine op een vlakke, horizontale ondergrond op. Schroef de machine
op de werkbank of een Creusen kolom vast.
Opstelling op werkbank: Plaats de machine zo, dat tijdens de ingebruikname hiervan geen hinder
ondervonden wordt. Monteer de machine d.m.v. bout-moer verbindingen, welke gezekerd worden door
veerringen. Zie tekening.
Opstelling op kolom: Zorg voor een stevige fundering van de kolom om vervolgens de machine op de
kolom te monteren d.m.v. bout-moer verbindingen.
Machines voorzien van een staaldraadborstel dienen op werkbank of kolom te worden vastgezet.
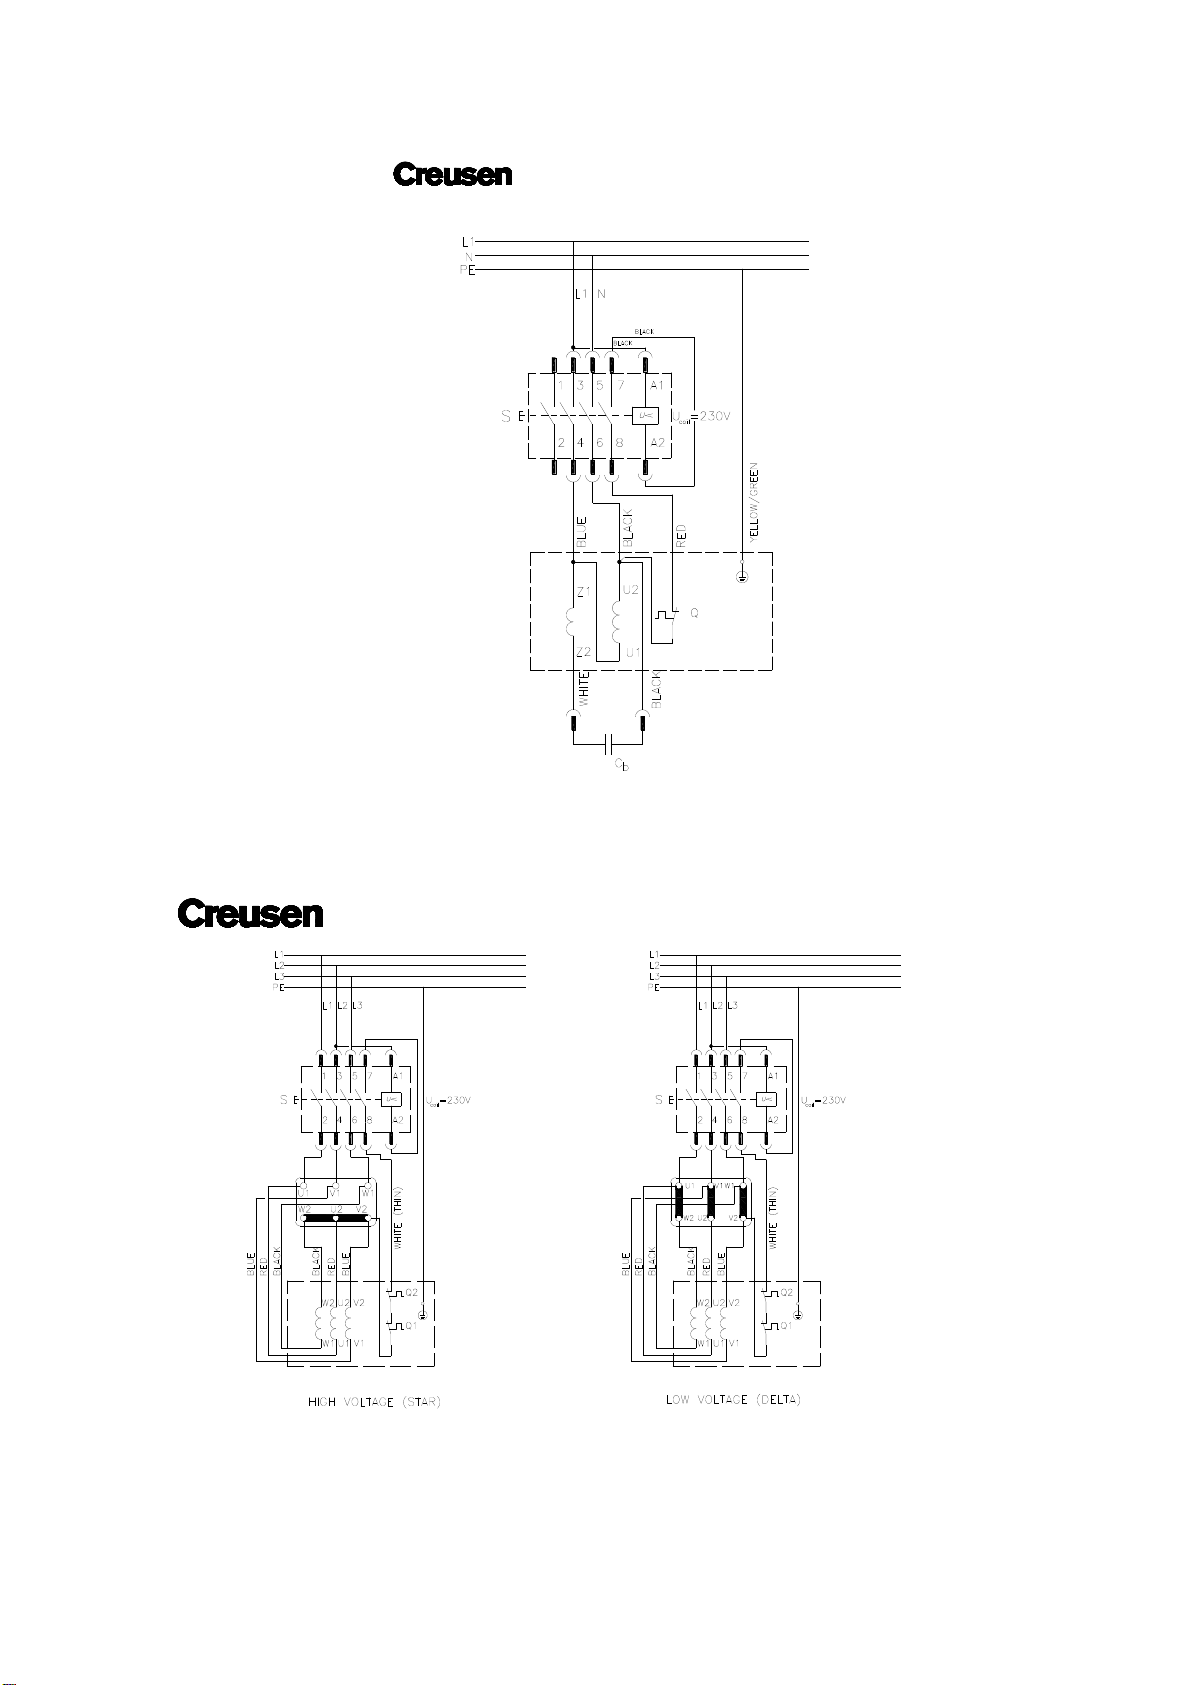
Aansluitschema serie 9000 1~
Aansluitschema serie 9000 3~ ster/driehoek

ALGEMENE VEILIGHEIDSVOORSCHRIFTEN
Zorg voor een opgeruimde werkomgeving
Een rommelige werkomgeving leidt tot ongelukken.
Houd rekening met omgevingsinvloeden
Stel elektrische machines niet bloot aan vocht. Zorg dat de werkomgeving goed is verlicht. Gebruik
elektrische machines niet in de buurt van brandbare vloeistoffen of gassen.
Draag geschikte werkkleding
Draag geen wijde kleding of loshangende sieraden. Deze kunnen door de bewegende delen worden
gegrepen. Houd lange haren bijeen.
Draag een veiligheidsbril
Gebruik ook een gezichts- of stofmasker bij werkzaamheden waarbij stofdeeltjes of spanen vrijkomen.
Houd kinderen uit de buurt
Laat andere personen niet aan de machine komen. Onder de 16 jaar is supervisie verplicht.
Gebruik de juiste machine
Het gebruik volgens bestemming is beschreven in deze handleiding.
Onderhoud de machine met zorg
Houd de machine schoon om beter en veiliger te kunnen werken.
Houdt u aan de instructies met betrekking tot het onderhoud en het vervangen van onderdelen
Controleer regelmatig de netkabel en laat deze bij beschadigingen door een vakman vervangen.
Wendt u voor reparaties tot een vakman
Deze elektrische machine voldoet aan alle geldende veiligheidsvoorschriften. Ter voorkoming van
ongevallen mogen reparaties uitsluitend door daartoe bevoegde technici worden uitgevoerd.
ELEKTRISCHE VEILIGHEID
Aansluiting
Laat de machine aansluiten door een hiertoe bevoegd technicus.
Controleer of de netspanning waarop de machine wordt aangesloten overeenkomt met de gegevens op
het typegegevenplaatje. Controleer bij drie-fasen machines ook of de aansluiting op het klemmenbord
geschakeld is overeenkomstig de netspanning. Zie tekening aansluiting.
Sluit de machine aan volgens de installatie voorschriften (NEN 1010) en overeenkomstig de plaatselijk
geldende voorschriften.
De machines zijn geschikt voor continue bedrijf.
In bedrijf stellen van drie-fasen machines
Om de draairichting te controleren wordt de machine kortstondig ingeschakeld
zodat de machine niet op snelheid kan komen.
Bij een verkeerde draairichting dient men eerst de spanning af te schakelen en dan
de aansluiting van twee fasen te verwisselen.
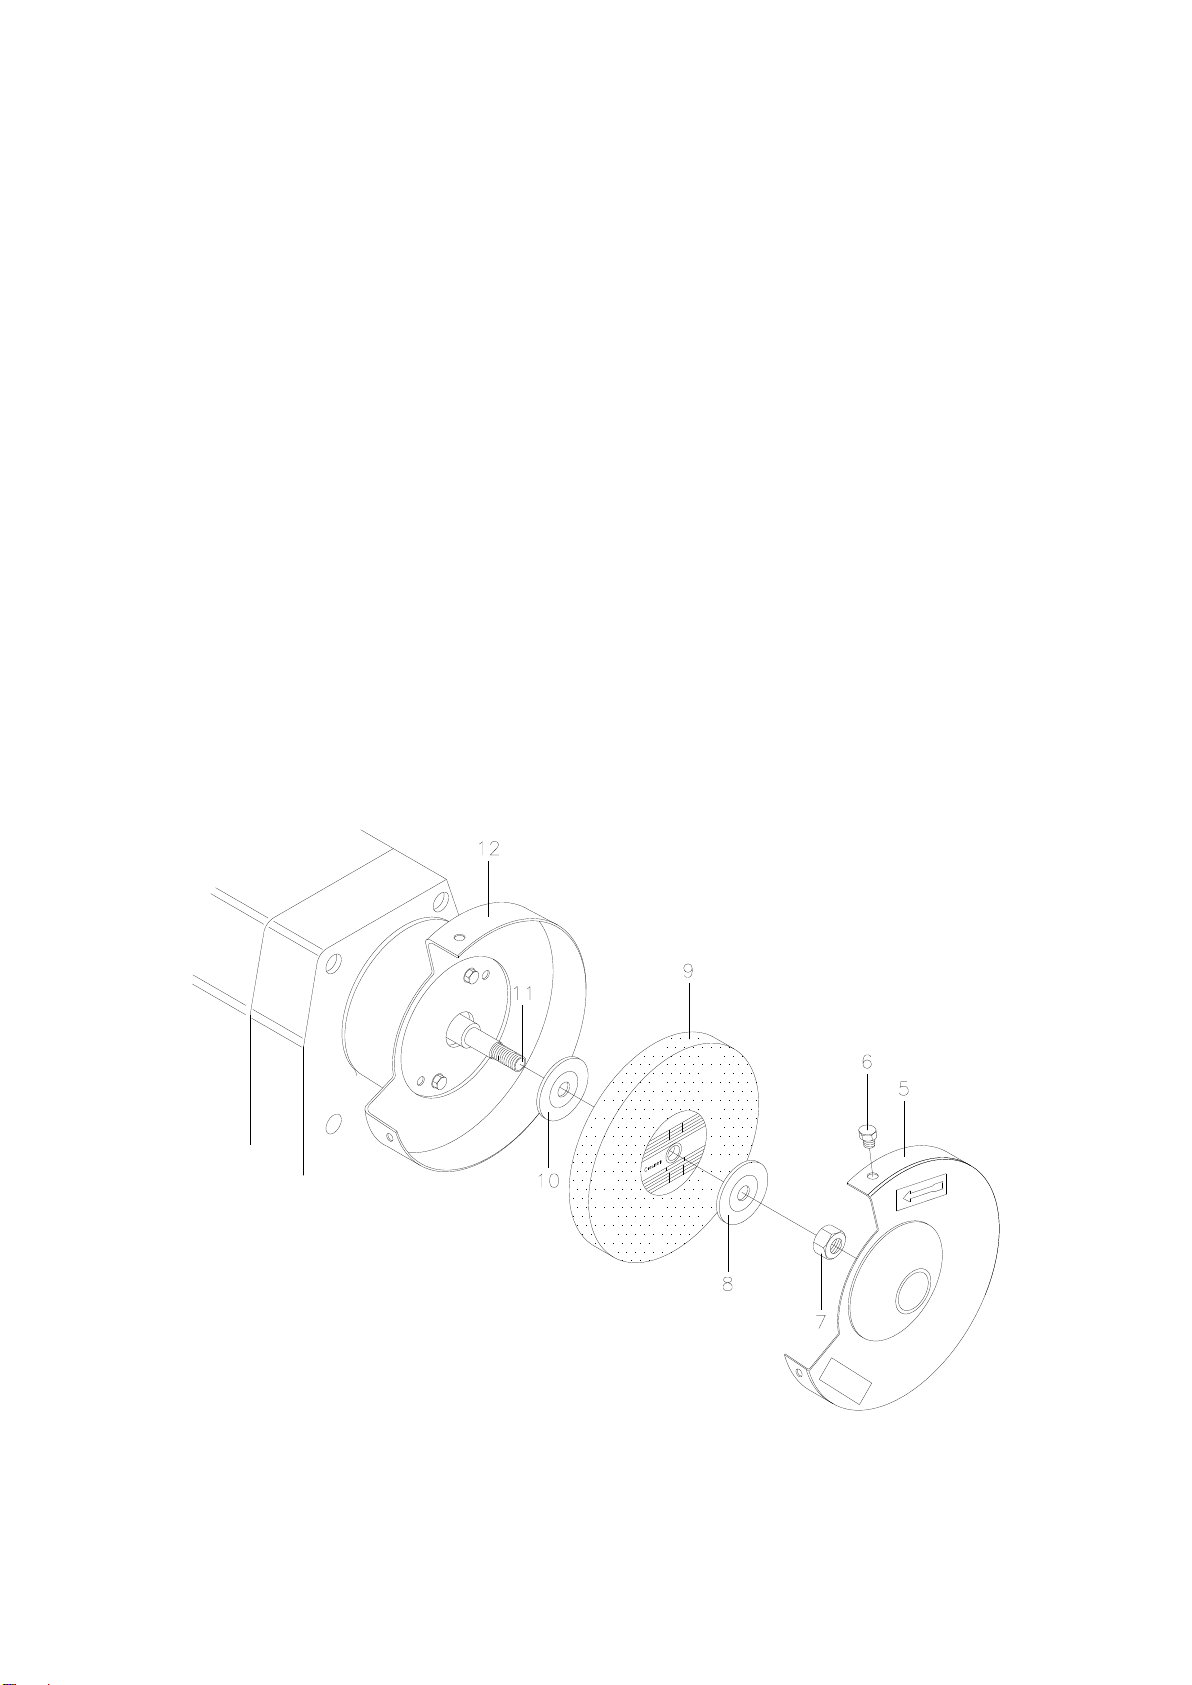
BESCHRIJVING
Deze machines zijn speciaal ontworpen voor het slijpen en polijsten van metalen gereedschappen en
andere metalen voorwerpen. Ze zijn bedoeld voor continue gebruik.
1. Slijpsteun
2. Vonkenvanger
3. Steun voor oogbeschermglas; alleen bij 200Ø mm slijpmachine
4. Oogbeschermglas
5. Kapdeksel
6. Schroef
7. Moer
8. Buitenste klemplaat
9. Slijpschijf
10. Binnenste klemplaat
11. As
12. Kap

MONTEREN EN INSTELLEN
Voor de beste resultaten adviseren wij u om alleen Creusen toebehoren en vervangende onderdelen te
gebruiken.
Bij ingebruikname van uw slijpmachine en bij vervanging van onderdelen dient u de volgende aanwijzingen
nauwlettend op te volgen. Gebruik alleen onderdelen en toebehoren van de juiste afmetingen.
Neem altijd de steker uit het stopcontact voordat u een onderdeel verwisselt of andere werkzaamheden aan
de machine verricht. Bij een vaste aansluiting de machine van het net afschakelen alvorens genoemde
werkzaamheden te verrichten.
MONTEREN VAN DE ONDERDELEN
Monteer de bijgeleverde onderdelen zoals slijpsteunen, oogbeschermglazen en eventueel vonkenvanger en
stel deze in volgens tekening.
Voor gebruik moeten de vonkenvangers en de slijpsteunen worden gemonteerd en ingesteld en de
oogbeschermglazen worden gemonteerd. Maximale afstand tussen de onderdelen:
tussen vonkenvanger en slijpschijf: 2 mm
tussen slijpsteun en slijpschijf: 2 mm
Stel de oogbeschermglazen zo in, dat ze optimale bescherming bieden.
Bij ingebruikname van de slijpmachine dient u eerst een inlooptest uit te voeren.
Laat de machine ca. 5 minuten onbelast lopen.
ONDERHOUD AAN DE MACHINE
Als de slijpsteun voor 20% is versleten, dient u deze te vervangen.
Bij slijtage van de slijpschijf dient de slijpsteun en vonkenvanger te worden bijgesteld tot de voorgeschreven
afstanden. De slijpschijf dient te worden vervangen als de afstand tussen buitendiameter van de schijf en de
rand van de beschermkap 5 mm bedraagt. Voer voor gebruik van een nieuwe slijpschijf eerst de zgn.
‘klankproef’‘ uit. Bij een lichte tik op de schijf moet u een heldere klank horen.
Hoort u een doffe klank, dan mag de slijpschijf niet worden gebruikt
VERWISSELEN VAN EEN SLIJPSCHIJF
De slijpschijf dient te worden vervangen als de afstand tussen buitendiameter van de schijf en de rand van
de beschermkap 5 mm bedraagt. U gaat dan als volgt te werk:
verwijder het deksel van de beschermkap
maak de moer vrij door deze in de oorspronkelijke stand te tikken
draai de moer los en verwijder klemplaat en slijpschijf
laat de binnenste klemplaat op de as
breng de nieuwe slijpschijf aan
monteer vervolgens de klemplaat en moer
monteer nu het deksel op de kap en stel de vonkenvanger en slijpsteun opnieuw in als eerder
omschreven
laat nu de machine ca. 5 minuten onbelast lopen
De slijpschijf mag een slingering vertonen, van 0,4 –0,6 mm radiaal en 0,4 –0,6 mm axiaal aan de omtrek
van de schijf.
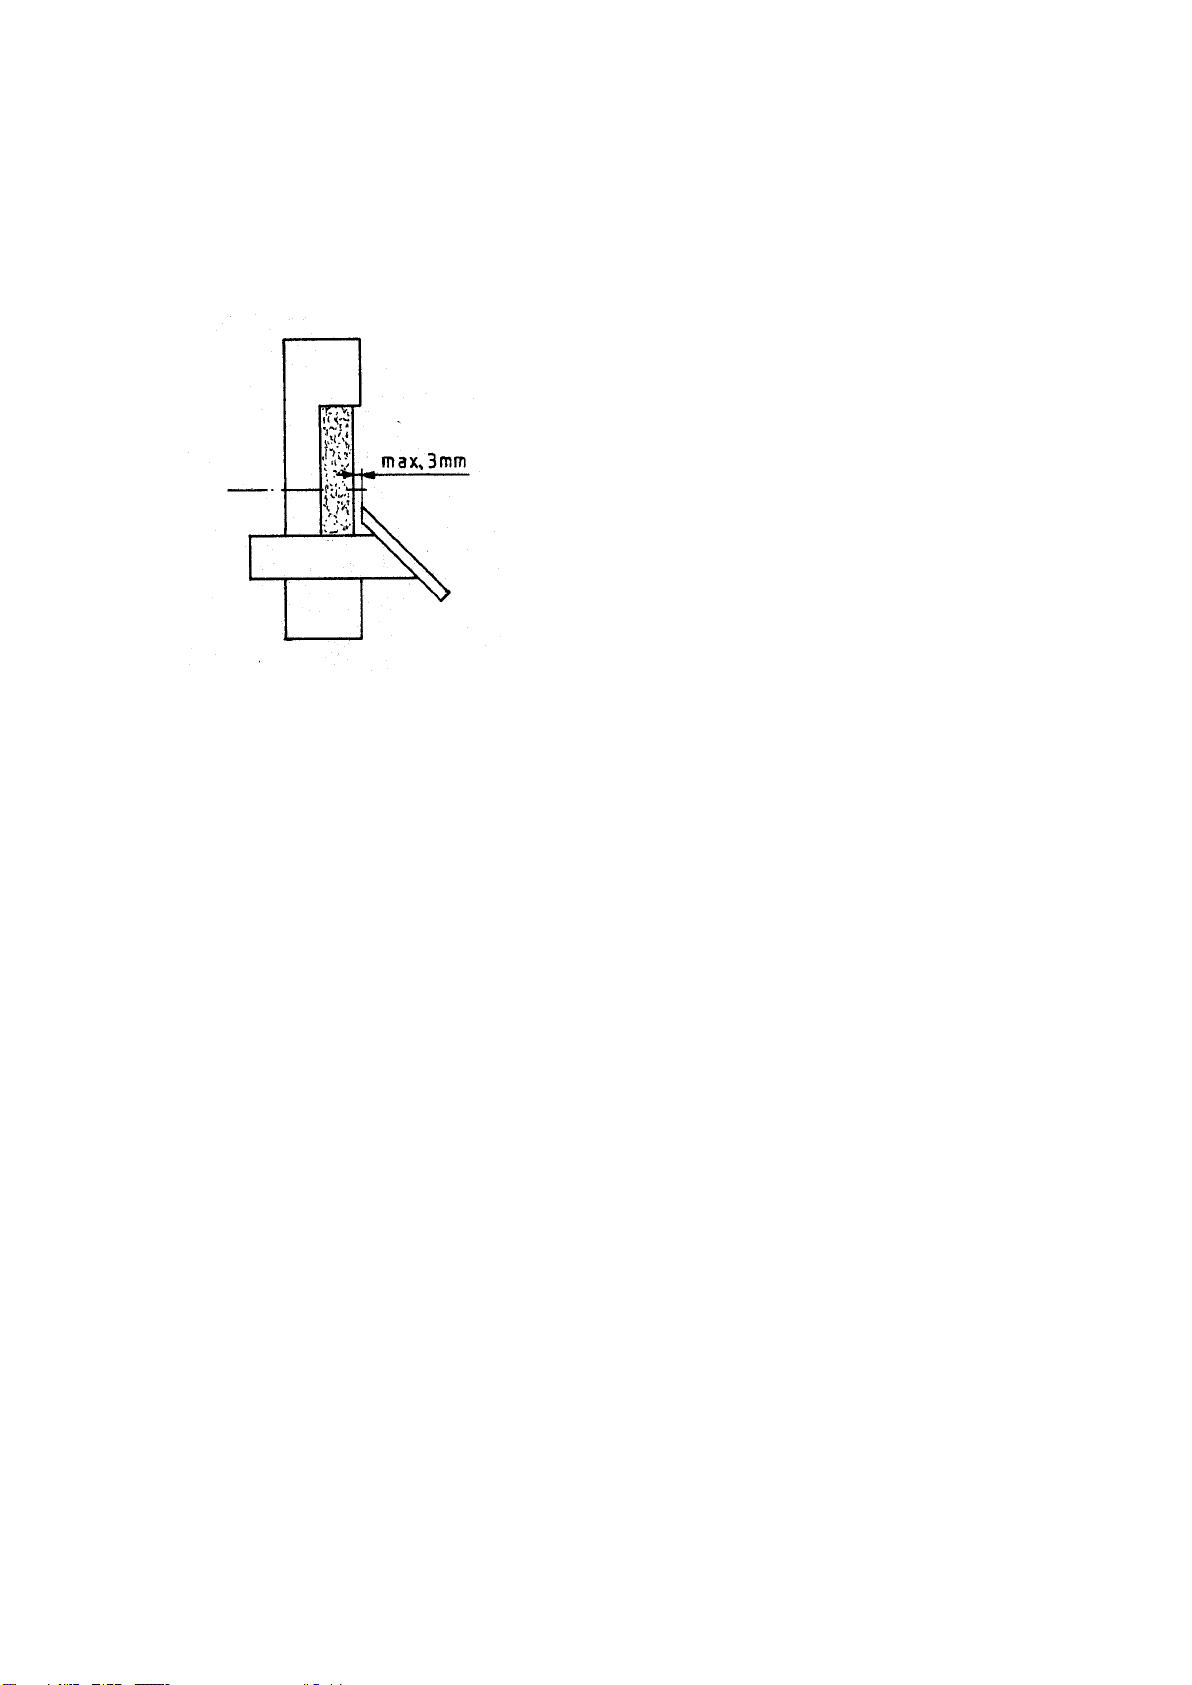
VLAKSLIJPMACHINES VSS 9200 en VSS 9300
De vlakslijpmachine is aan de zijkant uitgerust met een vlakslijpschijf voor het volledig vlakslijpen van uw
industriële gereedschappen zoals draaibeitels. De stalen slijptafel is instelbaar. Zie tekening.
Controleer en monteer de instelbare slijptafel zo dicht mogelijk bij de slijpschijf.
De afstand is 3mm maximaal.
POLIJSTMACHINES DPC 9200 en DPC 9300
De machines types DPC zijn voorzien van conische doorns. De conische doorns zijn geschikt voor de
montage van polijstschijven.
Op de conische doorn is het volgende merkteken aangebracht:
L: voor de doorn die aan de linkerkant van de machine moet worden gemonteerd.
R: voor de doorn die aan de rechterkant van de machine moet worden gemonteerd.
Indien een conische doorn aan de verkeerde kant van de machine is gemonteerd, zal de polijstschijf bij
rotatie van de doorn aflopen.
verwijder de schroeven uit de lagerafdekplaat; let op dat de gegolfde veerring op zijn plaats blijft
breng de polijstkap aan
draai de schroeven weer vast
monteer de conische doorn
CONISCHE DOORNS EN ASVERLENGINGEN (toebehoren)
De conische doorn r en l en de asverlengingen r en l zijn uitsluitend toepasbaar op de slijpmachines
DS 9200 en DS 9250 en VSS 9200.
Ze zijn niet geschikt voor DS 9300 en VSS 9300. Deze machines hebben een aseinde van 25Ømm,
waarop de genoemde toebehoren niet bevestigd kunnen worden.
STAALDRAADBORSTELS (toebehoren)
Monteer uitsluitend Creusen staaldraadborstels, aangezien zij nauwkeurig op de machines passen en
binnen de beschermkap.
Gebruik altijd de juiste borstels met de juiste afmetingen.
Monteer altijd een beschermkap over de borstel.

TIPS VOOR GOEDE SLIJPRESULTATEN
Slijp het werkstuk indien nodig altijd eerst met de grove slijpsteen en vervolgens met de fijne slijpsteen.
Controleer voor het slijpen altijd of het werkstuk vrij van olie, vet en verfresten is. Hiermee voorkomt men
dat de slijpschijf dichtslibt of wordt vervuild.
Voorkom overmatige verhitting van de slijpmachine. Oefen slechts een lichte druk op het werkstuk uit.
Indien een slijpschijf dichtslibt, dient men deze te dressen. Gebruik hiervoor een Creusen handdresser.
ONDERHOUD EN REINIGING
Bij gebruik volgens bestemming is het onderhoud aan de machine zeer gering.
Reinig de machine regelmatig
Verwijder vuil en vet dat zich op de buitenzijde van de machine bevindt.
Verwijder het achtergebleven slijpstof met een zachte borstel.
Zodra de slijpsteun voor 20% is versleten dient u deze te vernieuwen.
Indien de oogbeschermglazen zo beschadigd en vervuild zijn zodat ze het zicht belemmeren dienen
deze te worden vervangen.
MILIEUASPECTEN
Versleten schijven dienen op een milieuvriendelijke manier te worden afgevoerd.
GARANTIE
5 JAAR GARANTIE
Voor elke Creusen Industrial machine geldt een garantieperiode van 5 jaar op materiaal- en fabricagefouten
De gedateerde aankoopbon of rekening van uw leverancier geldt als garantiebewijs.
De garantie geldt alleen, nadat door of namens Creusen is vastgesteld dat er geen sprake is van schade
door verkeerd gebruik.
Wanneer u aanspraak wilt maken op garantie dient u de complete machine in een deugdelijke
verpakking via uw leverancier in te sturen, vergezeld van het gedateerde aankoopbewijs van uw
leverancier. Rechtstreeks aan Creusen toegezonden machines, incomplete machines en niet-franco
toegezonden machines worden niet in behandeling genomen.
Transportschade valt buiten de aansprakelijkheid van Creusen.
Uw garantie vervalt wanneer reparaties door derden zijn verricht.
Technische wijzigingen voorbehouden.
9N/15/01
© Creusen 2018

Instructions for use
Grinding- and polishing machines series 9000
standard execution.
INTRODUCTION
This Creusen grinder is a Dutch quality product and will put in many years of good service if it is properly
maintained. You should therefore read these directions carefully before taking it into use and follow the
instructions given.
For the best results we recommend the use of Creusen accessories only.
The machine destination is the grinding of steel or equivalent materials.
In this manual the following pictograms are used:
Denotes possible personal injury or damage to the machine
if the instructions in this manual are ignored.
Denotes risk of electrical shock
EC-declaration of conformity for machines
Creusen Finishing Solutions BV
Dr Philipslaan 39
6042 CT Roermond
The Netherlands
herewith declares that Creusen Industrial grinders series 9000
are in conformity with the
* European Machinery Directive 2006/42/EG
* The EC guidelines
- Low Voltage Directive 2014/35/EU
- Electromagnetic compatibility 2014/30/ EU
Naam: J. Pereira
Datum: 01-10-2017

Technical specifications
Type
DS 9200
DS 9200
DS 9250
DS 9300
Voltage V
230
1~
400 / 230
3~
400 / 230
3~
400 / 230
3~
Hz
50-60
50-60
50-60
50-60
Power P1 Watt
900
1100
1500
1700
Speed min-¹
2800/3400
2800/3400
2800/3400
1400/1700
Per.speed m/sec
30-36
30-36
37-44
22-26
Grindingwheel d1xbxd2
in mm
Grit
200x25x20
36/80
200x25x20
36/80
250x30x20
36/80
300x40x25
36/60
Noise level dB (A)
60
60
65
65
Weight kg
24
24
38
51
Type
VSS 9200
VSS 9300
Voltage V
400 / 230
3~
400 / 230
3~
Hz
50-60
50-60
Power P1 Watt
1100
1700
Speed min-¹
2800/3400
1400/1700
Per.speed m/sec
30-36
22-26
Grindingwheel d1xbxd2
in mm
Grit
200x25x20
200x40x20
36/60
300x40x25
300x50x25
36/60
Noise level dB (A)
60
65
Weight kg
27
60
Type
DP 9200
DP 9200
DP 9300
DPC 9200
DPC 9200
DPC 9300
Voltage V
230
1~
400 / 230
3~
400 / 230
3~
230
1~
400 / 230
3~
400 / 230
3~
Hz
50-60
50-60
50-60
50-60
50-60
50-60
Power P1 Watt
900
1100
1700
900
1100
1700
Speed min-¹
2800/340
0
2800/3400
1400/1700
2800/3400
2800/3400
1400/1700
Per.speed m/sec
30-36
30-36
22-26
30-36
30-36
22-26
Polishingwheel d1xd2
in mm (not standard)
200x20
200x20
300x25
200x20
200x20
300x25
Noise level dB (A)
55
55
60
50
50
50
Weight kg
16
16
27
16
16
27
Machines for other voltages and frequencies are available on request. The 1~ machines can be fitted with
various connection lines depending on the country of shipment.
INSTALLING THE GRINDER
Place the machine on a flat horizontal surface. Screw the machine
onto a workbench or a Creusen pedestal.
Mounting on workbench: Position the machine so that it does not cause any obstruction in use. Attach the
machine by means of nuts and bolts, which are secured by spring washers. See drawing.
Mounting on pedestal: Ensure that the pedestal has a secure foundation before fitting the machine by
means of nuts and bolts on the pedestal.
Machines with a steelwire brush have to be mounted on a workbench or a pedestal.
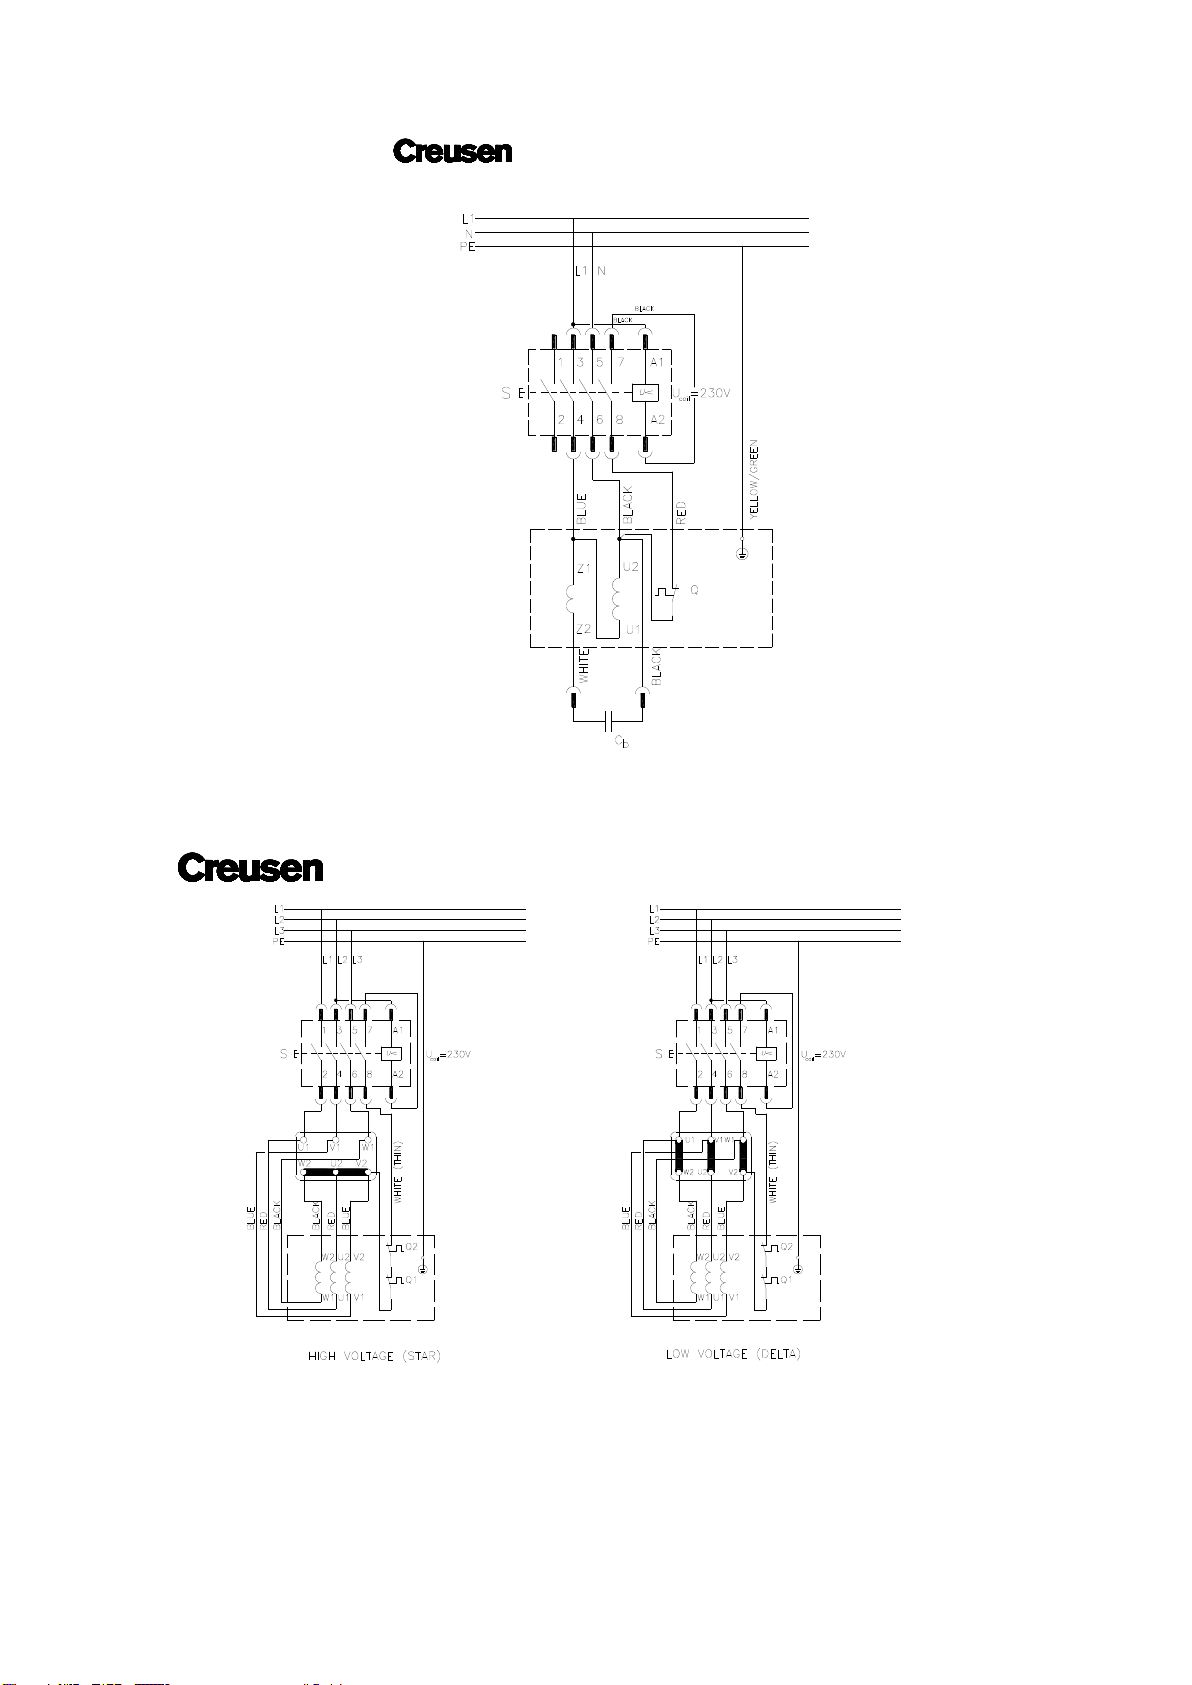
Wiring diagram series 9000 1~
Wiring diagram series 9000 3~

GENERAL SAFETY INSTRUCTIONS
Keep work area clean.
Cluttered work areas and benches can cause accidents.
Consider work area environment
Do not expose electric machines to humidity. Keep work area will lit. Do not use electric machines in the
presence of inflammable liquids or gasses.
Dress properly
Do not wear loose clothing or jewellery. They can be caught in moving parts. Tie long hair together.
Wear safety goggles
Also use a face or dust mask in case the operations produce dust or flying particles.
Keep children away
Do not allow other persons to touch the machine. Supervision is required for those under 16 years of
age.
Use appropriate machine
The intended use is laid down in this instruction manual. Do not force small machines or attachments to
do the job of heavy-duty machines.
Maintain machine with care
Keep the machine clean for better and safer performance.
Follow the instructions for maintenance and changing of accessories
Regularly inspect the mains cord and, if damaged, have it repaired by a qualified technician.
Always have your machine repaired by a qualified technician
This electric machine meets the relevant safety regulations. To avoid danger, electric appliances must
only be repaired by qualified technicians.
SAFETY INSTRUCTIONS
Installing
Installation to be done by a technician.
Before connecting the machine, check if the actual main voltage corresponds to the voltage on the
typeplate. Check with three-phase grinders also the connection on the terminal board. See drawing.
Connect the machine in accordance with the safety regulations (NEN 1010) and also observing any
locally applicable regulations.
The machines are suitable for continuous operation.
Starting 3-phase machines
To check the direction of rotation, switch the machine on briefly
so that the machine does not reach full speed.
If the direction of rotation is incorrect, first switch off the power supply and then change over the connections
of two phases or ask a technician to change over the two phase wires.

DESCRIPTION
These machines have been especially designed for grinding and polishing of metal tools and other metal
objects. They are intended for continuous operation..
1. Grinding support
2. Spark arrester
3. Support for eye shield; only 200Ø mm grinder
4. Eye shield
5. Wheel guard cover
6. Screw
7. Nut
8. Outer flange
9. Grinding wheel
13. Inner flange
14. Shaft
15. Wheel guard

INSTALLING AND ADJUSTING
For the best results we recommend the use of Creusen accessories and replacement parts only.
When using your grinder and when replacing parts the following instructions must be carefully
observed. Only use parts and accessories of the correct dimensions.
Always remove the plug from the socket before changing a part or carrying out other work on
the machine.
MOUNTING THE PARTS
Mount the parts like grinding supports, eye shields and spark arresters and adjust these according to
drawing.
Before use the spark arresters and grinding supports must be mounted and adjusted, and the eye shields
must be mounted. Maximum distance between the parts:
between spark arrester and grinding wheel: 2 mm
between grinding support and grinding wheel: 2 mm
Adjust the eye shields in such a way that they offer the maximum protection.
When using the grinder for the first time allow the machine to run
for approx. 5 minutes without load.
MAINTENANCE
Replace the grinding support if it is worn away by 20%.
To ensure safe working, check and adjust the gap regularly to allow for wear and tear of the grinding wheels.
The grinding wheel must be replaced when the distance between the outer diameter of the disc and the edge
of the guard is 5 mm. A new grinding wheel must be subjected to a 'ringing test'.
A light tap on the wheel should produce a clear ring.
If you hear a dull sound the grinding wheel must not be used.
CHANGING A GRINDING WHEEL
The grinding wheel must be replaced when the distance between the outer diameter of the disc and the edge
of the guard is 5 mm. Act as follows:
remove the protective cover
remove the nut, flange and grinding wheel
make sure the inner flange remains on the shaft
fit the new grinding wheel
fit flange and nut
mount protective cover, adjust the spark arrester and grinding support
allow the machine to run for approx. 5 minutes without load
A certain oscillation of the wheel is normal, up to 0,4 –0,6 mm in radiaal and 0,4 –0,6 mm in axiaal direction
measured at the circumference of the wheel.

SIDE GRINDERS VSS 9200 and VSS 9300
The side grinder is fitted with a side grinding wheel for perfect plane grinding of industrial tools like turning
chisels. The steel grinding table is adjustable. See drawing.
Check and fit the adjustable grinding table on max. 3mm of the grinding wheel.
POLISHING MACHINES DPC 9200 and DPC 9300
The machines of the DPC type are fitted with tapered spindles. The tapered spindles are suitable for
mounting polishing wheels.
One of the following marks is applied on the tapered spindle:
L: for the spindle which must be mounted on the left-hand side of the machine.
R: for the spindle which must be mounted on the right-hand side of the machine.
If a tapered spindle is mounted on the wrong side of the machine the polishing wheel will run off the spindle
when it starts to rotate.
remove the screws from the bearing cover plate; make sure that the undulated spring ring stays in its
position
fit the polishing guard again
tighten the screws again
mount the tapered spindle
CONICAL SPINDLES R AND L AND EXTENSION SHAFTS R AND L (Accessories)
Conical spindles r and l and extension shafts r and l, are only for models DS 9200 / DS 9250
and VSS 9200.
They are not fitting the DS 9300 or VSS 9300, as these models have a shaft of 25Ømm,
on which conical spindle and/or extension shaft do not fit.
STEEL WIRE BRUSHES (accessories)
Only fit Creusen steel wire brushes, because they fit exactly on the machine shaft.
Always use the correct brushes with the correct dimensions.
Always fit a guard cover over the brush.

TIPS FOR PROPER GRINDING RESULTS
If necessary, first grind the work piece with the coarse grinding wheel and subsequently with the fine
grinding wheel.
Before grinding always check that the work piece is free of oil, grease and paint deposits. In this way you
prevent the grinding wheel from clogging up or getting dirty.
Prevent overheating of the grinder. Only exert light pressure on the work piece.
If a grinding wheel clogs up, you need to dress it. Use a Creusen hand dresser for this purpose.
MAINTENCANCE AND CLEANING
When used in accordance with its intended use, the machine hardly requires any maintenance at all.
Regularly clean the machine.
Remove dirt and grease from the outside of the machine.
Remove the remaining grinding dust with a soft brush.
Replace the grinding support if it is worn away by 20%.
Change eye-shields when you have no clear view, caused by damage or dust on the eye shields.
ENVIRONMENTAL ASPECTS
Worn grinding wheels must be disposed of in an environmentally safe way.
WARRANTY
5 YEAR WARRANTY
A 5 year warranty period applies to every Creusen machine against material and or manufacturing defects.
The dated receipt or invoice from your supplier serves as the warranty.
The warranty only applies if Creusen has established or on behalf of Creusen it has been established
that the damage did not result from inexpert use.
If you want to claim on the warranty you must return the complete machine in a durable packaging to
your supplier, accompanied by the dated receipt of your supplier. Machines sent directly to Creusen,
incomplete machines, and machines which are sent in with postage unpaid are not accepted.
Transport damage is beyond the scope of liability of Creusen.
Your warranty expires if repairs have been carried out by third parties.
Technical modifications reserved.
9E/15/01
© Creusen 2018

Gebrauchsanweisung
Schleif- und Poliermachinen Serie 9000
standard Ausführung.
EINLEITUNG
Diese Creusen Maschine ist ein Niederländisches Qualitätsprodukt und wird Ihnen viele Jahre gute Diensten
leisten, wenn Sie vorschriftsmäßis gewartet wird. Sie sollten daher diese Anweisungen sorgfältig durchlesen,
ehe Sie die Maschine in Gebrauch nehmen, und die gegebenen Anweisungen befolgen.
Um beim Schleifen die besten Ergebnisse zu erzielen, empfehlen wir Ihnen, ausschließlich
Orginalzubehörteile von Creusen zu verwenden.
Die Maschinen sind geeignet zum Schleifen und Polieren von Stahl und gleichzusetzenden Werkstoffen.
In dieser Gebrauchsanweisung werden die folgenden Piktogramme benutzt:
Weist auf die Gefahr von Verletzungen oder Beschädigungen
der Maschine hin, falls die Anweisungen in dieser Anleitung
nicht eingehalten werden.
Hinweis auf elektrische Spannung.
EG Konformitätserklärung für Maschinen
Creusen Finishing Solutions BV
Dr Philipslaan 39
6042 CT Roermond
die Niederlande
Erklärt hiermit dass die Creusen Industrial Maschinen Serie 9000
folgende Richtlinien entsprechen
* Maschinenrichtlinie 2006/42/EWG
* die EWG Richtlinien
- Niederspannungsrichtlinie 2014/35/EWG
- Elektromagnetische Verträglichkeit 2014/30/EWG
Naam: J. Pereira
Datum: 01-10-2017

Technische Daten
Typ
DS 9200
DS 9200
DS 9250
DS 9300
Spannung V
2300
1~
400 / 230
3~
400 / 230
3~
400 / 230
3~
Hz
50-60
50-60
50-60
50-60
Leistung P1 Watt
900
1100
1500
1700
Drehzahl min-¹
2800/3400
2800/3400
2800/3400
1400/1700
Geschwindigkeit m/sec
30-36
30-36
37-44
22-26
Schleifscheibe d1xbxd2
in mm
Korngrösse
200x25x20
36/80
200x25x20
36/80
250x30x20
36/80
300x40x25
36/60
Schallpegel dB (A)
60
60
65
65
Masse kg
24
24
38
51
Type
VSS 9200
VSS 9300
Spannung V
400 / 230
3~
400 / 230
3~
Hz
50-60
50-60
Leistung P1 Watt
1100
1700
Drehzahl min-¹
2800/3400
1400/1700
Geschwindigkeit m/sec
30-36
22-26
Schleifscheibe d1xbxd2
in mm
Korngrösse
200x25x20
200x40x20
36/60
300x40x25
300x50x25
36/60
Schallpegel dB (A)
60
65
Masse kg
27
60
Type
DP 9200
DP 9200
DP 9300
DPC 9200
DPC 9200
DPC 9300
Spannung V
230
1~
400 / 230
3~
400 / 230
3~
230
1~
400 / 230
3~
400 / 230
3~
Hz
50-60
50-60
50-60
50-60
50-60
50-60
Leistung P1 Watt
900
1100
1700
900
1100
1700
Drehzahl min-¹
2800/340
0
2800/3400
1400/1700
2800/3400
2800/3400
1400/1700
Geschwindigkeit m/sec
30-36
30-36
22-26
30-36
30-36
22-26
Polierscheibe d1xd2 in
mm
(nicht standard)
200x20
200x20
300x25
200x20
200x20
300x25
Schallpegel dB (A)
55
55
60
50
50
50
Masse kg
16
16
27
16
16
27
Maschinen für andere Spannungen und Frequenzen sind auf Anfrage erhältlig. Je nach Bestimmungsland
können die Maschinen auch mit verschiedenen Anschlußleitungen ausgeführt werden.
AUFSTELLUNG DER SCHLEIFMASCHINE
Stellen Sie die Maschine auf einen flachen, horizontalen Untergrund. Schrauben Sie die Maschine
auf der Werkbank oder auf einem Creusen Ständer fest.
Aufstellung auf der Werkbank: Maschine so aufstellen, daß sie bei Inbetriebnahme keine Behinderung
verursacht. Befestigen Sie die Maschine mit Schraube-Mutter-Verbindungen, die durch Federringe gesichert
werden. Siehe Zeichnung.
Aufstellung auf Säule: Sorgen Sie dafür, das die Säule ein solides Fundament hat, ehe die Maschine
darauf montiert wird.
Maschinen versehen von einer Stahldrahtbürste müssen auf einer Werkbank oder Säule montiert werden.

Schaltbild Serie 9000 1~
Schaltbild Serie 9000 3~

ALLGEMEINE SICHERHEITSVORSCHRIFTEN
Sorgen Sie für Ordnung im Arbeitsbereich
Ein unaufgeräumter Arbeitsbereich führt zu Unfällen.
Berücksichtigen Sie Umgebungseinflüsse
Elektrische Maschinen dürfen nicht an hoher Feuchtigkeit aussetzen. Sorgen Sie für eine gute
Beleuchtung im Arbeitsbereich. Benutzen Sie elektrische Maschinen nicht in der Nähe brennbarer
Flüssigkeiten oder Gase.
Tragen Sie geeignete Arbeitskleidung
Tragen Sie keine weiten Kleidungsstücke oder Schmuck, da diese von den beweglichen Teilen erfaßt
werden können. Binden Sie langes Haar zusammen und tragen Sie ein Haarnetz.
Tragen Sie eine Schutzbrille
Benutzen Sie bei Arbeiten, bei denen sich Staubteilchen oder Späne lösen, auch eine Gesichts- oder
Staubmaske.
Kinder sind von der Maschine fernzuhalten
Lassen Sie andere Personen die Maschine nicht berühren. Bei einem Benutzer unter 16 Jahren muß
eine Aufsichtsperson anwesend sein.
Benutzen Sie die richtige Maschine
Der bestimmungsgemäße Gebrauch wird in dieser Gebrauchsanweisung beschrieben. Benutzen Sie
keine leichten Maschinen oder leichten Hilfsstücke für Arbeiten, für die eigentlich schwere Maschinen
benötigt werden.
Warten Sie die Maschine sorgfältig
Halten Sie die Maschine sauber, um besser und sicherer arbeiten zu können.
Halten Sie die Anweisungen in bezug auf Wartungsarbeiten und den Austauch von Maschinenteilen ein
Kontrollieren Sie regelmäßig das Netzkabel und lassen Sie es im Falle einer Beschädigung von einer
Fachkraft austauschen.
Lassen Sie Reparaturen von einer Fachkraft durchführen
Diese elektrische Maschine erfüllt alle geltenden Sicherheitsvorschriften. Um Unfälle zu vermeiden,
dürfen Reparaturen ausschließlich von entsprechend qualifizierten Fachkräften aufgeführt werden.
ELEKTRISCHE SICHERHEIT
Anschluß
Lassen Sie die Maschine durch Elektrofachkräfte anschliessen.
Kontrollieren Sie, ob die Netzspannung, an die Sie die Maschine anschließen, mit der auf dem
Typenschild angegebenen Spannung übereinstimmt. Kontrollieren Sie bei drei-Phasen Maschinen auch,
ob der Anschluß an der Klemmenplatte übereinstimmend mit der Netzspannung geschaltet ist. Siehe
Schaltbild.
Schließen Sie die Maschine nach den Sicherheitsvorschriften (NEN 1010) und den örtlichen Vorschriften
an.
Die Maschinen sind für Dauerbetrieb geeignet.
In Betriebsetzung von drei-Phasen Machinen
Zur Kontrolle der Laufrichtung wird die Maschine kurzfristig eingeschaltet,
damit sie nicht ihre volle Geschwindigkeit erreichen kann.
Bei falscher Laufrichtung ist erst die Spannung abzuschalten; dann sind die Anschlüße
von zwei Phasen umzuwechseln.
This manual suits for next models
5
Table of contents
Languages:
Other Creusen Grinder manuals


