Critter & Guitari Organelle M User manual

Organelle M User Manual
Contents
Organelle M User Manual
WAIT AM I IN THE RIGHT PLACE?
IMPORTANT NOTE
Getting Started
1. Organelle Concepts
1.1 What is this thing?
1.2 How to Use This Manual
2. The Hardware Unit
2.1 Acquainting yourself with the box.
2.2 A Few Configuration Ideas
3. Operating the Organelle by Itself
3.1 Main Menu Screen
3.2 Patch Screen
3.3 System Menu Items
3.4 Organelle's Default MIDI Setup
4. Managing Patches
4.1 Folder Structure
4.2 Using a USB Drive for Patches
4.3 Using internal microSD
5. Using WiFi with the Organelle
5.1 Using AP mode
5.2 Web Interface
5.3 Joining Existing WiFi Network


First edition by Dave Linnenbank - October 2015
Updated for Organelle M - 2020
OS version 4.0
WAIT AM I IN THE RIGHT PLACE?
Before we get started, please note that this manual is for the Organelle M, with a built-in
speaker and battery power. Visit this page if you are looking for the manual for the original
Organelle.
This manual is for OS version 4.0. You can check your OS version number from the Info
menu item in the SYSTEM menu. If your hardware unit is running a version earlier than
v4.0, see Chapter 7 for information on updating your Organelle OS.
IMPORTANT NOTE
The Organelle M has a powerful built in speaker. It is possible for a patch to make some
very loud and startling sounds. Any patch that feeds audio from the input to the audio
output, such as an eect processor, has the potential to feedback if the speaker is
enabled and the internal mic selected. For this reason it is strongly recommended to
switch the input select switch to the line-in position when you start a patch for the first
time.
It is also possible for an incorrectly configured patch to output very loud sounds from the

speaker. So if you are unsure of what a patch does, it is also a good idea to switch the
internal speaker o. There are two switches on the back to enable speaker and select
input, see Chapter 2 for more information.
Getting Started
For the simplest configuration, follow these steps.
1. First connect the power adapter, or insert batteries. Connect the adapter to a power
outlet, and then connect its plug to the leftmost port on the back of the Organelle. You
can also insert 4 AA batteries into the battery port housed on the bottom of the
instrument. When starting a patch for the first time, it is a good idea to set the input to
line in using the small switch on the back (see Chapter 2 for more information).
Once the Organelle is connected to power, move the Power switch to the On position.
The OLED Screen will be blank at first. The LED will be steady pale green for a brief time
and then blink on/oblue. The screen will display the Patches menu when this process
is done.
2. Set the volume of the speaker.
The Vol knob on the top right of the Organelle controls output volume. Start with this
knob all the way to the left (no sound). From the front of the Organelle, peer over the

back of the unit (don't worry; the port labels will be upright from this vantage). Set the
speaker switch to the sounding position. This will route all sound output to the onboard
speaker. Additionally, the leftmost 1/8" jack is for headphones, and the next 1/4" jack is
stereo line out.
3. Load a patch.
Immediately to the left of the volume knob is the Selector encoder. Turn this encoder to
select one of the listed patches, and then press down the top of the encoder to load the
patch. Pick something from the Synthesizer category to start.
4. Play! Play the keys, adjust some parameters (via the four knobs on the left), and enjoy!
And if you want to try a dierent patch, simply turn the Selector encoder and select
another patch.
5. When you have had enough fun for now, shut down the Organelle. This is achieved
simply by moving the Power switch on the rear panel to the OFF position. If the
included power supply is powering the Organelle, do not disconnect the cable until the
OLED screen clears.
1. Organelle Concepts
Again, welcome to the world of the Organelle! As this instrument can work for people in
many dierent ways and at multiple depths of operation, let us begin by getting a few
ideas straight, starting with the most obvious question...
1.1 What is this thing?

We can (and will) talk about what the literal Organelle device is, but we'd do better to start
with what it can be.
Organelle is an instrument.
As you may have already noticed in the getting-started section, the Organelle can be
connected quickly and is ready for sound. Other than the Organelle itself, no additional
peripherals are needed for performance.
Organelle is an eects processor.
In addition to audio output ports, the Organelle also has an audio input port. Accordingly,
patches can access and make use of incoming audio in various ways. This can range from
a simple eect processor (like a filter or basic delay) to something more elaborate (like a
sampler or vocoder or something else entirely).
Organelle is a generator.
There is no requirement that the patches you load into the Organelle are triggered by
playing notes on the device. There are patches that simply drone and/or create evolving
textures on their own over time. The audio input might be used as a source. As this
definition is starting to become circular, let's cut to the chase...
Organelle is whatever you want it to be.
In truth, the Organelle is a vessel for your musical ideas, connecting your own desires for
musical expression with customizable technology and portability. You may use the
Organelle in a completely dierent way than someone else, and that is not just okay: it's
the entire point.
So is it hardware or software?
In short, yes. The Organelle is a hardware device that comprises both controller elements
(the ports, knobs, keys, etc.) and a modern microcomputer housed inside the case. The
microcomputer itself is running a version of the Linux operating system, and one use of
the USB ports is to connect a USB drive that contains your software patches. (The microSD

card included with your Organelle is preloaded with the factory patches and ready to go.
The Organelle M does not include a USB Drive.)
What are these "patches" you speak of?
They are files configured with the program Pure Data. While the term "patch" often refers
to the settings and parameter values that create one sound in a synthesizer (or some other
predefined system), Pure Data patches are a bit more expansive. Each patch represents
the entire software system for taking any/all input received by the Organelle, processing it
as desired, and then delivering the output as audio, etc., via the Organelle's output ports.
(So by analogy, these patches are closer to both the synthesizer structure itself and all the
settings and parameters that define its initial sound.)
Some patches require various support files (audio media, other support patches that are
being referenced, "external" objects, etc.). Any time we discuss a particular patch, it is fair
to assume that we are also referencing any necessary subsidiary files.
What is Pure Data? And do I need to learn it to use the
Organelle?
Pure Data (often called Pd for short) is a visual multimedia programming environment,
meaning that its software files (yes, those patches) are created by adding objects from its
library and then interconnecting them with virtual patch cords. For example, here is a Pd
patch that simply adds together 32 oscillators:

And no, you do not need to learn Pure Data to use the Organelle. Aside from the patches
that come loaded on the Organelle, new patches will be listed on the patches page, and
many users have contributed patches available on Patch Storage. You can customize or
create your own patches, Pure Data is free and available for all computer platforms, but
"to code or not to code" is completely up to you.
What other concepts may be useful to understand?
A basic understanding of audio can only help. And MIDI (Musical Instrument Digital
Interface) is the protocol for triggering notes and sending control messages. To use the
Organelle as is, basics are enough. If you decide to create patches, a little bit more will be
required, but we will get to all that in later chapters.
1.2 How to Use This Manual
Certain chapters (such as this one!) are relevant to everyone. But depending on how you
will start using the Organelle, some chapters may be more valuable to you than others.
Regardless of your intentions, the getting-started section and concepts information
Chapter 1 will benefit you.

If you are satisfied with the included patches alone, the information on general
hardware configuration Chapter 2, system operation Chapter 3, and the patch listing
will all be relevant to you.
If you are looking to load additional patches into the Organelle, then Chapter 4 will
also be useful to you.
If you want to edit patches or even create some patches of your own, Chapter 6 will
be essential.
Your uses of the Organelle are likely to change over time. If a chapter is not important to
you today, don't feel bad about that: the chapters are happy to wait for you.
2. The Hardware Unit
As we begin to explore the universe that the Organelle makes available to us, we should
start with the Organelle's place in the physical universe: its hardware.
2.1 Acquainting yourself with the box.
In this age of software and "virtual" devices, please do not neglect the hardware side of
things! While its microcomputer does indeed run everything that the Organelle does, we
endeavored to make the Organelle an "un-computer." Configuring and then interacting
with the physical interface is just as critical as anything you do on the software side. In
fact, this is how the pretty box can become an instrument.
Layout of the Unit
The Organelle is rectangular, with three of its six faces containing either controls, ports, or
other interface items. We will start with the back and right-side panels (where all the ports
are housed) before moving to the controls of the main face.
BACK PANEL
If you have turned on the Organelle, then you already have some familiarity with its ports,
but there is a little more here than you realize (and a little more than is labeled).
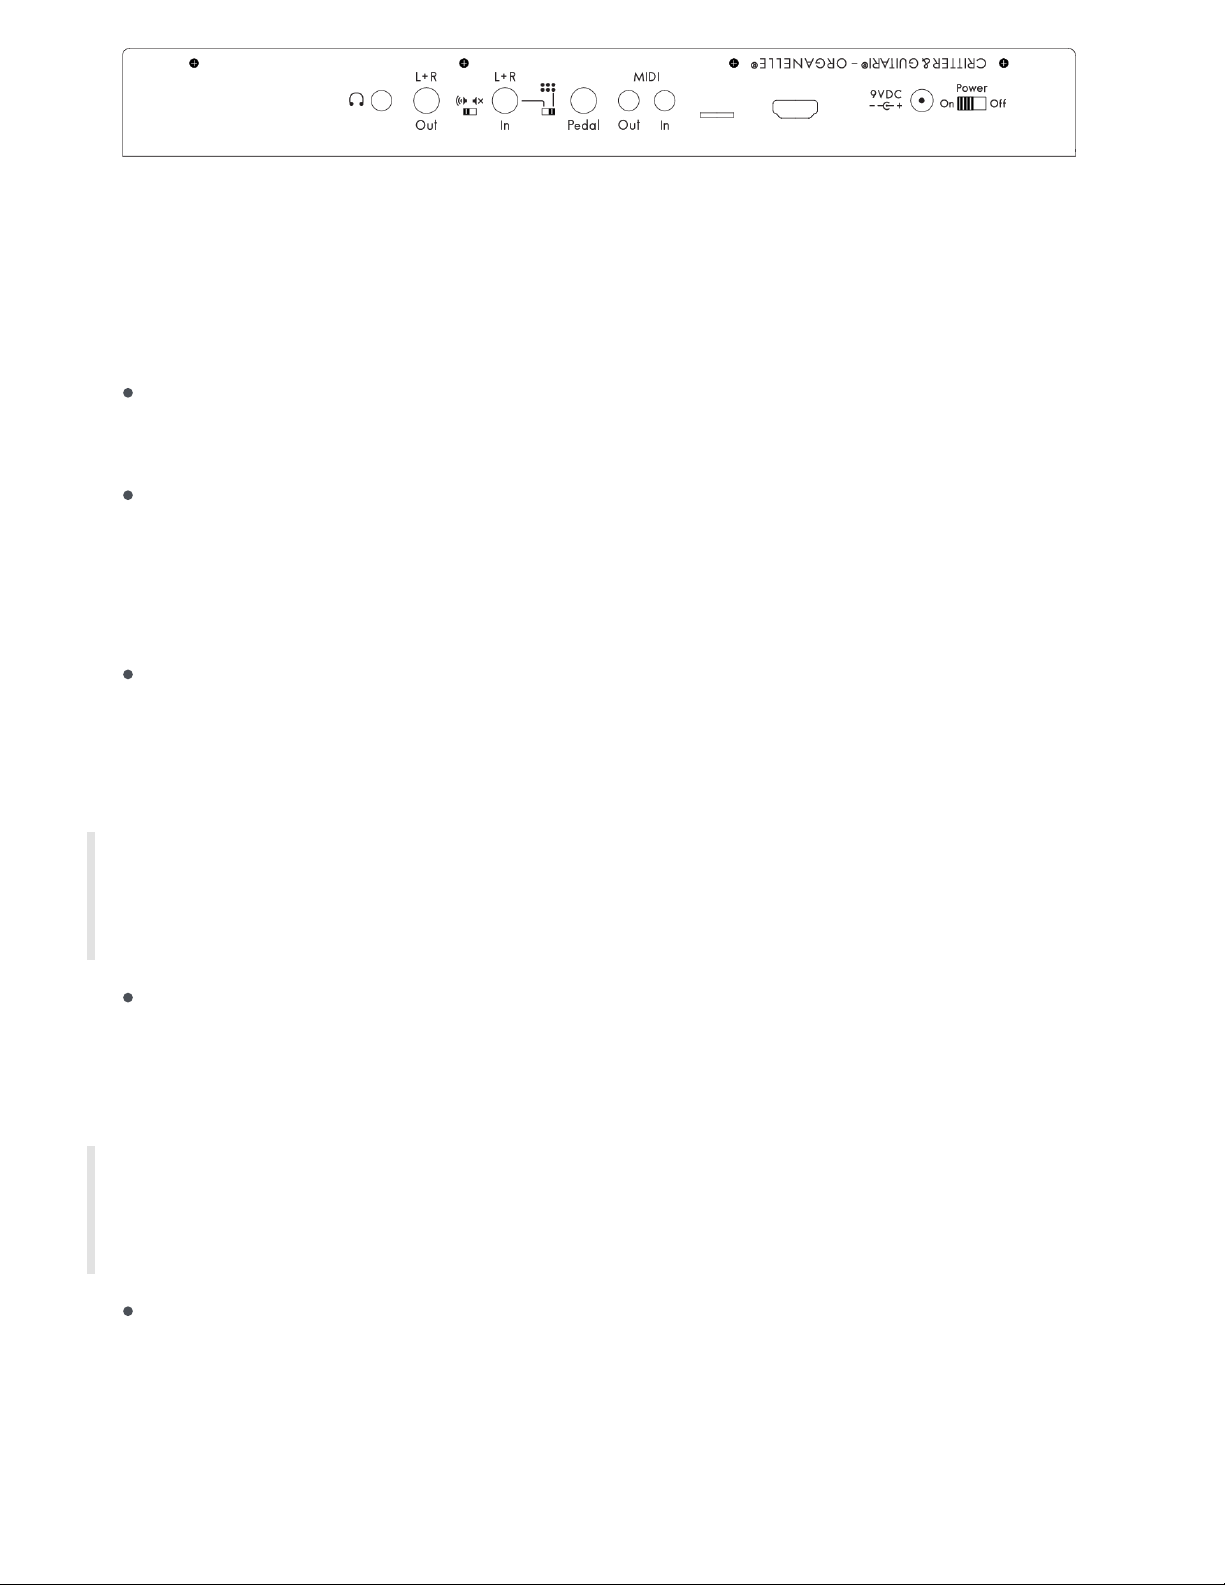
Again, our orientation would be upside down if you walked around to the back of the unit
and directly faced the back panel. We are assuming that you are standing in front of the
Organelle, just as you will be when operating it. From that position, you would access the
back panel either by leaning your head forward or by tilting the Organelle upward.
The headphone port is an 1/8" TRS (stereo) jack. It delivers the stereo audio output
of your current patch, as scaled by the Vol(ume) knob.
The L + R(left and right) Out port is a 1/4" TRS stereo line out jack. This delivers the
left and right audio outputs of your current patch, as scaled by the Vol(ume) knob.
This port exudes a line-level output. Connecting it to a mono balanced input (such
as an amplifier or mixer channel) may yield a muted/cancelled signal.
The speaker switch activates the onboard speaker. To hear the Organelle's current
sounds with the speaker, set this to the left 'sounding' position. To mute the speaker,
set this switch to the right 'non-sounding' position. The sound of the Organelle will
still be sent to the main outputs when the speaker is muted.
NOTE: The speaker switch is a hardwired switch (not software dependent) so if
something goes crazy, you can quickly stop the speaker from sounding.
The L + R(left and right) In port is a 1/4" TRS stereo line in jack. It receives any stereo
audio input that you would like fed into your current patch. This port is expecting a
line-level input. Connecting it to a mono balanced output may yield a
muted/cancelled signal.
NOTE: If a 1/4" TS (mono) cable is connected, any incoming signal will only be
received by the left input.
The ::: input select switch sets the audio input for the Organelle. In the left position,
only the sound from the 1/4" TRS input will be sent to the current patch. In the right
position, only the sound of the built-in microphone on the front panel will be sent to
the current patch.

The foot Pedal port is a 1/4" jack. It is intended to be connected to a keyboard
sustain-/damper-style pedal, which will deliver on/omessages to your patch.
NOTE: The Organelle presumes that any sustain/damper pedal used has a
"normally closed position" (negative polarity).
NOTE: If an expression pedal is connected, your patch should receive a
continuous range of values. In our experience, various expression pedal models
and settings tend to deliver dierent ranges of values.
The MIDI Out and In ports are stereo 1/8" jacks. These ports can send and receive
MIDI information with other instruments that also use 1/8" MIDI ports. These ports
meet the MIDI Manufacturers Association Specification for TRS MIDI connectors. An
adapter may be used to convert the 1/8" MIDI jack to standard 5-pin MIDI. The
Organelle uses the TRS To MIDI Type A spec.
The microSD card slot contains a card that acts as the internal microcomputer's root
disk. This means the Organelle's operating system lives here, but the microSD card is
also used to store patches.
The HDMI port delivers the video output of the Organelle's internal microcomputer.
Your Organelle matches whatever resolution your monitor/tv uses (up to 1080p). If
you power up the Organelle without HDMI connected and then connect HDMI, it will
default to 640x480 resolution. So it is best to connect your OG & Display before
powering them on. For additional information on using the HDMI port, see Chapter
6.
The 9VDC power port is for connection to the Organelle's power supply.
NOTE: The output specifications of the power supply are:
1. 9VDC
2. 1000mA (minimum)
3. 2.1mm diameter Center-positive tip
Any power supply used with the Organelle must meet these three specifications.
The Power switch will start the Organelle in the On position. This process takes a

few seconds. When you're done using your Organelle, move this switch to the O
position. This will run a shutdown procedure that also takes a few seconds.
RIGHT-SIDE PANEL
Compared to the back panel, the right-side panel is downright simple, housing two USB
2.0, Type A ports. They can connect class compliant devices that utilize MIDI over USB or
other computer peripherals.
Please remember that the Type A port is indicative of a USB host. That is to say, the
Organelle is a host to USB devices like USB-MIDI cables and WiFi adapters. Your
computer is also a USB host. You cannot connect two hosts directly together! Do not
purchase a special USB A-to-A cable to connnect the Organelle to your DAW. It won't work
and you may damage your Organelle, computer, or both!
NOTE: Some MIDI controllers can be powered by their Host's USB port. The
Organelle's USB ports can only supply a maximum of 0.5A. If your USB device
requires more than the Organelle can provide, communication and/or
performance issues may arise. If you experience these, please consult your USB
device's manual about power requirements. A powered USB hub or power
adapter for external device can resolve these power demands.
MAIN FACE
The main face is both Organelle's primary interface with you and the place that you will
spend the most time. While the other panels are critical when Organelle is being setup or
when you are altering its configuration, the main face is the operations center for when
you are actively running the show.
Knobs 1, 2, 3, and 4are available for parameter control within your patch. Each knob

is typically assigned to a parameter that is then continuously altered across a preset
range of values by movement of that knob. Movement of each knob can also send a
corresponding continuous controller (CC) MIDI message. For information on the
default MIDI operation of the Organelle, see Chapter 3.
The Organelle's display provides a window into its microcomputer brain, serving as
the on-board method of monitoring and adjusting both the system itself and your
patches.
The Selector encoder accompanies the Organelle's display because they are
dependent upon one another. While a patch is loaded, turning the Selector causes
the display to show the menu screen. By leaving the Selector alone for a few
seconds, the display will revert to the patch information screen.
NOTE: In some of the patches, the Selector encoder is used to advance through
additional pages of parameter assignments. This allows you to shift the the four
knobs' mappings to additional (read: more than four) parameters. Patches with
this behavior are often indicated by a message like ←- HOME in the bottom line
of the Organelle's on-board display. This functionality can also be built into your
own patches.
The Vol(ume) knob governs the potential audio output level of the Organelle. The
knob ranges from silence (in audio terms, -∞) at the far left to no attenuation (unity
gain) at the far right. Any adjustments to the Volume knob take eect immediately.
The small grille below Knobs 1& 2houses the built-in microphone.
The maple key at the far left and its accompanying LED comprise one special unit:
the Aux button. By default, the Aux button does nothing, but each patch can be
configured to use the input from the key for any type of mode switch or anything
else. The LED has eight static states (oplus seven color options) and is generally
used to provide the user with visual feedback of the Aux button's status. As with so
much about patches, the function of this control will be anything the patch designer
deems appropriate.
After the Aux button, the 24 other maple keys work together as a group. As their
piano-style layout may have indicated, these keys are for playing notes. By default,
each key triggers a "note on" MIDI message when it is pressed down and a
corresponding "note o" MIDI message when it is released. For patches that use

note messages to trigger or aect audio output, these keys will be your primary
performance vehicle.
The large grille to the far left houses the built-in speaker. The speaker is connected
to the left audio ouput channel. If a patch uses both right and left output channels,
the right channel will not be heard through the speaker.
BATTERY COMPARTMENT
The Organelle is portable! To use your instrument in the world, you may first want to insert
batteries. The Organelle requires 4 'AA' sized batteries (1.2-1.5V each).
Be careful:
Do not mix battery types (such as NiMH & Alkaline).
Do not mix old & new batteries.
Do not mix used & fresh batteries.
Press the tab on the side of the battery compartment and pull the cover to open the door.
Insert batteries in the orientation printed in the battery bed and replace the cover to shut
the door.
NOTE: The Organelle senses when a power source is connected. If your
Organelle has batteries and is also powered by a power supply, it will get power
from the power supply. If you remove the power supply from the wall socket or
switch power strip o, etc., the Organelle will detect the loss of power and
automatically switch to battery power.
2.2 A Few Configuration Ideas
While the Organelle is an open platform that permits and encourages nontraditional
setups, we will now look at a few potential configurations for the Organelle. Rather than
suggested setups, treat these more as baselines or ideas; nearly all elements of any
configuration can be mixed and matched. Of course, the Organelle will function on its own
without any connections to other devices, but combination is so much fun!
The following setups are merely examples of how one might use the Organelle. Each use
case depends highly on the patch being run, for example audio input might be irrelevant
in a simple synthesizer patch.
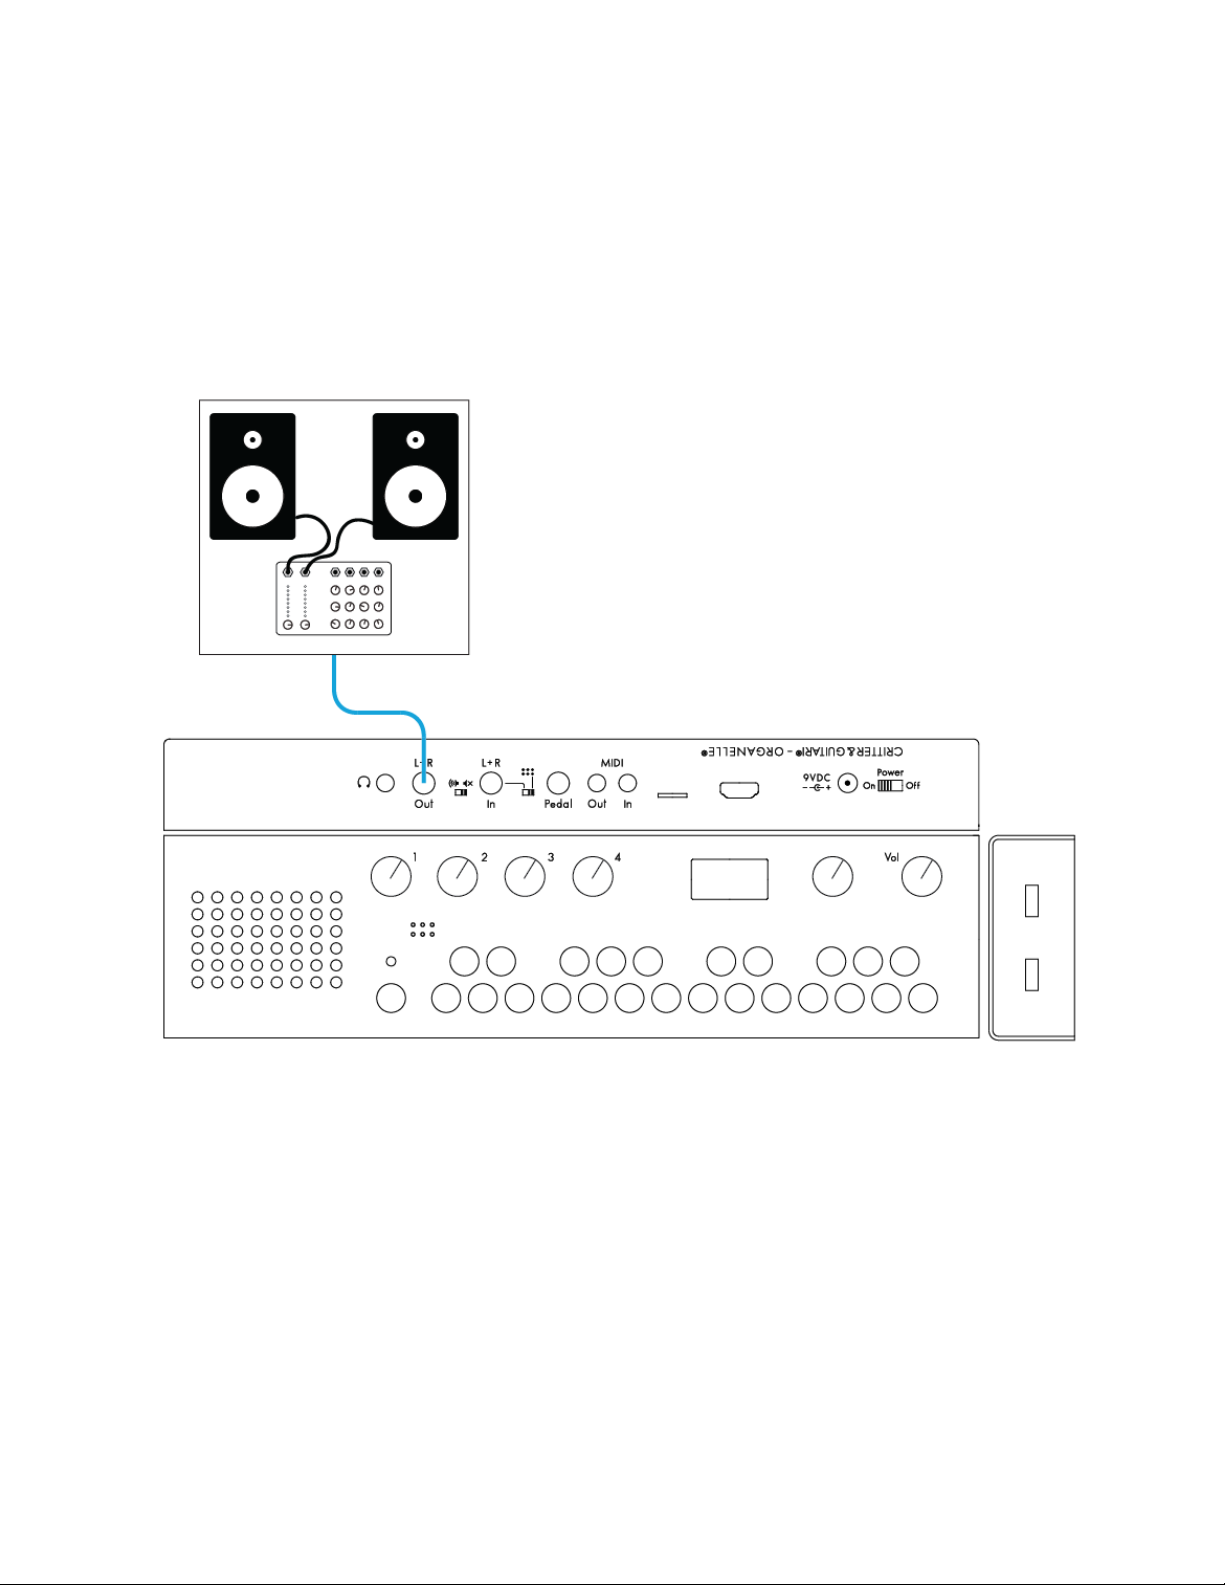
Minimal Performance Setup
Here we start with a variation on the setup proposed in the getting-started section. This
bare-bones approach is the most compact performance configuration possible.
Note that the Organelle is running on battery power.
The L+R(left and right) audio Out(put) ports are sending a stereo signal to a mixer, which
assumably runs to studio monitors, a recording interface, a venue's PA system, etc.
(Instead of going straight to a mixer, these ports could just as appropriately be connected
to direct boxes (DIs). If there is a sound person controlling levels, you may want to leave
the Vol(ume) knob most of the way up, providing optimal signal for them to work with.
Audio Input from a Microphone

This example uses a microphone as an audio source for the Organelle and a footswitch to
control an eects patch. This setup is also fairly minimal.
As the audio In(put) L+R port accepts a 1/4" cable, you will need something other than a
regular XLR cable to use a microphone with the Organelle. This could mean a cable with
the appropriate connection for your microphone (probably XLR) and a 1/4" plug on the
other end for the Organelle, a standard XLR cable with a female XLR to 1/4" adapter
attached, etc.
As most microphones are monophonic, most patches that use audio input are likely to
either sum the left and right inputs together or only use the left input. This is not
problematic in and of itself, but it could aect your setup choices and expectations.
A USB MIDI Controller and Audio Input from an Electric
Guitar
This example uses a guitar amplifier for audio output, an electric guitar as the source of
audio input, and a USB MIDI controller to supplement the Organelle's own keys and knobs.
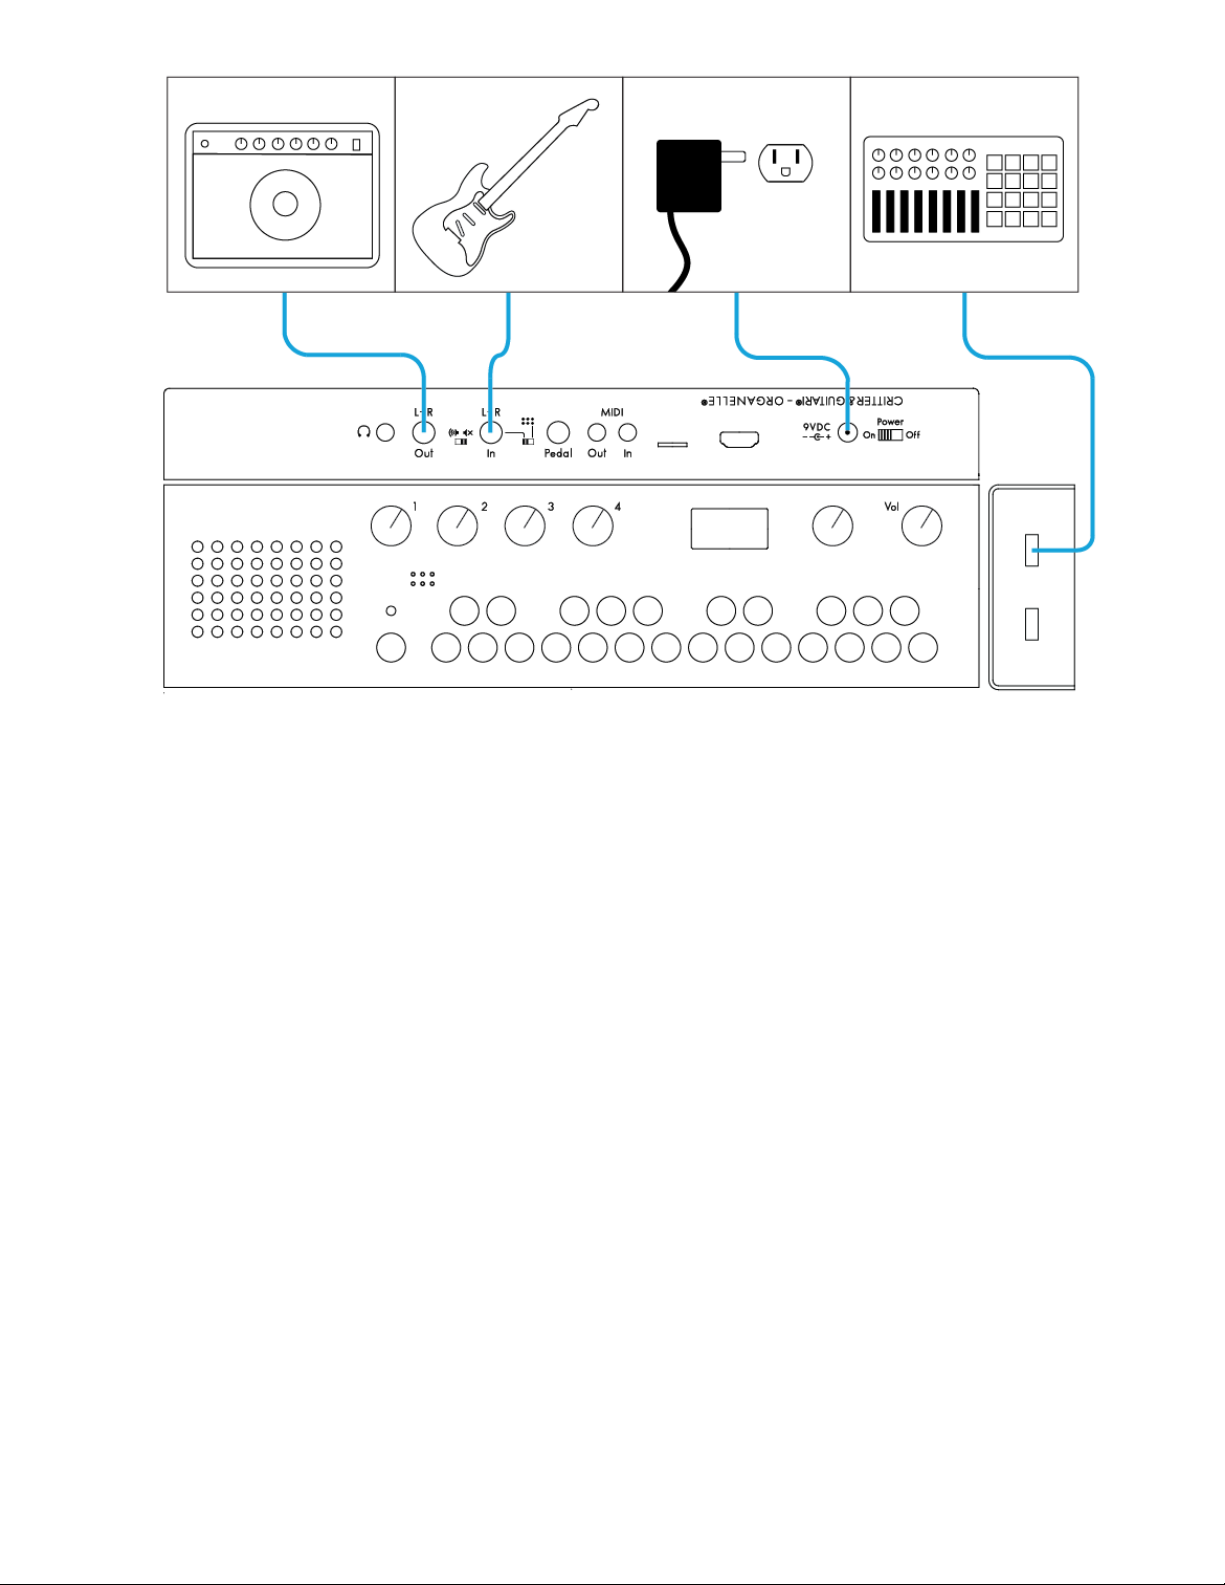
This setup demonstrates the Organelle's abilities as an eects processor. Use it like an
entire pedalboard, controlling many parameters with a USB MIDI controller. Any incoming
MIDI messages are sent directly to the current patch, which will determine how to use
them. As long as it is class compliant, any device supporting MIDI over USB would work,
whether it is an 88-key piano-style controller or a DJ-style controller, etc. Even MIDI-only
controllers will work when connected to the Organelle via a USB class compliant MIDI
interface.
Note that this setup has a 9V DC power supply connected.
An External Monitor, a USB Hub, and Computer Peripherals
This example uses the built-in speaker for audio output, two USB devices and an HDMI
monitor to facilitate Pure Data programming.

Connecting an HDMI monitor to the Organelle shows the internal microcomputer's
command-line interface and graphical user interface.
Connecting an HDMI monitor assumes that you want to operate the Organelle's
microcomputer in a typical way, and this implies the use of peripherals, such as a mouse
and keyboard. You may also make use of a USB hub, especially if you desire to use more
than two USB devices at once.
MIDI Input, MIDI Output, and a USB MIDI Controller
This example uses the Organelle as part of a larger MIDI setup.

Receive an external MIDI clock sync, MIDI notes, MIDI CC controls, or MIDI program
change messages with the 1/8" MIDI in jack. Send MIDI information to an external
instrument, such as MIDI notes to a synthesizer. Control the Organelle's keyboard with a
USB MIDI keyboard, expanding the number of playable notes within your patch.
3. Operating the Organelle by
Itself
As we stated early on and as the configuration ideas have shown, the Organelle is a fully
capable stand-alone instrument. To use the Organelle in this fashion requires
understanding the workings of its internal operating system. By learning the options
provided by the Organelle's software along with the uses of the Selector encoder and the
on-board display, you will be ready to travel and perform with the Organelle alone.
In this chapter, we'll explore where this combination of the Selector and on-board display
can go, and we will also go through the default MIDI operation of the Organelle and how
connected USB MIDI devices interface with the Organelle.

These topic areas will prepare you for general use of the Organelle. So let's start using it
now and get the pretty box singing.
3.1 Main Menu Screen
To interface with the Organelle, we will primarily work with two of its components. The
Selector encoder allows us to navigate system options and execute functions, and the on-
board display shows us the choices we have and provides feedback on our current patch
and system.
When the Organelle is powered up, it first runs through its boot sequence and then drops
us into its main menu screen.
The menu screen itself comprises two sections: the system section (or system menu) at
top and the patches section (or patches menu), which we see in the above image.
The first line of the screen displays some information. If no patch is currently playing it will
say 'Select Patch'. On the far right is a power icon. When running from batteries you will
see a battery guage indicating how many bars of power remain. When you plug the
Organelle in this changes to a flat solid bar. To the left of the power icon is a WiFi
connection icon. When the Organelle is connected to WiFi this icon will appear.
Patches Menu
Table of contents
Other Critter & Guitari Synthesizer manuals

Popular Synthesizer manuals by other brands


Roland
Roland Boutique JX-03 user guide

TB-Electronics
TB-Electronics F-SCAN3 NT instruction manual

Kurzweil
Kurzweil K2600 BEST OF VAST - REV A Musician’s Reference

Kurzweil
Kurzweil PC2R Musician's guide

Black Corporation
Black Corporation XERXES MK2 Operation manual

Keysight Technologies
Keysight Technologies N4963A user guide


