Crude Steel CX717S User manual

Always in Style ....
EManual de Instrucciones
GB Instruction Manual
Batidora de Mano
Hand Blender
Mod.: CX717S
Mod.: CX517S
HB S
Ld

2
700W
Partes Principales:
1 Selector de Velocidades
2 Interruptor de Funcionamiento
3
4
5
6 Pie de la Batidora-Triturador
7 Vaso de 900 ml con Tapa
Interruptor Pulse (Turbo)
Unidad Principal
Pulsadores para Extracción
Especificaciones:
Potencia en Vatios: 700
■ Voltaje: 230 - 240
■ Frecuencia: 50/60 Hz
■
■ Motor: DC
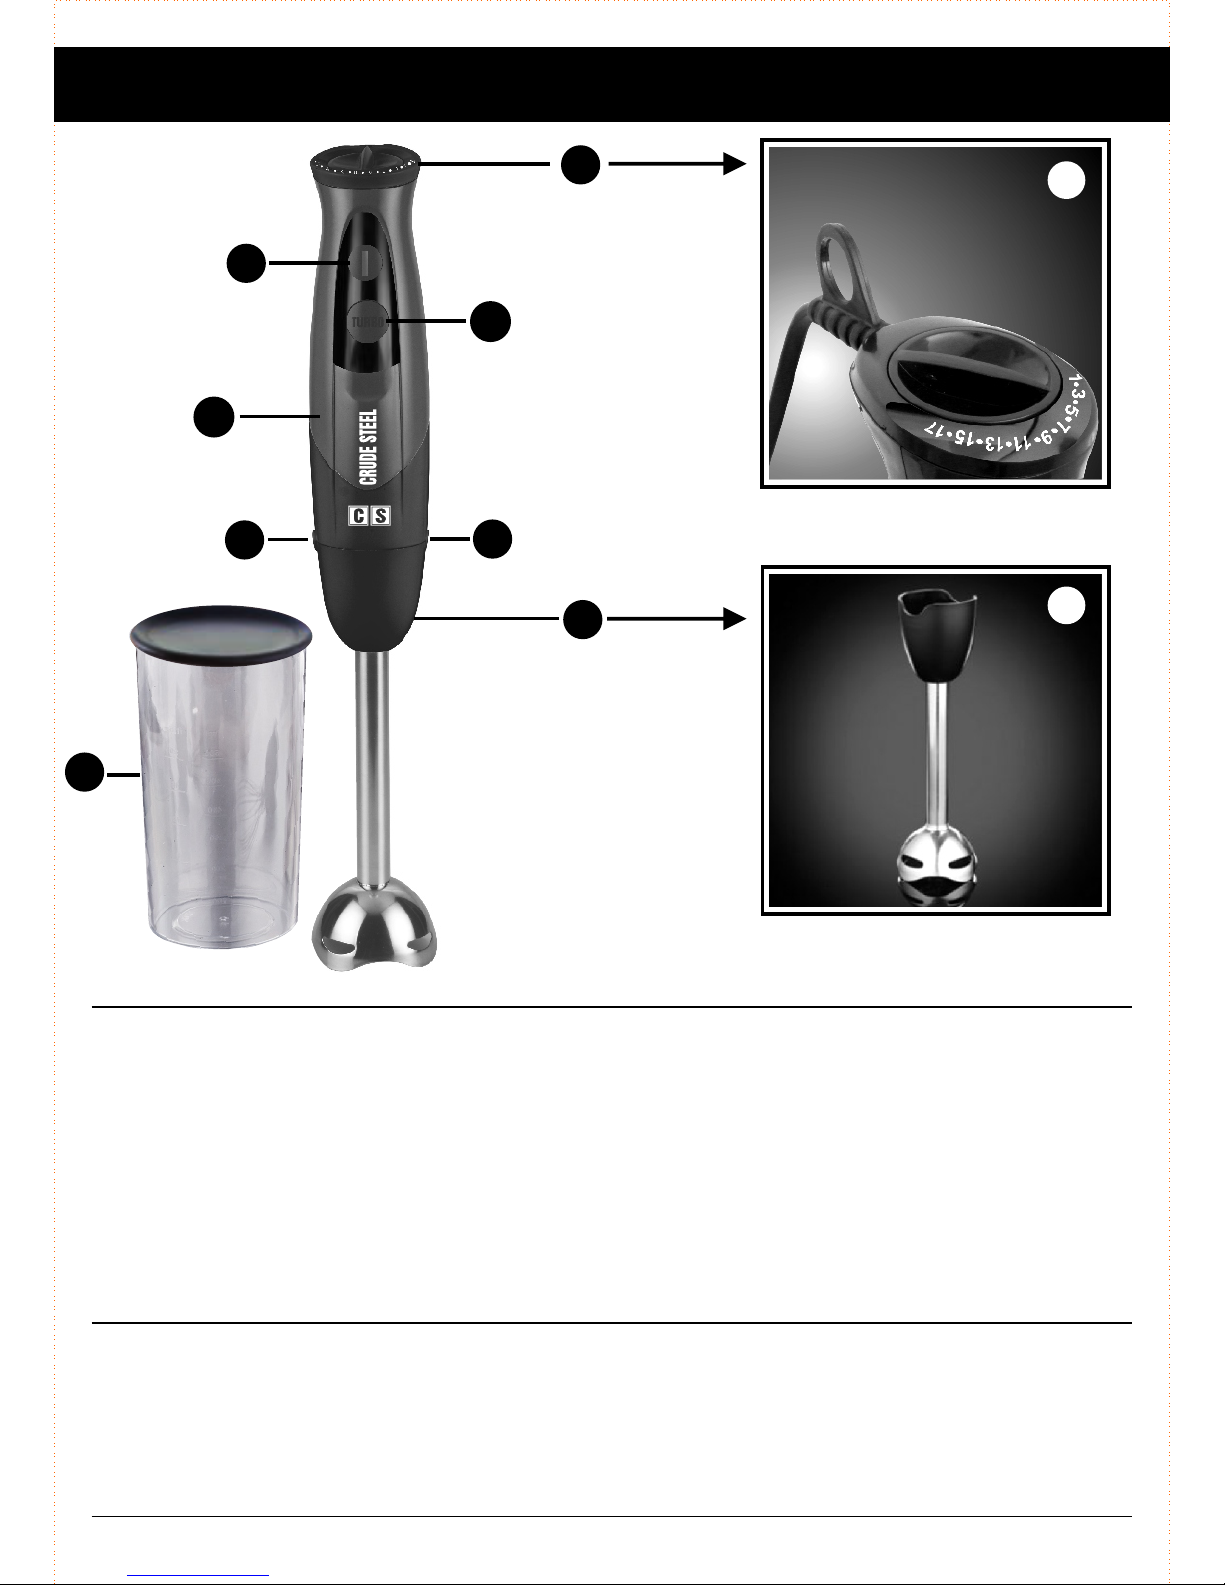
Main Components:
1 Speed Selector Switch
2 On/Off Push Button
3 Pulse (
4 Main Unit
Turbo) Push Button
5 Push Buttons for Extraction
6 Blender-Grinder Shaft
7 900 ml Beaker
Specifications:
■ Power in Watts: 700
■ Voltage: 230 - 240
■ Frequency: 50/60 Hz
■ Motor: DC
Mod.: CX717S
1
2
3
4
5
5
6
1
6
7
3
Partes Principales:
1 Selector de Velocidades
2 Interruptor de Funcionamiento
3
4
5
6 Pie de la Batidora-Triturador
7 Vaso 900 ml con Tapa
Interruptor Turbo
Unidad Principal
Pulsadores para Extracción
Main Components:
1 Speed Selector Switch
2 On/Off Push Button
3
4 Main Unit
Turbo Push Button
5 Push Buttons for Extraction
6 Blender-Grinder Shaft
7 900 ml Beaker
1
2
3
4
5
5
6
1
6
7
Mod.: CX517S
Especificaciones:
Potencia en Vatios: 500
■ Voltaje: 230 - 240
■ Frecuencia: 50/60 Hz
■
■ Motor: DC
Specifications:
■ Power in Watts: 500
■ Voltage: 230 - 240
■ Frequency: 50/60 Hz
■ Motor: DC

AVISOS DE SEGURIDAD
FUNCIONAMIENTO
La batidora está diseñada para batir, mezclar y triturar. Preparación de salsas, sopas,
mayonesas, cremas, papillas, purés, batidos y otras mezclas.
1. Encaje el pie de la batidora (6) en la unidad principal (4).
2. Elija una velocidad girando el selector de velocidad (1).
3. Enchufe el aparato en la toma de corriente.
4.
5. Introduzca la batidora en el vaso (7) o en cualquier recipiente.
6. Pulse el interruptor de funcionamiento (2) o el interruptor Pulse o Turbo (3) para
accionarla. Mueva la batidora en círculos y verticalmente para facilitar la operación.
NOTA: Utilice la batidora durante un máximo de 1 minuto y déjela reposar 1 minuto.
7. Desenchufe la batidora una vez finalizada la preparación.
LIMPIEZA:
1. Desenchufe la batidora antes de limpiarla.
2. Desmonte el pié de la batidora (6) presionando ambos pulsadores para extracción (5).
3. Limpie el pié de la batidora con agua jabonosa o introdúzcalo en el lavavajillas.
¡Advertencia! →
4.
Ÿ
ŸEste aparato es sólo para uso doméstico, no industrial.
ŸAntes de enchufar la batidora a una toma de corriente, compruebe que el voltaje se
corresponda con la indicada en la etiqueta del aparato o el especificado según el
modelo en este manual (página 2 o 3).
ŸDesenchufe siempre el aparato de la toma de corriente después de su uso y antes
de colocar o extraer piezas y antes de limpiarla.
ŸDesconecte el aparato tirando siempre del enchufe , nunca del cable.
ŸNo sumerja la unidad principal (4), ni el cable, ni el enchufe en agua u otro líquido.
ŸSi el cable de corriente esta dañado, debe ser reemplazado por el fabricante o servicio
técnico autorizado.
ŸNo deje la batidora en funcionamiento, ni enchufada sin vigilancia.
ŸMantenga el aparato siempre fuera del alcance de los niños.
ŸEste producto no está permitido para uso infantil u otras personas sin asistencia o
supervisión si su estado físico, sensorial o mental le limita de usarlo con seguridad. Los
niños deberían ser supervisados para asegurar que no juegan con dicho producto.
ŸEvite que el cable de alimentación entre en contacto con bordes afilados o cortantes y
manténgalo alejado de superficies u objetos calientes.
ŸSe desaconseja preparar alimentos muy calientes para evitar posibles quemaduras.
ŸEl vaso (7) no es apto para microondas.
ŸLas cuchillas están muy afiladas. Tenga mucho cuidado al manipularlas. No las
manipule con el aparato enchufado.
Introduzca los alimentos en el vaso (7) sin rebasar los la capacidad máxima indicada
en el vaso (600 ml). Capacidad máxima de almacenamiento del vaso es de 900 ml.
Al
procesar alimentos muy salados se debe enjuagar las cuchillas inmediatamente.
Las cuchillas están muy afiladas, manipúlelas con precaución.
Limpie la unidad principal (4) y el cable de conección con un trapo húmedo. Nunca
sumerja la unidad principal en agua.
Lea completamente estas instrucciones antes de utilizar el aparato.
4
E
Protege el medio ambiente: no tire los productos en las
basuras domésticas. Por favor devuelva los elementos
eléctricos en los puntos establecidos para su recogida.

5
GB
OPERATION
The mixer is designed for blending, mixing and grinding. To make Sauces, soups,
mayonnaise, cream, baby food, purees, shakes and other mixtures.
1. Fit the mixer shaft (6) on the main unit (4).
2. Choose a speed by turning the speed selector (1).
3. Insert the plug into the outlet.
4.Place the food in to beaker (7) without exceeding the maximum capacity stated
(600 ml).
5. Insert the blender into the beaker (7) or in any container.
6. Press on/off button (2) or turbo/pulse buttons (3) to operate it. Move the blender in circles
and vertically to facilitate the food preparation.
NOTE: Use the blender for a maximum of 1 minute and let stand 1 minute.
7. Unplug mixer after preparation.
CLEANING:
1. Unplug mixer before cleaning.
2. Remove the blender shaft (6) by pressing both buttons to extraction (5).
3. Clean the blender shaft with soapy water or put it in the dishwasher.
¡Warning! →
4.
SAFETY WARNINGS
ŸRead these instructions before using the appliance.
ŸThis appliance is for household use, not industrial.
ŸBefore connecting the hand blender to a power outlet, check that the voltage
corresponds to that indicated on the label of the appliance or specified by the model
in this manual (page 2 o 3).
ŸAlways unplug the appliance from the socket after use and before putting on or
taking off parts and before cleaning.
ŸUnplug by pulling the plug, not the cord.
ŸDo not immerse the main unit (4), or cord, or plug in water or other liquid.
ŸIf the power cord is damaged, it must be replaced by the manufacturer or authorized
service center.
ŸDo not leave the hand blender running, and plugged in unattended.
ŸAlways keep the appliance out of reach of children.
ŸThis product must not be used by children or other persons whose physical, sensorial or
mental states prevent them from using it safely without assistance or supervision.
Children must be supervised to ensure they do not play with the product.
ŸAvoid the power cord comes into contact with sharp edges or sharp and stay away from
hot surfaces or objects.
ŸTo avoid burns, we do not recommend the preparation of very hot food .
ŸThe plastic glass (7) is not suitable for microwave.
ŸThe blades are very sharp. Take care when handling them. Do not handle them when the
appliance is plugged in.
Maximum storage capacity of the cup is 900 ml.
When processing
very salty foods should be rinsed immediately blades.
The blades are very sharp, handle with care.
Clean the main unit (4) and the connection cord with a damp cloth. Never immerse the
main unit in water.
Protect the environment:not dispose of household
waste products. Please return the electric elements in the
set points for collection.

Always in Style ....
EManual de Instrucciones
GB Instruction Manual
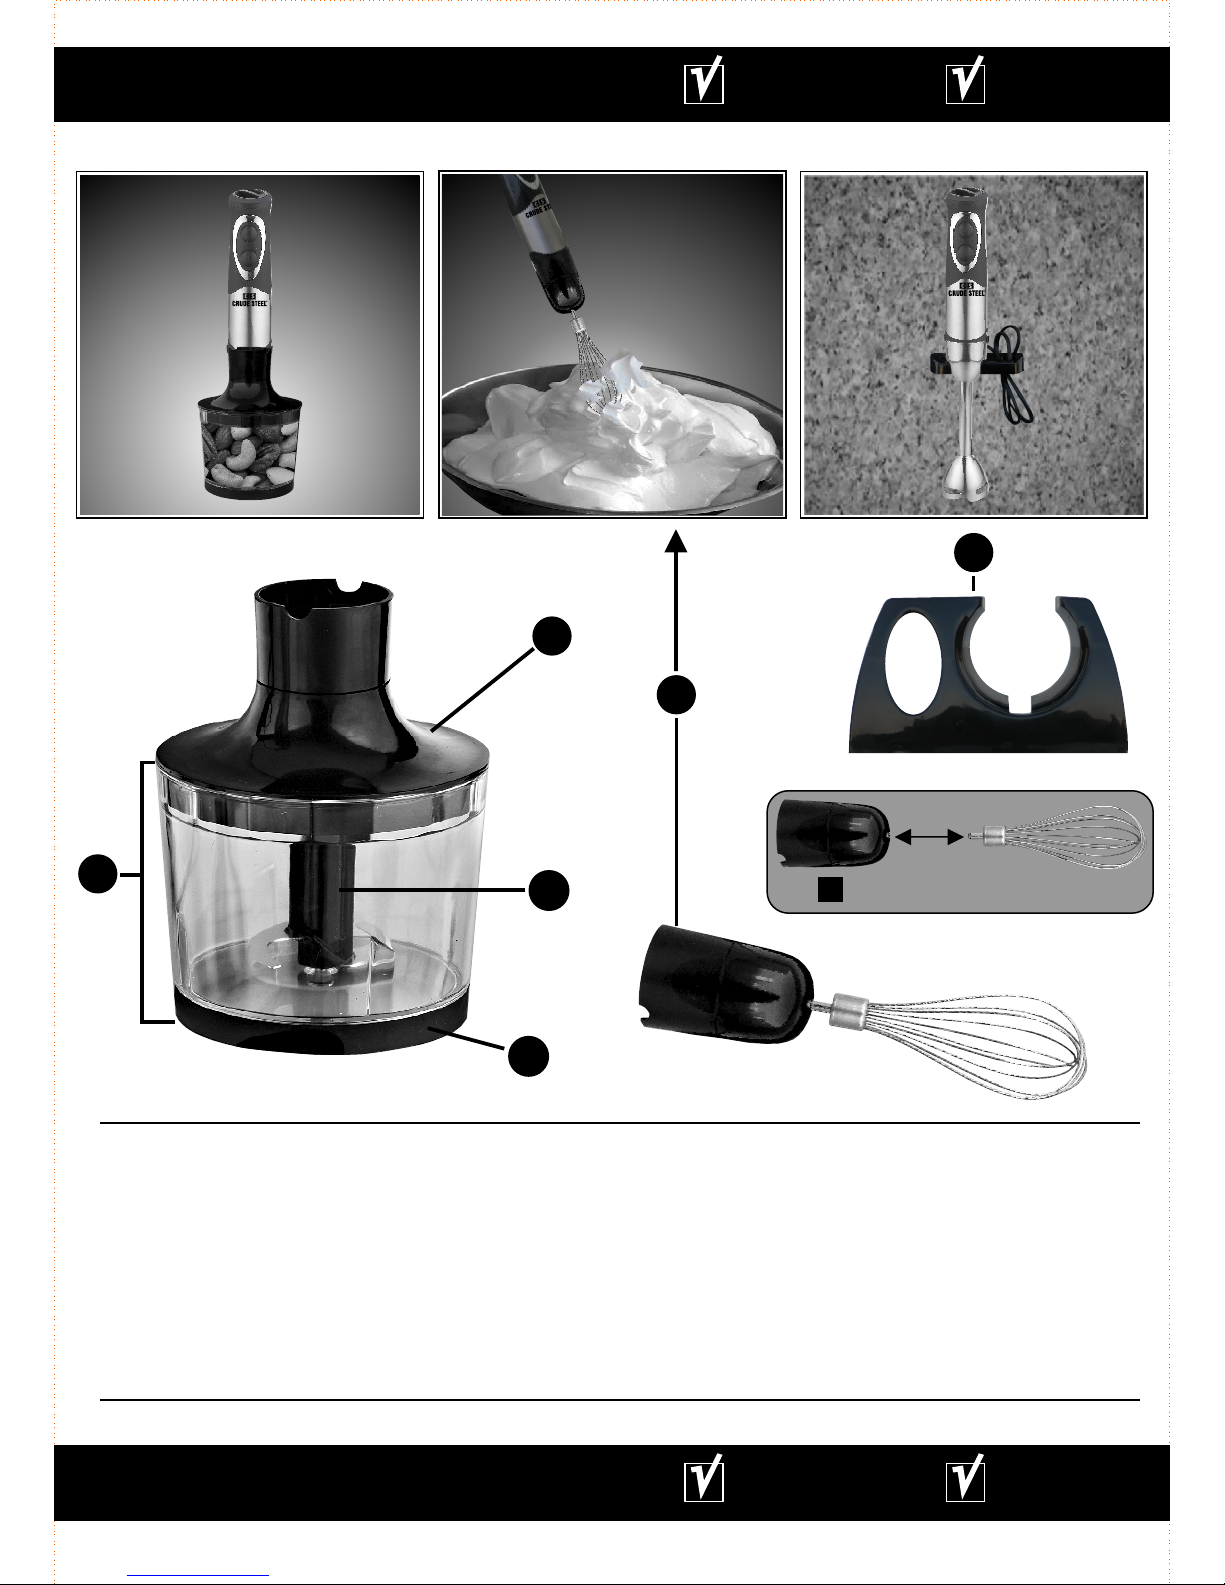
Kit de Accesorios
Accessories Kit
Mod.: CX203S
As
cc
7
Partes Principales:
1 Tapa Recipiente para Picar
2 Recipiente para Picar de 600 ml
3
4
5
Cuchilla para Picadora
Base Anti-Deslizante
Varilla para Batir
6 Soporte para Pared
Main Components:
1
2
3 Mincer Blade
4
Chopper/grinder Lid
600-ml Bowl for chopping food
Anti-Slip Base
5
6 Wall Mount Bracket
Balloon Whisk
1
17
●
●
5
●
7
●
9
●
●
11
13
●
15
●
3
700W
Fig. 3
700W
Fig. 2
1
17
●
●
5
●
7
●
9
●
●
11
13
●
15
●
3
700W
Fig. 1
1
23
4
5
Modelos de Batidoras de Mano Adaptables:
CX717S CX517S
&
Adaptable Hand Blender Models:
CX717S CX517S
&
6
Fig. 4
A

8
AVISOS DE SEGURIDAD
FUNCIONAMIENTO DEL PICADOR
- El picador (2) es apto para triturar alimentos duros, como carne, queso, cebollas, nueces,
ajos, almendras, zanahorias, ciruelas, pimientos, verduras, pan seco, etc.
- No intente picar alimentos excesivamente duros, como cubitos de hielo, granos de café.
nuez moscada, huesos o de otro tipo.
1. Extraiga la tapa del recipiente para picar (1).
2. Coloque la cuchilla (3) en el pasador central del recipiente para picar (2).
¡
LIMPIEZA:
1. Desenchufe el aparato antes de limpiarlo.
2. Desmonte todas las partes y piezas.
3. Limpie La unidad principal de la batidora {4} - (páginas 2 o 3), el cable de conexión, la
tapa del recipiente para picar (1) y el soporte (A) - figura 4-(página 7) de la varilla para
batir con un paño húmedo. No lave con agua los elementos mencionados ya que sus
engranajes podrían perder el lubricante.
4. El resto de las piezas pueden limpiarse con agua jabonosa y aclárelos con abundante
agua bajo el grifo o pueden limpiarse en el lavavajillas.
Ÿ
ŸEste kit es sólo para uso doméstico, no industrial.
ŸEl recipiente para picar no es apto para el microondas.
ŸUtilice el accesorio picador con la tapa correctamente colocada.
Atención! → la cuchilla está muy afilada , sujétela siempre por la parte superior de
plástico. Coloque siempre el recipiente para picar sobre la base anti-deslizante (4).
3. Introduzca los alimentos en el recipiente (2).
- En primer lugar triture los alimentos más sólidos y a continuación añada los más blandos.
De esta forma es más fácil conseguir una mezcla homogénea.
4. Coloque la tapa del recipiente para picar (1).
5. Acople firmemente la unidad principal {4} - (páginas 2 o 3) de la batidora de mano en la
tapa del recipiente para picar (Fig. 1 - Página 7).
6. Elija la velocidad en el selector {1} - (páginas 2 o 3) y presione el interruptor de
funcionamiento que considere conveniente {2 o 3} - (páginas 2 o 3). Sujete la unidad
principal con una mano y el recipiente para picar con la otra.
7. Después del uso, extraiga la unidad principal {4} - (páginas 2 o 3) del recipiente
8. Extraiga la tapa del recipiente para picar y la cuchilla con cuidado.
FUNCIONAMIENTO VARILLA PARA BATIR
Utilice la varilla batidora (5) solo para montar nata, batir crema, batir claras de huevo y
mezclar masa para bizcochos y postres preparados para batir.
1. Introduzca la varilla batidora en su soporte (A) - Figura 4 (página 7) luego encáje
2. Elija la velocidad en el selector {1} - (páginas 2 o 3) y presione el interruptor de
funcionamiento que considere conveniente {2 o 3} - (páginas 2 o 3).
3. Utilice la varilla batidora durante un máximo de 1 minuto, tiempo de reposo 1 minuto.
4. Presione simultáneamente los pulsadores laterales { de la unidad
principal {4} - (páginas 2 o 3) para extraer el accesorio.
Atención! → la cuchilla (3) está muy afilada ,
sujétela siempre por la parte superior de plástico y enjuáguela inmediatamente.
Lea completamente estas instrucciones antes de utilizar el kit de accesorios.
presionando ambos pulsadores laterales para extracción {5} - (páginas 2 o 3).
la en la
unidad principal {4} - (páginas 2 o 3) como muestra la figura 2 (página 7).
5} - (páginas 2 o 3)
¡
E

9
E
GB
SUJECIÓN PARED
GUÍA DE PROCESAMIENTO
El tiempo expuesto es aproximado dependiendo de las velocidades a usar.
Se recomienda previamente trocear los alimentos entre 2-3 cm.
El kit de accesorios trae un soporte de pared (6) para la sujeción de la batidora de mano y el
cable en la pared de su cocina (incluye tornillos y tacos) ver figura (3) página 7.
Ÿ
Ÿ
ŸRead these instructions before using the accessories kit.
ŸThe following kit is for household use, not industrial.
ŸDo not introduce the Bowl for chopping food into the microwave.
ŸClose the lid correctly on Bowl for chopping food.
SAFETY WARNINGS
HOW TO USE THE CHOPPING ACCESSORY
- The chopper (2) is suitable for grinding hard foods like meat, cheese, onions, walnuts,
garlic, almonds, carrots, plums, peppers, vegetables, dry bread, etc..
- Do not try to chop food that is very hard such, ice cubes, coffee beans, nutmeg, bones or
other types of food.
1. Remove the lid of the container for chopping (1).
Protege el medio ambiente: no tire los productos en las
basuras domésticas. Por favor devuelva los elementos
y de acero en los puntos establecidos para su recogida.
plásticos
Modelo Batidora de Mano: CX517S CX717S
ALIMENTO CANTIDAD VELOCIDAD ACCESORIO TIEMPO TIEMPO
Salsa mayonesa 300 ml Mínimo Pie-Vaso 1 min 45-50 s
Batido de frutas 500 ml Media Pie-Vaso 1 min 45-50 s
.
.
.
.
Picar queso 100 g Media-Alta Picador 15 s 5 s
Picar especias 50 g Media Picador 15 s 8 s
Picar cebollas 150 g Media-Alta Picador 15 s 8 s
Picar zanahoria 90 g Media-Alta Picador 15 s 5 s
Picar carne 250 g Alta Picador 15 s 8 s
Picar chocolate 100 g Máxima Picador 55 s 30 s
Picar galletas 150 g Media-Alta Picador 12 s 6 s
Picar pan seco 80 g Máxima Picador 15 s 5 s
.
Picar frutos secos 100 g Máxima Picador 15 s 8 s
Montar nata 150 ml Baja-Media Varilla 1 min 1 min
Levantar claras 2 claras Baja-Media Varilla 1 min 1 min
.
.
.
.
.
.
.
.
.

10
GB
2. (2).
¡
pressing
both side buttons for extraction {5} - (pages 2 o 3).
BALLOON WHISK OPERATION
{4} - (pages 2 o 3) as shown figure 2 (page 7).
¡
WALL BRACKET
PROCESSING GUIDE
ŸThe exposure time is approximate depending on the speed to use.
ŸPreviously recommended chopping food between 2-3 cm.
Put the blade (3) into the central pin of the chopping bowl
Warning! → Be careful, the blade is very sharp. Always hold it by the top part of the
plastic. Always put the chopping bowl on the anti-slip base (4)
3. Put the food into the chopping bowl (2).
- First, grind the more solid food and then add the softest food. This will help you obtain
a more homogeneous mix.
4. Put the lid on the chopping bowl (1).
5. Attach the main unit firmly {4} - (pages 2 o 3) of the hand blender into the chopping bowl
(Fig. 1 - page 7).
6. Choose the speed selector {1} - (pages 2 o 3) and push the appropriate button operation
{2 o 3} - (pages 2 o 3). Hold the motor body with one hand and the chopping bowl with the
other.
7. After use, remove the main unit {4} - (pages 2 o 3) from the chopping bowl by
8. Remove the lid of the chopping bowl and the blade with careful.
Use the balloon whisk (5) only for whipping cream, beat egg whites and mix dough for
cookies and desserts prepared.
1. Insert the ballon whisk into the support (A) - Figure 4 (page 7) then insert into the main
unit
2. Choose the speed selector {1} - (pages 2 o 3) and push the appropriate button operation
{2 o 3} - (pages 2 o 3).
3. Use the balloon whisk for no more than 1 minute and then rest for 1 minute.
4. Simultaneously press the side buttons {5} - (pages 2 or 3) of the main unit {4} -
(pages 2 or 3) to remove the accessory.
Warning!→ the blade (3) is very sharp , always pull from
through the top plastic and rinse immediately.
the connection cord
the chopping bowl balloon whisk with a damp
cloth
The accessory kit comes with a wall bracket (6) for support the hand blender and cable in
the wall of your kitchen (includes screws and wall plugs) see figure (3) page 7.
CLEANING:
1. Unplug the appliance before cleaning.
2. Remove all parts and pieces.
3. Clean the main unit of the hand blender {4} - (pages 2 o 3), , the lid of
(1) and support (A) - figure 4- (page 7) of the
. Do not wash the above elements mentioned because they could lose their gear
lubricant.
4. The remaining parts can be cleaned with soapy water and rinse with water under the tap
or can be cleaned in the dishwasher.
11
Certificates of High Quality and Technical Requirements:
Product Designed & Engineered in U.S.A. by TOMAHAWK USA Corporation to
CRUDE STEEL CORPORATION
Always in Style ....
GB
Hand Blender Model: CX517S CX717S
FOOD QUANTITY SPEED ACCESORY TIME TIME
Mayonnaise 300 ml Minimum Base-Glass 1 min. 45-50 s
Fruit milk shake 500ml 1 min. 45-50 s
.
.
.
.
Medium
Mincing Chesse 100 g Medium-High Mincer 15 s 5 s
Mincing spices 50 g Medium Mincer 15 s 8 s
Mincing onions 150 g Medium-High Mincer 15 s 8 s
Mincing carrots 90 g Medium-High Mincer 15 s 5 s
Mincing meat 250 g High Mincer 15 s 8 s
Mincing chocolate 100 g Max Mincer 55 s 30 s
Mincing cookies 150 g Medium-High Mincer 12 s 6 s
Mincing dry bread 80 g Max Mincer 15 s 5 s
.
Mincing nuts 100 g Max Mincer 15 s 8 s
Whipped cream 150 ml Low-Medium Rod 1 min. 1 min.
Whip egg whites 2 egg Low-Medium Rod 1 min. 1 min.
Base-Glass
.
.
.
.
.
.
.
.
.
Protect the environment:not dispose of household
waste products. Please return the and steel
elements in the set points for collection.
plastic

This manual suits for next models
1
Table of contents
Other Crude Steel Kitchen Appliance manuals

Popular Kitchen Appliance manuals by other brands

Husky
Husky HN7 'Reflections owner's manual

Barton
Barton SEMI-AUTOMATIC 90801 Owner's manual and safety instructions

CTC Union
CTC Union CLATRONIC DR 2751 instruction manual

Hendi
Hendi 229002 user manual

EFBE-SCHOTT
EFBE-SCHOTT ZN 3.1 operating instructions

U-Line
U-Line UHBV518-IS01A User guide & service manual


