Crystal View MES-1/5901 User manual

PLEASE READ ALL INSTRUCTIONS CAREFULLY AND RETAIN FOR FUTURE USE
Bluetooth Digital Audio Multimedia Center
Instruction Manual
MODEL:MES-1/5901

Safety Information
Disc handling
2
& Overview of controls(Main Unit)
Function / Mode
General operation
FM/AM operation
USB operation
Care and Maintenance
Troubleshooting
Technical Specications
Contents
Time setting
Alarm setting
Snooze
Sleep timer
Dimmer
Bluetooth operation
Paring and connecting
During playing
Disc Operation
During playing
During playing
2
Functions and Controls
Operating Instructions
1
4
3
5
Assembling the unit --Floor Standing Style
FCC statement
Limited Warranty
14
15
Assembling the unit--on wall
6
7
16
17
12
8
9
14
13
13
13
13
13
13
13
12
12
12
12
12
12
12
10
11
Program procedure
Assembling the unit --Floor Standing Style
Overview of controls(Remote Controller)
14
14
Assembling the unit--on wall
Assembling the unit--on wall
Assembling the unit--on wall
(Continued)
(Continued)
(Continued)
(Continued)
(Continued)
Aux/Audio
12
Package Cotents
Assembling the unit --Floor Standing Style
18
Important – Please read these instructions fully before installation
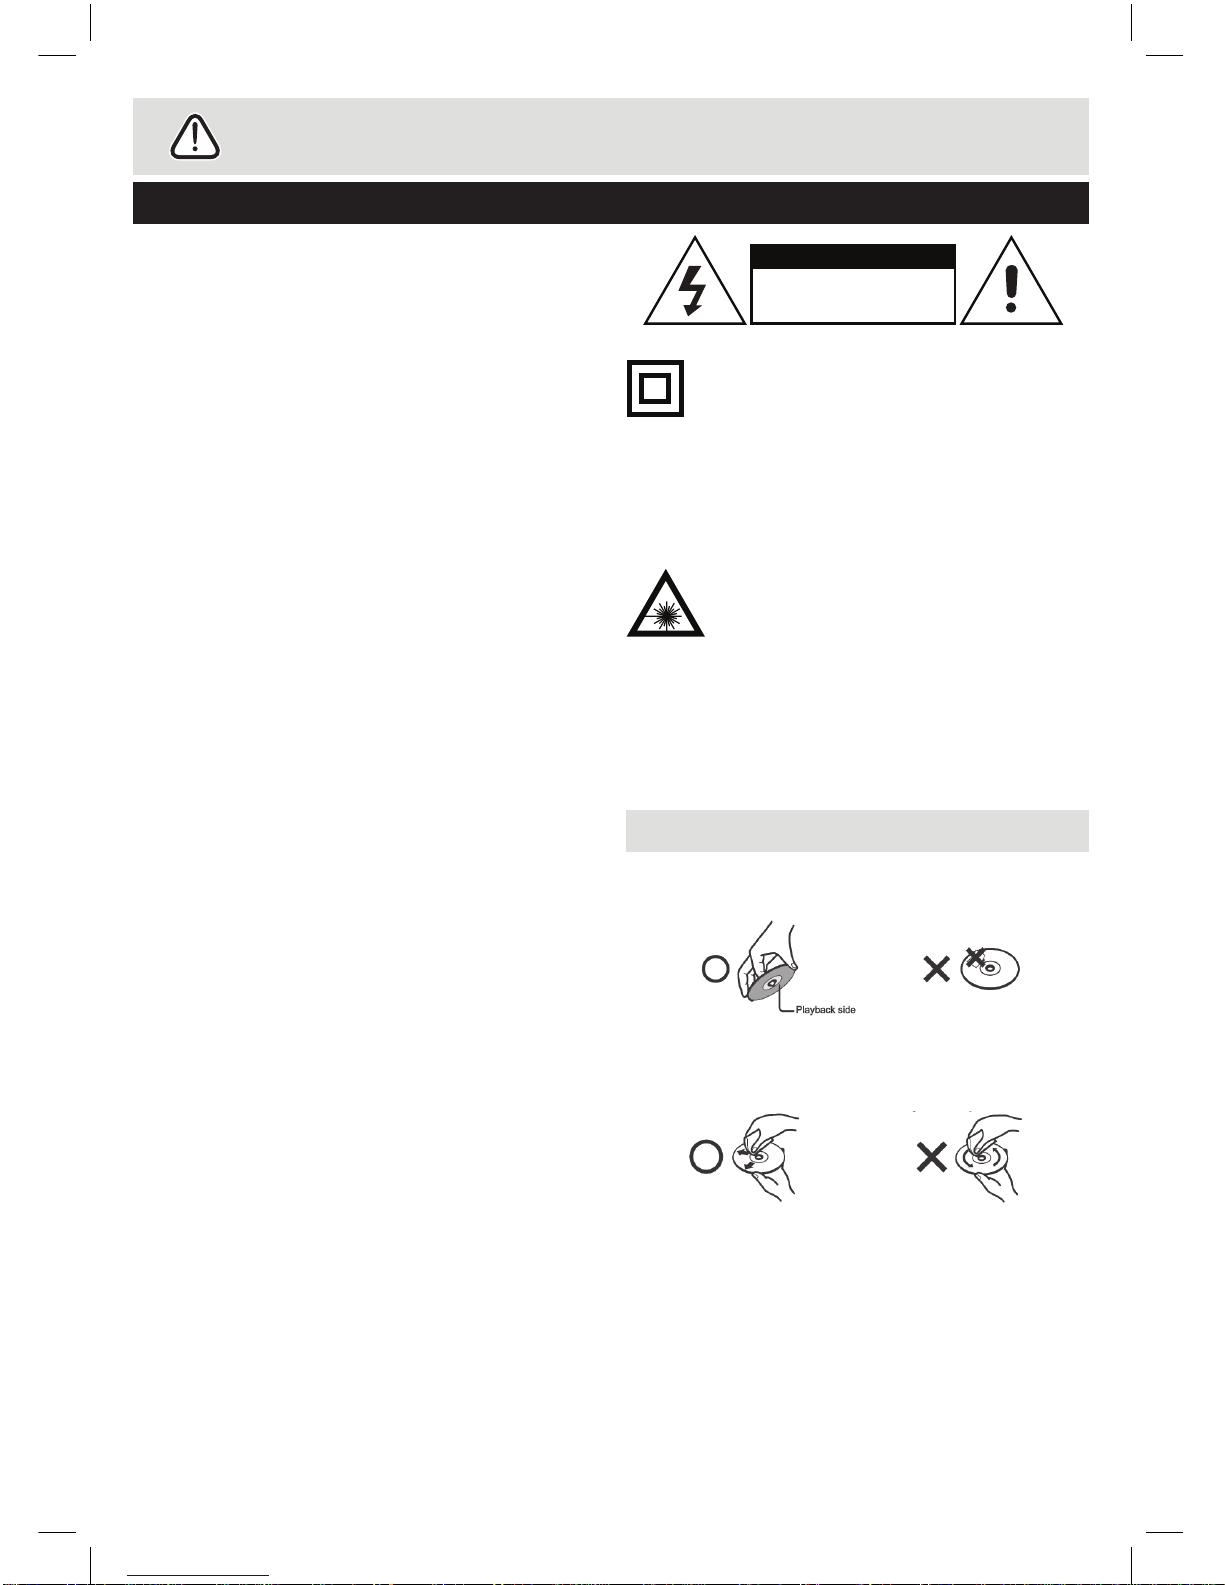
Safety Information
This symbol means that this unit is double
insulated. An earth connection is not required.
CAUTION : CLASS 1 LASER PRODUCT
Use of contents or adjustments of performance of
procedures other than those specied Herein may result
in hazardous radiation exposure.
LASER SAFETY
This unit employs a laser, only qualied service
personnel should attempt repair.
DANGER: Invisible laser radiation when open and
interlock failed or defeated avoid direct exposure to beam.
CAUTION: hazardous laser radiation when open and
intelock defeated.
CAUTION: TO REDUCE THE RISK OF ELECTRIC
SHOCK, DO NOT REMOVE ANY COVER. NO
USER-SERVICEABLE PARTS INSIDE, REFER
ANY SERVICING TO QUALIFIED SERVICE
PERSONNEL.
• Please read this owner’s guide
• Please take the time to follow the instructions in this
owner’s guide carefully. It will help you set up and
operate your system properly and enjoy all of its
advanced features.
• Please save this owner’s guide for future reference.
• The product label is located on the back of the
product.
• This product must be used indoors. It is neither
designed nor tested for use outdoors, in recreation
vehicles, or on boats.
• Heed all warnings - on the product and in the
owner’s guide.
• Do not use this apparatus near water or moisture.
Do not use this product near a bathtub, washbowl,
kitchen sink, and laundry tub, in a wet basement,
near a swimming pool, or anywhere else that water
or moisture is present.
• Only use attachments/accessories specied by the
manufacturer.
• Unplug this apparatus during lightning storms or
when unused for long periods of time - to prevent
damage to this product.
• Refer all servicing to qualied service personnel
• Servicing is required when the apparatus has
been damaged in any way: such as liquid has been
spilled or objects have fallen into the apparatus; the
apparatus has been exposed to rain or moisture,
does not operate normally, or has been dropped -
Do not attempt to service this product yourself.
Opening or removing covers may expose you to
dangerous voltages or other hazards.
• To prevent risk of re or electric shock, avoid
overloading wall outlets, extension cords, or integral
convenience receptacles.
• Use proper power sources - Plug the product into a
proper power source, as described in the operating
instructions or as marked on the product.
• The mains plug is used as the disconnect device, the
disconnect device shall remain readily accessible
CAUTION
RISK OF ELECTRIC SHOCK!
DO NOT OPEN!
• Do not touch the playback side of the disc.
• Do not attach paper or tape to disc.
• Fingerprints and dust on the disc cause picture and
sound deterioration. Wipe the disc from the centre
outwards with a soft cloth. Always keep the disc
clean.
• If you cannot wipe off the dust with a soft cloth, wipe
the disc lightly with a slightly moistened soft cloth
and nish with a dry cloth.
• Do not use any type of solvent such as thinner,
benzene, commercially available cleaners or
antistatic spray for vinyl. It may damage the disc.
• Do not store discs in a place subject to direct sunlight
or near heat source.
• Do not store discs in a place subject to moisture and
dust such as a bathroom or near a humidier.
• Store discs vertically in a case, stacking or placing
object on discs outside or their case may cause
warping.
Disc handling
2

3
Package Contents
Bluetooth Digital Entertainment Speaker System
Remote Control
RCA Cable
Auxiliary Cable
Assembly and Mounting Apparatus
Steel Pipe 1pcs
Base 1pcs
Metal Brackets 2pcs
Wall Plugs 4pcs
Three Types of Screws
Rubber Gaskets 2pcs
Instruction Manual
PWM4*17 4pcs
KA3.5*25*8mm 4pcs
PA3*10 6pcs
( 4 pcs for fixing cable under the base, 2 pcs for connecting steel pipe. )
( For fixing the base and the metal plate. )
( For fixing the metal brackets on wall. )
PWM4*17 KA3.5*25*8mm
PA3*10

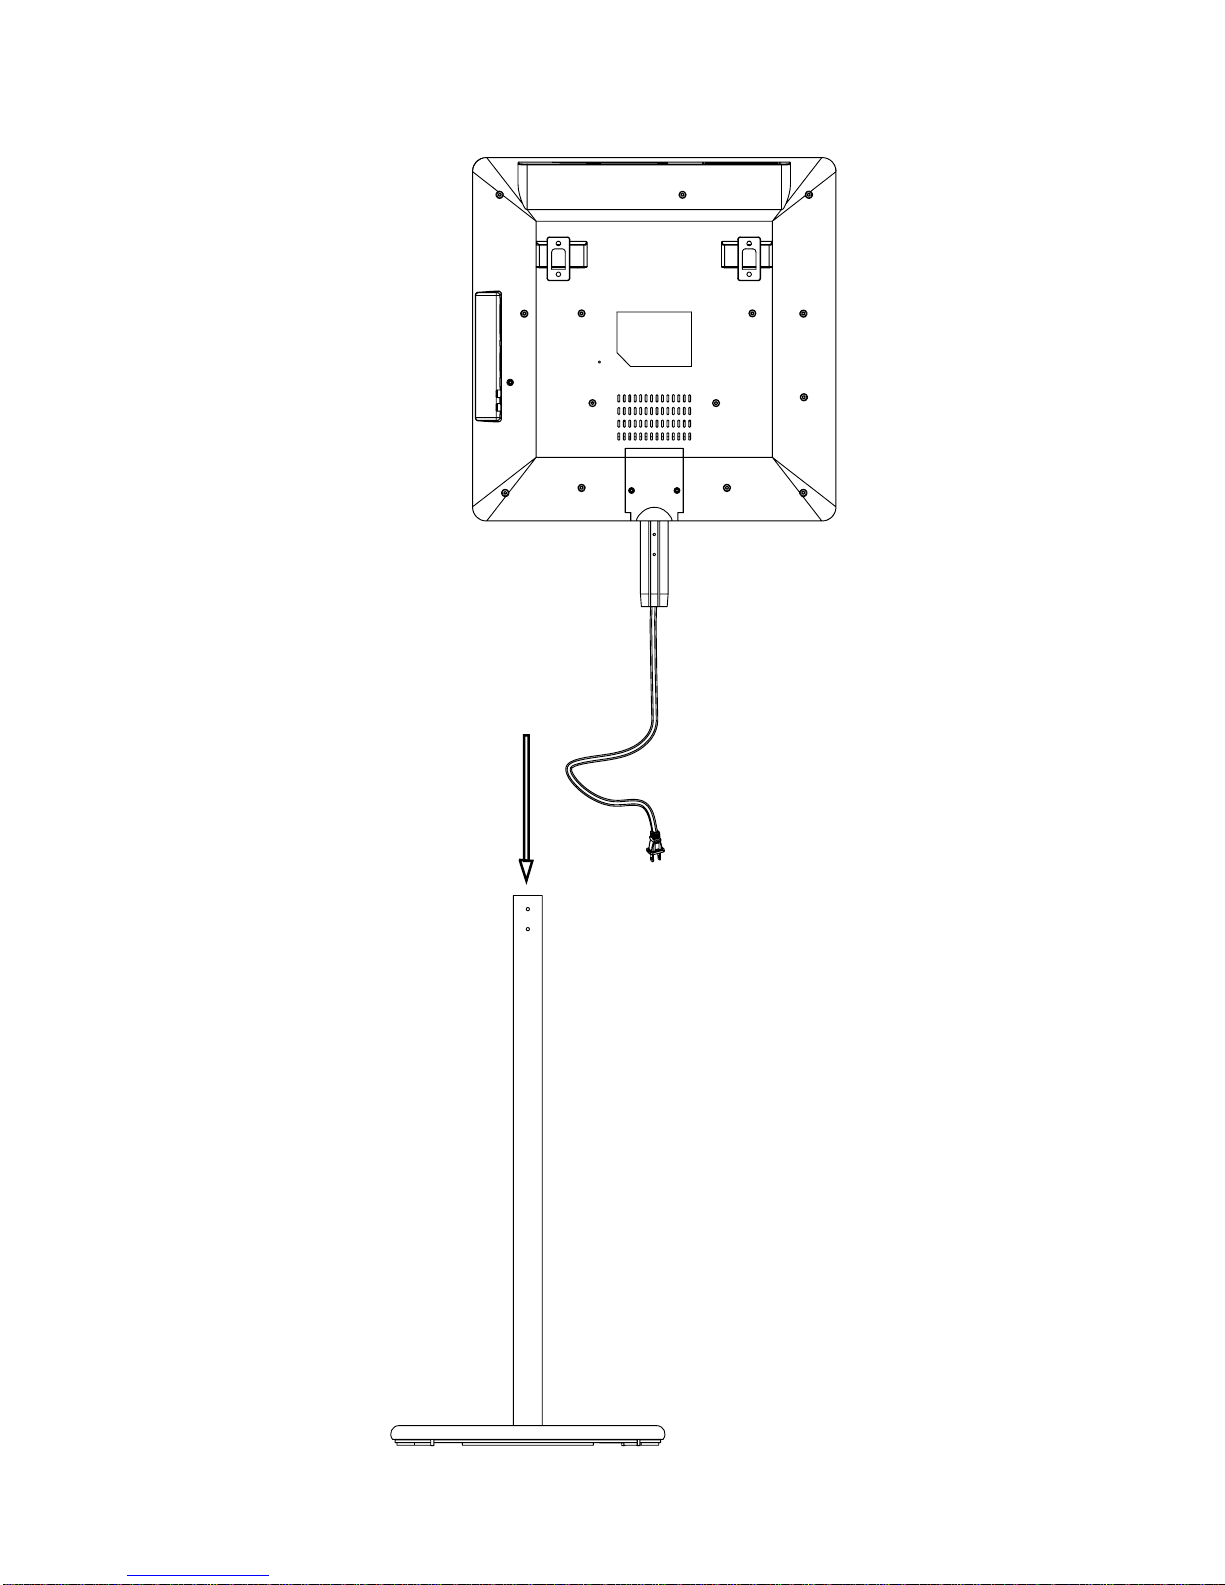
ASSEMBLING THE UNIT
Step 1:
Insert the pipe from the bottom of the stand and fix it with screws supplied.
Step 1
Assembling the Unit---Floor Standing Style
4
ASSEMBLING THE UNIT
Step 2: Insert the connection cord in the
Step 2
top of steel pipe, and run it through the
other end of the steel pipe.
Assembling the Unit---Floor Standing Style(Continued)
5
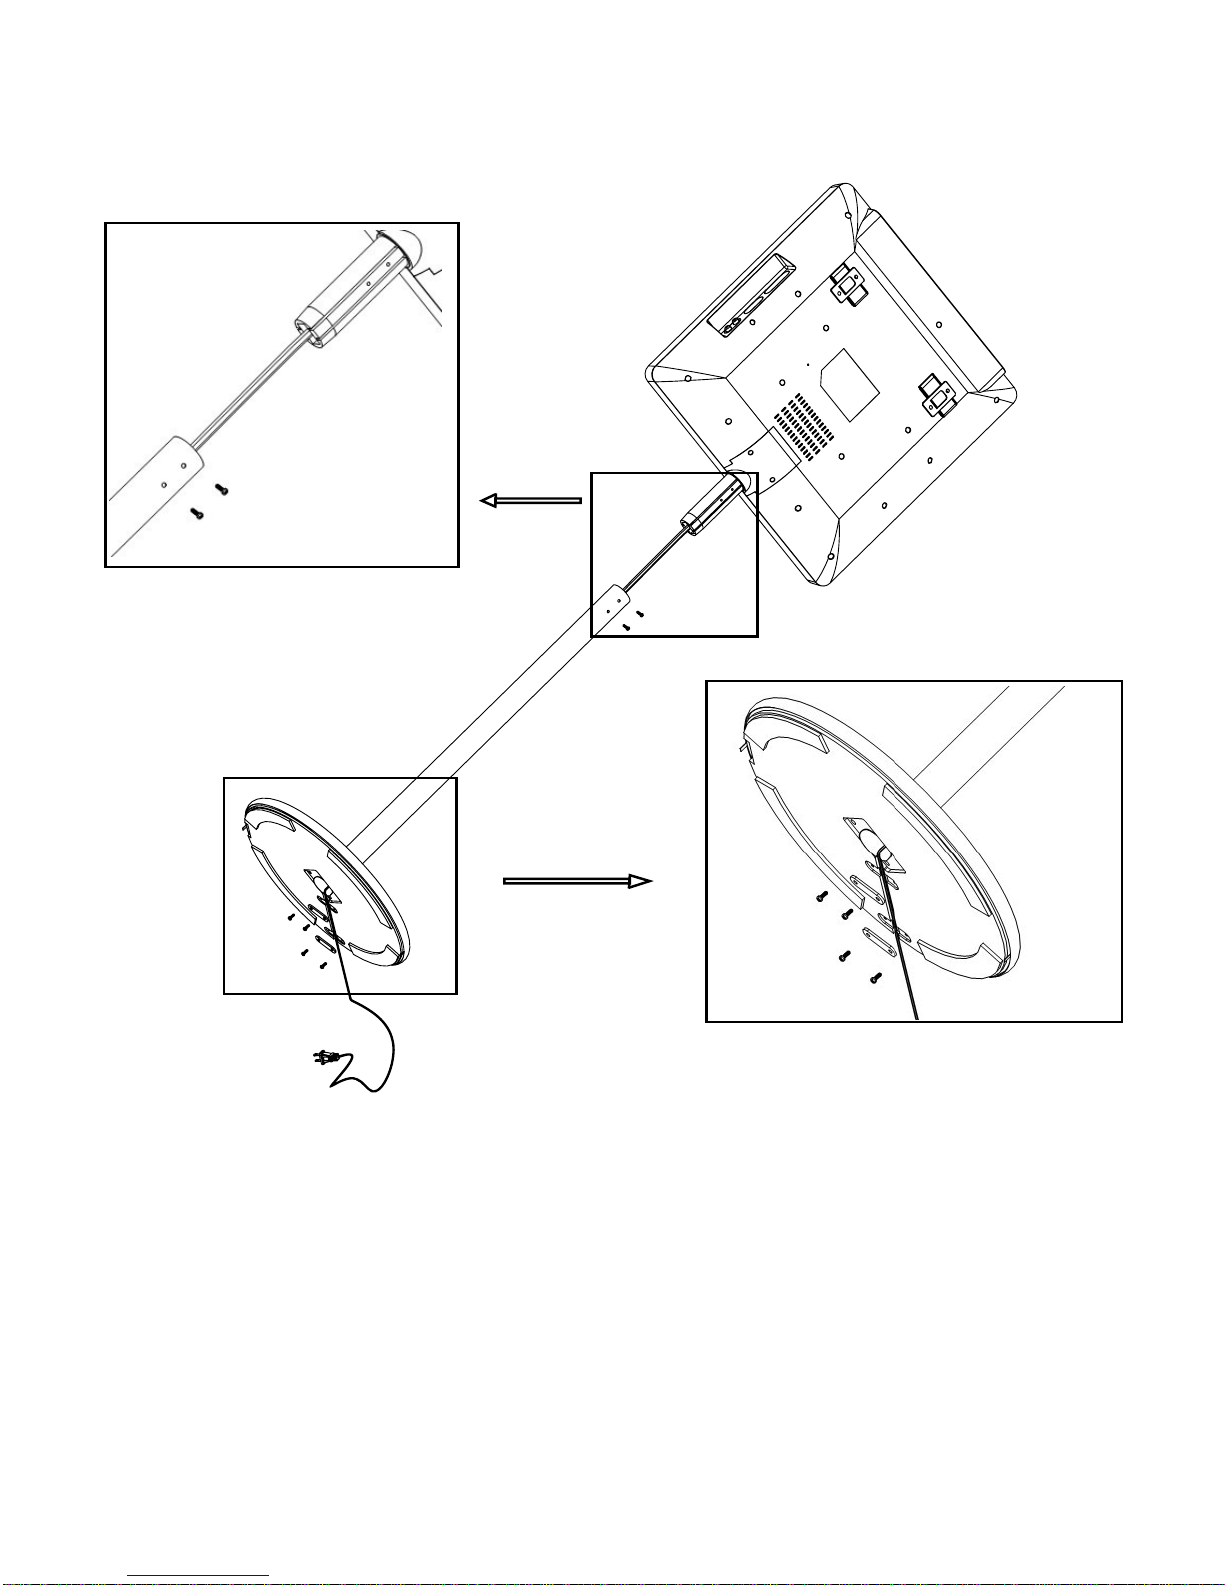
ASSEMBLING THE UNIT
Step 4: Pull wire towards the base, and fix it to the bottom of the stand using the
Step 4
Step 3:
Step 3
Insert the upper part of the unit into the steel pipe then use screw to
Assembling the Unit---Floor Standing Style(Continued)
fix two parts.
rubber brackets and screws provided. This concludes your assemble process.
6
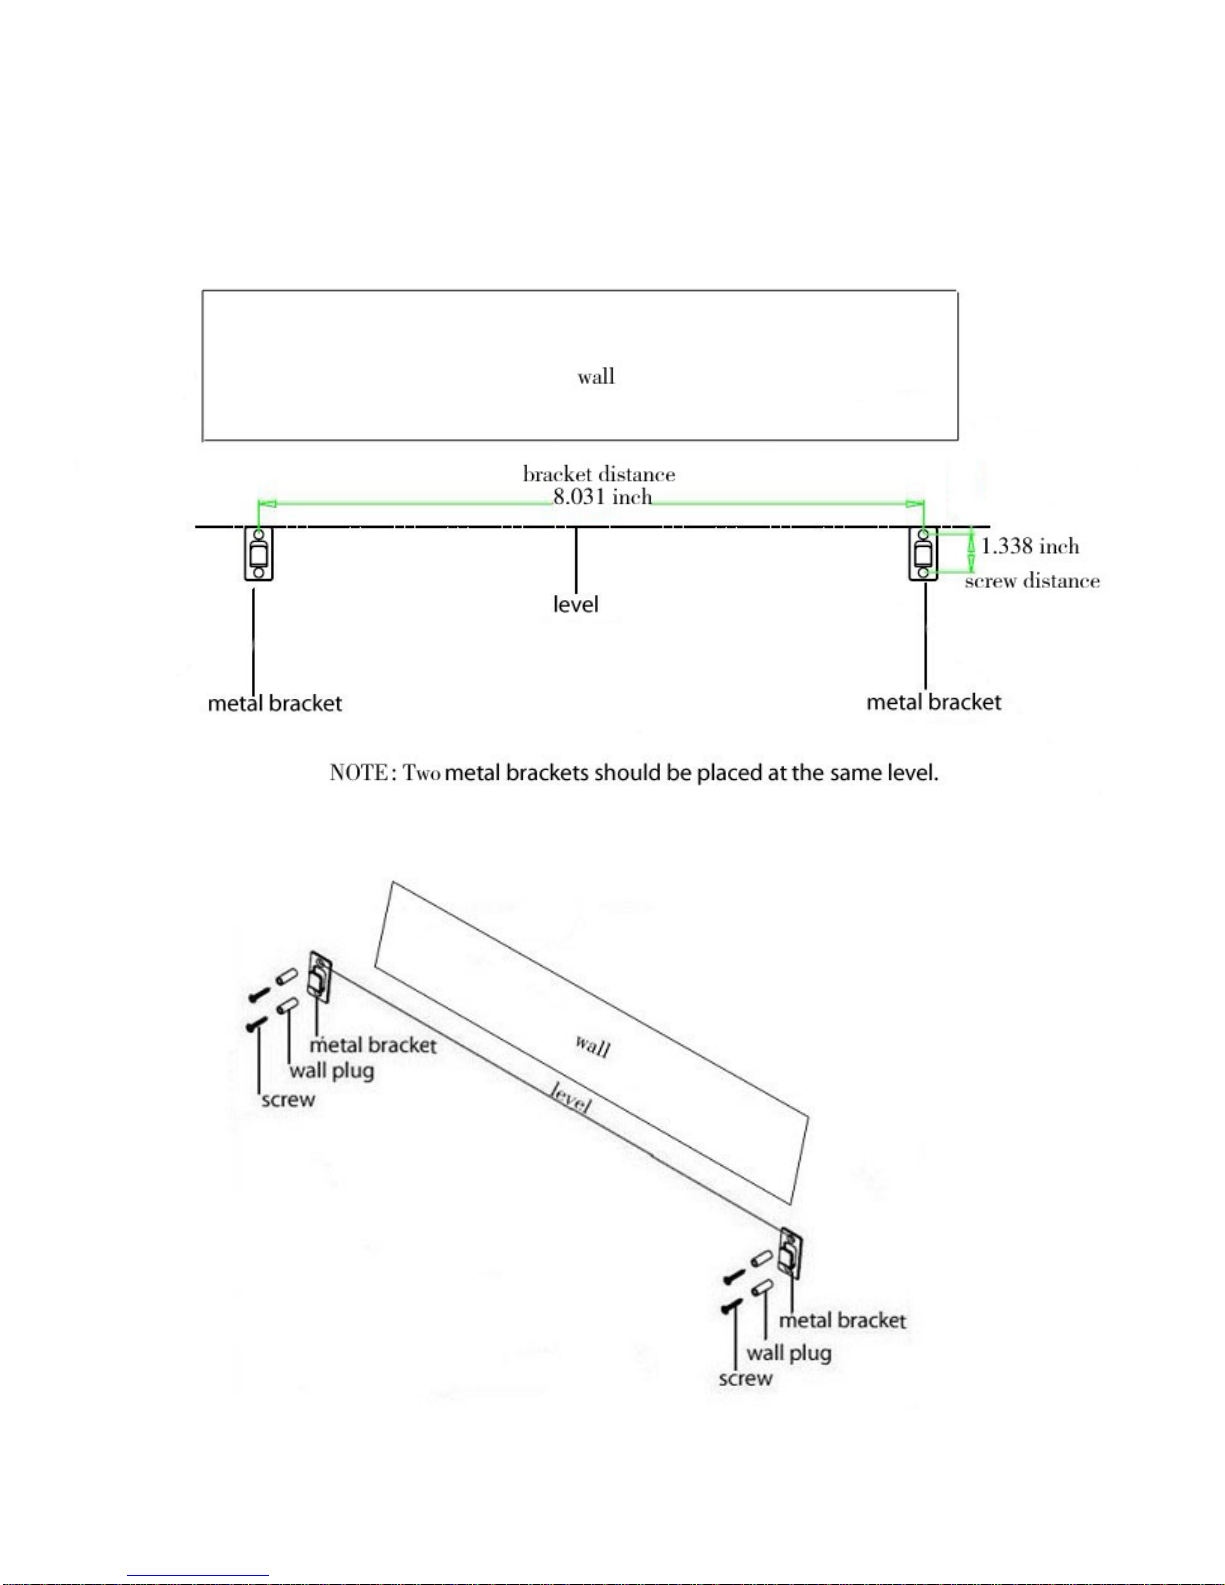
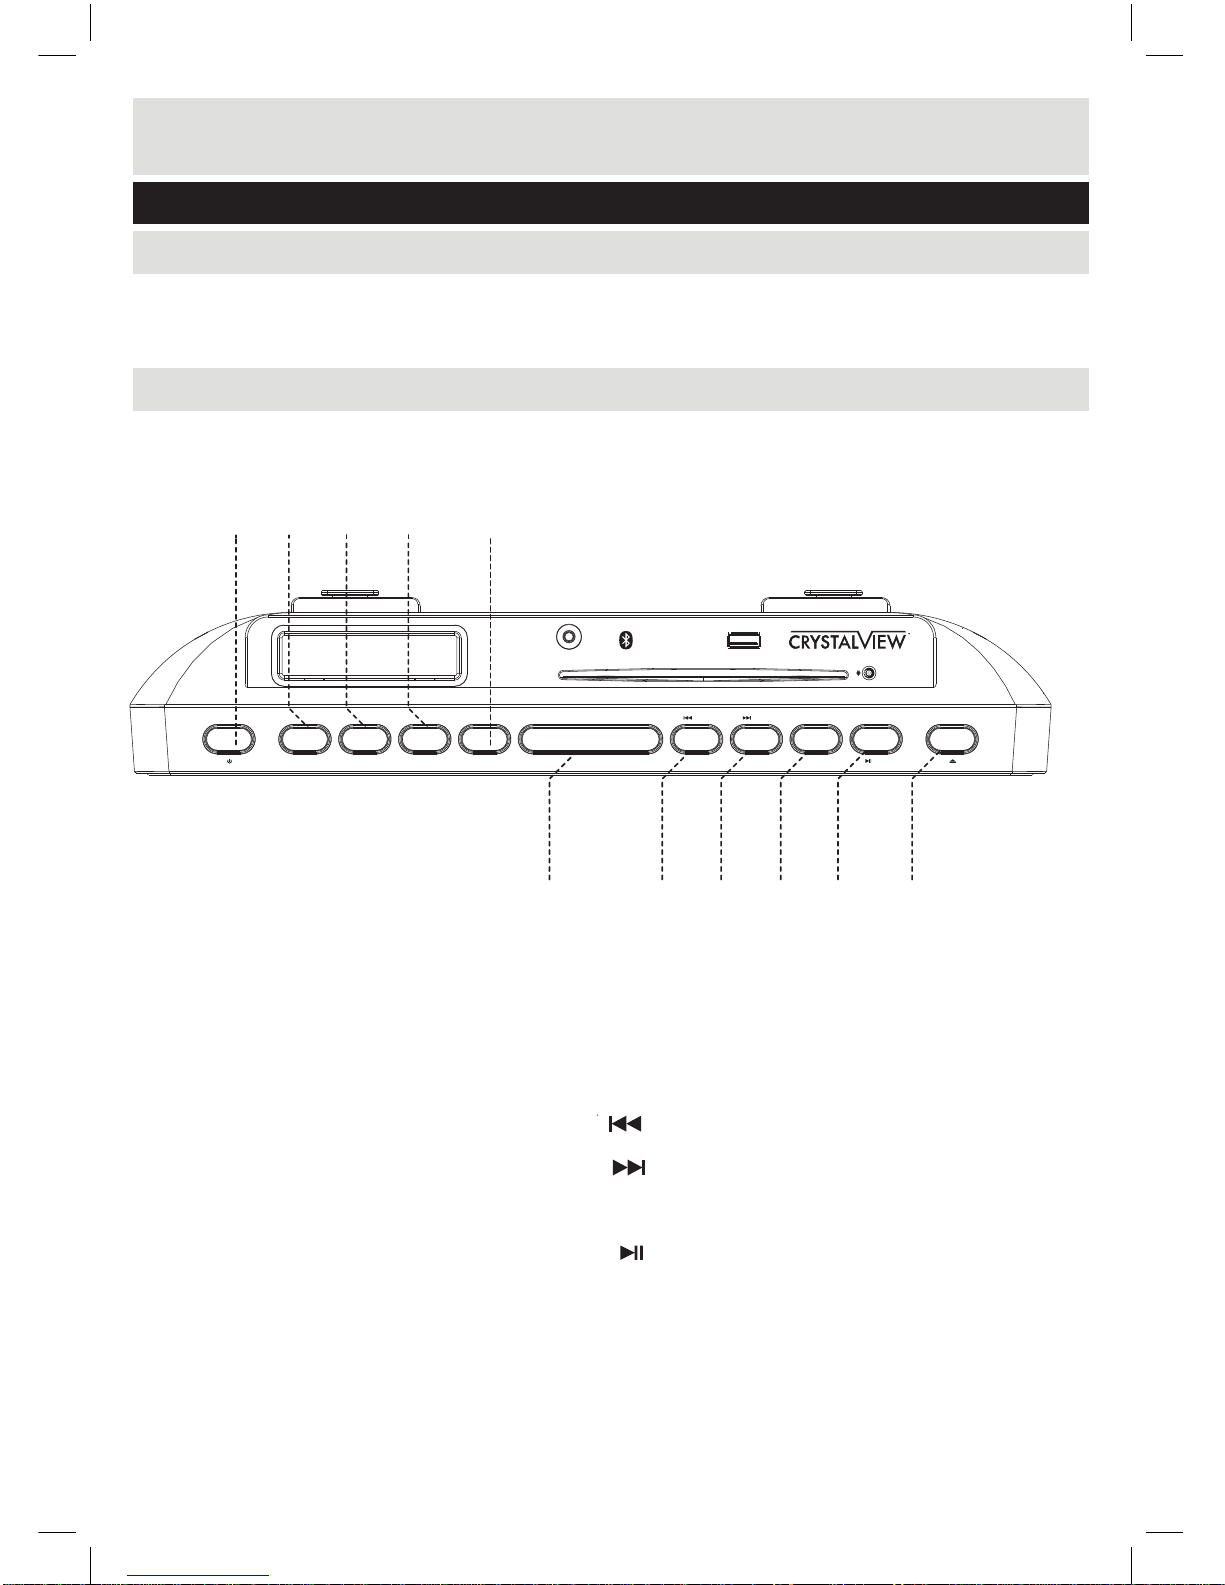
ASSEMBLING THE UNIT--- ON WALL
Step 1: Drilling holes according to the size in Fig below.
Step 2:Insert the wall plug and fix metal brackets on wall with screws provided.
7
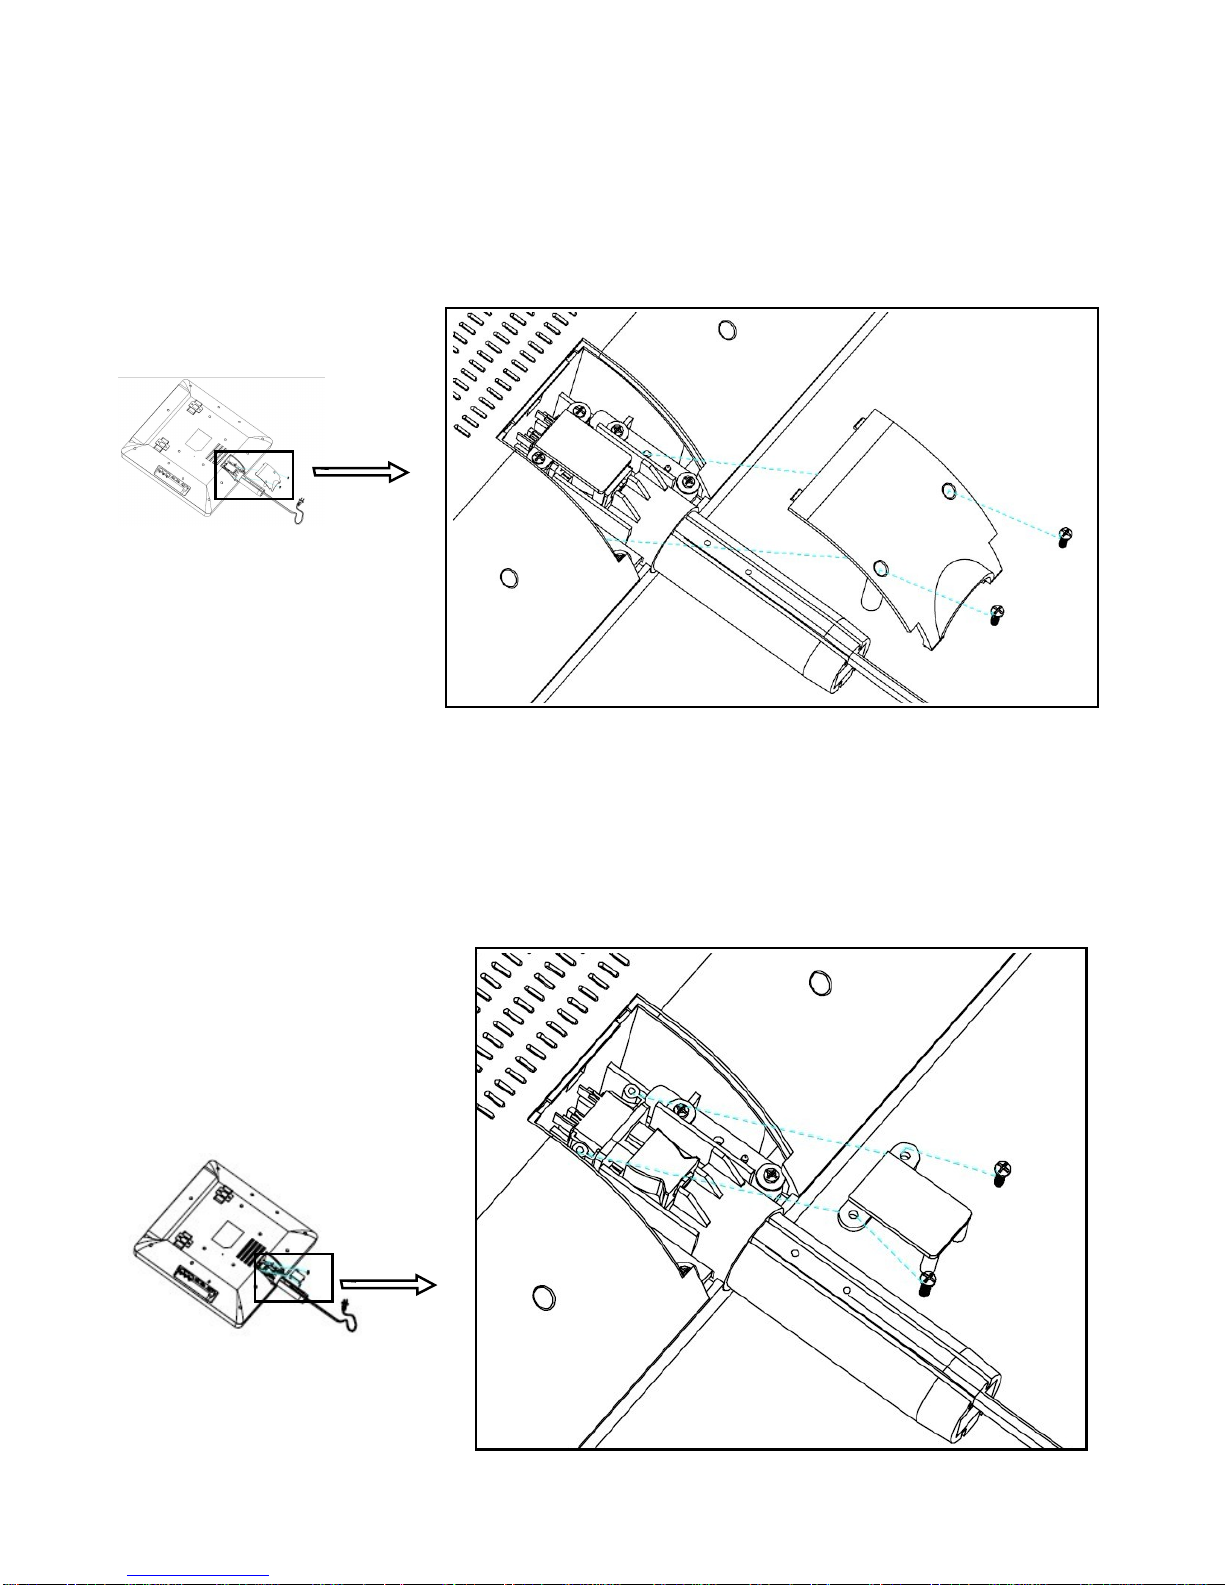
Step 3:Uncover the power plug plastic cover at the back of the unit.
Screw out and take off the cover.
Step 4:Screw out and disassemble the bracket fixing the power plug.
ASSEMBLING THE UNIT---ON WALL(Continued)
8
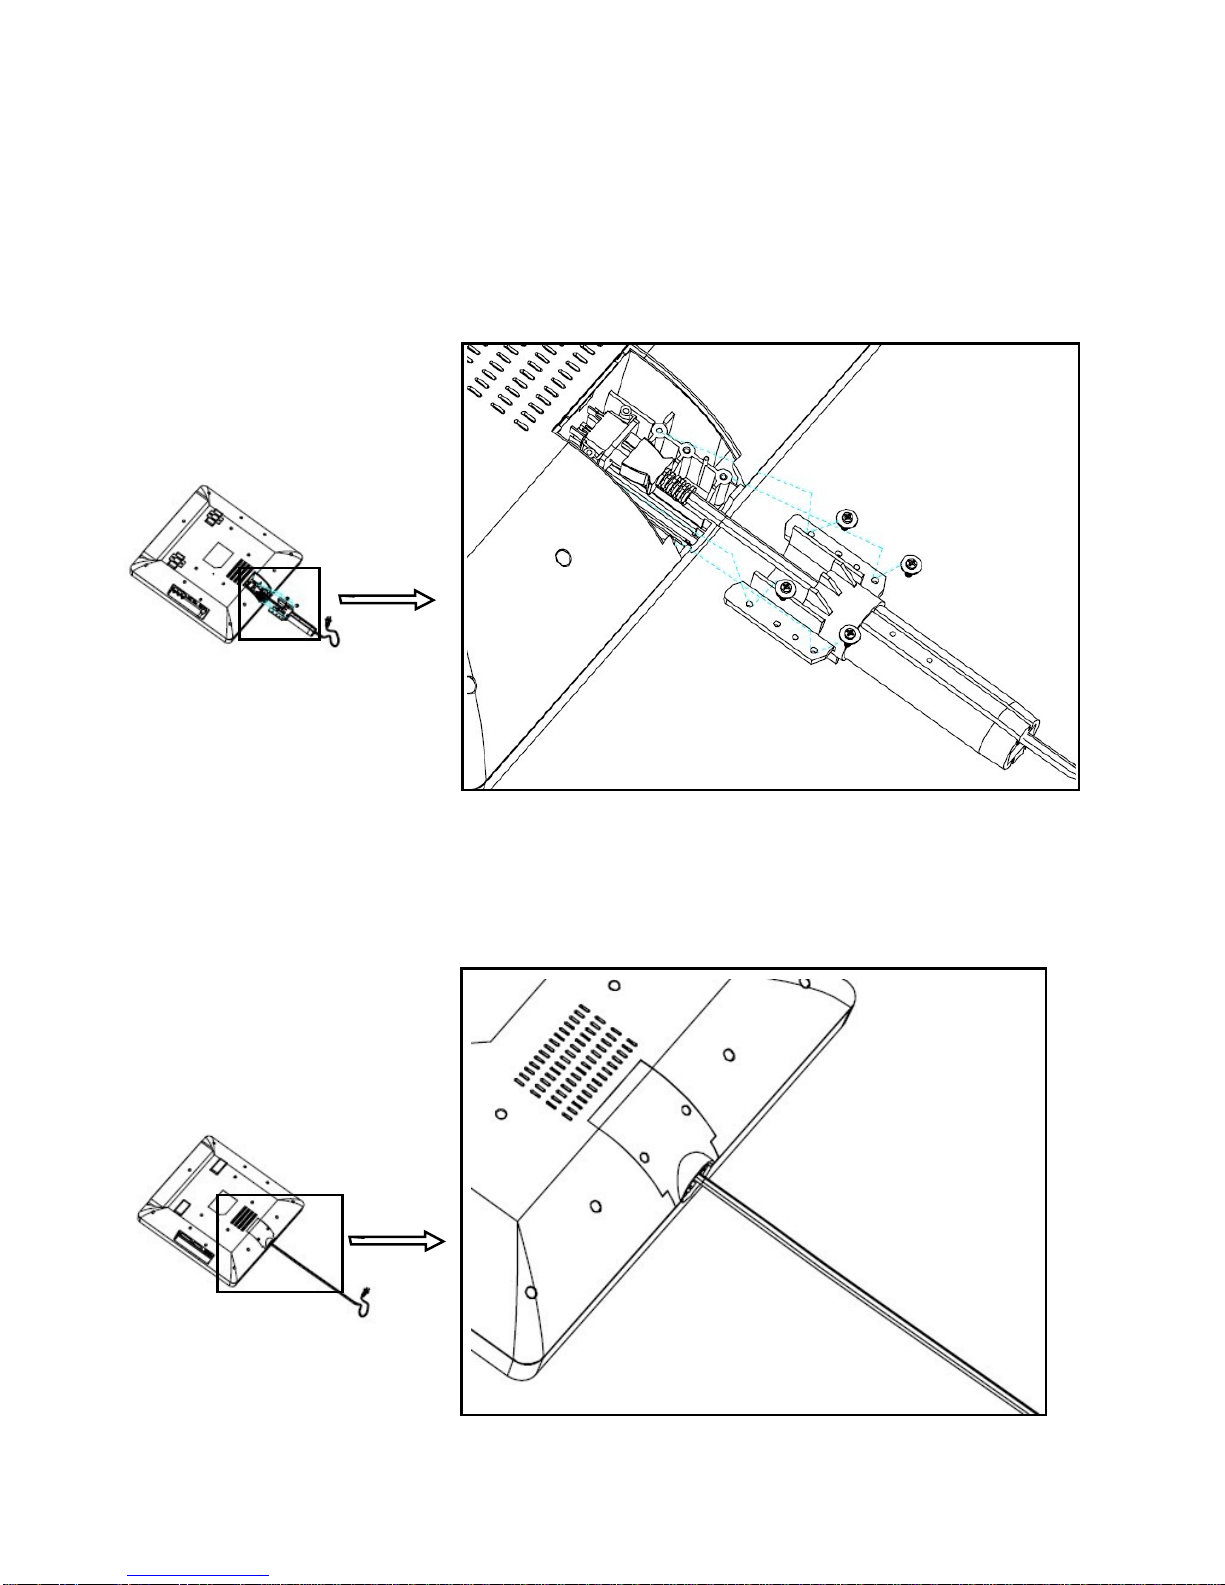
Step 5:Screw out and disassemble the short connecting and fixing pipe.
Step 6: Insert the power source plug and screw the brackets and the cover back.
9
ASSEMBLING THE UNIT---ON WALL(Continued)
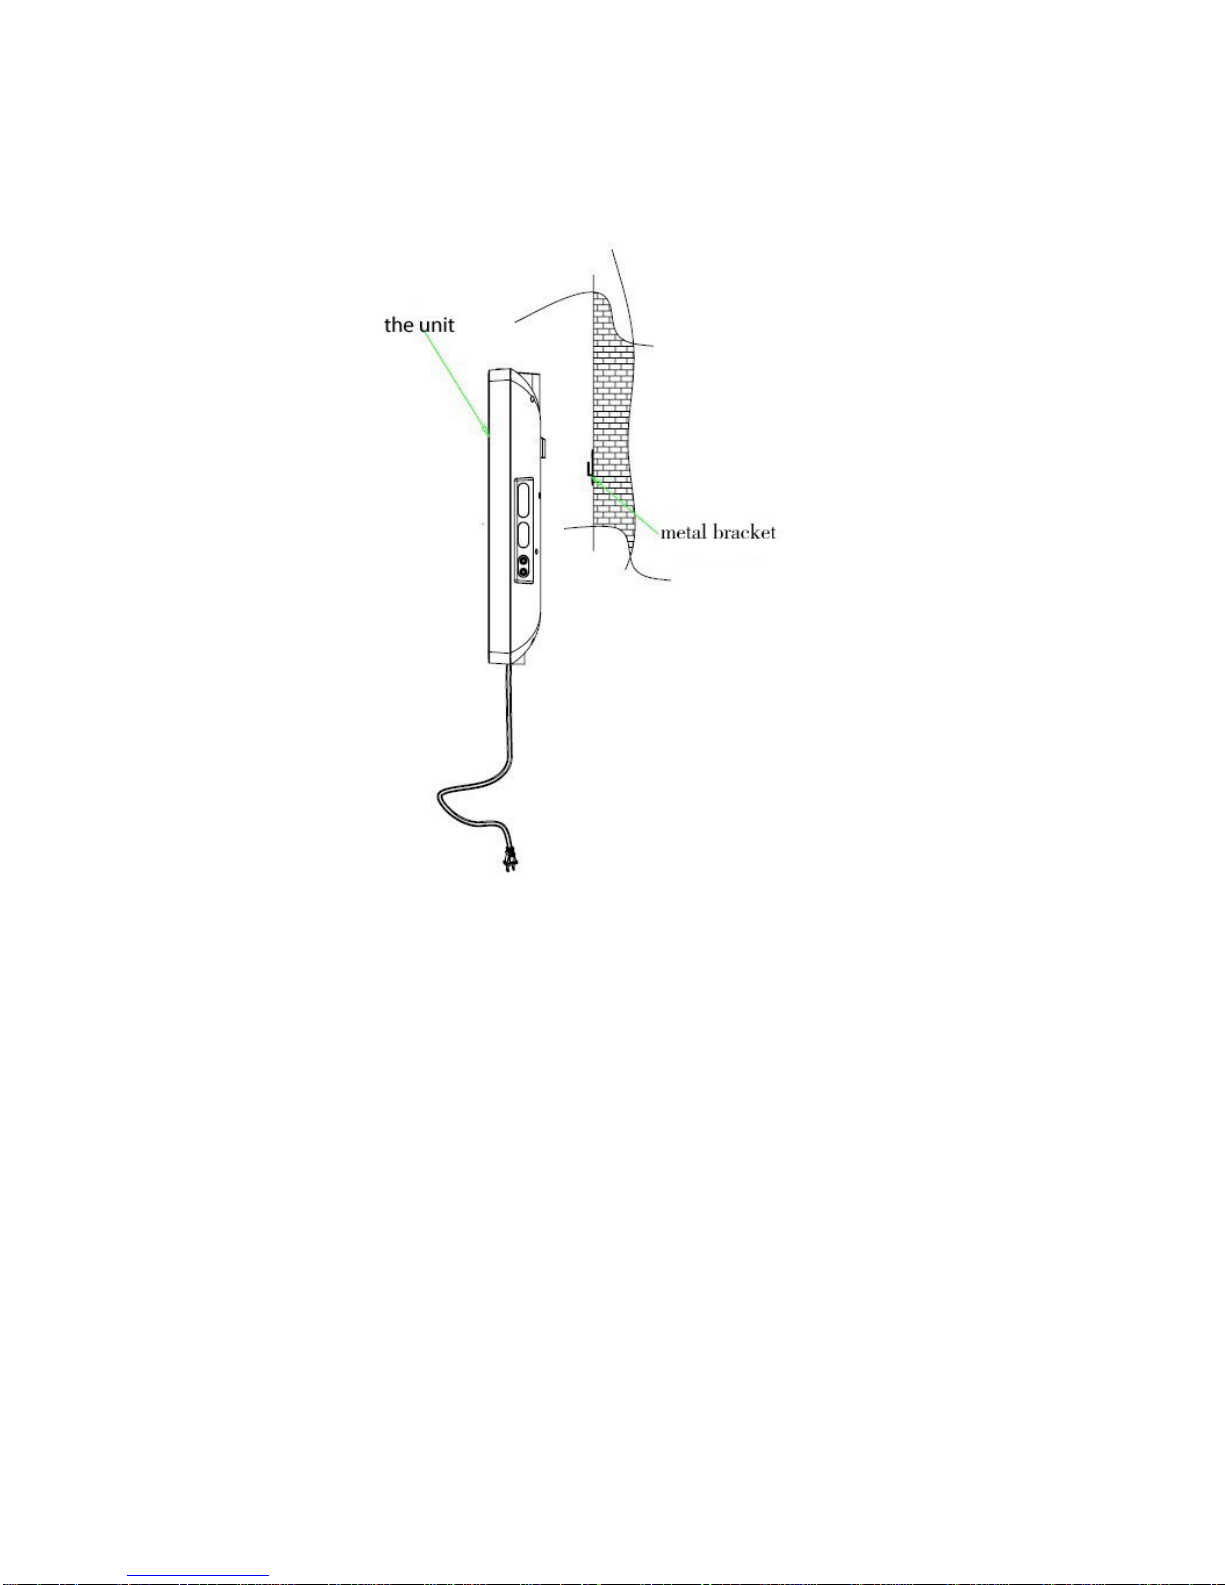
ASSEMBLING THE UNIT---ON WALL(Continued)
Step 7: After fixing the bracket at the back of the unit, hang the unit on the wall.
10
Accessories included
Please familiarize yourself with the parts and accessories listed below
Functions & Controls
● 1 x Instruction manual
● 1 x RCA cable
●1 x Remote control
Overview of controls(Main Unit)
542 31
6
542 31
14 15 16
● Wall mount brackets and screws
● 1 x AUX IN cable with 3.5mm stereo plug
- VOLU ME + ALAR M SOURCE SNO OZE TIME - AM/FM
/TUN- /TUN+
TIME + /PAIR
AUX IN 1 USB PL AYER
7 8 9 10 11
19 20 21
1. Power standby
2. Volume down
3. Volume up
4. Alarm
5. Source
6. Snooze
7.
8.
9. AM/FM Radio
10. Play/ pause /Pair button/Time set
11. Disc eject/inject
( [] Tune down/ previous
[ ] / time -
(
[ ]
Tune up/ next / time +
[ ]
EJEC T
11

27
12
29
30
28
21
22
23
24
25
26
13
14
15
16
17
18
19
20
31
32
33
34
35
36
37
38
39
40
41
42
43
44
45
12
TIME
24. Dimmer
25. Sleep
26. Snooze
27. Disc eject / inject
28. CD source
Bluetooth mode
29. AUX2 source
30.
31. Radio preset recall
32. Memory
33.
34. [ ]
Tune up/ Next
Time
35. Stop
36.
37. Time +
38. Volume up
39. Alarm
40. Bluetooth pairing
41. Random
42. Repeat
43. Bass up
44. Bass down
45.
AUX1 source
Radio preset recall
12.
13. Mute
14. AM/FM
15. USB source
16. Program
17.
18.
19.
20.
21. AM/FM scan
22. ST/MO
( [] Tune down/ Previous
[ ]
Play/ pause
Volume down
Time -
[Stereo / mono]
23.
EQ
Power standby
12
Overview of controls(Remote Controller)
542 31
Operating Instructions
Functions / Mode
General operation
Time setting
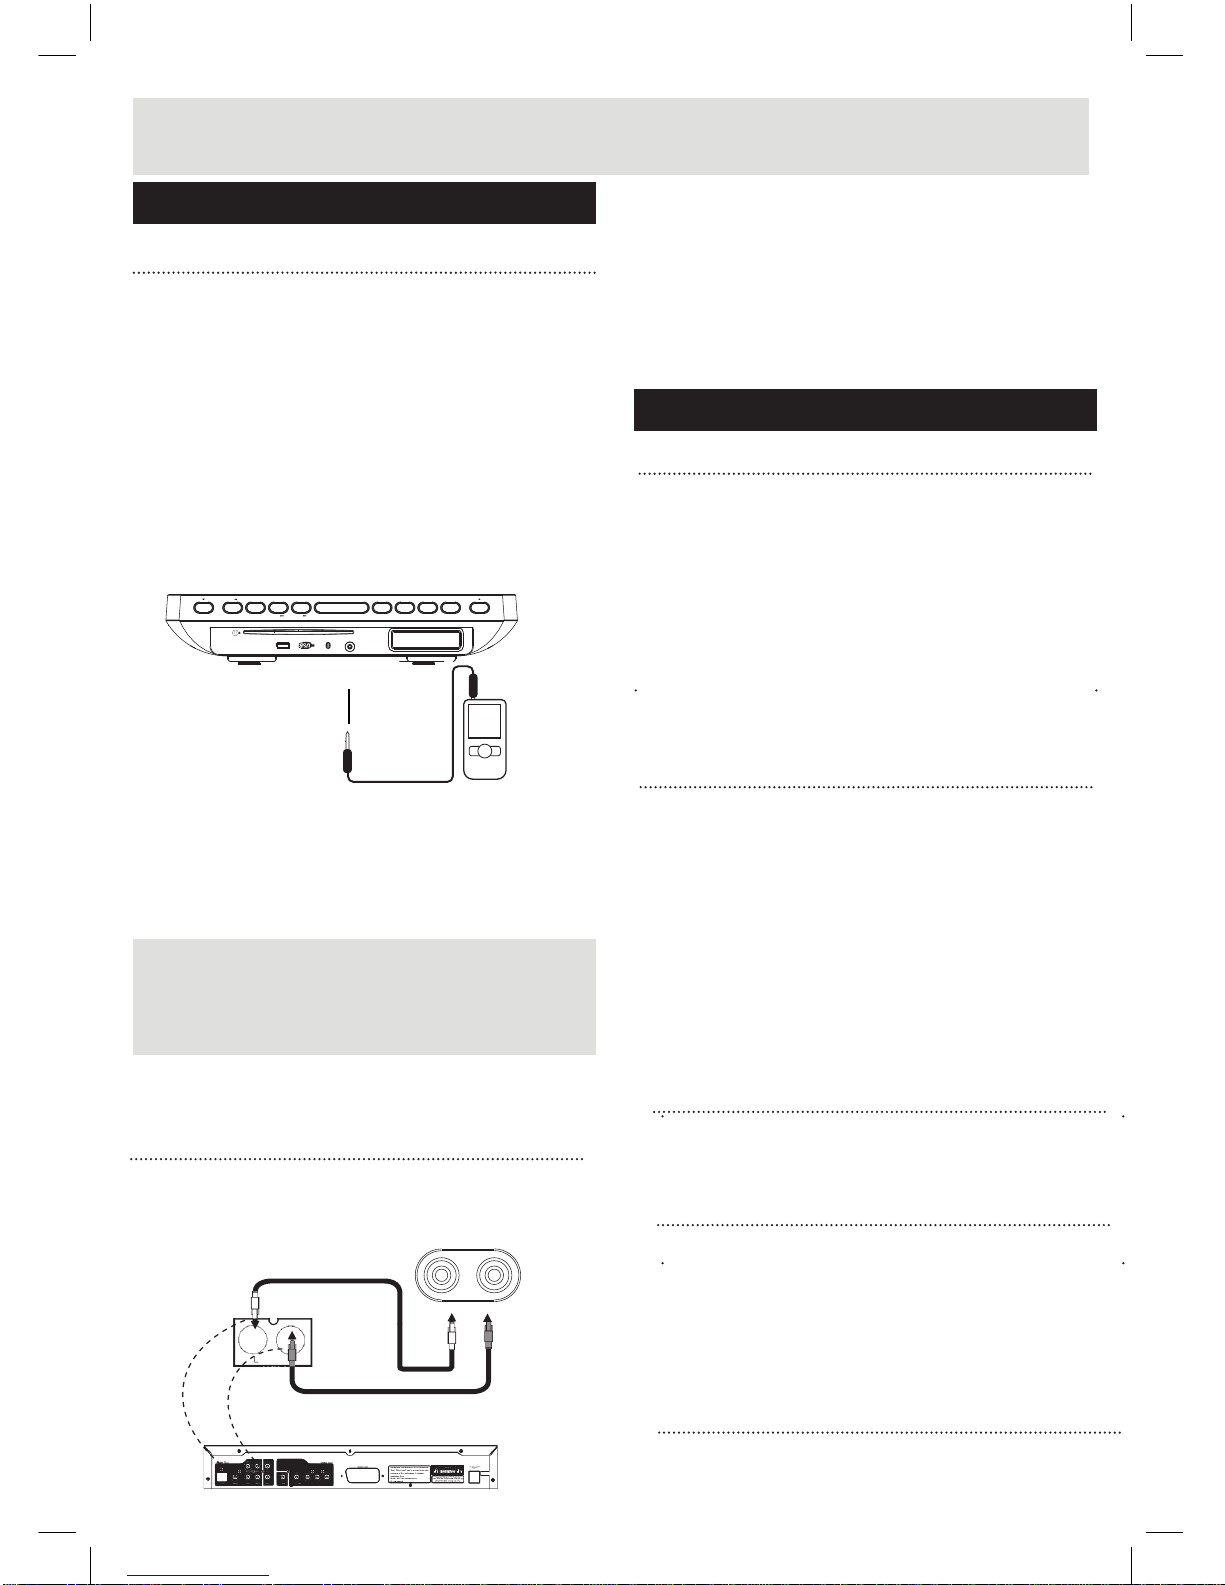
AUX AUDIO
NOTE: This function requires the AUDIO
CONNECTION to be made to an external media
device.This function will not work connected to a
TV input.
1. Insert a 3.5mm cable into the AUX IN 1 input
socket on the control panel.
2. Insert the other end to your audio devices
headphone output or Line-out.
MP3 PLAYER
3. Press the SOURCE
4. Press PLAY on the external audio source EG:-
MP3 player.
NOTE: The audio output level is effected by the
volume on the source EG: MP3 player so make
sure that is set to about 70-80% (not too loud to
avoid distortion).
5. Adjust the VOLUME control on the amplier to
set the main volume level.
AUX IN 1
button until AUX IN 1
appears on the display.
AUX IN 2
L R
DVD Player
Red
Red White
Audio Output
Jacks on the
DVD / VCR / DVR
the unit.
1.Connect the AV cable to the Audio Output Jacks
(White Jack=L, Red Jack=R) on DVD player
and Audio Input Jacks on the rear of
2.Press button until AUX 2 appears on the
SOURCE
display.
3. Activate the external device.
2. Hold TIME button on the remote control to start
3. Press button to set 12h or 24h.
Then press TIME button to confirm.
Alarm setting
1. Place the unit into Standby mode.
2. Hold button on the remote control to
ALARM
activate the alarm setting.
3. Press and button to adjust the hour
TIME+ TIME-
and the minute. Then press button to confirm.
ALARM
1. Place the unit into Standby mode.
4. Press or button to select the alarm
ALARM
When the alarm rings, press
SnoozeSnoozeSnoozeSnoozeSnoozeSnoozeSnoozeSnooze button to turnSnooze
off the ring and 9 minutes later, the alarm will ring
again.
Sleep timer
Dimmer
DIMMER
Press button to adjust the display
brightness.
the display.
the time setting.Then "12Hr"or "24Hr" will appear
on
4. Press to set hour and press
5. Press to set minute digit.Press "TIME"
to confirm.
"TIME" to
confirm, then, minute digit will flash.
rings as FM ("F")or buzzer("b"). Then press
button to confirm.
5. Press " " to set alarm volume level.
13
TIME+ TIME-
Press SLEEP button and it will show SLEEP and 90 on
the screen.The speaker will auto off after 90 minutes.
Press SLEEP button again, it will change to 80,70,60....
10 and sleep timer off.The duration ranges from 10-90
minutes.
Snooze
Connect to external media devices like MP3 player,
iPod, mobile phones etc to the unit, using the 3.5mm
audio cable (Included).
RCA Connectivity
Use RCA Audio Cable (included) to connect to
external devices like DVD player / DVR / VCR etc.
TIME +/-TIME +/-TIME +/-
TIME +/-TIME +/-TIME +/-
TIME +/-TIME +/-TIME +/-
TIME +/-TIME +/-
SnoozeSnoozeSnoozeSnooze
6. Press to confirm.
ALARMALARMALARM
TIME +/-TIME +/-

1. Press until radio FM or AM appears
on the display.
2. Press the button to switch between AMAM/FM
and FM.
3.
stations.
FM/AM operation
Hold and button search for the
TUNE+ TUNE-
4. Press button, then PX will appear on the
MEM
display. Press or button to select the
M+ M-
place you want the station to be stored. Then
press button again to store.
MEM
5. Press or button to listen to the preset
M+ M-
stations.
1. Press button until bt appears on the display,
the unit will start to search,
2. Activate the Bluetooth connection on the external
NOTE:
BT
device. eg: mobile phone, ipad...
Enter 0000 when asked for a password
during connecting.
search for other devices.
Paring and Connecting
Program Procedure
AM/FM
14
While the unit is on, Press and hold the Pair button
until beep sound is heard. When pairing, remain within
3 feet of the unit. Using the native controls on your
your Bluetooth settingto pair. If your device requests
a password, enter default password"0000".Refer to
user's manual for your specific device for instructions
on pairing and connecting Bluetooth devices. When
Re-Paring or Pairing New Devices
During Playing
-Press and button to skip to the previous or
(
next track.
-Press button to pause the playback, press again
to resume the playback.
NOTE: buttons may not work with all
(
the Bluetooth sources.
Disc Operation
1. Press button until CD appears
on the display.
CD
During Playing
-Press and button to skip to the previous or
(
next track.
-Press button to pause the playback, press again
to resume the playback.
-Press button to stop the playback
-Press button on remote control to activate or
RAN
deactivate random mode.
-Press button on remote control to activate or.
REP
-Press button to play the contents in the pre-
PROG
selected order.
2.Load the disc,it will play automatically.
3. Press button to eject disc when finished.
Unit will play media when a station is found.
Bluetooth Operation
4.Select it to complete the pairing process. Once it
paired, beep sound will be heard.
deactivate repeat mode.
Note:Device supports only audio CD or mp3 CD.Does not
support VCD or DVD discs.
3. Repeat Step 2, to program more tracks.
1. While in CD Or USB mode, press STOP, then press
PROG, “Pro” will appear on screen.
2. Press PREV/NEXT to select the track desired to be
programed, at the same time, the selected tracks
display on screen, the press PROG to confirm.
4. Press PLAY to start playing the programmed tracks.
Press STOP twice to cancel programming.
successfully paired and connected , Beep Sound
will be heard. After initial pairing, the unit will stay
paired unless unpaired manually by the user or
erased due to a rest of the device.
for the last conncted
device if it is found. If it is not found, the unit will
Bluetooth device, select the "CRYSTALVIEW DMC" in
3."CRYSTALVIEW DMC" will appear on the list of
detectable devices on your pairing device.
15
USB operation
During Playing
-Press and button to skip to the previous or
(
next track.
-Press button to pause playing, press again
to resume the play.
-Press button to stop the play.
Care & Maintenance
Important: Always unplug the appliance from the power socket during cleaning and
maintenance.
• Never use any sharp instruments or abrasive substances, soap, household cleaner, detergent or wax
polish for cleaning.
• Clean the external surfaces with a damp soft cloth only. Never use abrasive products or solvents as it
may damage the appliance.
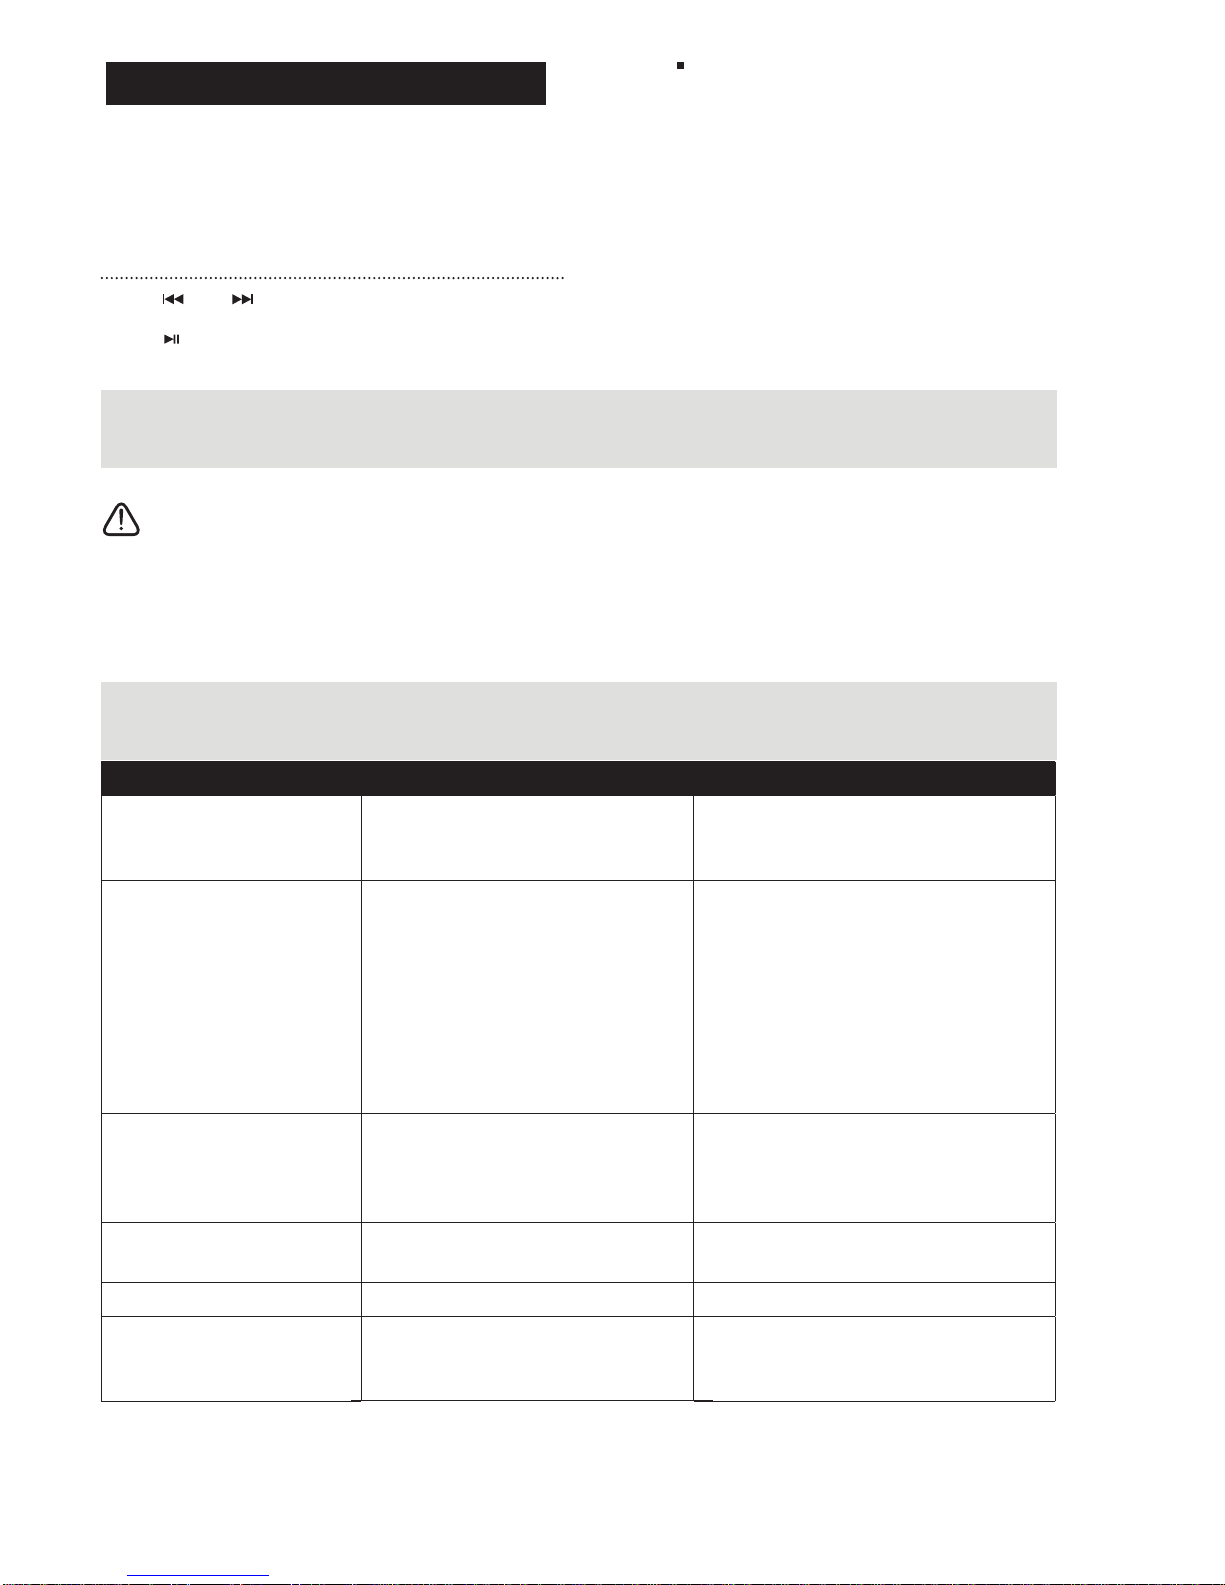
Troubleshooting
Problem Reason(s) Solution(s)
No Power ● Power cable not connected to wall socket
● Standby mode active
● Make sure the plug is connected
● Press the STANDBY button to wake the unit
Disc will not play ● Disc not inserted correctly
● Defective disc
● Moisture on disc
● Non standard disc
● Lens is dirty
● The unit requires resetting
● Remove and re-load the disc with the label
facing on the front
● Try another disc
● Wipe, clean and try again
● Use a disc bearing the standard logo
● Use a CD lens cleaner
● Disconnect from the mains power for 30
seconds, and re-connect and try again.
No sound ● Volume control set to minimum
● Defective disc
● Audio connections not correct
● Increase the volume level
● Try another disc
● Check the Audio connections to the TV or AMP
● Defective disc ● Try another disc
Remote not working ● Replace the battery with two new 2 x AAA batteries .
Disc playing error
● Battery is exhausted
\Bluetooth can not paired ● Connection lost ● Try restarting the device and pairing steps again
1. Press the USB button until USB appears on the
display.
2.Insert the USB device into the USB port. It will
automatically start playing
-Press REP button on the remote control to activate or
deactivate Repeat mode.
activate or deactivate Random mode.
-Press RAN button on the remote control to turn on or
-Press PROG button on the remote control to play
the contents in the pre-selected order.
unfunctional in other EQ MODE.
For all General Operation.
NOTE: BASS+/- will be effective in EQ
"NORMAL" MODE,

Technical Specications
General
Power source
Audio output
BT working range
AUX input Ø 3.5mm stereo headphone jack
USB File system
USB max capacity
FAT 16 / FAT 32
32GB
AC 120V~60Hz
FM coverage 887.5 - 108 MHz
30W
AM coverage 520 - 1710 KHz
16
32 feet

FCC Statement
This equipment has been tested and found to comply with the limits for a Class B digital
device, pursuant to Part 15 of the FCC Rules. These limits are designed to provide
reasonable protection against harmful interference in a residential installation. This
equipment generates, uses and can radiate radio frequency energy and, if not installed
and used in accordance with the instructions, may cause harmful interference to radio
communications. However, there is no guarantee that interference will not occur in a
particular installation. If this equipment does cause harmful interference to radio or
television reception, which can be determined by turning the equipment off and on, the
user is encouraged to try to correct the interference by one or more of the following
measures:
-- Reorient or relocate the receiving antenna.
-- Increase the separation between the equipment and receiver.
-- Connect the equipment into an outlet on a circuit different from that to which the
receiver is connected.
-- Consult the dealer or an experienced radio/TV technician for help.
This device complies with part 15 of the FCC Rules. Operation is subject to the
(1) This device may not cause harmful interference, and (2) this device must accept any
interference received, including interference that may cause undesired operation.
The antenna(s) used for this transmitter must be installed to provide a separation
distance of at least 20 cm from all persons and must not be co-located or operating in
conjunction with any other antenna or transmitter.
17
following
two conditions:

LIMITED WARRANTY
This manufacturer's product warranty extends to the original consumer purchaser of the
product. Neither the retailer nor any other company involved in the sale or promotion of this
product is a co-warrantor of this manufacturer warranty.
WARRANTY DURATION: All materials and workmanship are warranted to the
original consumer purchaser for a period of ninety (90) days from the original purchase
date.
WARRANTY COVERAGE: This product is warranted against defective materials or
workmanship. This warranty is void if the product has been damaged by accident,
in shipment, unreasonable use, misuse, neglect, improper service, commercial use,
repairs by unauthorized personnel or other causes not arising out of defects in
materials or workmanship. This warranty doesn’t cover the following which may be
supplied with this product, including but not limited to; LCD Screens, glass parts,
lenses, etc. This warranty is effective only if the product is purchased and
operated in USA, and does not extend to any units which have been used in
violation of written instructions furnished by manufacturer or to units which have been
altered or modified or, to damaged products or parts thereof which have had the serial
number removed, altered, defaced or rendered illegible.
WARRANTY DISCLAIMERS: This warranty is in lieu of all warranties expressed or implied
and no representative or person is authorized to assume for manufacturer any other
liability in connection with the sale of our products. There shall be no claims for defects
or failure under any theory of tort, contractor commercial law including but not limited to,
negligence, gross negligence, strict liability, breach of warranty and breach of contract.
WARRANTY PERFORMANCE: During the above 90 day warranty period, a product
with a defect will be either repaired or replaced with a reconditioned comparable
model (at manufacturer's option). The repaired or replacement product will be in
warranty for the balance of the 90 day warranty period and an additional one-
month period. No charge will be applicable for such repair or replacement.
SERVICE AND REPAIR: If service is required for this product, you should first contact
(866) 815-4714, Monday to Friday 9am to 5pm CST.
NOTE: Manufacturer cannot assume responsibility for loss or damage during
incoming shipment. As a precautionary measure, carefully package the product for
shipment, and insure it with the carrier. Be sure to enclose the following details with
the product: your full name, return address and daytime phone number, a note
describing the problem you experienced, a copy of your sales receipt or other proof of
purchase to determine warranty status. C.O.D. shipments cannot be accepted.
Table of contents


