Station météo avec horloge
Estación meteorológica con reloj
Weather Station with Clock
Stacja pogodowa z zegarem
WETTERSTATION MIT UHR WSU 7022
Bedienungsanleitung /Garantie
Mode d’emploi • Manual de instrucciones
Instruction Manual • Instrukcja obsługi/Gwarancja
Display
L’écran •Pantalla •Display • Wyświetlacz
1
WSU7022_IM_CTC_A3 01.03.18
DEUTSCH
Allgemeine Sicherheitshinweise
Lesen Sie vor Inbetriebnahme dieses Gerätes die Bedienungs anleitung
sehr sorgfältig durch und bewahren Sie diese inkl. Garantieschein,
Kassenbon und nach Möglichkeit den Karton mit Innenverpackung
gut auf. Falls Sie das Gerät an Dritte weitergeben, geben Sie auch die
Bedienungsanleitung mit.
• Das Gerät nicht an extrem heißen, kalten, staubigen oder feuchten
Orten verwenden.
• Benutzen Sie das Gerät ausschließlich für den privaten und den dafür
vorgesehenen Zweck. Dieses Gerät ist nicht für den gewerblichen
Gebrauch bestimmt.
• Batterien stets richtig herum einlegen.
• Setzen Sie das Gerät keinem Tropf- oder Spritzwasser aus.
• Niemals das Gehäuse des Gerätes öffnen.
• Benutzen Sie das Gerät längere Zeit nicht, entnehmen Sie die
Batterien.
Kinder und gebrechliche Personen
• Zur Sicherheit Ihrer Kinder lassen Sie keine Verpackungs teile (Plastik-
beutel, Karton, Styropor etc.) erreichbar liegen.
WARNUNG:
Lassen Sie kleine Kinder nicht mit Folie spielen. Es besteht Ersti-
ckungsgefahr!
• Dieses Gerät ist nicht dafür bestimmt, durch Personen (einschließlich
Kinder) mit eingeschränkten physischen, sensorischen oder geistigen
Fähigkeiten oder mangels Erfahrung und / oder mangels Wissen be-
nutzt zu werden, es sei denn, sie werden durch eine für ihre Sicherheit
zuständige Person beaufsichtigt oder erhielten von ihr Anweisungen,
wie das Gerät zu benutzen ist.
• Kinder sollten beaufsichtigt werden, um sicherzustellen, dass sie nicht
mit dem Gerät spielen.
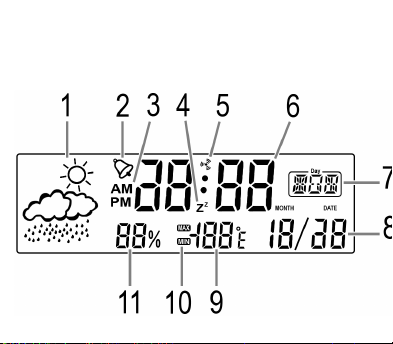
Display
1 Wettervorhersage
2 Weckzeit aktiv
3 Anzeige für „Vormittags“ (AM) und „Nachmittag“ (PM) bei der
12 Stunden-Anzeige
4 Schlummer-Funktion
5 Anzeige für „stündlicher Piepton aktiviert“
6 Anzeige der Uhrzeit, der Weckzeit, das Jahr
7 Wochentag (MON = Montag, TUE = Dienstag, WED = Mittwoch),
THU = Donnerstag, FRI = Freitag, SAT = Samstag, SUN = Sonntag)
8 Anzeige des Datums (MONTH = Monat, DATE = Tag)
9 Anzeige der Temperatur, der Temperatureinheit (°C oder °F)
10 Anzeige „maximale / minimale Temperatur“ (MAX / MIN)
11 Luftfeuchtigkeit
Inbetriebnahme des Gerätes
• Eventuell sind empndliche Flächen mit Folie geschützt. Entfernen
Sie diese Folien.
• Die Alkaline-Batterien im Batteriefach wurden für den Transport mit
einer Folie gesichert. Dies verlängert die Lebensdauer der Batterien.
Entfernen Sie diese Folie, um das Gerät betriebsbereit zu machen.
Verbrauchte Batterien austauschen
1. Öffnen Sie das Batteriefach auf der Rückseite.
2. Ersetzen Sie die Zellen durch zwei Batterien der gleichen Bauart
(LR44 / A76). Achten Sie auf die richtige Polarität.
3. Schließen Sie das Batteriefach.
WARNUNG:
• Setzten Sie Batterien keiner hohen Wärme, wie z. B. Sonnenschein,
Feuer oder ähnlichem aus. Es besteht Explosionsgefahr!
• Halten Sie Batterien von Kindern fern. Sie sind kein Spielzeug.
• Öffnen Sie Batterien nicht gewaltsam.
• Vermeiden Sie den Kontakt zu metallischen Gegenständen. (Ringe,
Nägel, Schrauben usw.) Es besteht Kurzschlussgefahr!
• Durch einen Kurzschluss können sich Batterien stark erhitzen oder
evtl. sogar entzünden. Verbrennungen können die Folge sein.
• Zu Ihrer Sicherheit sollten die Batteriepole beim Transport mit
Klebestreifen überdeckt werden.
• Falls eine Batterie ausläuft, die Flüssigkeit nicht in die Augen oder
Schleimhäute reiben. Bei Berührung die Hände waschen, die Au-
gen mit klarem Wasser spülen, und bei anhaltenden Beschwerden
einen Arzt aufsuchen.
ACHTUNG:
• Batterien können auslaufen und Batteriesäure verlieren. Wird das
Gerät längere Zeit nicht genutzt, entnehmen Sie die Batterien.
• Ungleiche Batterietypen und neue und gebrauchte Batterien dürfen
nicht zusammen verwenden werden.
• Batterien gehören nicht in den Hausmüll. Geben Sie verbrauchte
Batterien bei zuständigen Sammelstellen oder beim Händler ab.
Bedienung
Über einen internen Sensor ermittelt das Gerät nicht nur die Raumtem-
peratur und die Luftfeuchtigkeit, sondern zeigt auch eine Raumklimaaus-
wertung an. Die Messung gibt jedoch nicht die tatsächlichen Wetterver-
hältnisse wieder. Um einen ungefähren Wettertrend zu erhalten, stellen
Sie das Gerät in die Nähe eines geöffneten Fensters auf.
MODE Taste
Die normale Uhrzeitanzeige ist die Standardanzeige. Das Gerät wechselt
nach ca. 20 Sekunden automatisch zu dieser Anzeige zurück.
Drücken Sie die MODE Taste wiederholt, um zwischen den folgenden
Anzeigen zu wechseln:
Weckzeit Datum normale Uhrzeitanzeige
Einstellungen vornehmen
• Mit den UP / DOWN Tasten nehmen Sie die Einstellungen vor.
• Mit der SET Taste wechseln Sie zur nächsten Einstellung.
• Abschließend speichern Sie die Einstellungen mit der MODE Taste.
Uhrzeit einstellen
1. Während die Uhrzeit angezeigt wird, halten Sie die SET Taste
3 Sekunden gedrückt. Das Uhrzeit-Anzeigenformat (12 Hr) blinkt im
Display.
2. Stellen Sie nun nacheinander das Uhrzeit-Anzeigenformat (12 Hr oder
24 Hr), die Stunden und die Minuten ein.
Datum einstellen
1. Wählen Sie die Datumsanzeige mit der MODE Taste aus.
2. Während das Datum angezeigt wird, halten Sie die SET Taste 3 Se-
kunden gedrückt. Das Jahr beginnt zu blinken.
3. Stellen Sie nun nacheinander das Jahr, den Monat (MONTH) und den
Tag (DATE) ein.
HINWEIS:
Der richtige Werktag wird automatisch ausgewählt.
Weckzeit einstellen
1. Wählen Sie die Weckzeit mit der MODE Taste aus.
2. Während die Weckzeit angezeigt wird, halten Sie die SET Taste
3 Sekunden gedrückt. Die Stunden beginnen zu blinken.
3. Stellen Sie nun nacheinander die Stunden und die Minuten ein.
Weckzeit und stündliche Erinnerung ein-/ausschalten
Während die Weckzeit angezeigt wird, drücken Sie die UP Taste, um
die Weckzeit ein- / auszuschalten bzw. die stündliche Erinnerung
ein- / auszuschalten.
-Bei eingeschalteter Weckzeit erscheint das Symbol neben der
normalen Uhrzeitanzeige.
HINWEIS:
• Sobald die eingestellte Weckzeit erreicht ist, blinkt das Symbol
im Display.
HINWEIS:
• Das Wecksignal schaltet sich nach einer Minute automatisch in
die Schlummerfunktion.
• Weckzeit bis zum nächsten Tag deaktivieren:
Drücken Sie die MODE Taste, oder verwenden Sie die Schlum-
merfunktion.
• Schlummerfunktion (SNOOZE):
Drücken Sie die DOWN Taste, um den Signalton für ca. 4 Minuten
abzuschalten. Das Symbol blinkt.
-Ist die stündliche Erinnerung aktiviert, erscheint das Symbol im
Display. Zu jeder vollen Stunde ist nun ein kurzes Piepen zu hören.
Temperaturanzeige zwischen °C und °F umschalten
Drücken Sie wiederholt die SET Taste, um °C oder °F auszuwählen.
Anzeige der MIN / MAX Werte
Drücken Sie die UP Taste wiederholt, um sich die maximale, minimalen
oder aktuellen Temperatur / Luftfeuchtigkeit anzeigen zu lassen.
HINWEIS: MIN und MAX Werte resetten
Während der Anzeige von MIN oder MAX halten Sie die UP Taste für
ca. 2 Sekunden gedrückt. Das Gerät schaltet zu den aktuellen Werten
zurück.
RESET Taste
Etwaige Fehlfunktionen während des Betriebs können durch Drücken der
Reset Taste behoben werden.
Reinigung
ACHTUNG:
Tauchen Sie das Gerät nicht ins Wasser!
• Äußere Flecken können Sie mit einem leicht feuchten Tuch, ohne
Zusatzmittel, abwischen.
• Wischen Sie mit einem trockenen, weichen Tuch nach.
Technische Daten
Modell:.........................................................................................WSU 7022
Temperaturmessbereich:........................... -10 °C – 50 °C (14 °F – 122 °F)
Luftfeuchtigkeitsmessbereich: ..................................................20 % – 89 %
Batteriebetrieb:.............................................................2 × 1,5 V, LR44 / A76
Nettogewicht: ..............................................................................ca. 0,87 kg
Technische und gestalterische Änderungen im Zuge stetiger Produktent-
wicklungen vorbehalten.
Hinweis zur Richtlinienkonformität
Hiermit erklärt der Hersteller, dass sich das Gerät WSU 7022 in Überein-
stimmung mit den folgenden Richtlinien bendet:
• EU-Richtlinie für elektromagnetische Verträglichkeit 2014 / 30 / EU
• RoHS-Richtlinie 2011 / 65 / EU
Garantie
Garantiebedingungen
• Wir übernehmen für das von uns vertriebene Gerät eine Garantie von
24 Monaten ab Kaufdatum (Kassenbon). Als Garantienachweis gilt
der Kaufbeleg.
• Durch Garantieleistungen wird die Garantiezeit nicht verlängert. Es
besteht auch kein Anspruch auf neue Garantieleistungen. Diese
Garantieerklärung ist eine freiwillige Leistung von uns als Hersteller
des Gerätes. Die gesetzlichen Gewährleistungsrechte (Nacherfüllung,
Rücktritt, Schadensersatz und Minderung) werden durch diese
Garantie nicht berührt.
Garantieabwicklung
Im Service- / Garantiefall wenden Sie sich bitte an unseren Dienstleister
SLI (Service Logistik International)
Internet-Serviceportal:
www.sli24.de
Sie können sich dort direkt anmelden und erhalten alle Informationen zur
weiteren Vorgehensweise Ihrer Reklamation.
Über einen persönlichen Zugangscode, der Ihnen direkt nach Ihrer An-
meldung per E-Mail übermittelt wird, können Sie den Bearbeitungsablauf
Ihrer Reklamation auf unserem Serviceportal online verfolgen.
Entsorgung
Umweltschutz
Geben Sie das Gerät am Ende der Lebensdauer nicht in
den normalen Hausmüll. Bringen Sie es zum Recycling zu
einer ofziellen Sammelstelle. Auf diese Weise helfen Sie
die Umwelt zu schonen.
FRANÇAIS
Conseils généraux de sécurité
Lisez attentivement ce mode d’emploi avant de mettre l’appareil en
marche pour la première fois. Conservez le mode d’emploi ainsi que
le bon de garantie, votre ticket de caisse et si possible, le carton avec
l’emballage se trouvant à l’intérieur. Si vous remettez l‘appareil à des
tiers, veuillez-le remettre avec son mode d‘emploi.
• N’utilisez pas l’appareil dans des endroits très humides, poussiéreux,
froids ou chauds.
• Cet appareil est conçu uniquement pour l’utilisation privée et dans la
limite de ce pour quoi il a été conçu. Cet appareil n’est pas destiné à
l’utilisation commerciale.
• Installez toujours les piles dans le bon sens.
• N’exposez pas l’appareil aux éclaboussures ou aux gouttes d’eau.
• Ne jamais ouvrir le coffrage de l’appareil.
• Lorsque vous n’utilisez pas l’appareil pendant un certain temps,
veuillez-en retirer les piles.
Enfants et personnes fragiles
• Par mesure de sécurité vis-à-vis des enfants, ne laissez pas les em-
ballages (sac en plastique, carton, polystyrène) à leur portée.
AVERTISSEMENT :
Ne pas laisser les jeunes enfants jouer avec le lm. Il y a risque
d’étouffement !
• Le présent appareil n’est pas destiné à être utilisé par des personnes
(y compris les enfants) aux facultés mentales, sensorielles ou phy-
siques limitées ou n’ayant pas l’expérience et / ou les connaissances
requises, à moins d’être sous la surveillance d’une personne respon-
sable de leur sécurité ou d’avoir reçu par elle des instructions sur le
maniement de l’appareil.
• Les enfants doivent être surveillés an de garantir qu’ils ne jouent pas
avec l’appareil.
L’écran
1 Prévisions météo
2 Heure d’alarme active
3 Afchage de « dans la matinée » (AM) et « l’heure d’après-midi »
(PM) en mode d’afchage 12 heures
4 Fonction de report
5 Afchage pour « bip horaire activé »
6 Afchage de l’heure du jour, heure d’alarme, année
7 Jour de la semaine (MON = lundi, TUE = mardi, WED = mercredi,
THU = jeudi, FRI = vendredi, SAT = samedi, SUN = dimanche)
8 Afchage de la date actuelle (MONTH = mois, DATE = jour)
9 Afchage de la température, de l’unité de température (°C ou °F)
10 Afchage « température maximum / minimum » (MAX / MIN)
11 Humidité de l’air
Avant la première utilisation
• Les surfaces sensibles peuvent être protégées par un lm protecteur.
Retirez ce lm.
• Les piles alcalines dans le compartiment à piles ont été sécurisées
par un lm pour le transport. Cela prolonge la durée de vie des piles.
Retirez ce lm pour que l’appareil soit prêt à fonctionner.
Remplacer les piles usagées
1. Ouvrez le compartiment a piles a l’arrière.
2. Remplacez les cellules par deux piles de même type (LR44 / A76).
Veillez à respecter la polarité.
3. Fermez le compartiment à piles.
AVERTISSEMENT :
• N’exposez pas les piles à une source intense de chaleur telle que
p.ex. le soleil, le feu ou toute autre source similaire. Il y a un risque
d’explosion !
• Éloignez les piles des enfants ! Ce ne sont pas des jouets.
• Ne forcez pas l’ouverture des piles.
• Évitez le contact avec des objets métalliques (bagues, clous, vis,
etc.). Il y a un risque de court-circuit !
• Les piles peuvent considérablement chauffer à cause d’un court-cir-
cuit, ou même s’enammer. Cela peut causer des brûlures.
• Les bornes de la pile doivent être couvertes d’un ruban adhésif
pendant le transport pour votre sécurité.
• Si une pile fuit, ne frottez pas les yeux ou les muqueuses avec le
liquide. En cas de contact, lavez les mains, rincez les yeux à l’eau
claire et si les symptômes persistent, consultez un médecin.
ATTENTION :
• L’acide des piles peut fuir. Si vous n’utilisez pas l’appareil pendant
une longue période, retirez les piles.
• Différents types de batterie ou batteries neuves et utilisées ne
doivent pas être utilisés ensemble.
• Ne jetez pas vos piles dans les ordures ménagères. Nous vous
prions de les ramener à un centre de recyclage approprié ou chez
le fabricant.
Fonctionnement
À l’aide d’un capteur intégré, l’appareil peut calculer non seulement la
température et l’humidité de l’air dans la pièce, mais afche également
une évaluation de la température intérieure. Souvenez-vous cependant
que la mesure n’est pas une mesure exacte des conditions météo-
rologiques extérieures. Pour obtenir une mesure approximative des
conditions météo extérieures, positionnez l’appareil proche d’une fenêtre
ouverte.
Bouton MODE
L’afchage de l’heure est le mode d’afchage par défaut. L’appareil
revient à l’afchage de l’heure après un délai d’environ 20 secondes.
Appuyez sur le bouton MODE de manière répétée pour basculer entre
les afchages suivants :
Heure d’alarme Date afchage normal de l’heure
Dénir les préférences
• Dénissez les préférences avec les boutons UP / DOWN.
• Utilisez le bouton SET pour passer au réglage suivant.
• Ensuite, appuyez sur le bouton MODE pour enregistrer le réglage.
Régler l’heure
1. En mode d’afchage de l’heure, appuyez sur le bouton SET et main-
tenez-le appuyé pendant 3 secondes. Le format d’afchage heure du
jour (12 Hr) clignote sur l’écran.
2. Maintenant, ajustez le format d’afchage heure du jour (12 Hr ou
24 Hr), les heures et les minutes, l’une après l’autre.
Dénir la date
1. Appuyez sur le bouton MODE pour sélectionner l’afchage de la date.
2. En mode d’afchage de la date, appuyez sur le bouton SET et mainte-
nez-le appuyé pendant 3 secondes. L’année commence à clignoter.
3. Réglez maintenant l’année, le mois (MONTH) et la date (DATE) les
uns après les autres.
NOTE :
Le jour de la semaine correct sera automatiquement afché.
Dénir l’alarme
1. Appuyez sur le bouton MODE pour sélectionner l’alarme.
2. En mode d’afchage de l’alarme, appuyez sur le bouton SET et
maintenez-le appuyé pendant 3 secondes. Les heures commencent
à clignoter.
3. Réglez maintenant les heures et les minutes les unes après les
autres.
Allumer/Éteindre l’heure d’alarme et le rappel horaire
Tandis que l’heure d’alarme s’afche, appuyez sur le bouton UP pour
allumer / éteindre l’heure d’alarme et / ou allumer / éteindre le rappel
horaire.
-Une fois l’alarme activée, le symbole apparaît à côté de l’afchage
normal de l’heure.
NOTE :
• Une fois l’heure de l’alarme arrivée, le symbole clignote sur
l’écran.
• Au bout d’une minute, le signal d’alarme passe automatiquement
à la fonction de rappel.
• Désactiver l’alarme jusqu’au jour suivant :
Appuyez sur le bouton MODE, ou utilisez la fonction Rappel.
• Fonction de rappel (SNOOZE) :
Appuyez sur le bouton DOWN pour désactiver la sonnerie d’alarme
pendant environ 4 minutes. Le symbole clignote.
-Si le rappel horaire est activé, alors le symbole apparaît à l’écran.
Maintenant, un bref bip retentira toutes les heures.
Basculer l’afchage de la température entre °C et °F
Appuyez sur le bouton SET de manière répétée pour sélectionner °C ou °F.
Afchage des valeurs MIN / MAX
Appuyez sur le bouton UP de manière répétée pour afcher la tempéra-
ture maximum, minimum, ou la température et humidité de l’air actuelle.
NOTE : Réinitialiser les valeurs MIN et MAX
Pendant l’afchage de MIN ou MAX, maintenez le bouton UP appuyé
pendant environ 2 secondes. L’appareil revient aux valeurs actuelles.
Bouton RESET
Tout dysfonctionnement lors de l’utilisation peut être rectié en appuyant
sur le bouton Réinitialisation.
Nettoyage
ATTENTION :
Ne pas plonger l’appareil dans l’eau.
• Essuyez les taches extérieures avec un chiffon légèrement humide,
sans agent additif.
• Essuyez avec un tissu doux et sec.
Données techniques
Modèle :.......................................................................................WSU 7022
Plage de mesure de la température :........ -10 °C – 50 °C (14 °F – 122 °F)
Plage de mesure de l’humidité de l’air:.....................................20 % – 89 %
Fonctionnement piles :.................................................2 × 1,5 V, LR44 / A76
Poids net :............................................................................environ 0,87 kg
Nous nous réservons le droit d’apporter des modications techniques
ainsi que des modications de conception dans le cadre du développe-
ment continu de nos produits.
Cet appareil a été contrôlé d’après toutes les directives européennes
actuelles applicables, comme par exemple concernant la compatibilité
électromagnétique et la basse tension. Cet appareil a été fabriqué en
respect des réglementations techniques de sécurité les plus récentes.
Élimination
Protection environnementale
Ne jetez pas l’appareil à la n de sa durée de vie avec les
déchets ménagers. Apportez-le au centre de collecte auto-
risé en vue de son recyclage. Ainsi, vous participez à la pro-
tection de l’environnement.
ESPAÑOL
Indicaciones generales de seguridad
Antes de la puesta en servicio de este aparato lea detenidamente el
manual de instrucciones y guarde éste bien incluido la garantía, el recibo
de pago y si es posible también el cartón de embalaje con el embalaje
interior. En caso de dejar el aparato a terceros, también entregue el
manual de instrucciones.
• No use la unidad en lugares con extremos de calor, frío, polvo o
humedad.
• Esta unidad está destinada exclusivamente a su uso privado y la
aplicación especíca para la que ha sido diseñada. Esta unidad no ha
sido diseñada para nes comerciales.
• Instale siempre las baterías en la dirección correcta.
• No exponga la unidad a goteo ni salpicaduras de agua.
• Jamás se abrirá la carcasa del cuerpo del aparato.
• Si no utiliza el aparato durante un periodo largo, retire las pilas.
Niños y personas débiles
• Para la seguridad de sus niños no deje material de embalaje (Bolsas
de plástico, cartón, poliestireno etc.) a su alcance.
AVISO:
No deje jugar a los niños con la lámina. ¡Existe peligro de asxia!
• Este equipo no está destinado al uso por personas (niños incluidos)
que tengan capacidades físicas, sensóricas o mentales limitadas o
una falta de experiencia y / o conocimientos. Sólo pueden utilizar el
equipo si una persona responsable por su seguridad se les vigile o se
les instruye sobre el uso.
• Los infantiles deberían ser vigilados, para asegurar que no jueguen
con el aparato.
Pantalla
1 Previsión climatológica
2 Hora de alarma activa
3 Indicación para “mañana“ (AM) y “tarde” (PM) en la presentación de
12 horas
4 Función de descanso
5 Muestra “activación horaria con pitido”
6 Muestra la hora del día, la hora de alarma, el año
7 Día de la semana (MON = Lunes, TUE = Martes, WED = Miércoles,
THU = Jueves, FRI = Viernes, SAT = Sábado, SUN = Domingo)
8 Indicación de fecha actuales (MONTH = mes, DATE = día)
9 Indicación de temperatura, de unidades de temperatura (ºC o ºF)
10 Muestra “temperatura máxima/mínima” (MAX / MIN)
11 Humedad del aire
Puesta en marcha del aparato
• Las supercies sensibles pueden estar protegidas por una película.
Retire esta película.
• Las pilas alcalinas están aseguradas en el compartimento con una
película. Esto prolonga la vida útil de las pilas. Retire la película para
que el aparato quede listo para funcionar.
Sustitución de pilas gastadas
1. Abra la tapa del compartimiento de baterías de la parte posterior.
2. Sustituya las baterías por dos del mismo tipo (LR44 / A76). Tenga
atención con la polaridad correcta.
3. Cierre la cubierta de la pila.
AVISO:
• No exponga las baterías a calor intenso, como la luz del sol, el
fuego o similares.
¡
Riesgo de explosión!
• Mantenga las pilas lejos de los niños. No son un juguete.
• No abra las pilas con fuerza.
• Evite el contacto con objetos metálicos (aros, clavos, tornillos, etc.).
¡Existe el riesgo de cortocircuito!
• Las pilas se pueden calentar de manera considerable por un corto-
circuito o incluso pueden arder. Podría derivar en quemaduras.
• Se deben cubrir los terminales de las pilas con cinta adhesiva
durante su transporte por su seguridad.
• Si una pila tiene fuga, no frote el líquido en los ojos o en las mem-
branas mucosas. En caso de contacto, lávese las manos y aclárese
los ojos con agua limpia, y si los síntomas persisten, consulte a su
médico.
ATENCIÓN:
• Las baterías pueden derramar ácido de batería. Si no va a utilizar el
dispositivo durante un periodo prolongado, quite las baterías.
• Tipos de pila desiguales o pilas nuevas y usadas no se pueden
utilizar conjuntamente.
• Las baterías no se deben tirar a la basura doméstica. Por favor
lleve las baterías usadas a sitios especiales de recogida o a su
concesionario.
Uso
Con el uso de un sensor interno, el aparato calcula no solamente la
temperatura ambiente y la humedad del aire, sino que también muestra
una evaluación de la temperatura interior. Sin embargo, la medición no
reeja las condiciones metereológicas reales. Para recibir una aproxima-
ción de las tendencias meteorológicas, coloque el aparato cerca de una
ventana abierta.