CTM HS-268M User manual

Service Manual
Product Qualified as CE for EU ●GMP for Taiwan (ROC) ●ISO9001, 13485 Certification
HS-268 / HS-268M
581201-26800

Table of Contents:
1
2
3
4
5
6
7
8
9
10
Front Cover - Shroud Component List
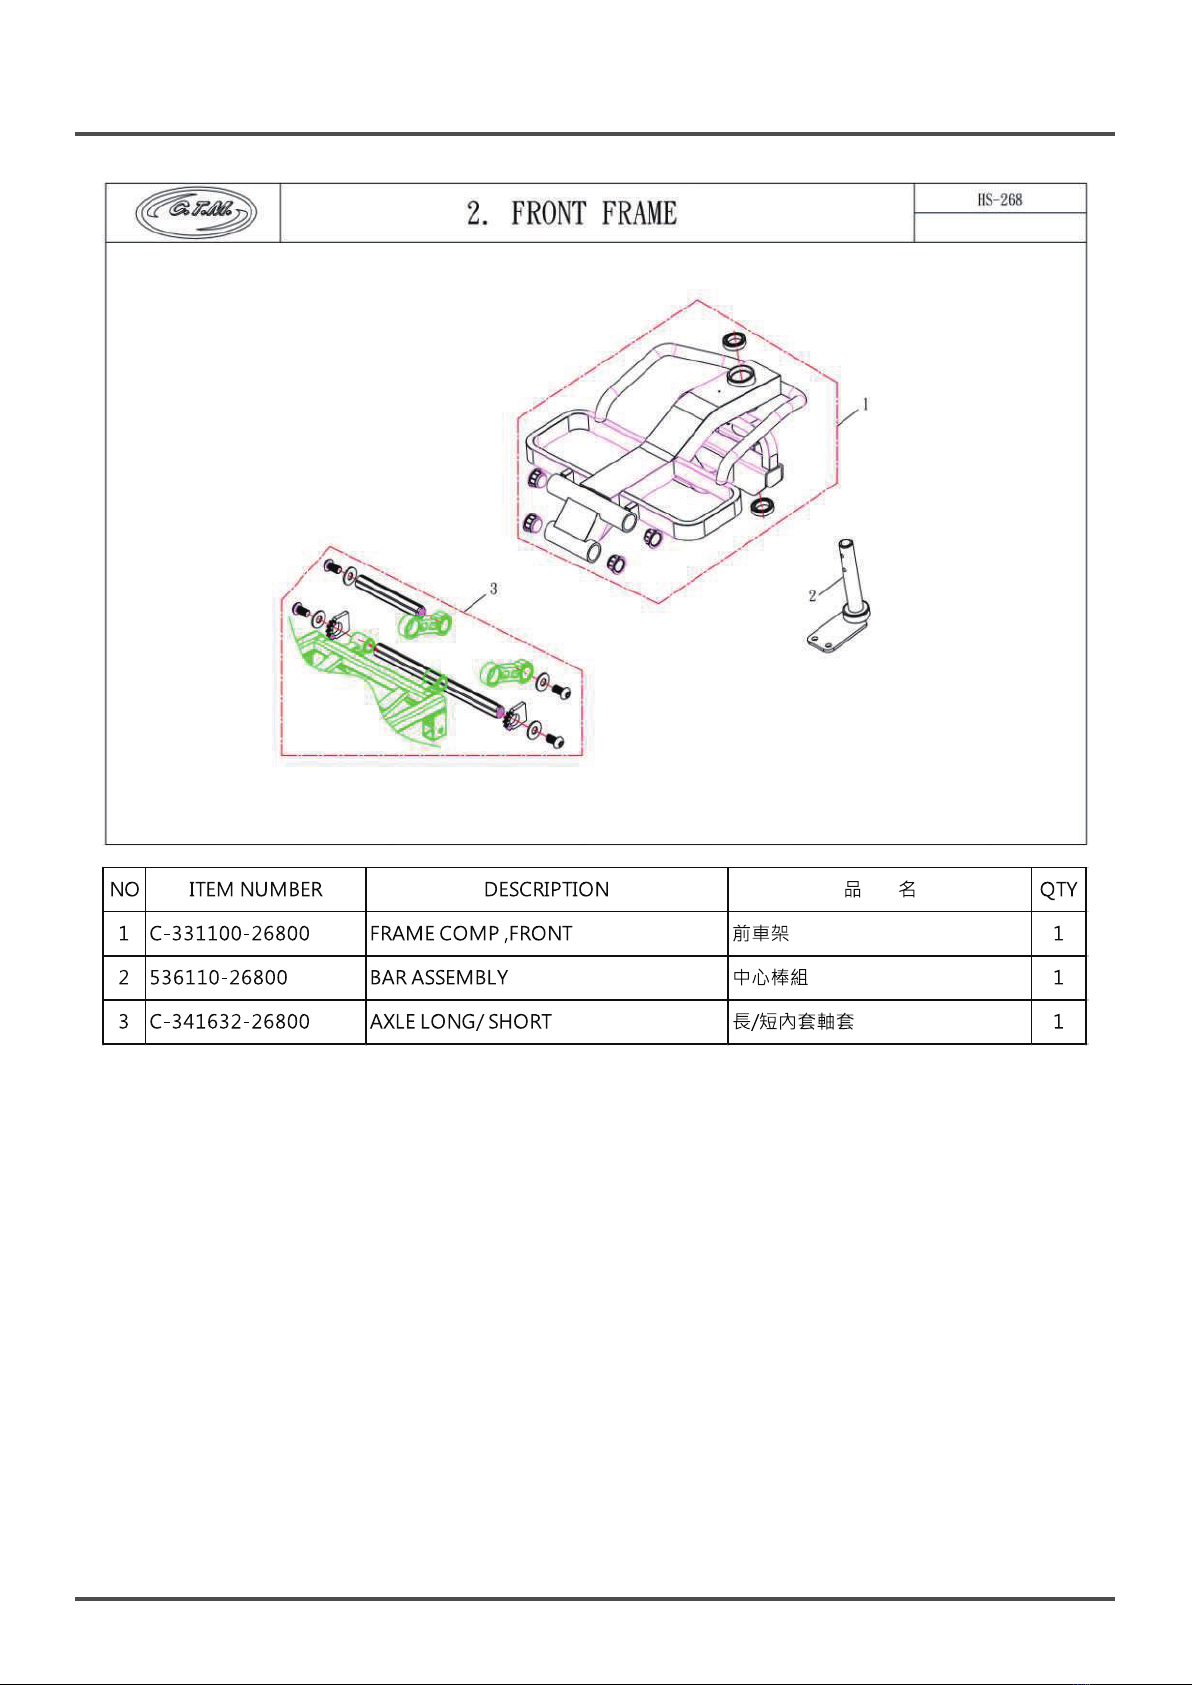
Front Cover - Frame Component List
Rear Cover - Shroud Component List
•Manual Version
•Automatic Version
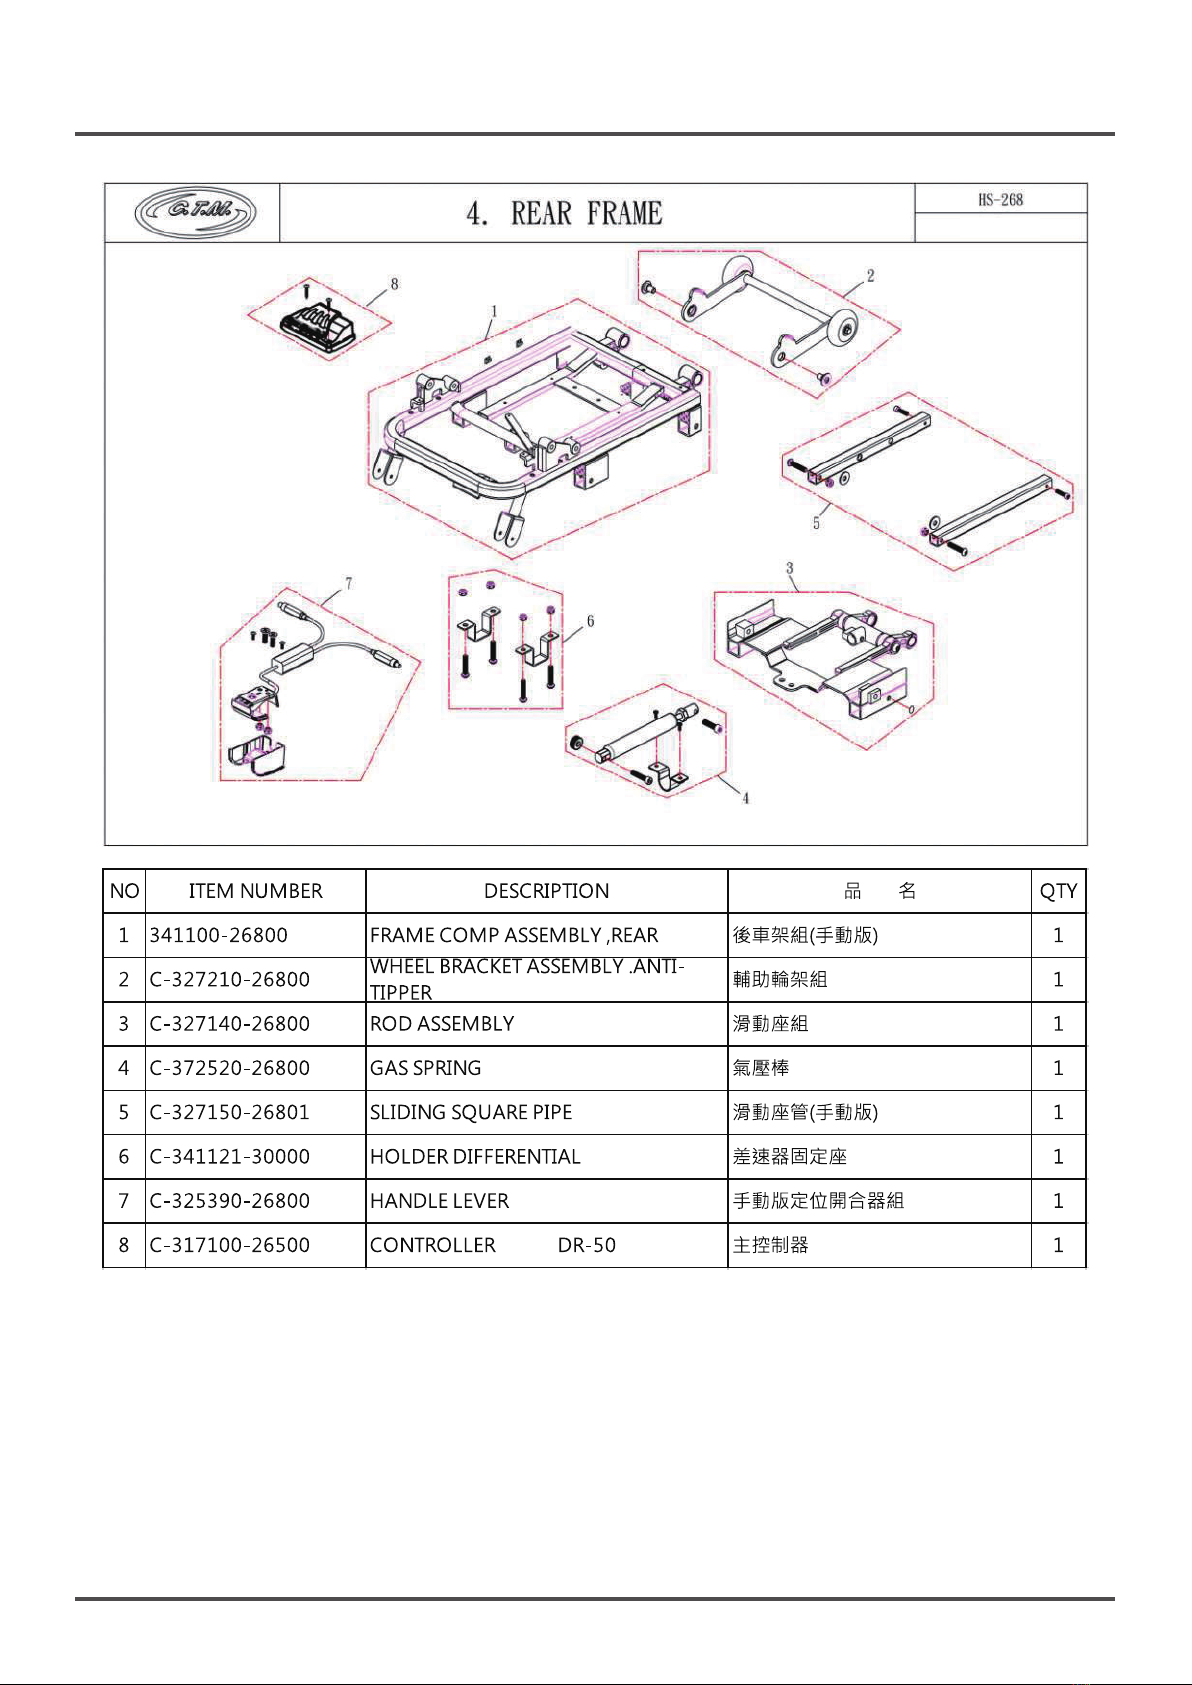
Rear Cover - Frame Component List
•Manual Version
•Automatic Version
Seat and Seat Options Component List
Front Wheel and Steering Component List
Rear Wheel and Motor Assembly Component List
Steering Component List
•Manual Version
•Automatic Version
Accessory Component List
Repair Items
•Preparations for Repairs
•Basic Maintenance
•Service procedures
SERVICE - 01 - Steering Head Cover
SERVICE - 02 - Steering Bar
SERVICE - 03 - Front Lamp Cover
SERVICE - 04 - Front Wheel
SERVICE - 05 - Rear Wheel
SERVICE - 06 - Battery Pack
SERVICE - 07 - Seat
SERVICE - 08 - Seat Bar Mechanism
SERVICE - 09 - Front Lower Cover
SERVICE - 10 - Front Top Cover
SERVICE - 11 - Rear Top Cover
SERVICE - 12 - Rear Lower Cover
SERVICE - 13 - Frame
..............................................1
...............................................3
4
6
8
9
...........................................9
.....................................11
..........................12
13
15
.............................................................17
16
21
.....................................................................22
23
30
32
33
34
35
41
42
44
46
48
53
59

1

2

3
Manual

4
Automatic

5
Manual

6
Automatic

7

8

9

10
Manual

11

12
Automatic

13

14

15

Service manual
16
•Please read this Service Manual carefully before attempting any repairs. Make sure you have identified
the cause of the failure before you start.
•Before starting to work on the scooter remove the battery to avoid electric shock or damage to
components of the electrical system.
•This Service manual has been prepared for the automatic version of the scooter. However, it can be used
when making repairs to the manual version. Some special repair procedures are marked as being “manual
version only”.
•Some repair procedures are relatively complicated and may need the operation of two persons.
•Please refer to the torque specifications when you use electric, pneumatic, or even manual tools to tighten
bolts, screws and nuts, to prevent damage to scooter parts.
•The drawings and diagrams in the manual may be slightly different from the appearance of the actual
scooter. However the repair procedures remain the same.
•After disassembl,make sure the parts are set aside carefully to avoid losing any of them.
•When old parts are replaced with new ones, the screws, washers, pads or auxiliary fixation parts are not
provided with the news parts. It may be necessary to use original parts when reassembling the scooter.
However, if any screw, washer or other part should appear to be worn, corroded, or damaged, it should
be replaced.
•When reassembling the scooter, please make sure to reassemble it in the proper order. Make sure all the
parts are secure and the scooter is in a good roadworthy condition to avoid accidents or injury to riders
or others.
•After the repair and reassembly has been completed, a test drive should be done to check that the fault
has been eliminated and that the scooter functions properly.
•The following is a list of tools necessary for this work: For details of tool specifications, please refer to
the instructions provided in the repair steps.
Caution
If these instructions are not followed
carefully the result could be damage
to the scooter, or even personal injury.
Recommendation
Frequent reference to the manual
during the repairs will facilitate the
operation.
Preparations for Repairs :
•Please follow all the steps in the order they appear
Step 1 → Step 2 as shown in the illustrations.
•Please refer to the pictures for instructions and details.
The pictures appear on the right and include detailed
descriptions of the procedures to be followed.
•Operation step code
•Key location indication
•Arrow direction indication
•Detailed item code
•Tools needed
•Torque limits
•Indication for notes
Service manual Reading Instructions :
18+-2kgf-cm
18+-2kgf-cm
(This drawing is for illustration only)
The Service manual
Flathead
screwdrivers
Socket tool set
Diagonal pliers
Cross screwdrivers
Adjustable wrench
Lineman’s pliers Rubber hammer
Allen keys or drivers
Brush

Service manual
17
Description of Failure :
Parts involved Nature of Failure Chapter reference and Trouble -
shooting Method
Buzzer
Control Panel
Headlight / Taillight
N-D lever
Throttle
Battery pack
Remote controller
RF key
Speed regulator
button
Tire
Motor
Seat
Steering bar
Rear fender
Shroud
frame
Buzzer repair
Top control panel repair
Headlight repair
Taillight repair
Electromagnetic brake
repair
Starter VR repair
DR controller repair
Battery pack
Battery pack - Charger
socket repair
Battery pack - power
socket repair
Change the battery
Remote control board
repair
RF key setting
Upper control board repair
Front wheel repair.
Rear wheel repair
Motor repair
Seat repair
Seat locking pin repair
Seat spring repair
Steering bar repair
Rear fender repair
Repairs to Steering cover
Front lower cover
Front top cover
Rear top cover
Rear lower cover
Frame repair
Buzzer function fault
Panel light controls abnormal
Failure lamp comes on
Headlight failure
Taillight failure
N-D lever abnormal, does not work,
or is jammed
Scooter forwards or backwards travel
abnormal
Electromagnetic brakes failure
Battery pack has been damaged
Battery pack does not charge
Battery pack power connection failure
Lithium battery ← Conversion → Lead-acid
battery
Remote control faulty or lost
Sensor abnormal or lost
Speed regulator does not work
Crack/deformation/yellowing/or puncture
Wheel track depth less than 0.5mm
Tire wobbles or is unstable
Motor action abnormal or makes noisy sound
Seat damage repair or seat replacement
Seat has become loose
Seat spring action abnormal
Height adjustment problem
Rear fender damaged or makes an unusual
sound
Damage to the exterior plastic shroud
Frame has been deformed or broken
SERVICE-1-2
SERVICE-1-1
SERVICE-3-1
SERVICE-11-2
SERVICE-13-5
SERVICE-1-3
SERVICE-11-1
SERVICE-6
SERVICE-6-1
SERVICE-6-2
SERVICE-6-3
SERVICE-12-2
SERVICE-1-5
SERVICE-1-1
SERVICE-4
SERVICE-5
SERVICE-13-4
SERVICE-7
SERVICE-8-3
SERVICE-8-2
SERVICE-2
SERVICE-11-4
SERVICE-1
SERVICE-9
SERVICE-10
SERVICE-11
SERVICE-12
SERVICE-13
Refer to "Self-Diagnostic Warning
Light" on the next page

Service manual
18
Folding / Unfolding Errors :
Code
Power On Turn off the main power switch
Battery Low Charge the battery immediately
Seat springs fall off Refer to SERVICE-7-1 Seat Spring
Repair
Seatback is not flipped down Flip down the seatback and restart the
folding / unfolding procedure.
Scooter is not on flat ground
Scooter cannot be folding / unfolding if
it’s not placed (lay down) on a flat ground.
Please place the scooter on a flat ground
and restart the folding / unfolding
procedure.
Foreign Object on footplate. Check and remove the object on the
footplate and restart the folding /
unfolding procedure.
Optional accessories
interference Remove obstructions such as :
handrails or baggage etc.
Folding / unfolding light indicator
on scooter is not in orange
(enter into sleep mode)
Acton :
1.Please wake up the
folding / unfolding function
(see figure on the right)
2. SERVICE-11-5 Folding / Unfolding
Board Repair.
Tapping error on the folding /
unfolding buttons
If the “Folding button” is pressed when
the scooter has already been folded
it will fold further. Press “Unfolding
button” again and do this until the
scooter has been fully expanded.
Scooter anti-tipping angle is too
great Scooter has anti-tipping protection,
please place it on flat ground and to
correct the problem.
Remote control inactive
Solution :
1.Battery needs to be replaced.
2.Refer to SERVICE-12-2 Remote
Board.
Folding / unfolding button inactive.
Refer to SERVICE-11-5 Folding /
Unfolding Board.
Scooter folds incorrectly
Possible Solution :
1. SERVICE-13-1 Solenoid Valve Repair
SERVICE-13-2 Folding Unit Repair
(manual version only)
2. SERVICE-13-3 Sliding Track Repair
3. SERVICE-13-7 Linear Actuator Repair
4. SERVICE-13-8 gas spring Repair
5. SERVICE-13 Frame Repair
6. SERVICE-13-6 Sliding Base Repair
Description What to do
1
2
3
4
5
6
7
8
9
10
11
12
13
This manual suits for next models
1
Table of contents
Other CTM Scooter manuals