Cub C16 User manual

© CUB CAMPERS • C16 OWNER’S MANUAL • REVISION 1 - 6/02/2023 PAGE 1of 59
C16 OWNER’S MANUAL
Congratulations on your purchase of the Cub C16! This manual serves as a brief introduction to
help you make the most of your C16 experience. Please refer to manufacturer manuals where
possible for detailed instructions, maintenance, and safe use of appliances and fittings.
PLEASE READ AND COMPREHEND these instructions before using your C16 for the first time.
TAKE THE TIME TO GET TO KNOW YOUR C16 and become familiar with all standard fittings and
options on the caravan.
IF IN DOUBT or if you feel you are doing something wrong, please call your local CUB dealer for
advice.
1300 CAMPING
1300 226 746
cubcampers.com.au
Join our Facebook Group https://www.facebook.com/groups/320243716415/
Check out handy tips on YouTube https://www.youtube.com/user/cubcampers

© CUB CAMPERS • C16 OWNER’S MANUAL • REVISION 1 - 6/02/2023 PAGE 2of 59
CONTENTS
1. CARAVAN TRAVEL CHECK LIST........................................................................................................................................3
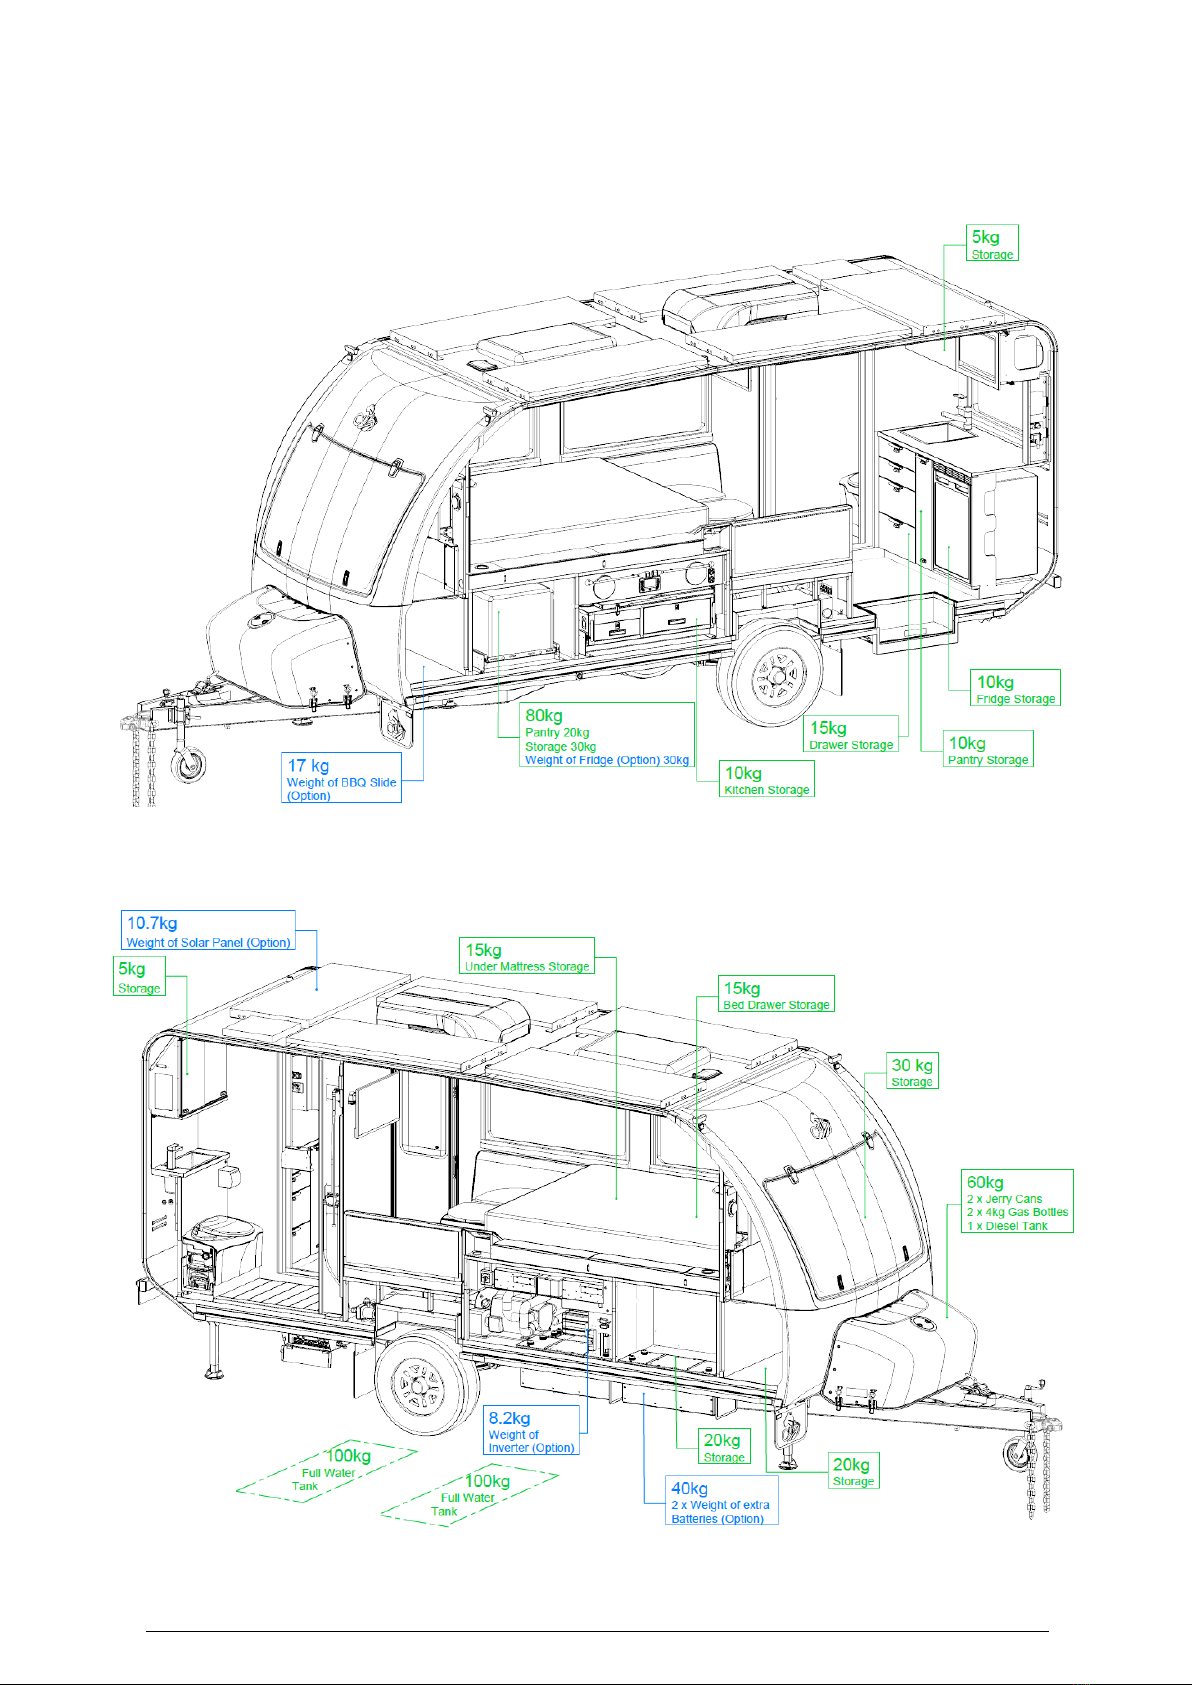
2. PACKING THE C16...........................................................................................................................................................5
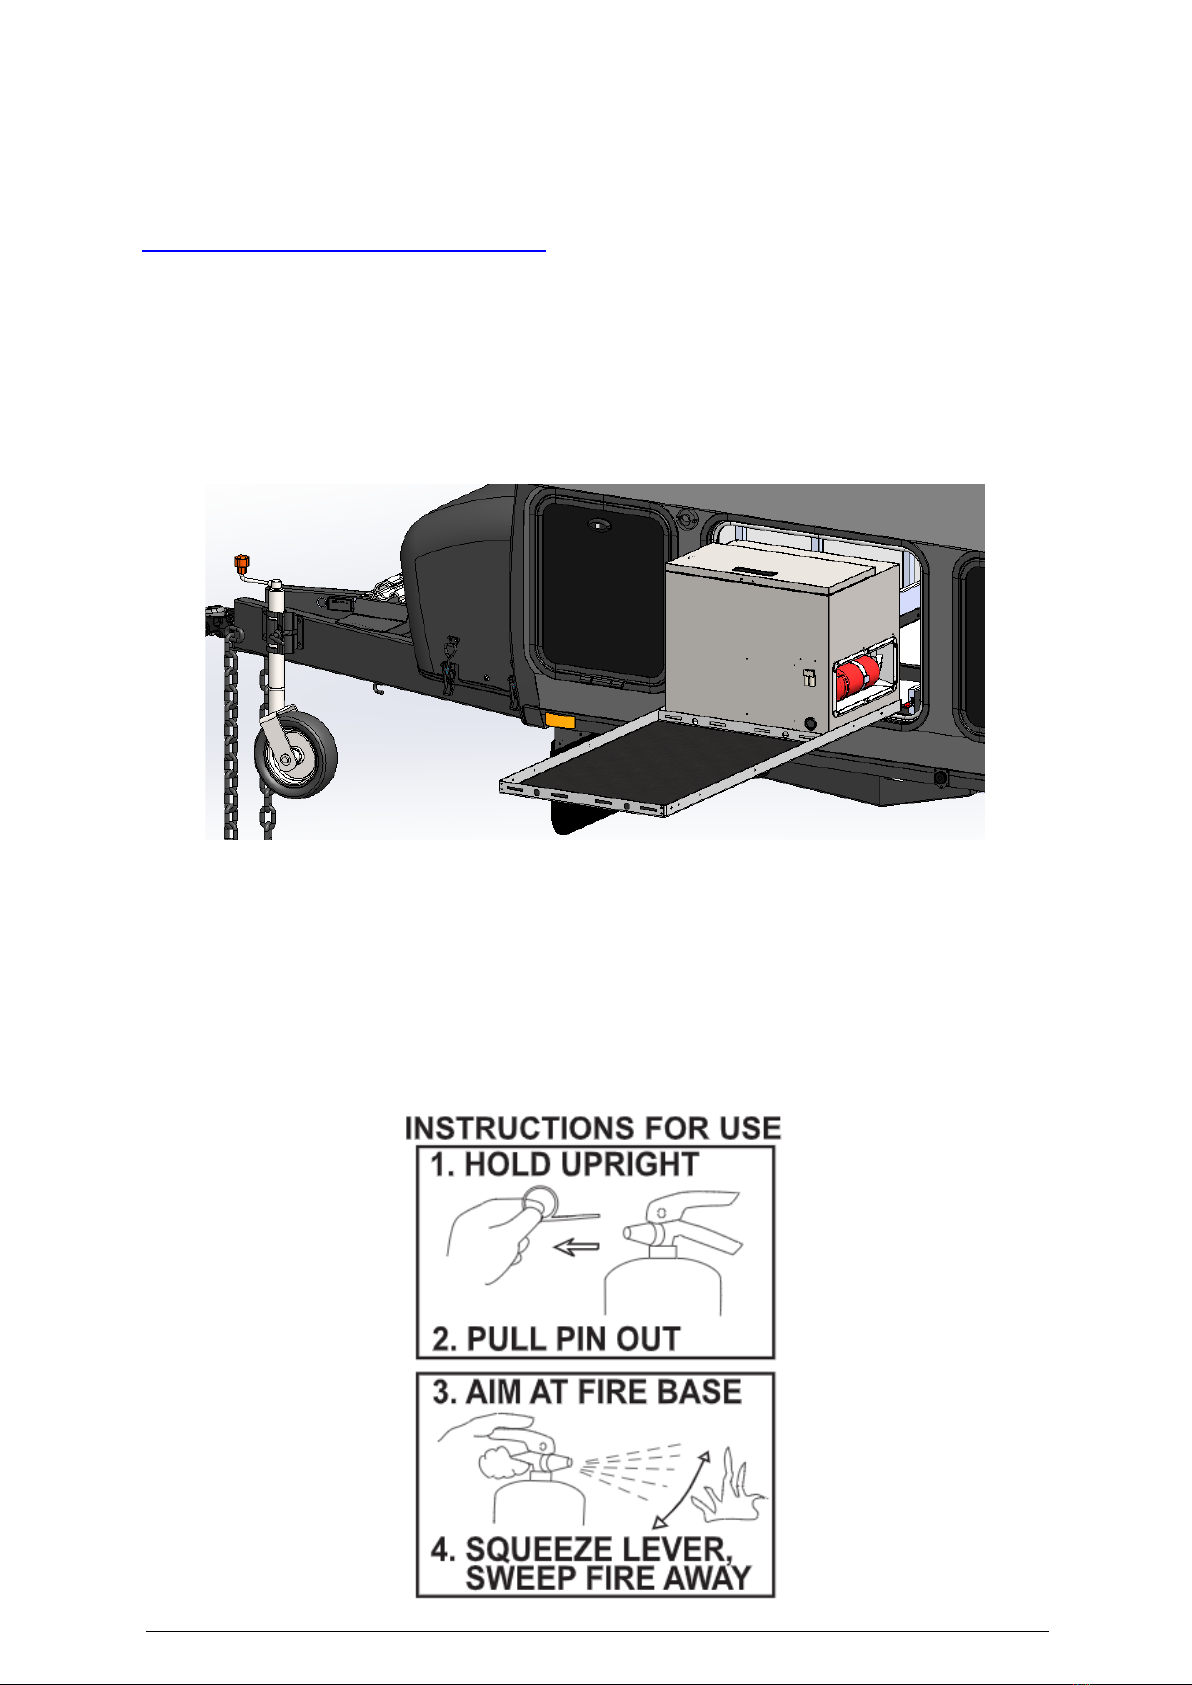
3. SAFETY...........................................................................................................................................................................7
4. COUPLING....................................................................................................................................................................11
5. 12-PIN TRAILER PLUG...................................................................................................................................................12
6. AL-KO TOW ASSIST MODULE........................................................................................................................................12
7. SCUPPER VENT –DUST PREVENTION............................................................................................................................13
8. BREAKAWAY SYSTEM...................................................................................................................................................13
9. REAR VISION CAMERA .................................................................................................................................................15
10. CARAVAN –SETTING UP.............................................................................................................................................16
11. EXTERNAL KITCHEN.................................................................................................................................................... 16
12. AWNING ....................................................................................................................................................................17
13. RED-VISION TVMS......................................................................................................................................................21
14. BATTERY MANAGEMENT............................................................................................................................................22
REDARC BMS30 &BCDC1240D –240V AND 12V................................................................................................................... 22
SOLAR PANELS..................................................................................................................................................................... 23
CONNECTION TO 240 VOLT ELECTRICITY............................................................................................................................. 23
15. INVERTER (OPTIONAL) ............................................................................................................................................... 24
16. 12V & 240V OUTLETS ................................................................................................................................................. 25
17. WATER TANKS............................................................................................................................................................ 27
18. HOT WATER & HEATER OPERATION ...........................................................................................................................28
19. INTERIOR LIGHT CONTROLS........................................................................................................................................ 30
20. TOILET........................................................................................................................................................................31
21. AIR CONDITIONING ....................................................................................................................................................37
22. ROOF VENTILATION ...................................................................................................................................................39
23. WINDOWS .................................................................................................................................................................41
24. ENTRY DOOR.............................................................................................................................................................. 42
25. SHOWER SCREEN DOOR .............................................................................................................................................44
26. FUSION STEREO..........................................................................................................................................................45
27. FRIDGE....................................................................................................................................................................... 47
28. MICROWAVE.............................................................................................................................................................. 48
29. TABLE LEGS ................................................................................................................................................................ 49
30. TV50
31. WI-FI SET UP ..............................................................................................................................................................51
32. JACKING THE CARAVAN.............................................................................................................................................. 52
33. FIBREGLASS CARE.......................................................................................................................................................52
34. WHEEL CARE ..............................................................................................................................................................53
35. SERVICING..................................................................................................................................................................53
36. KEYS, REMOTES & ACCESSORIES ................................................................................................................................54
37. APPENDIX ..................................................................................................................................................................59

© CUB CAMPERS • C16 OWNER’S MANUAL • REVISION 1 - 6/02/2023 PAGE 3of 59
1. CARAVAN TRAVEL CHECK LIST
Before travelling it is important to make sure your caravan is secured and in good condition
for travel. Below is a checklist of things to note before you make your trip if you have not used
your caravan in a while or it is your first trip.
oCheck your tow vehicle and trailer are roadworthy. Check your brakes and lights are
working.
oCheck wheel nuts, bearings, suspension are in good condition.
oCheck your tyre pressure and wear. Make sure tyres are of the same construction on
all wheels and have a tread depth of 1.6mm or more
oMake sure your maximum weight does not exceed what is recommended for your
caravan and car (refer to weights and loads)
oMake sure ball weight is 7-10% of total ATM (maximum unhitched weight of fully
loaded trailer)
INSIDE:
oTest the smoke alarm by pressing the Test button until it sounds. Be sure to do it at
arm’s length away.
oRoof skylight hatch is closed.
oWindows are all closed and locked
oIf required check scupper vent is open to prevent dust ingress.
oFridge and microwave are closed and secure.
oPantry, kitchen drawers and under bed drawer are locked.
oTable legs are locked into position.
oEnsuite roof vent is closed, ensuite cabinet is locked, shower head is secure
oMake sure there is no one inside the caravan you are towing.
OUTSIDE:
oEntry door is closed and locked. Check frame to make sure its secured. Handle should
be flat to the door.
oCheck safety chains, coupling and tow pin are clean and in good condition before
attaching. Make sure to keep hands and fingers clear and safety chains are attached.
oFront gas bottle and jerry can storage area is secure. Make sure all bottles are closed
and gas is off.
oInspect the fire extinguisher, make sure the gauge is in the green area and there is no
corrosion or damage.
oCheck awning brackets are firmly attached and bolts are not loose.
oTest the 240V circuit breakers with test button. Make sure you have packed a 15A
extension lead if you plan to use 240V mains power.
oTest Camec Breakaway System to make sure it is charged (with test button) and is
working correctly. Disconnect the trailer plug from the tow vehicle, check fuses, and
pull the break-away pin from the break-away switch attached at the A-frame (near
where the trailer connects to the tow vehicle). The electric brakes and brake lights of
the caravan should activate.
oMake sure RedVision system is turned off.
oMake sure HWS heater fuel supply is shut off.
oAll storage lockers outside are closed and locked.

© CUB CAMPERS • C16 OWNER’S MANUAL • REVISION 1 - 6/02/2023 PAGE 4of 59
oOutside toilet door is locked and the flush water tank is less than half full and the waste
holding tank is empty or not more than ¾ full to avoid leakage.
oFresh water tanks are full, grey water is empty, and water tank box is secured. Make
sure you have packed the hoses.
oWind down legs are up and secured.
NOTE:
•Learner, P1 car license holders and learner and provisional motorcycle riders are not
allowed to tow.
•You must not tow more than 1 trailer at a time
•You must secure and cover your load, making sure it does not overhang.
•During the trip, make sure coupling, all doors, hatches, covers and any load or
equipment, are still properly secured.

© CUB CAMPERS • C16 OWNER’S MANUAL • REVISION 1 - 6/02/2023 PAGE 5of 59
2. PACKING THE C16
The CUB C16 features a design style where most of the storage space is located forward of the
axle. This aspect needs to be carefully considered when packing the C16 for travel to ensure
that the maximum weight applied to the towbar of the tow vehicle is not exceeded.
Note that the most stable, sway-free towing condition is achieved when the ball load is within
7-10% of the trailer’s ATM. At the tare weight (weight of the empty van when delivered), the
tare ball weight is approx. 175kg, which is 8.5% of the tare weight. When the van is fully loaded
the ball weight percentage will likely increase, make sure to keep it within the 7-10%.
Before travelling, remember to make sure all doors, windows, vents, and hatches are closed
and locked securely.
See the next page for packing weight distribution guide.
Weights & Loads
Before packing your vehicle and trailer, it is important to know and understand the following
terms and limitations imposed upon your TOW-VEHICLE by the vehicle manufacturer.
1. GROSS VEHICLE MASS (GVM): The maximum legal weight of the tow-vehicle when it is
fully loaded. (This includes everything: the driver, passengers, equipment fitted to the
vehicle such as roof racks and bull-bars, luggage, fuel, weight on the tow ball etc.)
2. GROSS COMBINATION MASS (GCM): The maximum legal COMBINED weight of the loaded
tow-vehicle AND the loaded trailer.
3. TOWING CAPACITY: The maximum weight of a fully loaded trailer that the tow-vehicle can
legally tow. NOTE: If the towbar fitted to the vehicle is a factory-fitted or dealer-fitted item,
it will inevitably match this rating. However, if the towbar is a non-genuine after-market
fitment, it would be prudent to check the plaque fitted to the towbar to verify what the
Towing Capacity of the towbar in this case is.
4. TOW BALL MASS (TBM): The maximum downward load that can be applied to the tow-
ball (or equivalent). NOTE: It is also important to verify that the TBM rating of the towbar
can comfortably accommodate a ball load of at least 10% of the trailer’s ATM.
Similarly, fully understand the following terms and loading limitations imposed upon the
TRAILER by the trailer manufacturer (i.e., in this case Cub Campers):
5. TARE MASS: The weight of a trailer as it is delivered (i.e., with no water or gas in their
respective tanks.)
6. ATM (AGGREGATE TRAILER MASS): The maximum permissible weight of a free-standing,
fully loaded trailer (i.e., unhitched).
7. GTM (GROSS TRAILER MASS): The maximum permissible weight of a fully loaded trailer as
applied to the ground by the main wheels only (i.e., hitched).
NOTE: All these loading limits must be adhered to, and in particular the GCM! If the GVM and
TOWING CAPACITY add up to a higher figure than the GCM, then the loads upon the Tow-
Vehicle, Trailer, or both must be reduced to adhere to the GCM limit. Failure to comply with
these limitations may affect safety, risk police penalties and void prospective insurance claims.
Ultimately, it is the responsibility of the user to ensure that the caravan is used for its intended
purpose and that it is never over-loaded.

© CUB CAMPERS • C16 OWNER’S MANUAL • REVISION 1 - 6/02/2023 PAGE 6of 59
C16 - Packing Weight Distribution Guide

© CUB CAMPERS • C16 OWNER’S MANUAL • REVISION 1 - 6/02/2023 PAGE 7of 59
3. SAFETY
Fire Extinguisher
Click for Fire Extinguisher User Manual
The C16 is equipped with a 1kg ABE Dry Powder Fire Extinguisher FF1010 with a 1A20BE fire
rating. The fire extinguisher has a discharge range of 3-4mt and is rechargeable. It has a
pressure gauge to indicate internal pressure. Its discharge duration is 13 seconds. For safety
information and instructions please refer to Fire Extinguisher User Manual.
It is located in the locker with the pantry next to the external kitchen as shown below:
DANGER: This extinguisher is designed for use against small fires that have just started and
are small enough to fight safely. It is not designed to fight large fires that are burning out of
control. If the fire is too hot or smoky for you to get within 2 metres of it, do not try to fight it
yourself. Warn everyone, evacuate the premises, and have someone call your local Fire
Brigade (dial 000) from outside the building. Do not puncture or burn any fire extinguisher.
The contents are under pressure and the extinguisher may explode. Never locate this
extinguisher close to an engine, stove, or other source of heat. It is pressurised and could
rupture or explode if exposed to temperatures over 66°C.

© CUB CAMPERS • C16 OWNER’S MANUAL • REVISION 1 - 6/02/2023 PAGE 8of 59
CAUTION: This extinguisher contains a dry powder extinguisher agent. The agent/powder is
not toxic but can irritate skin. When using this unit, avoid breathing the powder. Always
ventilate the area after use.
WARNING: Do not check the pressure or test the fire extinguisher by operating it, even briefly.
Once used it will gradually lose pressure and will not be fully charged for use in an emergency.
When the pointer drops into the recharge area, the extinguisher may still be pressurised. You
must discharge the unit completely before disposing of it.
Inspect the extinguisher before and after travel or at least once a month.
1. Remove the extinguisher from the mounting bracket and inspect the gauge. If the
pointer is in the GREEN area, the extinguisher is properly pressurised and ready to use.
If the pointer has moved to the RECHARGE area, then the extinguisher has lost
pressure and must be recharged or replaced. If the unit is new or still under warranty,
return it to Master Distributers Pty Ltd. If the warranty has expired, take the
extinguisher outside, discharge its contents completely, discard the unit, and replace
it with a new one immediately.
2. Check for signs of damage or misuse. Make sure you can still read all the text on the
label.
3. Carefully examine the surface of the extinguisher for corrosion. You can help prevent
corrosion by cleaning the extinguisher if it gets wet or dirty. If you notice corrosion
during the warranty period, return the unit.
4. Make sure the tamper indicator (“safety seal”) is still intact. Make sure the nozzle is
clean and unobstructed.
5. When you finish inspecting the extinguisher, put it back securely into the mounting
bracket.
BEFORE YOU FIGHT ANY FIRE:
•Make sure everyone is leaving or has left the building.
•Notify your local fire authority by dialling 000.
•Make sure the fire is confined to a small area and is not spreading.
•Make sure you have a clear, unobstructed escape route.
•Make sure you know how to safely use your fire extinguisher.
•If you are fighting the fire and the fire begins to spread or burn out of control,
GET OUT IMMEDIATELY! Do not fight the fire yourself.

© CUB CAMPERS • C16 OWNER’S MANUAL • REVISION 1 - 6/02/2023 PAGE 9of 59
Smoke Alarm
Click for QUELL Smoke Alarm User Manual
The C16 is fitted with a Quell Smoke Alarm with Hush function. Refer to Smoke Alarm user
manual for information about operation and maintenance.
WARNING: TEST YOUR SMOKE ALARM OPERATION AFTER CARAVAN OR MOBILE HOME
VEHICLE HAS BEEN IN STORAGE, BEFORE EACH TRIP AND AT LEAST ONCE A WEEK DURING USE
Testing
Test the unit to ensure proper operation, by pressing the Test/Hush button for at least 5
seconds (or until the unit sounds). This will sound the alarm if the electronic circuitry, horn,
and battery are working.
CAUTION: Due to the loudness (85 decibels) of the alarm, always stand an arms-length away
from the unit when testing.
If no alarm sounds, the unit has a defective battery or other failure. DO NOT use an open flame
to test your alarm, you could damage the alarm or ignite combustible materials and start a
fire. Erratic or faint sound coming from your alarm may indicate a defective alarm.
Low Battery
This alarm has a low battery monitor which will cause the alarm to “chirp” approximately
every 40-50 seconds for a minimum of 30 days when the battery gets low. Use only the
following 9-volt batteries for replacement:
Alkaline Type
•Energizer 522
•Duracell MN1604 or MX1604
•Gold Peak 1604A
•Panasonic 6AM6, 6AM-6, 6AM-6PI, 6AM6X or 6LR61(GA)
Lithium Type
•Ultralife U9VL-J
Smoke Sensing Chamber Operation
This alarm will “chirp” if it detects a problem with the smoke sensing chamber. This chirp will
occur approximately 20 seconds after the flash of the red LED indicator light.
Clean the alarm. If the alarm is still chirping, replace the alarm.
LED indicators:
This alarm is equipped with a red LED indicator, with three modes of operation.
Red LED - Flashing every 40–50 seconds: Indicates that the smoke alarm is operating properly.
Red LED - Flashing: When the Test/Hush button is pressed, or when the smoke alarm senses
particles of combustion and goes into alarm (constant pulsating sound), the red LED will flash
once per second. The flashing LED and pulsating alarm will continue until the air is cleared.
Red LED - Alarm silencer (HushTM mode) indication: The red LED will flash every 11 seconds,
indicating the smoke alarm is in the alarm silencer (HushTM) mode.

© CUB CAMPERS • C16 OWNER’S MANUAL • REVISION 1 - 6/02/2023 PAGE 10 of 59
Alarm Silencer (HushTM)
The alarm silencer (Test/HushTM button) is extremely useful in a kitchen area or other areas
prone to nuisance alarms.
The alarm silencer (HushTM) has the capability of temporarily desensitising the alarm circuit
for about 11 minutes. This feature is to be used only when a known alarm condition, such as
smoke from cooking, activates the alarm.
The smoke alarm is desensitised by pushing and releasing the alarm silencer (Test/HushTM
button) on the smoke alarm cover. If the smoke is not too dense, the alarm will silence
immediately. The red LED will illuminate every 11 seconds to indicate that the alarm is in a
temporarily desensitized condition. The smoke alarm will automatically reset after
approximately 11 minutes. If after this period particles of combustion are still present, the
alarm will sound again.
The alarm silencer (HushTM) can be used repeatedly until the air has been cleared of the
condition causing the alarm. Pushing the Test/Hush button on the alarm will end the alarm
silencer (HushTM) period.
NOTE: Dense smoke will override the alarm silencer (HushTM) and sound a continuous alarm.
Electrical
WARNING –A CONNECTABLE ELECTRICAL INSTALLATION BATTERY SHALL
ONLY BE REPLACED BY ONE OF THE SAME TYPE AND SPECIFICATION AS
THAT ORIGINALLY FITTED. UPGRADES TO THE BATTERY OR SYSTEM
SHALL ONLY BE PERFORMED BY A COMPETENT PERSON.
230VAC POWER POINT SUPPLYING BATTERY CHARGER:
•IS NOT CONTROLLED BY THE POWER SOURCE CHANGEOVER SWITCH.
•IS FED DIRECTLY FROM THE EXTERNAL POWER INLET. (VIA POWER INLET
SAFETY SWITCH.)
•CANNOT BE SUPPLIED FROM THE INVERTER.
•IS ONLY LIVE WHEN EXTERNAL POWER IS CONNECTED TO THE CARAVAN &
“EXTERNAL SUPPLY PROTECTION” IS SWITCHED “ON.”
NOTE: Any unauthorised modification of any kind to Low-Voltage and/or Extra-Low Voltage
wiring systems, batteries, components etc. of this trailer will void product warranty.

© CUB CAMPERS • C16 OWNER’S MANUAL • REVISION 1 - 6/02/2023 PAGE 11 of 59
4. COUPLING
Click for CRUISE MASTER Coupling User Manual
Click for CRUISE MASTER D035 Coupling Hitching Youtube Video
The C16 is fitted with a Cruise Master DO35 Off-Road Coupling. It is ADR Rated to 3500 kg. For
more information and maintenance instructions, refer to the Cruise Master D035 Coupling
User Manual.
1. Remove Tow Pin Cover.
2. Check Tow Pin and Universal
surfaces are clean and lightly
greased to avoid premature wear.
3. Set the coupling to unlock by
pushing down the Red Lock Button
and pushing back the Lock Plate
towards the Red Lock Button.
4. Raise the height of the trailer so
the coupling is above the vehicle tow
pin using the jockey wheel.
5. Align the coupling and tow pin by
moving the vehicle or trailer and
then lower the coupling onto the
tow pin using the Jockey Wheel.
Make sure it is fully seated on the
tow pin, you will see the tow pin
through the locking plate via the
Lock View Port.
6. Once in position, push the Red
Lock Button to set the lock plate
back into locked position and you
will hear an audible click.
7.Secure the Check-Lock Dust Cap
by the back edge first and then
pushing down the front of the cap.
You will hear a snap when it is
secured correctly.
NOTE: Keep hands and fingers clear when attaching and ensure trailer safety chains are
attached whilst coupling and uncoupling.

© CUB CAMPERS • C16 OWNER’S MANUAL • REVISION 1 - 6/02/2023 PAGE 12 of 59
5. 12-PIN TRAILER PLUG
The C16 uses a 12-pin plug to connect to the tow vehicle. You will need to ensure the tow
vehicle has the appropriate 12 pin socket connection as below.
6. AL-KO TOW ASSIST MODULE
Click for AL-KO Tow Assist User Manual
The C16 comes with an AL-KO Tow Assist system which works in collaboration with an
approved in-vehicle Electric Trailer Brake Controller to improve the safety and stability of
trailer braking. It comes with built-in mileage tracking accessible via Bluetooth app.
Bluetooth Communication Adapter
The Tow Assist portion of the phone app requires the support of the supplied Bluetooth
communication adapter to communicate with the Tow Assist System. The Bluetooth adapter
comes pre installed in your system located in the OBD2 connector. Remove the adapter when
not in use to protect from environmental extremes. Please note that the app is only intended
to read information from the Tow Assist ECU only.

© CUB CAMPERS • C16 OWNER’S MANUAL • REVISION 1 - 6/02/2023 PAGE 13 of 59
The Dexter app has a dedicated section for the Tow Assist system. The app is available in the
Google Play Store or the Apple App Store or scan below to download.
The Tow Assist interface portion of the app allows users to:
•Create and manage account
•Efficiently manage multiple trailers
•Read trailer odometer, to identify critical maintenance intervals
•Diagnose and learn about system faults
•Save information about readings and faults
•Reset the Tow Assist Controller (ECU)
7. SCUPPER VENT –DUST PREVENTION
The C16 roof is fitted with a scupper vent to reduce dust ingress into the caravan by raising
the internal pressure to restrict air flow as you travel. All other hatches and windows must be
closed before travelling for the vent to be effective.
8. BREAKAWAY SYSTEM
Click for CAMEC Breakaway System User Manual
The C16 includes a Camec breakaway unit which is a safety device designed to apply the trailer
brakes and brake lights in the unlikely event the trailer is separated from the tow vehicle.
Before each trip, test the unit by pressing the green test switch. The unit is located in the
electrical locker. If the red recharge light illuminates, the black charge switch at the top should
be changed to “Battery Charger”or “Car Alternator”. Make sure to the turn the charging
switch back to “Off”after no more than 5 hours to prevent over charging. During normal use,
the charging switch MUST be in the “Off”position. This will prevent the unit from being over
charged and disconnect the unit from the Caravan’s main battery and the car’s alternator.
Overcharging or applying the brakes for an excessive amount of time, by means of connecting
the unit to an external power source such as the caravans’ battery, can cause heat build-up,
which may result in a fire.
Charging of the break-away battery can be done via the tow vehicle auxiliary line (black wire
from the vehicle), connecting the break-away black/white wire to the RV’s charging system or
to a battery trickle charger. The yellow Charging LED will illuminate to indicate that the battery
is charging.

© CUB CAMPERS • C16 OWNER’S MANUAL • REVISION 1 - 6/02/2023 PAGE 14 of 59
NOTE: Make sure to test the system regularly to make sure it is working correctly. Disconnect
the trailer plug from the tow vehicle, check fuses, and pull the break-away pin from the break-
away switch attached at the A-frame (near where the trailer connects to the tow vehicle). The
electric brakes and brake lights of the RV should activate.
Do not use the break-away system as a parking brake. The battery will be flat after a brief time
and release the brakes. Incorrect use will void all warranty.
The battery should be replaced every 2 years with the same type 12V 5AH SLA battery. The
Camec replacement battery part number is: 041767.

© CUB CAMPERS • C16 OWNER’S MANUAL • REVISION 1 - 6/02/2023 PAGE 15 of 59
9. REAR VISION CAMERA
Click for FURRION Rear Vision Camera User Manual
The C16 comes with a Furrion Vision S Rear-Vision Camera & 5" Display Kit. For safety
information and manufacturer user instructions please refer to Rear Vision Camera User
Manual.
The rear vision camera gives you a full range of view on a mountable touch screen monitor for
smoother mobility while you are travelling or reversing your caravan.
•Observation systems are wireless with high-resolution touch screen monitors that can
show up to four different camera images.
•IP65 waterproof cameras
•Rear assist reversing lines
•2.4GHz wireless communication digitally locks to the camera system for minimal
interference.
•Cameras offers 120-degree viewing angle, with infrared night vision.
•The monitor can be mounted with the included windshield or universal surface mount.
•5" touch screen anti-glare monitors
NOTE: This monitor is to be used as an aid to ensure there are no children or obstructions, do
not back up your vehicle while watching the monitor screen only. Please be aware of blind
spots when using this camera. The image is not designed to show distance and actual distance
is less than what appears in the monitor.
Clean the LCD screen with a microfibre cloth. Do not use coarse or abrasive materials. Only
use a dry cloth to clean the monitor, keep away from excessive moisture, extreme heat or
cold.
Use a wet cloth to clean the camera lens. A dry cloth may scratch the camera lens.

© CUB CAMPERS • C16 OWNER’S MANUAL • REVISION 1 - 6/02/2023 PAGE 16 of 59
10. CARAVAN –SETTING UP
1. Unhitch the C16 from the tow-vehicle and use the Jockey Wheel to set the caravan parallel
with the ground.
NOTE: This can be simply done by marking the height of the rear of the caravan floor against
your body and then leveling the front of the caravan using the jockey wheel, to the same
height on your body.
2. Pull the red handles towards you to release all 4 wind-down legs.
Ensure the legs are in the vertical position when the red handles
are locked back into place. Use the crank-handle supplied
(located in the front locker) to wind down each leg until they are
in firm contact with the ground.
NOTE: Suits 19mm socket if using battery drill. These legs are not
designed to be used as a jack or as a means of lifting the trailer off
the ground. They are designed to stabilize the trailer when
stationary.
11. EXTERNAL KITCHEN
Click for DOMETIC Gas Cooker User Manual
1. Unlock the kitchen locker door and turn handles counter clock wise. On both sides of the
kitchen, lift the locking tabs on the runners and slide out the kitchen all the way until it
clicks on both sides.
2. Pull out the braided stainless-steel gas hose located in the left-hand side and connect to
the gas bayonet outlet. (This outlet is to the left of the kitchen under the caravan floor).
3. Open the gas valve located underneath the caravan body beneath the bayonet. (The valves
are open when the handles are in-line with the tubing). Turn on the gas bottle at the front
of the caravan when ready to use, and remember to turn off after use.
4. Release the bungee loop from the front of the kitchen that’s holding down the table.
NOTE: To avoid scratching the window, ensure the side windows are fully closed or fully
opened before opening up the kitchen unit. Close windows when cooking to prevent cooking
smells from entering the caravan.
5. Slowly flip the table over allowing support legs to swing down vertically. Carefully guide
the support leg tabs into the slots on the right side of the kitchen body.
6. Open up the glass hatches, and raise the water faucet into position as required.
7. Turn on the water-pump switch located on the inside of the entry door to the left (on the
side of the lounge).
8. Your kitchen is now ready to use. When finished, make sure to turn off the gas at the
bottle, and to disconnect the bayonet before sliding the kitchen back into the caravan.
NOTE: The pump is now ‘active’ but will only operate when it detects a drop in water pressue
(e.g. when the tap is turned on, or if there’s a leak in the system). Switch 'OFF' at night to avoid
being woken by the pump periodically re-pressurising the system.

© CUB CAMPERS • C16 OWNER’S MANUAL • REVISION 1 - 6/02/2023 PAGE 17 of 59
12. AWNING
Click for FIAMMA Awning User Manual
The C16 is fitted with a Fiamma F45 S Awning. For more information on the operation and
maintenance of this awning please read carefully and refer to the respective Fiamma Owner’s
Manuals provided.
The handle and tension rafter are stored in the front lower locker area.
•Periodically check the brackets to make sure they are firmly attached (especially after
the first trip), make sure the bolts are not loose and that the holding brackets have not
shifted.
•Make sure that your awning is completely dry and clean before closing it. The
remaining humidity could cause stains. However, if you have no choice but to close the
awning when it is still wet, make sure to open it for drying within 12 hours.
•Most of the dirt is superficial and can be removed with clean water and a cloth or a
brush. If the fabric is very dirty, add some light cleaning detergent. Never use
aggressive chemical substances and never clean the fabric with a high-pressure
machine.
•Make sure that the awning perfectly rolls in; when it is, the red indicators in the front
profile ends are no longer visible. Before leaving, make sure the awning is correctly
closed. Damaged fabric will not allow the awning to perfectly roll in. Never use the
awning with a damaged canopy.
•FIAMMA recommend not to use the awning at a temperature below 0°C.
1. Use the awning handle to unwind the awning out. To avoid unnecessary strain on the
awning as well as on the caravan wall, we suggest taking out the legs about 1 metre
from the opening.

© CUB CAMPERS • C16 OWNER’S MANUAL • REVISION 1 - 6/02/2023 PAGE 18 of 59
2. Grasp the leg near its hinge-joint and pull it toward you.
3. Unhook the leg.
NOTE: The foot for leg A has been designed to prevent its incorrect placing inside the housing
of the lead bar during the closing phase of the awning. With an incorrect placing of the foot
the lead bar will not close completely; we advise you to always put it into the housing properly
with the base turned to the lead bar.
4. Lower the leg as shown in the figure.
5. After unrolling the awning completely,
adjust the legs at the chosen height.

© CUB CAMPERS • C16 OWNER’S MANUAL • REVISION 1 - 6/02/2023 PAGE 19 of 59
6. To avoid the awning being lifted by an unexpected gust of wind, it is necessary to
secure the legs to the ground with the provided hooks. For safety’s sake, we strongly
advise you also use some storm cords in the upper part of each support leg or anchor
the awning with the Fiamma Tie-Down Kit strap.
7. If you want to fasten the support legs to the vehicle, put the terminals into the wall
brackets.

© CUB CAMPERS • C16 OWNER’S MANUAL • REVISION 1 - 6/02/2023 PAGE 20 of 59
8. Install the tension rafter using the anchors shown in the figure. We remind you that
the awning is a sun protection, so please roll up your awning in case of rain, wind, or
snow. Otherwise, please take the following precautions: lower one side of your
awning, so that water can flow away and place the tension rafter as shown in the
figure.
To put away the awning, use the awning handle to wind up the awning.
9. A. The awning is open. B. The awning is about to close. The red flag is visible. C. When
the awning is completely closed, the red flag is no longer visible. The awning is now
properly closed.
Table of contents
Other Cub Motorhome manuals