Culina ICONCG60RF User manual

Cooker Hood
Instruction Manual
MODEL:ICONCG60RF

[01] x1 [03] x1
[05] x1 [06] x1
[07] x6
[11] x4 [12] x4 [13] x1[10] x4
[08] x6
(4 x 32mm)
[09] x4
(3.5 x 10mm)
[04] x1
[02] x1
Not included CARBFILT4
VENT PACK (Ø )150mm
This appliance includes a universal motor body. Replacement glass panels are available. Please
contact the customer service helpline for advice at the end of the Care & Maintenance section.

ICONCG60RF
Cooker Hood
3
18

4
Let's ...
get started
Getting stared 05
06
Installation
safety
Specifications
Use
care and maintenance
07
08
18
22

5
Getting
Started...
Getting started...

6
Getting started...
safety instruction
safety
There shall be adequate ventilation of the room when
the range hood is used at the same time as appliances
burning gas or other fuels;
There is a fire risk if cleaning is not carried out
in accordance with the instructions;
Do not flambe under the range hood;
CAUTION: Accessible parts may become hot when
used with cooking appliances.
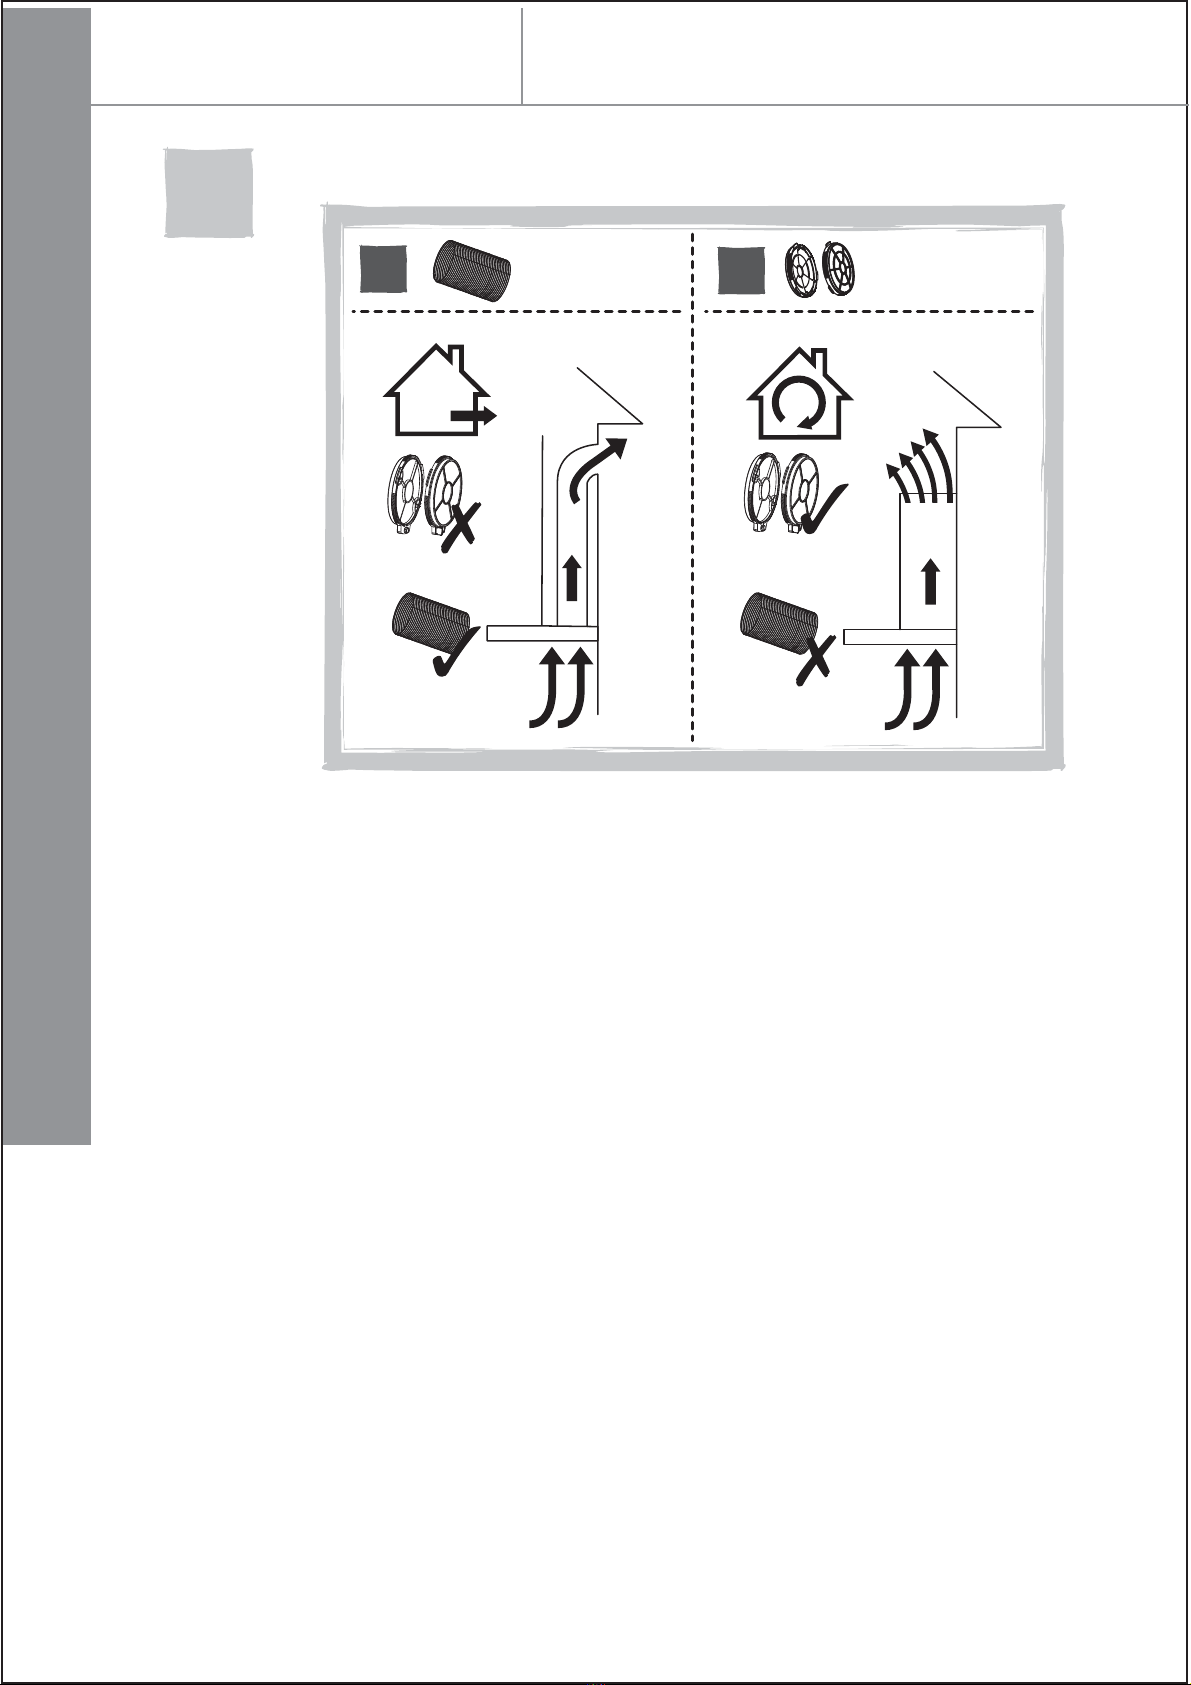
The air must not be discharged into a fuel that is
used for exhausting fumes from appliances
burning gas or other fuels;
Regulations concerning the discharge of air have to
be fulfilled
This appliance is not intended for use by
persons (including children) with reduced physical,
sensory or mental capabilities, or lack of
experience and knowledge, unless they have
been given supervision or instruction concerning
use of the appliance by a person responsible
for their safety.
This appliance can be used by children aged from 8
years and above and persons with reduced physical,
sensory or mental capabilities or lack of experience
and knowledge if they have been given super-
vision or instruction concerning use of the appliance
in a safe way and understand the hazards involved.
Children shall not play with the appliance. Cleaning
and user maintenance shall not be made by
children without supervision.
Disconnection must be incorporated in the fixed
wiring in accordance with the wiring rules.

Specifications
Specifications
Voltage : 220-240V ~50Hz
Motor power : 90W
Lamp power : 1*3W
DSL 3 s No cap 385mmx10mm
7
Getting started...

8
Installation
01
ABCARBFILT4
CARBFILT4
VENT PACK
(Ø150mm)
VENT PACK
(Ø150mm)
Choose a type of installation: Ducted option A (extraction to the outside)
or Recirculation option B (no extraction to the outside). This appliance is for
installation on a wall only.
Installation...

02
B ≥ 760mm
47mm
188mm
180mm
631-906mm
425-700mm
B
120mm
181mm
Installation
Mark the wall with the hole positions as shown in the diagram. The fixing supplied
are suitable for solid walls only. When fixing to any other type of wall use suitable
alternative fixings
Warning: Caution! Before drilling it is extremely important to check the wall
for hidden pipes, electrical cables etc using an appropriate detection device. For
safety reasons, use only the same size fixings and screws which are
recommended in this instruction manual. Failure to install the appliance
in accordance with these instructions may result in electrical hazards.
Drill the holes, insert the wall plugs in all 6 holes. Insert the screws in the middle
2 holes. Maximum gap between top two holes and middle two holes should be no
more than 700mm, dependent upon the ceiling height.
WARNING: Do not over tighten to avoid damaging the glass.
9
Installation...

10
Installation
[08] x2
(4 x 32mm)
[07] x6
2mm
[08]
[08]
[07]
03
Installation...

[04] x1
[08] x2
(4 x 32mm) 425 - 700mm
[04]
[08]
04
WARNING: Use only the same size of fittings and mounting screws a
recommended in this instruction manual. Failure to follow these instructions
may result in electrical hazards.
Installation
11
Installation...

06
05
[08] x2
(4 x 32mm)
[08]
[11] x4
[12] x4
[13] x1
[10] x4
[02] x1
[11]
[13]
[12]
[02]
[10]
Tighten all screws (do not overtighten).
Installation
12
Installation...

Installation
08
07 A
A
A
VENT PACK
(150mm)
[09]
[06]
[06] x1
[09] x2
(3.5 x 10mm)
13
Installation...

Installation
12
10
09
[03] x1
[03]
A
CARBFILT4
CARBFILT4
B
Only for recirculation option.
B
14
Installation...

Installation
13
11
12
BA
B
[03] x1
[03]
[09] x2
(?.5 x 10mm)
[09]
15
Installation...

Installation
14
13
[05] x1
[05]
Stainless steel only.
16
Installation...

Installation
All installation must be carried out by a competent person or qualified electrician
Before connecting the mains supply ensure that the mains voltage corresponds
to the voltage on the rating plate.
Direct Connection
The appliance must be connected directly to the mains using an omnipolar
circuit breaker with a minimum opening of 3mm between the contacts.
The installer must ensure that the correct electrical connection has been made
and that it complies with the wiring diagram.The cable must not be bent or
compressed.
Regularly check the power plug and power cord for damage. If the supply cord is
damaged, it must be replaced by a special cord or assembly available from the
manufacturer or its service agent.
WARNING: This is a Class I appliance and MUST be earthed.
This appliance is supplied with a 3 core mains cable coloured as follows:
Brown = L or Live
Blue = N or Neutral
Green and Yellow = E or Earth
N
L
N
L
(Blue)
(Brown)
N
LUSE A 3AMP FUSE
DOUBLE POLE SWITCHED
FUSED SPUR OUTLET
EUR UK
(Green and Yellow)
To avoid the risks that are always present when you use an electrical appliance it
is important that this appliance is installed correctly and that you read the safety
instructions carefully to avoid misuse and hazards. Please keep this instruction
booklet for future reference and pass it on to any future owners. After unpacking the
appliance please check that it is not damaged. If in doubt, do not use the appliance
but contact Customer Services - see end of Care & maintenance section for details.
Once the electrical connection point and routing of the mains
cable is established ensure that any excess cable is secured in
such a way to prevent it falling into the motor housing and
damaging the appliance.
Installation...
17

18
Use
Before you start
WARNING: Read the instructions before using the appliance.
Switch on the appliance at the switched fused connection unit. The appliance is
ready for use.
Function & Settings
Four-button panel
To obtain the best results from your cooker hood it is recommended that you
leave it switched on for up to 15 minutes after you have finished cooking
Light On/Off
Fan On/Off and Speed Reduction
LED Display
Boost Function and Speed Increase
To Set Up For First Use
Ducted Option This is the factory default setting if you are extracting air to
the outside.
Recirculation Option This is the option to be used with carbon filters
To change to this option, press both Speed icons together and the Timer
will flash red.
Press the Speed Increase to change to the Recirculation Option and the
Speed Reduction to revert back to the Ducted Option . Finally, press both
Speed icons together one more time to confirm the change and the Timer
will stop flashing
Use...
Timer

NOTE: This operation must be undertaken within two minutes of switching the
power on at the mains outlet. To change this setting at a later time, switch
off the power at the mains outlet, wait a few seconds, turn on the power and
repeat the above.
General Use
Light On/Off
Use this control to switch the light on independently of the fan motor, it will be
lit red in this mode.
When the fan is in use, and the light is off, the icon will be lit white in this mode,
but will turn red if the light is then switched on.
Fan On/Off and Speed Reduction
Press this icon once to turn on the fan motor at speed 1. All icons will be lit white
and the light icon will be red if already in use.
If the motor is on speed 1, pressing and holding this icon for two seconds will
turn off the fan motor. As above, the light control is independent of this
operation. If the motor is higher than speed 1, this will reduce the fan speed with
each press of the icon.
LED Display
Shows the extraction mode during set up or and the motor speeds from 1-5,
and P for Boost.
Boost Function and Speed Increase
Press this icon once to turn on the fan motor at full power, and P will flash in the
display.
If the motor is already on speed 1-5, each press of this icon will increase the fan
speed accordingly.
If you press and hold the icon for two seconds, the fan speed will increase to full
power and P will flash in the display.
NOTE: Full power or Boost only operates for five minutes maximum to
conserve energy and the fan speed will automatically drop to speed level
5 after this time.
Timer
When the fan motor is on and the Timer icon is pressed, the icon will be lit red
and the current speed in the display will start to flash.
The chosen speed level will remain in use for five minutes before dropping down
to the next lowest speed. This speed will remain in operation for two minutes before
dropping down again. This will be repeated every two minutes unless the speed is
already at level 1 and then the fan will turn off. If the light is already on, this will also
be turned off.
Use
Use...
19

20
Pressing the Speed Reduction or Speed Increase icon during a current timer
program will restart the countdown process again with a five minute cycle
If the Timer icon is pressed again during a current timer program, the cycle
will be cancelled, the icon will revert to white and the current fan speed will remain
on indefinitely.
The maximum timer program cycle is 15 minutes: 5 minutes on P and then
2 minutes each on speed 5 down to speed 1.
Controlling the cooker hood remotely
Before First Use
This cooker hood model ICONCG60RF and the ceramic hob model
ICONCER60RF must be paired by radio frequency before remote control
can occur. This only needs to be done once.
When connected the power output of the ceramic hob will control the
extraction rate of the cooker hood.
To Set Up Connectivity
1.Make sure that the hob and the hood are switched off.
2.Press the Timer icon and Light icon together on the control panel.
The LED display will alternately flash red and white.
3.Turn on the hob and make sure the connectivity indicator is lit red.
Note: Simultaneously press the "-" key and the "+" key on the hob if it is
not lit.
4.Press the keys and together on the hob and the connection
indicator will flash to confirm connection.
5.The control panel of the hood will show A for five seconds to indicate
connectivity has been made with the hob.
6.Press the keys and together on the hob one more time to store the
connectivity settings.
IMPORTANT:The connectivity operation above must be completed
within two minutes of turning on the power to the hood. If this is not
successful, switch off both the hood and the hob, wait for one minute
and attempt the connectivity again.
Use
Use...
IMPORTANT: This section is only applicable if you have purchased
the optional.Cooker Hood Model:ICONCG60RF
Table of contents
Other Culina Ventilation Hood manuals
Popular Ventilation Hood manuals by other brands

Parmco
Parmco T4-12LOW-9IS Installation and operating instructions

AVG
AVG AVW-308CS INSTALLATION GUIDE / USE AND CARE MANUAL

Luisi Air
Luisi Air BENEVENTO H94080015 Installation, Use and Maintenance Instruction

Signature
Signature SHIC95XRC Instructions for use

DeLonghi
DeLonghi S72 Instruction on mounting and use

Nyle Systems
Nyle Systems L200 Series user manual

Fulgor Milano
Fulgor Milano FPRHD 362 TC Installation, Use and Maintenance Instruction

Trade-wind
Trade-wind L7200 Series Installation instructions & use & care guide

Proline
Proline VHP60SS operating instructions

Baumatic
Baumatic BT7.3BGL instruction manual

KitchenAid
KitchenAid KVUC600KSS user manual

Klarstein
Klarstein Contempo manual