Curtis Mathes CM27020S User manual

20"! 25"!27 °S_REO MTS
OV_ER'S MANUAJ.
CMF2010S

Warning !Important
Safety Instructions
1) Read these instructions.
2) Keep these instrllctions.
3) Heed all warnings.
4) Follow all instrllctions.
5) Do not use this apparatus near water.
6) Clean only with chy cloth.
7) Do not block any ventilation openings, Install in accordance with the mamlfactlu'er_
instI7 lctions.
8) Do not install near any heat sources such as radiators, heat registers, or other at)paratus
(inch lding amplifiers) that prod1 me heat.
9) Do not defeat the safety t> u'pose of the polarized or gmlu]ding-type phlg. A polarized t)111g
has two blades with one wider than the othen A grounding type plug has two blades and a
thii'd grol u]ding prong. The wide blade or the thii'd prong are provided for yol u"safet3_
If the provided plug does not fit into your outlet, consult an electrician for replacement of
the obsolete o11tlet.
10) Protect the power cord fl'om being walked on or pinched particularly at plugs, convenience
receptacles, and the point where they exit from the apparatus.
l l) Only use attachments/accessories specified by the manufacturen
12) Use only with cart, stand, tripod, bracket, or table specified by the
manufacturer, or sold with the at_paratus. When a used, caution
when moving the cart!apparatlls combination to avoid i_jlwy fl'om
tip-over.
13) Unphlg this apparatlls. When a cart is used, use calltion when mov-
ing the cait/at_paratlls combination to avoid i_jl u'y from tip-oven
14) Refbr all sei_!icing to qualified service personnel. Servicing is required when the at_paratus
has been damaged in any way, such as t_owe>sul_ply cord or plug is damaged, liquid has
been spilled or otqjects have fallen into the at_paratus, the apparatus has been exposed
to rain or moisture, does not operate nommlly, or has been dropped.

CAUTION
( AUTION: TO REDU(t TIlE RISKOF t [ E(TRI( SIlO( K, l)O NOT
REMOVE(;OVER (OR BA(;K) NO USER SER\ I(;EAB[E D\RTS INSIDE
RtIFt RSt RVICING TO QUALIFIED S[ RVICE PERSONN[ L
Thissymbolindicateshighvoltageispresen_ Z_
inskk h is dangerous Io make any kind of coniacl
_,_,ithany insick parl (if this p_oduct
This symbol ak!rls you thai impollanl literature _ iIN'/!_
coi]c_ lnii]g operalion al]d lnaii]lellal]ce has heel]
included wfih this product ............................
Note to CATV system installer: This reminder is provided to call CATV system installer_ attention to
Article 820 40 of the National Electrical Code (Section 54 of Canadian Electrical Code, Part I), that
provides guidelines fbr proper grounding and, in particular, specifies that the cable ground shall be
coimected to the grounding system of the building as close to the point of cable ent W as practical.
Calltion: FCC/CSA regldations state that any onallthorized changes or modifications to this eqllipment
may void the user's a_lthol_ty to operate it.
Caution: To prevent electric shock, match the wide blade of phlg to the wide slot, and fldly insert the
phlg.
Attention: poor eviter les chocs electriqoes, introdoire la lame le phls large de la fiche darts la borne
correspondante de la prise et poosser filsqo'all fond.
Important: One Federal Court has held that unauthorized recording of copyrighted TV programs is ail
infi'ingenmnt of U.S. copyright laws.
Certain Canadian progralns may also be copyrighted and any unauthorized recording in whole or in
part may be in violation of these rights.
To prevent damage which may result in fire or electric shock hazard, do not expose this
appliance to rain or moisture.
This device complies with part 15 of the FCC Rules. Operation is subject to the
following two conditions:
(1) This device may not cause harmful interference, and
(2) This device must accept any interference that may cause undesired operation.
This television receiver provides display of television closed captioning in accordance
with §15.119 of the FCC rules.
SAIq 71Y *1

CONTENTS ]
Chapter 1: Your New TV ............... 1.1
List of Features ......................................... 1.1
Familiarizing Yourself with The TV .......................... 1.2
Front Panel Buttons .............................. 1.2
Front Panel Jacks ................................ 1.2
Rear Panel Jacks ................................. 1.3
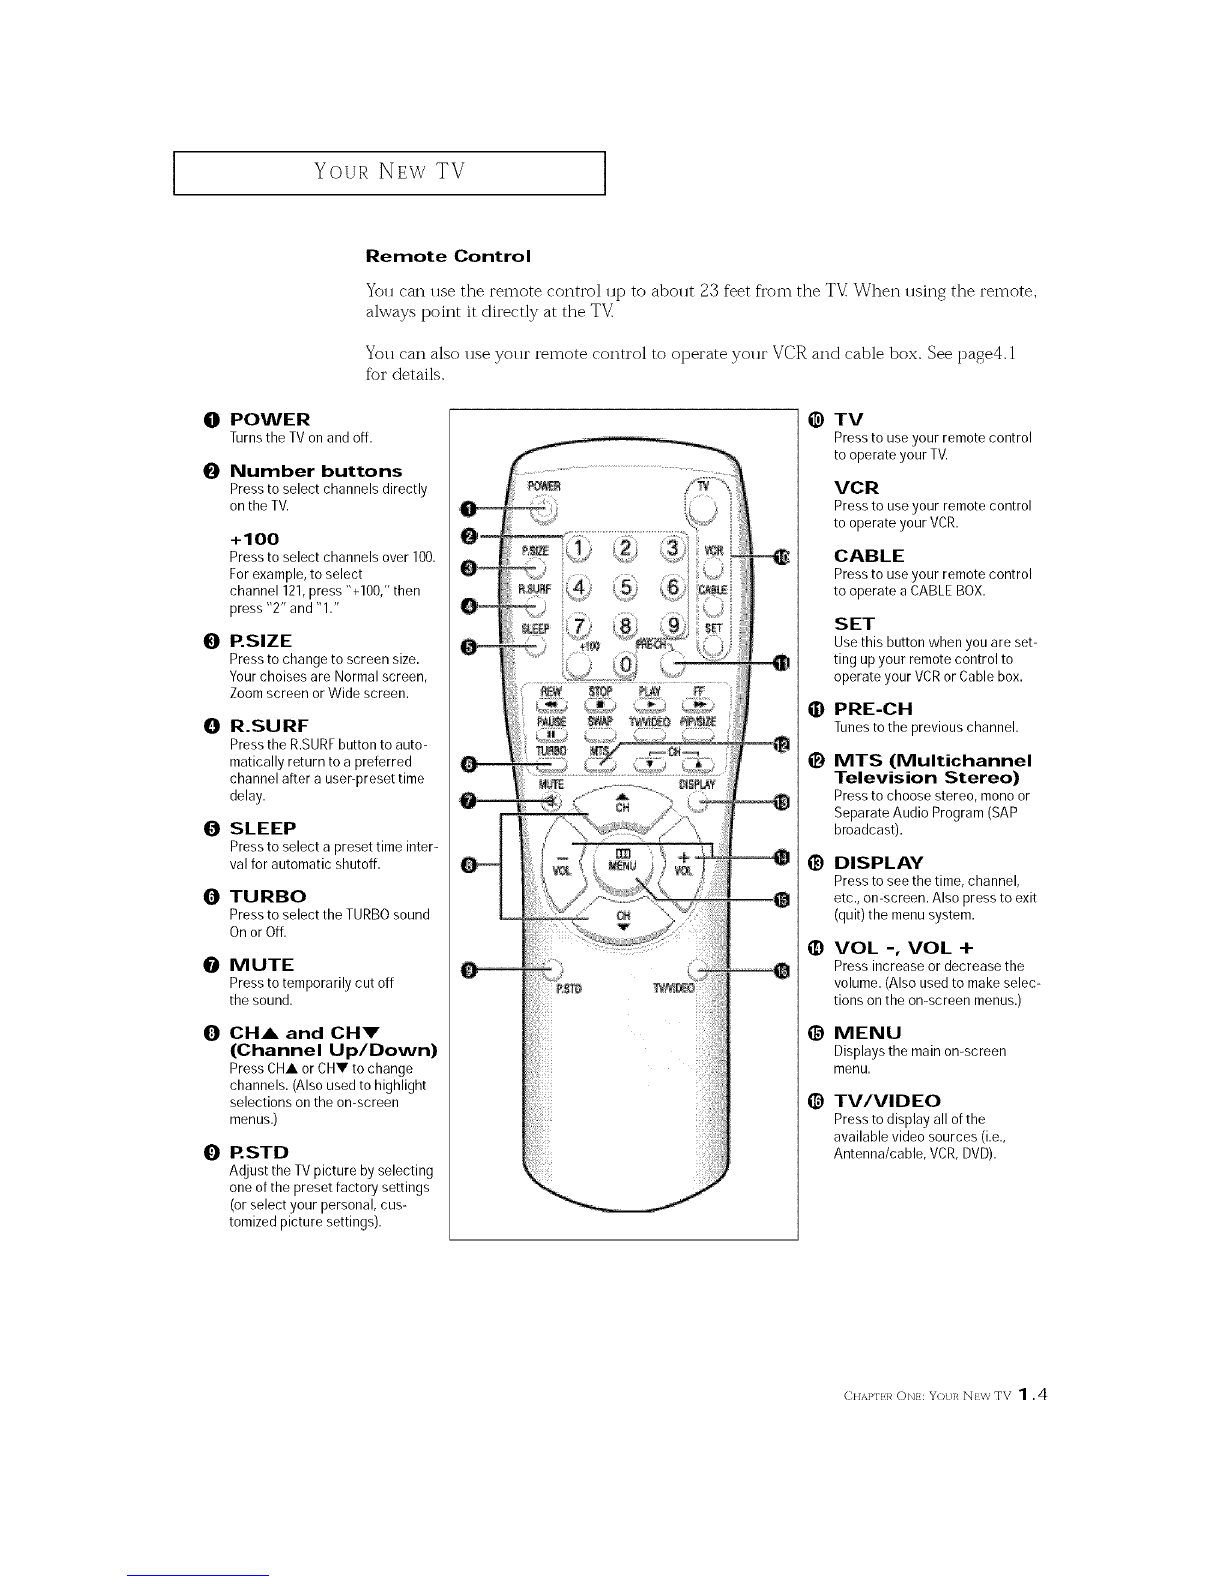
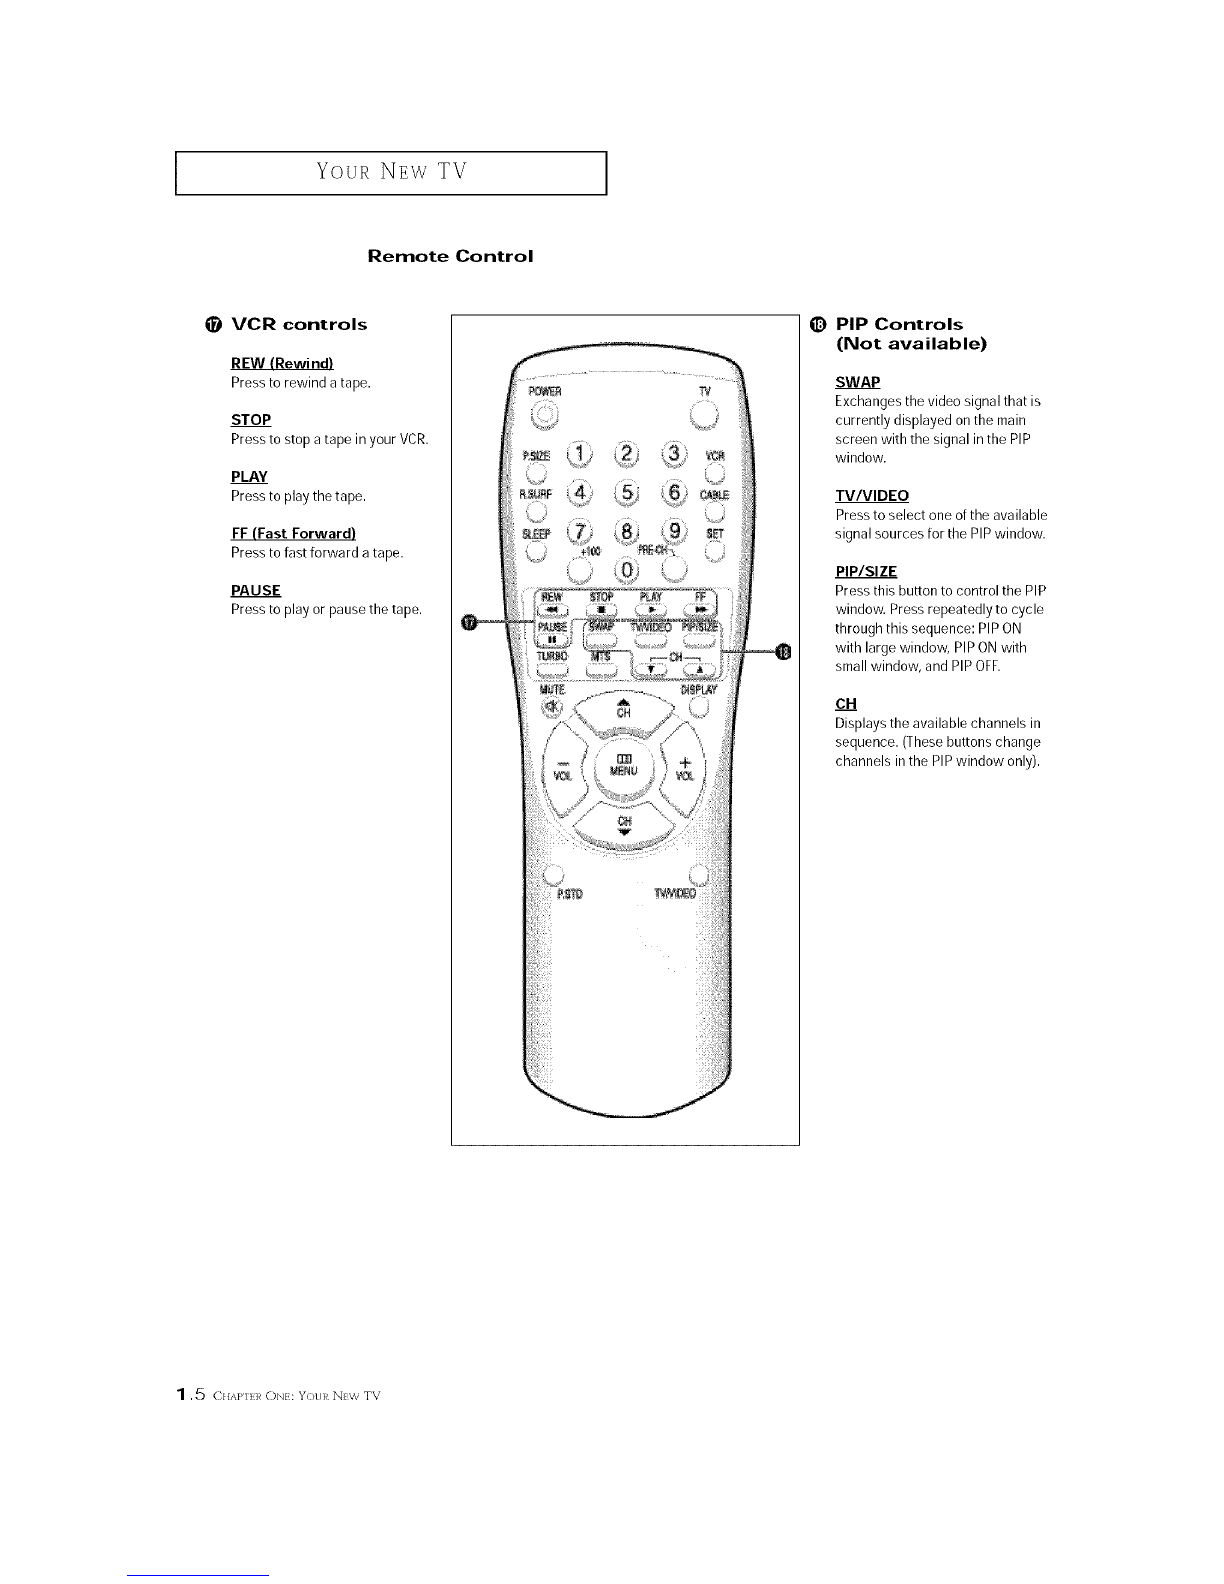
Remote Control ................................. 1.4
Chapter 2: Installation ................ 2.1
Connecting VHF and UHF Antennas ........................ 2.1
Antennas with 300-ohm Flat Twin Leads .............. 2.1
Antennas with 75-ohm Round Leads ................. 2.2
Separate VHF and UHF Antennas .................... 2.2
Connecting Cable TV .................................... 2.2
Cable without a Cable Box ......................... 2.2
Connecting to a Cable Box that Descrambles
All Channels .................................... 2.3
Connecting to a Cable Box that Descrambles
some Channels .................................. 2.3
Connecting a VCR ...................................... 2.5
Connecting an S-VHS VCR ................................ 2.6
Connecting a DVD Player (480i/480p) ....................... 2.6
Connecting a Camcorder ................................. 2.7
Installing Batteries in the Remote Control ..................... 2.8
Chapter 3: Operation .................. 3.1
Tiu'ning the TV On and Off ................................ 3.1
Viewing the Menlls and On-Screen Displays ................... 3.1
Viewing the Men*is ............................... 3.1
Viewing the Display .............................. 3.1
Selecting a Menu Lang*lage ................................ 3.2
Memorizing the Channels ................................. 3.3
Selecting the Video Signal-so* uve .................... 3.3
Storing Channels in Memory (Automatic Method) ....... 3.4
Adding and Erasing Channels (Manual Method) ........ 3.5
Changing Channels ..................................... 3.6
Using the Channel Buttons ......................... 3.(3
Directly Accessing Channels ........................ 3.6
Using the PRE-CH B*ltton to select the Previolls Channel.. 3.6
Ac!justing the Volume .................................... 3.6
Using Mute ..................................... 3.6
Setting the Clock ....................................... 3.7
Customizing the Picture .................................. 3.8
Using Automatic Picture Settings ........................... 3.9
Customizing the Sol u_d .................................. 3.10
Using Automatic Sound Settings ............................ 3.11
Setting The On/Off Melody ................................ 3.12
Viewing a VCR or Camcorder Tape .......................... 3.13
1CONTEN'f S

CONTENTS
Chapter 4: Special Features ............ 4.1
Customizing Your Remote Control .......................... 4.1
Setting Up Your Remote Control to Operate Your VCR.... 4.1
Setting Up Your Remote Control to Operate Your Cable Box ...... 4.3
Fine 7iruing Channels .................................... 4.4
Changing the Screen Size ................................. 4.5
Using the S**rfFeat**re.................................... 4.6
Setting the On/Off Timer ................................. 4.7
Setting the Sleep Timer. .................................. 4.8
Sound Features ......................................... 4.9
Choosing a M*flti-Channel Solu_d (MTS) Solu_dtrack ..... 4.9
Extra sound settings
(']1 li'bo Sol lnd, S11i"I"Ollnd, oi" A*ltO Voh ll_le) ............ 4.10
Viewing Closed Captions ................................. 4.11
Using the V-Chip ....................................... 4.12
Setting Up Your Personal ID Number (PIN) ............ 4.12
How to Enable/Disable the V-Chip ................... 4.13
How to Set up Restrictions Using the "TV g*fidelines" . . . . 4.13
How to Set up Restrictions using the MPAA Ratings:
G, PG, PG-13, R, NC-17, X ........................ 4.15
How to Reset the TV after the V-Chip Blocks a Channel
("Emergency Escape") ............................. 4.16
Chapter 5: Troubleshooting ............ 5.1
Identifying Problems .................................... 5.1
Appendix ........................... A.1
Cleaning and Maintaining Yo**i"TV .......................... A.1
Using Yo**i"TV in Another Col *ntry ......................... A. 1
Specifications .......................................... A.1
CONT_ N'I S 2

Your NEw TV
List of Features
Your TV was designed with the latest technology This TV is a high-performance unit that
inchldes the fbllowing special feanlres:
• Easy-to-llse remote control
• gasy-to-llse on-screen lrlenl 1 system
• Automatic timer to turn the TV on and off
• Ac{justable picture and sound settings that can be stored in the TV_ memory
• A*ltomatic channel t, ruing for up to 181 channels
• A special filter to reduce or eliminate reception problems
• Fine tlu_ing control for the sharpest picnlre possible
• Built-in, dual channel speakers
• A special sleep timer
1.1 CHAPTERON: YOURN}'W TV

Your NEw TV
Familiarizing Yourself with The TV
Front Panel Buttons
The buttons on the front panel control your TV% basic fbatures, including the on-screen
menu. To use the more advanced fbatures, you must use the remote control.
CM25020S
CM27020S
CMF2010S
O MENU
Pressto see an on-screen menu of your TV's fea-
tures.
O VOL -, +
Pressto increase or decrease the volume. Also
used to select itemson the on-screen menu.
0CH rand CH A
Pressto change channels. Also press to select
various items on the on-screen menu.
() Remote Control Sensor
Aim the remotecontrol towards this spot onthe
TV.
O POWER
PresstoturntheTVonandoff.
Front Panel Jacks
You can use the fl'ont panel.jacks to connect an A/V component that is used only occa-
sionally, such as a camcorder or video game. (For infbrmation on connecting equipment,
see pages 2.1 -2.7.)
CM25020S CMF2010S
CM27020S
O VIDEO INPUT
Used to connect a video signal from a camcorder
or video game.
0 AUDIO INPUTS
Usedto connect the audio signals from a cam-
corder or video game.
CHAPTbl/ ON: Your N},w TV 1.2

Your NEw TV
Rear Panel Jacks
Use the rear panel,jacks to connect an A/'V"component that will be connected
continuously, such as a VCR or a DVD player.
Because there are two sets of input.jacks, you can connect two different A/V"
components (i.e., a VCR and a DVD, 2VCRs, etc.)
For more information on connecting equipment, see pages 2.1 -2.7.
O
O
O
COMPONENT VIDEO INPUT O
(Y, PB, PR)
(For models CM27020S/CMF2010S)
Use thesejacks to connect the component video
signal from a DVD player. 0
VIDEO INPUT
Videosignals from VCRs,DVDplayers and similar
devices.
AUDIO INPUTS
Audio signals from VCRs,DVDplayers and similar
devices.
0
AUDIO MONITOR OUTPUTS
Send audio signals from the TVto anexternal
source such as a VCR.
SUPER VIDEO INPUT jack
(For model CM25020S)
S-Video signal from an S-VHSVCRor laserdisc
player.
VHF/UHF (75£2)
Connect to an antenna or to a cable TV system.
1.3 C,A}'T_RoN: ¥o,_ N},wTV

Your NEW TV
Remote Control
You can use the remote control up to about 23 feet from the TV When using the remote,
always point it directly at the T'V:
Youcan also use your remote control to operate your VCR and cable box. See page4.1
for details.
OPOWER
Turnsthe TV onand off.
0Number buttons
Press to select channels directly
on the TV.
+100
Press to select channels over 100.
For example, to select
channel 121,press "+100," then
press "2" and "1."
0P.SIZE
Press to change to screen size.
Yourchoises are Normal screen,
Zoomscreen or Wide screen.
0R.SURF
Press the R.SURFbutton to auto-
matically return to a preferred
channel after a user-preset time
delay.
0SLEEP
Press to select a preset time inter-
val for automatic shutoff.
0TURBO
Pressto select the TURBOsound
On or Off.
OMUTE
Press to temporarily cut off
the sound.
0CHA and CHV
(Channel Up/Down)
Press CHA or CHV to change
channels. (Also used to highlight
selections onthe on-screen
menus.)
0RSTD
Adjust the TVpicture by selecting
one ofthe preset factory settings
(or select your personal, cus-
tomized picture settings).
@
@
O
O
@
@
@
TV
Pressto use your remote control
to operate your TV.
VCR
Pressto use your remote control
to operate your VCR.
CABLE
Pressto use your remote control
to operate aCABLEBOX.
SET
Use this button when you are set-
ting upyour remote control to
operate your VCRor Cable box.
PRE-CH
Tunestothe previouschannel.
MTS (Multichannel
Television Stereo)
Pressto choose stereo, mono or
Separate Audio Program (SAP
broadcast).
DISPLAY
Press to see the time, channel,
etc., on-screen. Also press to exit
(quit) the menu system.
VOL -, VOL -I-
Press increase or decrease the
volume. (Also used to make selec-
tions on the on-screen menus.)
MENU
Displays the main on-screen
menu.
TV/VIDEO
Press to display all ofthe
available video sources (i.e.,
Antenna/cable, VCR,DVD).
CtIAP'rEI_ ONE: YOUI/ NIW TV 1.4

I Your NEW TV I
Remote Control
_I VCR controls
REW (Rewi nd)
Press to rewind atape.
STOP
Press to stop a tape in your VCR.
PLAY
Press to play thetape.
FF (Fast Forward)
Press to fast forward atape.
PAUSE
Press to play or pausethe tape.
PIP Controls
(Not available)
SWAP
Exchangesthe video signal that is
currently displayed onthe main
screen with the signal in the PIP
window.
TV/VIDEO
Pressto select one of the available
signal sources for the PIP window.
PIP/SIZE
Press this button to control the PIP
window. Pressrepeatedly to cycle
through this sequence: PIP ON
with large window, PIPON with
small window, and PIP OFF.
CH
Displays the available channels in
sequence. (These buttons change
channels in the PIPwindow only).
1.5 ([ HAP'H,iF_ ONe: YOUi/ NKW TV

INSTALLATION
Connecting VHF and UHF Antennas
If yollr antenna has a set of leads that
look like this, see "Antennas with
300-ohm Flat Twin Leads," below.
If yo_r antenna has one lead that looks
like this, see "Antennas with 75-ohm
Round Leads," on page 2.2.
If you have two antennas, see "Separate
VHF and UHF Antennas," on page 2.2.
Antennas with 300-ohm Flat Twin Leads
If"you are using an offUair antenna (sllc'h as a roof antenna or "rabbit ears") that has
300-ohm twin flat leads, follow the directions below.
il ¸ (( (
Place the wires from the
twin leads under the
screws onthe 300,75ohm
odapto[(net supplied),
Use a screwdriver to
tighten the screws.
2
Plug the adaptor into the
VHF!UHFterminal onthe
bottom of the back panel.
(HiPqrl/ TWO: INSqAIIA'fION 2. 1

I INSTALLATION I
Antennas with 75-ohm Round Leads
Plug the antenna lead into
the VHF/UHF
terminal on the bottom of
the back pane!.
Separate VHF and UHF Antennas
If you have two separate antennas for yollr TV (one VHF and one UHF), you mllst
combine the two antenna signals before connecting the antennas to the TV[This
procedure requires a an optional combiner-adaptor (available at most elecHt-)nics shops).
Connect both antenna
leads to the combiner.
i
2........
Plug the combiner in
VHF!UHFtermina! onthe
botto m o[the tea[ panel
i
Connecting Cable TV
To connect to a cable TV system, follow the instructions below.
Cable without a Cable Box
Plug the incoming cable
into the VHF/UHFantenna
terminal on back ofthe TV. /.4.
_1 Because this TV is cable-ready,
you do not need a cable box to view
unscrambled cable channels.
2. 2 CHAPq_ }/ TWO: INSTAI IA'II()N

INSTALLATION
Connecting to a Cable Box that Descrambles AI__IChannels
1
Find the cable that is con:
nected tothe ANTENNA
0UT terminal 0n YoUr
-.91 This terminal inight he labeled
"ANT OUT," "VHF OUT;" or siinply,
"OUT."
i i i
Connect
this cable tothe VHFIUHF
antenna terminal onthe
Connecting to aCable Box that Descrambles Some Channels
If yollr cable box descramb]es only some channels (slK'h as premillm channels), follow the
instITK'tions below. You will need a two-way splitter, an RF (A/B) switch, and four lengths of"
coaxial cable. (These items are available at most electronics stores.)
Findant alsconnecr me
cable that is connected to
the ANTENKA IN
[erminal onyour cable
box,
_1 This terminal might be labeled
"ANT IN," "VHF IN," or simply,
"IN."
2
Connec_this CaBle [O a
[wo-way SpllEer
Connect a coaxial cable
oe[ween anOUTPUTter-
minal onthe splitter and
the IN terminal onthe
cable box
CHAPTH_ Two: [NSTAI ]A'I]ON 2.3

INSTALLATION
Connect a coaxial cable
between the ANTENNA
OUT terminal onthe cable _:
box and the B_IN terminal _ _ [he
onthe A!B switch, tt_ _
Connect another cable
between the other OUT
t#rmina! onthe splitter
andthe A-IN terminal on
the RF(A/B) switch. _ _
Connect the last coaxial
cable between the OUT
terminal onthe RF(A!B)
Switch and the VHF!UHF
terminal onthe rear of the
TV.
After you've made this connection, set the A/B switch to the "A" position %r nom_al view-
ing. Set the A/B switch to the "B" position to view scramb]ed channels. (When yoH set the
A/B switch to "B," you will need to tune your TV to the cable box_ output channel, which is
usually channel 3 or 4.)
z, 4 c,_,_,,q,1_Two: INST)\r ] A'froN

INSTALLATION
Connecting a VCR
These instiulctions assllme that you have ah'eady connected yolu" TV to an antenna oi" a cable
TV system (according to the iF_sti'tlctions on pages 2.1- 2.3). Skip step 1if yoll have not yet
connected to an antenna or a cable system.
1
Unplugthecab!eor
antennafromthebackof
theTV,
Connect the cable or '_R _ :%
antenna to the _ _ _ _
ANTENNA INterminal on _¢_ _ _ @
the back of the VCR. _
Connect a coaxial cable
between the ANIENNA
QUTterminal on the VCR
andthe antenna
terminal onthe TV.
V_ _ P_
A coaxial cable is tlstla]]y included with a VCR. (If not, check your local electionics
stoI'e).
Connect a set of audio
cables between the
AUDIO OUTjacks on the _
VCR andthe AUDIOjacks
on th_
Connect a video cable
between the VIDEOOU]"
jack onthe VCRandthe
V!DEOjack on the TV,
Follow the instructions in "Viewing a VCR or Camcoider Tape" to view your VCR tape.
(]tAPqr }/ TWO: INST)\I ]A'fION 2, 5

INSTALLATION ]
Connecting an S-VHS VCR (For model CM25020S)
Your TV can be connected to an S-Video signal from an S-VHS VCR.
(This connection delivers a better picture as compared to a standard VHS VCR.)
1
Tobeg n,follow steps
1-3 in the previous
sec[ _n_oconnect the
an[enna or cable to your
VCRand your TV
2
Connect a set or audio
cables between the
AUDIO OUT acks onthe
VCRand the AUDIO
INPUTjacks on the TV
Connect an S-video cable
between the
S-VIDEOOUTjack onthe
VCRand the
S-VIDEOINPUT
jack onthe TV,
An S-video ('able is usllally inch lded with an S-VHS VCR. (If"not, check yo111" local
electronics store.)
Connecting a DVD Player (480i/480p)
(For models CM27020S/CMF2010S)
The rear panel jacks on your TV make it easy to connect a DVD player to your TV
Connect a set of audio
cables between the DVD-
IN AUDIO !Njacks onthe
W and the AUDIOOUI
jacks on the DVDplayer. _ _
z
Connect a video cable
between the DVD-IN
(Y,P_,P_)jacks on the IV
and the DVD=OUI(Y,PB,
P_)jacks onthe DVD
player.
Note: For an explanation of Component video, see your DVD player's owner's manual.
2.6 Ct IAPq_ l/ TWO: INSqAI I A'II( )N

INSTALLATION
Connecting a Camcorder
The front panel,jacks on your TV make it easy to connect a camcorder to your TV[
They allow you to view the camcorder tapes without using a VCR. (Also see "Viewin_ a VCR
_J Camcorder Tape on page 3.13)
Locate the AiV outou[
jacks on the camcorder.
1-hey are usually found on
the side or back af the
camcorner
2
Connect ar audio cable
between the AUD 0 OUT-
PUTjack on tne cam-
corder andthe AUDIO
[erminals on the front of
the TV,
3
Connect a vloeo cable
between LheVIDEOOUT-
PUTjack onthe cam-
corner andthe VIDEOter-
m,n_ onthe front ot the
1`V.
The audio-video cables shown here are usually included with a Camcoider. (If not, check
yolu" local electronics store.) If yolu" camcorder is stereo, you need to connect a set of two
cables.
C HAP'H,:]_ TWO: [NSTAIlAq]()N 2,7

I INSTALLATION I
Installing Batteries in the Remote Control
pletely,
2
Install two AA size
batteries.
_'_ Make sore to match tile "+" and
"-" ends of the batteries with the
diagram inside the conlpat'tment.
Replace the Cover.
Remove the batteries and store
them in a cool, dry place if you won't
be using the remote control fbr a
long tiine.
The remote control carl be used up
to about 23 feet fi'om tile TV.
(AsstuTling typical TV usage, the bat-
teries last _r about one year.)
2.8 C.AP'.:IRTwo: [NSTAIIAT]ON

OPERATION
Turning the TV On and Off
Press the POWERbutton onthe remote control.
You can also use the POWER button on the frnnt panel.
Viewing the Menus and On-Screen Displays
Viewing the Menus
1
With the power on,press
the MENUbutton
Themain menu appears
onthe screen. Its left side
has four icons: Picture,
Sound Channel and
Function
2
Use the CH• and CHV buttons to highlight one of the 4 icons
Then Dressthe VOL+burton to access the icon's suB-menu.
Pressthe MENU button to exit.
-41 The on-screen menus disappear
h'om the screen are[" about thirty
secorlcls.
You can also use the MENU.
CHANNEL, and VOLUME buttons
oil the control panel of the TV to
make selections.
Viewing the Display
press the DISPLAYbuRon.
onthe remote control,
The on:screen display
shows any or all ofth_
following: Active chahne!,
Audio source and the
Time,
-41 The on screen displays
disappear after about tweix,e seconds.
When Closed Caption has been set,
the icon(E C--_) will appear by press
ing the Display btltton.
CtIAP'H,:R TtIRIH,:: TV ()PI,:RJ_FI()N 31

0 PffRATION ]
Selecting a Menu Language
¸1¸¸¸¸¸¸¸ ¸ _--
Press MENU to display
the menu.
Press CH* three times to
Select _iFunction'1;
then presstheVOL+ but-
¸2¸¸¸¸¸¸¸¸¸¸¸¸
PressVOL+ to select the
appropriate language:
English, Spanish, or
French.
Press MENU twice to exit.
3,2 ( }IAP']; }/ TH}_Fr : TV (DP}H_ATK)N
This manual suits for next models
2
Table of contents
Other Curtis Mathes TV manuals