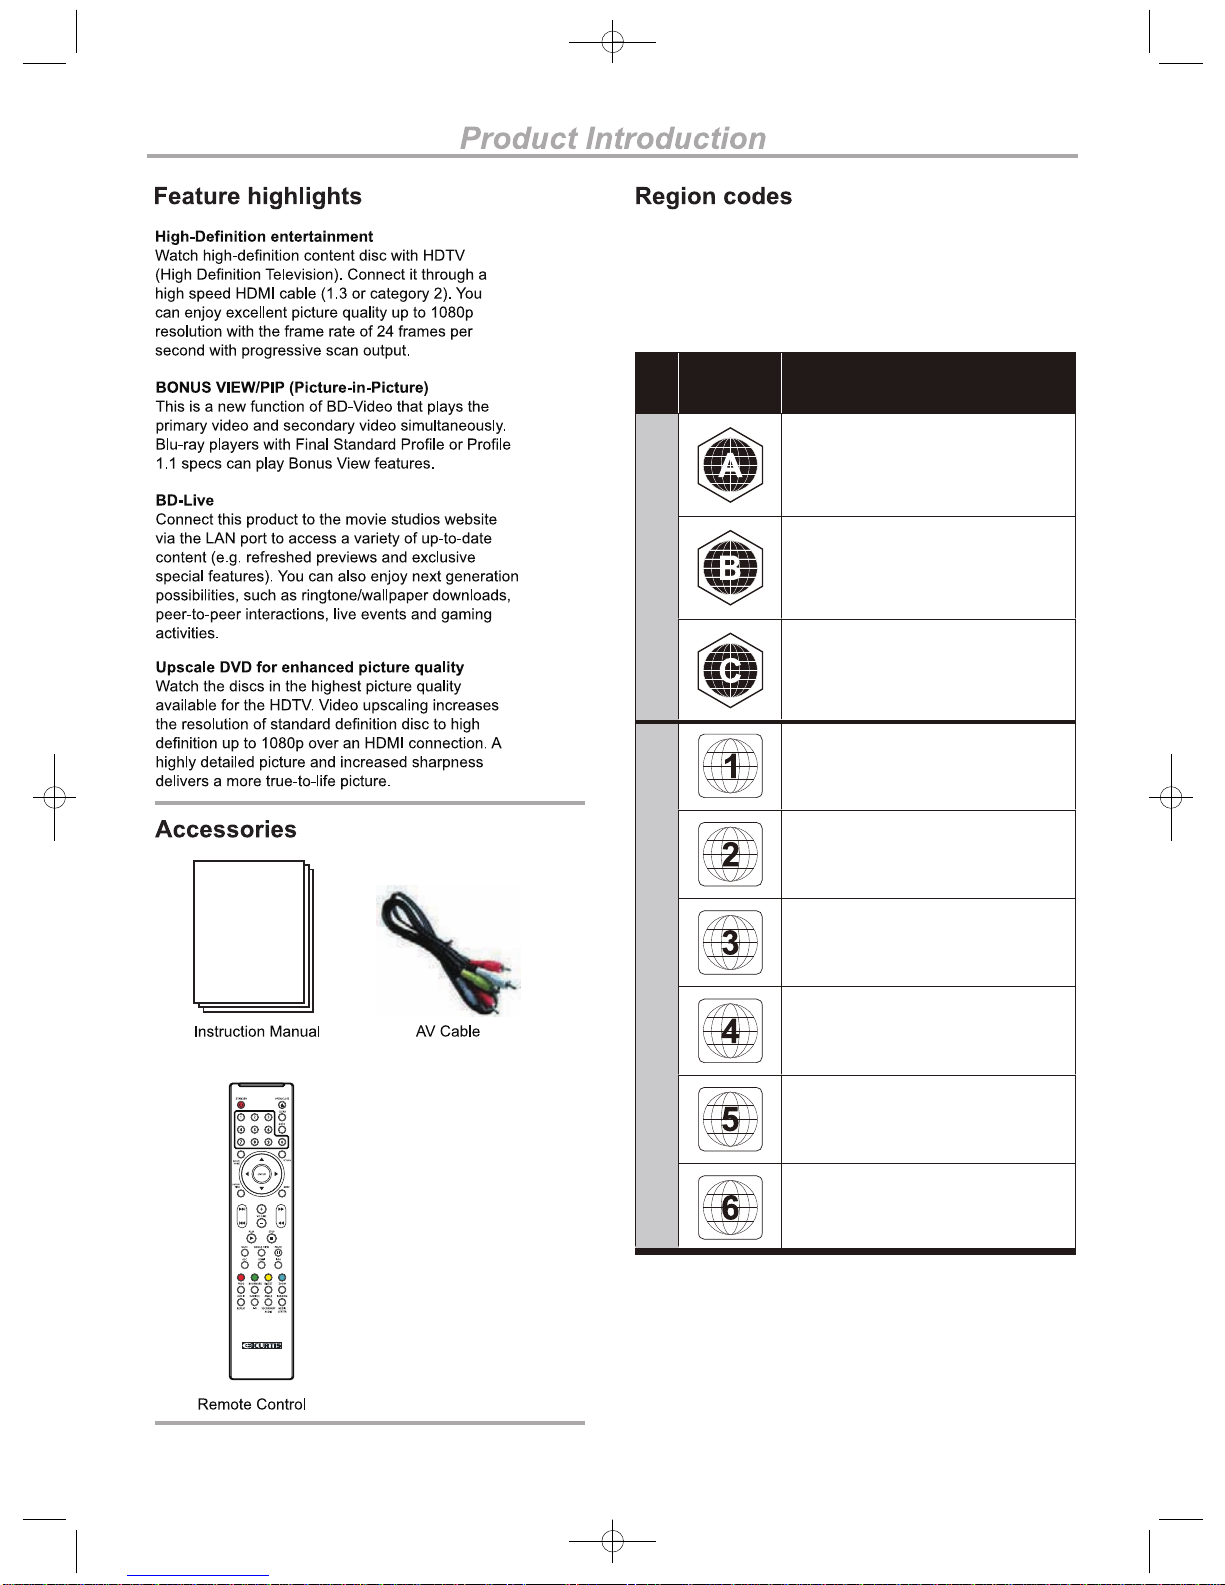
Curtis DVD8532 User manual

TM
DVD8532
Model No.

18
System Information
3
3
17
17
17
17
17
Connect Speaker’s
8
9
10-12
13-14
14
14
15
16
16
16
16

Once the Blu-ray system is operated abnormally, the system
will be hanged up due to circuit protection. If user unplugs
the power cord, this system can normally be operated.
1

Region
Code Area/Cou ntry
North America, Central America,
South America, Korea, Japan,
Taiwan, Hong Kong, South East Asia
Europe, Greenland, French
territories, Middle East, Africa,
Australia, and New Zealand
India, China, Russia, Central Asia,
and South Asia
D V D D I S C S B L U- R A Y D I S C S
The U.S.A., U.S.A. territories, and
Canada
Europe, Japan, the Middle East,
Egypt, South Africa, Greenland
Taiwan, Korea, the Philippines,
Indonesia, and Hong Kong
Mexico, South America, Central
America, Australia, New Zealand,
Pacific Islands, and Caribbean
Russia, Eastern Europe, India, North
Korea, Mongolia, and most of Africa
China
The region code for this player is located on the rear panel of the
player.
DVD and Blu-ray players and discs are coded for a specific region.
The disc and player code must match in order for the disc to play
in that player.
2

3
8. 5.1 CH AUDIO OUTPUT
8
SL
FL
FR SR CEN
SW
5.1 CHANNEL OUT
PLAY/PAUSE
Press to play the loaded disc, press
again to pause current playback.
Rear panel
POWER Supply Socket Wire
Create power between wall outlet and the unit.
VIDEO OUTPUT

1. RCA STEREO AUDIO INPUT
Speaker rear panel
2.
RCA STEREO 5.1CH INPUT
3. SPEAKER CONNECTIONS
4. POWER
Press to turn the subwoofer
power off or on.
L FL SW SL
SRCEN
SRSL
CENFL
FR FRR
5.1CH INPUT
AUX
SPEAKER OUTPUT
POWER AC 110V/60Hz
ON OFF
I
O
4

8.
10. BONUS VIEW
1
2
3
4
5
6
7
8
9
10
11
12
13
14
15
16
17
18
7. VOLUME + / -
Press volume + or volume - control the volume.
Press this to return to the DVD menu.
Standby.
. MENU
25
24
23
22
21
20
19
26
27
29
28
30
31
32
33
34
35
5

Y Cb Cr
Y Cb Cr
Tip
•The video input jack on the TV might be labeled as A/V IN,
VIDEO IN, COMPOSITE or BASEBAND.
•This type of connection provides standard picture quality.
VIDEO
VIDEO IN
CVBS
1 Connect a composite video cable to:
• the VIDEO jack on this product, the VIDEO input jack on
the TV.
2 Connect the audio cables to
• the AUDIO L/R-AV OUTPUT jacks on this product.
the AUDIO input jacks on the TV.
Option 3: Connect to the composite video jack.
SL
FL
FR SR CEN
SW
5.1 CHANNEL OUT
SL
FL
FR SR CEN
SW
5.1 CHANNEL OUT
SL
FL
FR SR CEN
SW
5.1 CHANNEL OUT
6

SL
FL
FR SR CEN
SW
5.1 CHANNEL OUT
Connection
Note
•The type plate is located on the back of the product.
Caution
• Before connecting the AC power cord, ensure you have
completed all other connections.
Route audio to other devices
To enhance audio play, you can route the audio from this
product to other devices.
• This type of connection provides good picture quality.
Connect to digital amplifier/receiver
COAXIAL
COAXIAL
Connect a coaxial cable (not supplied) to:
• the COAXIAL jack on this product.
• the COAXIAL/DIGITAL input jack on the device.
Connect network
Connect analogue stereo system.
AUDIO
L
R
AUDIO IN
Connect the audio cables to:
• theAUDIO L/R-AV OUTPUT jacks on this product.
• theAUDIO input jacks on the device.
• the 5.1CH OUTPUT jacks on this product.
• the 5.1CH input jacks on the device.
Connect this product to the network to enjoy software
updates and BD-Live bonus content.
Connect the network cable (not supplied) to:
• The LAN jack on this product.
• The LAN jack on the broadband modem or router.
• Note: before log in the internet, you first make sure
the unit is under default set.
Connect power
Connect the AC power cable to the wall socket.
This product is ready to be set up for use.
Connect the 5.1CH cables to:
L FL SW SL
NEC RS
L
S R
S
CEN
FL
FR R RF
5.1CH INPUT
AUX
SPEAKER OUTPUT
POWER AC 110V/60Hz
ON OFF
I
O
L FL SW SL
NE
C RS
LS R
SCEN
FL
FR RR
F
5.1CH INPUT
AUX
SPEAKER OUTPUT
POWER AC 110V/60Hz
ON OFF
I
O
FL SW SL
NE
C RSR
F
5.1CH INPUT
SL
FL
FR SR CEN
SW
5.1 CHANNEL OUT
SL
FL
FR SR CEN
SW
5.1 CHANNEL OUT
SL
FL
FR SR CEN
SW
5.1 CHANNEL OUT
SL
FL
FR SR CEN
SW
5.1 CHANNEL OUT
7

Connection Speaker's
L FL SW SL
SRCEN
SRSL
CENFL
FR FRR
5.1CH INPUT
AUX
SPEAKER OUTPUT
SRSL
CENFL
FR
SPEAKER OUTPUT
POWER AC 110V/60Hz
ON OFF
I
O
Connection
8

The batteries shall not be exposed to excessive heat
such as sunshine, fire or the like.
9
(not included)

POPUP/TITLE POPUP/TITLE
Bookmark the point. Press for 5 Seconds to
activate the Bookmark menu.
BOOKMARK
10
T
he function can be used to play selected chapter
and titles in a desired sequences. Press the PROG
button playing DVD/VCD/CD.
(This function not support BD)
Use the UP/DOWN button to highlight the desired
title then use Nemeric Buttons to input the title what
you want to play.
To play selected chapters, use the LEFT/RIGHT key
to select the PLAY and press ENTER button to start
sequence playback.
To remove selections from the program list, highlight
and select “Clear” or press CLEAR button to delete the
selected chapters.

mains
2
11

Play
Note
• It may require longer time to display the disc content on
the TV due to the large number of songs/photos compiled
onto one disc.
• This product can only display digital camera pictures
according to the JPEG-EXIF format, typically used by
almost all digital cameras. It cannot display Motion JPEG,
or pictures in formats other than JPEG, or sound clips
associated with pictures.
• Folders/files that exceed the supported limit of this
product cannot be displayed or played.
Note
• Some operations may not work with some discs or files.
Note
• To create a musical slideshow, you must store the MP3
and JPEG files on the same disc.
Play photo
Play photo as slideshow
You can play JPEG photos (files with .jpeg or .jpg extensions).
1 Insert a disc or USB devise that contains the JPEG photos.
2 Select a photo folder, then press ENTER to enter.
• To select a photo, press the Navigation buttons.
• To enlarge the selected photo and start slideshow, press
ENTER.
Control photo play
1 Play a photo slideshow.
2 Use the remote control to control the play.
Buttons Action
Rotate a photo anticlockwise/clockwise.
Flip a photo horizontally/vertically.
Stop play.
Set slideshow interval and animation
1 During play, press OSC.
The play options menu is displayed.
2 Select a option in the menu, then press ENTER.
3 Select the option by Navigation buttons.
4 Press ENTER.
Play musical slideshow
Create a musical slideshow to play simultaneously
MP3 music files and JPEG photo files.
1 Play MP3 music.
2 Press Media Center to return to the main menu.
3 Navigate to enter a photo folder, then press ENTER to start
slideshow play.
Slideshow begins and continues till the end of the photo
folder.
Audio continues to play until the end of the disc.
12

1 Press SETUP.
Settings
Note
•You have to select the audio and subtitle language
according to the disc.
Note
• If the setup option is grayed out, it means the setting
cannot be changed at the current state.
General Setting
Basic operation for the menu
System
1Screen Saver: Turn on/off the screen saver.
The screen saver will display in 3 mins without any
operation when the function’s on.
2Disc Auto Playback: Turn on/off the disc auto playback
function.
3Load Default: Return to DEFAULT SETTING.
4Upgrade: Select the device that you want to upgrade from.
5Easy Setup: Select the easy setup mode.
6Buda: Select the buda mode.
Language
1OSD: Select the OSD language.
2Menu: Select the menu language of the disc.
3Audio: Select the audio language for the program.
4Subtitle: Select the subtitle language for the program.
2 Select a mains menu by .
3 Select the menu you want to setting by , and press .
•You could press up to mains menu.
4 Select the option by , and press .
• You could press to return to the previous menu.
6 To return to the mains menu from the submenu, press
RETURN.
7 To exit the menu, press SETUP.
5 Select by , and press ENTER to confirm.
• You could press to return to the previous menu.
Playback
1Closed Caption: Turn on/off the Closed Caption function.
2Angle Mark: Turn on/off the Angle Mark function.
3PIP Mark: Turn on/off the PIP Mark function.
4Secondary Audio...: Turn on/off the secondary audio
language select.
1Parental Control: Enter to set the parental control. The
password is 0000.
Security
13

Settings
Network
1Internet Connection: Display the internet connection state.
2Information: Display the informations of the Network.
3Connection Test: Test the internet connection state.
4IP Setting: Setting the IP for the product.
1TV Screen: Select the display mode for the TV.
2Resolution: Select the resolution for the TV.
3TV System: Select the TV system.
4Color Space: Select the color space.
5HDMI Deep Color: Select deep color for HDMI.
6HDMI 1080P 24HZ: Turn on/off the HDMI 1080P
TV
• Connect this product to the broadband modem or router.
•This product starts to detect if there is a connection to the
network.
• If the connection test fails, select [Retry] and press ENTER
to re-connect again to the network.
Display Setting
5BD-Live Connecting: Set this function to Permitted, Partial
permitted, Prohibited.
6Proxy Setting: Set the Proxy Setting to Disable, Enable,
Proxy Host, Proxy Port.
24HZ function.
1Sharpness:
Motion video: Select the video mode.
Select the sharpness mode.
V
Motion Video
ideo Process
Audio Setting
1Spdif: Select the SPDIF mode.
2HDMI: Select the HDMI mode.
3Down Sampling: Select down sampling.
4DRC: Select the DRC mode.
PAL
YCbCr
480P/576P
Audio Output
14

Settings
Speaker Setting
Post Process
Display the system information(The information on the picture
above is for reference only ).
System Information
1 Configuration: Select configuration mode.
2 Test Tone: Select the text tone mode.
1 UpMix: Select the UpMix mode.
15

NTSC/PAL/Multi
Audio CD
AC100-240V 50
Operating conditions:0°C-40°C
Amplifier
/60Hz
14 W
Cb
Cr
AC110V 60Hz
16
Total Output Power : 40W
Sub-woofer Output Power : 10W (4 Ohm)
Satella CH. (5 channels): 6W / ch (8 Ohm)

Troubleshooting
Warning
• Risk of electric shock. Never remove the casing of the
product.
To keep the warranty valid, never try to repair the product
yourself.
Main unit
No reaction to the remote control.
• Connect this product to the power outlet.
• Point the remote control at the IR sensor located on the front
panel of this product.
• Insert the batteries correctly.
• Insert new batteries in the remote control.
No picture.
• See TV manual for correct video input channel selection.
Change the TV channel until you see the screen.
No picture on HDMI connection.
• If this product is connected to an unauthorized display device
with an HDMI cable, the audio/video signal may not be output.
• Check if the HDMI cable is faulty. Replace a new HDMI cable.
• If this happens when you change the [resolution] setting,
press HDMI on the remote control repeatedly until picture
appears.
No high-definition video signal on the TV.
• Ensure that the disc contains high-definition video.
• Ensure that the TV supports high-definition video.
Picture
Sound
No audio output from the TV.
• Ensure that the audio cables are connected to the audio input
of the TV.
• Assign the audio input of the TV to the corresponding video
input. See the TV user manual for details.
No audio output from the loudspeakers of the audio device
(stereo system/amplifier/receiver).
• Ensure that the audio cables are connected to the audio
input of the audio device.
• Turn on the audio device to its correct audio input source.
No sound on HDMI connection.
• You may not hear any sound from the HDMI output if the
connected device is non-HDCP compliant or only DVI-
compatible.
Play
Disc cannot be played.
• Ensure that the disc is correctly loaded.
• Ensure that this product supports the disc. See
'Specifications'.
• Ensure that this product supports the region code of the
DVD or BD.
• For DVD+RW or DVD+R, ensure that the disc is finalized.
• Clean the disc.
Data files (JPEG, MP3) cannot be played or read.
• Ensure that the data file was recorded in the UDF, ISO9660
or JOLIET format.
• Ensure that the selected group (folder) does not contain more
than 9,999 files for DVD, and 999 files for CD.
• Ensure that the JPEG file extension is jpg, JPG, jpeg or
.JPEG.
• Ensure that the MP3 file extension is .mp3 or .MP3 for
windows Media™ Audio.
'No entry' sign appears on the TV.
• The operation is not possible.
Unable to access BD-Live feature.
• Check the network connection or ensure that the network
has been set up.
• Clear local storage or USB.
• Ensure that the BD disc supports BD Live feature.
17

Glossary
A
Aspect ratio
Aspect ratio refers to the length to height ratio of TV screens.
The ratio of a standard TV is 4:3, while the ratio of a high-
definition or wide TV is 16:9. The letter box allows you to enjoy
a picture with a wider perspective on a standard 4:3 screen.
B
Blu-ray Disc (BD)
Blu-ray Disc is a next generation optical video disc capable of
storing five times more data than a conventional DVD. The
large capacity makes it possible to benefit from the features
such as high-definition videos, multichannel surround sound,
interactive menus and so on.
BONUS VIEW
This is a BD-Video (Final Standard Profile or Profile 1.1) that
supports interactive content encoded on the disc, such as
picture-in-picture. This means you can play the primary video
and secondary video simultaneously.
D
Digital Audio
Digital Audio is a sound signal that has been converted into
numerical values. Digital sound can be transmitted through
multiple channels. Analogue sound can only be transmitted
through two channels.
Dolby Digital
A surround sound system developed by Dolby Laboratories
that contains up to six channels of digital audio (front left and
right, surround left and right, center and subwoofer.)
DTS
Digital Theatre Systems. A surround sound system for
providing 5.1 channels of discrete digital audio in consumer
electronics products and software content. It is not developed
by Dolby Digital.
H
HDCP
High-bandwidth Digital Content Protection. This is a
specification that provides a secure transmission of digital
contents between different devices (to prevent unauthorized
copyright.)
HDMI
High-Definition Multimedia Interface (HDMI) is a high-speed
digital interface that can transmit uncompressed high definition
video and digital multichannel audio. It delivers high quality
picture and sound quality, completely free from noise.
HDMI is fully backward-compatible with DVI. As required by
the HDMI standard, connecting to HDMI or DVI products
without HDCP (High-bandwidth Digital Content Protection) will
result in no Video or Audio output.
J
JPEG
A very common digital still picture format. A still-picture data
compression system proposed by the joint Photographic
Expert Group, which features small decrease in image quality
in spite of its high compression ratio. Files are recognized by
their fill extension '.jpg' or '.jpeg.'
L
LAN (Local Area Network)
A group of linked devices in a company, school or home.
Indicates the boundaries of a particular network.
Local storage
This storage area is used as destination for storing additional
contents from BD-Live enabled BD-Video.
M
MP3
A file format with a sound data compression system. MP3 is
the abbreviation of Motion Picture Experts Group 1 (or
MPEG-1) Audio Layer 3. With the MP3 format, one CD-R or
CD-RW can contain about 10 times more data than a regular
CD.
P
PBC
Playback Control. A system where you navigate through a
Video CD/Super VCD with on-screen menus that are recorded
onto the disc. You can enjoy interactive playback and search.
PCM
Pulse Code Modulation. A digital audio encoding system.
R
Region code
A system that allows discs to be played only in the region
designated. This unit only plays discs that have compatible
region codes. You can find the region code of your unit on the
product label. Some discs are compatible with more than one
region (or ALL regions.)
w
WMA
Windows Media™ Audio. Refers to an audio compression
technology developed by Microsoft Corporation. WMA data
can be encoded with Windows Media player version 9 or
Windows Media player for Windows XP. Files are recognized
by their file extension '.wma.'
Notes: Design and specifications in this instruction manual are subjected to change without
prior notice.
Imported By: C.I. Ltd., Toronto, Ontario M9W 5C1
18
Table of contents