CZEM Drill One Evo User manual

DISPLAYS - MANUAL

2
LCD and OLED displays for DRILL ONE EVO motorcycles
The DRILL ONE EVO motorcycle comes in standard with an LCD display
providing information on battery capacity and voltage.
LCD display 7S
Settings
When turn o hold on the K key on the back and power on. 7S displays the present speci cation. Use K+ and K
keys to adjust speci cations, select desired speci cation you need, then press the OK key on the front, 7S will
work normally (correspond with code as below). Description of settings 13 CEL.

3
Press the "K+" button on the back of the device to set the mode function. The 7S has two functions: F0 and
F2. Use the "K+" button to select the F0 or F2 function. To conrm the selection, press the "OK" button on the
front to start the selected function. The default function is F2.
F0 Backlight - 7S is always on, LCD and backlight are always on.
F2 Power saving mode - 7S switches to power saving mode (<15uA) after 10s, LCD and backlight turns o.
Press "OK" button, LCD and backlight will turn on for 10s.
Press the "K-" button on the back of the device to set the display mode. The 7S has three types of display
mode. Use the "K-" button to change the display mode setting. Press the "OK" button to turn on the
selected mode.

4
V&% Volt and Percentage Display - The 7S displays the current volt and percentage capacity status.
Press the "OK" button to change the display.
V Volts Display - The 7S displays only the current volt level.
% Percentage Display - 7S displays only the current percentage status.
Warning and warranty
During use or storage, the 7S must not be exposed to direct sunlight or be in an environment with strong
ultraviolet radiation, such as winter (< -20°C) and summer (> 60°C), as this may lead to shortened LCD life.
Any defects not caused by improper handling will be repaired free of charge within one year of purchase.

BATTERY
F1 250A
F3 500mA
SILIXCON
13S/16P 48Ah
BMS
ON
OFF
KILL SW THROTTLE
MAP
SW
MAP
DIODE
CHARGER TYPE
KP600A-60L
53,9V/10A
ONLY!!!
F3 30A
A
B
C
100%
F2 1A
AS150
(Black-F)
AS150
(RED-M)
AS150
(Black-M)
AS150
(RED-F)
CON1-FCON1-M
CON5-M
CON5-F
CON6-FCON6-M
CON7-M
CON7-F
CON8-MCON8-F
CON9-MCON9-F
CON10-F CON10-M
CON2-MCON2-F
3x
XT150-F
3x
XT150-M
CON9-MCON9-F
CON8-MCON8-F
GREY CABLE
(40cm)
XT150-F
XT150-F
XT150-M
XT150-M
RE255002RE255003 050552ER100552ER020552ER
RE255025
RE255060
RE255051
RE650003
RE600051
RM500000
ENGINE
DC 53,9V
AC230V/110V
TEMP SENSOR
DRILL ONE WIRE DIAGRAM v0.1
5
Diagram

6
OLED extended display
OLED display can be selected as an optional extra
with a resolution of 128 x 64 pixels. The display does not have
a backlight as each dot is active.
The advantage of this display is the ability to display additional
data, especially the driving speed or engine speed.
There are also other data available, see Section: "Description of
OLED display functions".
The OLED display reads information via CAN bus directly from the controller located on the battery.
The reading is done with a period of 100 ms, which makes the display of values very fast.
The OLED display kit consists of two components:
1/ OLED display with bracket for mounting under motorcycle handlebars (code RE255070)
2/ Display control unit mounted on the battery next to the motor controller (code 255170)
The connection is shown in the wiring diagram at the end of this document. The control unit has four cable
terminals which are used to connect to the main battery connector (3-pin male connector, red, green and
black wires) , the CAN bus data connector (3-pin female connector, green, yellow and black wires), the ON/OFF
switch connection (2-pin female connector, red and green wires) and the OLED display connection (6-pin
female connector).

7
Switch on the display
To turn on the display, switch the ON/OFF switch to the ON position.
After switching on, the CZEM logo appears on the display and the CAN data on the motorcycle
is initialised.
If proper initialization is not achieved, the display will automatically restart within a few seconds
and attempt to re-establish communication.
If the display still shows only the CZEM logo, please check that:
- the CAN communication cable is correctly tucked in (3-pin female connector, green, yellow
and black wires)
- the fuse cap is correctly positioned
- the remaining wiring is correctly connected
After establishing communication with the controller, the CZEM logo disappears and the display shows
the remaining battery capacity for a few seconds. Then the display switches to the mode of displaying the
values read from the controller.
By default, the display always shows the speed of the motorcycle rst. You can change this option and
set the display to show, for example, the engine speed as the rst value when switched on.
A description of the change is given in the chapter "Display conguration".

8
Description of OLED display functions
Display of the selected map
The currently selected map is shown in the upper left part of the display with three indicator bars.
One (smallest) bar indicates map 1 with the lowest power, two bars the medium power and three bars the highest
power of the motorcycle. If the text SELECT MAP is displayed instead of the bars, then no map has been
selected yet. Press the MAP button on the handlebars to select your desired map stored in the controller.
If your motorcycle includes a colored LED, then the selected map is also indicated by a colored light on the LED.
In the main section, the display shows the following parameters:
You can switch between the dierent data by briey pressing the button below the display. The upper
right corner shows which parameter is currently indicated on the display:
- KMH/MPH - speed o f the motorcycle
- RPM - engine rev counter
- VOLT - battery voltage
- CAPA - remainin g battery capacity
- ODO - odomete r
DRIVING SPEED
ENGINE REV COUNTER
BATTERY VOLTAGEBATTERY CAPACITY
DISTANCE COUNTER

97
The lower part indicates the remaining battery capacity with a bar. One part corresponds to 20% of the
battery capacity.
The number of functions displayed can be expanded in the future. The functions described are up-to-date
as of the released version 1.4.3.
When the display rmware update is released, the new rmware can be downloaded from www.czem.pro
and uploaded as a user to the controller. For a description of the update, see the section Updating rmware.
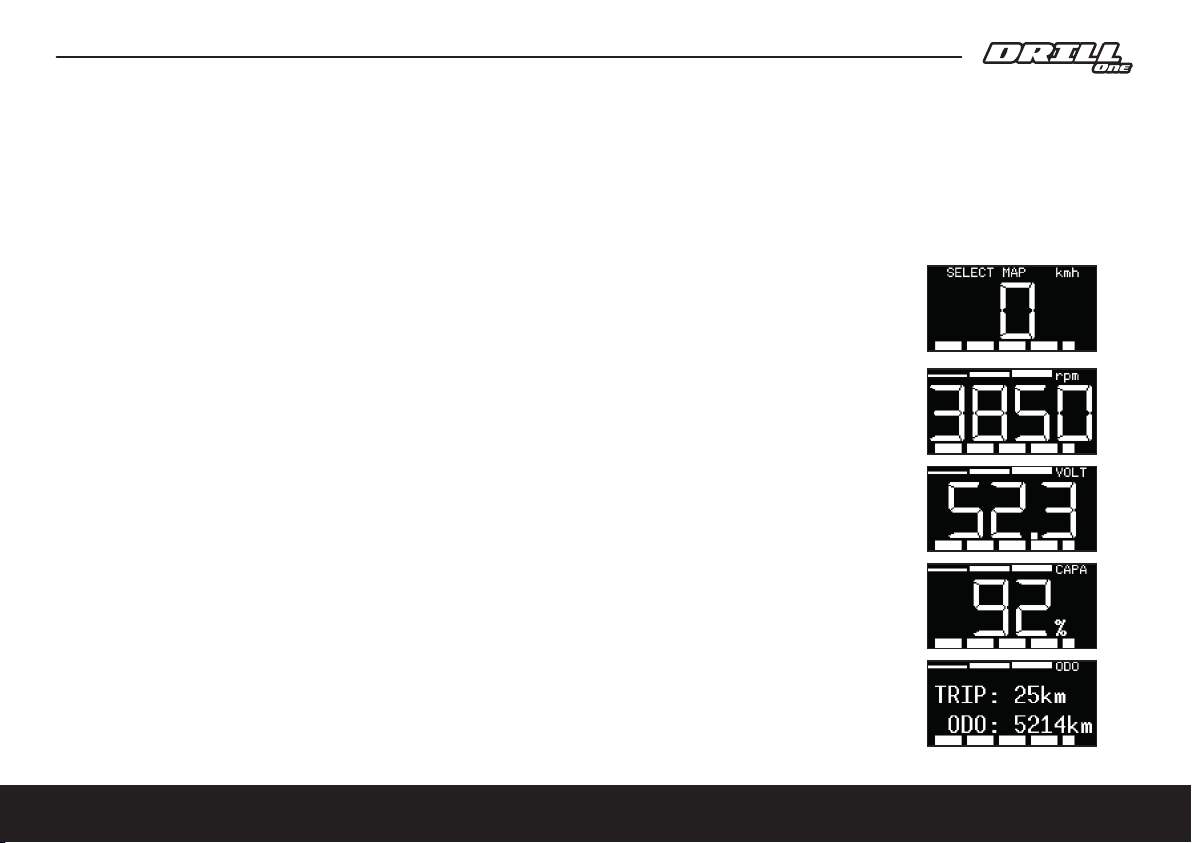
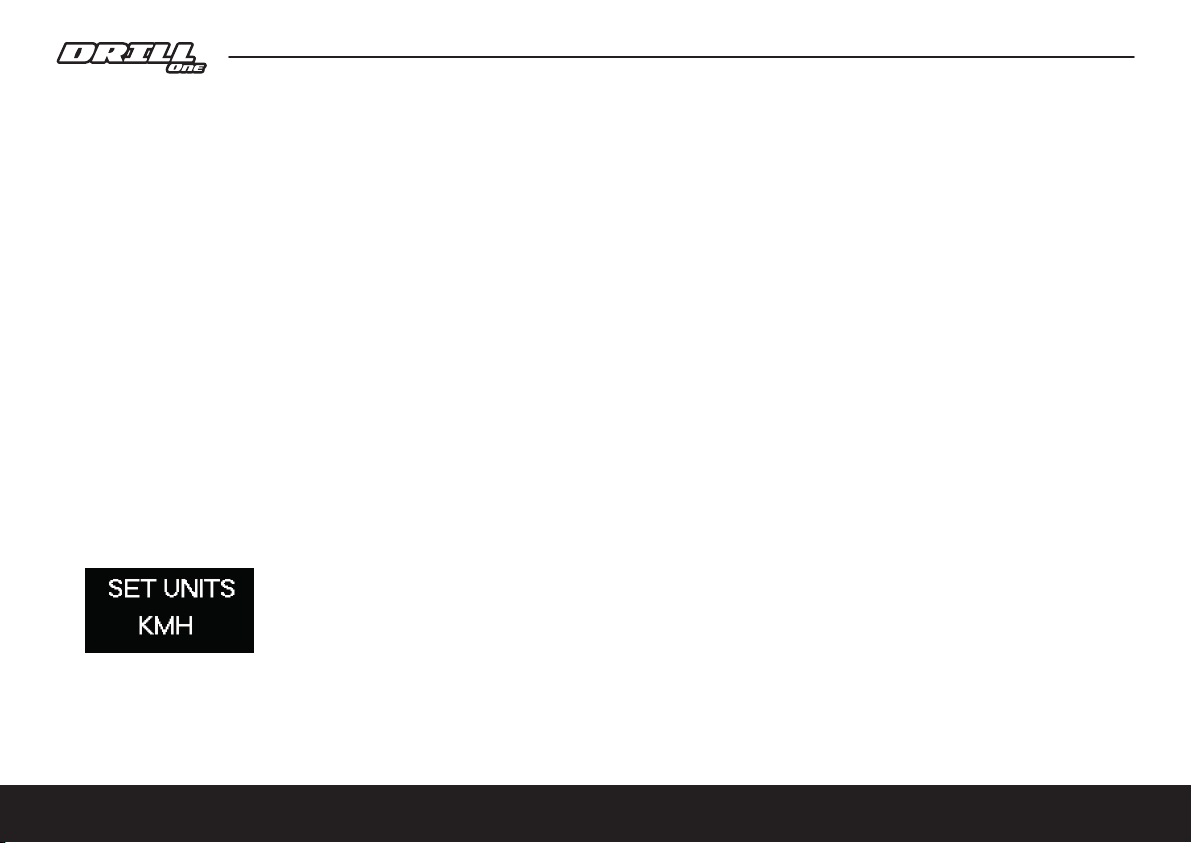
Display of speed
Speed is displayed in kilometres per hour (kmh) or miles per hour (mph).
The units can be easily switched in the setup mode, see the chapter on the display
conguration.
Display of engine revolutions
In this mode, the engine speed (revolutions per minute) is displayed.
Display of battery voltage
The battery voltage is displayed to one tenth of a volt.
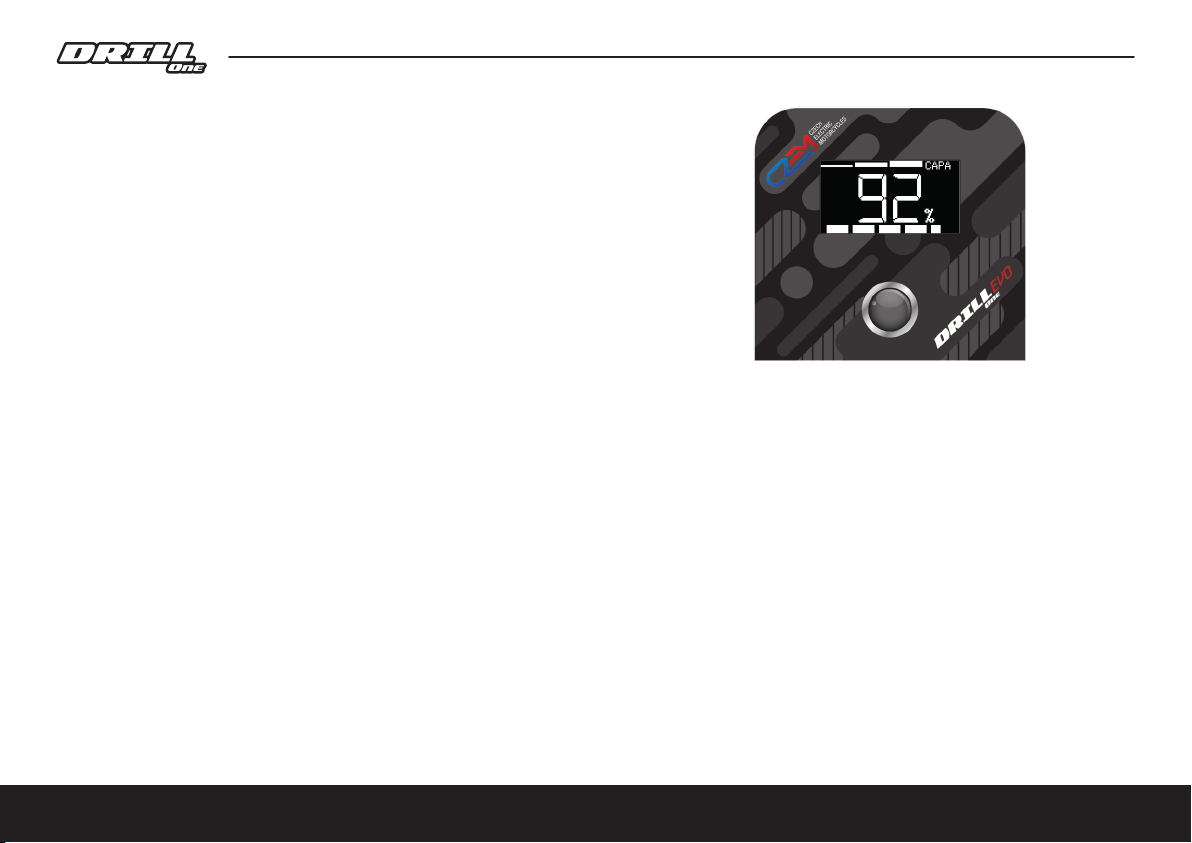
Remaining battery capacity
The remaining battery capacity is indicated as a percentage (0-100%).
Distance travelled
The display shows the total distance travelled (ODO) since the motorcycle was sold.
In the current version 1.4.3, only the ODO (total distance) is displayed,
In a future version we are preparing to display the "daily" counter (TRIP),
which will display the distance travelled since the motorcycle was switched on.

10
Display conguration
The display allows the user to change the following data:
- speed units (kmh/mph)
- gear ratio
- the default value displayed when the display is switched on
Entering conguration mode.
- make sure the motorcycle is switched o (ON/OFF switch is in OFF position)
- press and hold the button on the display
- switch the motorcycle on with the ON/OFF button
- wait until the entire display is white, release the button
At this point you are in the display conguration menu.
The display should show text like this image:
Short press to switch between the KMH or MPH option.
Long press to switch to the next parameter conguration.

911
Another selectable parameter is the gear ratio. By default, a value of 1.0 is displayed and used.
This means that the speed and distance traveled data sent by the controller to the display are shown as 1:1.
If a dierent wheel or sprocket size is used, the recalculation of the values sent by the controller can be
adjusted to match reality. For this purpose, a table with individual motorcycle congurations that can be
supplied by CZEM is prepared.
Example: the motorcycle uses a larger wheel than the standard wheel, the speed
therefore does not match reality and the conversion "times 1.1" is needed.
First, we set whole number. Press the button briey to increase the value by one,
when the value reaches 9 the value 0 is displayed. This allows you to set the
conversion to a smaller value (for example 0.8). Long press the button to conrm
the desired whole number value and move on to the decimal setting. Select the
desired value and conrm by long pressing the button.
The last option for conguration is the default value that will be displayed when the
display is turned on.
Press the button briey to change the value in the upper right corner and select the default value
displayed when the display is switched on. So if we prefer, for example, to display the battery voltage
instead of the speed, we do not have to switch the display from speed to voltage every time we switch on
the bike, but choose VOLT as the default value.
Save the desired value again by long pressing the display button.
The saving of the set values is conrmed on the screen.

12
Update of the display rmware
The display rmware can be updated by the user. The update is
done via WIFI connection. For the update, the display must nd a
WIFI access point (ACCESSS POINT) named CZEM in its vicinity.
The access point can be created very easily, for example using a
mobile phone with ANDROID.
To create an access point:
Activate the WIFI Hotspot on your mobile phone with Android
and adjust to the following parameters.
Hotspod SSID
Encryption type
Password

13
If you have activated the access point on your phone, follow the steps in the Conguration of the display.
Go through all three steps (setting the speed units, setting the gear ratio and setting the default display
value). As soon as "SETTINGS SAVED" appears on the screen, the display will search for and connect
to a CZEM access point in your area.
The connection is conrmed with the following text:
Download the latest rmware from www.czem.pro/podpora,
save the le with the rmware to your phone, open a web browser
and type in http://czem.local
If the page does not open, try entering the IP address assigned to the display instead of the text czem.local.
The IP address shown in this picture is only illustrative, you need to enter the value that your display shows.
When you open the page, you will see the following content:

14

15
Click on the "Select File" button, locate the folder where you saved the downloaded rmware and conrm
the upload of the rmware with the UPDATE button.
The process of uploading new rmware is indicated by the text
UPDATE STARTED, the correct upload is:
If rmware has an incorrect format, the message BAD FILE FORMAT is displayed.
Important note, leave the downloaded rmware name as it is available for
download on our website. Do not rename the le in any way.
After the rmware has been successfully downloaded, the display restarts. On startup the display shows its
version, please check that the version shown is the same as the version you downloaded and uploaded to
the display.

BATTERY
F1 250A
F2 500mA
SILIXCON
13S/16P 48Ah
BMS
DISPLAY
CONTROLLER
DISPLAY
ON
OFF
KILL SWITCH
THROTTLE
MAP
SW
MAP
DIODE
CHARGING
CHARGER TYPE
KP600A-60L
53,9V/10A
OR
AP-PF900CH05880150
53,9V/15A
ONLY!!!
F3 30A
A
B
C
FM12315
FM12316
AS150
(Black-F)
AS150
(RED-M)
AS150
(Black-M)
AS150
(RED-F)
CON1-FCON1-M
CON4-F
CON4-M
CON5-M
CON5-F
CON6-F
CON6-M
CON7-M
CON7-F
CON8-M
CON8-F
CON9-M
CON9-F
CON10-F CON10-M
CON2-MCON2-F
CON3-FCON3-M
3x
XT150-F
3x
XT150-M
RE255001
RE255013 RE255012RE255052RE255070
RE255170
RM500000
RE650003
RE600051
RE680001
RE255021
RE255920
90cm
80cm
70cm
60cm
30cm
45cm
100cm
ENGINE
DC 53,9V
AC230V/110V
A
B
C
TEMP SENSOR
DRILL ONE WIRE DIAGRAM v0.5
16
Diagram


Table of contents