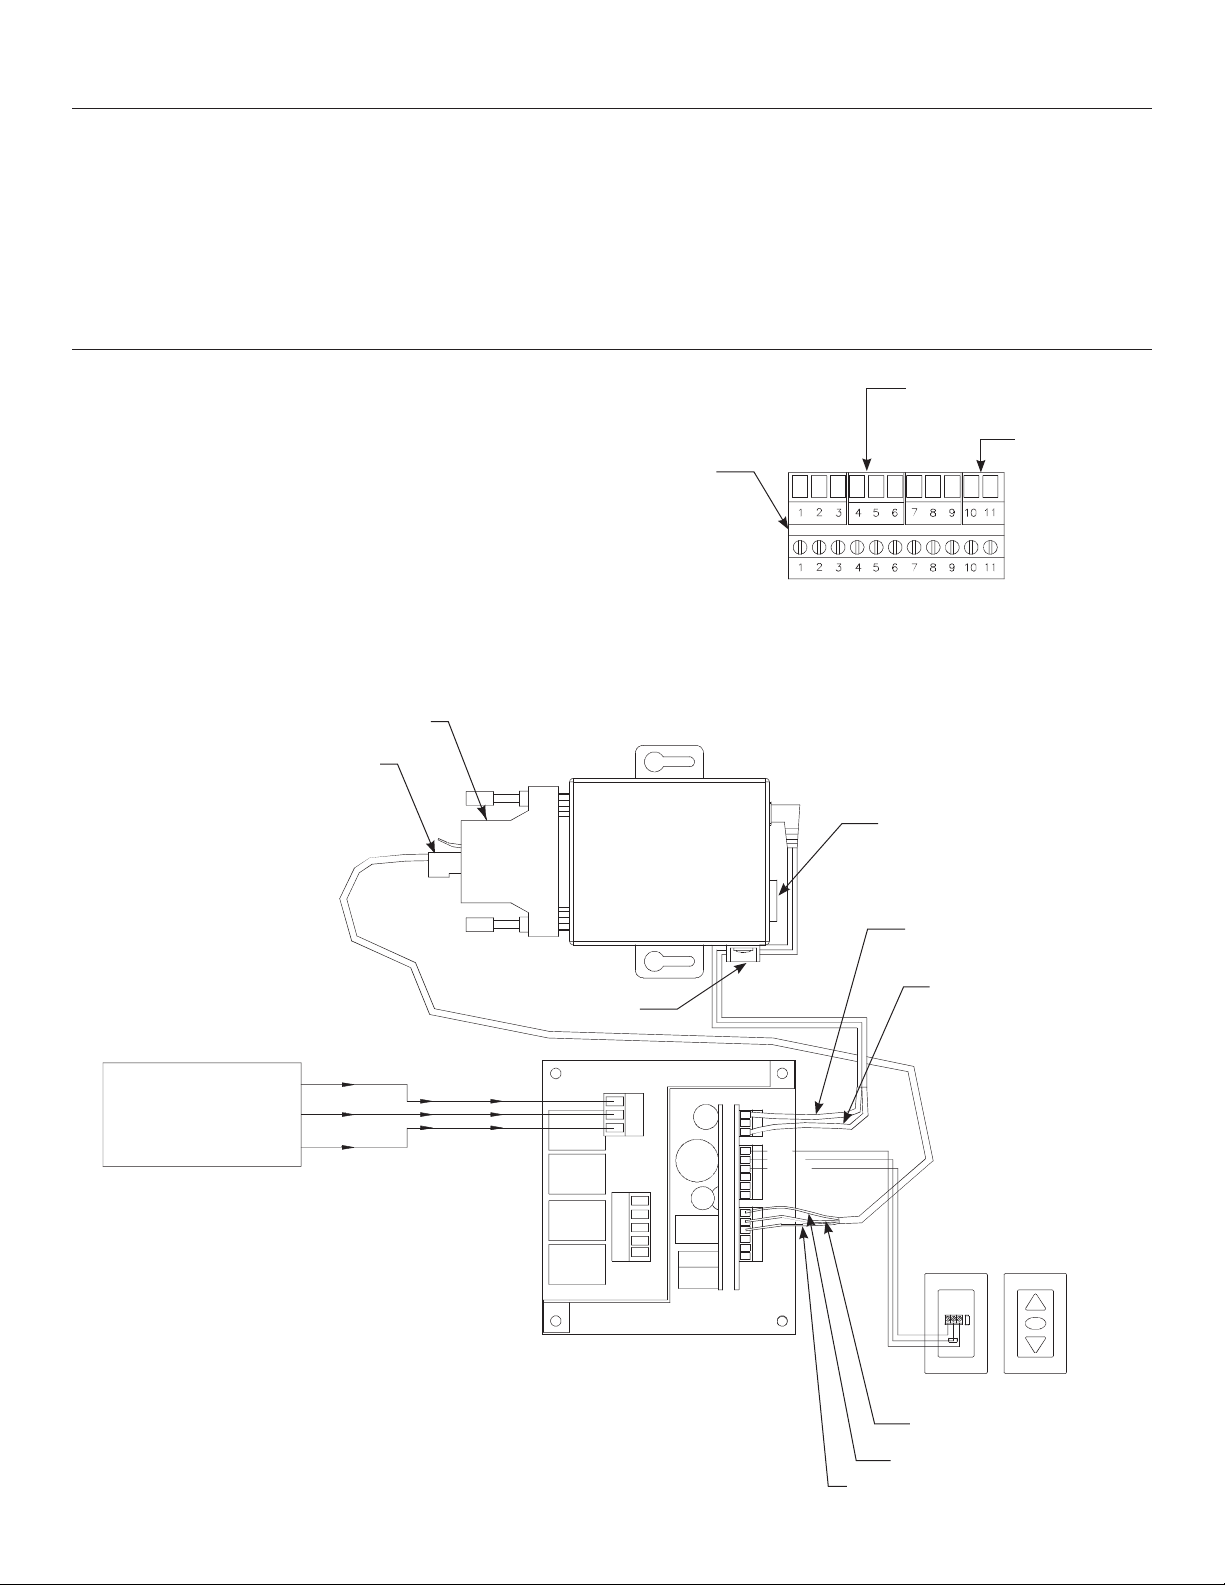
manuals.online logo
Brands
  1. Home
  2. •
  3. Brands
  4. •
  5. Da-Lite
  6. •
  7. Adapter
  8. •
  9. Da-Lite NET-100 User manual

Da-Lite NET-100 User manual

Popular Adapter manuals by other brands

Mini Gadgets BB2Outlet user manual

Mini Gadgets

Mini Gadgets BB2Outlet user manual

LSI LSISAS3442E-R Quick installation guide

LSI

LSI LSISAS3442E-R Quick installation guide

Moeller BBA -16 Series installation instructions

Moeller

Moeller BBA -16 Series installation instructions

Acer MWA3 quick start guide

Acer

Acer MWA3 quick start guide

Connect Tech ADG095 user guide

Connect Tech

Connect Tech ADG095 user guide

cable matters 604002 user manual

cable matters

cable matters 604002 user manual

Solwise PL-85PEW Easy start

Solwise

Solwise PL-85PEW Easy start

HP Photosmart 7100 user guide

HP

HP Photosmart 7100 user guide

HP E2494A installation guide

HP

HP E2494A installation guide

StarTech.com USB150WN1X1 quick start guide

StarTech.com

StarTech.com USB150WN1X1 quick start guide

Lindy 43198 user manual

Lindy

Lindy 43198 user manual

A&D AD-8527 instruction manual

A&D

A&D AD-8527 instruction manual

Motorola WU830G user guide

Motorola

Motorola WU830G user guide

Hawking HUF2 Specifications

Hawking

Hawking HUF2 Specifications

Allen-Bradley E3 Plus installation instructions

Allen-Bradley

Allen-Bradley E3 Plus installation instructions

Trust BT-2210Tp manual

Trust

Trust BT-2210Tp manual

HP NC7170 overview

HP

HP NC7170 overview

Uconnect BLE-485C user manual

Uconnect

Uconnect BLE-485C user manual

manuals.online logo
manuals.online logoBrands
  • About & Mission
  • Contact us
  • Privacy Policy
  • Terms and Conditions

Copyright 2025 Manuals.Online. All Rights Reserved.

INSTALLATION GUIDE FOR
Da-Lite NET100
2
When connecting the NET100, there are three connections that
must be made to the SCB100 for proper operation: Power
+12Vdc, RS232 Communication and Ethernet.
NOTE: If you ordered your screen with a built-in SCB100 it will
come equipped with a 11-pin phoenix connector. The NET100 will
be equipped with a 2-pin plug and 3-pin plug for connection. The
2-pin plug will plug into #10 and #11 and the 3-pin plug will plug
into #4, #5 and #6. (See Fig. 1)
Product Description
The NET100 is an Ethernet adapter to the SCB100 Serial Control Board for Da-Lite motorized screens and projector lifts. This Ethernet
adapter allows remote control of a screen or lift through a TCP/IP connection.
The NET100 is classiied as a serial device server, which by deinition means that it makes available to client computers the Da-Lite
screen or lift as a serial device (enabled by the SCB100). The NET100 supports the suite of RS232 commands developed under the
SCB100, and allows those commands to be issued by an Ethernet enabled computer or third party controller.
Installation
Figure 1
Terminal
Block
3Pin Plug
RS232 Communication
2Pin Plug
+12VDC Output
If you did not order your screen with a built-in SCB100, remove the 2-pin and 3-pin connectors from the NET100. Refer to (Fig. 2)
Once these connections have been made and power
is supplied to the SCB100, the NET100 will be
powered from the SCB100.
Upon a successful connection, the power LED and
the status LED will turn on solid green. The green
10/100 Mb Link LED indicates the presence of
communication between the NET100 and
one or more nodes on the network.
Power II IPut
120VAC / 60Hz
Back Of
Wall Switch
Red (Tx)
Black (Rx)
Green (Ground)
Front Of
Wall Switch
NOTE: 2024AWG Wire
Recommended For Connecting
Wall Switch To The SCB100
Controller
RJ45 Connector
RJ45 Ethernet
Connection
Black With White
Stripe 12VDC+
Black Solid
12VDC -
DB25 to RJ45
Adaptor
Strain Relief
Black (Hot)
Green (Ground)
White (Common)
Black (Hot)
Green (Ground)
White (Common)
+ 120 VDC OUT
Red Up
Black (Down)
White (Common)
Red (Up)
Black (Down)
White (Common)
Rx - Data In
G - Ground
TX - Data Out
RX - Data In
G - Ground
Tx - Data Out
WBR
- 120 VDC OUT
Up
Stop
Down
RJ45 PINOUT
PIN - 3 RX
PIN - 4 TX
PIN - 5 GR
PIN - 6 NOT USED
Figure 2
3
Coniguration
The NET100 is designed for simple, transparent installation and
coniguration. By default the NET100 is shipped with DHCP
disabled. The following IP address is assigned to the NET100.
IP Address: 192.168.1.100
Subnet: 255.255.255.0
To conigure the network settings, type the IP address into your
browser. It will open a new page with the setup proile. A new
window will pop up asking for a user name and password. Leave
the user name and password ield blank and press the OK
button.
The new window will contain the coniguration browser program.
The menu will be located on the left side of page. Click on
"Network".
For DHCP click on "Obtain IP address automatically" and type in
the DHCP HostName. For Static IP leave the option "Use the
following IP coniguration" clicked and type in the IP address and
Subnet Mask. Then click the "OK" button. Finally click on the
"Apply Settings" in the left menu.
Network Menu
OK Button
Blank
OK Button
Apply Settings
21249
A Milestone AV Technologies Brand
3100 North Detroit Street
Warsaw, Indiana 46582
P: 574.267.8101 or 800.622.3737
F: 574.267.7804 or 877.325.4832
E: info@da-lite.com
www.da-lite.com
DL–0397 (Rev. 1) 03.16
© 2016 Milestone AV Technologies LLC. Printed in U.S.A.
SCB100 unit will actuate command that was sent.
Click “Transfer” and “Send Text File”
Browse to ile location and select appropriate text ile and
click “Open”
Usage
To control the screen or lift connected through the SCB100 to
the NET100, you will need to create a TCP/IP Winsock
connection through HyperTerminal or other emulator program.
1. You will be required to create (4) text iles in a text editor like
Notepad. They will be named Up, Stop, Down and Poll.
Commands
@1u – Motor 1 up
@2u – Motor 2 up
@1d – Motor 1 down
@2d – Motor 2 down
@1s – Motor 1 stop
@2s – Motor 2 stop
@P – Poll (Reports Relay Status)
NOTE:All commands need to be sent as a continuous string
Example command text ile for Up:
2. Create a TCP/IP Winsock connection through HyperTerminal
or other emulator program.
Host Address: 192.168.1.100
Port Number: 10001
The above example will activate Motor 1 and Motor 2 simultaneously.