Dangerous Music 2-BUS+ User manual

2-BUS+
USER GUIDE
®

SAFETY REVIEW
The Exclamation point within an equilateral triangle is intended to alert the user to the presence of important operating and
maintenance (servicing) instructions in the literature accompanying this product
Certain precautions should be taken when using electrical products. Please observe the safety hints by reading the manual
and obtaining qualified help if necessary to adhere to the precautions.
1. Always use a properly grounded power supply cord with this product. Please do not defeat the ground pin on the mains
plug. This connection provides earth to the chassis and signal grounds inside the device for clean and quiet operation.
2. Avoid high temperature operation in equipment racks by providing air circulation. The number one killer of electronic
gear is HEAT. Vented rack panels may look like wasted space to an interior decorator, but they look like beauty to a
technician or equipment designer! If the front panel is hot, it is roasting inside the box.
3. Avoid areas of high magnetic fields. The steel chassis is designed to shield the circuits from EMI and RFI (magnetic and
radio interference). When installing equipment in racks, it is prudent to put power amplifiers and large power supplies at
least several rack spaces, if not in a different rack, away from equipment that deals with low level signals. Separation of
high level and low level equipment can pre-empt trouble caused by heat and EMI.
4. Care should be taken to avoid liquid spills around equipment. If a spill occurs, please shut off the gear and disconnect
the mains. A qualified technician should investigate accidents to prevent further equipment damage or personnel hazards
caused by spills.
5. If one is uncomfortable with opening gear and changing jumpers or making adjustments, please seek qualified help if
necessary.
6. If adjustments or jumper changes are required, please disconnect the mains plug before opening the top. Dropped
screws or tools on a live circuit board can manifest themselves as burn marks and smoked components. While we feel your
pain, (been there) subsequent damage is not covered by the warranty.
Dangerous Music Incorporated reserves the right to change the specifications or modify the designs of its equipment.
Sending in the registration card is our way of keeping in touch with users of our equipment should this become necessary.
Registration information is always kept confidential and never disclosed to third parties for any reason. Company contact
information is on the last page of this manual.
!
!
!
!
!
!
!
The CE sign on this product signifies the fact that this product has been tested and verified to conform to the appli-
cable standards of 89/336/EEC.EN55103-1 (emissions) EN61000-2 (immunity) and EN60065:2002 (safety requirements)
This product uses components of the types and quantities that comply with the EC RoHS standard 2002/95/EC. A list
of suppliers and materials is available from DMI. We tightly control production to use top quality materials.

THANK YOU
By purchasing our equipment, you have made a true investment. Due to our meticulous design, construction and component selection, you
can expect decades of reliable service from this product. We are recording industry veterans who know first-hand that real value lies in the
combination of excellent sound and long term reliability.
The brain trust at Dangerous launched the summing revolution with custom ordered and built 2-BUS summing amplifiers in 1999, finally
crafting the finished market version in 2001. With the 2-BUS+ we’ve not only raised the bar higher for the core sound of the summing
amps, we’ve also created three unique color circuits to give you more control while crafting your recordings. There are comprehensive tips
and application notes in this user’s guide, so don’t skip the read.
If you have any suggestions for applications or future products, feel free to forward them. We are always interested to learn as much as we
can from real people using our products in real situations.
ABOUT DANGEROUS MUSIC
“Audio Integrity: non-negotiable.” This is the credo upon which Dangerous Music is founded. Conceived by recording veterans in conjunction
with world-class designers, the results are products that resurrect dynamic range, punch, intelligibility and emotion. These high-fidelity,
uncompromising signal paths are achieved by harnessing several decades of real-world experience. Then the critical listening skills of top
tier engineers are applied, with the result being musical tools that fulfill the actual needs of today’s flexible computer based studio.

Contents
Overview . . . . . . . . . . . . . . . . . . . . . . . . . . . . . . . . . . . . . . . . . . . 1
2-Bus+: Quickstart Guide . . . . . . . . . . . . . . . . . . . . . . . . . . . . . . . . . . . . . 1
Unpack And Power Up . . . . . . . . . . . . . . . . . . . . . . . . . . . . . . . . . . . . . 1
Connect The 2-Bus+ To Your Studio . . . . . . . . . . . . . . . . . . . . . . . . . . . . . . . . 1
Zero Out The 2-Bus+ . . . . . . . . . . . . . . . . . . . . . . . . . . . . . . . . . . . . . 2
Stem Out A Mix And Make Some Sound. . . . . . . . . . . . . . . . . . . . . . . . . . . . . . . 2
Start Mixes In The Analog Mixing Environment . . . . . . . . . . . . . . . . . . . . . . . . . . . . 2
Try Out Some Real Analog Color. . . . . . . . . . . . . . . . . . . . . . . . . . . . . . . . . . 2
Meet The Tone Circuits . . . . . . . . . . . . . . . . . . . . . . . . . . . . . . . . . . . . . 2
2-Bus+: Front Panel Features & Benefits . . . . . . . . . . . . . . . . . . . . . . . . . . . . . . . 4
LED Metering . . . . . . . . . . . . . . . . . . . . . . . . . . . . . . . . . . . . . . . . 4
Mono Buttons . . . . . . . . . . . . . . . . . . . . . . . . . . . . . . . . . . . . . . . . 4
Effects Control: Parallel & Series Processing . . . . . . . . . . . . . . . . . . . . . . . . . . . . . 5
Effects Control: Assignment & Engagement . . . . . . . . . . . . . . . . . . . . . . . . . . . . . 5
Effects Control: Harmonics . . . . . . . . . . . . . . . . . . . . . . . . . . . . . . . . . . . 6
Effects Control: Paralimit . . . . . . . . . . . . . . . . . . . . . . . . . . . . . . . . . . . . 7
Effects Control: X-Former . . . . . . . . . . . . . . . . . . . . . . . . . . . . . . . . . . . . 7
Effects Control: External Insert . . . . . . . . . . . . . . . . . . . . . . . . . . . . . . . . . . 8
Output Level Trim . . . . . . . . . . . . . . . . . . . . . . . . . . . . . . . . . . . . . . . 8
DB-25 & XLR Inputs . . . . . . . . . . . . . . . . . . . . . . . . . . . . . . . . . . . . . 9
Expansion Inputs . . . . . . . . . . . . . . . . . . . . . . . . . . . . . . . . . . . . . . . 9
External Insert . . . . . . . . . . . . . . . . . . . . . . . . . . . . . . . . . . . . . . 10
Main & Monitor Output . . . . . . . . . . . . . . . . . . . . . . . . . . . . . . . . . . . 10
Power Cable & Fuse . . . . . . . . . . . . . . . . . . . . . . . . . . . . . . . . . . . . 11
2-Bus+: Routing Scenario . . . . . . . . . . . . . . . . . . . . . . . . . . . . . . . . . . . . . .12
Routing In Pro Tools (One Of Many Options) . . . . . . . . . . . . . . . . . . . . . . . . . . . . 12
2-Bus+ With 16 Channel Interface. . . . . . . . . . . . . . . . . . . . . . . . . . . . . . . . 13
Specifications . . . . . . . . . . . . . . . . . . . . . . . . . . . . . . . . . . . . . . . . 14
Warranty . . . . . . . . . . . . . . . . . . . . . . . . . . . . . . . . . . . . . . . . . . 15

2-BUS+ | 1
OVERVIEW
The new 2-BUS+ is a two-rack-space, 16-channel analog summing mixer with both XLR and DB-25 inputs. New innovative features include
three custom tone circuits that allow you to flexibly add real analog color to your mixes. Harmonics is a euphoric odd- and even-order
distortion generator; Paralimit is a hard-hitting FET-style limiter; and X-Former is a pair of CineMag output transformers with an exclusive
core-overdrive circuit. Both Harmonics and Paralimit can be applied across the stereo mix together or separately and then blended in with
the main signal or on a pair of stems for instant parallel processing. ‘X-Former’ inserts a pair of custom CineMag transformers across the
stereo mix and has a control for core saturation that’s totally unique to Dangerous products. All three tone controls can be active at once,
and the order of signal flow through Harmonics and Paralimit can be flipped.
CONTENTS: Inside the box you’ll discover the 2-BUS+, this manual, a standard 3 Pin IEC power cable and a ton of sonic sculpting
opportunities.
Note: We recommend reading the entire manual before using the 2-BUS+ so that you can get the most out of its unique and powerful
features right away- but... if you can’t wait, we did cook up a Quickstart Guide here.

2| DANGEROUS MUSIC
2-BUS+: Quickstart Guide
UNPACK AND POWER UP
Remove the 2-BUS+ from the box along with the included IEC power cable and plug the unit into AC mains power.
Turn on the power switch next to the AC cable socket on the back and confirm that the unit has powered up by checking that
the front panel LEDs are illuminated.
Turn the unit off.
CONNECT THE 2-BUS+ TO YOUR STUDIO
Using high quality cables, connect the outputs of your digital-to-analog converter to either the XLR or DB-25 connectors on the
back of the 2-BUS+.
Connect the stereo MONITOR OUTS to a balanced input on your monitor controller. Do not hook the 2-BUS+ directly to
speakers. Excellent monitor controller options include The Dangerous SOURCE, D-BOX or MONITOR ST.
Connect the stereo MAIN OUTS to whatever your final print path will be (back into your DAW Interface, 2-Channel A/D converter
or to an external digital or analog 2-track recorder).
TIP: If you’re using a patch bay, make the same connections according to your bay’s routing. Be sure to use high quality patch
bays and cables to assure the best connections for all the gear in your studio.
ZERO OUT THE 2-BUS+
Power up the 2-BUS+.
Set the Attenuator to the 12 o’clock position (orange triangle).
Disengage the Harmonics, Paralimit, and X-Former buttons (light dim) and turn their knobs fully counter-clockwise.
Make sure the EXT. INSERT is disengaged (light dim).
STEM OUT A MIX AND MAKE SOME SOUND
Assign track outputs or groups of track outputs (called “stems”) from your DAW to the channels you want them to occupy on
the 2-BUS+. You might send all the drums out in stereo on channels 3-4, guitars on 5-6, etc…
Assign mono tracks from the DAW that you’d like to have in the middle of your mix (perhaps bass and lead vocals) to channels
1-2 or 9-10 and then engage the MONO buttons to bring those channels to the center of the mix.
Press play and use your DAW to get a basic mix happening. Enjoy mixing in analog!
TIP: Don’t overthink the routing. Just remember that sounds with loud transients should be spread out to take the stress off the
DAW. Remember, there’s no one right way to organize a mix. Every project is unique, and even different genres of music call for
different approaches. Organizing the routing in effective ways is part of the craft of analog mixing. See our website or read the
rest of this manual for routing examples, diagrams and helpful tips.
START MIXES IN THE ANALOG ENVIRONMENT
Analog and digital mixing environments are very different, and what worked “in the box” might not hold up once it’s being
summed in analog. Ultimately you’ll get far better results in analog, but if you need to rework a pre-existing digital mix, we
recommend zeroing out the mix, removing the plug-ins and starting from scratch.
Begin all new mixing projects through the 2-BUS+ (Create a template in your DAW). That way you wont have to re-do anything

2-BUS+ | 3
down the road. You’ll be surprised how quickly you can work in the analog environment.
TIP: Try mixing without any plug-ins. Many mixing engineers used to working in the box depend on plug-ins to get their mixes
to come together, but when you mix in the analog realm some of those plug-ins might be holding your original sounds back.
Deinstantiate all of them and get a cool balance happening in the analog environment. Now see if you’d like to change any of
the original sounds with your plug-in processors. Many users find they use far fewer when mixing with the active summing
amps in the 2-BUS+.
TRY OUT SOME REAL ANALOG COLOR
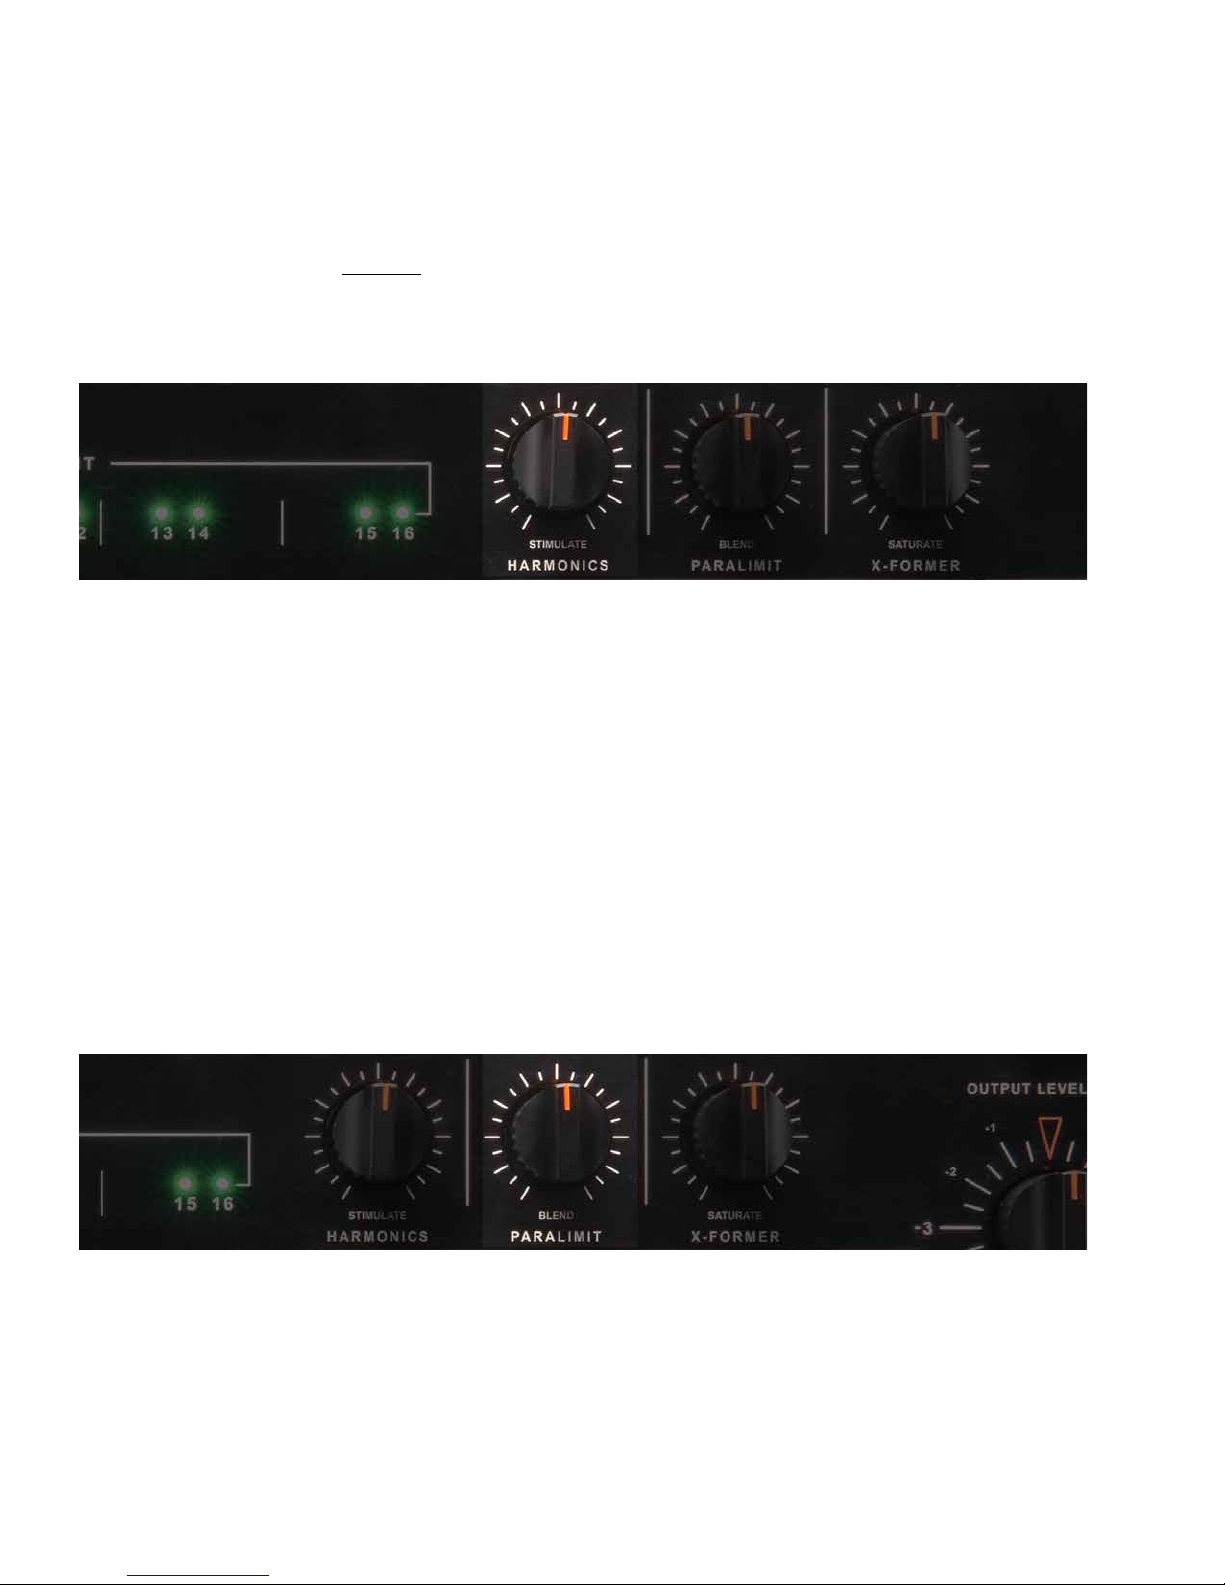
Once you’ve got a decent balance together, go ahead and dial in some color with the unique on-board analog circuits.
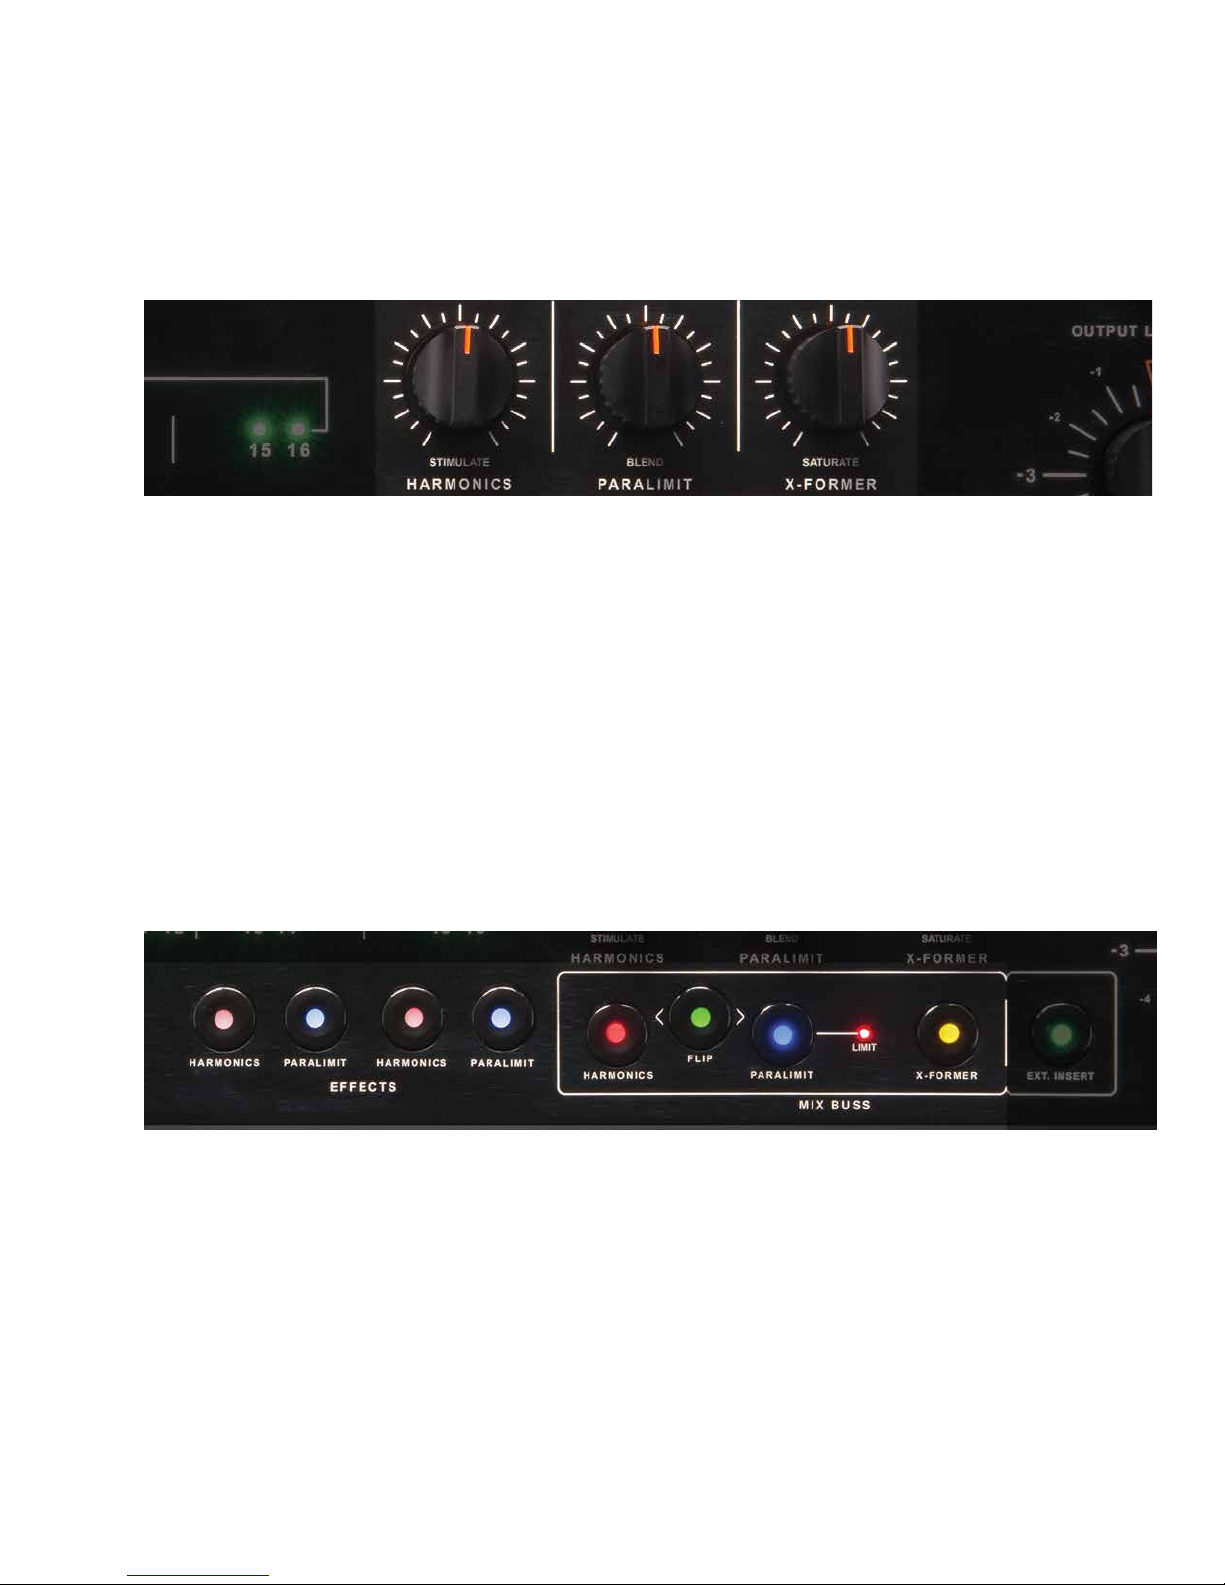
Engage Harmonics by pressing the button so it lights up, and then turn the knob clockwise to increase the effect. Do the same
for Paralimit and X-Former, blending all three colors to taste.
Try “Flip” to change the order of Harmonics and Paralimit.
MEET THE TONE CIRCUITS
Harmonics is a totally unique analog saturation circuit that adds the perfect blend of even and odd harmonics to your mix or
stem. At subtle settings, the sound will gently glow. Turn it up for more obvious distortion! (Note: This is shaped distortion, not
the same thing as turning a guitar amp up to 11).
Paralimit is inspired by the famous Urei 1176 Limiting Amplifier with all of its ratio buttons pushed in at once, a cool insider trick
that generates an explosive sound. Blend Paralimit into the full mix or to any stem assigned to 13-14 or 15-16.
X-Former inserts a pair of customized CineMag transformers across the mix buss and lets you drive the core with a very unique
circuit developed by our masterful designer, Chris Muth. Listen closely for a tightening of the low-end and increased richness in
the mids as you drive it harder.
TRY SOME INSTANT RE-PATCHING
Because Harmonics and Paralimit are instantly assignable (independently or together) to channels 13-14 and 15-16, you can
choose to take them off the mix buss and use them on channel pairs.
The FLIP button changes the order of Harmonics and Paralimit when they’re assigned to the mix buss or to a channel pair
together. Flipping them allows for different interactions between the two circuits.
TIP: The Paralimit circuit gives you incredibly high-quality analog parallel compression processing. Famously used by the top pro
mixers, blending in a bit of “squashed” signal with the original signal adds umph, sustain and energy to your mixes. Try blending
Paralimit into a drum stem for huge drum sounds, or try a little on a vocal to get an edgy tone happening.
RELAX AND ENJOY
With the 2-BUS+ you’re using the best analog summing mixer available. Your ears will thank you, and so will your clients. Take
your time getting to know its high-fidelity sound, its powerful tone circuits, and most of all take time to enjoy mixing in the
analog environment. Many claim that analog mixing takes the stress and fatigue out of digital work, that they are more relaxed
and energized throughout even the longest mixing sessions. We think you’ll agree.

4| DANGEROUS MUSIC
2-BUS+: Front Panel Features & Benets
01. LED METERING
[SIGNAL PRESENT LEDS PICTURED ABOVE]
Feature: LED Metering.
Benefit: Verify audio is present on any of the 16 channel inputs- simplifies troubleshooting.
Tip: ,LEDs will either be dark when no audio is present or green when signal is present. They will not turn red for overload-
because the 2-BUS+ has more headroom built in than any D/A converter set to standard calibrations (meaning you
will clip in your DAW before you ever get close to clipping the 2-BUS+). The 2-BUS+ provides 6dB of headroom above
full-scale output of a converter calibrated to the industry standard of -18dBu.
02. MONO BUTTONS
[MONO BUTTONS PICTURED ABOVE]
Feature: Switch inputs 1&2 and/or 9&10 from stereo to mono.
Benefit: Pan specific instruments straight up the middle of your mix.
Example: If you have the kick drum on input 1, the snare on input 2, the bass guitar on 9 and the lead vocal on 10, then the mono
buttons could be engaged to send those four elements straight up the middle of the mix.
Tip: ,Want to drop your favorite EQ on the lead vocal? No problem. Simply patch it between your D/A (or interface) to the EQ
and into input 10. Boom! You’re processing in analog, which means no latency that can cause phasing and other issues
while mixing. Many users are wiring the 2-BUS+ into a patch bay or a Dangerous Liaison along with their converters
to make for even easier integration of their outboard gear.

2-BUS+ | 5
03. EFFECTS CONTROL: PARALLEL & SERIES PROCESSING
[PARALLEL & SERIES PROCESSING KNOBS PICTURED ABOVE]
Feature: Each of the three color options are controlled individually via a continuously variable potentiometer. Both Harmonics
and Paralimit are blended using parallel processing. The X-Former is wired in series, meaning that the CineMag
transformers are patched across the stereo mix directly, rather than blended in parallel. However, you can control how
hard the X-Former circuit is driven with the “Saturate” knob.
Benefit: Dictates the amount of direct (non-effected, dry) or processed (effected, wet) signal to achieve the right balance of
color for every mixing project. Instantly and simply achieve otherwise complicated parallel processing at the push of a
button and the turn of a knob.
Tip: ,The parallel processors are virtually level matched- meaning that from dry through to wet the level will be largely
unchanged. Not only does this help you maintain levels in your mix while adding processing, it also keeps you from
falling for the “louder is better” fallacy so common when comparing processed and unprocessed signals.
04. EFFECTS CONTROL: ASSIGNMENT & ENGAGEMENT
[EFFECTS ASSIGNMENT & ENGAGEMENT CONTROLS PICTURED ABOVE]
Feature: All three color options may be assigned to the mix buss. Harmonics and Paralimit can alternately be assigned to mix
stems 13-14 or 15-16 individually or together. When assigned together, the “Flip” button instantly changes the order of
Harmonics and Paralimit.
Benefit: With the simple front panel buttons and knobs, you are instantly creating complex patches and parallel processing
configurations in a hassle-free way – all in the analog realm. Many engineers will confess to not trying out alternate
configurations if it involves elaborately re-patching their mix, so now there’s no excuse not to try a radically different
configuration on the fly. Experimentation often leads to new discoveries and great results! Assigning Harmonics and
Paralimit to separate stems (13-14 or 15-16) allows for quick analog parallel processing of individual instrument pairs
within the mix. Combine them in any order with the “Flip” control, or use them separately.
Insert the on-board CineMag transformers and “Saturate” them to taste.

6| DANGEROUS MUSIC
Use the External Insert to patch your favorite outboard processing to the entire mix at the press of a button.
Use: Simply press the buttons to engage the effects on the appropriate stem or master mix buss.
Tip: ,All three color options employ True Hard Wired Bypass technology. In other words, when the effect is disengaged,
the circuitry is completely out of the signal path, allowing for true A/B comparisons. This also allows you to use the
2-BUS+ in its pure form as the most transparent analog summing mixer available.
05. EFFECTS CONTROL: HARMONICS
[HARMONICS CONTROL PICTURED ABOVE]
Feature: Tuned harmonic distortion generator in parallel.
Benefit: Introduces a controlled amount of analog distortion. Our lead designer, Chris Muth, has carefully tuned the amount of
even- and odd-order Harmonics for a very musical analog sound. For example, add shimmer to drum overhead mics,
warm up the whole mix, or sweeten a vocal without it getting too sibilant. This is the kind of analog tone circuit that
will continually reveal new uses throughout the years.
Operation: Select where to insert the effect (i.e. Buss 13-14, Buss 15-16 or the Master Buss) then starting with the knob fully
counterclockwise (dry), turn it clockwise (wet) to introduce the effect.
Tip: ,Try training your ear to see how little of the Harmonic effect you can reliably discern. As years of experience add up,
you’ll be able to discern smaller and subtler differences in tone. The Harmonics circuit can add nuanced colors that
are consciously audible to some people and only subconsciously felt by others. Experiment and test your perceptual
skills.
06. EFFECTS CONTROL: PARALIMIT
[PARALIMIT CONTROL PICTURED ABOVE]
Feature: Paralimit is a Dangerous-original design inspired by the famous UREI 1176 FET Limiting Amplifier with “all buttons in.”
“ABI” was a trick where the ratio selectors were all pressed at once to give the 1176 a near infinite ratio that absolutely
slammed signals. We’ve added our unique implementation of preemphasis to help it cut through the mix.
Benefit: Add as much or as little “crush” to your stems or master buss as you choose. Subtly blend Paralimit into stereo
background vocals, strings and keyboard pads to “consolidate” them and help them cut through. Especially effective
on drum tracks when an aggressive sound with lots of sustain is called for. Will not introduce “swoosh” artifacts upon

2-BUS+ | 7
the initial attack, collapse the stereo image, or suck the life out of the bottom end.
Use: Select where to insert the effect (i.e. Buss 13-14, Buss 15-16 or the Master Buss) then starting with the knob fully
counterclockwise (dry), turn it clockwise (wet) to introduce the effect.
Tip: ,Use the red LED to determine when you’re crossing the Threshold. See photo under item 4 for a screenshot.
07. EFFECTS CONTROL: X-FORMER
[X-FORMER CONTROL PICTURED ABOVE]
Feature: X-Former utilizes a pair of customized CineMag transformers with a Chris Muth designed core saturation circuit that
takes a unique approach to generating real analog artifacts and tone.
Benefit: When merely inserted and not driven, the CineMag transformers will add a subtle tightening to the low-end and will
firm up the whole mix. By turning up the knob, you begin to drive the transformer in a controlled manner that eventually
gives way to a unique analog distortion when fully clockwise.
Use: Insert the effect by selecting the X-Former Mix Buss button, then starting with the knob fully counterclockwise (dry),
turn it clockwise (wet) to introduce the effect.
Note: The X-Former is engaged even when the knob is fully counterclockwise (It is in series, not parallel).
Tip: ,Try working with the transformer circuit on, but turned fully counterclockwise. The subtle tightening of low end will
often allow you to do less compressing to low end content, like bass and kick drums. Many vocal tracks will also pick
up a hint of interest from a the subtle effects of running your mix through excellent transformers.
08. EFFECTS CONTROL: EXTERNAL INSERT
[EXTERNAL INSERT SWITCH PICTURED ABOVE]
Feature: Have a favorite piece or chain of outboard for the Mix Buss? Rented or borrowed a piece of gear to audition in your
arsenal? Plug it in here and turn it on and off instantly with the EXT. INSERT button.
Benefit: Audition outboard gear at the touch of a switch on a True Hardwire Bypass for honest A/B comparisons. Also, the
outboard changes will be audible via the Monitor Output vs. daisy chaining the Main Output to outboard, which requires
monitoring of the final “print track” in your DAW for comparisons.
Operation: Simply press the EXT. INSERT button to instantly patch in your favorite outboard gear. Hard-bypass when disengaged.

8| DANGEROUS MUSIC
Tip ,: Imagine Buss B of the Dangerous Liaison wired to the External Insert for instant A/Bs- Boom!
09. OUTPUT LEVEL TRIM
[OUTPUT LEVEL TRIM STEPPED ATTENUATOR PICTURED ABOVE]
Feature: The stepped attenuator (not a potentiometer) can cut -4dB or boost 6dB for the final print stage.
Benefit: The exacting stepped attenuator has .01dB of tolerance, meaning it tracks identically through the entire range, allowing
the stereo image to remain unchanged. Recall your exact settings easily due to the steps.
Operation:Twist at will to compensate for any added or lost gain during mixing to get the perfect print levels for your mix, whether
you’re printing to tape, back into your DAW or to an external digital recorder.
Tip ,: If sending the Mix Output into outboard gear, it may be desirable to “drive” it by pushing the output of the 2-BUS+. For
example, certain vintage compressor / limiters utilize a fixed ratio, so by cranking more voltage into their input stage,
the effect will be more dramatic and thus, audible. Conversely, reducing the level to external gear will have the opposite
effect (especially when attempting not to blow out A/D converters and plug-in limiters!).

2-BUS+ | 9
2-BUS+: Rear Panel Connections
10. DB-25 & XLR INPUTS
[REAR PANEL INPUTS PICTURED ABOVE]
Feature: High-Quality DB-25 Connectors and XLR input connectors.
Benefit: High-quality connectors assure proper connection of all your equipment in and out of the 2-BUS+, while the DB-25 and
XLR duplicates allow for versatile and quick connection in any studio configuration.
Note: DB-25s wired per the Tascam-Avid standard. Please use high quality cables when connecting your beloved audio gear.
Tip ,: Utilize either set of inputs at your convenience. (Do not use them simultaneously!)
11. EXPANSION INPUTS
[EXPANSION INPUTS PICTURED ABOVE]
Feature: Expand your 2-BUS+ by patching in another 2-BUS+, an original 2-BUS, a 2-BUS-LT or a D-BOX here.
Benefit: There are plenty of mix engineers out there with three or more Dangerous Music Summing Mixers working together for
even more channels of conversion and more channels of our superior active analog summing.
Note: If combining the 2-BUS+ with other models, make it the final unit in the chain in order to apply the colors to the entire
mix.
Tip ,: Want to employ an external console? Take the master outs of your mixer and connect them to the Expansion Inputs of
the 2-BUS+.

10 | DANGEROUS MUSIC
12. EXTERNAL INSERT
[EXTERNAL INSERT CONNECTIONS PICTURED ABOVE]
Feature: Have a favorite piece or chain of outboard for the Mix Buss? Rented or borrowed a tasty morsel of gear to audition for
your arsenal? Plug it in here.
Benefit: Audition outboard gear at the touch of a switch on a True Hardwire Bypass for honest A/B comparisons. Also, the
outboard changes will be audible via the Monitor Output vs. daisy chaining the Main Output to outboard, thus requiring
monitoring of the final “print track” for comparisons.
Operation: Hit the External Insert button and tweak your outboard at will.
Tip ,: Imagine Buss B of the Dangerous Liaison wired to the External Insert for instant A/Bs- Boom!
13. MAIN & MONITOR OUTPUT
[MAIN & MONITOR CONNECTIONS PICTURED ABOVE]
Feature: Use the MAIN OUTPUT to feed whatever you’re using to capture your mix. A pair of interface inputs back into your DAW,
an external digital recorder or analog tape machine are typical destinations for final mix prints.
Use the MONITOR OUTPUT to feed your monitor controller (for example, The MONITOR ST, The SOURCE, etc...).
Benefit: The MAIN and MONITOR paths offer essential big-console functionality, executed here to the highest standards so that
so that true A/B comparisons before and after the print A/D converter are effortless. What you hear is what you’ll print.
Operation: Patch accordingly in your studio, either directly or via a high-quality patch bay or Dangerous Liaison.

2-BUS+ | 11
14. POWER CABLE & FUSE
[AC INLET & FUSE HOLDER PICTURED ABOVE]
Feature: Utilizes a standard 3 pin IEC power cable.
Benefit: Easy to replace if lost.
Feature: Switching power supply auto detects voltage, but you must use the correct fuse value.
Benefit: Travel with your favorite gear anywhere in the world while spreading the audio gospel.
Operation: Unit ships with voltage appropriate fuse value. To change it, use a screwdriver to gently pry the mains inlet module’s
cover open and insert the correct voltage. Fuses for the alternate voltage are included in the shipping box.
Tip: ,The power switch is on the inlet module. Seat the AC cable completely and use properly grounded power mains for safe
and quiet operation.
Tip: ,If the 2-BUS+ will not power on and the power is known to be good, check the fuses under the inlet module’s cover.
Use 2 amp Slo-Blo for 90-120V (Americas) and 1 amp Slo-Blo for 200-240V (Europe). Switching fuses will not void
your warranty.

12 | DANGEROUS MUSIC
2-BUS+: Routing Scenario
15. ROUTING IN PRO TOOLS (ONE OF MANY OPTIONS)
[SCREEN SHOT OF PRO TOOLS 11 ROUTING PICTURED ABOVE]
For this example, we assume you’ve wired 16 analog outputs from your interface or D/A converter into the 16 inputs of the 2-BUS+, the
stereo MONITOR OUTS to a balanced input on your monitor controller (not directly to your speakers), the stereo MAIN OUTS back into your
DAW interface and sent the digital output to your monitor controller for the final mix. (Refer to the wiring diagram ahead).
Next, open your DAW and create 8 stereo aux tracks that correspond to their associated outputs. In other words, Aux 1-2 has Analog 1-2
of your interface as its output, and internal buss 1-2 as its input. Subsequent busses follow the same pattern (see picture above). You can
name these aux tracks once you know what you will be sending to them (i.e. Drum Buss, Background Vocals, Effects, etc).
Assign tracks from your session to these busses according to how you would like to split up your stems (i.e. all guitar tracks are bussed to
3-4, all percussion tracks are bussed to 5-6). For important mono tracks such as kick drum, snare drum, lead vocal, or bass guitar, you can
utilize the mono buttons on the 2-BUS+ by sending these tracks to buss 1, 2, 9, or 10.
Note the return to your DAW (in this example 17-18) is on an AUX because you may want to instantiate a plug-in here. That AUX is assigned
to the stereo track named “Mixdown”. This will be your final printed master.

2-BUS+ | 13
DB-25 CONNECTORS ARE
WIRED TO TASCAM / AVID
PROTOCOLS
2-BUS+ with 16 CHANNEL INTERFACE
DB-25 SNAKE
XLR-F TO DB-
25 SNAKE
2-BUS+
DB-25 SNAKE
TO MONITOR
CONTROLLER
DIGITAL
OUTPUT
ANALOG OUTPUT
9-16
ANALOG OUTPUT
1-8
ANALOG INPUT
9-16
INTERFACE

14 | DANGEROUS MUSIC
SPECIFICATIONS
Note: Dangerous Music, Inc. publishes actual measured specifications, not theoretical numbers derived from data sheets
published by chip manufacturers.
THD+N @+4dBu 1KHz, unweighted, 22Hz to 22kHz < 0.0048%
THD+N @+22dBu 1KHz, unweighted, 22Hz to 22kHz < 0.0026%
IMD @ +4dBu < 0.0038%
IMD @ +22dBu < 0.0021%
Crosstalk rejection > 108dBu @ 1KHz
Noise at Unity Gain 22Hz to 22KHz: < -86dBu
Noise at Nominal Mix Setting 22Hz to 22KHz: < -91dBu
Frequency Response Flat within 0.1dB from 10Hz -50kHz
Input Impedance 25K Ohms Balanced
Output Impedance 50 Ohms Balanced
Replacement Fuses: AMERICAS 90-120VAC 2 Amp Slo-Blo fuse
EUROPE 200-260VAC 1 Amp Slo-Blo fuse

2-BUS+ | 15
WARRANTY
Free 2 year extended warranty with online registration.
Standard warranty: 90 days parts and labor, subject to inspection.
Does not include damage incurred through shipping damage, abusive operation or modifications/attempted repair by unauthorized
technicians.
USA EUROPE
Dangerous Music Inc. Dangerous Music Europe
231 Stevens Road Stieleichenweg 55
Edmeston, NY 13335 50999 Cologne, Germany
Fon: +49 2236 393731
Fax: + 49 2236 393732
Dangerous Music, Inc. reserves the right to alter the software and design of their equipment.
If after reading the manual more information for an application is needed, please contact us via email for the quickest response.
•Factory contact for RA# must occur before shipping a unit to us for service.
•Please keep the original cartons in case storage or transportation of units is required.
•Always insure shipment as these damages are not covered by the warranty.
•Thank you for actually reading the manual. Now go make some Dangerous Music!
revision 5.0 Audio Alchemist August 2015

16 | DANGEROUS MUSIC
Table of contents
Other Dangerous Music Music Mixer manuals