DanPumps S-IP User manual

In-Line Pumps models: S-IP / S-MP.
End-of-life, pump has to be recycled in accordance with local regulations. Version 1.0 2017.

1. Manual content.
1. Pump labels.
2. Applications.
3. Technical specification.
4. Handling.
5. Pump installation.
6. Electrical installation.
7. Operation.
8. Service & maintenance.
9. CE Declaration.
10. Trouble shooting.
11. Spare parts.
2. Pump labels.
Danpumps wet-end label.Motor label example.
Technical information is subject to change without notice.
3. Applications.
This installation and service manual are valid to pump type S-IP and S-MP series.
S-IP and S-MP pumps are single stage, and non-self-priming pumps.
The pumps are constructed as in-line model, and driven with a standard norm electro motor.
The pumps are designed for clean water, saltwater and water with small contaminants.
Impeller is a closed model.
S-IP and S-MP pumps are as standard assembled with Svend-Hoyer electro motor.
•Option: S-IP and S-MP pumps can be ordered with other motor brands like ABB or BEVI.
•Option: Frequency Converter Drive direct mounted on the motor.
•Option: ATEX motor. A22 (II 3D Ex tc IIIB T120) & ExnA (II 3G Ex nA IIC T3)
•Option: Forced Fan Cooling.
•Option: Bearing temperature sensor.
•Option: IP56 / IP65.
•Option: SIC/SIC Mech. Seal.
•Option: Automatic Aspirator unit.
WARNING.
The pump must never be used in flammable or explosive media. If there are local restrictions concerning fire
risks, they must be obeyed at all time.
The pump meet EU’s machine directive, see declaration of conformity in this manual.
The individual national country and local standards has at all time to be observed.

4. Technical specification.
•S-IP and S-MP pumps are assembled with a 3-phased motor. Version 2-pol or 4-pol.
•50 or 60 Hz after choice. See motor label for accurate motor information on your pump.
•230/400 or 400/690 after choice. See motor label for accurate motor information on your pump.
•Motor space heater* 1x230vac. 50watt to 100watt. Have to be protected with an extern fuse.
•Svend Höyer electric motors are type approved by BV, GL and ABS (design approval).
•Svend Höyer electric motors are CE marked according to the Low Voltage Directive 2006/95/EC.
•PTC resistance*: 200-250ohm at 20ºC. (U = 7,5V max).
•Thermistor. On/off. 135ºc.
•Ambient temperature: up to max. 40ºC.
•Media temperature: 5ºC to 100ºC
•Flange according EN1092-1
•Pump is based on design according ISO 2858.
•Pump Standard surface treatment: Blue RAL 5010. C5M.
*Only if it is built-in into the motor.
Motor protection.
Degree of protection is standard IP55, and insulation class is F. Tested to standard IEC 60034-2-1.
The IE2 class motor has standard tropical windings.
The IE3 class motor has tropical windings as an option.
Pump material.
Pump materiale as standard.
Items
S-IP
S-MP
Motor < 4 kw.
Alu.
Alu.
Motor > 4 kw.
Cast Iron
Cast Iron
Motor bracket
Cast Iron
Cast Iron
Back plate
Cast Iron
Bronze RG10
Mech Seal
SiC/C-NITRIL
SiC/C-NITRIL
Pump shaft
AISI 329
AISI 329
Impeller
Bronze Ni.AL.
Bronze Ni.AL.
O-Ring
Nitrile / NBR.
Nitrile / NBR.
Volute
Cast Iron
Bronze RG10
Wear rings
Bronze Ni.AL.
Bronze Ni.AL.
For some pump size can impeller i Stainless steel be an option
Danpumps Pumps can be manufactured with other types of Mech. Seal and O-rings for specific conditions.

Pump dimensions.

5. Handling.
The pump must be packaged properly during transport, to avoid damage to the pump or surroundings.
It can be transported and stored in vertical or horizontal position.
Always place the pump on a stable surface, so it cannot tip over during service, transport, testing and
installation.
For storage for long periods of time the pump must be checked again before use. Before electrical
connection, the impeller shall be turned by hand to ensure the parts do not bind.
Accidents in relation to installation can be minimized by taking care.
Be especially careful with the pump’s weight and the risk of electrical accidents.
When lifting with hoisting equipment, these must always be of the correct dimensions with regard
to the lifted weight. Secure pallet and lift the pump using motor eye-bolts.
Never walk under hanging pump.Then lift high enough only to clear pallet, and gently place on a
flat floor surface in a stable upright position.
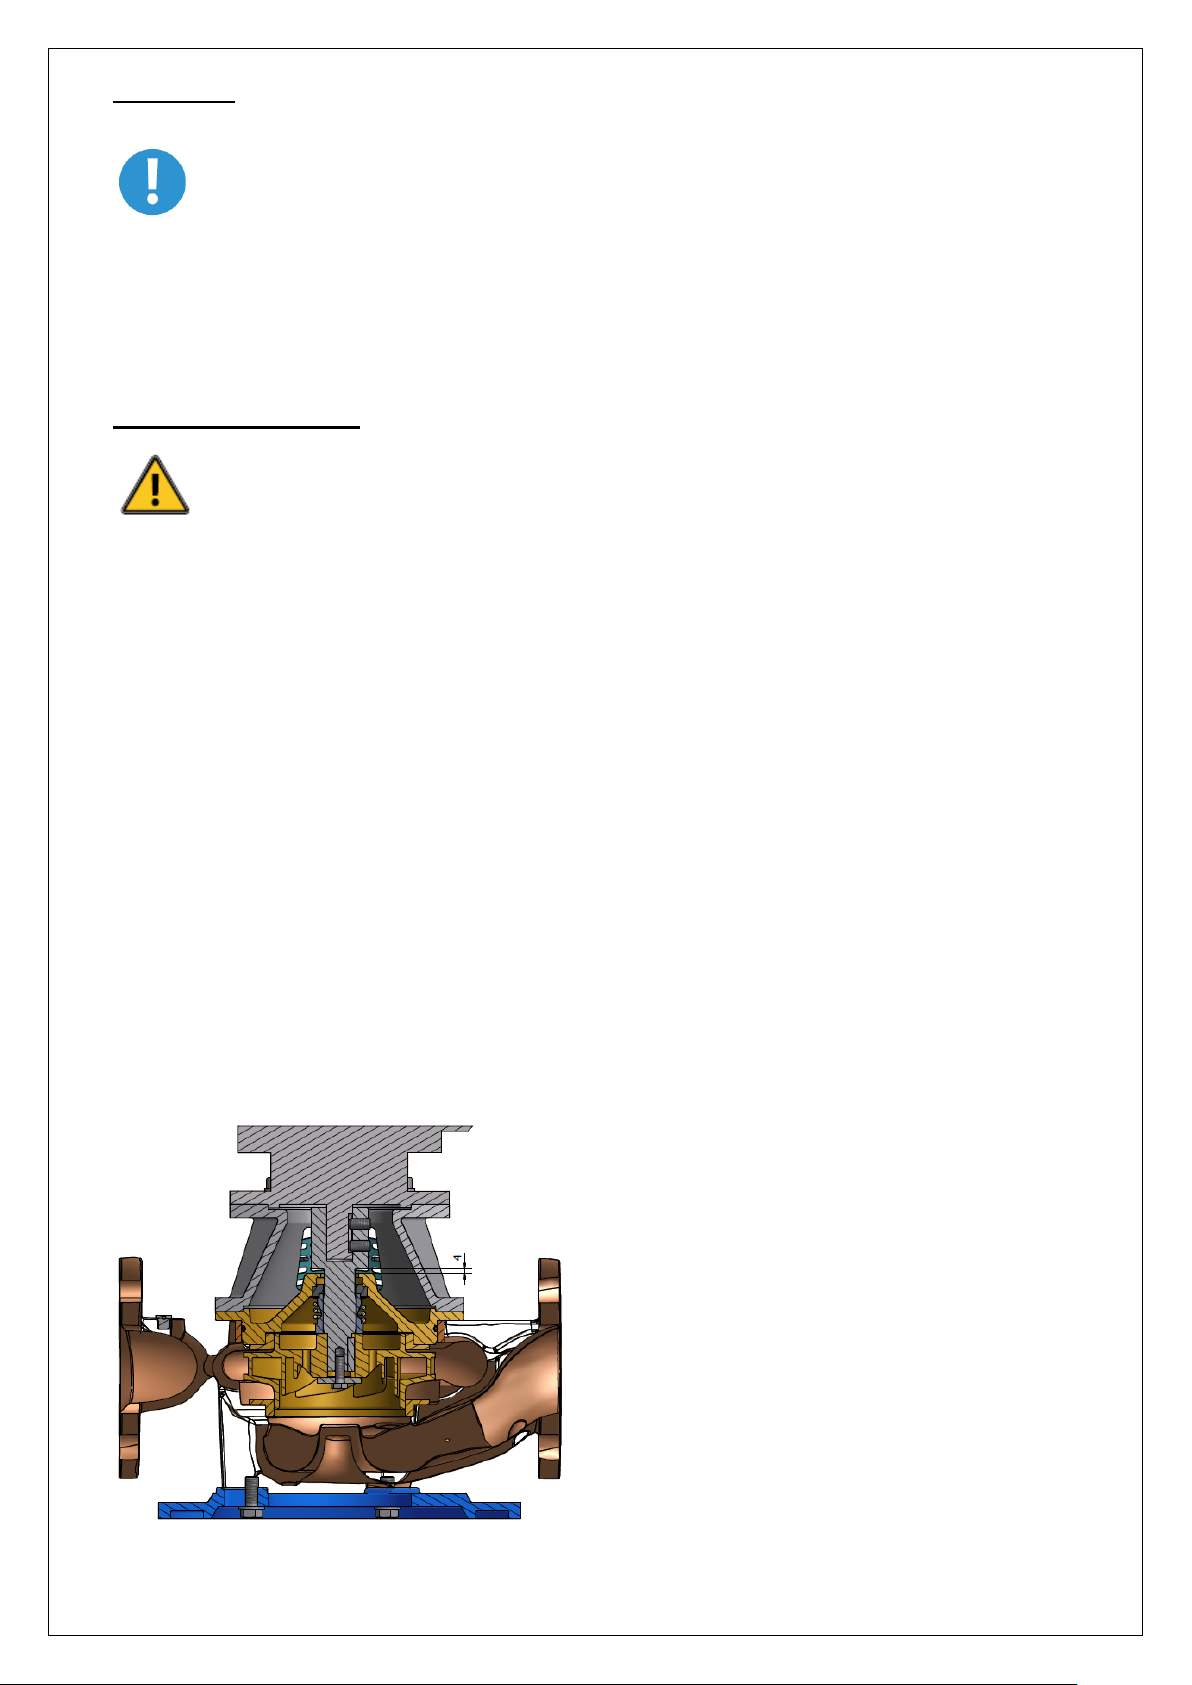
6. Pump installation.
The pipe system must have at least the same section (DN) as the pump connections.
The pump unit is designed to be installed in the pipeline. Standard piping supports on either side of the
pump should be used, to eliminate pipe and flange stresses.
The suction and discharge pipes must be in line, and the pump must not be used to pull the piping into
place by tightening the flange bolts.
Pipes should be supported near the pump
Never run the pump with suction side and discharge side blocked simultaneously.
Only shunt the pump on the discharge side.
Cavitation in the pump volute may occur, if the pump's suction becomes obstructed.
Cavitation can cause damage to the internal elements of the pump, especially on the impeller.
Always provide the right suction conditions.
Suction.
Connection elements that may cause air pockets, should not be used under any circumstances.
User larger pipes whenever needed, to maintain the water speed in the pipe below 1.2 m/s (4 feet per
second).The suction pipe must be one continuous run from its starting point to the pump.
In order to prevent air pockets and the intake pipe must never be positioned higher than the water level or
the level of the pump.
Whenever, if reducers are required to be used on the pump, then we recommend the use of concentric
reducers.
All pipe systems containing water, must be equipped with valves to prevent flooding during pump
maintenance.
Discharge.
All pipe systems containing water must be equipped with valves to prevent flooding during pump
maintenance.
In order to reduce power and flow losses, we recommend the use of pipes of same (DN) or larger diameter
than the pump discharge.
Elements that may cause air pockets should not be used under any circumstances.
The diameter of the pipes ought to be such, the water speed in the pipe remains below
2 m/s (7 feet per second).

Pump priming.
Never dry-run the pump. Water acts as a coolant for the mechanical seal.
If the pump is operated when dry, the mechanical seal will be damaged, causing leaks, expensive repair and
down-time. Damaged seal by dry-run will not be covered by the warranty.
If the water level is below the level of the pump intake, then use a low resistance check valve / foot valve on
the end of the suction side. The inner DN size in the check valve must not be less than the pump.
Fill the pump and the suction line with liquid from an outside source.
Trapped air should be allowed to escape.
The pump may be stopped with the discharge valve open without causing damage.
However, in order to prevent water hammer effects, as a general recommendation the discharge valve
should be closed first.
7. Electrical installation.
Work is only permitted to be carried out by qualified specialists and must to be
carried out in accordance with local regulations.
Before work commences, ensure that all power is switched off and cannot be
switched on again accidental.
This also applies to the auxiliary power circuits, e.g. anti-condense heaters.
Check that supply voltage and frequency are the same as rated data.
Motors can be used with a supply deviation of ± 5% voltage and ± 2% frequency, according to IEC60034-1.
Connection diagrams for main supply and accessory as PTC or heater are located inside the terminal box.
Connections must be made in such a way, to ensure that a permanently safe electrical connection is
maintained, both for the main supply and the earth connection.
We recommend that crimped connections are made in accordance with IEC 60352-2.
Use always overload switch / motor protection.
The pump must be mounted with a motor guard and a ground fault
circuit breaker.
Tightening torques for terminal board screws:
Thread M5 M6 M8 M10 M12 M16 M20 M24
T.(Nm) 2.5 3.5 7 12 18 35 55 80
Ensure that the terminal box is clean and dry.
Unused cable glands must be closed with blind caps.
Check the terminal box gasket before it is remounted.
Motor space heater: No. 1 - 2
PTC terminals: No. 3 - 4
Bimetal: No. 5 – 6
PT100: No. 7 – 8 – 9
For your motor, please see motor label inside the motor terminal box.
Equipment may vary.

8. Operation.
Before the pump is started for operation, the rotation direction must be checked. At start the
motors starting torque will cause the pump to jerk, and therefore has the pump to be mounted firm
to the base.
Before start, the pump must be fully assembled and ready for operation.
At wrong start rotation, two phases must be switched. See the connection diagram.
Wrong rotation or cavitation in the pump can make loud noise.
NOTE.
If danger of freezing exists, isolate the pump by closing the valve in the pump suction line and discharge and
drain the pump completely.
9. Service & maintenance.
Before any inspection, service or repair of the pump, it has to be physically disconnected from
the power supply. Remove connectors or dismount the wires from the electric board. An
emergency stop can be released accidental or be defective and start the pump by mistake.
All pumps require regular service and preventive maintenance to operate economically and reliably.
The pump should be checked every 6 months and during possible extreme operating conditions more often.
For complete overhaul of the pump contact an authorized pumps workshop or your local DanPumps dealer.
Clean the pump carefully before dismantling it. Follow local and national safety instructions.
Bearings in our DanPumps are lubricated for lift, and don´t need re-lubrication.
Typical duty hours for motor with lifetime lubricated bearings.
Frame size Poles Typical lifetime
56 - 160 2 - 8 40,000h
180 2 - 4 35,000h
200 2 - 4 27,000h
225 2 - 4 23,000h
180 - 225 4 - 8 40,000h
If the mechanical seal need visually inspection or have to be replaced, then never use hydrocarbon liquids
(oil or solvent) to clean mechanical seal parts. Use of oil or solvent will deteriorate material used on the seal.
Use mild soap solution to clean seal parts. Use only your finger to remove dirt. Rinse with clean water and
dry with mild air stream. Use care not to damage or scratch the delicate surfaces.
Check O-rings for cracks or tears.
Note for the electrical motor: Make sure the fan cover is clean which enable the fan wing to cool the motor.
Pumps manufactured with plug-in shaft, has a gap of 4
mm. between the back plate and adapter neck.
Please see picture.

10. Trouble shooting.
Pump don´t deliver sufficient liquid.
Pump seal leaks.
Pump makes hydraukic noise.
Pump consumes too much Amps.
Discharge pressure and flow too low.
Pump fails to deliver after start-up.
x
x x x
x x x
x x x
x x x
x x Valve has by mistake, been closed on the suction side.
x
x
x x
x x x x
x x x
x
x
x
x x x
x x x x
xVoltage or Hz are incorrect for the pump.
Voltage or Hz are incorrect for the pump.
Water level in the well is too low (open tank)
Impeller is partially clogged. Pump vibrates.
Wear ring is worn.
Air inside pump-house or periodically sucked into the pump.
The impeller is clogged.
Excessively high suction lift.
Seal not correct for the medie.
Pump has been running dry.
Pump is not running the right way.
The pump back pressure is too low.
The pump is missing 1 phase in the power line.
Operating problems.
Description of possible errors.
Valves has to be opened gradually after pump start.
The pipes are too small in diameter for the flow m³/h.
The suction is obstructed.

11. Spare parts.
The S-IP and S-MP are manufactures according specific order conditions, which give the pump a unique
composition. In order to find the correct spare parts for the pump, then always inform about the pump serial
number. You will find the serial number on the DanPumps wet-end label. (See page 2)
Model: pump with plug-in shaft. Model: Pump with claw clutch (2L)


12. CE Declaration.

Nordager 25
DK-6000 Kolding
Denmark Tel. +45 86 571 344
www.sonflow.dk
This manual suits for next models
1
Table of contents
Other DanPumps Water Pump manuals
Popular Water Pump manuals by other brands

Champion Sports
Champion Sports EP1500 quick start guide

Giant
Giant P470H installation instructions

WITA
WITA go.future 2 40-XX LED TRANSLATION OF THE ORIGINAL INSTALLATION AND OPERATING INSTRUCTIONS

GORMAN-RUPP PUMPS
GORMAN-RUPP PUMPS T3A61-B Installation, operation, and maintenance manual with parts list

Mondi
Mondi Utility & Sump pump owner's manual

Wilo
Wilo Rexa CUT GE Series Installation and operating instructions