Datron 1062 How to use

rrControl #-106637 Control Date -05/1 5,^2000
Mfg -DATRON
Model/'Series -1062, 1061A, 1061
Document T}pe -Calibration &Servicing Handbook
Note -Digital Multimeter
s
0
0
.13
0
Q
a
li
CALIBRATON
AND
SERVICING
HANDBOOK
10B1A10B1
^INS'C RUM
Idigital multimeter

CALIBRATION AND SERVICING
HANDBOOK
for
THE DATRON AUTOCAL 1062, 1061Aand 1061
DIGITAL MULTIMETERS
(The calibration and servicing information in this Handbook applies equaily to the
Autocal instruments 1061, 1061 Aand 1062.
For operating procedures refer to the User's Handbook.
850045 Issue
For any assistance contact your nearest Datron Sales and Service center.
Addresses can be found at the back of this handbook.
Due to our policy of continuously updating our products, this handbook may contain minor differences in specification, components and
circuit design to the instrument actually supplied. Amendment sheets precisely matched to your instrument serial number are available
on request.
:1984 Datron Instruments

I
CONTENTS
GENERAL DESCRIPTION \
INSTALLATION 1Refer to
MEASUREMENT PROCEDURES (
SPECIFICATION AND SPECIFICATION VERIFICATION 1User's Handbook
SYSTEMS APPLICATIONS )
Section Title Page
1CALIBRATION
1.1 INTRODUCTION
1.1.1 General
1.1.2 Essentials for Good Calibration 1
1.1.3 The 'AUTOCAL' Process 1
1.2 DC VOLTAGE CALIBRATION 2
1.3 OHMS CALIBRATION 4
1.4 AC VOLTAGE CALIBRATION -OPTION 10 ONLY 6
-OPTION 12 ONLY 7A
1.5 DC CURRENT CALIBRATION 8
1.6 AC CURRENT CALIBRATION 9
1.7 'AUTOCAL' USING 'KEYBOARD' 10
1.8 'AUTOCAL' OVER THE BUS 11
2MECHANICAL DESCRIPTION 13
2.1 GENERAL 13
2.2 FRONT PANEL 13
2.3 REAR PANEL 13
2.4 EXTERNAL CONSTRUCTION 13
2.5 INTERNAL CONSTRUCTION 13
3TECHNICAL DESCRIPTION 15
3.1 INTRODUCTION 15
3.2 ANALOG ASSEMBLY 15
3.2.1 Analog Interface 15
3.2.1. 1Introduction 15
3.2. 1.2 Power-On 15
3.2.1. 3General Interface Update Sequence 17
3.2.1.4Test 17
3.2.2 DC Isolator Section '17
3.2.2.1 Preamplifier Scaling 17
3.2.2.2 Preamplifier 20
3.2.2.3 DC Bootstrap 20
3.2.2.4 Filtering 20
3.2.2.5 Input Current Compensation 21
3.2.2.B Test 21
3.2.3 Analog to Digital Conversion (Analog Section) 21
3.2.3.1 General Principles 21
3.2.3.2 A-D Input Control 23
3.2.3.3Reference Voltages and Control Logic Power Supply 23
3.2.3.4 High Speed Buffer 24
3.2.3.5 Integrator 24

ii
Section Title Page
3.2.3.6 1st Null Detector 25
3. 2.3.7 2nd Null Detector 25
3. 2. 3.8Reset Period 25
3.3 OPTION 10 AC ASSEMBLY 27
3.3.1 General Principles 27
3.3.2 Preamplifier and Scaling 27
3.3.3 RMS Converter 28
3.3.4 High Frequency Compensation 29
3.3.5 Frequency Detection 29
3.3.6 Test 29
A3.3 OPTION 12 AC ASSEMBLY A27
A3.3.1 General Principles A27
A3.3.2Preamplifier and Scaling A27
A3.3.3RMS Converter A28
A3.3.4 High Frequency Compensation A29
A3.3. 5Frequency Detection A29
A3.3.6 Test A29
3.4 OHMS ASSEMBLY 30
3.4.1 Low Drift Voltage Follower 30
3.4.2 Constant Current Source 30
3.4.3 Test 31
3.5 CURRENT ASSEMBLY 31
3.5.1 Current Measurements 32
3.5.2 Test 32
3.6 REAR INPUT/RATIO INPUT 32
3.6.1 General 32
3.6.2 Front Panel/Rear Panel Input 32
3.6.3 Ratio 32
3.6.4 Test 33
3.7 ANALOG OUTPUT 33
3.7.1 General 33
3.7.2 Description 33
3.8 DIGITAL ASSEMBLY 33
3.8.1 Processor and Memory 33
3.8. 1.1 Software Overview 34
3.8.1 .2 The Two-Phase Clock 35
3.8.1.3 RAM/ROM Circuit 36
3.8.2 CMOS Address Decode and Input/Output Circuits 36
3.8.3 Analog to Digital Conversion (Digital Section) 39
3.8.3.1 General Principle 39
3.8.3.2 Preset Procedure 39
3. 8.3.3A-D Measurement Sequence 41
3. 8. 3.4Master Clock and Line Locking 41

II
Section Title Page
3.9 FRONT PCB ASSEMBLY 42
3.9.1 Analog Input Signals 42
3.9.2 Display Signals 42
3.9.3 Keyboard Data Encode 42
3.9.4 Keyboard LED Data Decode 43
3.10 DISPLAY DRIVER ASSEMBLY 45
3.10.1 Write Mode 45
3.10.2 Read Mode 45
3.11 IEEE DIGITAL INTERFACE 46
3.11.1 ROM Circuit 46
3.11.2 Interface Circuit 46
3.12 BCD DIGITAL INTERFACE
3.12.1 RAM/ROM Circuit
3.12.2 Interface Circuit
3.13 REAR (POWER SUPPLY) PCB ASSEMBLY 48
3.13.1 General
3.13.2 180V Supply 48
3.13.3 5V Supply 48
3.13.4 ±15V Supply 48
3.14 SELF TEST SEQUENCE 48
4INTERNAL ADJUSTMENT PROCEDURES 51
4.1 ALTERATION OF LINE VOLTAGE AND FREQUENCY 51
4.1.1 Changing Line Voltage 51
4.1.2 Changing Line Frequency 51
4.2 BATTERY REPLACEMENT 51
4.3 POST-REPAIR PROCEDURES 51
4.3.1 Basic DC Instrument 52
4.3.2 Ohms Assembly 5^
4.3.3 AC Assembly (Option 10) 54
4.3.4 AC Assembly (Option 12) 55
APPENDIX 1ANALOG DATA LINE 'F.E.T.' PATTERNS 57

IV
Section Title Page
5COMPONENT LISTS, BOARD LAYOUTS AND CIRCUIT DIAGRAMS
Interconnection Diagram 430291
Front PCB Assembly 400294/430294
Rear PCB Assembly 400295/430295
Centre PCB Assembly 400296/430296
Left Hand PCB Assembly 400297/430297
Right Hand PCB Assembly 400298/430298
Current Assembly 400304/430304
Ratio/Rear Input 400307/430307
Analog Output 400308/430308
Analog Assembly 400328/430328
Digital Assembly 400329/430329
Display Driver Assembly 400330/430330
Ohms Assembly 400331/430331
BCD Interface Assembly 400332/430332
Rear Input 400386/430386
AC Assembly (Option 10) 400402/430402
IEEE Interface Assembly 400427/430427
AC Assembly (Option 12) 400552/430552
IEEE 488 Option kit 440082/83/84
ILLUSTRATIONS AND TABLES
Figure Title Page
1.1 Zero Resistance Source Connections 4
2.1 Exploded View of Instrument 14
3.1 Printed Circuit Boards Block Diagram 15
3.2 Power-On Options Fitted Test 16
3.3 Analog Interface Sequence; Power-Up 16
3.4 Analog Interface Data Line Timing Diagram (Power-Up) 16
3.5 Analog Interface Sequence: Ohms Select 17
3.6 General Form of Analog Interface Update Timing Diagram 18
3.7 Simplified Diagram of DC Isolator 18
3.8 Simplified Diagram of Isolator Switching 19
3.9 Preamplifier Gain Circuits 20
3.10 Simplified DC Isolator Filtering Circuit 21
3.11 Simplified Diagram of Bias Current Compensation 21
3.12 Simplified Diagram of Analog Section of A-D Converter 22
3.13 Timing Diagram For Analog Section of A-D Converter 22
3.14 Multiplexer Control Line Signals 23
3.15 Positive Reference Circuitry 23
3.16 High Speed Buffer Circuitry 24
3.17 Integrator Circuit 24

V
Figure
3.18
Title
1st Null Detector Circuitry ...
Page
3.19 2nd Null Detector Circuitry. ...
3.20 Diagram of Averaging Process ..Oft
3.21 Simplified Diagram of A-D During Reset Period Oft
3.22 Simplified Diagram of AC Assembly .0*7
3.23 Simplified Diagram of the AC Preamplifier Scaling OR
3.25 Block Diagram of RMS Conversion Technioue . . OR
3.26 Simplified Diagram of AC High Frequency Compensation oq
A3.22 Simplified Diagram of AC Assembly A0"7
A3. 23 Simplified Diagram of the AC Preamplifier Scaling AOQ
A3. 24 Simplified Diagram of AC Filters ...
A3.25 Block Diagram of RMS Conversion Technioue AOQ
A3.26
3.27
Simplified Diagram of AC High Frequency Compensation
Simplified Resistance Assembly ..OQ
3.28 Simplified Diagram of Voltage Follower Circuit .. . on
3.29 Ohms Current Range Switching ...on
3.30 Simplified 12 Current Switching ..01
3.31 Use of Ohms Guard ....
3.32 Simplified Diagram of Current Assembly oo
3.33 Simplified Block Diagram of Digital Assembly oo
3.34 Job Scheduler
3.35 Two-Phase Clock Generation ....
3.36 Timing Diagram of Stretched Two-Phase Clock Oft
3.37 Simplified Diagram of Memory Circuits oo
3.38 Start Up and Non-Volatile RAM Protection OR
3.39 CMOS Address Decoding . . .OR
3.40 Simplified Diagram of Digital Section of A-D Converter ."iq
3.41 Flowchart of A-D Digital Section. .An
3.42 A-D Analog Sequence Control Signals. ., , 40
3.43 Command Delays .... An
3.44 Line Locking Timing Diagram ,
3.45 CMOS Data Bus *K©v Salect Codinc| A*y
3.46 CMOS Data Bus :LED Select Coding .
3.47 Display Driver Write Circuitry ..
3.48 Display Driver Read Mode Address States .AA
3.49 Simplified Display Driver Read Circuitry AC
3.50 Simplified Diagram of IEEE Assembly
3.51 Simplified Diagram of BCD Interface Assembly ...>IO
3.52 Line Transformer
3.53 Flowchart of Self Test Routine ^Q
4.1 Reference Selection Voltages. ...
4.2 Option 10 AC Assembly Output Selection Voltages ..ft/1
4.3 Option 12 AC Assembly Output Selection Voltages

1
SECTION 1
CALIBRATION
1.1 INTRODUCTION
1.1.1 General
The purpose of calibration is to take account of any
long-term drifts in the components of the instrument and
to restore the accuracy, traceable to aknown standard.
The period between calibrations depends upon the
accuracy performance required from the instrument and for
guidance, guaranteed accuracies for 24 hours, 90 days and
1year are quoted.
The calibration procedures presented in the following
pages should cater for most calibration situations. If, how-
ever, aspecial problem arises, please contact our Customer
Service Section.
1.1.2
The Essentials for Good Calibration
Temperature -So that the instrument can meet its
specification over the quoted temperature range, the temp-
erature environment should be stabilised at 230C ±1oc.
In addition, temperature gradients around the instrument
should be considered, therefore calibrate the instrument in
its normal operating position and allow plenty of room for
ventilation.
Warm up -It is essential that the instrument has
fully temperature stabilised if the best results from cali-
bration are to be achieved. Therefore, at least a2hour
warm-up period is recommended during which time the
line supply or the covers should not be removed even for a
short period. In addition, if the covers have been removed,
make certain that they are correctly fitted and that the leaf
contacts to the Earth and Guard Shields are in good shape.
Calibration Source -To perform auseful calibration
the accuracy of the source should always be at least four
times that of the instrument being calibrated. In most
cases, examples of likely sources are given for each cali-
bration function.
With some calibration sources, the output may take
several seconds to settle to afinal value, therefore unless
ashorter settling time is assured, aperiod of 10 seconds is
'ecommended before each calibration operation.
Guarding -It is preferable to arrange for the DVM
to be calibrated with 'Local Guard' selected. Furthermore
to arrange for the 'Lo' terminal of the DVM to remain at
'earth' throughout and let the calibration source float.
If a'Remote Guard' connection is necessary then examples
are shown in the Operating Manual.
1.1.3
The 'AUTOCAL' Process
1.1.3.1 General
The Datron 'AUTOCAL' process means that complete
calibration of AC, DC, Ohms and Current on every range
can be carried out from the instruments own front panel.
In the process, an internal non-volatile memory stores
calibration constants for each function and range as deter-
mined when the instrument takes aseries of 16 readings of
the applied calibration source. Internally, each of the
readings is deviated by one sixteenth of adigit and when
an average is taken, the instrument is able to resolve to
better than one least significant digit displayed.
Access to the non-volatile memory is gained using
akey inserted into the rear panel. When calibration is
complete, the key is removed, therefore preventing acci-
dental or unauthorised use of the calibration routine.
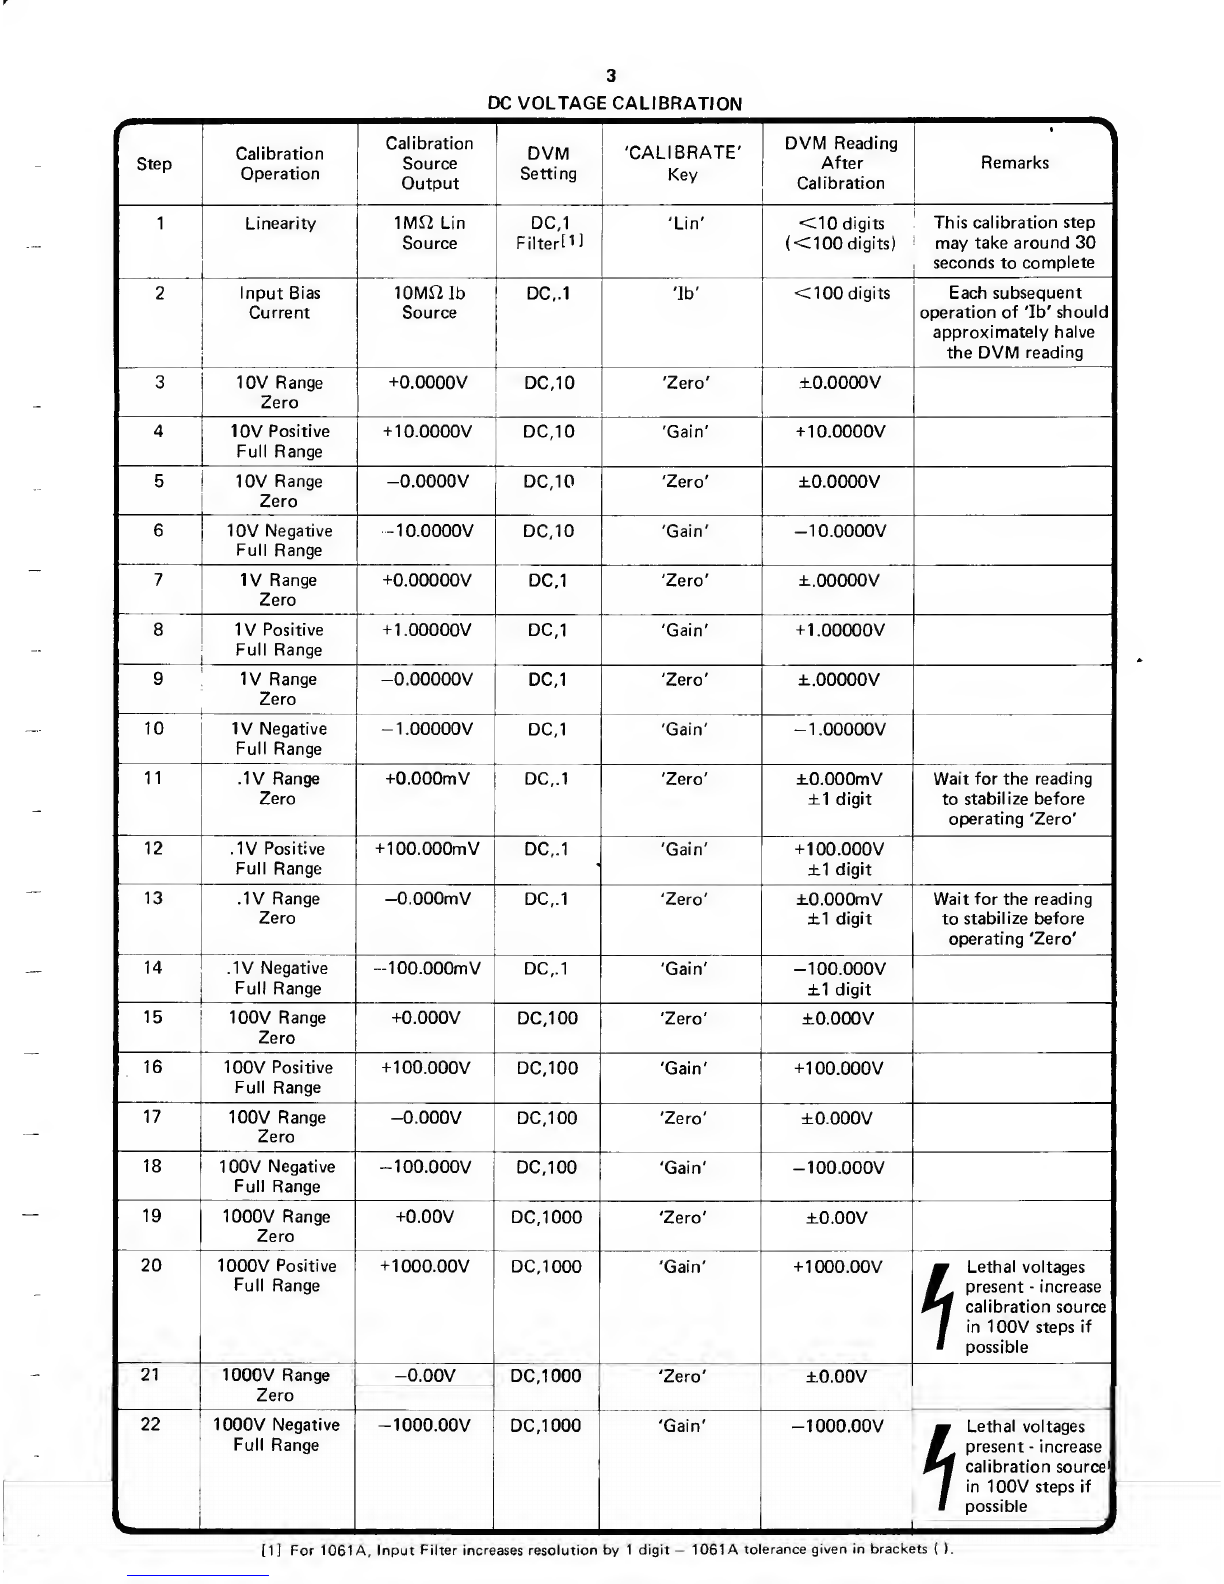
1.1.3.2Procedure Outline
-Select the 'FUNCTION' and 'RANGE' to be cali-
brated and cancel any 'MODE' or 'COMPUTE' buttons.
Insert the key into the 'CALIBRATE ENABLE'
keyswitch on the rear panel and turn to the 'CAL' position.
(The 'cal' legend will be displayed on the front panel.)
If the instrument is fitted with Option 50 IEEE Bus,
set the rear panel address switch to 31 i.e. all 1's.
-Connect the calibration source to the input terminals
and operate the keys shown in the tables in the following
pages. When a'CALIBRATE' button is operated, its assoc-
iated L.E.D. indicator will light and extinguish when the
calibration operation is executed.
-When all calibration is complete turn the keyswitch
to 'RUN' and remove the key.
1.1.
3.3
The Five 'AUTOCAL' Keys
'Zero' -This takes account of offsets in the instrument
and in the calibration source.
'Gain' -This sets ascaling factor for each range and
function.
Ib -This nulls the input bias current of the DC
voltage measurement circuits to around lOpA. Therefore
it only has asignificant effect on the low DC voltage ranges
and high resistance Ohms ranges. It can be operated as
often as required and independently of other calibration
operations. It will be seen that successive operations of 'Ib'
approach the final nulled value of current iteratively.

2
'AcHf' -This flattens the response of the A.C. ampli-
fier used for AC voltage measurement. It should only be
used when afull calibration i.e. 'Zero', 'Gain' and 'AcHf'
is carried out. As with 'lb' the calibration action is iterative
and requires several operations of the key to complete.
'Lin' -This is an important calibration operation as
it optimises the basic linearity of the internal measurement
circuitry used for all ranges and functions. It must be used
before any DC voltage or Ohms calibration is carried out.
1. 1.3.4 'AUTOCAL' using 'KEYBOARD'
This is an extension of the 'AUTOCAL' process
which is useful when using acalibration source set to a
nominal value but with known errors. This means for
example that calibration directly to astandard cell is
possible. Afull explanation of the procedure is covered
in section 1.7.
1. 1.3.5 'AUTOCAL' over the Bus
Each of the five calibration operations can be control-
led using Option 50, the IEEE bus. This means that the
instrument can be entirely calibrated remotely or under
program control. As mentioned in the 'Procedure Outline'
for amanual calibration, the rear panel address switch
should be set to 31, i.e. all 1's. When abus calibration is
required the address switch must be set to the address
number assigned to the DVM in the system. More details
of calibration with the bus are included in section 1.8.
1.2 DC VOLTAGE CALIBRATION
1.2.1
General
^The procedure in the table opposite is all that is
'necessary to completely 'AUTOCAL' the DC voltage
function. Steps 1and 2affect the accuracy on all ranges
and should therefore be carried out even if just one range
is being calibrated.
On each range a'Zero' and 'Gain' calibration is
required for each polarity of input. The two 'Zero' calibrat-
ions are included to overcome apossible zero difference
with the polarity setting of the DC calibration source.
If the 'DVM Reading After Calibration' is not in
accordance with the table, repeat operations of the same
'CALIBRATE' key are permissible. Where no tolerance
is shown in this column, only the exact reading quoted
with an occasional least significant digit showing is to be
expected.
1.
1.3.6
'Error 4'
If during calibration 'Error 4' is displayed, this indi-
cates that the Calibration Source deviates too far from the
calibration span of the instrument. Under these circum-
stances, the calibration memory is not updated and the
instrument goes into 'Hold' with the calibration button
calibration key LED remains on.
In the case of 'Zero', 'Gain' or 'AcHf' the Calibration
Source should be checked and the same 'CALIBRATE'
key repressed. The 'Hold' mode may be released any
time and the instrument will free run again. If 'Error 4'
follows 'Ib' or 'Lin' or persistently appears following 'Zero',
'Gain' or 'AcHf' then an instrument failure may have
occurred. Therefore either consult our Customer Service
Section or the Servicing Section of this Handbook.
1.2.2 Equipment Required
-1M12 'Lin' Source. This is aIMfi 5% resistor in
parallel with aInF capacitor, shielded to reduce noise
interference.
-10MJ2 'Ib' Source. This is alOMfi 5% resistor in
parallel with aInF capacitor, shielded to reduce noise
interference.
Datron products, number 400391 and 400392, are
available as 'Lin' and 'Ib' sources and are recommended.
-ADC Calibration Source, e.g.: Datron 4000/4000A
Autocal Standard.
1.2.3 Checking Accuracy after 'AUTOCAL'
To check the accuracy after 'AUTOCAL' the 'Specification
Verification' section of the User's Handbook will be useful;
it provides tables for quick reference of accuracy on all
ranges and functions in displayed digits.

3
DC VOLTAGE CALIBRATION
-Step Calibration
Operation
Calibration
Source
Output
DVM
Setting
'CALIBRATE'
Key
DVM Reading
After
Calibration
Remarks
—1Linearity 1M12 Lin
Source DC,1
FilterMI
'Lin' <10 digits
(<100 digits)
This calibration step
may take around 30
seconds to complete
2Input Bias
Current 10Mi2 Ib
Source DC,.1 'Ib' <100 digits Each subsequent
operation of 'Ib' should
approximately halve
the DVM reading
310V Range
Zero +0.0000V DC, 10 'Zero' tO.OOOOV
410V Positive
Full Range +10.0000V DC,10 'Gain' +10.0000V
510V Range
Zero -O.OOOOV DC,10 'Zero' ±0.0000V
610V Negative
Full Range -10.0000V DC,10 'Gain' -10.0000V
7IV Range
Zero +0.00000V DC,1 'Zero' ±.00000
V
8IV Positive
Full Range +1.00000V DC,1 'Gain' +1.00000V
gIV Range
Zero -O.OOOOOV DC,1 'Zero' ±.00000
V
10 IV Negative
Full Range -1.00000V DC,1 'Gain' -1.00000V
-
11 IV Range
Zero +0.000mV DC,.1 'Zero' ±0.000mV
±1 digit
Wait for the reading
to stabilize before
operating 'Zero'
12 •IV Positive
Full Range +100.000mVDC,.1 'Gain' +100.000V
±1 digit
13 IV Range
Zero -O.OOOmV DC,.1 'Zero' ±0.000mV
±1 digit
Wait for the reading
to stabilize before
operating 'Zero'
—14 ,1V Negative
Full Range -1 00.000mVDC,.1 'Gain' -100.000V
±1 digit
15 100V Range
Zero +O.OOOV DC,100 'Zero' iO.OOOV
16 100V Positive
Full Range +100.000V DC,100 'Gain' +100.000V
—17 100V Range
Zero -o.ooov DC,100 'Zero' ±0.000V
18 100V Negative
Full Range -100.000V DC, 100 'Gain' -100.000V
—19 1000V Range
Zero +0.00V DC,1000 'Zero' ±0.00V
-
20 1000V Positive
Full Range +1000.00V DC,1000 'Gain' +1000.00V mLethal voltages
mpresent -increase
calibration source
fin 100V steps if
possible
—21 1000V Range
Zero -0,00V DC, 1000 'Zero' ±o.oov
-
22 1000V Negative
Full Range -1000.00V DC,1000 'Gain' -1000.00V mLethal voltages
Mpresent -increase
calibration source'
fin 100V steps if
fpossible
[1] For 1061 A, Input Filter increases resolution by 1digit —1061 Atolerance given in brackets ().

4
1.3 OHMS CALIBRATION
1.3.1
General
The procedure in the table opposite is all that is
necessary to completely 'AUTOCAL' the Ohms function.
If just the Ohms or just one range of the Ohms is to be
calibrated, then steps 1and 2in the DC Voltage Calibration
table should be carried out first. Then on each Ohms range
just a'Zero' and 'Gain' calibration is required.
If the 'DVM Reading After Calibration' is not in
accordance with the table, repeat operations of the same
'CALIBRATE' key is permissible to improve the reading.
Where no tolerance is shown in this column, only the exact
reading quoted with an occasional least significant digit
showing is to be expected.
1.3.2 'Zero' Resistance Source
For accurate 'Zero' calibration on Ohms it is
ESSENTIAL that acorrectly connected zero source is used.
Two arrangements are necessary as shown in Fig. 1.1;
it can be seen that '4 wire J2' selection is recommended on
all ranges.
1.3.3 Equipment Required
Aset of resistance standards from lOfil to lOMO in
decades; it is essential that 10J2 to lOOkfi standards are
4terminal devices, e.g. Datron 4000/4000A Autocal
Standard with Option 20.
1.3.4 Checking Accuracy after 'AUTOCAL'
To check the accuracy after 'AUTOCAL' the 'Speci-
fication Verification' section of the Operating Handbook
will be useful. It provides tables for quick reference of
accuracy on all ranges and functions in displayed digits.

5
OHMS CALIBRATION TABLE
r
Step Calibration
Operation
Calibration
Source
DVM
Setting
'CALIBRATE'
Key
DVM Reading
After
Calibration
’
Remarks
110J2 Range
Zero
4wire zero kl2, 4wire, 1012 'Zero' ±0.000012
±1 digit
Wait for the reading
to stabilize before
operating 'Zero'
210S2 Full
Range
10O [1]
Standard
Resistor
kl2, 4wire, 1012 'Gain' 10.000012
±1 digit
Wait for the reading
to stabilize before
operating 'Gain'
3,1kJ2 Range
Zero
4wire zero kl2, 4wire, .1 'Zero' ±0.00012
4.1kl2 Full
Range
10012 [1]
Standard
Resistor
kl2, 4wire, .1 'Gain' 100.00012
51kJ2 Range
Zero
4wire zero kl2, 4wire, 1'Zero' ±.00000kl2
61kJ2 Full
Range
1kl2 [1]
Standard
Resistor
kl2, 4wire, 1'Gain' 1.00000kl2
7lOkfi Range
Zero
4wire zero kl2, 4wire, 10 'Zero' ±0.0000kl2
8lOkfi Full
Range
10kl2 [1]
Standard
Resistor
kl2, 4wire, 10 'Gain' 10.0000kl2
9100kJ2
Range Zero
4wire zero kl2, 4wire, 100 'Zero' ±0.000kl2
10 100kS2
Full Range
100kl2 [1]
Standard
Resistor
kl2, 4wire, 100 'Gain' 100.000kl2
11 1000kS2
Range Zero
4wire zero kl2,4 wire, 1000
Input Filter[2]
'Zero' ±0.00kl2
(±0.000kl2)
12 1000k^2
Full Range
1000kl2 [1]
Standard
Resistor
kl2, 4wire, 1000
Input Filter[2l
'Gain' 1000.00kl2
±1 digit
(1000.000kl2)
(±10 digits)
13 10MJ2 Range
Zero
4wire zero kl2, 4wire, 10M12
Input Filter(2]
'Zero' ±0.0000M12
(±O.OOOOOM12)
14 10MJ7 Full
Range
10M12 [1]
Standard
Resistor
kl2, 4wire, 10M12
Input Filter[2]
'Gain' 10.0000M12
±5 digits
(10.00000M12)
(±50 digits)
[1 ]-With Standard Resistor sources it may be useful to use the 'KEYBOARD' method of calibration -see section 1.7
[2] -For 1061 A, Input filter increases resolution by 1digit, so 1061 Afigures are given in brackets ().

6
1.4 AC VOLTAGE CALIBRATION -OPTION 10 ONLY
1.4.1
General
The procedure in the table opposite is all that is
necessary to completely 'AUTOCAL' the AC voltage
function. On each range just a'Zero', 'Gain' and 'AcHf'
calibration is required.
If the 'DVM Reading After Calibration' is not in
accordance with the table, repeat operation of the same
'CALIBRATE' key is permissible to improve the readings.
This will be necessary with the AcHf key.
1.4.2 Equipment Required
Acopper shorting link and an AC calibration source
e.g. Datron 4200 Autocal AC Standard.
1.4.3 Checking Accuracy after 'AUTOCAL'
To check the accuracy after 'AUTOCAL' the 'Speci-
fication Verification' section of the Operating Handbook
will be useful. It provides tables for quick reference of
accuracy on all ranges and functions in displayed digits.

7
Calibration
Operation
DC coupled
AC Zero
Calibration
Source
Output
Copper
Shorting link
DVM
Setting
AC,DC,.1
'CALIBRATE'
Key
'Zero'
1000V Full
Range HF 1000V rms
20kHz AC,1000
Input filter
'AcHf'
DVM Reading
After
Calibration
O.OOOmV
±3 digits
2.IV Range
Zero
Copper
Shorting link
AC,.1 Check only <100 digits
3IV Range
Zero
Copper
Shorting link
AC,1 'Zero' .OOOOOV
±1 digit
410V Range
Zero
Copper
Shorting link
AC,10 'Zero' O.OOOOV
±1 digit
5100V Range
Zero
Copper
Shorting link
AC,100 'Zero' O.OOOV
±1 digit
61000V Range
Zero
Copper
Shorting link
AC,1000 'Zero' O.OOV
±1 digit
710V Full
Range LF 10V rms
500 Hz AC,10
Input Filter
'Gain' 10.0000V
±1 digit
810V Full
Range HF 10V rms
30 kHz AC, 10
Input filter
'AcHf' 10.0000V
±5 digits
9IV Full
Range LF IV rms
500Hz AC,1
Input filter
'Gain' 1.00000V
±1 digit
10 IV Full
Range HF IV rms
30 kHz AC,1
Input filter
'AcHf' 1.00000V
±5 digits
11 .IV Full
Range LF .IV rms
500 Hz AC,.1
Input filter
'Gain' 100.000mV
±2 digits
12 .IV Full
Range HF .IV rms
30 kHz AC,.1
Input filter
'AcHf' 10O.OOOmV
±5 digits
13 100V Full
Range LF
10OV rms
500 Hz AC, 100
Input filter
'Gain' 100.000V
±1 digit
14 100V Full
Range HF 100V rms
30 kHz AC,100
Input filter
'AcHf 100.000V
±5 digits
15 1000V Full
Range LF 1000V rms
500 Hz AC, 1000
Input filter
'Gain' 1000.00V
±1 digit
1000.00V
±5 digits
Remarks
Set 'Local Guard'. Do
not set 'Input filter'.
Wait for reading to
stabilize before
operating 'Zero'
Select 'Input filter'
for remaining steps
Lethal voltage
present. -increase
calibration source
in 10OV steps if
possible
Lethal voltage
present -increase
calibration source
in 100V steps if
possible. DO
NOT EXCEED
25 kHz

7A
1.4 AC VOLTAGE CALIBRATION -1061 AOPTION 12 ONLY
1
.4.4
General
The procedure in the table opposite is all that is
necessary to completely 'AUTOCAL' the AC voltage
function. On each range just a'Zero', 'Gain' and 'AcHf'
calibration is required.
If the 'DVM Reading After Calibration' is not in
accordance with the table, repeat operation of the same
'CALIBRATE' key is permissible to improve the readings.
This will be necessary with the AcHf key.
Note; To reduce the effect of noise at low input levels, AC
zero calibration is carried out at 0.1% Range; and for
lOOmV Range zero (steps 1&2of the table). Guard is
connected to Lo using acopper shorting link.
1.4.5 Equipment Required
Acopper shorting link and an AC calibration source
e.g. Datron 4200 Autocal AC Standard.
1.4.6 Checking Accuracy after 'AUTOCAL'
To check the accuracy after 'AUTOCAL' the 'Specif-
ication Verification' section of the User's Handbook can
be employed. It describes the use of 'Spec' mode to verify
the accuracy of the instrument, also providing areport
sheet 'master copy' for compilation of permanent records.

7B
AC VOLTAGE CALIBRATION TABLE (1061A OPTION 12 ONLY)
Calibration
Operation
DC coupled
AC Zero
.IV Range
Zero
IV Range
Zero
10V Range
Zero
100V Range
Zero
1000V Range
Zero
10V Full
Range LF
10V Full
Range HF
IV Full
Range LF
IV Full
Range HF
.IV Full
Range LF
.IV Full
Range HF
100V Full
Range LF
100V Full
Range HF
1000V LF
Range Gain
I1000V HF
jRange Gain
Calibration
Source
Output
O.IOOmV
500Hz
(short Guard
to Lo)
Short Hi to
Lo to Guard
0.00100V
500Hz
0.0100V
500Hz
0.100V
500Hz
1.00V
500Hz
10V rms
500Hz
10V rms
30KHZ
IV rms
500Hz
IV rms
30kHz
.IV rms
500Hz
.IV rms
30kHz
100V rms
500Hz
100V rms
30kHz
500V rms
500Hz
500V rms
20kHz
DVM
Setting
AC,DC,.1
AC, 10
AC, 100
AC, 1000
AC, 10
AC, 10
AC,100
AC, 100
'CALIBRATE'
Key
'Zero'
Check only
'Zero'
'Zero'
'Gain'
'AcHf'
'Gain'
'AcHf'
'Gain'
'Gain'
'AcHf'
AC,1000 'KEYBOARD 500V'
'Gain'
DVM Reading
After
Calibration
O.IOOmV
±10 digits
<C100 digits
0.00100V
±1 digit
0.010,0V
±1 digit
0.100V
±1 digit
1.00V
±1 digit
10.000,0V
±1 digit
10.000.
0V
±10 digits
1
.000.
00V
±1 digit
1.000,00V
±10 digits
100.000mV
±2 digits
100.000mV
±10 digits
100.000V
±1 digit
100.000V
±10 digits
500.00V
±1 digit
AC.1000 'KEYBOARD 500V' 500.00V
'AcHf' ±15 digits
Remarks
Set 'Local Guard'.
Do not set filter in.
Wait for reading to
stabilize before
operating 'Zero'
Lethal voltage
present -increase
calibration source
in lOOv steps if
possible
Lethal voltage
present increase
calibration source
in 100V steps if
possible. DO
NOT EXCEED
25kHz

1.5 DC CURRENT CALIBRATION
(No DC Current facility if Option 12 is fitted)
8
1.5.1
General
The procedure in the table below shows all that is
necessary to completely 'AUTOCAL' the DC Current
function. If just the DC Current or just one range of DC
Current is to be calibrated, then step 11 to 14 of the DC
Voltage Calibration table should be carried out first.
Then on each DC Current range just a'Zero' and 'Gain'
calibration is required.
If the 'DVM Reading After Calibration' is not in
accordance with the table then repeat operation of the
same 'CALIBRATE' key is permissible to improve the
reading. Where no tolerance is shown in this column, only
the exact reading quoted with an occasional least significant
digit showing is to be expected.
1.5.2
Equipment Required
ADC Current calibration source, e.g. Datron 4000/
4000A Autocal Standard with Option 20.
1.5.3
Checking Accuracy after 'AUTOCAL'
To check the accuracy after 'AUTOCAL' the 'Speci-
fication Verification' section of the Operating Handbook
will be useful. It provides tables for quick reference of
accuracy on all ranges and functions in displayed digits.
DC CURRENT CALIBRATION TABLE
Step Calibration
Operation
Calibration
Source
Output
DVM
Setting
'CALIBRATE'
Key
DVM Reading
After
Calibration
Remarks
1.1mA Range
Zero
O.OOOjuA DC,I,.1 'Zero' ±0.000)iA
±1 digit
Do not select
'Input filter'
2.1mA Full
Range
-MOO.OOOmA DC,I,.1 'Gain' -MOO.OOOmA
±2 digits
31mA Range
Zero
O.OOOOOmA DC,I,1 'Zero' ±.00000mA
±1 digit
41mA Full
Range
-M.OOOOOmA DC,I,1 'Gain' H.00000mA
±2 digits
510mA Range
Zero
O.OOOOmA DC,1,10 'Zero' ±0.(K)00mA
±1 digit
610mA Full
Range -MO.OOOOmA DC,1,10 'Gain' -H O.OOOOmA
7100mA Range
Zero O.OOOmA Dc;,ioo 'Zero' ±0.000mA
8100mA Full
Range
-I- 100.000mA DCJ[,100 'Gain' -1-1 00.000mA
91000mA
Range Zero 0.00mA DC,1, 1000 'Zero' iO.OOmA
1
10 1000mA
Full Range
-n 000.00mA DC,I,1000 'Gain' +1000.00mA

1.6 AC CURRENT CALIBRATION
(In conjunction with Option 10 only)
9
1.6.1
General
The procedure in the table below shows all that is
required to completely 'AUTOCAL' the AC Current
function. If just the AC Current or just one range of AC
Current is to be calibrated, then steps 1, 2, 11 &12 of the
Option 10 AC Voltage Calibration table must be carried out
first. Then on each range just a 'Zero' and 'Gain' calibration
is required.
If the 'DVM Reading After Calibration' is not in
accordance with the table then repeat operations of the
same 'CALIBRATE' key is permissible to improve the
reading.
1.6.2
Equipment Required
An AC Current calibration source at 1kHz. e.g.
Datron 4200 Autocal AC Standard with option 30.
1.6.3
Checking Accuracy after 'AUTOCAL'
To check the accuracy after 'AUTOCAL' the speci-
fication Verification section of the Operation Handbook
will be useful. It provides tables for quick reference of
accuracy on all ranges and functions in displayed digits.
AC CURRENT CALIBRATION TABLE
Calibration
Operation
Calibration
Source
Output
DVM
Setting
'CALIBRATE'
Key
DVM Reading
After
Calibration
Remarks
DC coupled
AC Zero No connections
to DVM input
terminals
I,DC,AC,.1 'Zero' O.OOOmA
±5 digits
Do not select
'Input filter'
Hi .1mA Range
Zero
nI,AC,.1 Check only <±100 digits Cancel DC coupled
H1mA Range
Zero
ft I,DC,AC,1 'Zero' .00000mA
±5 digits
10mA Range
Zero
ft I,DC,AC,10 'Zero' 0.0000mA
±5 digits
5100mA Range
Zero
ft I,DC,AC,100 'Zero' O.OOOmA
±5 digits
61000mA
Range Zero
ft I,DC,AC,1000 'Zero' 0.00mA
±5 digits
7.1mA Full
Range
IOOmA, 1kHz I,DC,AC,.1 'Gain' 100.000/uA
±10 digits
81mA Full
Range 1mA, 1kHz I,DC,AC,1 'Gain' 1.00000mA
±10 digits
910mA Full
Range
10mA, 1kHz I,DC,AC,10 'Gain' 10,0000mA
±10 digits
10 100mA
Full Range
100mA, 1kHz I,DC,AC,100 'Gain' 100,000mA
±10 digits
11 1000mA
Full Range
1A, 1kHz I,DC,AC,1000 'Gain' 1000.00mA
±10 digits

10
1.7 CALIBRATION USING KEYBOARD'
1.7.1
General
The 'KEYBOARD' method of calibration is useful
when acalibration source although set to anominal value
has known errors. In this situation the known value of the
calibration source can be entered into the DVM before the
'AUTOCAL' process is executed. The process is functional
during any calibration with asource of magnitude between
20% and 200% of the range selected, but it should be noted
that for equal magnitude source errors, calibrating at the
lower percentage end of range produces ahigher percentage
calibration error. The 'KEYBOARD' method operates for
both the 'Gain' and 'AcHf' calibration operations. An
example using 'KEYBOARD' to calibrate directly against
aStandard Cell is shown in the table below.
1.7.2 'KEYBOARD' with Negative Inputs
If the 'KEYBOARD' method is used on DC Voltage
calibration with Negative polarity sources, it is important
NOT to enter anegative sign with the keyed-in source
value. The instrument itself can determine the polarity of
the source and update the appropriate calibration memory
location.
1.7.3 'KEYBOARD' Calibration Example
The example shown in the table below uses 'KEY-
BOARD' to calibrate the 1000V AC LF Range Gain at
500V (step 15 of the AC Voltage Calibration table for
Option 12).

11
1.8 'AUTOCAL' OVER THE BUS
All the calibration procedures covered in this manual
can be carried out remotely using Option 50, the IEEE Bus.
Effectively, the five calibration keys are replaced
by five Bus instructions and these are used instead of the
'CALIBRATE' keys listed in the Calibration tables on
previous pages.
An example of calibration with the Bus is given in
the table below. Acomplete program listing for the same
calibration operation assuming an HP9825 controller is as
follows:
-
0; dim DS[15]
1: clr728
2: wrt 728,"F3R3Q1W1="
3: O-^'S
4: wrt 728,"G0="
define 15 character string
variable
send 'device clear' to DVM
(interface 7, address 28)
program to DC IV, SRQ
Mode 1, Enable Cal.
program zero cal. trigger
5: oni 7,"srq"
6: eir 7,128
7: if bit ("01XXXXXX' ,S)
=0;jmp —1
8: dsp "Apply IV &
CONTINUE"
9: 0-^S;stp
10: wrt 728,"G1="
11: oni 7,"srq”
12: eir 7,128
13: if bit ("01XXXXXX' ,S)
=0:jmp —1
14; wrt 728,"T0W0="
15: Id 728
16: stp
17: "srq":rds(728)->S
18: red 728, DS
19: iret
*7717
jump to SRQ service routine
on interrupt
enable SRQ interrupts from
interface 7
check status byte S
obtained by service routine
prompt operator to apply
calibration source on com-
pleting zero cal
program gain cal. trigger
program to Internal Trigger,
Disable Cal. on completion
of gain cal.
program DVM to local state
SRQ service routine to read
status byte
CALIBRATION EXAMPLE USING THE BUS
Step Calibration
Operation
Calibration
Source DVM
Setting
Bus
Controller
Instruction
DVM Reading
After
Calibration
Remarks
1Set DVM to
known state
In Remote
State
'Device Clear' Program DVM to
predetermined state
A0C0DXE0F3M0N0
O0P0Q0R6S0T5
2Set DVM to
DCV, IV
Range, and
prepare for
calibration
-(-O.OOOOOV Calibration
key to 'CAL'
'F3R3Q1W1=' Program DVM to
Function:DC V(F3)
Range:1V (R3)
SRQ Mode 1(Q1)
Enable Cal. (W1)
3IV Range
Zero
-^O.OOOOOV In Remote
State
'G0=' ±.ooooov Program 'Zero' cal.,
SRQ indicates when
calibration operation
completed
4IV Positive
Full Range
-1- 1.00000V In Remote
State
'G1=' -(-1.00000V Program 'Gain' cal.,
SRQ indicates when
calibration operation
completed
5Set DVM to
Internal
Trigger,
Disable Cal.
In Remote
State
'T0W0=' Program DVM to
Internal Trigger (T0),
Disable Cal. (W0)
6In Local State,
Calibration key
to 'RUN'
'Local' DVM in normal mode,
free-running
This manual suits for next models
2
Table of contents
Other Datron Multimeter manuals