DAVID D2000 User manual

Models: S10S.DV, S10P.DV
Owner’s Manual


1
Getting Started
Important Safety Instructions 2
Polarization Instructions 3
State of California Proposition 65 Warnings 3
Description of the Vacuum 4
Assembling the Vacuum 5
Operation
Reclining the Handle 6
On/Off Switch 6
Edge Cleaning 6
Automatic Carpet Height Adjustment 6
Bare Floor Cleaning 6
Maintenance and Care
Power Cord Care 7
Vacuuming Under Furniture 7
Replacing the Vacuum Bag 8
Removing/Reinstalling the Bottom Plate 9
Replacing the Agitator Belt 10
Lifetime Belt Protection 10
Brushroll Jam Indicator 11
Resetting the Circuit Breaker 12
Replacing the Squeegee 12
Annual Checkup 12
Problem Solving Guide
Troubleshooting 13
How to Contact Your Authorized Retailer 13
Key Replacement Parts 13
For Best Performance 13
Warranty 14
CONTENTS

2SAVE THESE INSTRUCTIONS
IMPORTANT SAFETY INSTRUCTIONS
When using an electrical appliance, basic precautions
should always be followed, including the following:
READ ALL INSTRUCTIONS BEFORE USING THIS
APPLIANCE. FOR HOUSEHOLD USE ONLY.
IMPORTANT:
The manufacturer cannot accept responsibility for damage
caused when the appliance is not used according to the instructions, or for uses other
than those for which it was intended.
WARNING:
To reduce the risk of fire, electric shock, damage or injury:
• Do not leave appliance when plugged
in. Unplug from outlet when not in use
and before servicing.
• Do not use outdoors or on wet
surfaces.
• Do not allow to be used as a toy. Close
attention is necessary when used by or
near children.
• Use only as described in this manual.
• Do not use with damaged cord or plug.
If appliance is not working as it should,
has been dropped, damaged, left
outdoors, or dropped into water, return
it to your Authorized DAVID Vacuum
Retailer for service.
• Do not pull or carry by cord, use cord
as a handle, close a door on the cord,
or pull cord around sharp edges or
corners. Do not run appliance over
cord. Keep cord away from heated
surfaces.
• Do not unplug by pulling on cord. To
unplug, grasp the plug, not the cord.
• Do not handle plug or appliance with
wet hands.
• Do not put any object into openings.
Do not use with any opening blocked;
keep free of dust, lint, hair and anything
that may reduce air flow.
• Keep hair, loose clothing, fingers and all
parts of body away from openings and
moving parts.
• Do not pick up anything that is burning
or smoking, such as cigarettes, matches
or hot ashes.
• Do not use without vacuum bag in
place.
• Turn off all controls before unplugging.
• Use extra care when cleaning on stairs.
• Do not use to pick up flammable or
combustible liquids such as gasoline or
use in areas where they may be
present.
• Do not attempt to service the unit while
appliance is plugged in.
3
State of California Proposition 65 Warnings:
WARNING: This product contains one or more chemicals known to the State of
California to cause cancer.
WARNING: This product contains one or more chemicals known to the State of
California to cause birth defects or other reproductive harm.
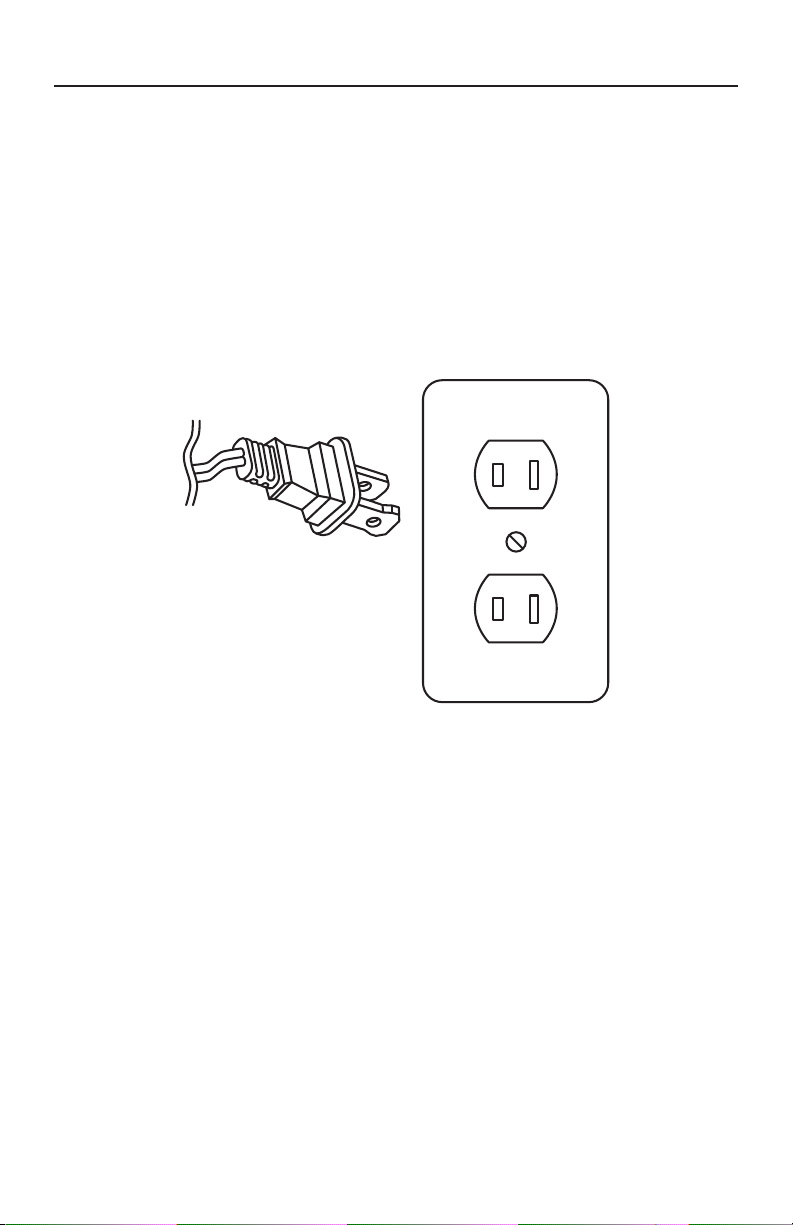
POLARIZATION INSTRUCTIONS
Power Cord, 2-Wire Polarized Cord
To reduce the risk of electric shock, the charger is equipped with a polarized
alternating current line plug (a plug having one blade wider than the other). This
plug will fit into the power outlet only one way. This is a safety feature. If you are
unable to insert the plug fully into the outlet, try reversing the plug. If the plug
should still fail to fit, contact a qualified electrician to replace the obsolete outlet.
Do not defeat the safety purpose of the polarized plug.
4
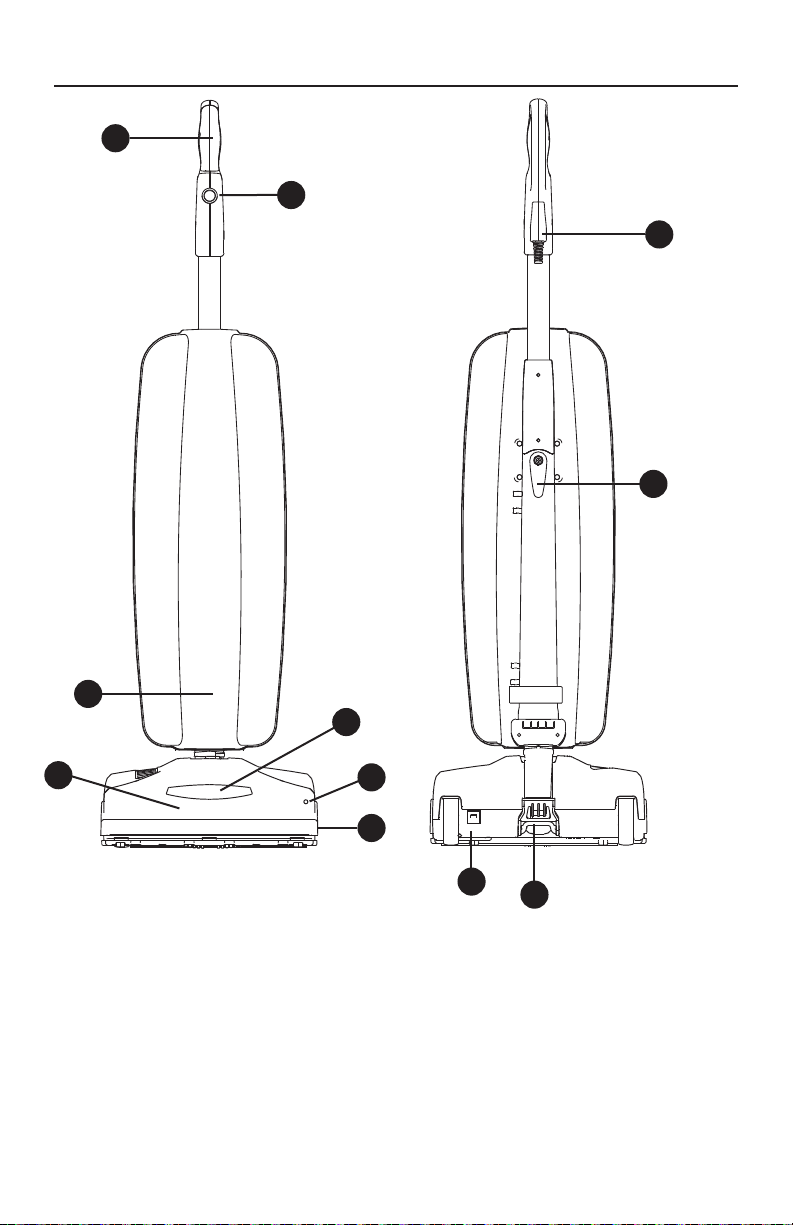
1 Ergonomic Handle
2 On/Off Power Switch
3 Bag Compartment
4 Vacuum Nozzle
5 Headlight
6 Furniture Guard
7 Brushroll Jam Indicator (model S10P.DV)
8 Circuit Breaker Reset Button (model S10S.DV)
9 Handle Release Pedal
10 Quick Release Cord Hook
11 Upper Cord Hook
1
2
3
4
5
6
7
89
10
11
DESCRIPTION OF THE VACUUM

5
Attaching the Handle
to the Vacuum
NOTE: Do not plug in the vacuum until it
is completely assembled.
The vacuum cleaner and the handle are
packed separately and require assembly.
• Thread the cord through the lower and
upper cord guides on the back of the
vacuum bag (Fig. 1).
• Remove the handle bracket by
removing the two screws (Fig. 2).
• Place handle onto the back of the
vacuum, aligning holes with pegs
(Fig.3).
• Place the handle bracket back into
position (Fig. 4).
• Secure with two screws removed in
Step 2.
• Open the bag compartment to ensure
a vacuum bag is in place.
• Your vacuum is now ready for use.
• If storing the vacuum, wrap the cord
clockwise around the top and bottom
cord hooks. Fasten the plug to the
wrapped cord using the channel on
theplug.
Unwinding the Power Cord
• The lower cord hook rotates to allow
for quick access to the power cord.
Turn the lower cord hook upward and
you can quickly drop the power cord to
the floor without unwinding it from the
cord hooks.
• When storing the vacuum cleaner, turn
the lower cord hook to the downward
position and wind the power cord
around the cord storage hooks.
Fig. 2
Fig. 3 Fig. 4
Fig. 1
ASSEMBLING THE VACUUM
6
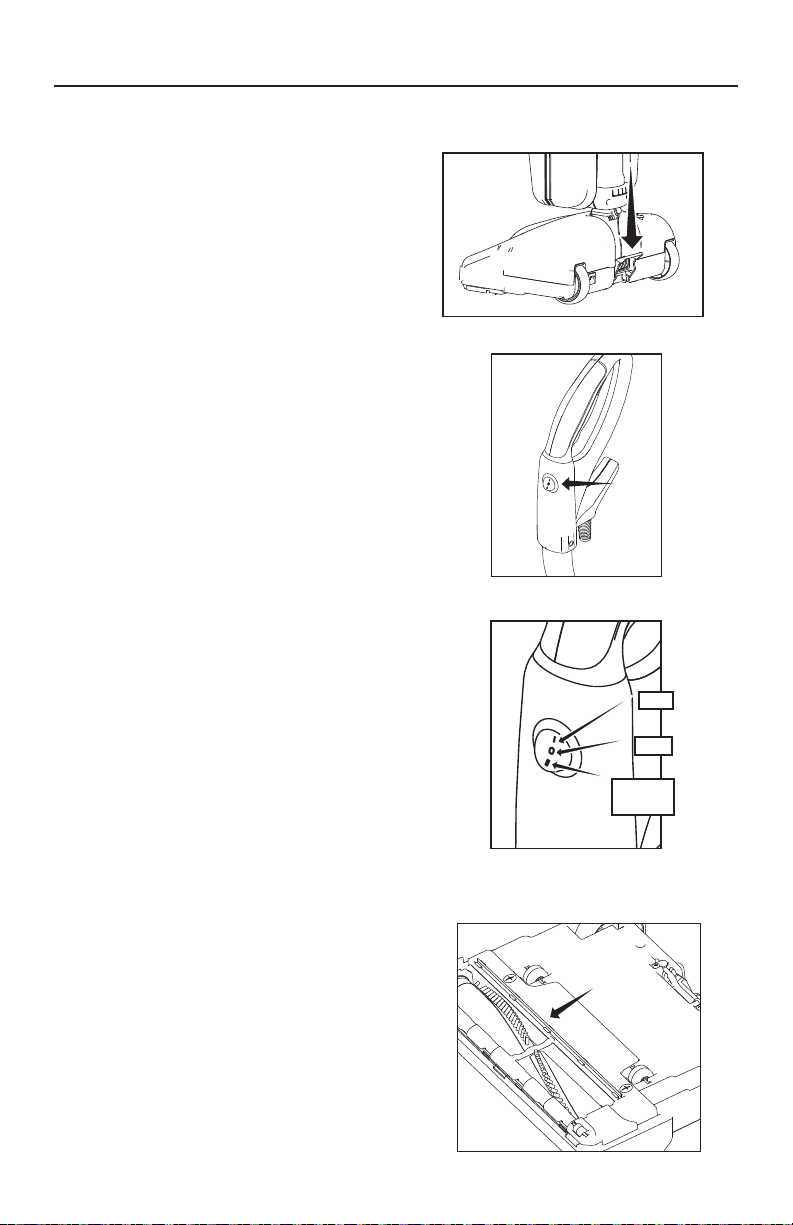
Reclining the Handle
• Press the handle release pedal located
on the back of the vacuum with your
foot to recline the handle (Fig. 1).
On/Off Switch
• The power switch located on the
vacuum handle, is a three-way switch
(Fig. 2). The middle position is the “Off”
setting, the rear position is the “On”
setting and the forward position is for
“Maximum Power” (Fig. 3).
• Use the “Maximum Power” setting for
carpet cleaning. Use the “On” setting
for cleaning bare floors and throw rugs.
Always turn the vacuum cleaner to the
“Off” setting before unplugging it from
the electrical outlet.
Edge Cleaning
The edge cleaning feature provides
improved cleaning near walls and
stationary furniture. For maximum edge
cleaning, place the left side of the nozzle,
from the user’s perspective, against the
wall or stationary furniture.
Automatic Carpet
Height Adjustment
Your vacuum is designed with an
automatic self-adjusting nozzle. No
manual adjustments are required. The
height of the nozzle automatically
adjusts to the flooring surface. This self-
adjusting feature allows the nozzle to
float evenly over all flooring surfaces.
Bare Floor Cleaning
Your vacuum is equipped with a
squeegee on the bottom of the vacuum
to improve its effectiveness in cleaning
bare floors (Fig. 4). When cleaning
tile, hardwood, vinyl, etc., use the “On”
setting for best results.
This vacuum is intended for household use only.
Fig. 2
Fig. 1
Fig. 3
ON
OFF
MAX
POWER
Fig. 4
OPERATION

7
Fig. 2
Power Cord Care
• If the cord or plug has any apparent
damage, refrain from using the vacuum.
Please visit an Authorized DAVID
Vacuum Retailer for a new cord or plug.
• When the vacuum is in use, hold the
cord to keep from running over it.
• Avoid obstructions and do not pull the
cord around sharp edges or corners.
• Always keep the cord away from
heated surfaces and never close doors
on it as this may cause damage to
thewiring.
• To unplug, always grasp the plug, not
the cord.
Vacuuming Under Furniture
Your vacuum will lay flat on the floor for
effective cleaning under beds and tables.
• Press the handle release pedal once for
normal vacuum cleaning (Fig. 1).
• Continue to lower the handle to enable
the vacuum to lay flat on the floor
(Fig.2).
MAINTENANCE AND CARE
Fig. 1
8
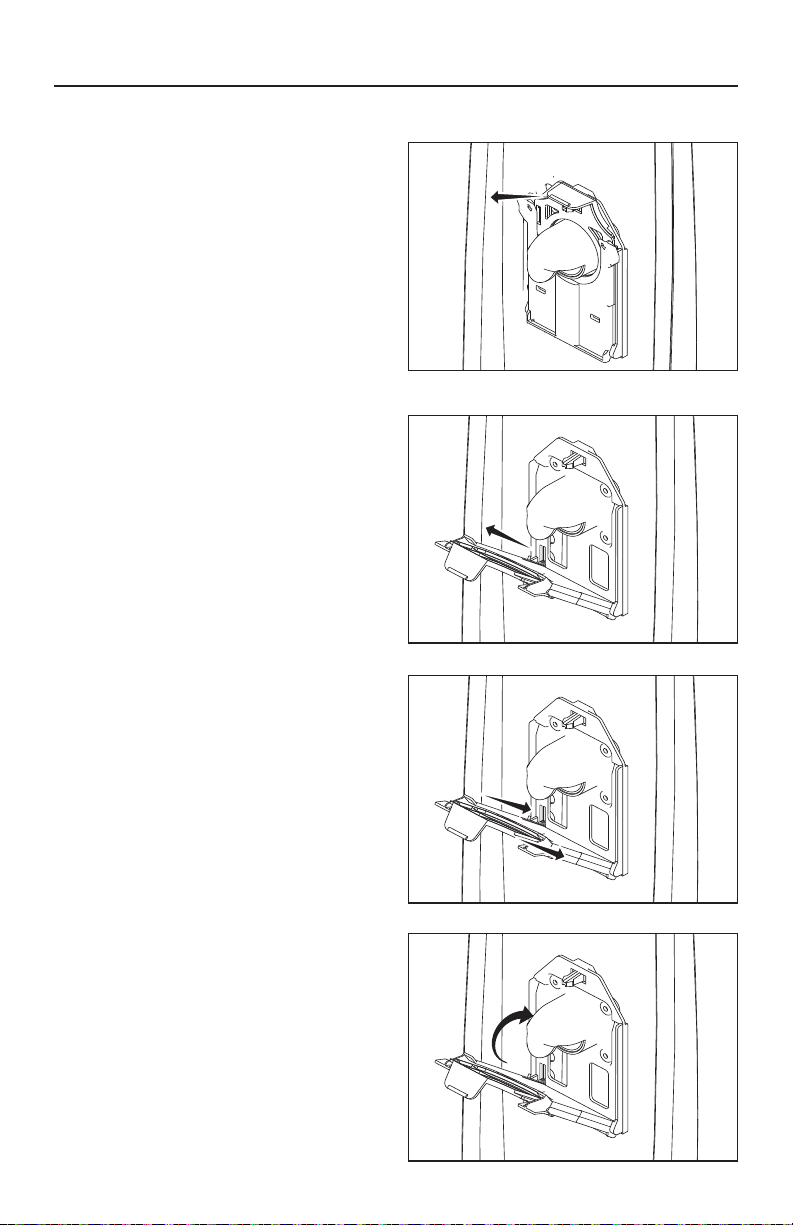
Replacing the Vacuum Bag
NOTE: Unplug the vacuum cleaner from
the electrical outlet before changing
thebag.
• Unzip the bag compartment.
• Remove the used vacuum bag by
pulling the green bag collar tab away
from the vacuum (Fig. 1). Slide the
used bag out of the bag holder which
automatically seals the bag opening
(Fig. 2). Discard the used bag.
• To install a new bag, slide the bottom
of the green bag collar into the bag
holder until it “snaps” into place
(Fig.3).
• Push the top of the bag collar upward
until the collar “snaps” into place on the
vacuum (Fig. 4).
• Tuck the bag corners into the bag
compartment then zip the bag
compartment closed.
Fig. 1
Fig. 2
MAINTENANCE AND CARE
Fig. 3
Fig. 4

9
MAINTENANCE AND CARE
Fig. 1
Fig. 2
Removing and Reinstalling
the Bottom Plate
WARNING! To Reduce the Risk
of Electrical Shock or Injury From
Moving Parts, Unplug Before Servicing
orCleaning.
To Remove the Bottom Plate:
• Press the handle release pedal to place
the vacuum cleaner in the flat position.
• Turn the vacuum cleaner over,
exposing the bottom plate.
• Turn the two screws a quarter turn
to release the bottom plate (Fig. 1).
Remove the bottom plate.
• Reinstall the bottom plate by aligning
the front edge of the bottom plate into
the notches inside the nozzle housing
(Fig. 2).
• Press the bottom plate into position
until the plate “clicks” on both sides.
Tighten the two screws a quarter turn
to secure the bottom plate.

10
MAINTENANCE AND CARE
Fig. 1
Fig. 2
Replacing the Agitator Belt
(Model S10S.DV)
WARNING! To Reduce the Risk of
Electrical Shock or Injury From Moving
Parts, Unplug Before Servicing or
Cleaning.
NOTE: To ensure maximum cleaning
efficiency, the belt should be checked
regularly to be sure it is in good
condition. Check to see if the belt is
stretched, cracked, or if excessive
slipping is occurring. Replace if needed.
• Remove the bottom plate (see page 9).
• Remove the brushroll and the worn or
broken belt from the brushroll pulley
and the motor drive shaft (Fig. 1).
• Loop the new belt around the motor
drive shaft and the brushroll (Fig. 2).
• Reinstall the brushroll into the housing.
Turn the brushroll by hand, making sure
the belt is not twisted and all rotating
parts move smoothly.
• Reinstall the bottom plate (see page 9).
Lifetime Belt Protection
Warranty
(Model S10P.DV)
Your vacuum belt is covered with a
lifetime warranty. Should the vacuum
belt break, simply bring your vacuum to
your Authorized DAVID Vacuum Retailer
for a free replacement.
11
Brushroll Jam Indicator
(Models S10S.DV and S10P.DV only)
If an object, such as a throw rug or
article of clothing is ever picked up into
your vacuum, the vacuum will sense this
“jammed brushroll” condition and turn
off the brushroll. When this happens, the
Brushroll Jam Indicator light on the top
of the nozzle will flash in red.
• Turn off the vacuum and remove the
cause of the jam. Turn the vacuum
backon.
• If the brushroll is free of obstructions
and the Brushroll Jam Indicator light
is still flashing, it’s likely the clogged
condition is located in the vacuum
motor fan. If so, please take your
vacuum to an Authorized DAVID
Vacuum Retailer for service.
MAINTENANCE AND CARE

12
Resetting the Circuit Breaker
(Models S10S.DV and S10P.DV only)
WARNING! To Reduce the Risk
of Electrical Shock or Injury From
Moving Parts, Unplug Before Servicing
orCleaning.
Your vacuum features a circuit breaker
to protect the machine against damage
due to a surge in the electrical current.
Electrical surging can be a result
of, though not limited to, a jammed
motorfan.
Should your vacuum cleaner experience
a jammed brushroll with the circuit
breaker tripping, first turn the vacuum
off and unplug the unit. Inspect the
brushroll by removing the bottom plate
(see page 9) and remove any debris
that may be causing the jam. Reinstall
the bottom plate (see page 9) and
reset the circuit breaker by pressing the
Circuit Breaker Reset Button. Plug in the
power cord and turn on the vacuum.
If the vacuum fails to turn on, visit an
Authorized DAVID Vacuum Retailer for
assistance.
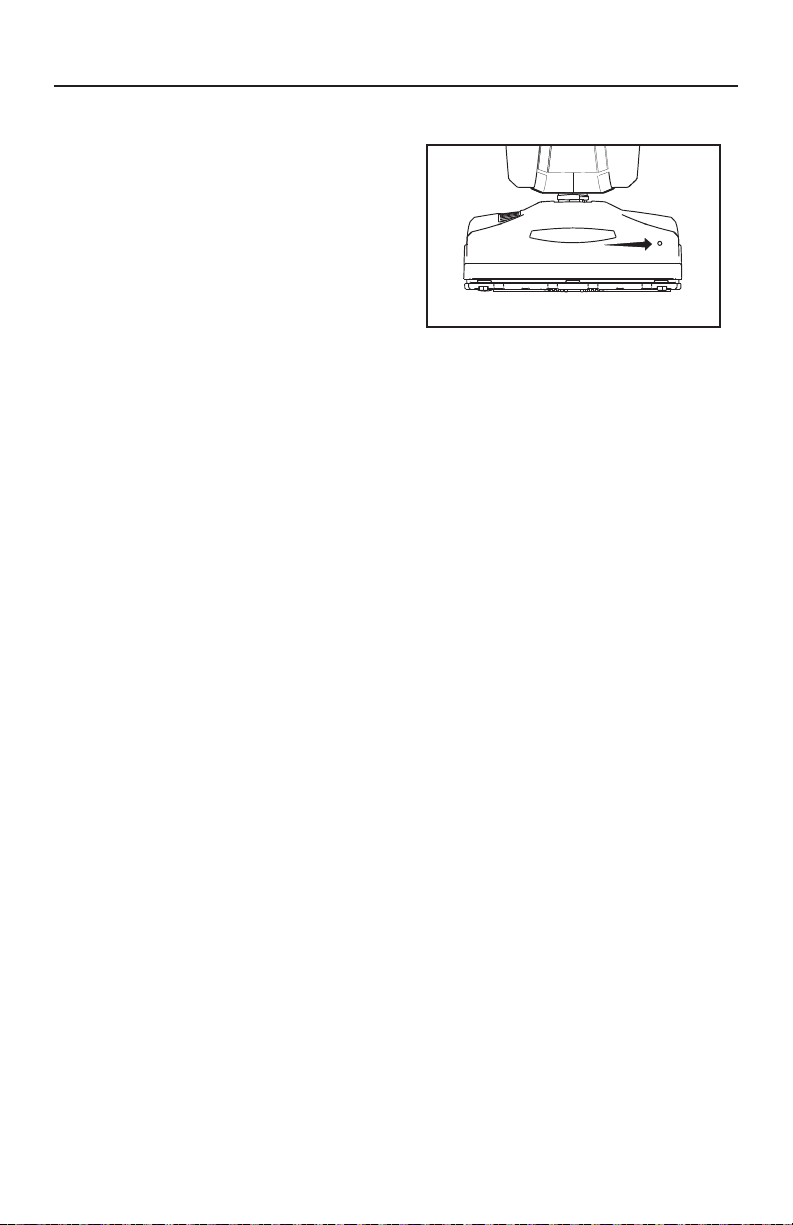
Replacing the Squeegee
If your squeegee splits or begins to look
worn, simply slide the worn squeegee
from its track and slide a new one into
the track. If you have trouble installing
the new squeegee, please visit an
Authorized DAVID Vacuum Retailer
forhelp.
Annual Checkup
To keep your vacuum in peak operating
condition, it is recommended you bring
it to an Authorized DAVID Vacuum
Retailer for an annual checkup. The
retailer will conduct a comprehensive
examination to ensure your vacuum is in
top operatingcondition.
MAINTENANCE AND CARE
Circuit Breaker
Reset Button

13
PROBLEM SOLVING GUIDE
Troubleshooting
WARNING! To Reduce the Risk of Electrical Shock or Injury From Moving Parts,
Unplug Before Servicing or Cleaning.
CAUTION! To Reduce the Risk of Electric Shock, Do Not Handle Plug or Appliance
with Wet Hands.
PROBLEM POSSIBLE REASON POSSIBLE SOLUTION
Vacuum won’t
turn on
Power cord not firmly plugged in Plug cord in firmly
Blown fuse or tripped breaker Check house fuse or breaker.
Replace fuse/reset breaker.
Needs service Take to Authorized DAVID
Vacuum Retailer
Vacuum won’t
pick up or low
suction
Vacuum bag full Install new bag
Broken belt Replace belt
Worn brushroll Replace brushroll
Dust escaping
from vacuum
Vacuum bag not installed
properly
Install bag properly. Review
bag installation (page 8)
Any other service should be performed by an Authorized DAVID Vacuum Retailer.
To locate your nearest Authorized DAVID Vacuum Retailer, visit our website at
www.DAVIDSVACUUMS.COM or call 281-866-0027.
Key Replacement Parts
Genuine HEPA bags and belts are available from your authorized DAVID retailer.
For Best Performance
• Keep your vacuum clean and in good operating condition.
• Change the vacuum bag once a month or when the bag is 2/3 full to maximize
cleaning performance.
• Always use genuine vacuum bags and replacement parts. Use of other products
may result in poor cleaning performance, potential vacuum cleaner damage and
may void vacuum warranty. Genuine products are designed for maximum cleaning
performance.
• Have your vacuum checked annually by your Authorized DAVID Vacuum Retailer.
• Store your vacuum carefully in a dry area.
• For optimum cleaning performance and safety, follow your owner’s manual
instructions.

14
WARRANTY
David’s Vacuums Household Vacuum Limited Warranty
David’s Vacuums warrants that, from the date of purchase by the consumer who originally
purchased the product (“you”) and until the expiration of the warranty period set forth for your
product above, the product shall be free from defects in material and workmanship when it is
used under normal household conditions and maintained according to the requirements outlined
in the Owner’s Manual, subject to the conditions and exclusions set forth below.
Who may use this limited warranty?
David’s Vacuums extends the limited warranty set forth below only to the consumer who
originally purchased the product. This limited warranty does not extend to any subsequent owner
or other transferee of the product.
What is covered by this limited warranty?
1. The original product, as described above, and/or non-wearable parts deemed defective, in
David’s Vacuums’ sole discretion, will be repaired or replaced for the duration of the warranty
period. If found to be defective within the stated warranty period, the unit will be repaired at
no charge to you (both parts and labor) by an authorized David’s Vacuums Service Center.
2. In the event a replacement product is issued, the warranty coverage continues from the date
of purchase of the original product. David’s Vacuums reserves the right to replace the original
product with one of equal or greater value.
3. Return freight and reshipment costs (ground freight only) are prepaid by David’s Vacuums for
warranty claims that meet the eligibility requirements.
4. Designated models include a separate lifetime warranty on the belts. This applies to model
S10P.DV only.
5. David’s Vacuums product warranties vary per model. Please see duration warranty above for
details of the time frame of your purchase.
6. To find an authorized David’s Vacuums sales and service center, visit
https://davidproducts.com
How to get service and initiate a warranty claim
We encourage you to register your product online at https://davidproducts.com/register/.
If your product fails to operate properly while in use under normal household conditions within
the warranty period, visit https://davidproducts.com/ or call 1-888-6-DAVID to assist with
product support and warranty service options. So we may better assist you, please register your
product online.
To find an authorized David sales and service center, visit our retailer locator at
https://davidproducts.com/retailers/.
Owner’s Warranty Information (keep this for your records.)
Store name
Store Address City State Zip
Telephone Date of purchase
Serial number Model number

15
OWNER’S WARRANTY INFORMATION
Register your warranty online at DAVIDSVACUUMS.COM
What is not covered by this limited warranty?
1. Normal wear and tear of wearable parts (such as foam filters, HEPA filters, belts, brush strips
etc.), which require regular maintenance and/or replacement to ensure the proper functioning
of your product, are not covered by this limited warranty. Replacement parts are available for
purchase from your local retailer or at www.DavidsVacuums.com.
2. Any product that has been tampered with or used for commercial purposes.
3. Damage caused by misuse (e.g., vacuuming up water or other liquids), abuse, negligent
handling, failure to perform required maintenance (e.g., not cleaning the filters or changing the
bags), or damage due to mishandling in transit.
4. Consequential and incidental damages.
5. Defects caused by repair persons not authorized by David’s Vacuums. These defects include
damages caused in the process of shipping, altering, or repairing your David’s Vacuums
product (or any of its parts) when the repair is performed by a repair person not authorized
by David’s Vacuums.
6. Products purchased, used, or operated outside the USA and Canada.
7. Products that are second-hand, or products outside of the warranty period.
8. Products that have not been assembled, used, or maintained in accordance with the operating
instructions.
9. Defects or damage caused by the use of non-genuine David’s Vacuums parts, including
but not limited to bags, belts, filters and spare parts, or machines that have unauthorized
modifications.
10. Products in which filters have been washed and/or bags have been reused.
11. Typical wear and tear, accident, other casualty, misuse, neglect, improper use or maintenance,
or any product in which the serial number has been altered or removed.
12. Normal maintenance, such as the removal of clogs or cleaning brush rollers.
**Exclusions and limitations of this limited warranty and your potential rights under State law.
TO THE EXTENT NOT PROHIBITED BY APPLICABLE LAW, THIS LIMITED WARRANTY IS
EXCLUSIVE AND IN LIEU OF ANY AND ALL OTHER WARRANTIES WHETHER WRITTEN, ORAL,
STATUTORY, EXPRESS OR IMPLIED, (INCLUDING, WITHOUT LIMITATION, ANY WARRANTY OF
MERCHANTABILITY OR FITNESS FOR A PARTICULAR PURPOSE). THIS LIMITED WARRANTY
DISCLAIMS LIABILITY FOR INCIDENTAL OR CONSEQUENTIAL DAMAGES.
THIS LIMITED WARRANTY GIVES YOU SPECIFIC LEGAL RIGHTS, AND YOU MAY ALSO HAVE
OTHER RIGHTS WHICH VARY FROM STATE TO STATE. SOME STATES DO NOT ALLOW
DISCLAIMERS OF IMPLIED WARRANTIES, SO THE FOREGOING DISCLAIMER MAY NOT APPLY
TO YOU. FURTHERMORE, SOME STATES DO NOT ALLOW LIMITATIONS ON HOW LONG AN
IMPLIED WARRANTY LASTS, SO THE ABOVE LIMITATION MAY NOT APPLY TO YOU. TO THE
EXTENT SUCH WARRANTIES CANNOT BE DISCLAIMED OR LIMITED IN DURATION UNDER
THE LAWS OF YOUR JURISDICTION, WE LIMIT THE DURATION AND REMEDIES OF SUCH
WARRANTIES TO THE DURATION OF THIS EXPRESS LIMITED WARRANTY, AS STATED ABOVE
FOR YOUR PARTICULAR PRODUCT.

NOTES

NOTES

B503-7009 11.20
DAVIDSVACUUMS.COM
This manual suits for next models
3
Table of contents


