DAVINCI GLIDERS BALLAD 19 User manual

www.dv-gliders.com
BALLAD MANUAL
19, 21, 23, 25, 27, 29
REV.1 01 JULY 2017

www.dv-gliders.com
Congratulations!
Thank you for choosing the BALLAD.
This manual will help you to get all information about
your glider. We strongly recommend that you read this
manual carefully in order to be aware of any general
limitations, performance characteristics, take off and
flight characteristics, landing procedures, dealing with
emergency situations and general maintenance.
This is information about the design of the BALLAD,
advice how to use it best and how to care for it to
ensure it has a long life, We hope that the BALLAD
will give you a lot of satisfactory flying times.
-DAVINCI GLIDERS TEAM-
WARNING!
THIS IS NOT TRAINING MANUAL. ATTEMPTING TO FLY THIS OR
ANY OTHER PARAGLIDER WITHOUT PROPER INSTRUCTION FROM
A CERTIFIED PROFESSIONAL INSTRUCTOR IS EXTREMELY
DANGEROUS TO YOURSELF AND BYSTANDERS.
DAVINCI GLIDERS are carefully manufactured and inspected at the
factory. Please use the glider only as described in this manual.
Do not make any modifications to the glider.
As with any sport – without taking the
necessary safety precautions, paragliding can be dangerous.
www.dv-gliders.com
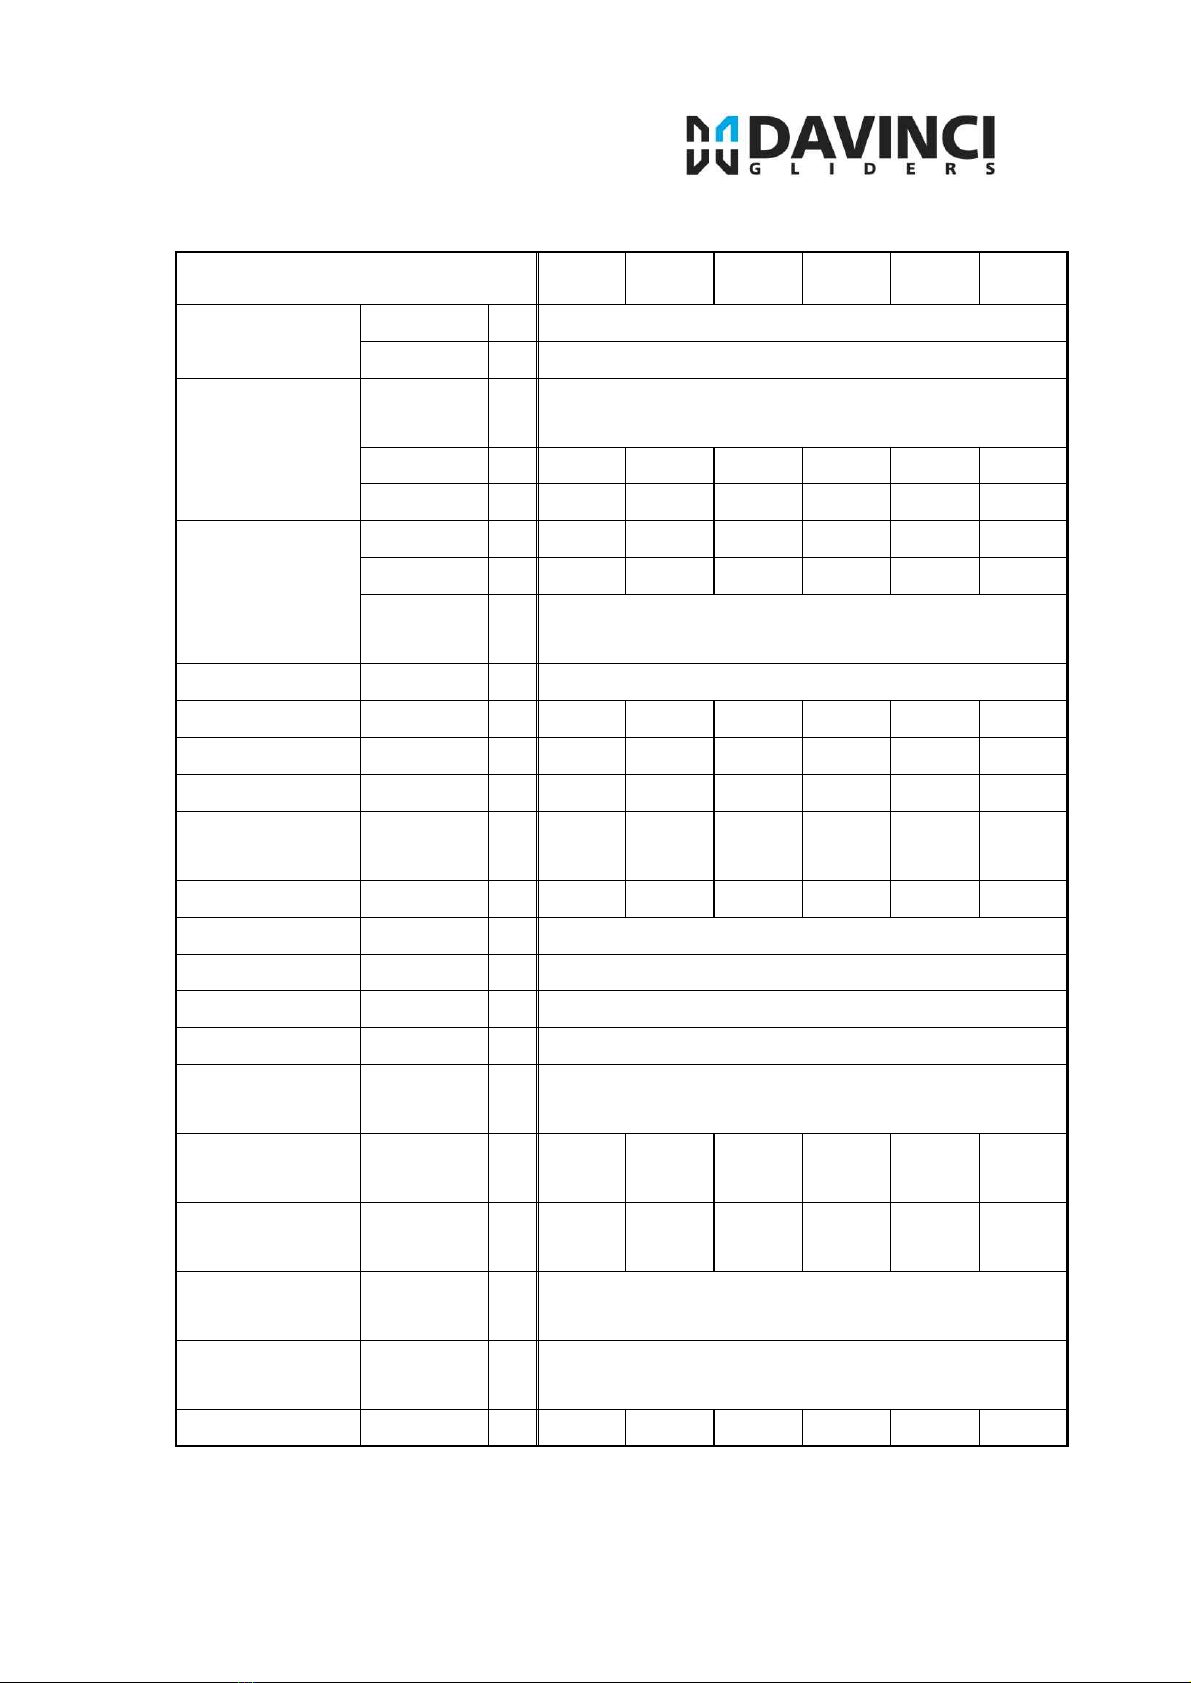
1. Technical DATA
BALLAD
20
22
24
26
28
30
CELLS
NUMBER
44
CLOSED
10
FLAT
ASPECT
RATIO
4.8
AREA
m2
20
22
24
26
28
30
SPAN
m
9.8
10.3
10.7
11.2
11.6
12
PROJECTED
AREA
m2
17.3
19.0
20.8
22.5
24.3
26.0
SPAN
m
7.8
8.2
8.5
8.9
9.2
9.6
ASPECT
RATIO
3.51
FLATTENING
%
13.4
CORD
MAX
m
2.58
2.71
2.83
2.95
3.06
3.17
MIN
m
0.52
0.54
0.57
0.59
0.61
0.63
AVER
m
2.04
2.14
2.24
2.33
2.42
2.5
LINES
TOTAL
METERS
m
300
316
331
345
359
372
HEIGHT
m
6.7
7.0
7.3
7.6
7.9
8.16
NUMBER
228
MAIN
2+1/4/3/1
RISERS
NUMBER
3
A+A’/B/C
TRIMS
130
ACCELERA
TOR
150
PILOT WEIGHT
(FREE FLIGHT)
MIN-MAX
KG
45-70
50-75
65-85
80-105
95-125
105-14
0
PILOT WEIGHT
(PARAMOTOR)
MIN-MAX
KG
45-115
50-120
65-130
80-140
95-160
105-18
0
CERTIFICATION
8G
EN926-1
KG
PENDING
5.25G
DGAC
KG
PENDING
GLIDER WEIGHT
KG
5.6
5.7
5.8
5.9
6.0
6.1

www.dv-gliders.com
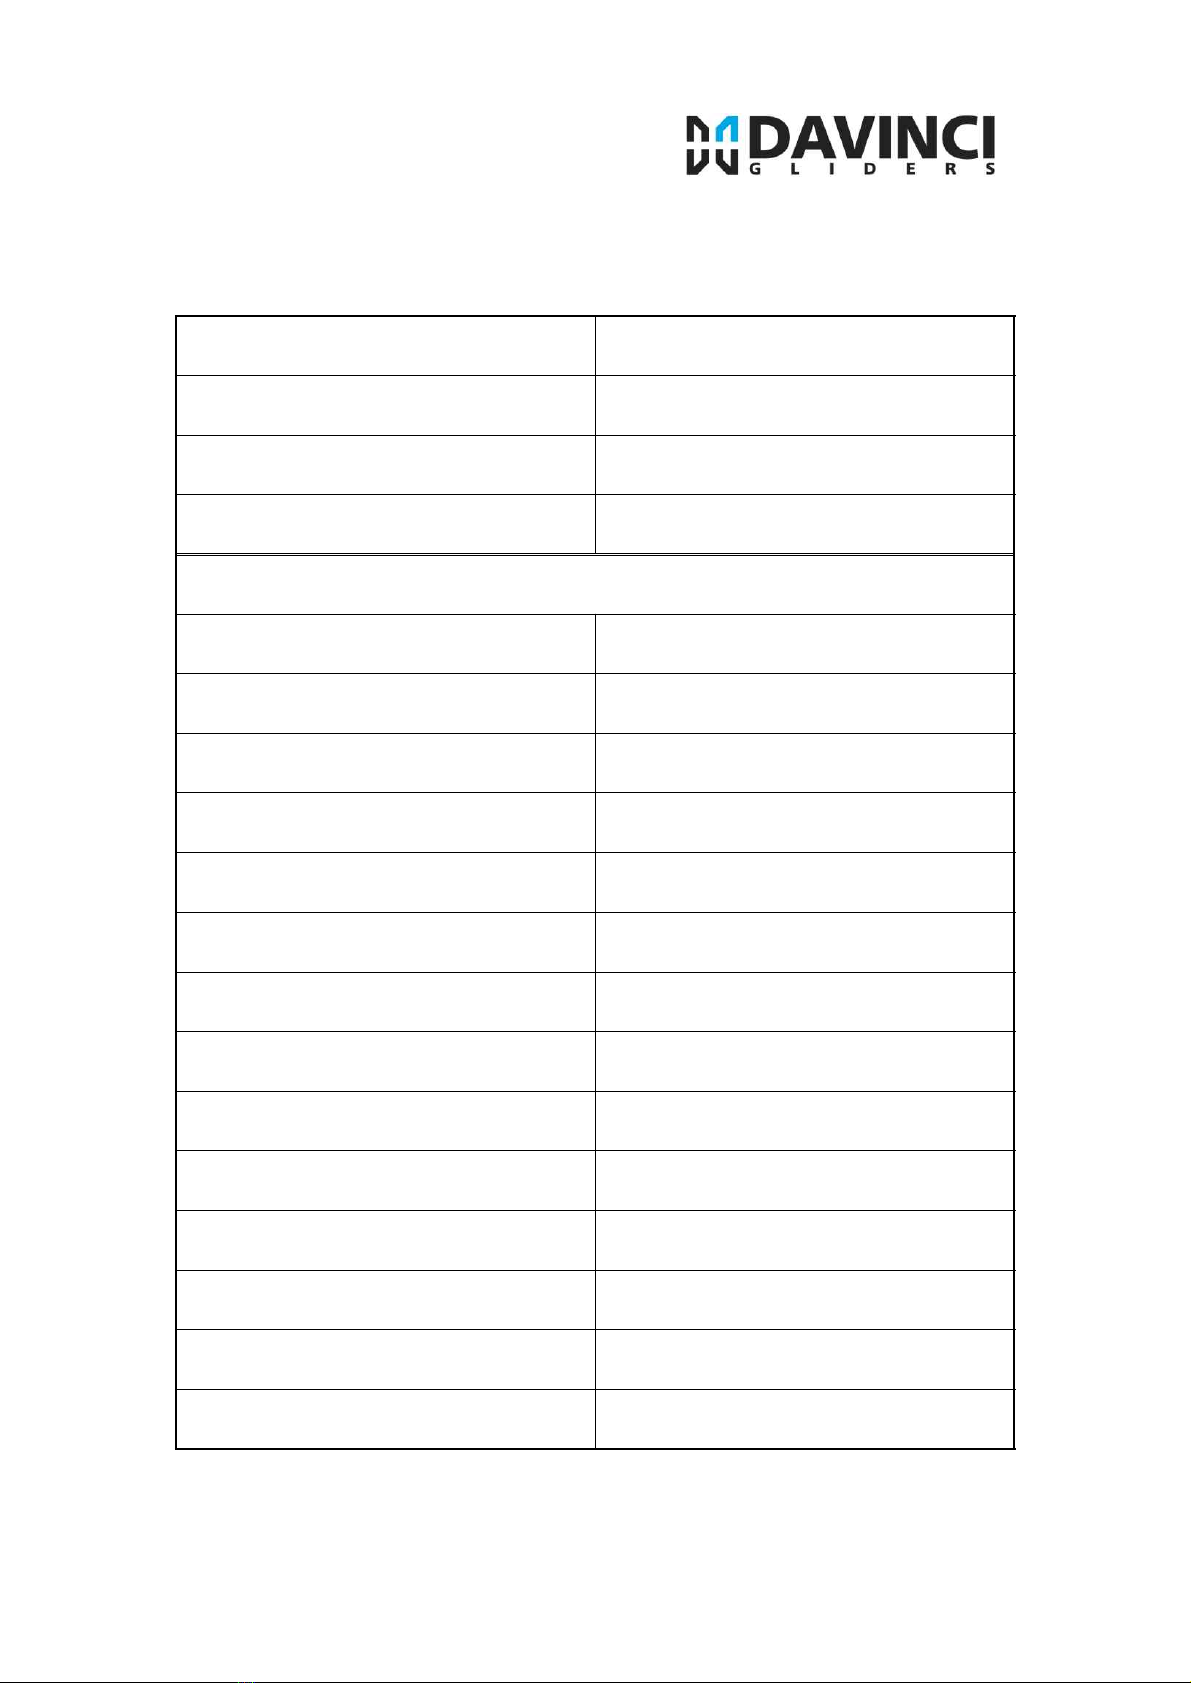
2. MATERIALS DATA
CANOPY
FABRIC CODE
SUPPLIER
UPPER SURFACE
30D FM
DOMINICO TEXTILE CO
BOTTOM SURFACE
30D FM
DOMINICO TEXTILE CO
PROFILES
30D FM(NON WR)
DOMINICO TEXTILE CO
DIAGONALS
30D FM(NON WR)
DOMINICO TEXTILE CO
SUSPENSION LINES
FABRIC CODE
SUPPLIER
UPPER CASCADES
DSL-70
LIROS
MIDDLE CASCADES
PPSL-200
LIROS
MIDDLE CASCADES
PPSL-160
LIROS
MAIN
7343-280
EDELRID
MAIN STABLE
6843-160
EDELRID
MIDDLE BRAKE
PPSL-120
LIROS
MIDDLE BRAKE
PPSL-200
LIROS
MAIN BREAK
10N-200
EDELRID
RISERS
FABRIC CODE
SUPPLIER
MATERIAL
WEBBING 20MM
GUTH&WOLF GMBH
PULLEYS
RIELY
LW RILEY PTY LTD
www.dv-gliders.com
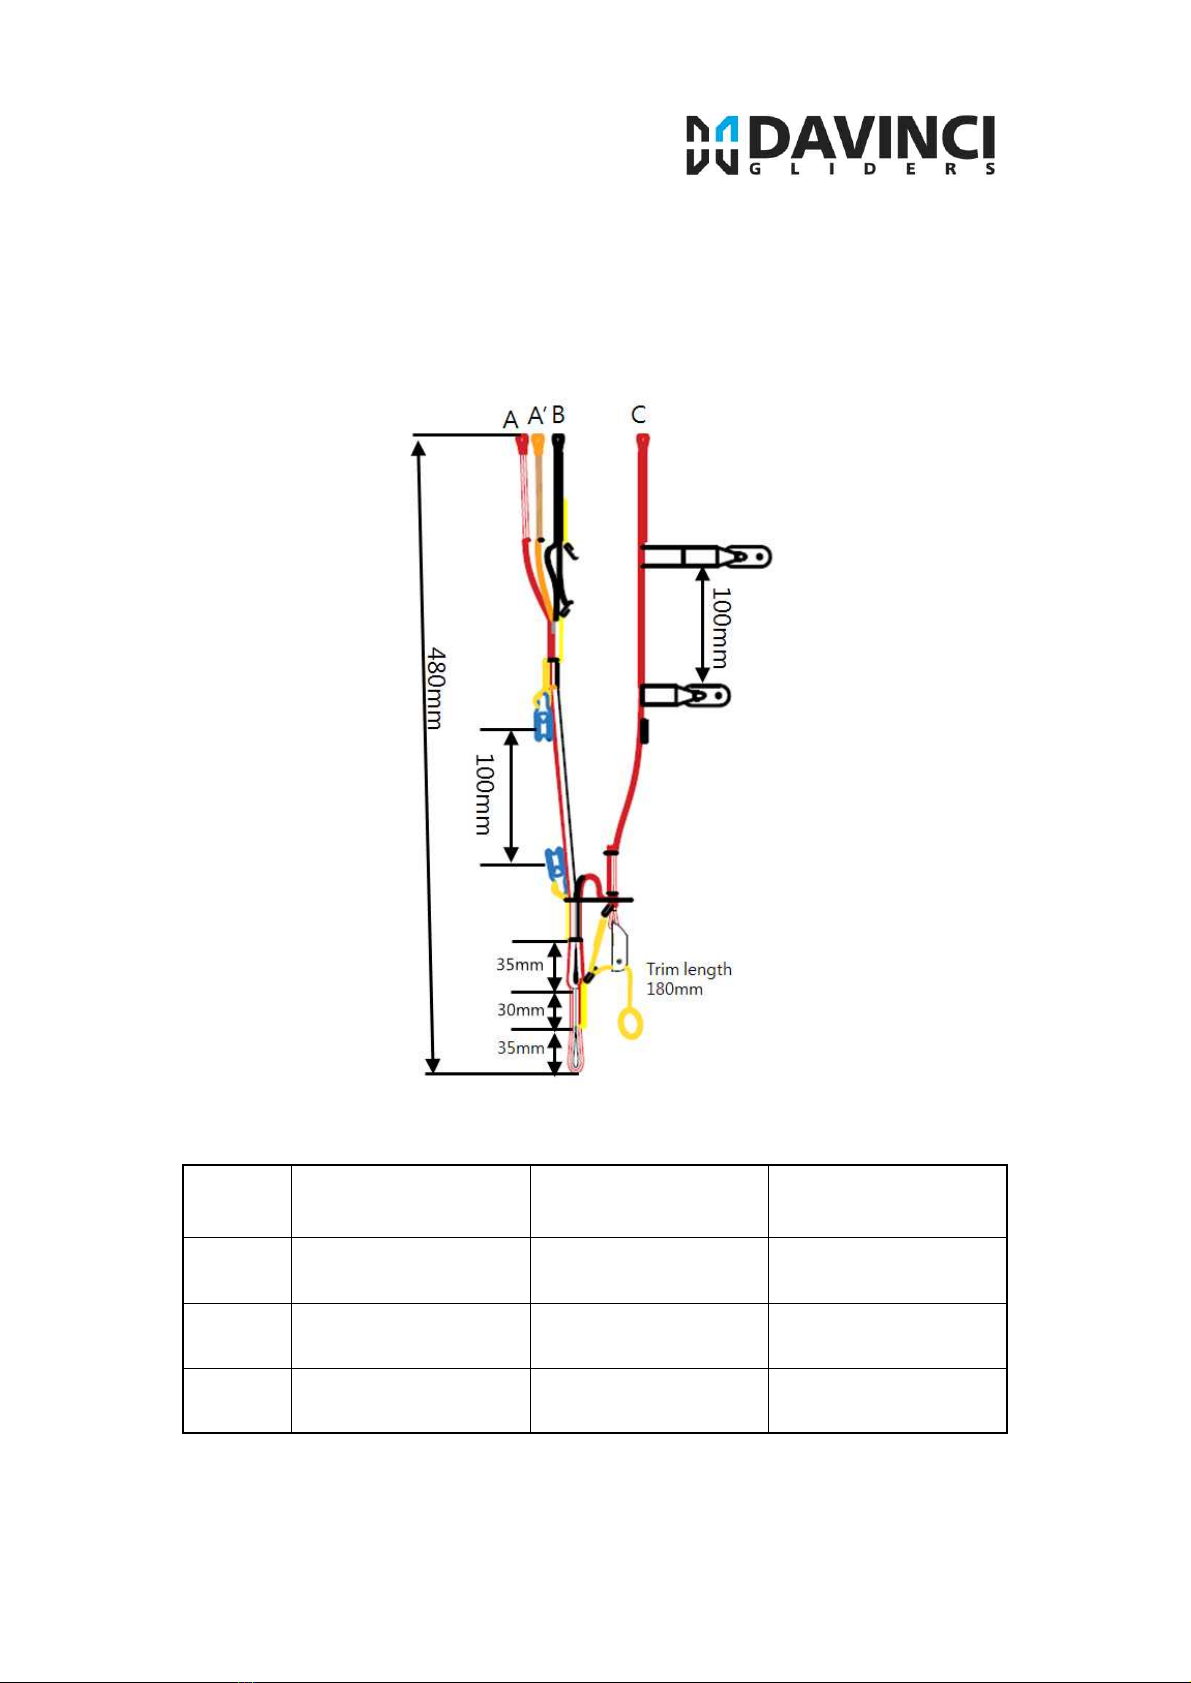
3. Risers
BALLAD has 3 risers. The A riser has a red cover to
easy identification. There is another line with red
mailon. There is A’ and is for the big ears.
Non Accelerated
[mm]
Accelerated
[mm]
Trim
[mm]
A
480
380
480
B
480
430
500
C
480
480
570

www.dv-gliders.com
4. Lines
They come in different diameters of Kevlar and
Dyneema with sheathed cover. They must to be
inspected every 100 hours maximum.
In case of Brake lines, it was cut a little longer, so
every pilot can adjust it according to his personal
taste.
But you must always leave 10cm before the brakes
line starts acting in order to avoid trailing edge
deformation when the wing is fully accelerated. In case
the brake handle comes loose during flight or any
brake lines is cut you can use the C riser softly for
directional control instead of brake line.
5. Adjustable Brake Pulley Position
The brake line pulley position can be adjusted
according to pilot preference to suite the power unit’s
hang points height. There are 2 settings: Upper and
Lower. The upper setting (as set by the factory) is for
low hang point motors whilst the lower setting is for
units with higher hang points.
If you use the lower pulley, you must lengthen the
brake lines accordingly. Moving to the lower pulleys
requires the addition of 5cm to the overall brake line
length (measured from the mark on the brake line).
To change the pulley position, remove the brake line

www.dv-gliders.com
from the pulley by taking off the brake handle.
Re-route the brake line through the other pulley
before attaching the brake handle at the new adjusted
length.
6. Accelerator system
The accelerator has being limited in travel up to a
safety point, however you can gain 8-12 km of extra
speed.
You have to adjust the harness to the speed system so
you can use all the speed travel.
To do so you have to be seated in the ground
meanwhile you are in your harness and adjust the
lines by pulling up the risers with tension. Another
person help to do this is recommended. Make sure
also that the pedal is not pulling down the risers when
you are not using it.
Once all the gear is rigged you have to test the whole
speed travel in calm air.
The use of the speed system reduces the angle of
attack and the canopy may be more sensitive to
collapses therefore do not use near the ground or in
turbulent air and in case you are hit by turbulence
remove your feet off the pedal bar as quickly as
possible.

www.dv-gliders.com
7. Trimmers
The BALLAD is supplied with a trim riser set. The
‘neutral’ or standard position is when the trimmers are
pulled all the way down and A/B/C riser lengths are
equal. We recommend performing landing and take-off
with the trimmers closed.
The standard trim setting is ideal for climbing under
power and when the air is turbulent. Brake pressure is
lighter and the handling at its best in the standard
trim setting. To increase cruise speed you can use the
speed system, release the trimmers, or do both. Using
the speed system has exactly the same effect as
releasing the trimmers so it is safe and possible to fly
with the trimmers in the standard position whilst using
the full range of the speed system.
Unlike the majority of reflex PPG wings, to increase
cruise speed you can use the speed system, release the
trimmers, or do both.
It is not necessary to release the trimmers before
accelerating. Using the speed system has exactly the
same effect as releasing the trimmers so it is safe and
possible to fly with the trimmers in the neutral position
whilst using the full range of the speed system.
In turbulent air the reflex profile is very stable. It will
resist reasonable levels of turbulence with a high

www.dv-gliders.com
resistance to collapse without pilot input. The faster
the wing is flown the more inherent stability there is,
as the reflex has a greater effect. In mild turbulence it
may be best to not attempt to fly the wing actively and
let the profile absorb the turbulence itself, indeed small
applications of the brakes can reduce the inherent
stability of the profile. However in very strong
turbulence, we recommends to return the trimmers to
the neutral position (pulled down) and flying the glider
actively. This way, you will be in the best position to
react correctly should an incident occur.
8. Pre-flight check
To know yourself with the glider it is a good idea to
perform practice inflations and ground handling with
and without the motor.
You should have no difficulties flying the BALLAD for
the first time in suitable conditions, but as with all new
equipment.
When you have the new glider, the below points should
be inspected.
- Check the lines are clear and not twisted.
- Connection points between the glider and harness.
- All harness buckles are closed.
- The karabiners are fully closed and not damaged.
- The sewing, condition of the lines and connection of
the lines are right

www.dv-gliders.com
- Internal demage to ribs and diagonal ribs.
- Demage to th etop and bottom panels and seams
between panels.
9. Take-0ff
Whilst inflating the BALLAD, you should hold both of
th A risers on your hands. Pilot run in an upright
position and just increases throttle of the engine.
In strong winds it is desirable that an assistant helds
the front of the trike from tipping over. When BALLAD
is at an angle of 70 - 80 degrees, pilot should
gradually slow it down by brakes. Once the wing will
come to the “normal” angle of attack, while continuing
to run, slightly pull the brakes (20 - 30 cm) to reduce
the runway. Don’t stop running until your geet have
left up to the ground and you feel surely safe climb
out.
We recommend to take off with closed trimmers.
10. In flight characteristics
BALLAD has ling brake travel length and increased
brake pressure.
10.1 Speed control
You can change speed by using the trimmers an speed
bar. By pulling the trimmers to the closed point and
brakes are pulled approximately 30cm, the BALLAD will

www.dv-gliders.com
achieve its best minimum sink rate.
10.2 Turn control
To familiarize yourself with the BALLAD your first
turns should be gradual and progressive.
To make efficient and coordinated turns with the
BALLAD first look in the direction you want to go and
check that the airspace is clear. Your first input for
directional change should be weight-shift, followed by
the smooth application of the brake until the desired
bank angle is achieved. To regulate the speed and
radius of the turn, coordinate your weight shift and
use the outer brake.
11 Deflations
11.1 Asymmetric collapse
Turbulence may cause a portion of the wing suddenly
to collapse. Asymmetric collapses should be controlled
by weight shifting away from the collapse and applying
enough brake to control your direction. And you
should use the brake to re-inflate the glider.
11.2 Frontal collapse
BALLAD comes out of symmetrical front collaps by
itself. But It could be fast recovered, if you apply the
brake down to 15 to 20cm.
If your wing collapses in accelerated flight, immediately
release the accelerator and manage the collapse using

www.dv-gliders.com
the same methods described above.
11.3 Full stall
Full stall can occur when you fully pull the both
brakes. To recover to the normal flight you must
release both brakes. After this usually comes a front
dive with a possible front deflation. An asymmetric
recovery (one control released faster than the other)
from a full-stall can cause a big dynamic collapse. The
full-stall is a hazardous manoeuvre and should be only
done under the right safety preparations.
11.4 Deep stall
It is possible for gliders to enter a state of deep stall.
This can be caused by several situations including; a
very slow release from a B-line stall; flying the glider
when wet; or after a front/symmetric deflation.
When you meet this situation you should fully raise up
the both brakes. and push the A-risers forwards or
speed bar to regain normal flight.
11.5 Asymmetrical stall
It can take place when you pull one of the brakes too
hard, or while spiraling at a small speed in turbulence
you increase the angle of attack. Rotation in the
asymmetrical stall is called negative spiral. This is one
of the most dangerous flying situations. In order to get

www.dv-gliders.com
out of asymmetrical stall, just release the brakes.
There may follow side thrust forward with a following
wing collapse.
11.6 B stall
The BALLAD has a very clean stable B stall. To enter
the B stall, the pilot has to pull the first 20cm slowly
until the r glider loses forward speed and starts to
descend at around 6 m/s vertically. Do not release the
brake handles during B stall. If you pull too much
B-line the glider may horseshoe and move around a
lot. If this happens, release the B risers.
To exit the B-stall the B-risers should be released
symmetrically and in one smooth, progressive motion.
The glider will resume normal forward flight without
further input. Check you have forward flight again
before using the brakes.
11.7 Cravat
In case a cravat should occur from an asymmetric
collapse or other manoeuvres, it is important to keep
your flying direction by applying some brake on the
opposite side and weight shift. You can also use strong
deep pumps on the brake to the cravated side, If you
can not do it and the rotation is increasing, you must
use the parachute.

www.dv-gliders.com
12 Descent Techniques
12.1 Big ears
Sink rate can be decreased in a controlled way by
folding both wing tips. While holding the brakes you
should symmetrically pull the outermost A-risers.
In order to return to the normal flight, you should
release the A-risers and pull the brake short times
until wing tips regain pressure.
Spiraling is not permitted with big ears, because of the
increased load on the remaining lines so that they can
be physically deformed.
12.2 Spiral dive
When you hold one sided brake down for a long time,
the glider goes into a fast sharp turn and loses a lot
of height. We recommend you don’t to get into the
sink rate over 10m/s. The sink rate could be more
than 15 m/sec. To get out of the spiral dive you must
release the inner brake. Mind that BALLAD may take
one more turn after releasing the brake. While spiral
diving, the pilot experiences considerable overload up
to 3 – 4g, so you can lose orientation.
13 Landing
We recommend to land with trimmers to the normal
slow position.
When you are 1-2m over the ground, you should pull

www.dv-gliders.com
the brakes smoothly for minimize vertical speed.
Don’t hit the ground by your overtake the glider.
14. Packing your BALLAD
Spread the BALLAD completely out on the ground.
Separate the lines to the each side. The BALLAD must
be folded cell to cell to keep the plastic reinforcement
at the leading edge lie flat on each other and don’t get
bent. Try to pack your BALLAD as loosely as the
rucksack allows, because every fold weakens the
fabric.
Avoid packing the glider where it is wet or abrasive
conditions(sand, asphalt pavement, concrete)
15. Maintenance and cleaning
Cleaning should be carried out with only pure water. If
the glider comes in contact with salt water, clean
thoroughly with fresh water. Do not use solvents of
any kind, as this may remove the protective coatings
and destroy the fabric.
16. Caring tips
- Do not expose your glider to the sun any longer
than necessary
- Keep it away from water and other liquids
- Do not let the front edge hit the ground

www.dv-gliders.com
- Keep your glider away from fire
- Do not put anything heavy on your glider, do not
pack it in a rucksack too tightly.
- Regularly inspect the canopy, lines, risers and
harness. If you find any defects, contact your dealer
or the manufacturer. Do not attempt to repair the
paraglider by yourselves.
- If you detect a damaged line, inform the dealer or
manufacturer about the line number according to the
line plan
- Keep your BALLAD in a rucksack in a dry
well-ventilated place under neutral temperature and
humidity conditions
- If you do not use the glider, then once a month you
should unpack it, ventilate it well, and then pack it
back in the rucksack.
17. Warrantee
The producer guarantees the correctness of the
declared characteristics and the paraglider’s normal
performance for two years after the purchase date, but
no more than 200 flying hours. The producer conducts
special, and after warranty repairs and maintenance at
the owners’ request for an extra price.
We recommend to inspect your paraglider (including
checking suspension line strength, line geometry, riser
geometry and permeability of the canopy material) one

www.dv-gliders.com
time at two years, or every 150 hours of flying time
(whichever comes first); Those inspection must be
made by manufacturer or dealer.
www.dv-gliders.com
BALLAD
Serial Number
Date of Production
Dealer
Date of sales
Check and repair information
This manual suits for next models
11
Other DAVINCI GLIDERS Aircraft manuals

DAVINCI GLIDERS
DAVINCI GLIDERS DUET User manual

DAVINCI GLIDERS
DAVINCI GLIDERS OPERA User manual

DAVINCI GLIDERS
DAVINCI GLIDERS SOUL User manual

DAVINCI GLIDERS
DAVINCI GLIDERS TANGO XS User manual

DAVINCI GLIDERS
DAVINCI GLIDERS JAZZ 21 User manual

DAVINCI GLIDERS
DAVINCI GLIDERS Point User manual

DAVINCI GLIDERS
DAVINCI GLIDERS Funky2 User manual

DAVINCI GLIDERS
DAVINCI GLIDERS DUET User manual


