DAVINCI GLIDERS SOUL User manual

1

User’s manual
Rev 1
08.2020
2

3

Thank you for choosing the Davinci SOUL harness.
This harness is for the beginner and accuracy competition pilot.
It has been designed to effectively protect the pilot from the any unexpected condition.
Although the SOUL has been certified of EN 1651 and LTF NfL II 91/09, paragliding is a
dangerous sport that can be caused injury, physical disability and even death.
To reduce the risk to the pilot, we invest and challenge a lot of research and
development. As a result, there are many Davinci’s innovative technology like the Smart
Rescue Bridle system, In sight rescue parachute handle and it has clean zipper shape and
modern design.
We wish you a comfortable and safe flight with the SOUL.
-Davinci Gliders team-
4
Thank you

WARNING!
THIS IS NOT TRAINING MANUAL. ATTEMPTING TO FLY THIS OR ANY
OTHER PARAGLIDER WITHOUT PROPER INSTRUCTION FROM A
CERTIFIED PROFESSIONAL INSTRUCTOR IS EXTREMELY DANGEROUS
TO YOURSELF AND BYSTANDERS.
DAVINCI GLIDERS are carefully manufactured and inspected at the
factory. Please use the harnesses only as described in this manual.
Do not make any modifications to the harnesses.
As with any sport –without taking the
necessary safety precautions, paragliding can be dangerous.
5

Thank you ............................................................................................................................................................
Warning .............................................................................................................................................................
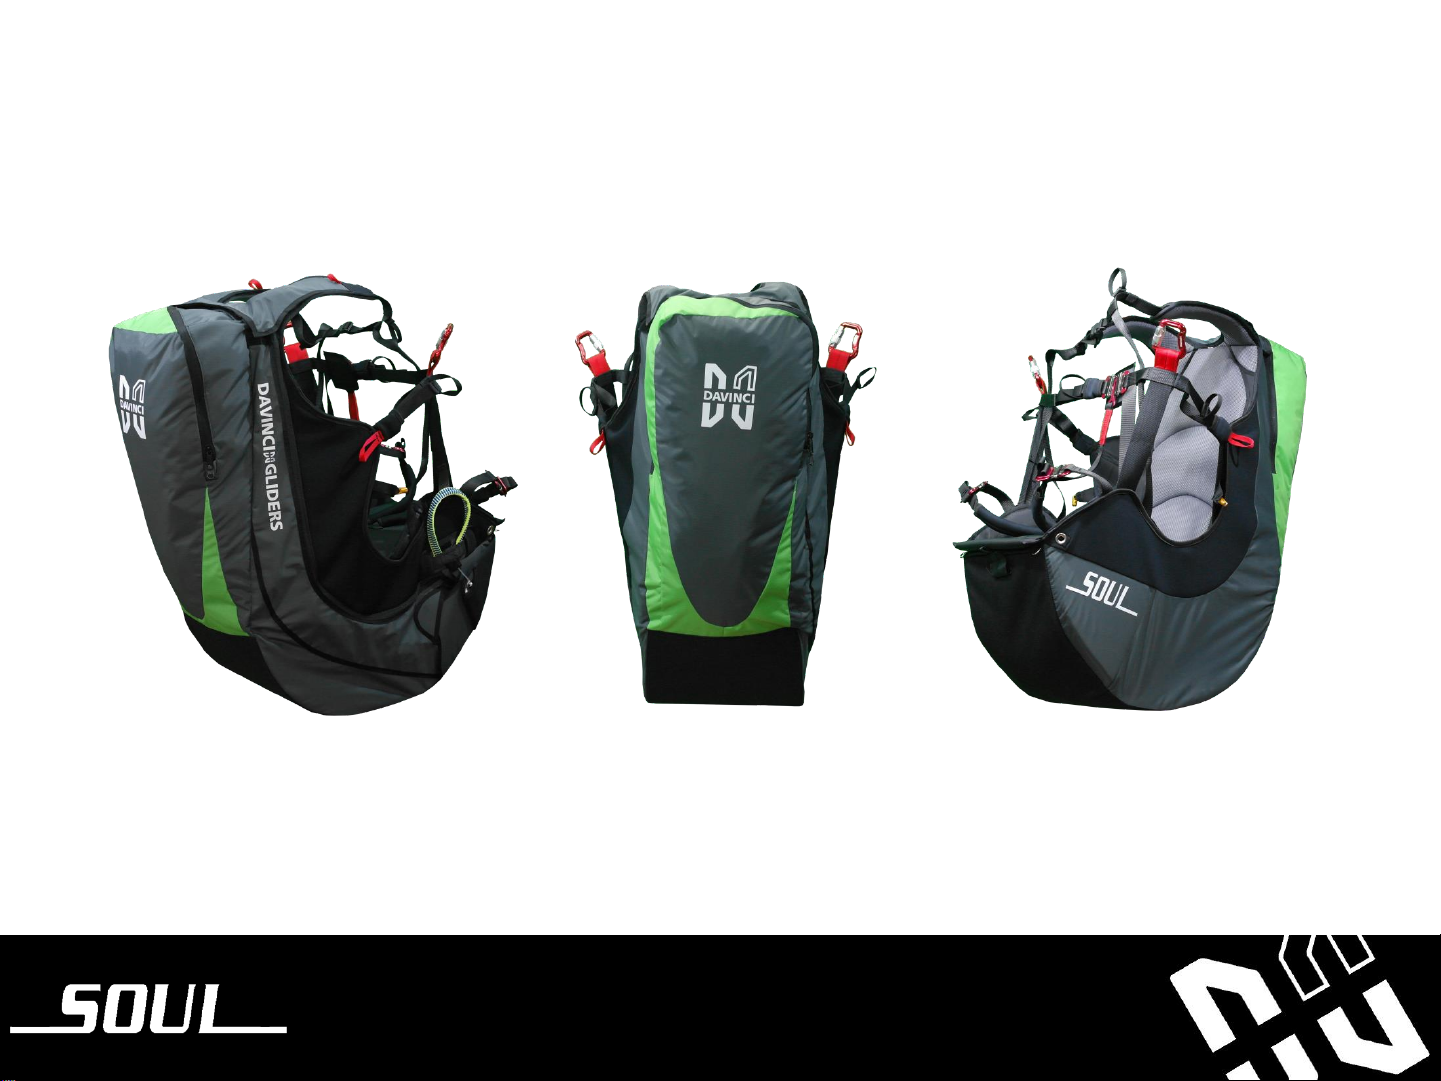
Introducing the Soul ....................................................................................................................................
Components and Features ........................................................................................................................
Before you fly .................................................................................................................................................
Connecting the carabiner ..............................................................................................................
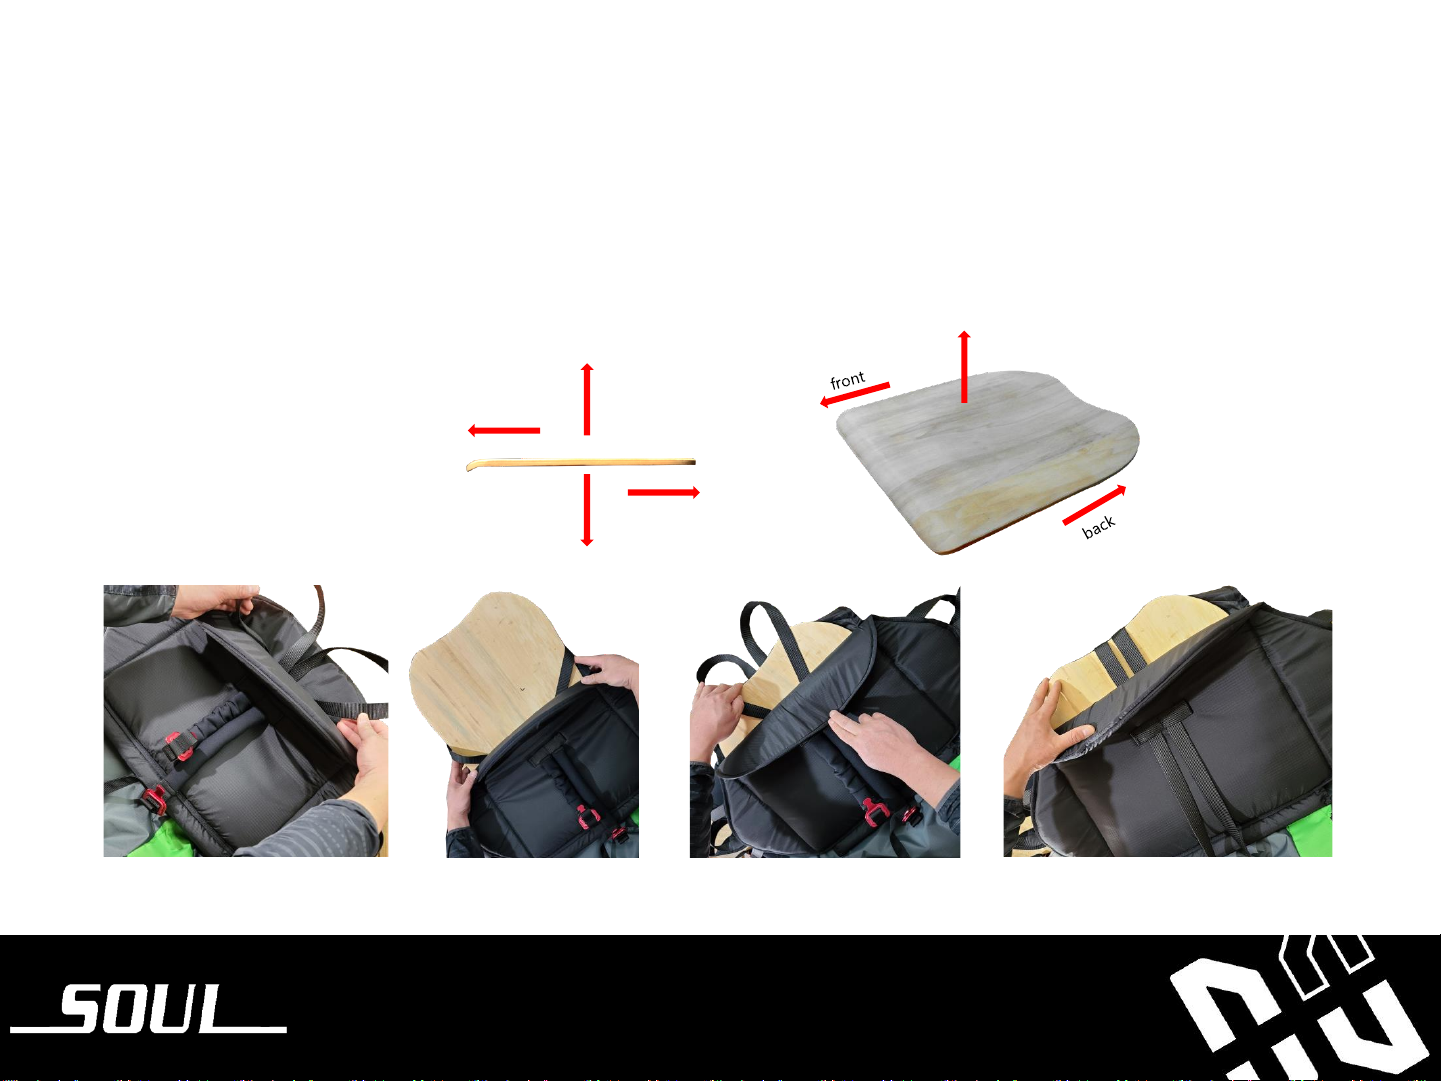
Installing the seat plate .................................................................................................................
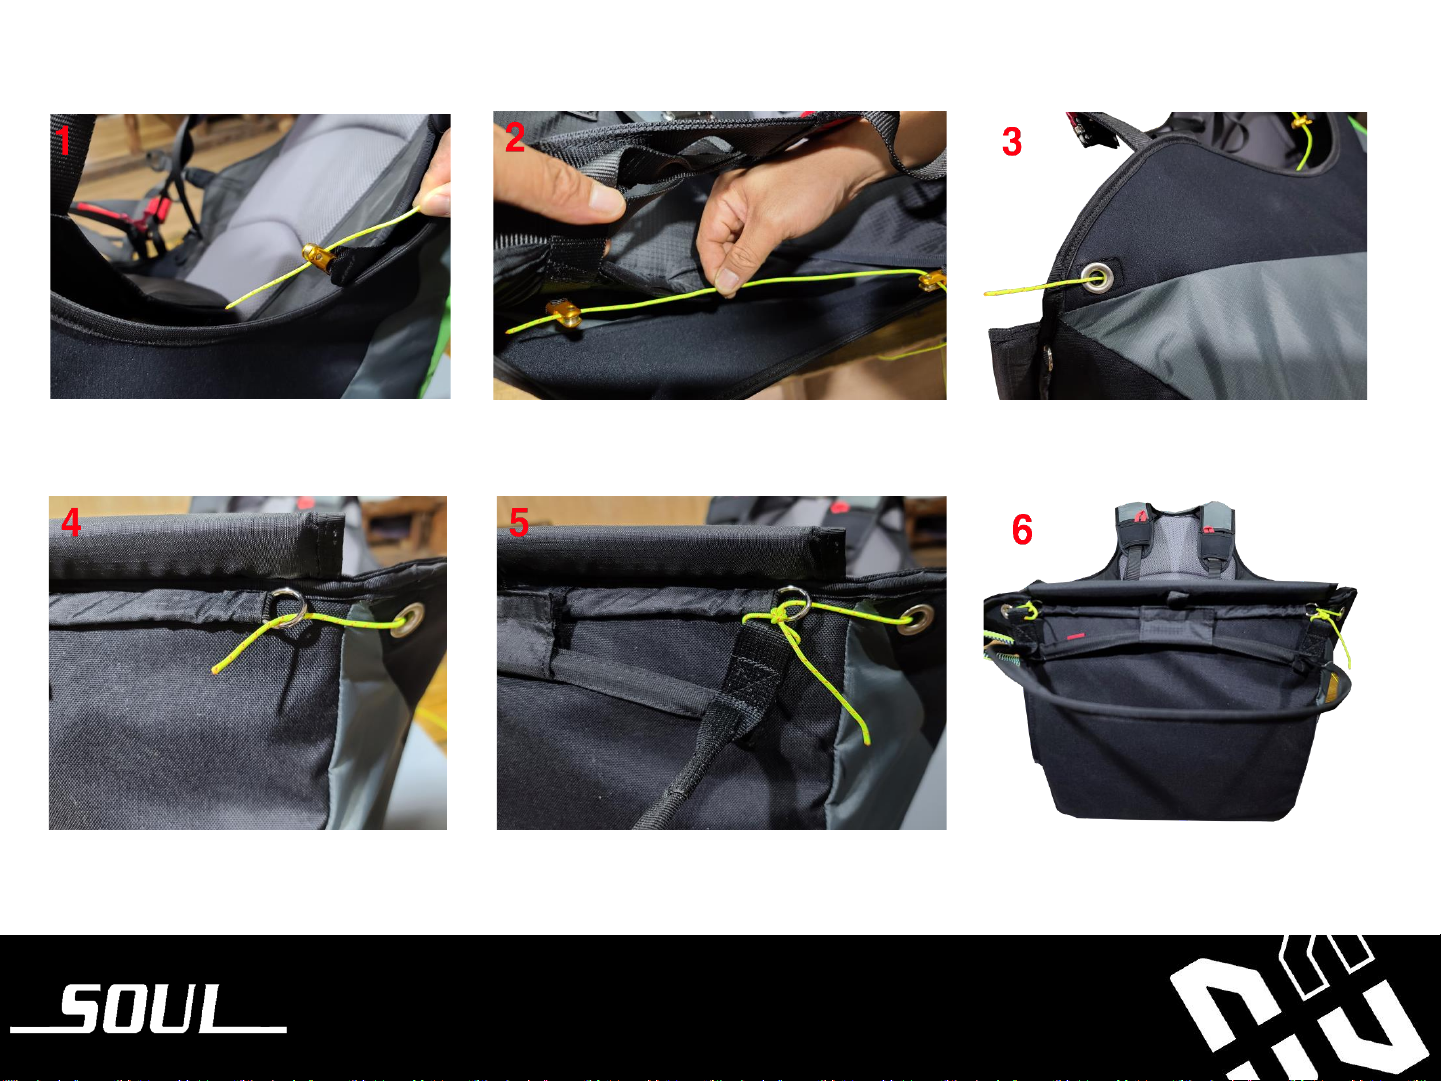
Installing the back protector .......................................................................................................
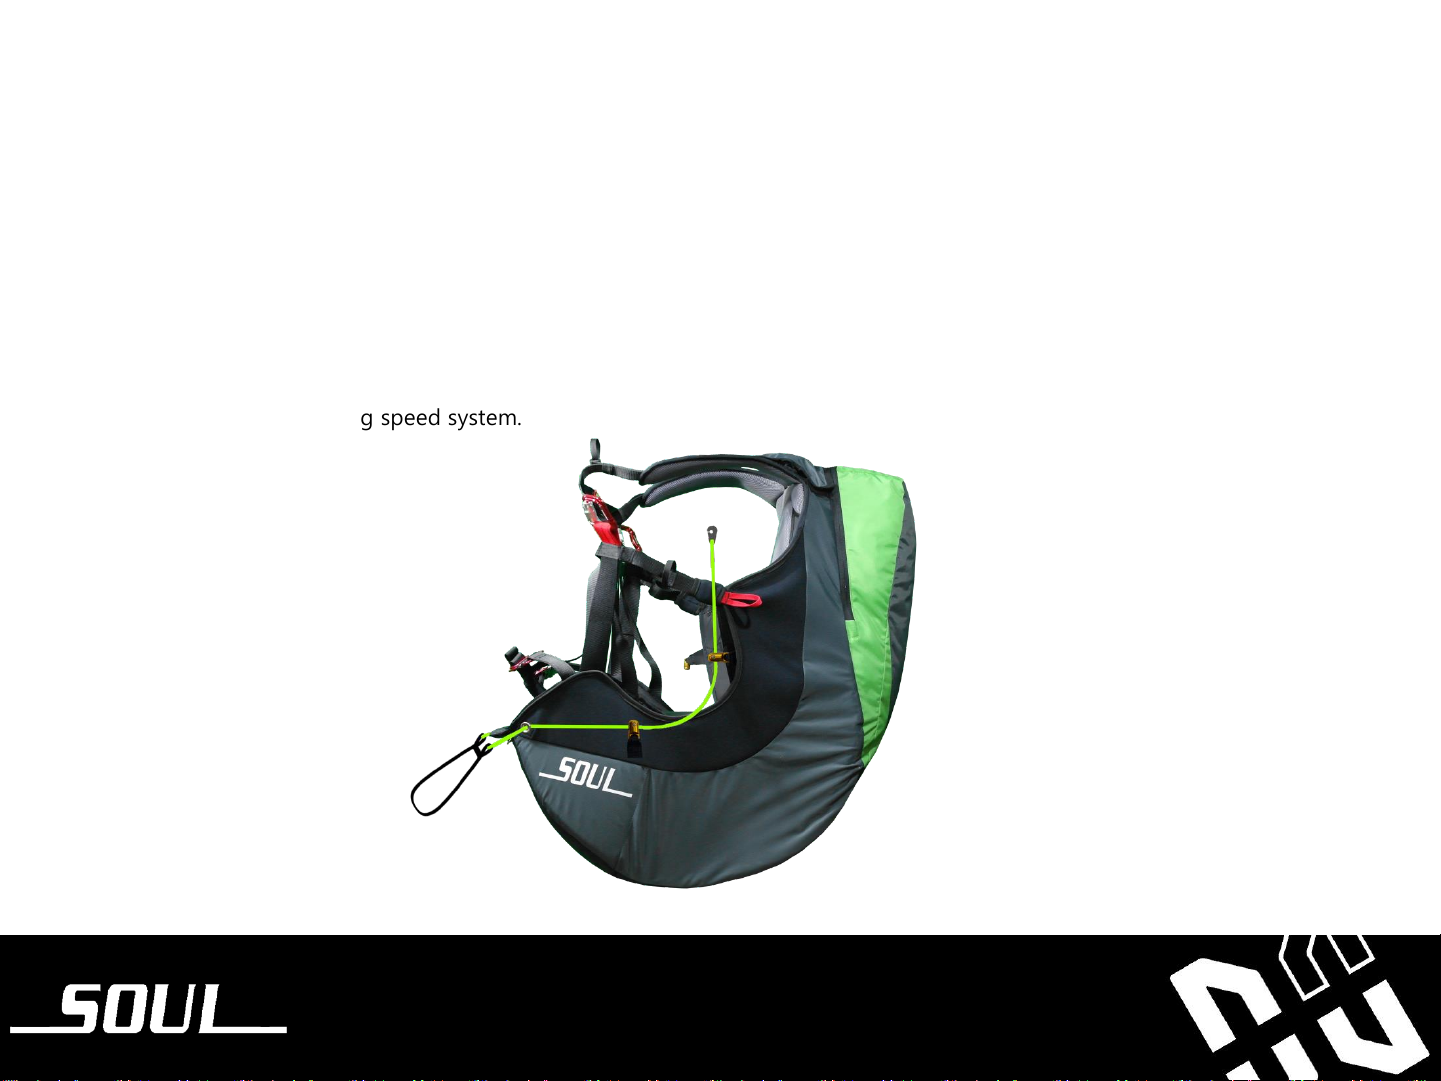
Installing the speed system .........................................................................................................
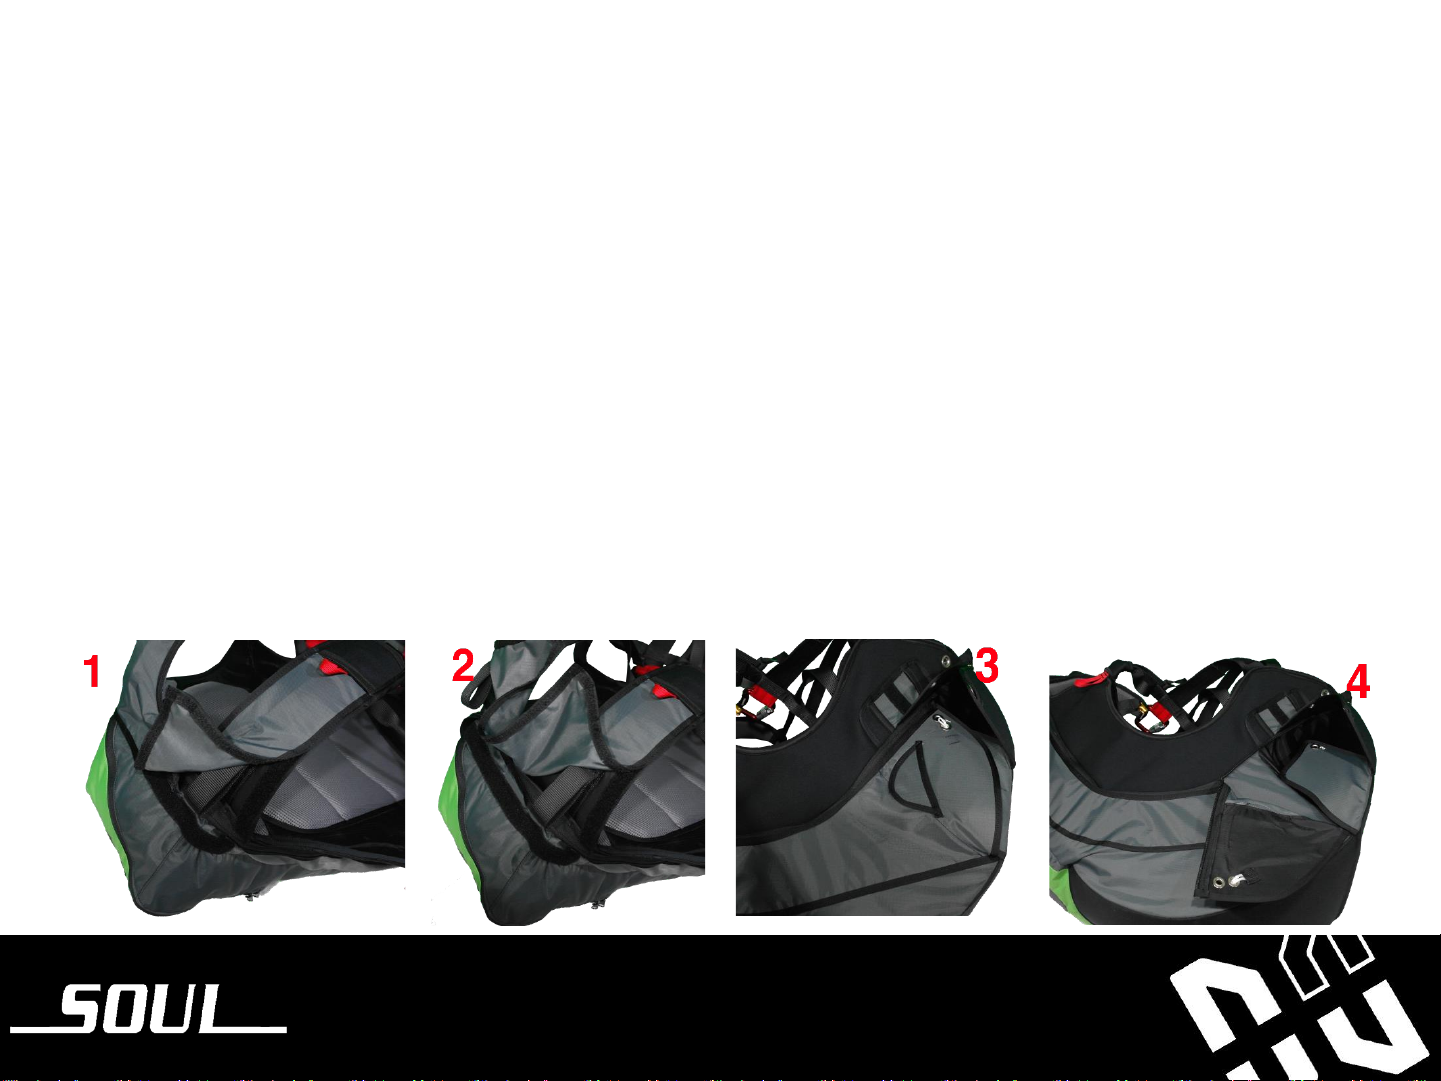
Rescue Installation and compatibility check .........................................................................
Attaching the rescue deployment bag to the harness deployment handle ............
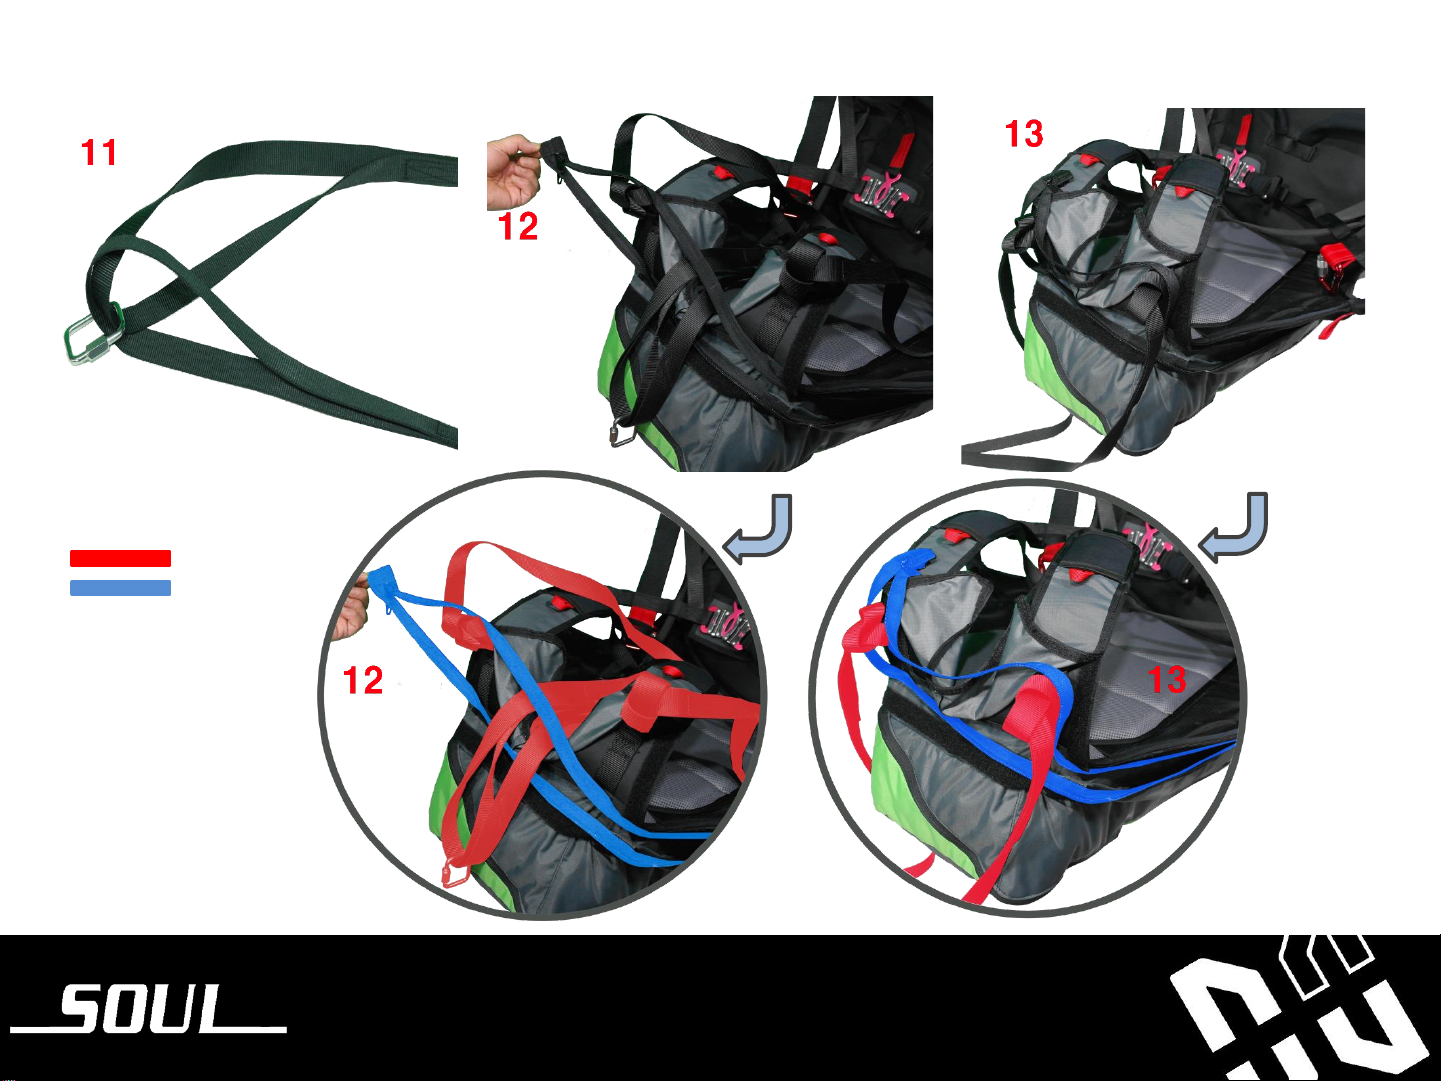
Connecting the rescue bridle ......................................................................................................
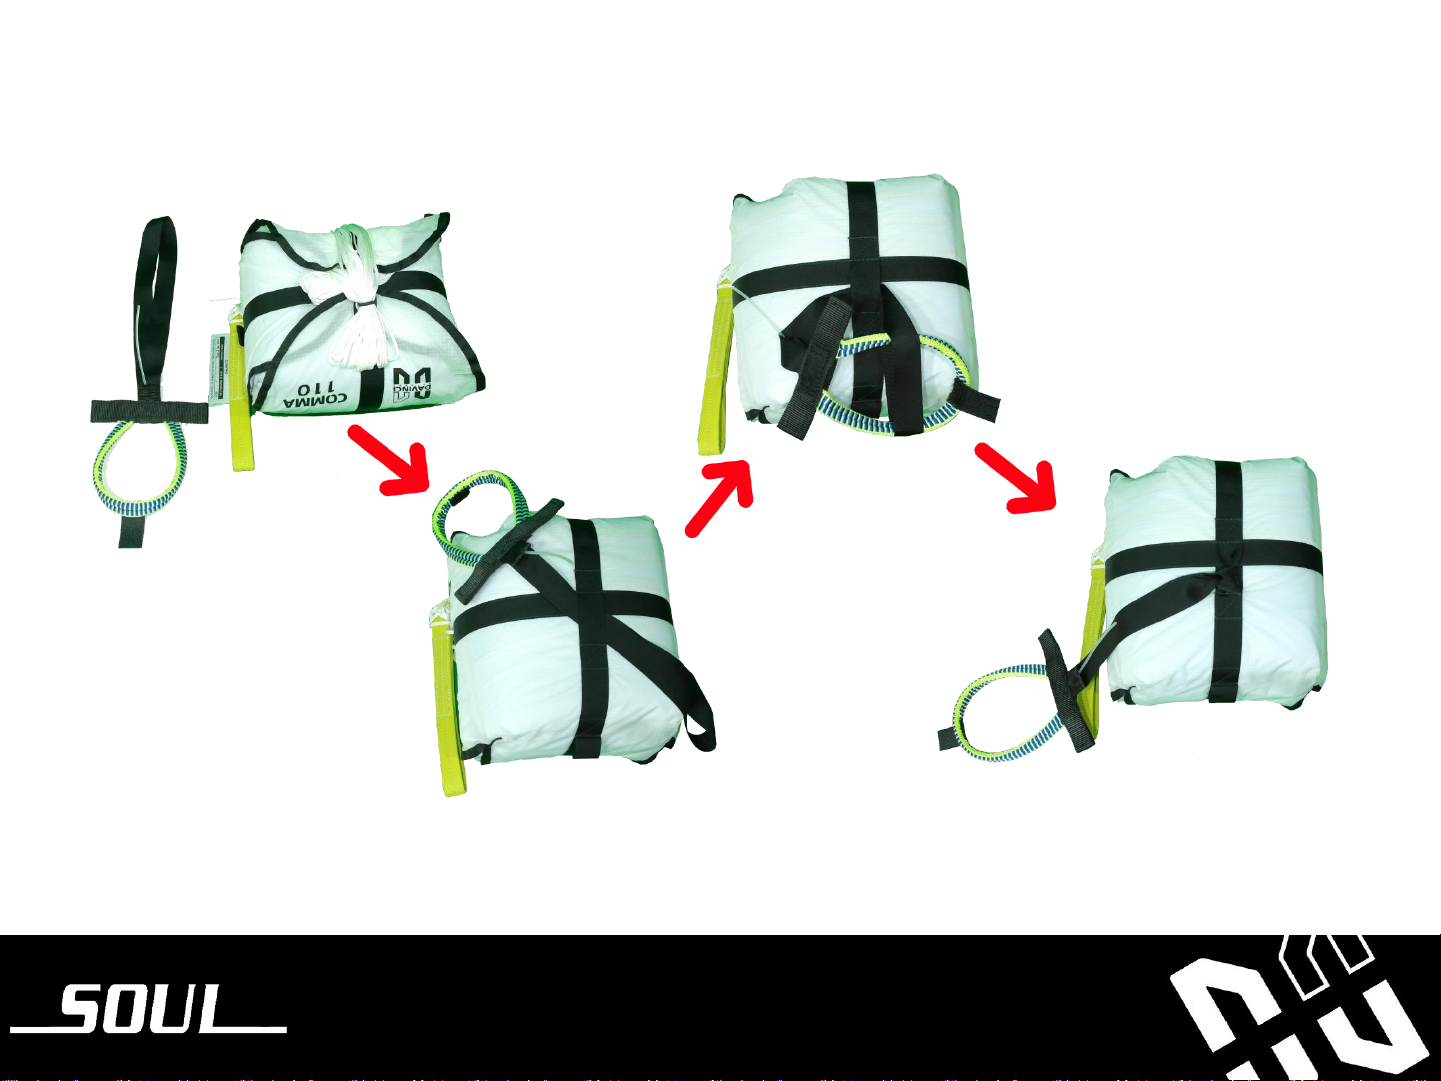
Rescue installation guide ..............................................................................................................
Storage .................................................................................................................................................
Adjustments .......................................................................................................................................
Shoulder straps .................................................................................................................................
Lateral Straps .....................................................................................................................................
Leg straps ............................................................................................................................................
Chest Strap .........................................................................................................................................
Flying with the Soul .....................................................................................................................................
General warnings and advice ......................................................................................................
Pre-flight checks ...............................................................................................................................
Landing with the SOUL ..............................................................................................................................
Miscellaneous ................................................................................................................................................
Maintenance and repairs ..........................................................................................................................
6
4
5
7
8
9
9
10
11
12
14
15
17
21
25
26
27
28
29
30
31
31
31
32
32
33
Contents

7
Certification
The SOUL has EN 1651 and LTF NfL II91/09
certification, max load 120 DaN
Introducing the SOUL
SOUL Spec S M L
Height (Cm) 150-170 165-185 175-195
Weight (Kg) 50-75 60-85 75-100
Board Width (Cm) 33 36 39
Board Depth (Cm) 36 38 40
Height of Suspension Point (Cm) 41 43 44
Harness Weight (Kg) 4.0 4.2 4.4
Back protection type Foam type
Min/Max container volume (Cm2)7,500 / 8,500
Technical specifications

8
Components and Features
Features
Shoulder
adjustment
Rescue
Parachute
pocket
Back Storage
Container
Leg buckle
Chest buckle
Suspension
point
Rescue
Parachute
handle
Foam back
protection
Speed bar
Pulley
Backrest angle
Adjustment
1. Harness 2. Back Protection
3. 40mm Carabiners 4. Wooden Seat Plate
Components

9
Double check that your dealer has checked the integrity and basic
settings of the harness. The harness should be assembled by
appropriately qualified paragliding instructor.
•Connecting the carabiner
Before your flight, you have to
make sure the connection with the
Harness with the carabiner like this
picture.
Before you fly

10
•Installing the seat plate
The seat plate can be removed and accessed on the back of the seat. Disconnect the leg strap and pull it back to remove
it. Place the leg straps on the back edge of the sheet when installing the seat plate. The seat plate must be installed with
the rounded edge to the backward and the front curve facing downward.
# You have to check the leg straps pass the rounded edge like last picture
front
back
top
top
Bottom

11
•Installing the back protector
The SOUL has a 16cm back foam protector which is installed through the back container pocket. To assemble the back
protector, open the back container pocket and insert the it as shown below. Make sure that the end of the small part of
the protect size is inserted first. The rear protector should easily enter its place and fit neatly inside the rear protector
compartment. The Protector should be placed under the webbings. And close the zipper to finish.

12
•Installing the speed system
Because the hook is attached to one side, install the speed system from the top to the bottom. Pass the speed
system line along the inside of the harness and route it through both pulleys
(1) After second pulley, route the line through the metal ring at the bottom edge of the seat
(2) Before tying the knot, pass it through the metal ring connected with rubber band.
(3) Connect the line to the speedbar using a certain knot
(4) When finished or ready to fly, you can attach a speed system to the Velcro at the bottom of the seat
harness to prevent sagging speed system.

13

14
Rescue Installation and compatibility check
Davinci gliders recommends that rescue installation should be performed by a instructor who has the license of rescue
packing. Rescue parachute is a last resort for pilots and can cause death or serious injury if the preparatory parachute is
not packed or connected in the right way. The pilot is responsible for ensuring the parachute is properly installed.
This harness is compatible with the Davinci Gliders’s Comma and Comma # lite. The rescue from other manufacturers can
also be used, we do not guarantee each function. The pilot must be responsible for checking compatibility.
Whenever a rescue system is first installed on the harness, a qualified paragliding professional instructor should check
compatibility. To check the valid of that installation, you need to perform the test at the simulation hanger.
Rescue parachutes should be repacked at least every 6 months
WARNING: If you have any doubts regarding installation, find the expert’s advice!
IMPORTANT: You must perform a trial test at the simulator to verify the installation.

15
Attaching the rescue container bag to the harness rescue parachute handle
SOUL is included the rescue parachute handle. The handle have to be connected to the rescue container bag.
For the connection, you have to check the length of the strap. It must be longer than the connecting plastic pin not being
pulled before the strap tightens on the reserve. But it is not so long, the movement may be restricted before the plastic
pin exits.
The containers of other manufacturers may have different shape, pin and position. It could be caused a operation failure to
opening reserve.
So, we strongly recommend that you have to check contact your dealer or instructor to check the condition of your rescue
which is installed like the manual.

16

17
Connecting the rescue bridle
To connect your rescue to the SOUL harness, we recommend using a Davinci Rescue Carabiner which has Min
28kN(2854kgf) of breaking load. It has more than 10 times of your maximum weight.
Be sure to inspect your connector during normal maintenance and safety checks.
The SOUL Harness has a special Bridle installation system.
This system minimizes the comfort of the pilot when you open the parachute and the condition that the pilot is
awarded lower on ground contact. The hanging point is positioned at the frount of the shoulder and is designed to
combine the advantages of the zipper system with a clean shape than Velcro.
So when you install a parachute, you have to pay more attention to it and set it up in order to fit the order of the
pictures. Initially, the bridles will be placed on the right position!!
IMPORTANT: The bridles must be zipped inside the zipper as shown in Figures 12 and 13, before locking
the zipper located on the top of the harness.

18

19
Zipper
Rescue bridle

20
This manual suits for next models
3
Table of contents
Other DAVINCI GLIDERS Aircraft manuals

DAVINCI GLIDERS
DAVINCI GLIDERS OPERA User manual

DAVINCI GLIDERS
DAVINCI GLIDERS BALLAD 19 User manual

DAVINCI GLIDERS
DAVINCI GLIDERS TANGO XS User manual

DAVINCI GLIDERS
DAVINCI GLIDERS DUET User manual

DAVINCI GLIDERS
DAVINCI GLIDERS Point User manual

DAVINCI GLIDERS
DAVINCI GLIDERS Funky2 User manual

DAVINCI GLIDERS
DAVINCI GLIDERS JAZZ 21 User manual

DAVINCI GLIDERS
DAVINCI GLIDERS DUET User manual