DAYE DYM1P64FE User manual

1 / 20
ENGINES
OWNER´S MANUAL
DYM1P64FE
WARNING:
The engine exhaust from this product contains chemicals to cause cancer, birth defects or other
reproductive harm.
(EN) Original Instructions EN-11/2017 - No. 755

2 / 20
CONTENTS
INTRODUCTION ............................................................................................................ 2
SAFETY MESSAGES..................................................................................................... 3
Damage Prevention Messages..................................................................................... 3
Safety Information......................................................................................................... 3
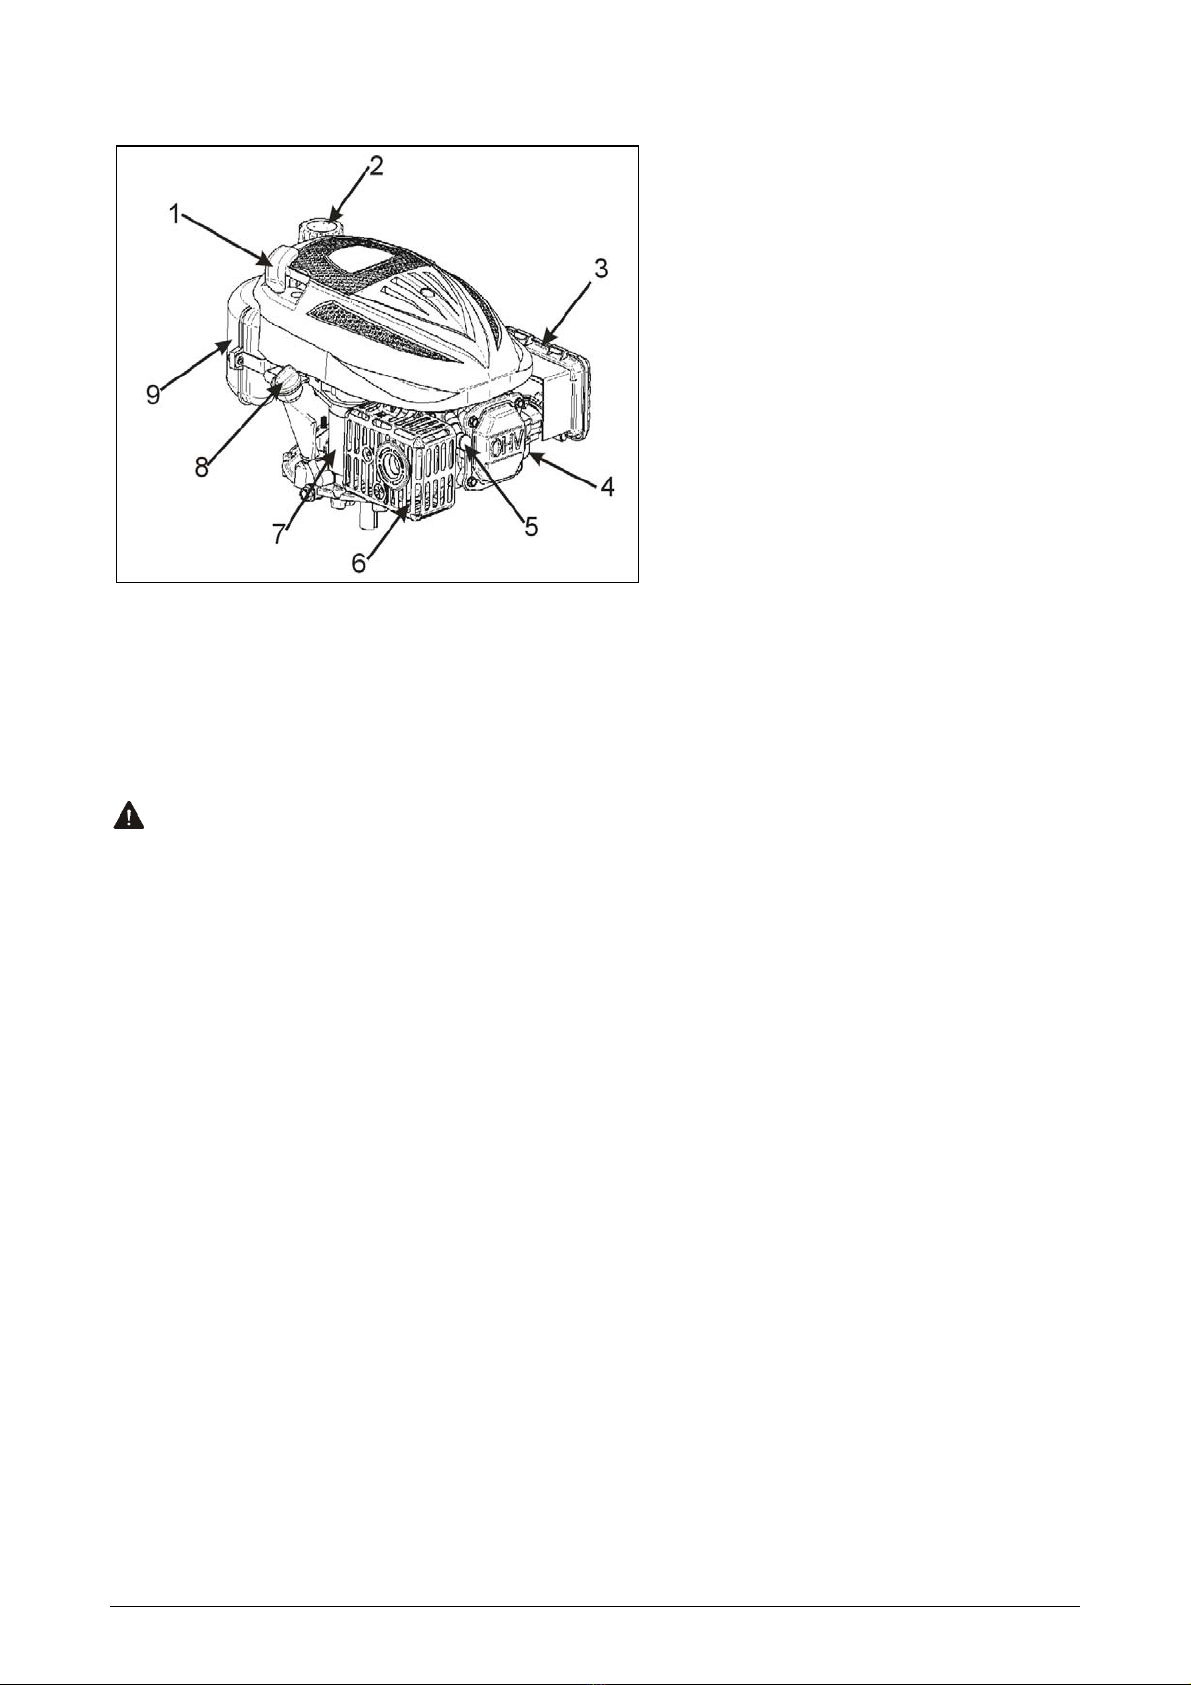
COMPONENT& CONTROL LOCATION ........................................................................ 4
BEFORE OPERATION CHECKS ................................................................................... 4
OPERATION................................................................................................................... 5
Safe Operating Precautions.......................................................................................... 5
Starting the Engine ....................................................................................................... 5
Stopping the Engine .....................................................................................................6
Specifications ...............................................................................................................7
SERVICING YOUR ENGINE .......................................................................................... 8
The Importance of Maintenance...................................................................................8
Maintenance Safety...................................................................................................... 8
Safety Precautions........................................................................................................ 8
Maintenance Schedule ................................................................................................. 9
Fuel............................................................................................................................. 10
Engine Oil ...................................................................................................................11
Air Cleaner..................................................................................................................13
Spark Plug .................................................................................................................. 14
Spark Arrester............................................................................................................. 14
Flywheel Brake Inspection.......................................................................................... 15
Engine Adjustments.................................................................................................... 15
STORAGE AND TRANSPORTING OF THE ENGINE.................................................. 16
Cleaning .....................................................................................................................16
Preparation for Engine Storage .................................................................................. 16
Engine Storage........................................................................................................... 18
Removal from Storage................................................................................................ 18
Transporting ............................................................................................................... 18
TAKING CARE OF UNEXPECTED PROBLEMS ......................................................... 19
TECHNICAL & CONSUMER INFORMATION .............................................................. 20
Serial Number Location .............................................................................................. 20
High Altitude Operation...............................................................................................20
INTRODUCTION
Thank you for purchasing our engine. We want to help you to get the best results from your new
engine and to operate it safely. This manual contains information on how to do that; please read it
carefully before operating the engine.
This manual should be considered a as permanent part of the engine and should remain with the
engine if resold.
Review the instructions provided with the equipment powered by this engine for any additional
information regarding engine startup, shutdown, operation, adjustments or any special
maintenance instructions.

3 / 20
SAFETY MESSAGES
Your safety and the safety of others are very important. We have provided important safety
messages in this manual and on the engine. Please read these messages carefully.
WARNING, read owner´s manual before operation.
WARNING, risk of burns. Do not touch the engine before it has cooled. Some parts
may be very hot.
WARNING, risk of fire. Gasoline is extremely flammable. Before refueling, allow
engine to cool 2 minutes.
WARNING, risk of carbon monoxide poisoning. The engine produces carbon
monoxide. Do not start the engine in an enclosed space.
A safety message alerts you to potential hazards that could hurt you or others. Each safety
message is preceded by a safety alert symbol and one of three words DANGER, WARNING or
CAUTION.
These signal words mean:
DANGER
You WILL be KILLED or SERIOUSLY HURT if you don't follow instructions.
WARNING
You CAN be KILLED or SERIOUSLY HURT if you don't follow instructions.
CAUTION
You CAN be HURT if you don't follow instructions.
Each message tells you what the hazard is, what can happen, and what you can do to avoid or
reduce injury.
SAFETY INFORMATION
Understand the operation of all controls and learn how to stop the engine quickly in case of
emergency. Make sure the operator receives adequate instruction before operating the
equipment.
Your engine's exhaust contains poisonous carbon monoxide. Do not run the engine without
adequate ventilation, and never run the engine indoors.
The engine and exhaust become very hot during operation. Keep the engine at least 3 feet (1
meter) away from buildings and other equipment during operation. Keep flammable materials
away, and do not place anything on the engine while it is running.

4 / 20
COMPONENT & CONTROL LOCATION
1. Starter grip
2. Fuel cap
3. Air cleaner
4. Carburetor
5. Spark plug
6. Muffler
7. Electric starter
8. Oil filler cap/dipstick
9. Fuel tank
BEFORE OPERATION CHECKS
For your safety, and to maximize the service life of your equipment, it is very important to take a
few moments before operating check the engine condition. Be sure to take care of any problem you
find, or have your servicing dealer to correct it before you operate the engine.
WARNING
Improper maintenance to this engine, or failure to correct a problem before operation, can cause a
malfunction in which you can be seriously hurt or killed.
Always perform a preparation inspection before each operation, and correct any problem.
Always check the following items before you start the engine:
1. Fuel level (see page 10).
2. Oil level (see page 11).
3. Air cleaner (see page 13).
4. General inspection: Check for fluid leaks and loose or damaged parts
5. Check the equipment powered by this engine.
Review the instructions provided with the equipment powered by this engine for any precautions
and procedures that should be followed before engine startup.

5 / 20
OPERATION
SAFE OPERATING PRECAUTIONS
Before operating the engine for the first time, please review the SAFETY INFORMATION section
on page 3 and the BEFORE OPERATION CHECKS above.
WARNING
Carbon monoxide gas is toxic. Breathing it can cause unconsciousness and even kill you.
Avoid any areas or actions that expose you to carbon monoxide.
Review the instructions provided with the equipment powered by this engine for any safety
precautions that should be observed with engine startup, shutdown or operation.
STARTING THE ENGINE
A1. FOR STARTING A COLD ENGINE:
Move throttle lever to the choke position . Close safety brake control handle (on the
equipment).
For manual start: Grasp rope handle and pull it slowly until resistance is felt, then pull cord
rapidly to overcome compression prevent kickback and start engine.
For electric start: Press and hold the starter button. After starting up the engine, loose the
button.
Important: Do not use longer start-up cycles than 10 s. A longer start-up time will reduce the
life of the battery and the starter, and may result in fire.
After starting move the throttle lever to the run position.
A: Throttle Lever

6 / 20
A: Throttle cable hole
A2. FOR RESTARTING A WARM ENGINE:
Do not use the primmer when the engine is warm.
Move the throttle control slightly past position.
NOTICE: The engine will stop if you release the starter control handle.
Do not allow the starter grip to snap back against the engine. Return the handle slowly then allow
the starter cord rewind it, to prevent damage to the starter.
1. Starter grip
STOPPING THE ENGINE
Release the starter control handle (located on equipment) to stop the engine.

7 / 20
SPECIFICATIONS
TYPE DYM1P64FE
Dry weight (kg) 12
Engine type 4-stroke, OHV, single cylinder
Displacement (bore x stroke) 135 ccm, 64x42 mm
Max. torgue 7 Nm at 2 600 ot/min
Cooling system Forced, air
Lubrication system Forced, splash
Ignition system TCI
PTO shaft rotation Counterclockwise
TUNEUP SPECIFICATION
ITEM SPECIFICATION MAINTENANCE
Spark plug gap 0,028 – 0,031 in
(0,7 – 0,8 mm)
See page 14
Valve clearance (cold engine) IN: 0,06±0,02 mm
EX: 0,08±0,02 mm
See your authorized
dealer.
Other specifications No other adjustment needed.

8 / 20
SERVICING YOUR ENGINE
THE IMPORTANCE OF MAINTENANCE
Good maintenance is essential for safe, economical and trouble-free operation. It will also help
reduce pollution.
WARNING
Improper maintenance, or failure to correct a problem before operation, can cause a malfunction in
which you can be seriously hurt or killed.
Always follow the inspection and maintenance recommendations and schedules in this owner's
manual.
To help you properly care for your engine, the following pages include a maintenance schedule,
routine inspection procedures, and simple maintenance procedures using basic hand tools.
Other service tasks that are more difficult, or require special tools, are best handled by
professionals and are normally performed by our technician or other qualified mechanics.
The maintenance schedule applies to normal operating conditions.
If you operate your engine under severe conditions, such as sustained high-load or high-
temperature operation, or use in unusual wet or dusty conditions, consult your servicing dealer for
recommendations applicable to your individual needs and use.
MAINTENANCE SAFETY
Some of the most important safety precautions follow. However, we cannot warn you of every
conceivable hazard that can arise in performing maintenance. Only you can decide whether or not
you should perform a given task.
WARNING
Failure to properly follow the maintenance instructions and precautions can cause you to be
seriously hurt or killed.
Always follow the procedures and precautions in this owner's manual.
SAFETY PRECAUTIONS
Make sure the engine is off before you begin any maintenance or repairs. This will eliminate
several potential hazards:
-Carbon monoxide poisoning from engine exhaust.
Be sure there is adequate ventilation whenever you operate the engine.
-Burns from hot parts.
Let the engine and exhaust system cool before touching.
-Injury from moving parts.
Do not run the engine unless instructed to do so.
Read the instructions before you begin, and make sure you have the tools and skills required.
To reduce the possibility of fire or explosion, be careful when working around gasoline. Use
only a nonflammable solvent, not gasoline, to clean parts. Keep cigarettes, sparks and flames
away from all fuel related parts.
Remember that an authorized servicing dealer of our company knows your engine best and is
fully equipped to maintain and repair it.
To ensure the best quality and reliability, use only our new genuine parts or their equivalents for
repair and replacement.

9 / 20
NOTICE
When handling it is necessary to tilt the engine so as not to spill engine oil into the cylinder space,
the air cleaner or muffler. This causes difficulty in starting or air cleaner element damage. Tilt the
engine only to the spark plug was always at the top.
MAINTENANCE SCHEDULE
Regular Service Period
Before
Each
Use
First
Month
or 5
hours
Every 3
Month
or 25
hours
Every 6
Month
or 50
hours
Every
year or
100
hours
Every
two year
or 250
hours
Page of
Manual
ITEM
Perform at every
indicated month or
operating hour interval
(whichever comes first)
Engine Oil Check ᴑ11
Replace ᴑᴑ(2) 12
Air Cleaner
Check ᴑ
13Clean ᴑ(1)
Replace ᴑ
Spark Plug
Check -
Adjust ᴑ14
Replace ᴑ
Flywheel
Brake Pad Check ᴑ15
Spark
Arrester Clean ᴑ14
Fuel Tank
and Strainer Clean ᴑ(3) Service
manual
Fuel Line Check Every 2 years (replace if necessary) (3) Service
manual
Valve
Clearance
Check -
Adjust Service
manual ᴑ(3) Service
manual
Combustion
Chamber Clean Every 200 operating hours (3)
(1) Service more frequently when used in dusty areas.
(2) Change engine oil every 25 hours when used under heavy load or in high ambient
temperatures.
(3) These items should be serviced by an authorized servicing dealer of our company, unless you
have the proper tools and are mechanically proficient. Refer to the service manual for service
procedures.

10 / 20
FUEL
Use unleaded gasoline with a octane rating of 86 or higher. This engine is certified to operate on
unleaded gasoline. Unleaded gasoline produces fewer engine and spark plug deposits and
extends exhaust system life.
WARNING
Gasoline is highly flammable and explosive, and you can be burned or seriously injured when
refueling.
Stop engine and keep safety distance from source of heat, sparks and flames.
Refuel only outdoors.
Wipe up spills immediately.
NOTICE
Fuel can damage paint and some types of plastic. Be careful not to spill fuel when filling your fuel
tank. Damage caused by spilled fuel is not covered under the Warranty.
Never use stale or contaminated gasoline or oil/gasoline mixture. Avoid getting dirt or water in the
fuel tank.
Adding Fuel
1. Remove the fuel tank cap. See page 4.
2. Add fuel to the bottom of the fuel level limit in the neck of the fuel tank.
Do not overfill. Wipe up spilled fuel before starting the engine.
Fuel tank capacity:
0,32 US gal (1,2 l)
2. Fuel Cap
Gasoline will oxidize and deteriorate in storage. Deteriorated gasoline will cause hard starting, and
it leaves gum deposits that clog the fuel system.
The length of time that gasoline can be left in your fuel tank and carburetor without causing
functional problems will vary with such factors as gasoline blend, your storage temperatures, and
whether the fuel tank is partially or completely filled. The air in a partially filled fuel tank promotes
fuel deterioration. Very warm storage temperatures accelerate fuel deterioration. Fuel problems
may occur within a few months, or even less if the gasoline was not fresh when you filled the fuel
tank. Therefore we recommend do not use gasoline older than 30 days.

11 / 20
ENGINE OIL
Recommended Oil
Use 4-stroke engine oil that meets or exceeds the requirements for API service classification SH,
SJ or equivalent. Always check the API service label on the oil container to be sure it includes the
letters SH, SJ, or equivalent.
SAE 10W-30 is recommended for general use. Other viscosities shown in the chart may be used
when the average temperature in your area is within the indicated range.
Oil Level Check
1. Check the oil with the engine stopped and level.
7. Oil filler cap/dipstick
Max: upper limit
Min: lower limit
2. Remove the oil filler cap/dipstick and wipe dipstick clean in a clean absorbent cloth.
3. Insert the oil filler cap/dipstick into the oil filler neck as shown, but do not screw it in, then remove
it to check the oil level.
4. If the oil level is near or below the lower limit mark on the dipstick, remove the oil filler
cap/dipstick, and fill with the recommended oil to the upper limit mark (bottom edge of .the oil fill
hole). Do not overfill.
5. Reinstall the oil filler cap/dipstick.
NOTICE
This engine is delivered without oil! Be sure to put oil in the engine before starting. Use a clean,
detergent and high quality oil corresponding to the above mentioned specification.

12 / 20
Oil Change
Drain the engine oil when the engine is warm. Warm oil drains quickly and complete, together with
impurities.
7. Oil filler cap/dipstick
A: Sealing washer
B: Drain bolt
1. To avoid fuel leak, evacuate the fuel tank (see page 17).
2. Place a suitable container next to the engine to catch the used oil.
3. Remove the drain bolt and drain the oil into the container by slightly tipping the engine toward
the oil filler cap/dipstick.
Note: To drain the oil can be used the breast pump that allows you to drain the oil from the
engine without having to tilt the engine and fuel pumping. Contact your dealer.
Please dispose of used motor oil in a manner that is compatible with the environment. We
suggest you take used oil in a sealed container to your local recycling center or service station
for reclamation. Do not throw it in the trash or pour it on the ground or down a drain.
4. With the engine in a level position, fill to the upper limit mark on the dipstick with the
recommended oil (see below).
Engine Oil Capacity:
0,63 US qt (0,60 l)
WARNING
Running the engine with a low oil level can cause engine damage.
5. Reinstall the oil filler cap/dipstick securely.
OIL FILLER CAP/ DIPSTICK
UPPER LIMIT
LOWER LIMIT

13 / 20
AIR CLEANER
A dirty air cleaner will restrict air flow to the carburetor and cause poor engine performance. Inspect
the air cleaner each time the engine is operated. You will need to clean the air cleaner more
frequently if you operate the engine in very dusty areas.
WARNING
Operating the engine without an air cleaner, or with a damaged air cleaner, will allow dirt to enter
the engine, causing rapid engine wear. This type of damage is not covered under the Warranty.
Inspection
1. Remove the air cleaner cover. Be careful to prevent dirt and debris from falling into the air
cleaner base.
2. Remove the air cleaner from the air cleaner base.
3. Inspect the air cleaner elements. Replace any damaged elements. Clean or replace dirty
elements.
Cleaning
1. Remove the air cleaner cover and element, as described in the INSPECTION procedure (see
above).
2. Remove the element from the air cleaner base.
3. The foam element: wash it in soapy water and let it dry completely. On the foam filter insert pour
a few drops of oil SAE30, wrap it in absorbent cloth, strongly press it to remove any excess oil.
Replace the paper element if it is excessively dirty.
4. Wipe dirt from the air cleaner base and cover using a moist rag. Be careful to prevent dirt from
entering the air duct that leads to the carburetor.
5. Reinstall the air cleaner element, and make sure both elements are properly positioned. Install
the air cleaner cover to the base and check the cover seats securely in its position.
A: Air Cleaner Base
B: Foam Element
C: Air Cleaner Cover

14 / 20
SPARK PLUG
Recommended Spark Plug: BPR5ES (NGK) W16EPR-U (DENSO), or equivalent; the
recommended spark plug is the correct heat range for normal engine operating temperatures.
WARNING
Incorrect spark plugs can cause engine damage.
For good performance, the spark plug must be properly gapped and free of deposits.
1. Disconnect the cap from the spark plug, and remove any dirt from the spark plug area.
2. Use the proper size spark plug wrench to remove the spark plug.
3. Inspect the spark plug. Replace it if damaged, badly fouled, if the sealing washer is in poor
condition, or if the electrode is worn.
4. Measure the electrode gap with a suitable gauge. The correct gap is 0.0280.031 in (0.700.80
mm). If adjustment is needed, correct the gap by carefully bending the side electrode.
5. Install the spark plug carefully, by hand, to avoid cross-threading.
6. After the spark plug is seated, tighten with the proper size spark plug wrench to compress the
washer.
7. When installing a new spark plug, tighten 1/2 turn after the spark plug seats to compress the
washer.
8. When reinstalling the original spark plug, tighten 1/8 1/4 turn after the spark plug seats to
compress the washer.
WARNING
A loose spark plug can become very hot and can damage the engine. Over tightening the spark
plug can damage the threads in the cylinder head.
9. Attach the spark plug cap to the spark plug.
SPARK ARRESTER (if equipped)
Cleaning and checking the spark arrester should be performed by a specialist workshop.
It requires the spark arrester maintenance after every 100 hours of operation.
SPARK PLUG
CAP SPARK PLUG
WRENCH
SEALING
WASHER

15 / 20
FLYWHEEL BRAKE INSPECTION
1. Check to see if the inspection screw is contacting the brake bracket.
2. If the inspection screw is contacting the brake bracket, take the engine to an authorized engine
servicing dealer for flywheel brake pad inspection.
3. Release the starter control handle (located on equipment) and verify that there is a strong
resistance when pulling on the recoil starter. Also verify that the governor arm is moved to the
idle (slow), position and there is free play in the cable. The cable should 10-15 mm from the
centerline as shown when the cable is new.
4.Move the starter control handle(located on equipment) to release the flywheel brake, and verify
that there is clearance between the governor arm and the throttle return rod when the throttle
return rod when the throttle is in the fast (or high) position.
Also verify that there is at least 2 mm clearance between the stopper and the brake cable
bracket (see below).
8. Fuel tank
A: Fly wheel
B: Brake system
ENGINE ADJUSTMENTS
WARNING
Do not change in any way the rated speed of the engine (carburetor side or regulator side)
Your engine was adjusted in the factory and the non-respect of the homologation speed engine
could be dangerous for your safety and others safety. If the rated speed is changed in any way, the
factory warranty will be cancelled.
Brake cable
At least 2 mm clearance between the
stopper and the brake cable bracket

16 / 20
SUGGESTIONS FOR STORING YOUR ENGINE
CLEANING
If the engine has been running, allow it to cool for at least half an hour before cleaning. Clean all
exterior surfaces, touch up any damaged paint, and coat other areas that may rust with a light film
of oil.
WARNING
The spraying by a garden hose or high pressure cleaner may result in water entering the air filter
and the opening of the muffler. Water in the air cleaner will soak the air filter, and water that passes
through the air filter or muffler can enter the cylinder, causing damage.
PREPARATION FOR STORAGE ENGINE
Proper storage preparation is essential for keeping your engine trouble free and looking good. The
following steps will help to keep rust and corrosion from impairing your engine's function and
appearance, and will make the engine easier to start when you use it again.
Fuel
Gasoline will oxidize and deteriorate in storage. Deteriorated gasoline will cause hard starting, and
it leaves gum deposits that clog the fuel system.
The length of time that gasoline can be left in your fuel tank and carburetor without causing
functional problems will vary with such factors as gasoline blend, your storage temperatures, and
whether the fuel tank is partially or completely filled. The air in a partially filled fuel tank promotes
fuel deterioration. Very warm storage temperatures accelerate fuel deterioration. Fuel problems
may occur within a few months, or even less if the gasoline was not fresh when you filled the fuel
tank. Therefore we recommend do not use gasoline older than 30 days.
If the gasoline in your engine deteriorates during storage, you may need to have the carburetor,
and other fuel system components, serviced or replaced. Fuel system damage or engine
performance problems resulting from neglected storage preparation are not covered under
Warranty.
Adding Gasoline Stabilizer to Extend Fuel Storage Life
When adding a gasoline stabilizer, fill the fuel tank with fresh gasoline. If only partially filled, air in
the tank will promote fuel deterioration during storage. If you keep a container of gasolinefor
refueling, be sure that it contains only fresh gasoline.
1. Add gasoline stabilizer by following the manufacturer's instructions.
2. After adding a gasoline stabilizer, run the engine outdoors for 10 minutes to be sure that treated
gasoline has replaced the untreated gasoline in the carburetor.

17 / 20
Draining the Fuel Tank and Carburetor
If you do not use a fuel stabilizer for the conservation of fuel in the tank, it is necessary to drain fuel
from the engine.
WARNING
Gasoline is highly flammable and explosive, and you can be burned or seriously injured when
handling fuel.
Stop engine and keep heat, sparks, and flame away.
Refuel only outdoors.
Wipe up spills immediately.
1. Place an approved gasoline container below the carburetor, and use a funnel to avoid spilling
fuel.
2. Remove the drain bolt.
3. After all the fuel has drained into the container, reinstall the drain bolt and washer. Tighten the
drain bolt securely.
Note: To drain the fuel can be used the breast pump that allows you to drain the fuel from the tank
without removing the drain plug carburetor. Contact your dealer.
Engine Oil
1. Change the engine oil (see page 12).
2. Remove the spark plug (see page 14).
3. Pour a tablespoon (ca 5 ccm) of clean engine oil into the cylinder (see picture above).
4. Pull the recoil starter several times to distribute the oil in the cylinder.
5. Reinstall the spark plug.
4. Carburetor
A: Drain bolt
B: Washer
OIL SPARK PLUG HOLE

18 / 20
Clean fuel strainer
WARNING
Gasoline is extremely flammable and is explosive under certain conditions. Do not smoke or allow
flames or sparks in the area.
Remove the fuel strainer from the fuel tank and fuel line.
Clean the fuel strainer (remove dirt which has accumulated on the mesh, and check that the mesh
is not broken anywhere).
Reinstall the fuel strainer and fuel line.
A: Fuel Strainer
STORAGE PRECAUTIONS
If your engine will be stored with gasoline in the fuel tank and carburetor, it is important to reduce
the hazard of gasoline vapor ignition. Select a well-ventilated storage area away from any
appliance that operates with a flame, such as a furnace, water heater, or clothes dryer. Also avoid
any area with a spark producing electric motor, or where power tools are operated.
If possible, avoid storage areas with high humidity, because that promotes rust and corrosion.
Keep the engine level in storage. Tilting can cause fuel or oil leakage.
With the engine and exhaust system cool, cover the engine to keep out dust. A hot engine and
exhaust system can ignite or melt some materials. Do not use sheet plastic as a dust cover. A
nonporous cover will trap moisture around the engine, promoting rust and corrosion.
REMOVAL FROM STORAGE
Check your engine as described in the BEFORE OPERATION CHECKS section of this manual
(see page 4).
If the fuel was drained during storage preparation, fill the tank with fresh gasoline. If you keep a
container of gasoline for refueling, be sure it contains only fresh gasoline. Gasoline oxidizes and
deteriorates over time, causing hard starting.
If the cylinder was coated with oil during storage preparation, the engine will smoke briefly at
startup. This is normal.
TRANSPORTING
Keep the engine level when transporting to reduce the possibility of fuel leakage.

19 / 20
TAKING CARE OF UNEXPECTED PROBLEMS
ENGINE WILL NOT START Possible Cause Correction
1. Fuel.
Out of fuel. Refuel.
Bad fuel; engine stored
without eating or draining
gasoline, of refueled with
bad gasoline.
Drain the fuel tank and
carburetor (page 17). Refuel
fresh gasoline.
2. Spark plug.
Spark plug is faulty, fouled or
improperly gapped.
Spark plug wet with fuel
(flooded engine)
Remove the spark plag
(page 14), replace the
damaged one.
Dry and reinstall the spark
plug.
3. Choke position
Choke is opened. Close the choke.
4. Battery
Empty battery Charge the battery
5. Take engine to an
authorized service dealer,
or refer to service manual.
Fuel strainer is clogged,
carburetor malfunction,
ignition malfunction, valves
stuck, etc.
Replace or repair faulty
components as necessary.
ENGINE LACKS POWER Possible Cause Correction
1. Check air cleaner. Air cleaner elements are
clogged.
Clean or replace air cleaner
elements (page 13).
2. Check fuel. Bad fuel; engine stored
without eating or draining
gasoline, of refueled with
bad gasoline.
Drain the fuel tank and
carburetor (page 17). Refuel
fresh gasoline.
3. Take engine to an
authorized service dealer,
or refer to service manual.
Fuel strainer is clogged,
carburetor malfunction,
ignition malfunction, valves
stuck, etc.
Replace or repair faulty
components as necessary.

20 / 20
TECHNICAL & CONSUMER INFORMATION
SERIAL NUMBER LOCATION
Record the engine serial number in the space below. You will
need this information when ordering parts and when making
technical or warranty inquiries.
Engine serial number: ___________________________________
A: Serial number location
CARBURETOR MODIFICATIONS FOR HIGH ALTITUDE OPERATION
At high altitude, the standard carburetor air-fuel mixture will be too rich. Performance will decrease,
and fuel consumption will increase. A very rich mixture will also foul the spark plug and cause hard
starting.
Operation at an altitude that differs from that at which this engine was certified, for extended
periods of time, may increase emissions.
High altitude performance can be improved by specific modifications to the carburetor. If you
always operate your engine at altitudes above 5.000 feet (1.500 meters), have authorized servicing
dealer perform this carburetor modification. This engine, when operated at high altitudes with the
carburetor modifications for high altitude use, will meet each emission standard throughout its
useful life.
Even with carburetor modification, engine horsepower will decrease about 3,5% for each 1.000 feet
(300 meters) increase in altitude. The effect of altitude on horsepower will be greater than this if no
carburetor modification is made
NOTICE
When the carburetor has been modified for high altitude operation, the air-fuel mixture will be too
lean for low altitude use. Operation at altitudes below 5.000 feet (1.500 meters) with a modified
carburetor may cause the engine to overheat and result in serious engine damage. For use at low
altitudes, have an authorized servicing dealer return the carburetor to original factory
specifications.
Table of contents
Languages:
Other DAYE Engine manuals
Popular Engine manuals by other brands

Trinamic
Trinamic PANdrive PD-1021 Firmware manual

MTU
MTU 8 V 2000 M84 operating instructions

Grundfos
Grundfos MMG-H IE4 Installation and operating instructions

Teryair
Teryair 16VMS Series Operation and maintenance guide

Vortex
Vortex ROK DVS J owner's manual

Interpump
Interpump RS500H operating instructions