deBont Vidur User manual

Vidur Tube Pre-amplifier
Owner’s Manual (v1.0)
Index
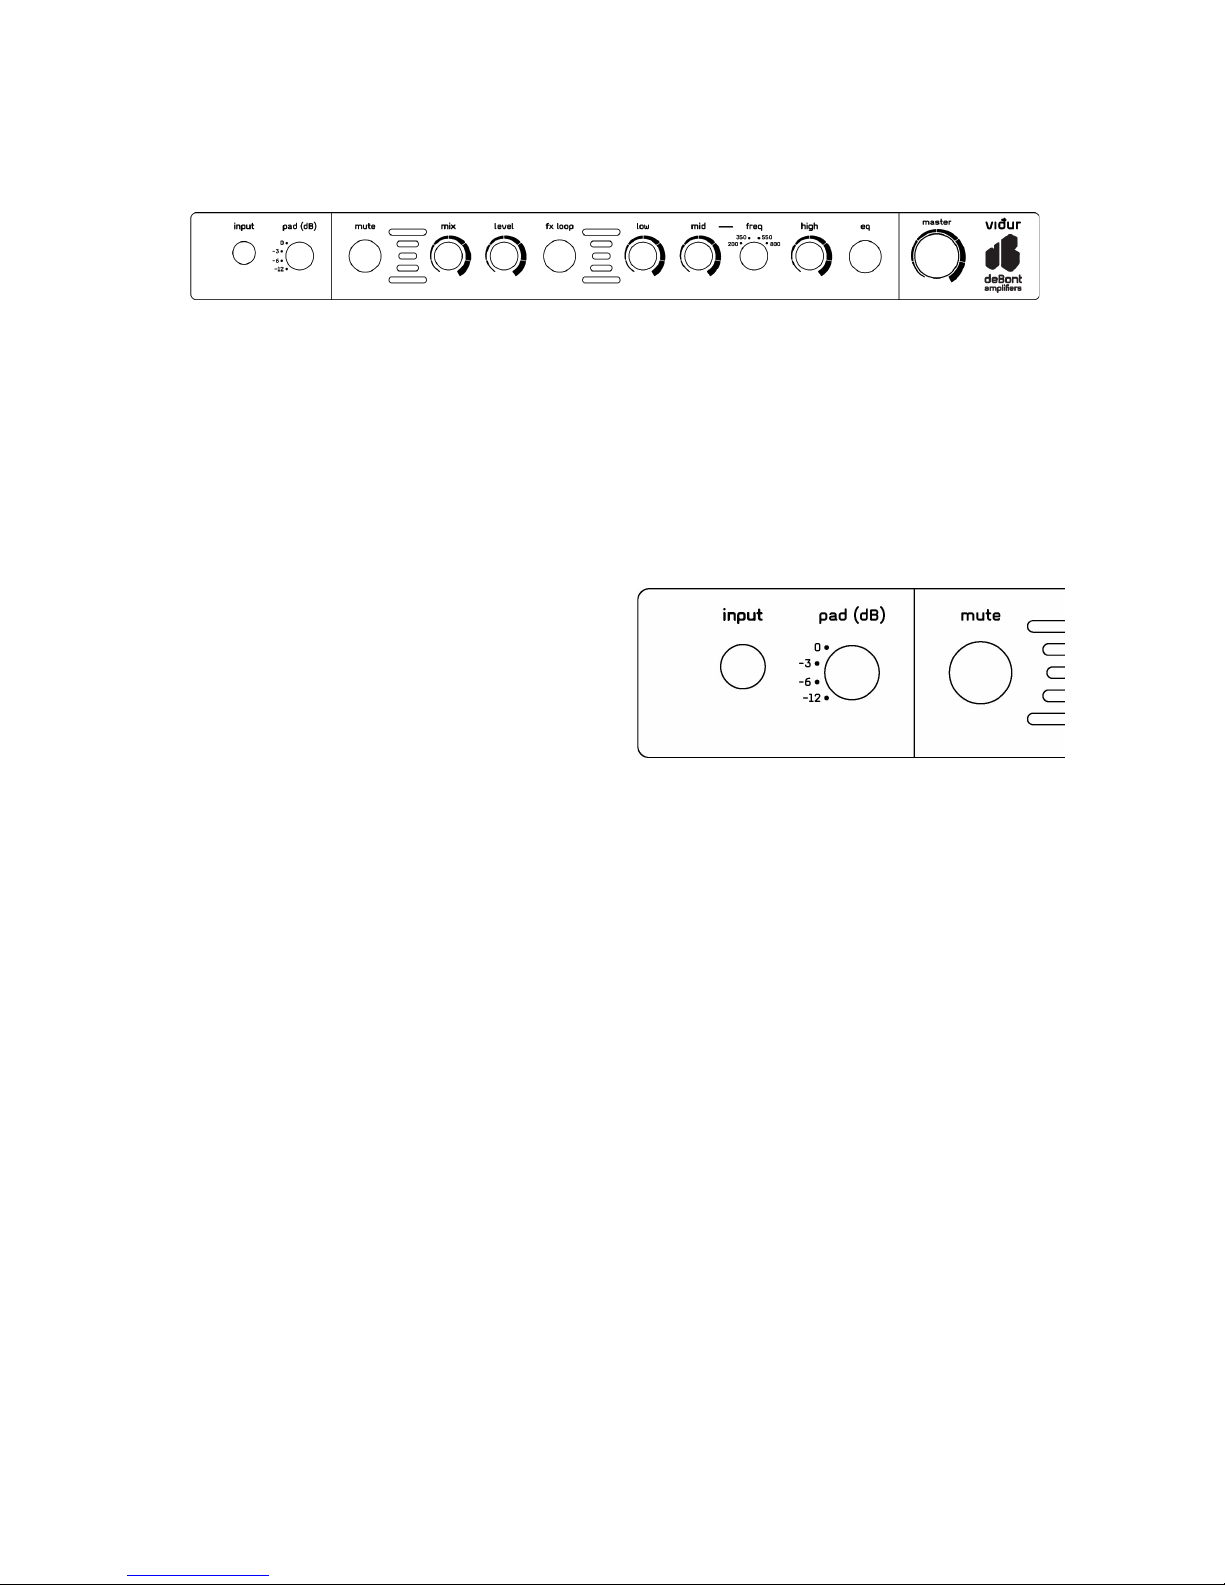
Front
Input……………………………… 1
Pad control knob
Selectable sound signatures
Mute button
FX loop controls………………… 2
FX button
EQ controls…………………….... 3
EQ button
Master
Back
Tuner out……………………….... 4
FX loop
Line out…………………………... 5
Footswitch
Main outputs
Voltage selector…………………. 6
Power cord receptacle
Power switch
Main fuse
How to replace tubes…………….. 7
Appendix A - footswitch pinning... 8
Front
█ Input
The single jack input will accept any 6.35mm (1/4”) jack plug.
█ Pad control knob
The Vidur is designed to be a clean sounding preamp. It is unlikely the input will run out of
headroom. However, other audible, (perhaps preferred) sound colorations might occur when
presenting the input with larger signal levels, like slight compression. By setting the pad
control knob to any other value than 0dB , the signal level presented to the first stage of the
preamp can be reduced to taste. This affects all
outputs (tuner, fx loop, line out, main outputs).
● 0dB = full signal is amplified
● -3dB = 1/2 the perceived loudness
● -6dB = 1/2 of the original signal level
● -12dB = 1/4 of the original signal level
█ Selectable sound signatures
The Vidur comes with an optional passive filter network in the first stage of the preamp, also
known as the ‘selectable sound signature’
. This gives you even more tonal possibilities to
play with. Depending on taste, setting, or the bass being used, the filter can be enabled or
disabled on the fly (see below).
Note: As this is a passive filter, enabling it will decrease the perceived audio volume slightly.
Note: The ‘selectable sound signature’ is completely independent of the EQ state or setting.
█ Mute button
The mute button on the Vidur has two functions:
1. Pressing and releasing the mute button will toggle a true bypass, muting/ unmuting
the signal. The tuner output (back) will always remain active. All other outputs will be
silenced. This button is also available on the optional footswitch.
● red: preamp muted
● green: preamp unmuted
2. Pressing and holding the mute button for two seconds will activate the sound
signature selection. The EQ LED will start to blink with the current state of the
selectable sound signature. Pressing the EQ button while still holding the mute
button toggles between the two sound signatures. Release the mute button to set the
preferred sound signature. The EQ LED will blink as follows:
● red blinking: filter disabled
● green blinking: filter enabled
deBont Amps Vidur Tube Preamplifier Owner’s Manual 1

█ FX loop section
Instead of connecting your effects between your bass and the Vidur’s input, you can use the
available FX loop. This has many technical advantages and makes for a clean setup. The
Vidur is equipped with a fully parallel, mixable FX loop. By mixing clean bass with the signal
that has been moulded by your chain of effects, the tonal possibilities become even greater.
Another big plus of mixing in a bit of clean signal, is the retention of a solid, full, rich bass
sound, which some effects pedals, unfortunately, seem to lack.
mix: The mix control determines the balance
between your clean signal (dry) and the signal being
returned from the FX loop (wet). Turning the control
fully counterclockwise results is a 100% dry signal,
as if the FX loop was completely disabled. Turning
fully clockwise will only give the (wet) effects signal
coming in from the FX return connector (see ‘back’
section below). Anything in between is a mix of the
wet and dry signal.
level: The level control sets the overall volume being fed back to the the preamp from the FX
loop. This is especially useful when regularly switching between the clean- and effects
signal. The level control will then act as the balance between the two states.
Note: The FX loop can be used as an auxiliary input/output as well, for e.g. practicing
purposes. The audio source (laptop, MP3 player, etc) can be connected to the FX return and
mixed in to the desired level with the mix and level controls.
█ FX button
The FX button enables or disables the FX loop section. When disabled, the FX loop is
removed completely from the audio path by means of a true bypass. This button is also
available on the optional footswitch.
● red: FX loop disabled
● green: FX loop enabled
deBont Amps Vidur Tube Preamplifier Owner’s Manual 2

█ EQ control
The Vidur comes with an active baxandall type tone control (EQ). It can either cut
(counterclockwise) or boost (clockwise) the chosen frequency range.
freq: The ‘freq’
knob, short for frequency, selects the center frequency preferred for the mid
control.
The EQ works in the following ranges:
●low: low cut/boost @ 80Hz. +/- 9dB, shelving
●mid: band cut/pass @ 200, 350, 550 or 800 Hz. +/- 10dB
●high: high cut/boost @ 1,2 kHz +/- 9 dB, shelving
Note: The EQ setting is completely independent of the selectable sound signature.
█ EQ button
The EQ button has two functions:
1. Pressing and releasing the EQ button enables/disables the EQ section. When
disabled, the EQ is completely removed from the audiopath by means of a true
bypass. Signal level remains the same and the sound is comparable to when all EQ
controls are centered. This button is also available on the optional footswitch.
● red: EQ disabled
● green: EQ enabled
2. When the mute button is pressed and held for two seconds, the EQ button LED will
show the current state of the selectable sound signature. Pressing the EQ button will
change the state.
● red blinking: filter disabled
● green blinking: filter enabled
Note: The EQ state is completely independent of the selectable sound signature.
█ Master
The master will control the signal level to the main outputs. Tuner output, fx loop and line out
are not influenced in any way.
deBont Amps Vidur Tube Preamplifier Owner’s Manual 3
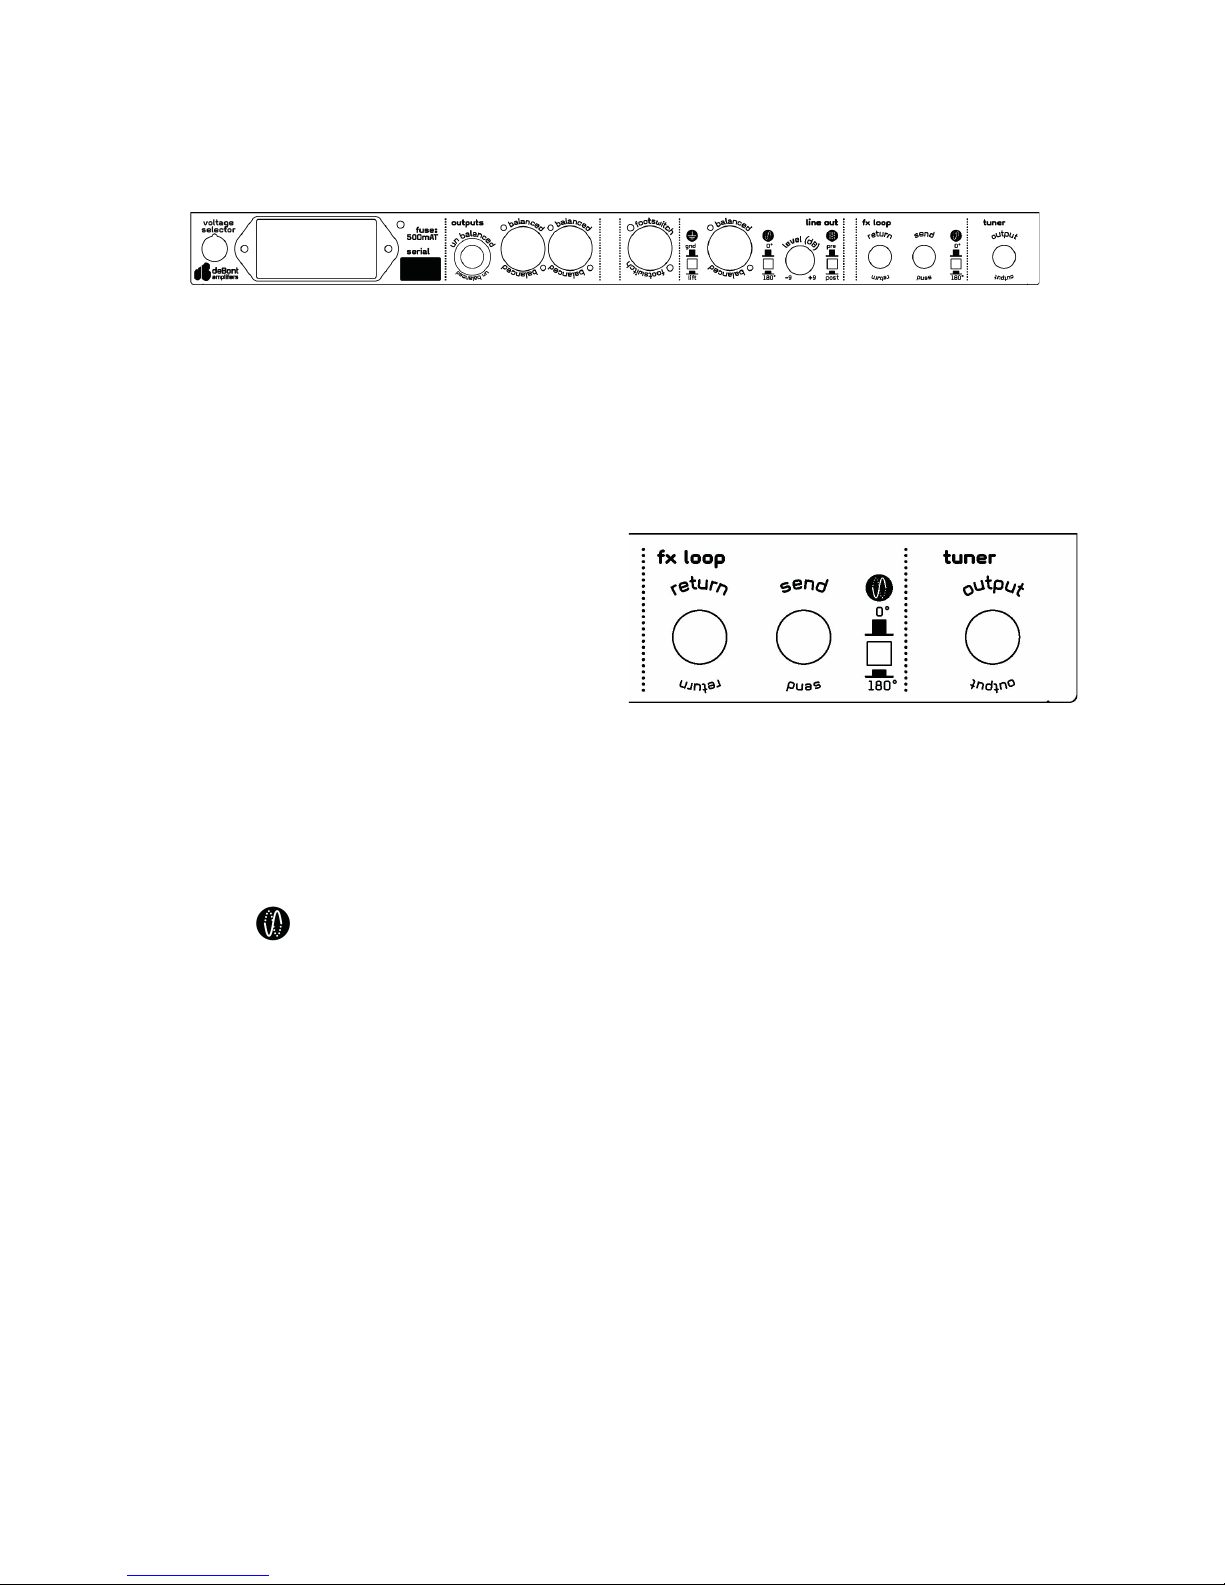
Back
█ Tuner out
This unbalanced output is always on, independent of the mute function found on the front
panel. It can be used to connect a (rack)tuner or act as a simple, low quality line output.
█ FX loop
The FX loop connectors work in conjunction with the FX loop section on the front panel
send: The send connector provides an
unbalanced output signal, capable of driving
any effect with a clean bass signal.
Note: If not used for the FX loop, the ‘send’
can act as an unbalanced line output.
return: The return connector takes the signal
from the effects chain and feeds it back to the amplifier. How the signal is treated depends
on the settings made on the FX loop section on the front panel.
Note: If not used for FX loop, you can use this connector as an auxiliary input. See ‘FX loop
section’ above.
phase : shift the phase of the send signal by 180 degrees.
Note: Many effects out there shift the phase by 180 degrees. When mixing a shifted return
signal with the original signal, the two will cancel eachother out completely or to a large
extend. By flipping the signal that’s send to the effects to begin with, the returned signal is in
phase again with the rest of the preamp, negating the issue. So, if you experience loss of
perceived volume when mixing the wet and dry signal, flipping the phase button will usually
resolve this.
send level: The signal level required by various effects varies from small to (very) large. This
is rarely an issue, but depending on the bass being used, plus the pad setting on the front
panel, the level might not be optimal. Inside the preamp, near the send connector, you’ll find
a jumper (JP1) used to boost the signal that’s send to the connected effects.
● Jumper ON: instrument level
● Jumper OFF: +6dB (double the signal level)
Warning: Please treat changing this jumper as you would changing the tubes. See the ‘how
to replace tubes’ section below and ignore step 5 and 6.
deBont Amps Vidur Tube Preamplifier Owner’s Manual 4

█ Line out
This standard XLR connector will provide a balanced line level output signal. It’s capable of
driving (very) long leads to mixing consoles, recording equipment, etc. The line out is
surrounded by various controls for maximum flexibility.
●pre/post : sets the point where the signal is tapped from inside the preamp;
before (pre) or after (post) the EQ.
●level: adjust the output level by +/- 9dB
●phase : change the phase of the output signal by 180 degrees*.
●ground lift : (dis)connect pin 1 from the XLR connector. This will effectively cure
any ground loop issues.
Note: There are a few examples
why changing the phase of the
line out signal might be
necessary. Bad wiring, specific
distances from the FOH
speakers when using a speaker
cab too, or wrong settings within
a mixing console to name a few. These issues will result in a phase shift, recognizable by a
vague tone or complete signal loss. Flipping the phase button will usually resolve the issue.
█ Footswitch
All three functions of the buttons found on the front panel (mute, fx loop and EQ) can be
controlled externally by the optional footswitch. For convenience and the ability to use a
widely available type of cable, a RJ45 connector is used. The control is fully parallel. If you
prefer to build your own footswitch, or integrate these functionalities into a larger control
system, the pinning is available in appendix A below or on http://debontamps.com/manuals/
█ Main outputs
The Vidur preamp comes with three output connectors.
●Jack output, (un)balanced: A 6.3mm (1/4”) standard jack connector. Can be used
unbalanced (TS) or balanced (TRS). Using the jack output will mute the XLR outputs.
●XLR outputs, balanced (2x): These
standard XLR connectors are wired in
parallel. Since most solid state power
amplifiers come as two channel, two input
devices, the second XLR is there simply
for convenience.
deBont Amps Vidur Tube Preamplifier Owner’s Manual 5
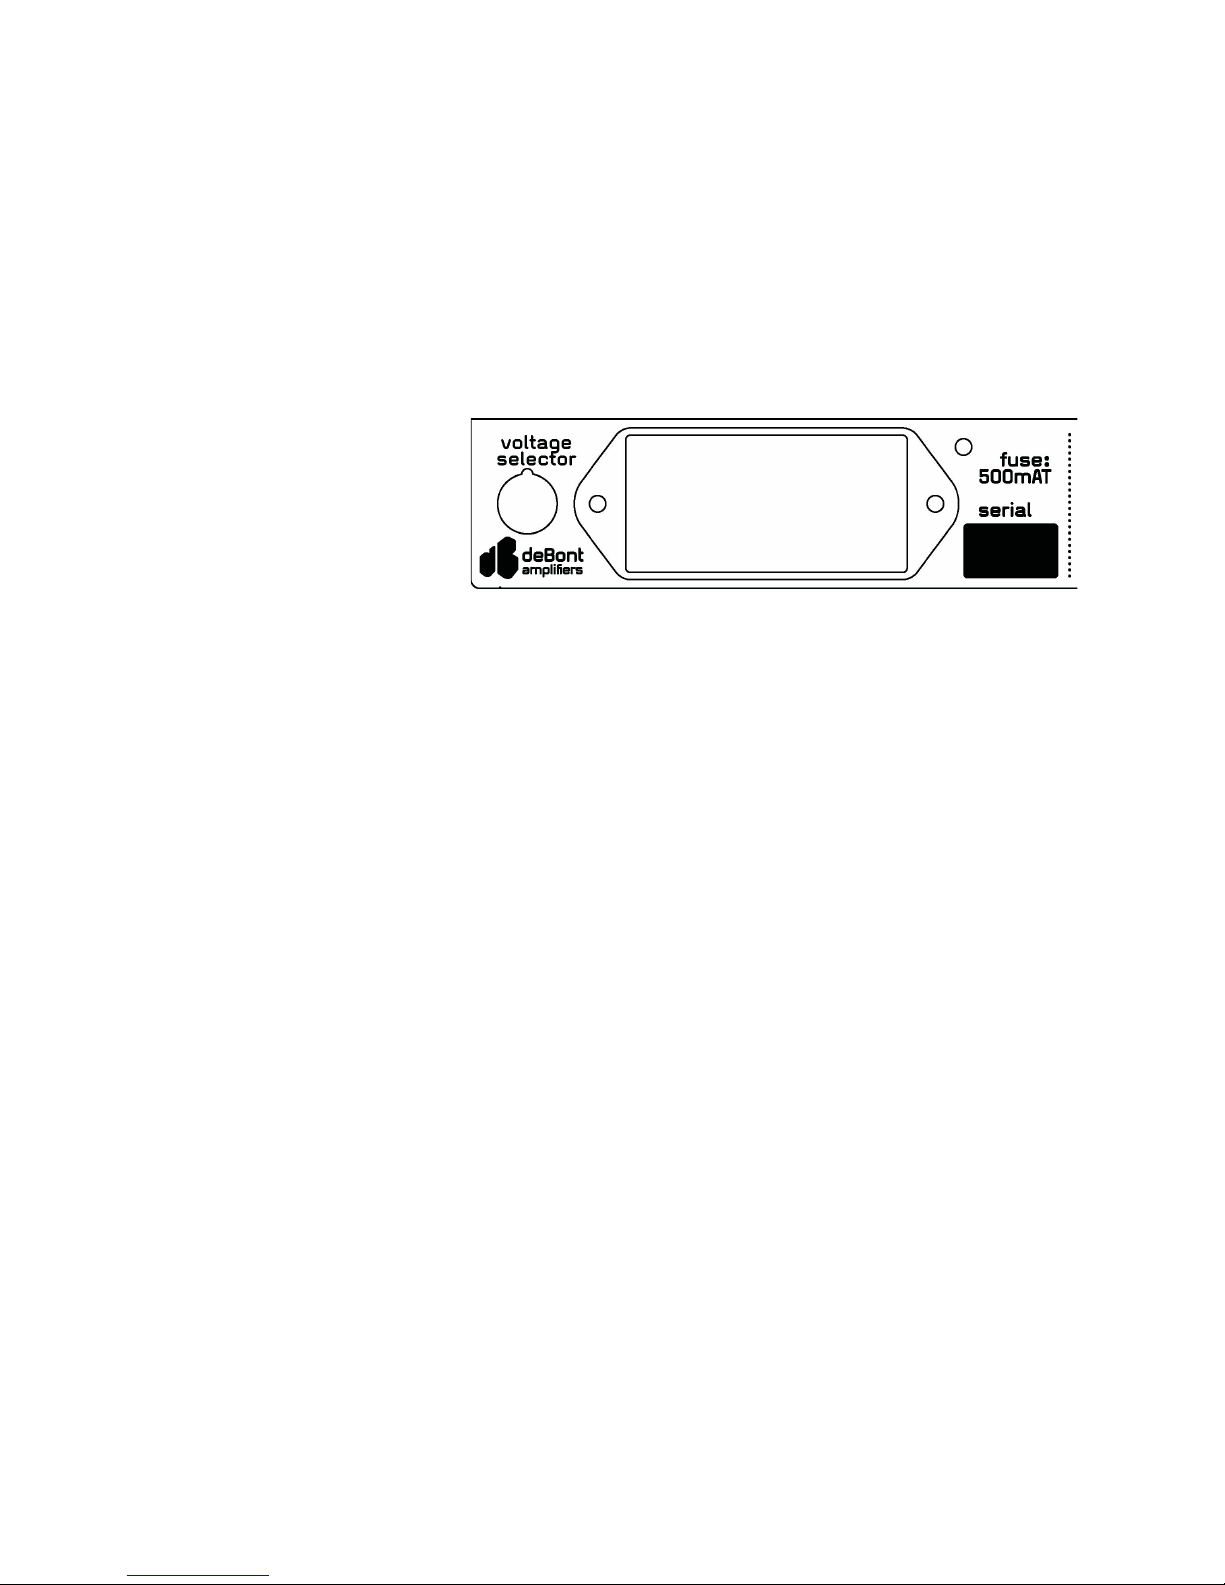
█ Voltage selector
The Vidur can be used in countries with mains voltages ranging from 110VAC to 120VAC or
from 220VAC to 240VAC. Choose the voltage closest to the actual mains voltage by turning
the selector with a small screwdriver until it clicks into place. Failure to do so will either cause
the preamp to not work properly, or cause serious damage to the inside electronics.
█ Power cord receptacle
The Vidur is fed by a IEC 60320 C13 plug, better known as a computer plug. Please make
sure the power cord is undamaged and of proper quality.
█ Power switch
Use this switch to turn the
preamp on or off.
Note: There’s no standby
switch as seen on most
other tube amplifiers. The
Vidur will take care of all processes normally associated with standby switches automatically.
Note: After power on, the preamp will enter a startup procedure. The three LED’s (mute, fx
loop and EQ) will indicate the progress. After the startup, the EQ LED will blink three times
with the current selectable sound signature setting.
█ Main fuse
This fuse cuts power to the entire amplifier in case of a serious electrical fault.
█ Replacing a fuse
Turn the preamp off, unplug the power cord and let the remaining energy drain for at least 20
minutes before checking and/or replacing any of the fuses. Always replace with a fuse of the
same type and rating as stated on the back of the preamp next to the fuse holder.
Note: Fuses usually blow for a good reason. Please consult a qualified technician when
replacement is necessary.
deBont Amps Vidur Tube Preamplifier Owner’s Manual 6

█ How to replace tubes
Preamp tubes, or small signal tubes, as used in the vidur preamp, will last for many years. If
one does get faulty, or you want to experiment with different makes and models, you can
replace them yourself!
!WARNING! Never turn the amp on when the top cover is removed. The voltages used
inside the Vidur preamp are lethal!
1) Turn the preamp off.
2) Unplug the power cord.
3) Let the tubes cool down and the power supply drain and remaining energy for about 20
minutes.
4) Remove the top cover.
5) Carefully and slowly remove the tube you want to replace by gently pulling and ever so
slightly wiggling it. Easy does it.
6) Press the new tube into the socket. It can only go in one way. Don’t force anything.
7) Replace the top cover and tighten screws.
8) Turn on the amp and rock on.
deBont Amps Vidur Tube Preamplifier Owner’s Manual 7
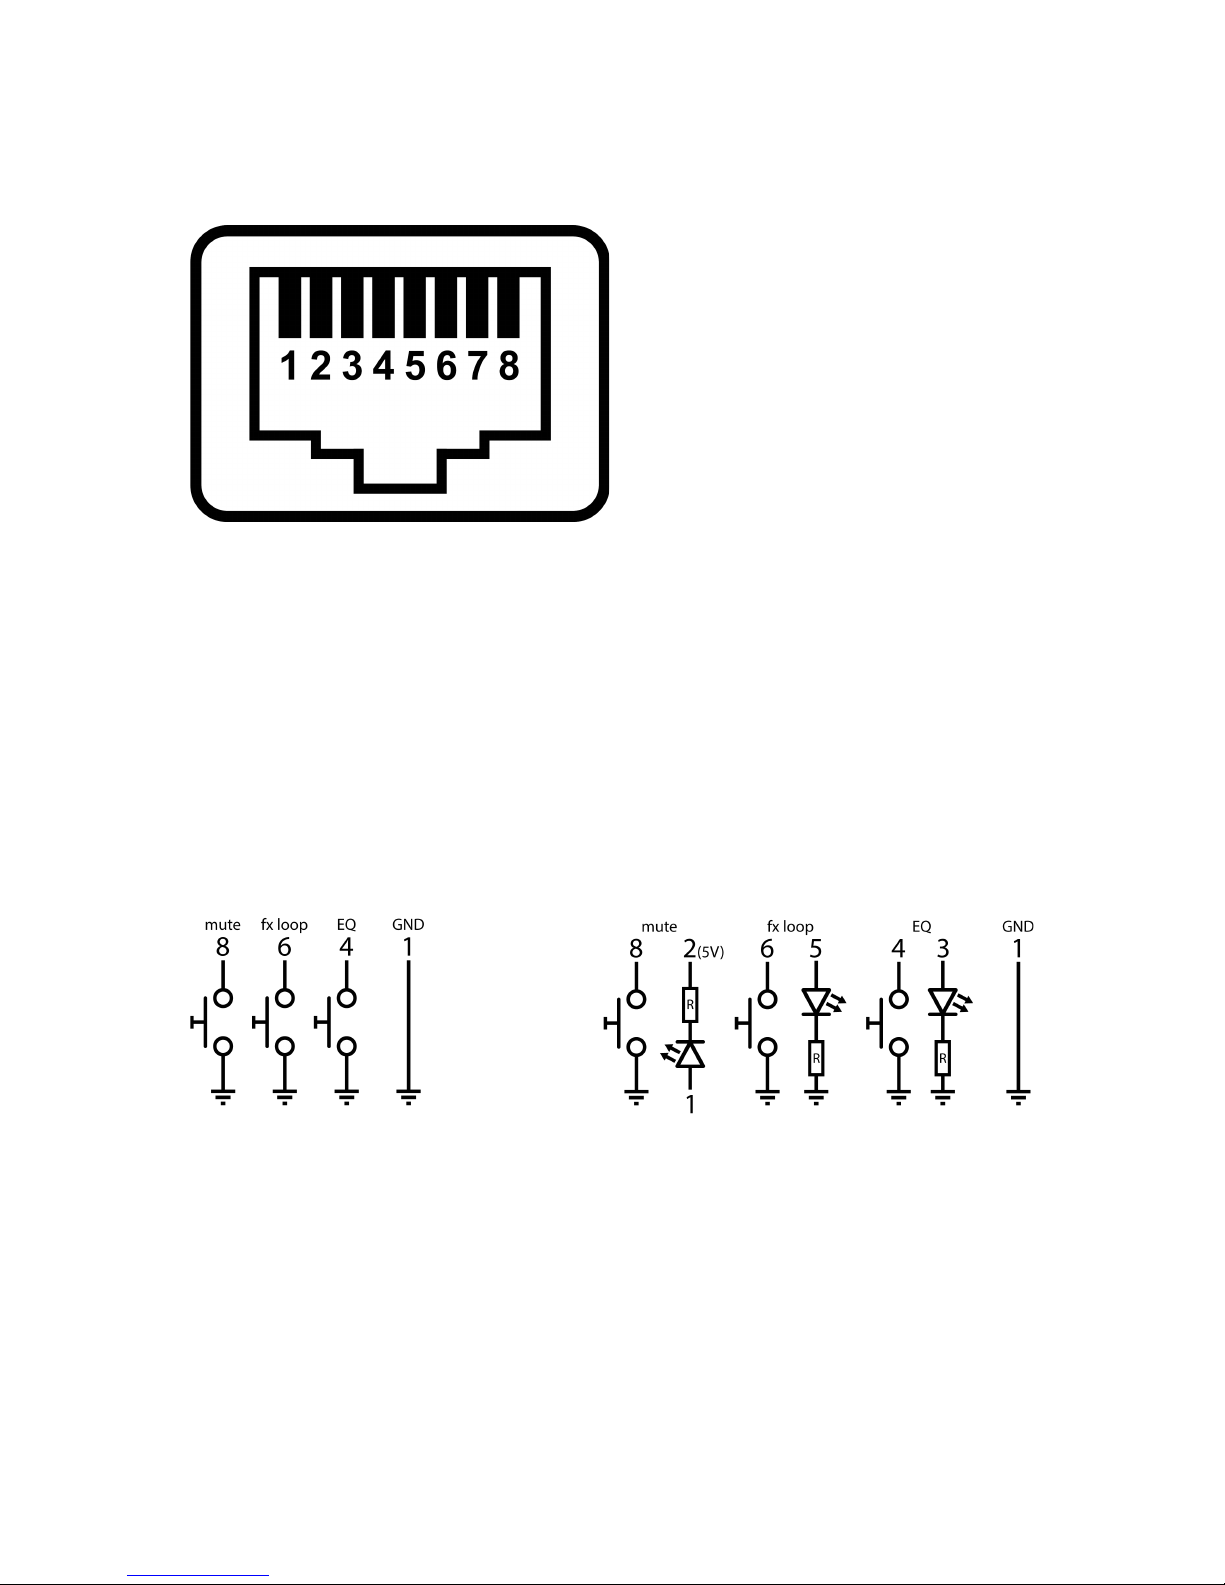
Appendix A - footswitch connector pinning
1. GND
2. +5V
3. EQ LED
4. EQ switch (NO, pulse)
5. FX LED
6. FX switch (NO, pulse)
7. Mute LED
8. Mute switch (NO, pulse)
*(NO, pulse) = normally open,
pulse/momentary contact switch
● Image shows pinning when looking into the connector on the back of the preamp.
● Connecting the switch contact (4,6,8) momentary to ground, the function associated
with that contact will toggle from enabled to disabled and vice versa.
● When the function is disabled, the LED contact goes LOW.
● Two color LED arrangements are possible. See ‘examples’ below.
Examples
Switch only Switch + LED
Switch + 2 color (red/green) LED
(coming soon)
deBont Amps Vidur Tube Preamplifier Owner’s Manual 8

http://debontamps.com
© 2018 deBont Amps
deBont Amps Vidur Tube Preamplifier Owner’s Manual 9
Table of contents
Other deBont Amplifier manuals


