Defy DDW168 User manual
Page 1
DDW168
DDW169
4 PROGRAMME
DISHWASHER
Record in the space below the listed information for f t re reference.
The serial n mber is on the serial label located on the inside of the door on the dishwasher.
SERIAL NUMBER..
DATE OF PURCHASE...
PURCHASED FROM..
.
The man fact rer strives for contin o s improvement. For this reason, the text and
ill strations in this man al are s bject to change witho t notice.

Page 2
INDEX
Introduction
Explanation of symbols
Register your product
Important safety precautions
et to know your dishwasher
Before use
Unpacking
Report damage
Preparation
Installation
Electrical installation
Water connection
Drain requirements
Adding water softener
Adding rinse aid
Adding detergent
Loading dishes, cutlery & pots
Loading options
Loading options continued
Basket adjustment
Cutlery basket
Storage
How not to load
The control panel
How to use the dishwasher
Description of controls
On / Off button
Programme selection knob
Start/Cancel button
Progress indicators
Half load button
Cancelling a programme
Changing a programme
Salt indicator
Programme table
Cleaning the cabinet
Cleaning the filters
Cleaning the spray arms
Trouble shooting
Technical specifications
Owners responsibility
Service Centres
Warranty
PA E
2
2
2
3
4
5
5
5
5
5
5
5
5
6
7
8
9
10
11
12
13
13
13
14
14
15
15
15
15
15
15
15
15
15
16
17
17
17
18
20
20
21
22
Introd ction
Dear c stomer,
Yo r new Defy dishwasher was
man fact red in a state of the art facility
and has passed the strictest q ality
control proced res.
Please read this man al caref lly before
sing yo r dishwasher for the first time
and then store it within easy reach for
f t re reference.
This man al will provide yo with
information on how to operate and care
for yo r dishwasher to gain the maxim m
benefit from it.
We tr st yo will enjoy years of tro ble
free se.
EXPLANATION OF SYMBOLS
Important information
Warning—Hazardo s sit ations
Warning—Electric shock
PLEASE RE ISTER YOUR PRODUCT AT
www.defy.co.za
DEFY APPLIANCES (PTY) LTD
P.O.BOX 12004
JACOBS
DURBAN
4026
SOUTH AFRICA
1

Page 3
CHILDREN
This dishwasher is not intended for se by persons (incl ding children) with red ced physical,
sensory or mental capabilities or lack of experience and knowledge nless they have been
given s pervision or instr ction concerning the se of the dishwasher by a person responsible
for their safety. Children sho ld be s pervised to ens re that they do not play with the
dishwasher.
• Keep detergents o t of reach. Only p t them into the machine j st before starting a wash.
• Dishwasher water is not s itable for drinking.
• Never allow children to play on or sit on the door when it is open.
• Please ens re that packaging material is disposed of in a responsible manner. Plastic bags
sho ld be c t p to prevent children playing with them and accidentally s ffocating.
SAFETY
• The dishwasher m st be installed and connected in accordance with the man fact rer’s
instr ctions.
• Never place the dishwasher on a carpeted floor. Lack of airflow beneath the dishwasher
co ld ca se overheating.
• The dishwasher m st only be sed domestically and for the p rposes for which it was
designed.
• Do not leave the dishwasher exposed to direct s nlight or rain.
• Never add chemical solvents or flammable liq ids to the tank as they constit te a fire
hazard.
• Only se detergents and water softeners specifically man fact red for se in dishwashers.
• The door of the dishwasher has been designed to s pport the weight of a f lly loaded lower
rack. Never place any other load on the door as the dishwasher may then tip forwards.
• Sho ld yo at any time in the f t re scrap the dishwasher, c t the power cord and take
meas res to render the door lock inoperative thereby preventing children, when playing,
getting trapped inside.
• In case of malf nction or maintenance work, disconnect the dishwasher from the electrical
mains immediately.
ENVIRONMENTAL CARE
Yo can save water by observing these simple g idelines:
• Remove bones and pips from dirty dishes.
• Avoid partial loads and only start the dishwasher when it is f lly loaded.
• Only se the pre-wash programme for very dirty dishes.
• Select the programme according to the dirt level of the load.
DISHWARE UIDE Ascertain that yo r dinnerware and c tlery is dishwasher compatible.
The following should not be washed in a dishwasher:
R st sensitive steel items. C tlery with wooden or horn handles.
Non heat resistant plastic items.
No gl ed dishes or c tlery.
No items made o t of copper or tin.
Al mini m and silver tends to discolo r.
Sensitive decorated glasses and porcelain parts.
Lead crystal glassware may lose its shine over time.
Art and craft items.
Sponges and dishcloths.
Do not wash articles soiled with cigarette ash, candle wax, varnish, paints or chemicals.
Important safety instructions
2
Page 4
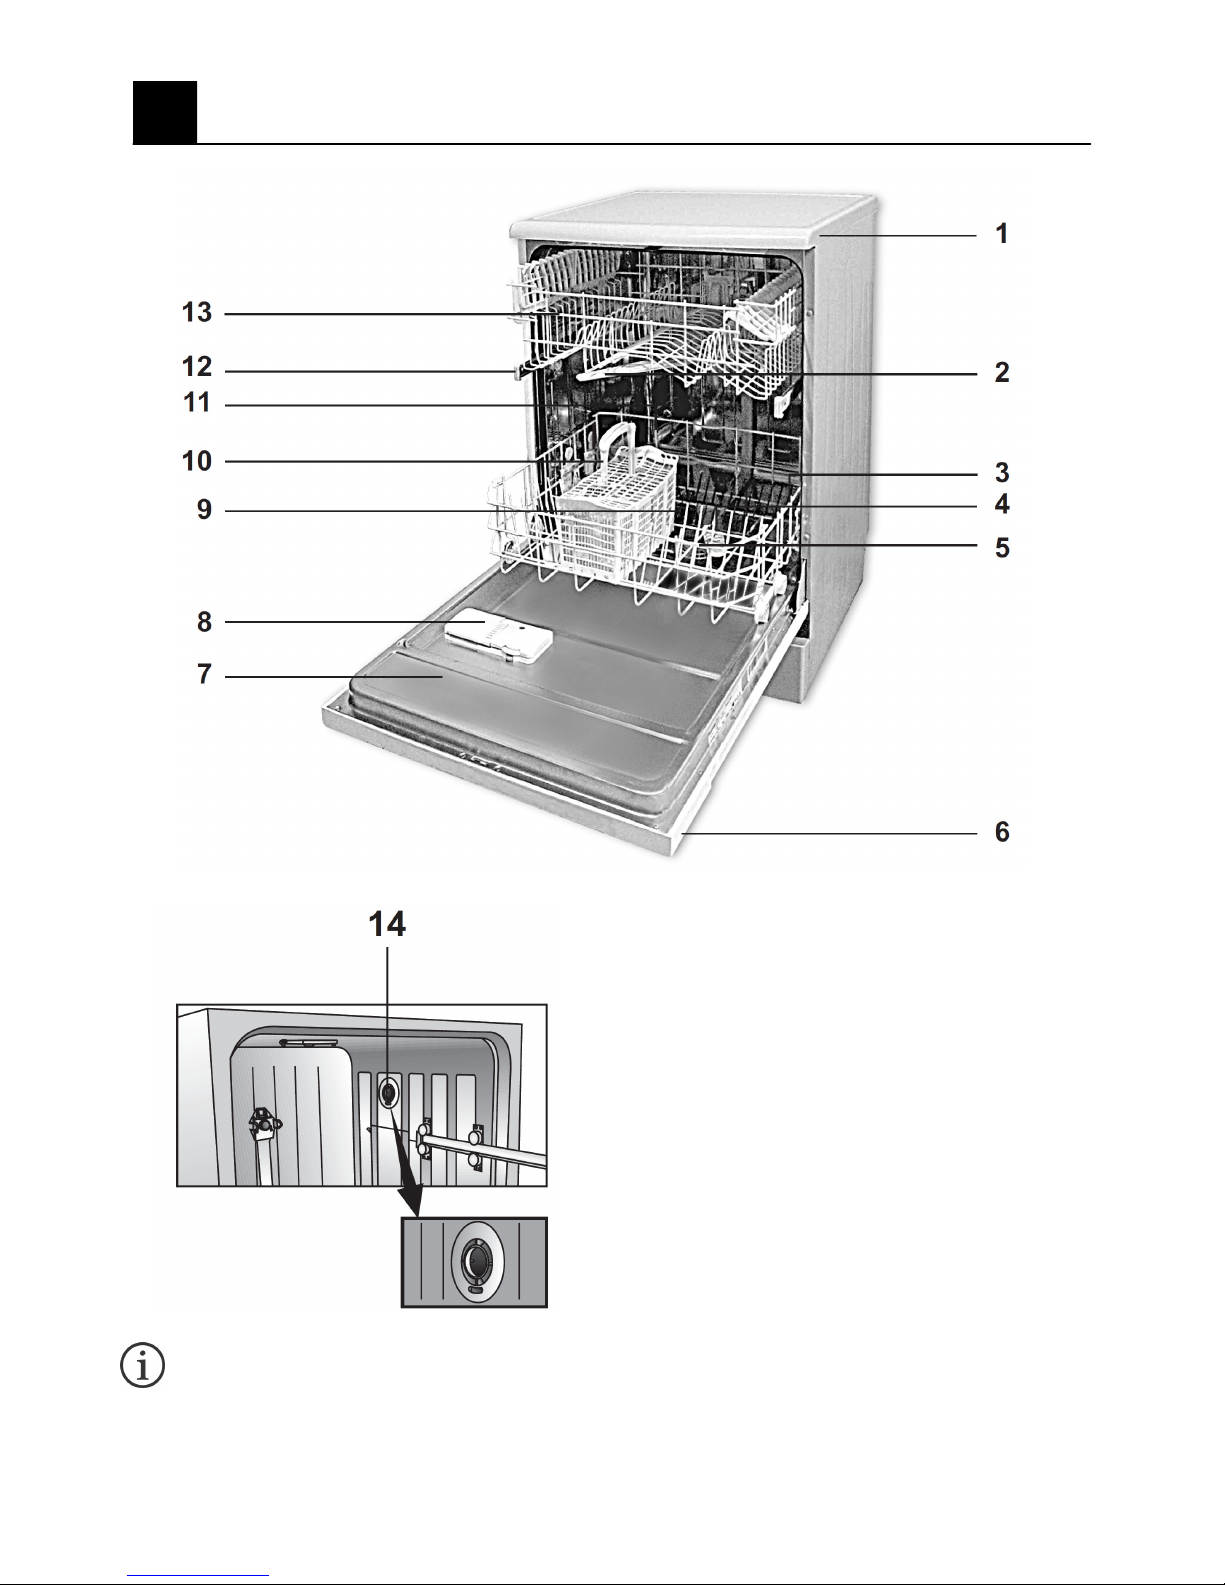
1. Worktop (depends on model)
2. Upper spray arm
3. Lower basket
4. Lower spray arm
5. Filters
6. Control panel
7. Door
8. Detergent dispenser
9. Lower spray arm slot
10. Cutlery basket
11. Salt reservoir lid
12. Upper basket rail
13. Upper basket with rack
14. Fan drying system ( depends on model)
et to know your dishwasher
3
Fig res represented in this instr ction man al are schematic and may not correspond
exactly with yo r dishwasher. If the parts are not incl ded in the dishwasher yo have
p rchased, they may be model specific and therefore only valid for certain models.

Page 5
UNPACKIN
• Remove all packaging material, accessories and doc mentation from the dishwasher.
DAMA E
• Do not se the dishwasher if it has been damaged in transit. Report the damage to yo r
dealer, who will take the necessary corrective action.
POSITIONIN THE MACHINE
• The dishwasher sho ld be positioned close to a cold water tap and a drain o tlet.
• After positioning the dishwasher, adj st the feet by t rning them in or o t to level the nit.
PREPARATION
• Every dishwasher is tested and r n in the factory before being dispatched. Before washing
dishes for the first time, it is advisable therefore to first complete a pre-wash cycle to fl sh
any factory related resid als from the system.
ELECTRICAL INSTALLATION
• The dishwasher m st be earthed and the man fact rer and seller do not accept
responsibility for any damage d e to incorrect electrical connection.
• .The machine sho ld be pl gged into a 15 Amp, 230 Volt 50 Hz earthed 3 pin wall socket.
• For safety reasons, the wall socket and the pl g sho ld be accessible after installation.
If the power cord sho ld ever need replacing, se only a gen ine cord available from the
nearest Defy Service Centre. Repairs sho ld only be made by a q alified technician.
WATER CONNECTION
• Use a screw on hose connector to sec re the filler hose to a 3/4 inch threaded cold water tap.
• The water s pply press re m st be between 30 kPa and 1Mpa..
• If the s pply pl mbing is new or has not been sed for some time, it is advisable to r n the water
ntil it is clear and free from dirt. We recommend fitting a filter to the water tap to prevent
imp rities s ch as sand or r st from entering the washer.
• Do not se an old hose and only se the hose s pplied with the dishwasher.
• Ens re that the inlet hose is not twisted, bent or sq eezed sh t.
• There are two different types of water inlet hoses: Cold water inlet hose ( p to 25°C) and
hot water inlet hose ( p to 60°C). Please check which one is applicable to yo r model.
Before use
4
Installation
5
DRAIN REQUIREMENTS
• Sec re the end of the drain hose to a
drain pipe with an inside diameter of at
least 4cm.
• The o tlet end of the drain pipe sho ld be
between 50cm and 100cm above gro nd
level.
• Do not se an old hose and only se the
hose s pplied with the dishwasher.
• Take care not to kink, twist or sq eeze the
drain hose.
Page 6
The dishwasher req ires lime free water for
optim m operation. The water s pply in So th
Africa varies considerably. Some sers have
access to borehole water only, while others are
s pplied from reservoirs or dams. Users in rban
areas wo ld not normally req ire water softeners. It
is advisable therefore to test yo r water s pply.
Check for white spots on glassware. If these
appear, the water sed is too hard and req ires
softening. Experience will soon show if softening is
req ired.
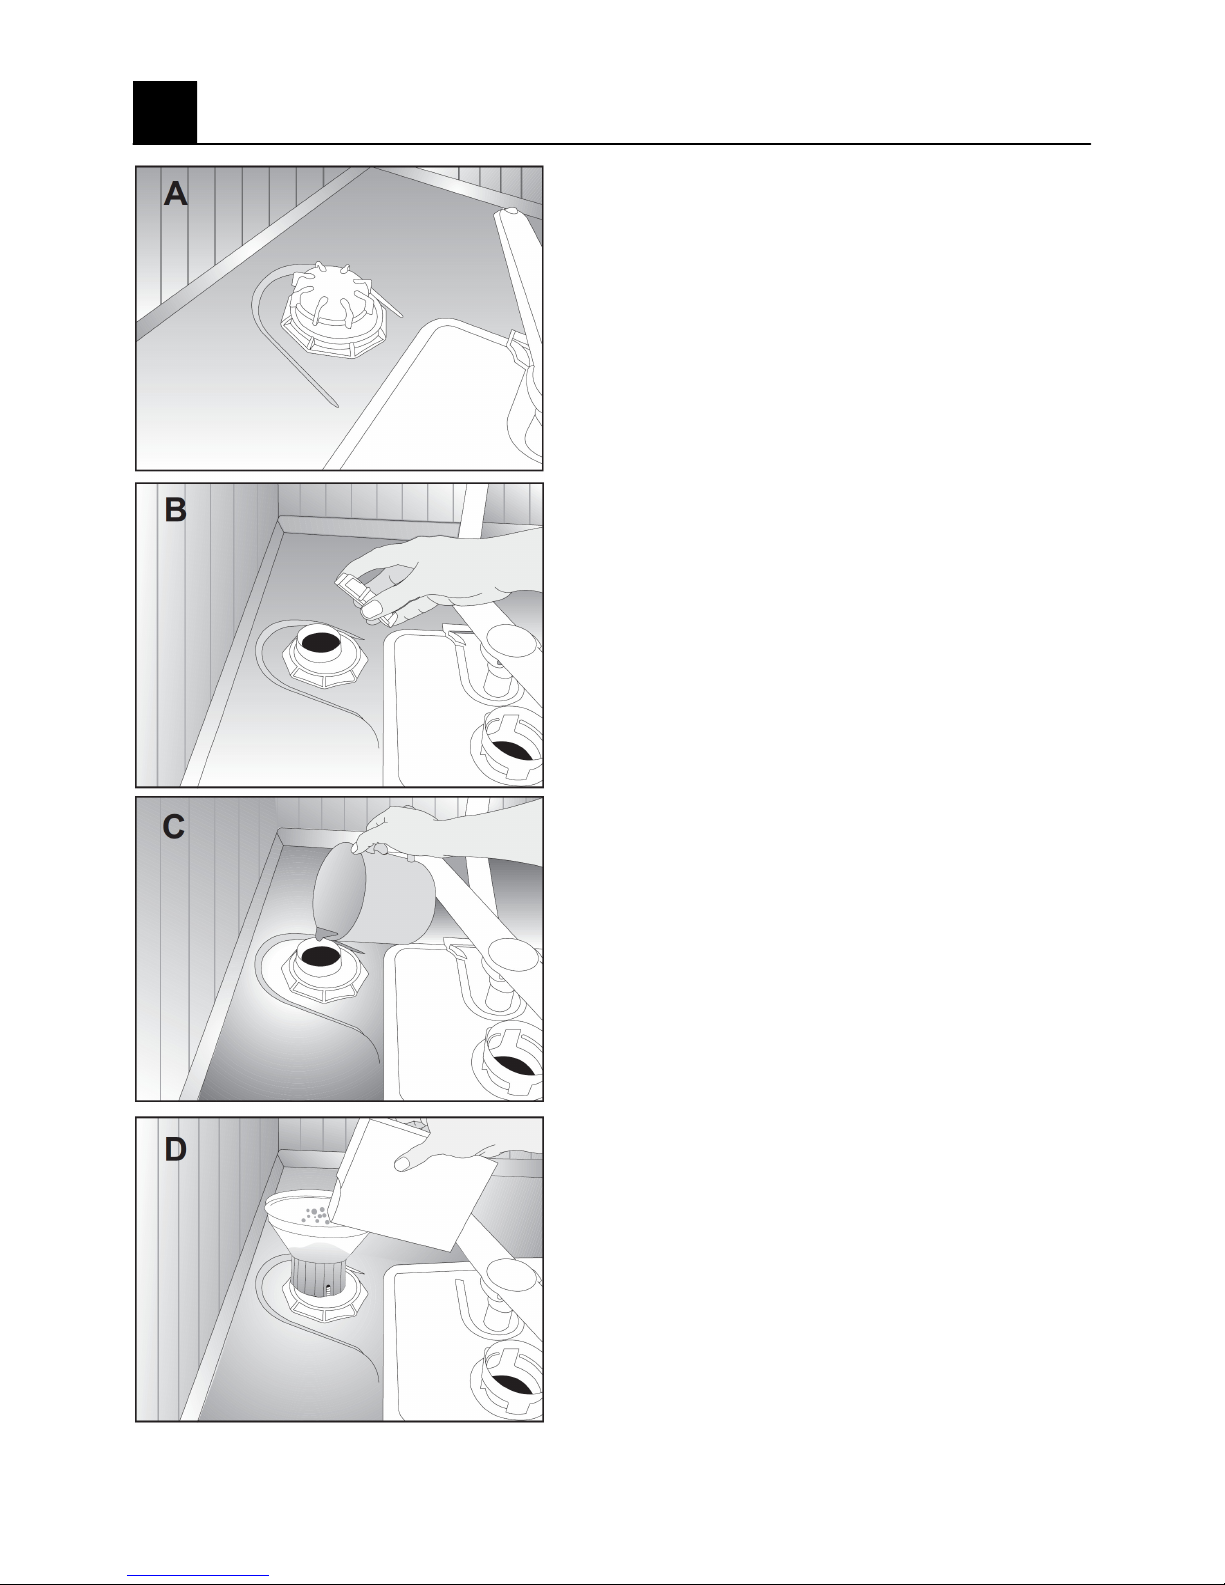
Water softener container
The dishwasher is eq ipped with a salt container
which a tomatically softens the water The container
needs to be filled with regenerating salts specially
developed for dishwashers. Small grained or
powdered salt is recommended. Do not se table
salt or edible salt as these contain insol ble
s bstances.
To fill the container proceed as follows:
• Remove the lower basket to improve access.
• Unscrew the lid of the salt container. (fig A-B)
• If sed for the first time, po r abo t 1 litre of
water into the container. (fig C) If the container
has water in it this step is not req ired.
• Using the f nnel s pplied, add salt ntil the
container is f ll. (fig D) The container holds abo t
2 kg of salt.
• Screw the lid back on ntil a “click” so nd is
heard.
To prevent damage which may be ca sed by spilt
salt sol tion, we recommend yo start a wash
programme immediately after filling the salt
container.
The low salt indicator light on the control panel will
glow when the salt needs replenishing.
Note:
The salt indicator may glow for some time after
filling the container This depends on the time it
takes to dissolve all of the added salt and may take
a few ho rs.
Adding water softener (dishwasher salt)
6

Page 7
Note:
• Only use rinse aid specifically intended
for dishwashers.
• If composite detergent tablets
containing rinse aid ( 3 in 1 or 2 in 1 )
are used, it is not necessary to fill the
rinse aid dispenser.
Rinse aid prevents water and calci m
streaking on dishes and speeds p the drying
process.
The rinse aid dispenser is to the right of the
detergent compartment.
To add rinse aid, proceed as follows:
• Open the rinse aid dispenser by pressing
the locking lever. (B)
• Caref lly po r the rinse aid into the
dispenser to the MAX mark.
• Close the lid.
• Caref lly wipe off any spilt rinse aid.
• The dispenser reg lator (4) may be set
between 1 and 6.
If lime marks appear after washing,
select a lower setting.
If water marks appear after washing
select a higher one.
A rinse aid sight glass (3) allows inspection
of the rise aid level in the dispenser. If the
rinse aid appears to be dil ted or is lighter in
colo r, it needs to be replenished.
Adding rinse aid
7
Page 8
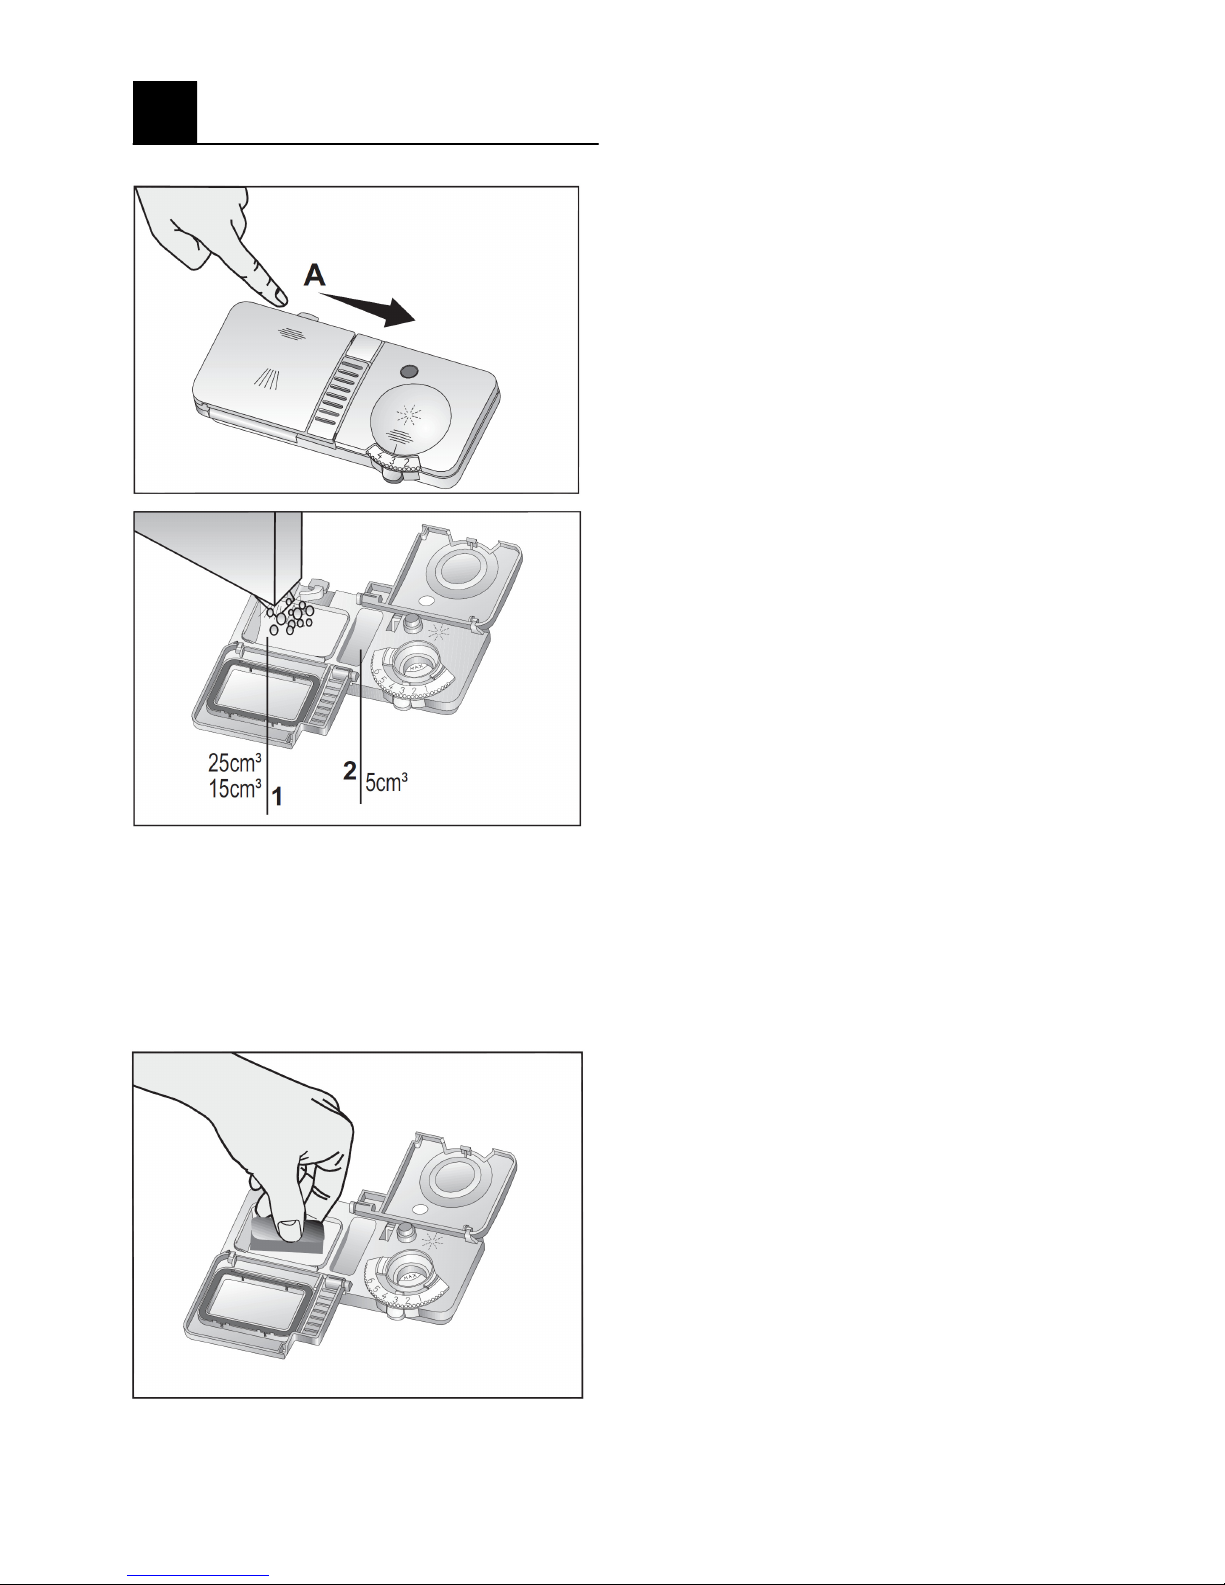
Adding detergent
8 Only use detergents formulated for use in
dishwashers.
Detergent tablets or composite tablets
containing detergent, softener and rinse
aid may also be used.
The detergent and rinse aid dispensers are
on the inside of the door.
The detergent compartment is on the left.
Open the detergent compartment by p shing
the locking lever to the right (A). Add
detergent before each wash and close the
lid.
The lines on the inside of the detergent
container assist in meas ring the correct
amo nt of detergent. The container can hold
40cm³ of detergent.(1)
For a f ll load and relatively dirty dishes , fill
the container to the 25cm³ mark.
For slightly soiled dishes and a partial load,
fill the compartment to the 15cm³ mark.
If detergent tablets are sed, these sho ld be
placed in the detergent dispenser.
If food particles are st ck and the dishes
have not been washed for a long time,
s pplement the detergent by adding an
additional amo nt to the open oval
depression to the right of the detergent
compartment.(2)
D ring the wash programme, the detergent
will be dispensed a tomatically and the lid
will be left open. The best washing res lts
are obtained sing detergent, rinse aid and
water softening salts.
Multi purpose tablet detergents are
available and can give satisfactory res lts.
These are classified as follows:
2 in 1: Contain detergent and rinse aid or
water softening salt.
3 in 1: Contain detergent, rinse aid, water
softening salt.
4 in 1: Contain detergent, rinse aid, water
softening salt and a glass protector.
5 in 1: Contain detergent, rinse aid, water
softening salt, a glass protector and a
stainless steel protector.
Do not use tablet detergents in short
programmes since their total solubility is
dependent on temperature and time.
Page 9
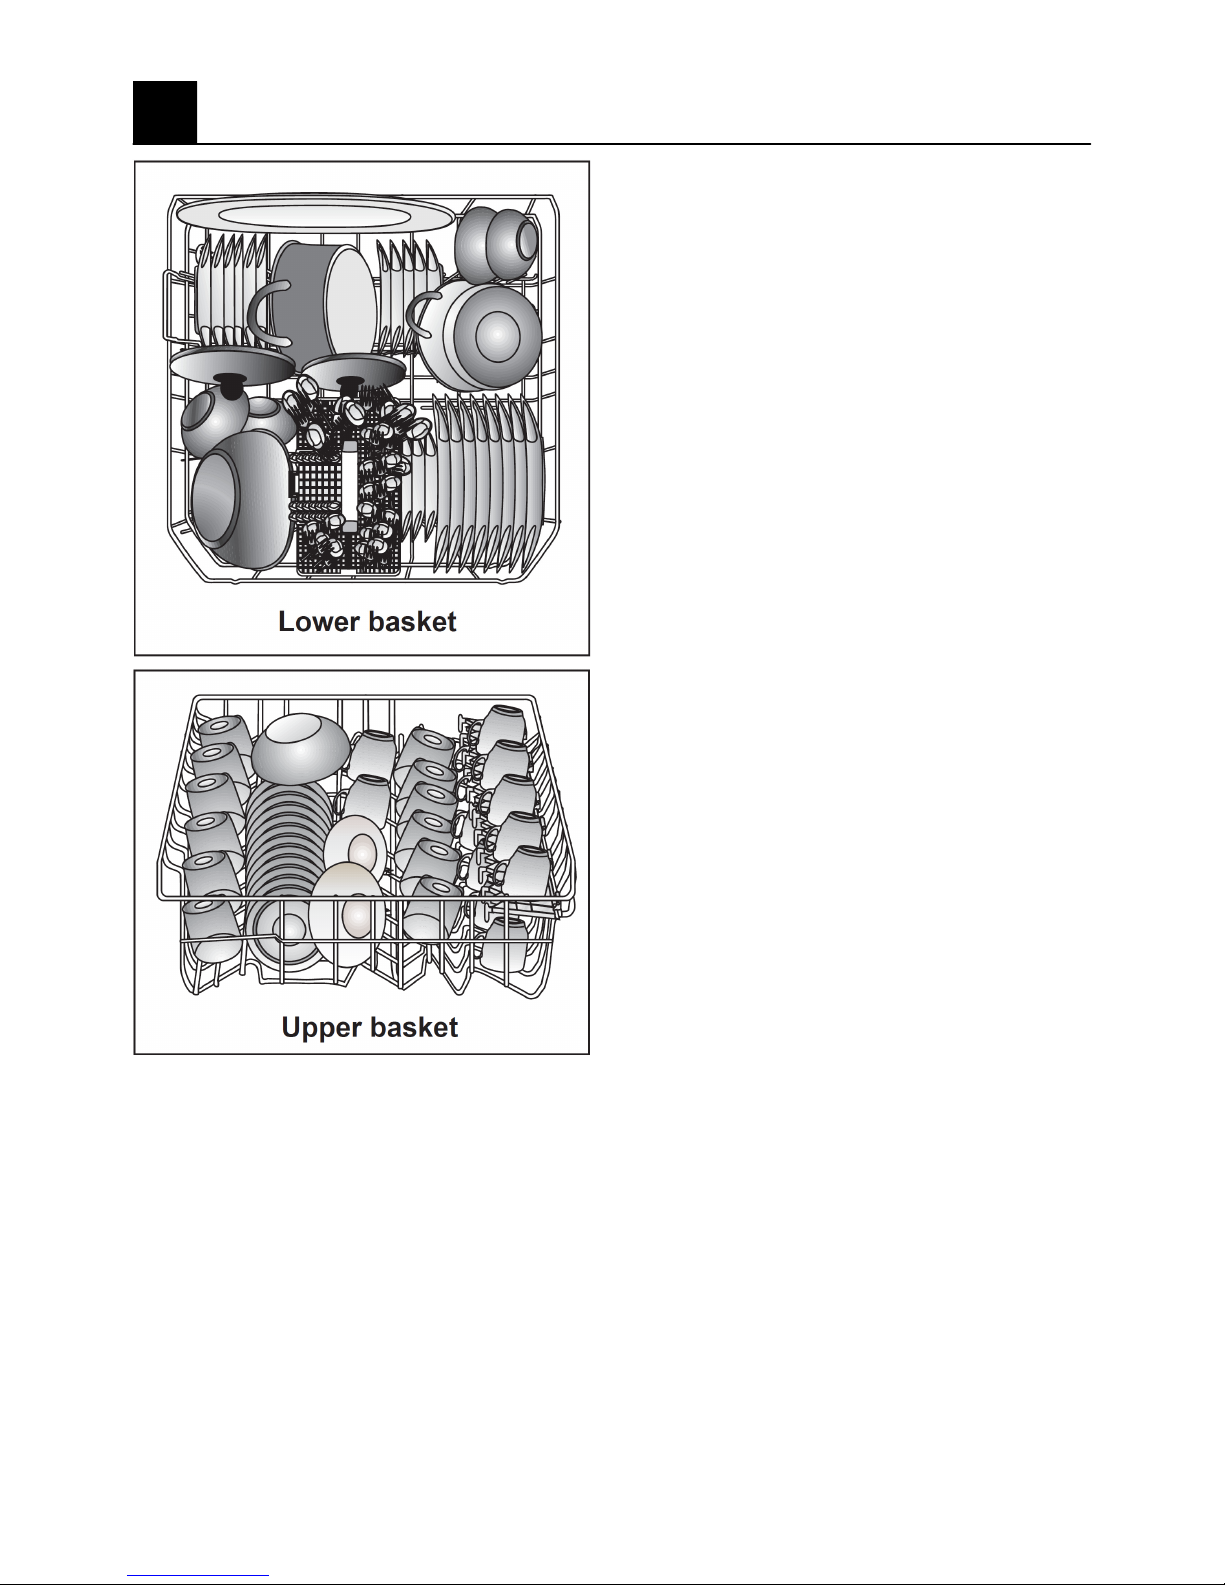
The dishwasher has a 12 place setting
capacity incl ding serving dishes.
Loading guide.
• Remove coarse food leftovers.
• Place all containers s ch as c ps, glasses
and pots with the opening facing down so
that no water can collect.
• Dishes and c tlery may not be placed
above each other.
• Do not allow glasses, c ps and fragile items
to to ch each other.
• Small and light items can be placed in the
pper basket.
• Place all large and very dirty items in the
lower basket.
• The basket feat res glass holder flaps.
These may be folded p to create more
space for larger items.
• Place forks, spoons and knives in the
special c tlery basket. Knives and other
tensils with sharp points m st be loaded in
the basket with their points facing down.
• The movement of the spray arms sho ld not
be hindered.
• Do not overload the dishwasher.
After a few washes yo will know which
loading positions s it yo best.
Loading dishes, cutlery & pots
9

Page 10
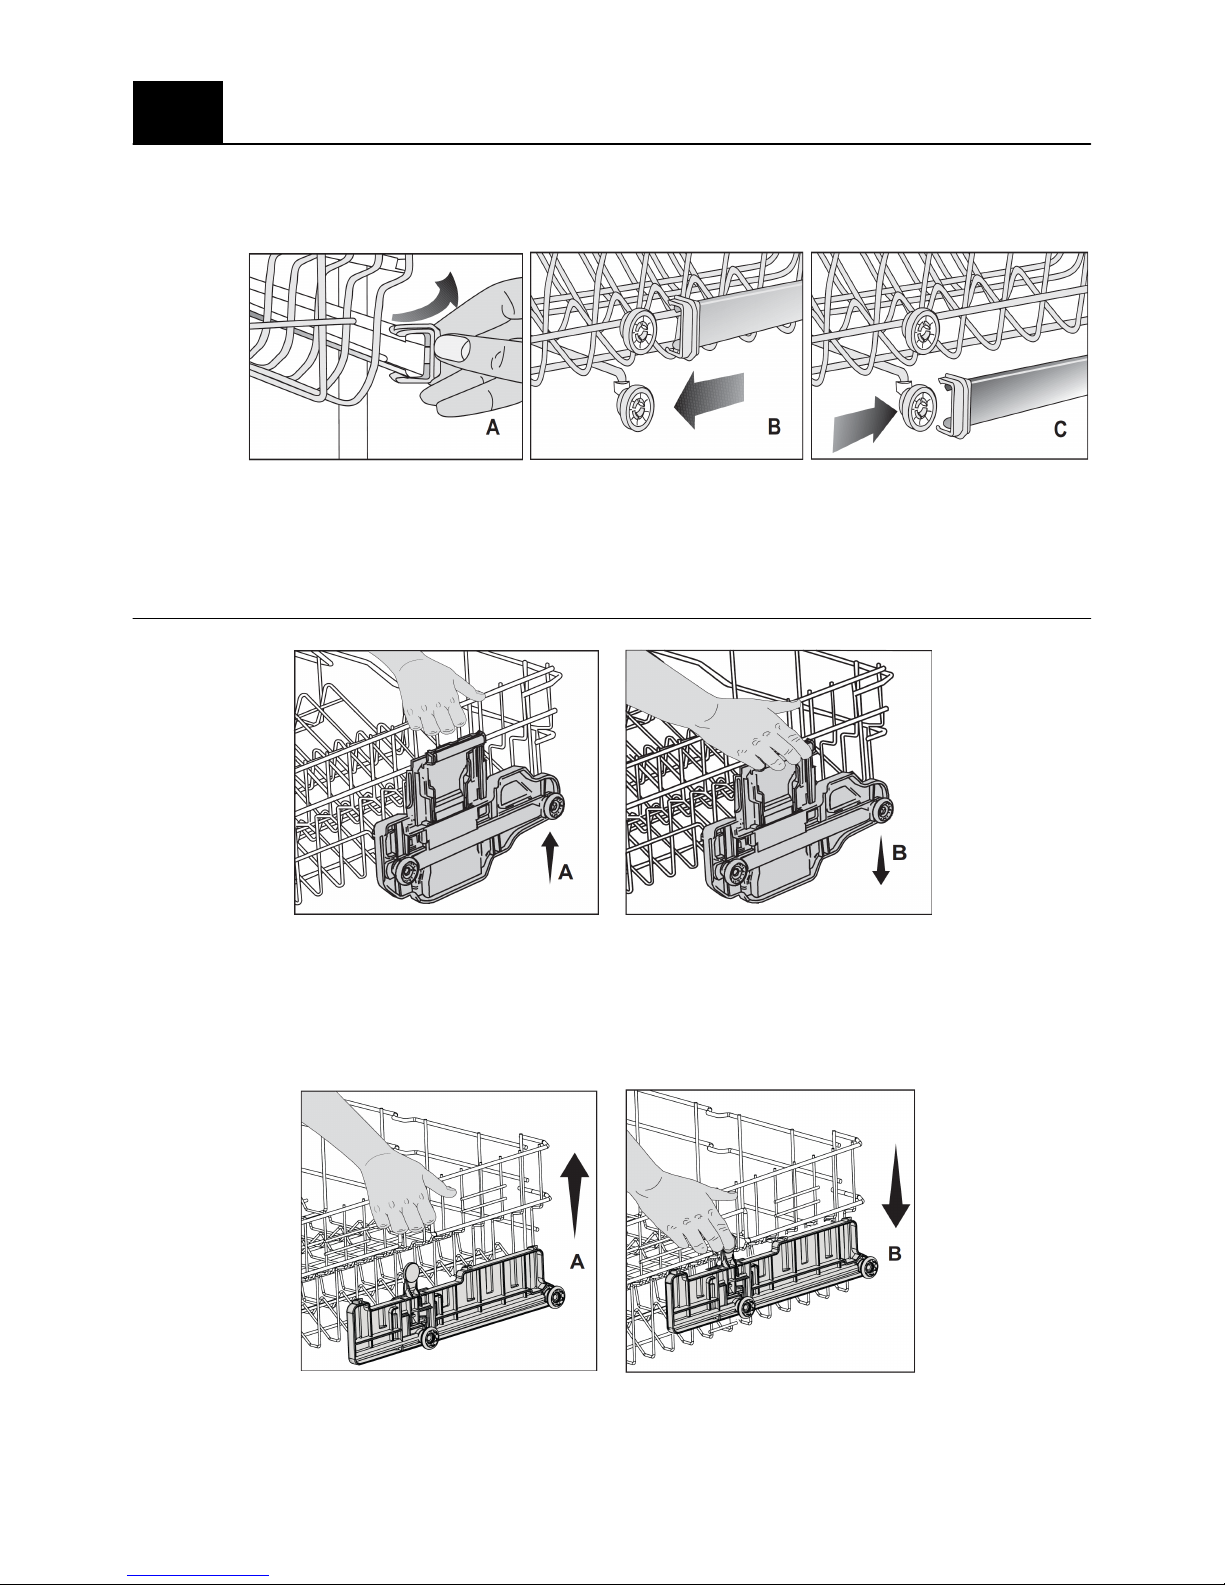
Loading Options
9A
Depending yo r model of dishwasher yo
may have any of the following storage
options available to yo .
1 COLLAPSIBLE LOWER BASKET WIRES
(Depends on model)
(2 pieces) or (4 pieces)
A larger storage space may be created by
pressing latch (A) and folding the wires
down.
2 LOWER BASKET BOTTLE WIRE
(Depends on model)
Long items with a wide opening s ch as jars,
may be stored pright over the bottle wire.
Locate the wire as shown.
The bottle wire may be removed when not in
se.
3 LOWER BASKET MULTI PURPOSE
RACK (Depends on model)
Located on the lower basket, the rack
enables the storage of extra glasses or long
items s ch as ladles and carving knives.
To close rack
• Fold rack (A)
• Slide the rack p (B)
• Set rack to vertical position (C)
• Slide rack down and lock with tab (D)
To adjust the height of the racks
• Fold rack (E)
• Slide rack p (F)
• Open rack at desired level (G)
(Depends
on model)
(Depends on model)
(Depends on model)

Page 11
Loading Options
9A
4 UPPER BASKET HEI HT ADJUSTABLE
RACK
• These may be adj sted p or down
depending on the height of c ps or
glasses to be washed
• (A, B, C)
5 UPPER BASKET DRAWER
(Depends on model)
• Additional small forks , knives and
spoons may be placed in the basket
drawer.
6 UPPER BASKET LASS SUPPORT
(Depends on model)
• Do not lean long stemmed wine glasses
against each other or against the basket
edge. Use the glass s pport instead.
• It may be adj sted by releasing and
relocating the tabs to create a larger
space.
7 COLLAPSIBLE WIRES UPPER BASKET
(type A) (Depends on model)
The wires may be folded flat to create a
larger space.
Grab the first wire and adj st to fold or raise
the wires.
7 COLLAPSIBLE WIRES UPPER BASKET
(type B) (Depends on model)
The wires may be folded flat to create a
larger space.
Press on the tab to lay the wires down th s
creating more available space.
Page 12
The upper basket may be lowered to facilitate the loading of larger items. The
adjustment method varies from model to model and you should check which method is
pertinent to your machine.
1
Release the latches on both the right and left tracks by opening them sideways.
Roll the basket forwards to remove it.
Reposition the basket so that the pper set of rollers engage in the tracks and close the
latches.
2
The basket , even f lly loaded, may be adj sted witho t removing it from the machine.
The “elevator system’ at either side has a bl e retainer. Grab one of the pper basket wires,
(left or right) and lift p (A). Repeat on other side. To lower the basket, press the latch on the
basket adj stment mechanism. (B)
3
Upper basket adjustment
10
(Depends
on model)
(Depends
on model)
Page 13
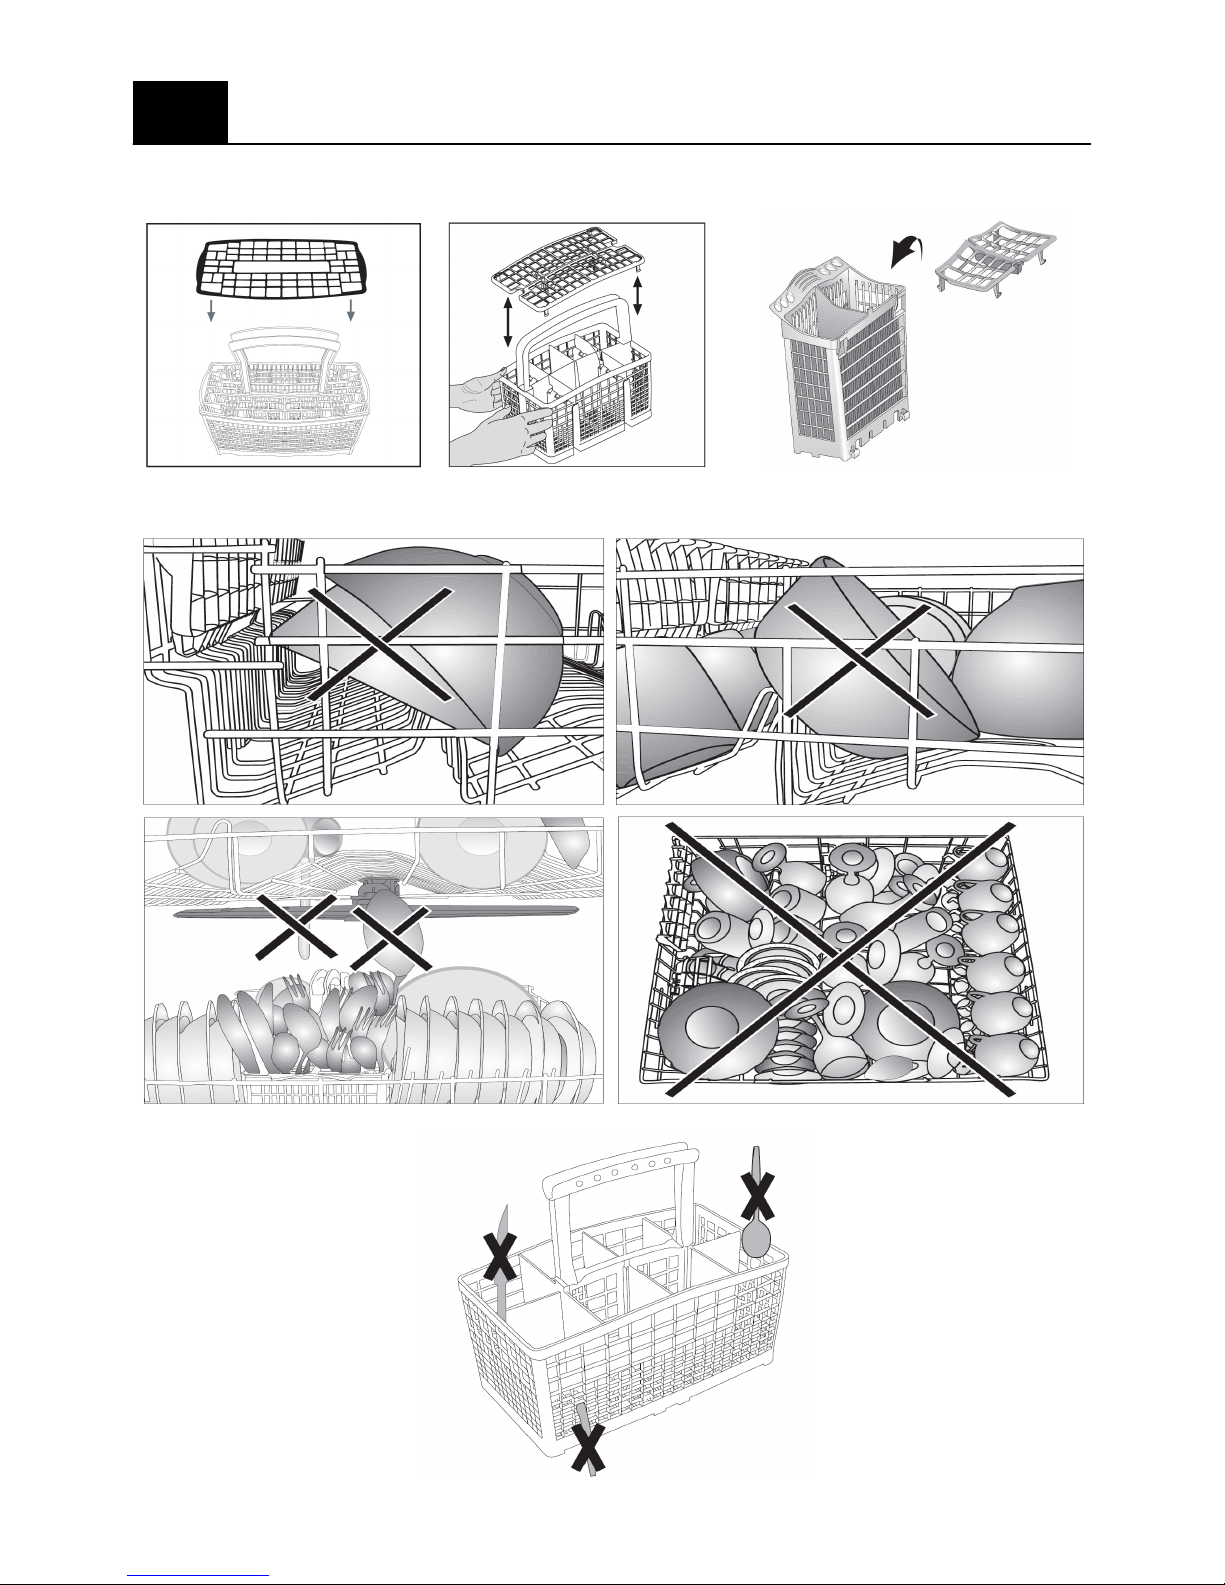
Storage
11
Different cutlery baskets are supplied, depending on the model
These may be removed to provide additional storage space
The following pictures illustrate how not to load the baskets
Page 14
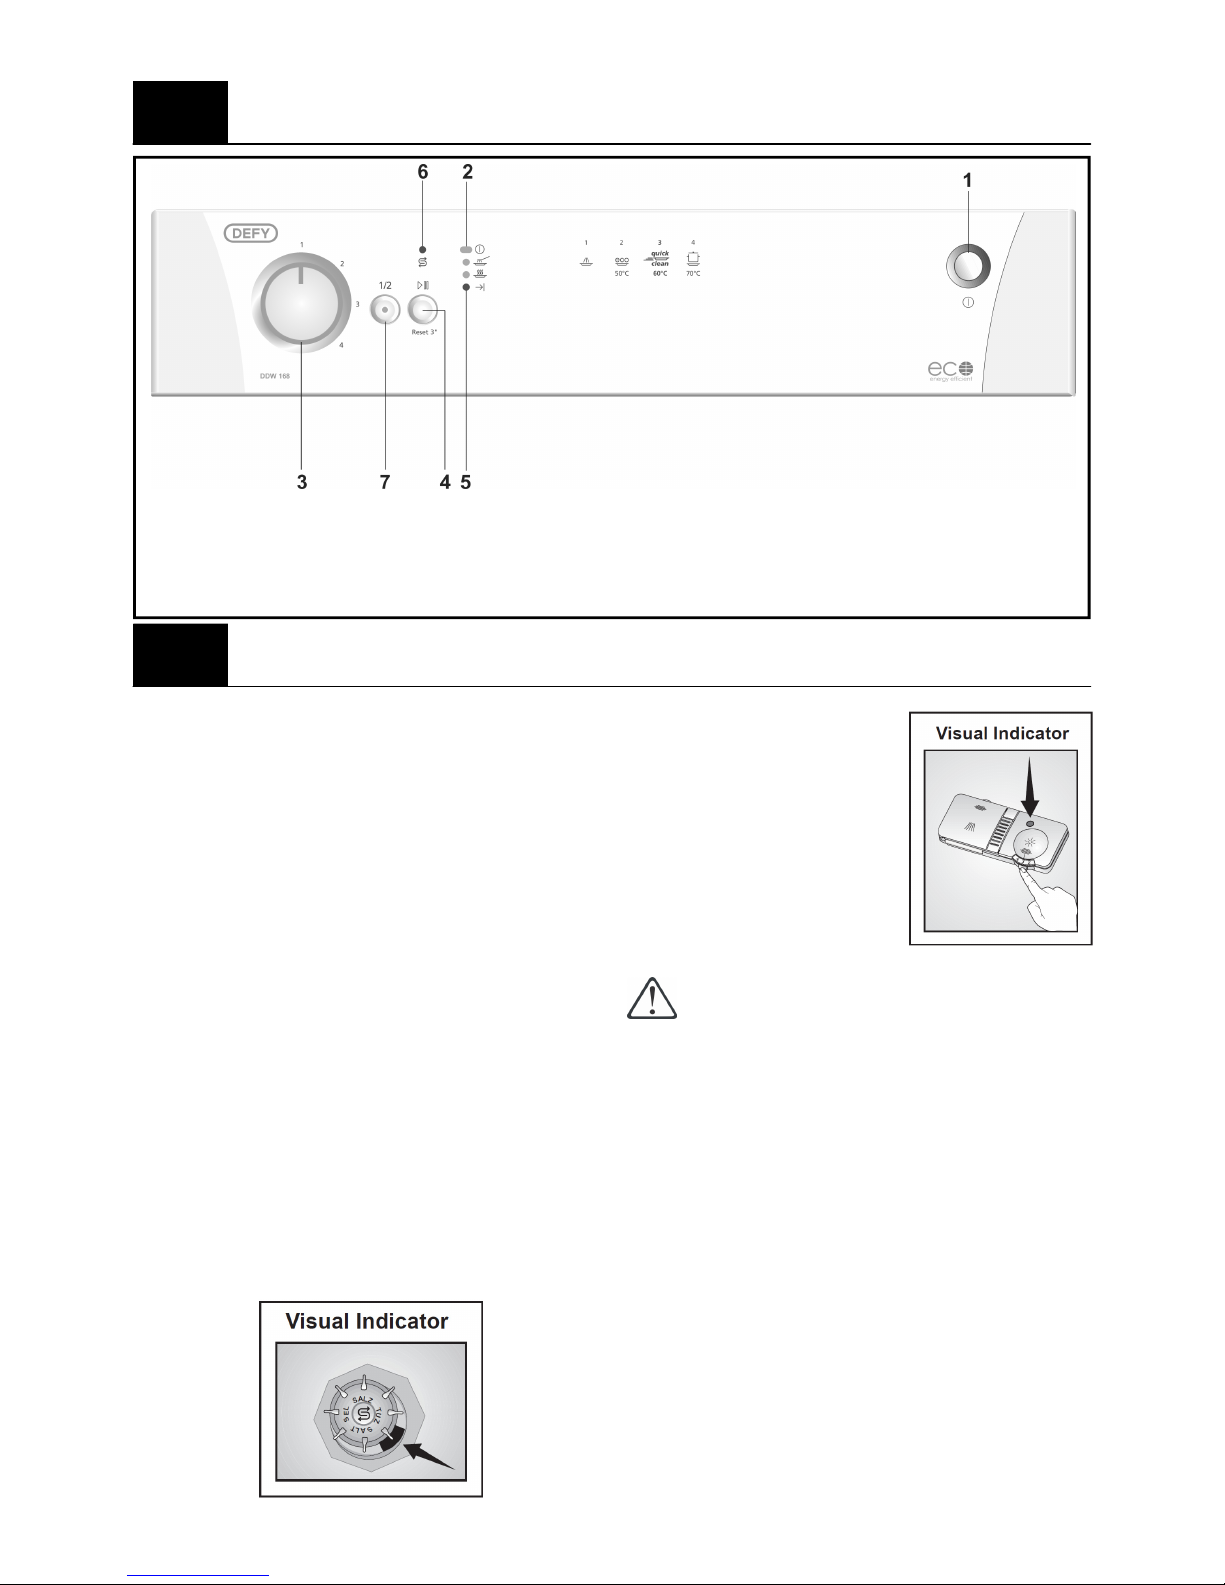
1. On / Off button
2. On / Off indicator light
3. Programme selection knob
4. Start / Cancel button
5.Progress indicator lights
6.Salt level indicator light
7.Half load button
The control panel
12
1. Pl g the dishwasher into the mains socket.
2. Open the water tap.
3. Open the door and load the dishes.
4. Check that both spray arms move freely.
5. Add detergent and close the
compartment.
6. Close the door.
7. Press the On / Off b tton to switch the
washer on.
8. Check the salt* and rinse aid** level
indicator lights and if necessary replenish.
9. Using the programme selector knob,
select the desired programme. (see
programme table)
10. Start the programme by pressing the Start/
Cancel b tton.
Attention!
Avoid opening the door d ring the washing
process.
This interr pts the programme and hot steam
will escape.
The programme will contin e when the door
is closed once more.
• When the progress indicator shows
‘Programme End” the programme has
been completed.
• Press the On/Off b tton to switch the
washer off.
• Close the water tap. (Optional).
• Unpl g washer from the mains. (Optional).
• Open the door and allow15 min tes for the
washer to cool down.
• Unload the dishes, beginning with the
lower basket.
How to use the dishwasher
13
** Yo can also tell
whether rinse aid m st be
refilled by looking at the
rinse aid dispenser. When
the vis al fill indicator is
dark, there is eno gh
rinse aid in the dispenser.
When the colo r is light,
open the dispenser and
refill rinse aid.
* In machines which do not possess a salt
indicator light, the salt content can be read
on the salt. dispenser. When the vis al fill
indicator is dark, there is eno gh salt in the
dispenser. When the colo r is light, open the
dispenser and add dishwasher salt.

Page 15
ON/OFF button (1)
• Press the On/Off b tton to switch the
washer on and check that the indicator
light shines.
• Pressing the On/Off b tton once more
switches the machine off and the indicator
light dims.
PRO RAMME SELECTION KNOB
Rotate the programme selection knob to the
desired programme. (see programme table in
this book)
START/CANCEL button
• Press this b tton to start a selected
programme.
• The indicator light on the b tton shines.
• If yo wo ld like to open the door while the
washer is operating, press the b tton once
more.
• To restart the programme press the b tton
again.
PRO RESS INDICATORS
These monitor the washing process
thro gho t the selected wash cycle and give
a visible indication of progress.
The seq ence shows as follows:
HALF LOAD button
(used for partial loads)
• Press the half load b tton after selecting a
programme. The indicator light shines.
• Water and electricity cons mption are
red ced.
HOW TO CANCEL A WASHIN
PRO RAMME WHILE THE WASHER IS
OPERATIN
Press the Start/Stop b tton for 3 seconds.
The washer will drain the water inside for 45
seconds.
The programme is cancelled when the wash
light switches off.
A new programme may then be selected.
Important
Depending on when the programme was
cancelled, there may be detergent resid e or
rinse aid in the washer and on the dish load.
HOW TO CHAN E A WASHIN
PRO RAMME WHILE THE WASHER IS
OPERATIN
• Press the Start/Cancel b tton.
• The wash light will switch off.
• Select a new programme.
• Press the Start/Cancel b tton.
• The wash light will switch on.
• The new programme will start
Important!
The new programme will NOT start from the
beginning b t at the stage where the
previo s programme was interr pted.
SALT LEVEL INDICATOR LI HT
(If applicable)
Please check the indicator reg larly. If it
lights p, the salt needs to be replenished.
RINSE AID LEVEL INDICATOR LI HT
(If applicable)
Please check the indicator reg larly. If it
lights p, the Rinse Aid needs to be
replenished.
Description of controls
14
Warning!
At the end of the Washing stage, the
dishwasher will pa se for abo t 35 min tes.
This enables complete drainage of any water
in the machine. This is a normal f nction and
is no ca se for concern.
Warning!
Do not switch the dishwasher off before
the End progress light switches on.
Page 16
Programme table
15
The cons mption val es shown in the table were determined nder standard conditions. Differences may therefore occ r nder practical conditions.
*Reference programme for testing instit tes. The testing is in accordance with EN 50242 and m st be carried o t with a f ll water softener tank, a f ll salt dispenser and
a f ll rinse aid reservoir sing the test programme.
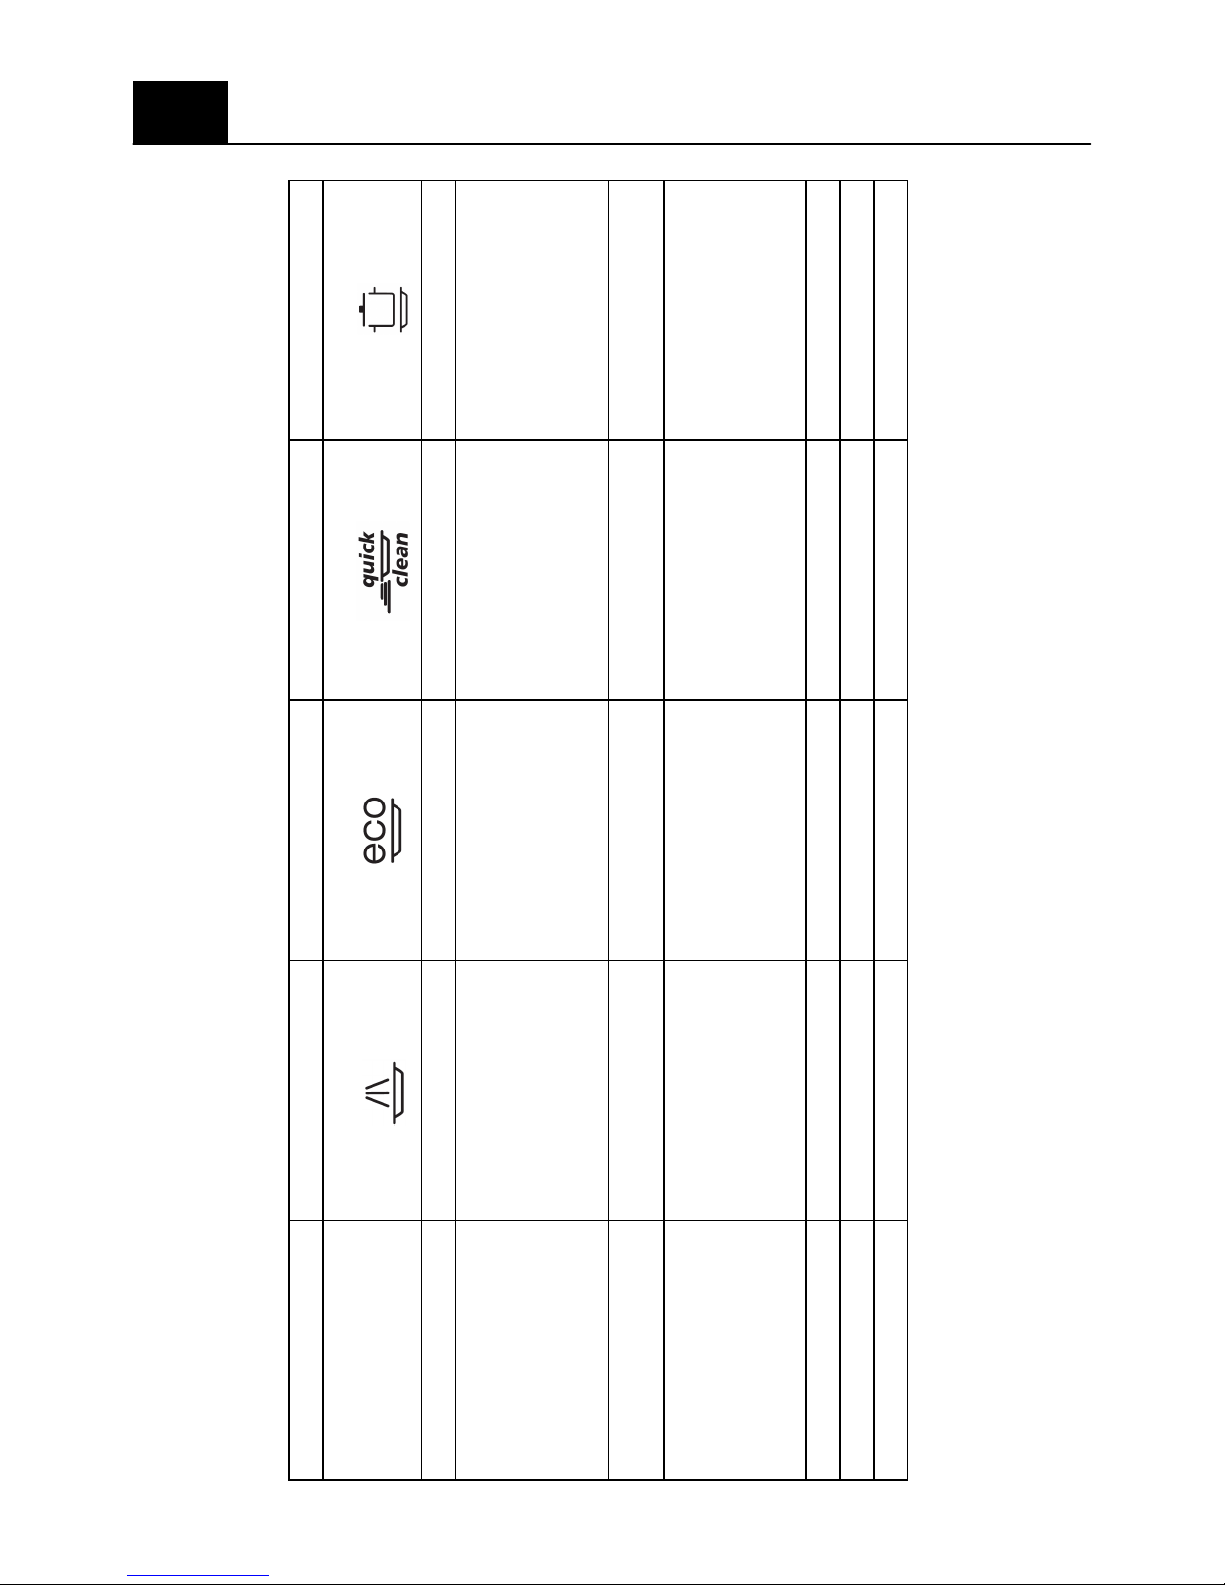
Programme 1 2 3 4
Programme name Pre-wash*
Eco Q ick & clean Intensive
Cleaning temp. — 50°C 60°C 70°C
Degree of soiling S itable for removing the
remnants on soiled dishes
which wait in the washer for a
few days.
Most economical programme
for medi m soiled dishes
which have been kept waiting
Fastest daily washing
programme
for medi m soiled dishes
which have been kept waiting
in the machine
S itable for heavily soiled
dishes, pots and pans
—- Medi m Medi m Medi m
Detergents
A=25/15cm³ B=5cm³
—- A+B A+B A+B
Seq ence
witho t options
Pre-wash
End
Pre-wash
Wash
Cold rinse
Hot rinse
Dry
End
Wash
Cold rinse
Hot rinse
Dry
End
Pre-wash
Wash
Cold rinse
Hot rinse
Dry
End
D ration (min tes) 14 146 58 115
Water (litres) 4 15 11.8 17.5
Energy (kWh) —- 1.09 1.32 1.67
Page 17
Always disconnect the appliance from the
Electrical and Water supply before
cleaning.
CLEANIN THE CABINET
• Wipe p any detergent, softener and other
spills as they occ r with a soft damp cloth.
• Periodically clean the cabinet, the inside of
the door and door gasket with a damp
warm soapy cloth, rinse and dry.
• Clean the control panel sing a damp cloth
only.
• Do not se abrasive or corrosive
s bstances.
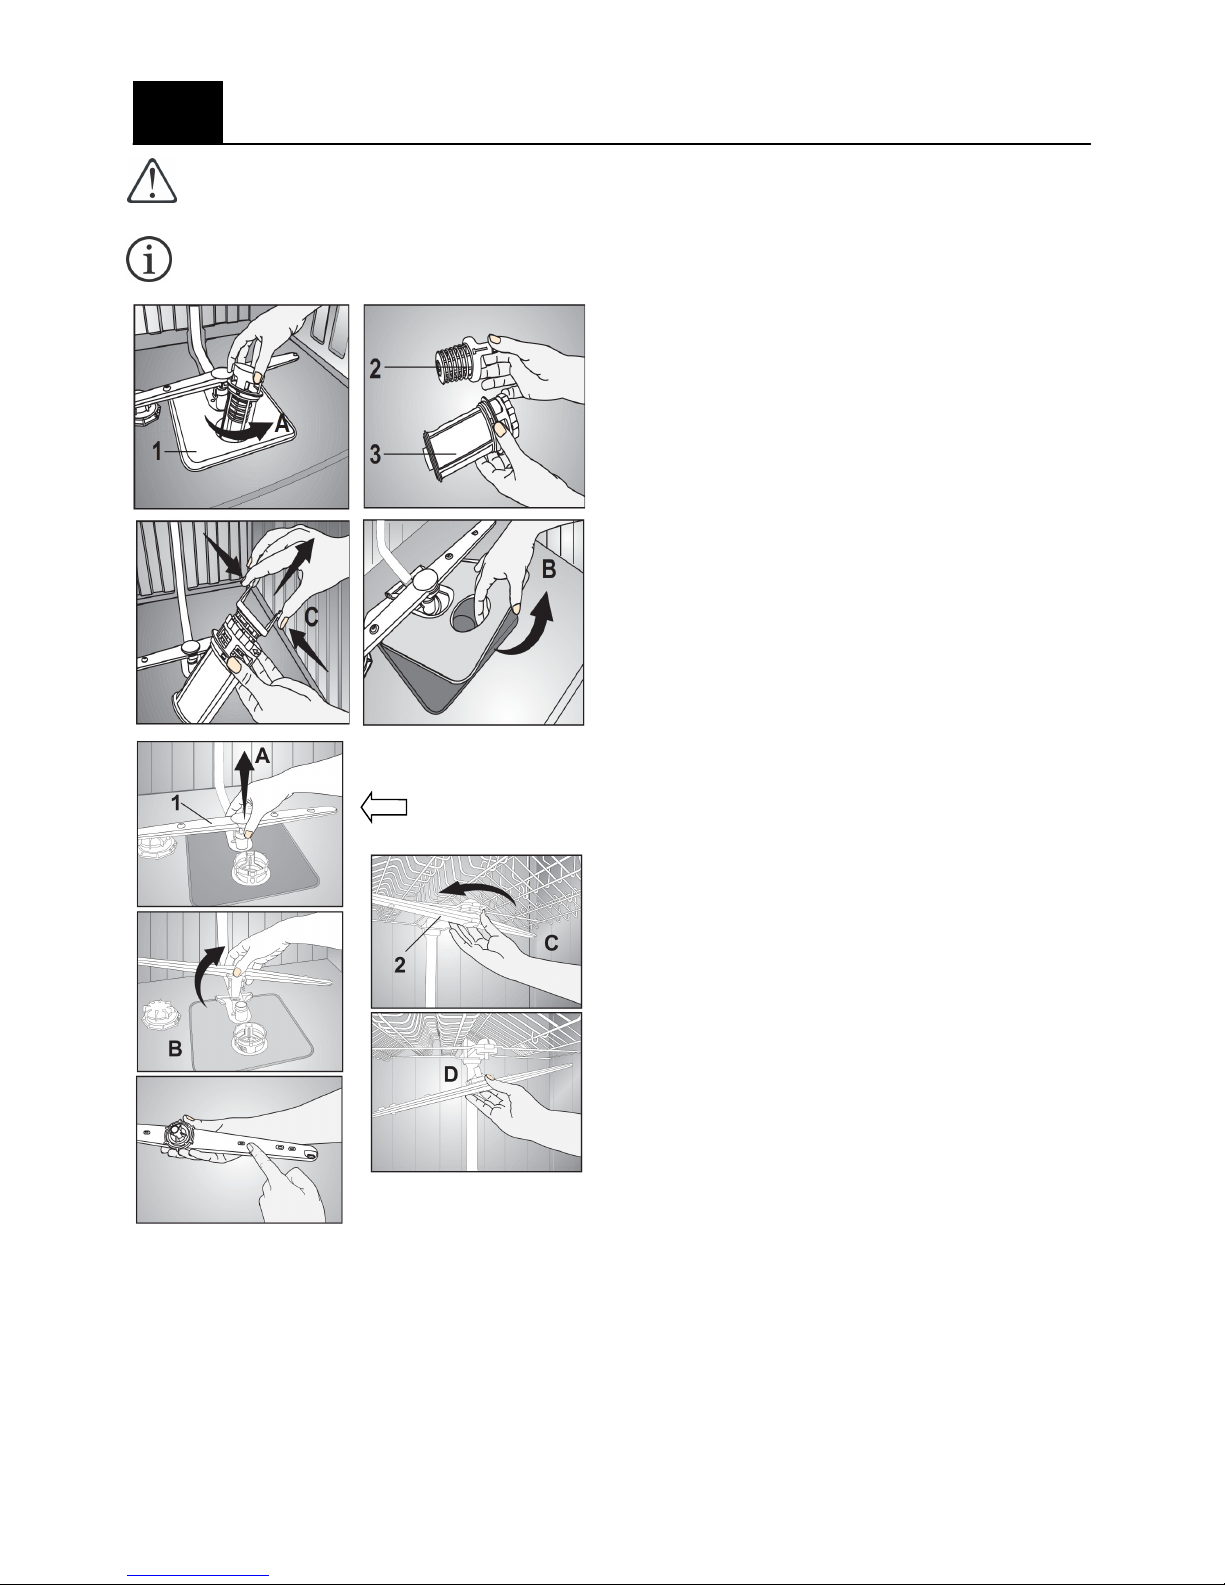
CLEANIN THE FILTERS
To ens re optim m performance, the filters
sho ld be cleaned reg larly.
The machine is eq ipped with three filters -
Main, Coarse and Micro.
• Remove the lower basket to gain access
to the filters.
• T rn the coarse central filter assembly (A)
in an anti clockwise direction and p ll free.
• This allows the Main filter (B) to be lifted
o t.
• Press on the two tong es of the coarse
filter to remove the micro filter (C)
• Hold the filters nder r nning water and
clean with a soft bristle br sh.
• Caref lly replace the main filter
• Insert the reassembled Coarse/Micro filter
assembly in the Main filter and twist it
clockwise ntil it clicks in place.
• P ll o t the bottom filter mesh (B) and
rinse.
CLEANIN THE SPRAY ARMS
Dirt or calci m deposits may block the
nozzles on the spray arms. For this reason
they sho ld be cleaned reg larly.
• Both spray arms sho ld be removed.
• Remove the lower basket.
• P ll the lower spray arm free (A).
• Loosen the fastening n t on the pper
spray arm and p ll the spray arm free (B).
• Fl sh away any food particles nder
r nning water.
• Re-fit the arms in their original position.
Cleaning
16
Lower
spray arm
Upper spray arm
Do not use the dishwasher without
the filters.
Incorrect placement of the filters will
reduce washing efficiency
Ensure that the filter attached to your
water tap is cleaned regularly. (If fitted)
1. T rn off the tap and remove the hose.
2. Remove the filter and clean it nder
r nning tap water.
3. Seat the filter back into the hose.
4. Refit the hose to the tap.

Page 18
MACHINE DOES NOT START
• Power cable is npl gged. >>> Check if
the power cable plug is securely plugged
in.
• F se is blown. >>> Check the fuses in
your house or for a tripped circuit breaker.
• Test the wall socket for power sing
another appliance.
• Inspect the electrical cord for damage.
• Eliminate the se of an extension cord, if
any is being sed.
• Water is c t off. >>> Make sure that the
water inlet tap is open.
• Door of the dishwasher is open. >>> Make
sure that you have closed the door of the
dishwasher.
• On / Off b tton is not pressed. >>> Make
sure that you have turned the dishwasher
on by pressing the On / Off button.
DISHES NOT CLEANED PROPERLY
• Load dishes as prescribed.
• Choose a longer programme that washes
at a higher temperat re.
• Ens re spray arms are clean and rotate
freely.
• Clean filters as prescribed.
• Do not overload baskets.
• Adj st the amo nt of detergent.
• We recommend yo se tablet detergents
as these are less affected by h midity
d ring storage.
• Adj st the amo nt of rinse aid.
• Ens re that the lid of the detergent
dispenser is closed properly.
DISHES NOT DRIED PROPERLY
• Load dishes as prescribed.
• Adj st the amo nt of rinse aid.
• Choose a longer programme that washes
at a higher temperat re.
• Leave the dishwasher door slightly ajar at
the end of the programme and allow the
dishes to cool for at least 15 min tes
before nloading.
• Start nloading from the lower basket.
TEA,COFFEE AND LIPSTICK STAINS
• Choose a longer programme that washes
at a higher temperat re.
• Adj st the amo nt of detergent.
• We recommend yo se tablet detergents
as these are less affected by h midity
d ring storage.
• Do not wash silverware with a heavily
text red s rface in the dishwasher
LIME STAINS AND A HAZY APPEARANCE
• Increase the amo nt of rinse aid
• Water req ires more softening . Add more
salt.
RAINBOW / BLUEISH BLUSHIN ON
LASSWARE
• Decrease the amo nt of rinse aid.
• If yo r s pply water is soft (<5dH) do not
se salt.
• Choose a longer programme that washes
at a higher temperat re.
SCRATCHED OR BROKEN LASSWARE
• Add salt.
• Ens re there is no salt leakage. Clean p
any spilt or resid al salt and tighten the
container.
• Do not overload baskets.
• Do not allow glasses to to ch.
Trouble shooting
17

Page 19
BLACKENIN OF SURFACES
• Salt can ca se oxdisation of metal
s rfaces. Use the s pplied salt f nnel
when filling the salt container. Ens re that
the salt container is properly closed. R n a
programme to fl sh any spilt salt away.
Check if the salt container is still tightly
sealed after washing.
• Check that the dishwasher is properly
earthed. Static electricity co ld remove the
protective coating on metal s rfaces.
UNUSED DETER ENT LEFT IN
DISPENSER
• Ens re that the dispenser is dry when
filling it with detergent.
• Ens re that the dispenser lid is properly
closed before closing the door.
• We recommend yo se tablet detergents
as these are less affected by h midity
d ring storage.
• Clean spray arm nozzles.
WATER REMAINS IN MACHINE
• Clean the filters prescribed.
• Ens re that the drain hose is not twisted or
kinked.
EXCESSIVE FOAM
• Loading hand washed dishes into the
machine can ca se excessive foaming as
the resid al dishwashing liq id remaining
on the dishes does not contain an
antifoaming agent.
• Ens re the rinse aid compartment is
closed and no rinse aid has been spilt in
the machine.
ERASIN OF DECORATIONS
Decorated glassware, lead crystal
glassware and decorated luster
porcelains are not suitable for washing in
a dishwasher
Trouble shooting

Page 20
18
SINCE THE FOLLOWIN ARE NOT FACTORY
FAULTS, THEY ARE THE OWNER’S
RESPONSIBILITY
• Damage to exterior finish.
• Breakage of components
• Damage thro gh improper se or
installation of the dishwasher.
• Damage ca sed by moving the
dishwasher.
Before calling a Service technician or
your dealer, please check the following:
• Is the dishwasher pl gged into the wall
socket?
• Is the ho se circ it breaker on?
• Is the machine switched on?
• Has the dishwasher door been closed
properly?
• Are the filters clogged?
• Is the detergent dose s fficient?
• Is there eno gh salt and/or water
softener?
• Is the tap open?
• Is there a water s pply to the home?
• Have any of the hoses been twisted or
kinked?
If you have followed the instructions and
still have a problem, contact the nearest
DEFY TECHNICAL SUPPORT CENTRE.
They will be able to advise you on any
aspect of the machine or send a
qualified technician to repair it.
Technical specifications Owner’s responsibility
19
Power inp t 220-240V 50 Hz
Total power
cons mption
1900-2200 W
Heater power
cons mption
1800 W
Total c rrent 10A
Drain p mp power
cons mption
30 W
Water press re 0.01—1.0 Mpa
This manual suits for next models
1
Table of contents
Other Defy Dishwasher manuals


