DEGEN DE660 User manual
DE660
用户手册
OPERATION MANUAL
蓝牙电话音响
插卡音乐播放器
FM收音机
BLUETOOTH HANDSFREE SPEAKER
MP3 PLAYER
FM STEREO
本机支持软件升级,请关注德劲公司网站
http://www.degen.com.cn的软件更新。
地址:深圳市宝安区福永镇怀德村翠岗第四工业区26栋
网址:www.degen.com.cn
邮编:518053 传真:0755-26918325
电话:0755-26912618 26918406 26918409
Address: Building 26, NO.4 District Cuigang Industrial Zone,
Fuyong Town, Baoan District, Shenzhen, Guangdong, China
Website: www.degen.com.cn
Postalcode: 518053 Fax: 86-755-26918325
Tel: 86-755-26912618 26918406 26918409
SHENZHEN DEGEN ELECTRONICS CO., LTD.
深圳市德劲电子有限公司

Foreword
OUR THANKS
Thank you for choosing this product from the DEGEN series; we are very
happy that you are using our product. Please keep this manual in case you
need to review it in the future.
This package includes:
üDE660
üUser’s manual
üUSB connection cable
üCarrying strap
üLithium battery (BL-5C)
üAnti-slip mats
STATEMENT
DEGEN is a registered trademark of their respective owners. DEGEN’s
continuous focus is building a strategy for sustainable development. We
reserve the right to, without prior notice, modify and upgrade the products
described in this manual. This manual is for reference only. With or without
any new modifications or upgrades, the functions may not operate exactly as
described in this manual. Without prior written permission from DEGEN, it is
strictly prohibited to, in any form, reproduce, transfer, distribute or store any
content of this manual. For the latest updates about product documentation,
please visit the DEGEN website at: www.degen.com.cn. DEGEN, as well as its
licensors and vendors, is not liable for any damage or loss of data.

Contents
Location of controls 1
Battery power supply:
(I) Installing the battery 3
(II) Battery consumption indicator 3
(III) Charging the lithium battery 4
How to operate the buttons 5
Turn on/off the device 6
Switching modes 7
Bluetooth mode:
(I) Pairing a mobile device through a Bluetooth connection 7
(II) Answering incoming calls via Bluetooth 8
(III) Call recording 9
(IV) Bluetooth audio playback 9
Time mode 12
Music mode:
(I) Playing audio files 13
(II) Song selection 14
Radio mode:
(I) Using the whip antenna 15
(II) Auto-scan stations 15
(III) Auto Tuning Storage (ATS) 16
Active speaker (line-in) 17
Using anti-slip mats 17
Firmware upgrade 18
Care and maintenance 19
Battery safety information 20
Battery hazard warning 21
Troubleshooting 23
Specifications 24
Contents: toxic and hazardous substances 25
Page | 1
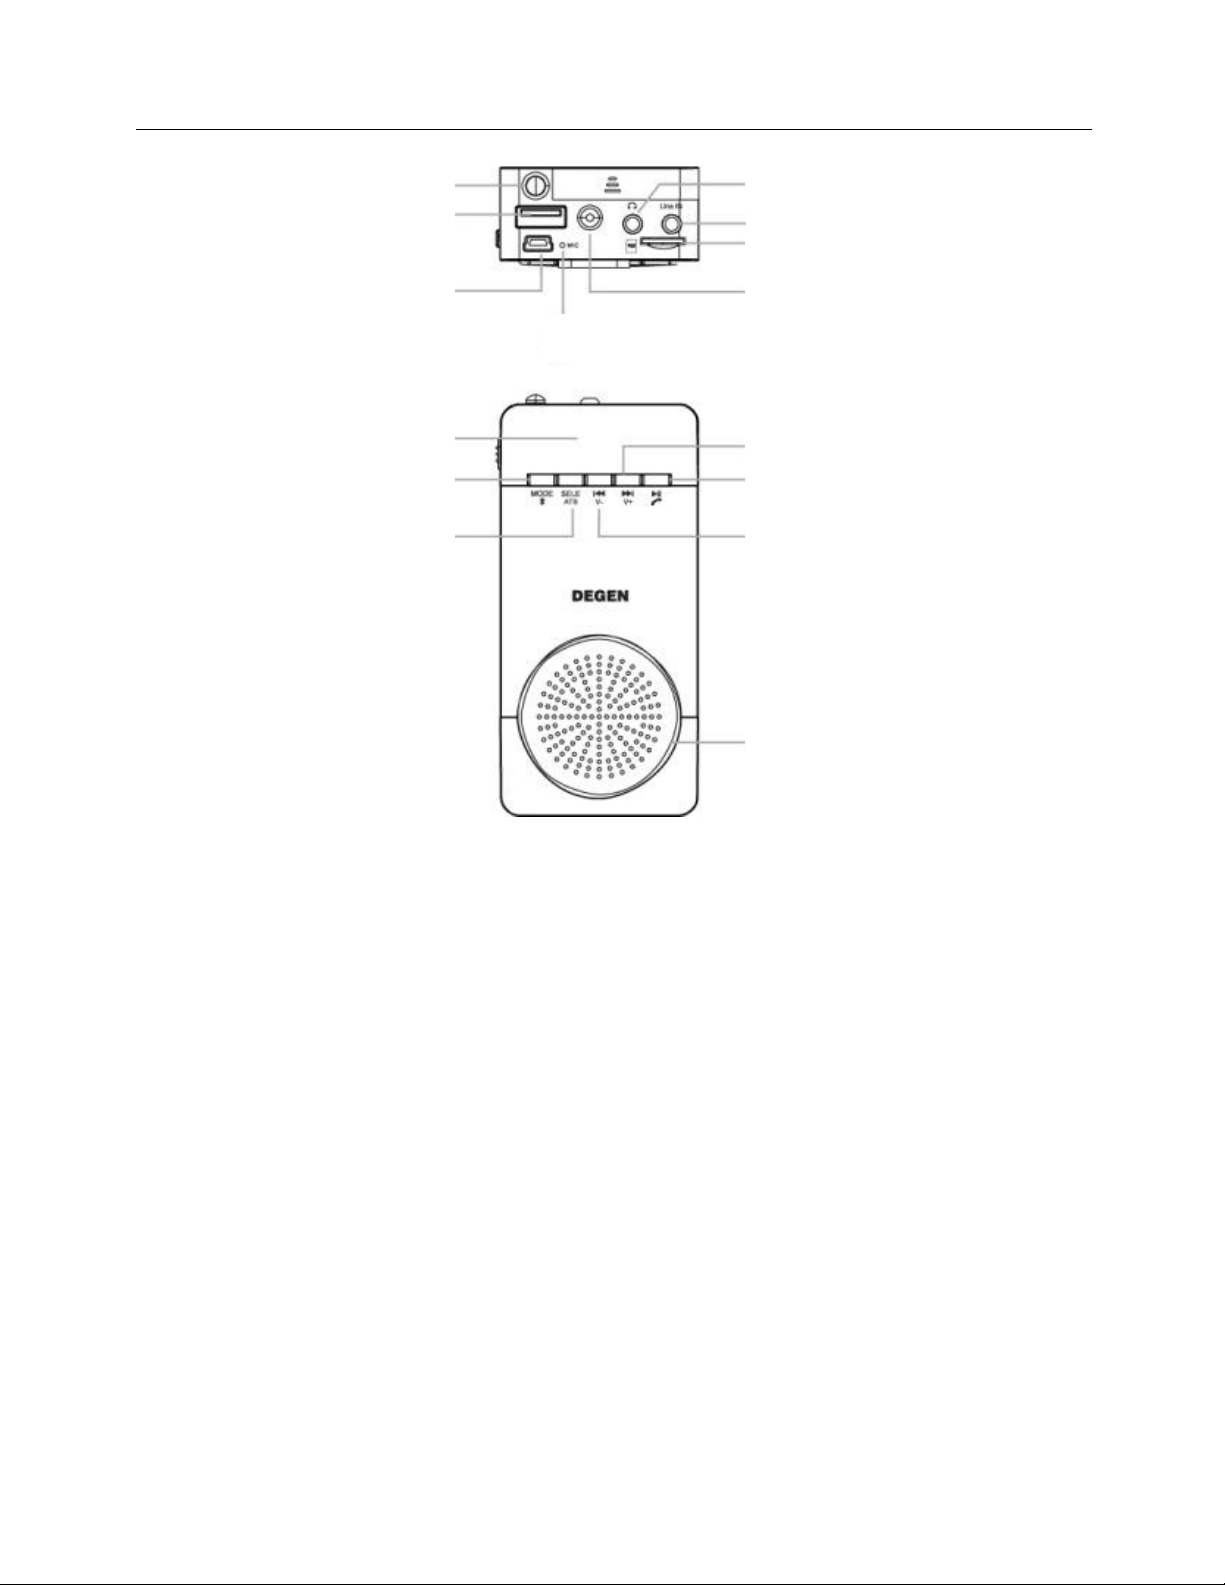
Location of Controls
1. Telescopic antenna
2. USB (flash disk) jack
3. Mini-USB jack
4. Built-in microphone
5. Strap hole
6. Micro-SD card slot
7. Line-in jack
8. Earphone jack
9. Display
10. Mode switching
Reject a call
7
4
3
11
10
2
1
13
5
8
12
14
9
1
5
6

Page | 2
11. Auto Tuning Storage (ATS)
Select songs
Phone call recording
Clock adjustment
12. Speaker
13. Music mode: rewind (short press); reduce volume (long press)
Radio mode: auto-scan high-to-low frequency (short press);
reduce volume (long press)
14. Radio mode: switch stored radio stations (short press).
Music mode: play and pause.
Accept incoming phone calls (short press).
Long press: turn off the device.
15. Music mode: forward (short press); increase volume (long press)
Radio mode: auto-scan low-to-high frequency (short press);
increase volume (long press)
16. Power switch
17.
Battery compartment
1
6
1
7

Page | 3
Battery Power Supply
For the power supply, please use a lithium battery that is proven
appropriate by DEGEN. If you are using other unqualified batteries,
this may cause voltage instability. Although the radio works properly,
it may increase the risk of fire or explosion. When the battery’s
operating time is shortened or the battery expands or is deformed,
replace the battery with a new one immediately.
(I) INSTALLING THE BATTERY
1. Turn off the device and open the battery cover.
2. Install the provided lithium battery according to the battery’s
polarity.
3. Close the battery cover.
(II) BATTERY CONSUMPTION INDICATOR
1. Full
2. Reduced power (indicator does not flash)
3. Low power, please charge (indicator flashes)
1 2 3

Page | 4
(III) CHARGING THE LITHIUM BATTERY
To charge the battery using an external adapter, connect the device
through the mini-USB port to a power source (5V DC/≥500mA, not
provided). While charging, the battery symbol shown on the display
moves from right to left, and stops when the battery is fully charged.
A computer with a USB jack can also be used as a power source to
charge the battery. After installing the lithium battery, connect the
device to a computer with the provided USB cable.
NOTE:
-When using the battery for the first time, please charge it
continuously for more than 6 hours, but not more than 12 hours.
After charging the battery for the first time, you can fully charge
it within 3-5 hours.
-When not using the device for a long time, please remove the
battery.
-AC current can interfere with the reception of radio signals; do
not charge the battery while listening to radio.
-The power adapter, as well as connecting with a computer, can
only charge the lithium battery. It cannot replace the battery as
a power source for playing audio or listening to radio; the
battery needs to be inserted into the device.
-When charging the battery through a computer, we recommend
using the provided USB cable; otherwise it may affect the
charging time and performance of the battery.

Page | 5
How to Operate the Buttons
The device is operated by three operating keystrokes: short press,
long press, and press & hold. Unless specified differently, all
keystrokes mentioned in this manual are “short press”.
-Short press: press the button to take effect immediately.
-Long press: press & hold for 1-2 seconds.
-Press and hold: press & hold until action commences.

Page | 6
Turn On/Off the Device
(1) While the < ON/OFF > switch is in the "OFF" position, the device is
turned off. To turn on the device, push the switch into the "ON"
position. The Bluetooth mode is automatically turned on. The device
can also be turned off by long pressing the < > button.
(2) When the <ON/OFF> switch is in the "ON" position, but the device
is turned off, long pressing the < > button can turn on the device
again. The display indicates "OPEN" and the voice prompt mentions
“Bluetooth mode"; the Bluetooth mode is turned on automatically.
As shown on the picture, the four-line indicator flashes on the display
to indicate that the device is available for pairing with another
(compatible) device.
Page | 7
Switching Modes / Bluetooth Mode
SWITCHING MODES
While the device is turned on, press < > to switch to another
mode.
The voice prompts indicate the change of mode:
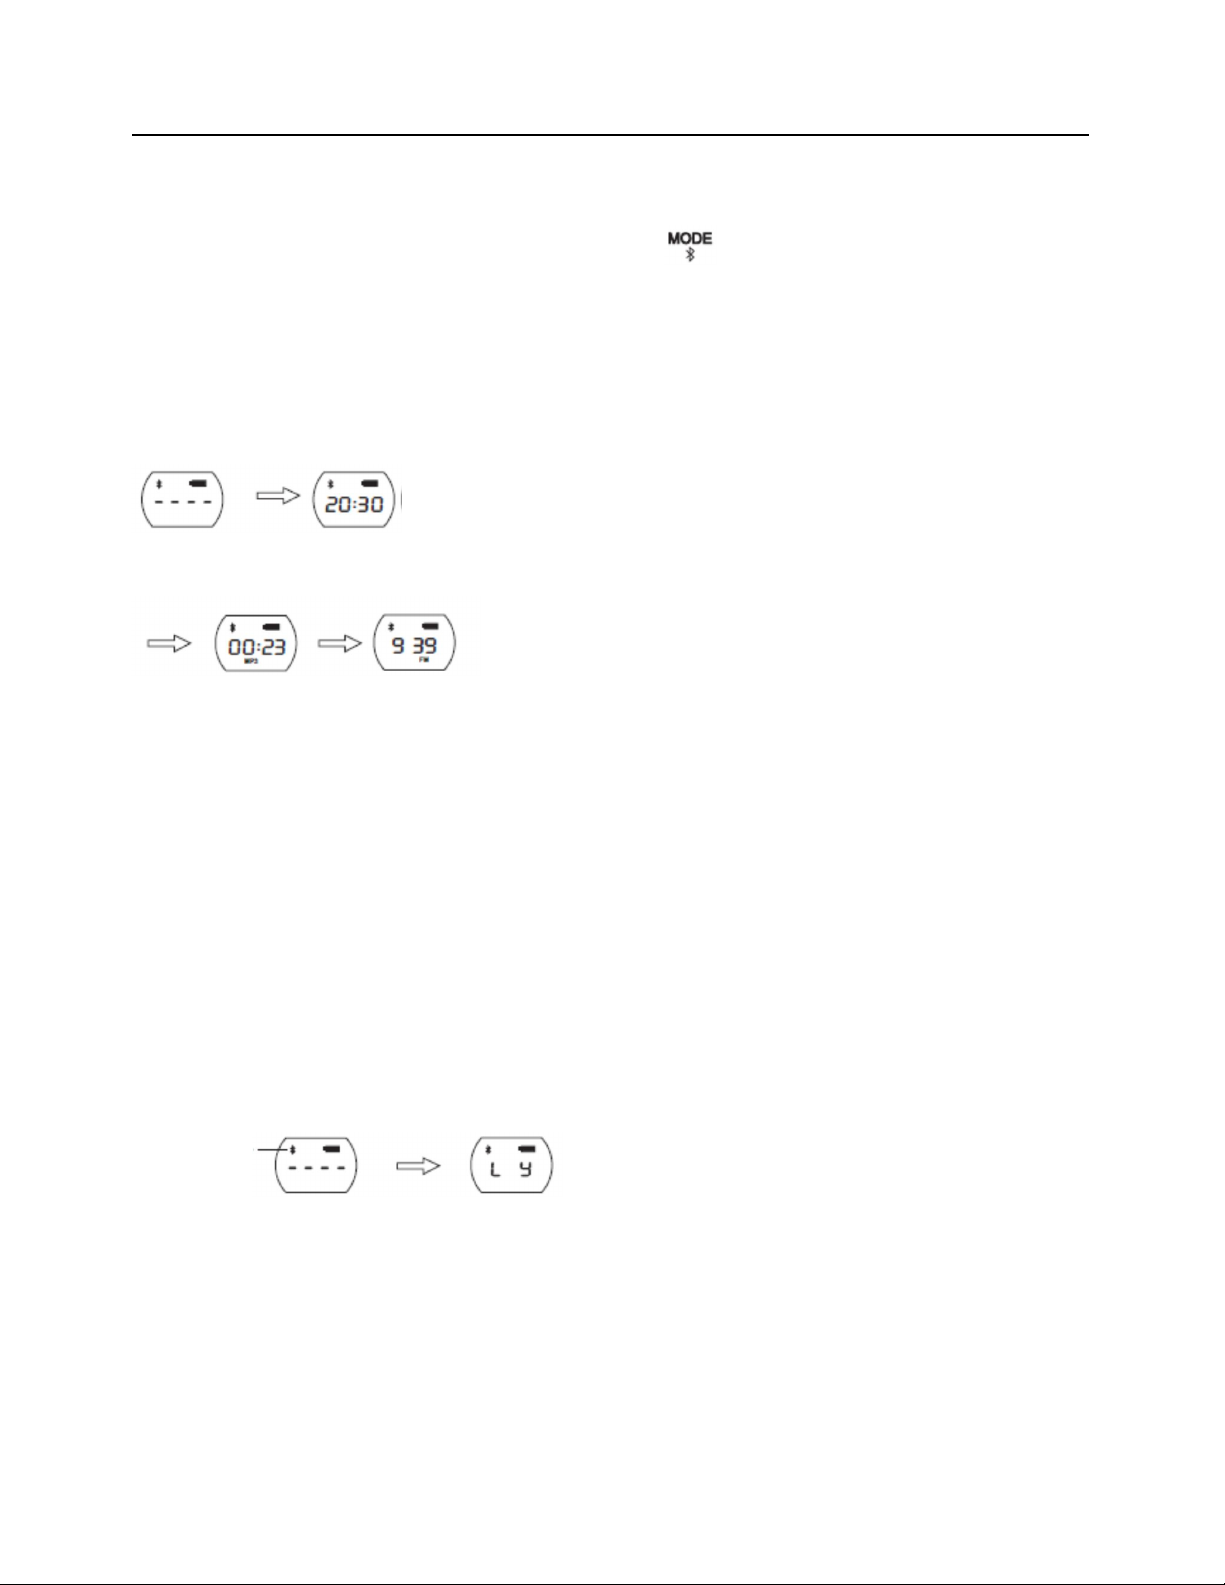
Bluetooth mode Time mode
Music mode Radio mode
BLUETOOTH MODE
(I) Pairing a mobile device through a Bluetooth connection.
1. Select the Bluetooth mode. The device is now ready to pair with
another Bluetooth device.
Bluetooth symbol
waiting for a connection connected
When there is no Bluetooth connection, the four lines in the middle
of the display are flashing. When a connection has been made, the
lines disappear and “L Y”is shown on the display.

Page | 8
2. Turn on the Bluetooth of your (mobile) device.
3. Search for the Bluetooth device called DE660.
4. Select the DE660 device and pair with it. If prompted to fill in a
password, please enter “0000”.
5. When the pairing is complete, the display of DE660 will show “L Y”.
The device can now be used for incoming/outgoing phone calls or
listening to audio files on your mobile device.
NOTE:
-DE660 can only connect to one other device at a time.
-The method of pairing and connecting by Bluetooth differs per
mobile device. Most devices will connect automatically after
pairing.
-If the connection is unsuccessful, there may be a glitch in the
mobile application. Please restart your mobile device, and retry
the pairing procedure.
(II) Answering incoming calls via Bluetooth
After successfully pairing your mobile phone through Bluetooth, you
can use DE660 to answer incoming calls.
1. To answer an incoming phone call, short press < >. To refuse,
long press < >. After finishing a phone call, press < > to
hang up.
2. When an incoming call is received, "PH" is shown on the display.
If “PH”is not shown, you cannot use the device, but have to
answer the call with your phone. It may take some time before

Page | 9
“PH”is shown on the display, which varies according to phone
and Bluetooth connection.
NOTE:
-While charging the battery, or when the battery power is low,
the Bluetooth connection may not be stable. In this case, the
Bluetooth Call function may not work properly.
-Incoming calls can also be answered in Time mode, Music mode,
Radio mode, and while playing audio via a Bluetooth connection.
(III) Call Recording
After answering an incoming call, press < > to start the recording.
Press again to end the recording and save it to the USB flash disk or
Micro-SD card.
NOTE:
To record an incoming call, you must first correctly insert a USB flash
disk or Micro-SD card.
(IV) Bluetooth audio playback
After successfully connecting to a mobile device, the audio files
become available for listening through this device.

Page | 10
NOTE:
-Make sure that the audio function of your mobile device is
activated.
-This Bluetooth speaker has to be in Bluetooth mode in order to
listen to audio files on your mobile device.
-In Radio mode, press < > to switch to Bluetooth mode.
-If not using the Bluetooth function, it is recommended to
disconnect the Bluetooth connection and turn off the mobile
phone’s Bluetooth function.
Page | 11
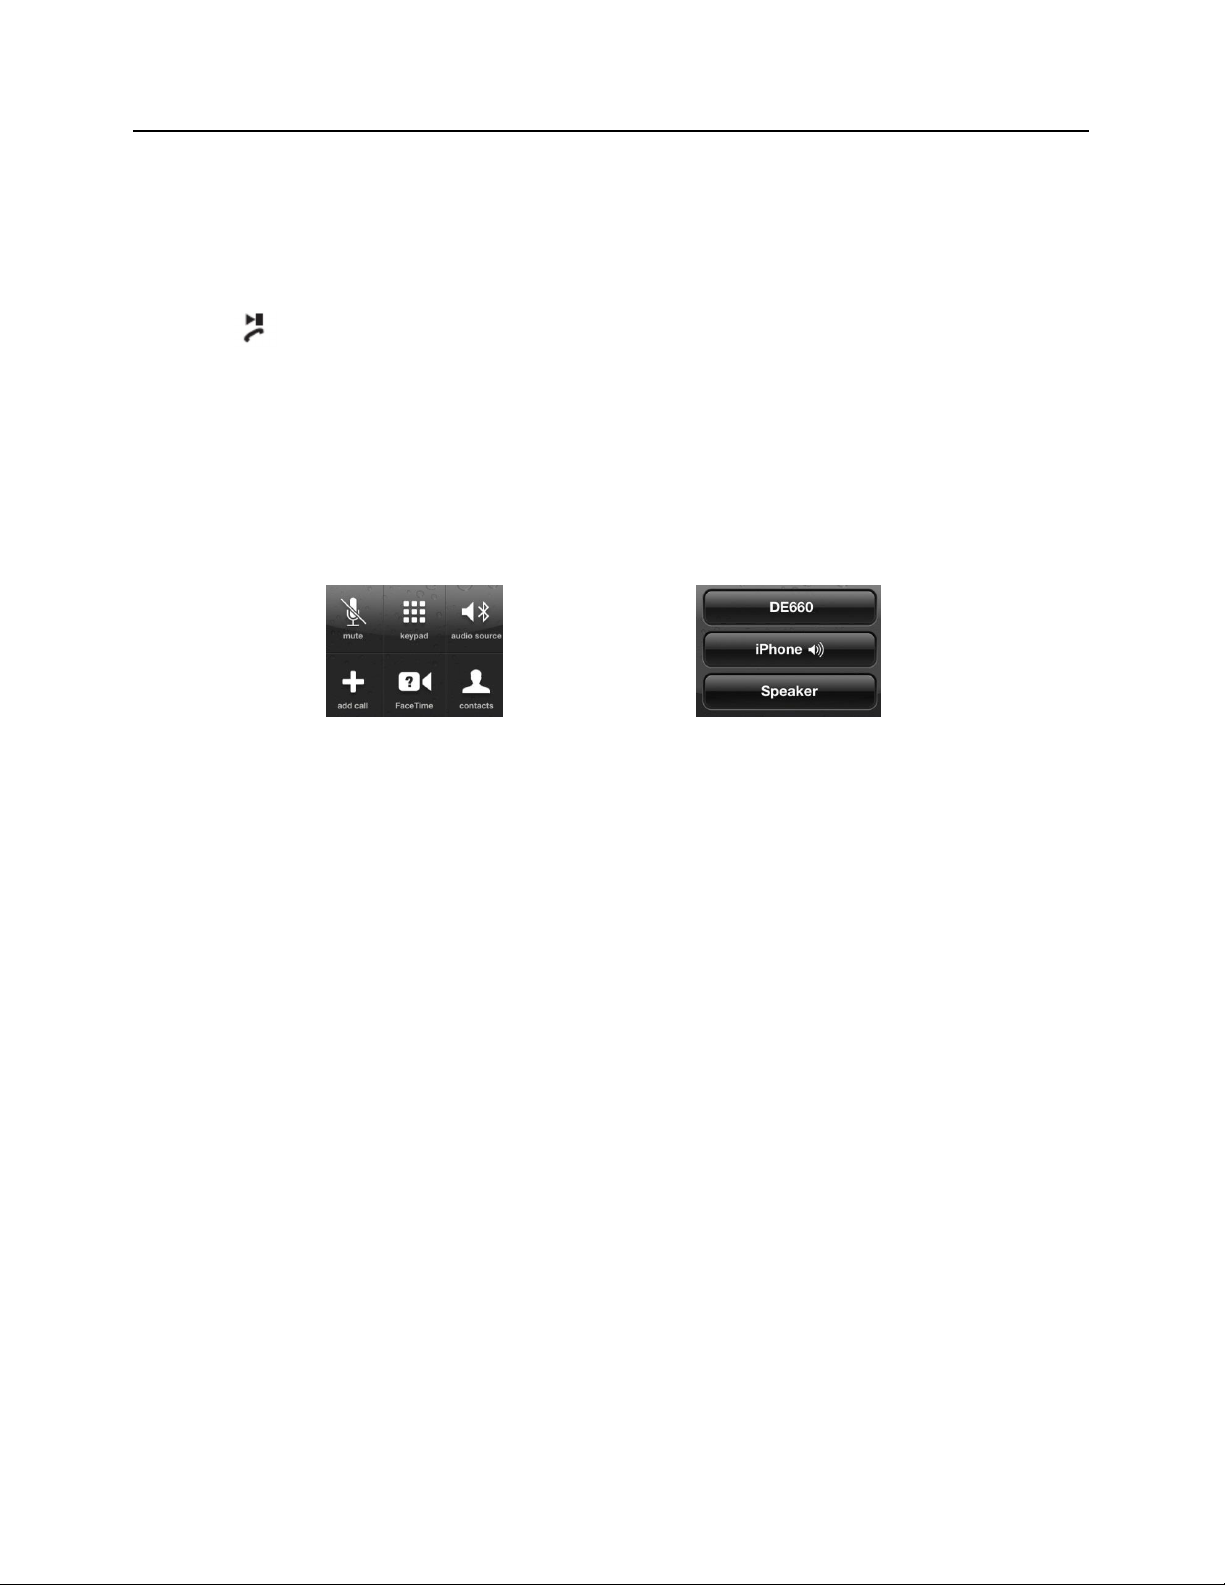
Bluetooth Function: Reminder
-Using this device as a handsfree speaker may work differently
according to the phone type and brand used. When receiving a
call on an iPhone, and when you answer the call by pressing the
< > button, the device will function as a handsfree speaker.
However, when answering the call through the iPhone, the
device may not immediately work as a handsfree speaker. In this
case, after answering the call, you need to enter the “audio
source”menu on your iPhone and select DE660.
Audio source selection Audio source menu
-Although this device uses the best functioning original American
CSR chip, this cannot guarantee that it is compatible with all
mobile devices. In some cases this will be the result of
incompatible Bluetooth communication protocols.

Page | 12
Time Mode
Press < > to select the Time mode:
Time mode:
Hour Minute
In Time mode, press < > to enter the time setting. Move the
cursor by pressing < >. Press the < > or < > to set the
number. After completing the time setting, short press < > to
save.
NOTE:
-When the time is set, the cursor must be placed back to the
minute’s position again. Press < > to return to the time
display mode and effectively save the time setting.
-When the battery is exhausted, or when replacing the battery
takes more than 15 seconds, the time setting is lost. You will
need to re-set the time again.

Page | 13
Music Mode
I. Playing audio files
Turn on the device after correctly inserting the Micro-SD card or USB
flash disk containing your MP3/WAV audio files. Press < > to
select Music mode; the device automatically plays the audio files and
displays the playback progress.
Music mode:
Playback progress: minutes and seconds
1. Pause: while playing in Music mode, press < > to pause. The
display shows the current track number.
2. When paused, press < > to play.
3. Press < > to play previous file; press < > to play next file.
4. While paused, short press < > or < > to go to the
previous/next track. Long press to go to the previous/next folder.
5. Long Press < > to increase the volume; Long press < > to
reduce the volume.
NOTE:
If there is a Micro-SD card as well as an USB flash disk inserted: the
device plays all the audio files on the Micro-SD card first, before
playing the audio files on the USB flash disk.

Page | 14
II. SONG SELECTION
In Music mode, while playing audio, press < > to enter the song
selection menu. Short press < > or < > to change track
number. Press < > to change digit location. Press < > to
confirm and play the selected song.
NOTE:
-If the entry number exceeds the number of songs on your
Micro-SD card or USB flash drive, song selection will not function.
-If you wish to select a song from a different folder, you first have
to pause the music playing mode.

Page | 15
Radio Mode
When turned on, press < > to select Radio mode. The "FM"
indicator is shown on the lower right corner of the display.
Radio mode:
Frequency display
FM indicator
(I) USING THE WHIP ANTENNA
While tuning into stations, extend the antenna according to signal
reception. You can enhance radio reception by adjusting the length
and direction of the antenna.
(II) AUTO-SCAN STATIONS
Press the < > or < > to start the auto-scan function. Scanning
for radio stations stops automatically when a station is found. Press
again to search for the next available station.

Page | 16
(III) AUTO TUNING STORAGE (ATS)
In Radio mode, long press < > to start the ATS function. All
available stations will be stored. The device can save up to 40 radio
stations. ATS will stop after searching all frequencies.
NOTE:
It is recommended not to listen to radio while connected to an
external power supply or computer, because this may cause
interference of the FM reception.

Page | 17
Active Speaker / Using the Anti-slip Mats
ACTIVE SPEAKER (LINE-IN)
This device has a line-in jack, enabling it to function as a speaker for
an external audio source (such as: laptop, recording pen, small audio
players, etc.). Connect one end of the audio cable to the external
audio source and another end to this device’s <LINE IN> jack. Turn on
the device. When properly connected, "LINE" shows on the display.
You can now press the play button on the external audio source.
USING ANTI-SLIP MATS
Accompanying this device are two non-slip mats, one large and one
small. The large anti-slip mat is designed for use within a vehicle; the
small mat for desktop use.
When using the large mat inside a vehicle, place the device onto the
anti-slip mat horizontally. Make sure the microphone is directed
towards you. This is better suited for the handsfree function.
When using the small mat on your desktop, the device can stand
vertically. In case the mat becomes dusty, you may use warm water
for cleaning. This will also improve the mat’s viscosity.
Table of contents


