DEKO LIVING COB10503 User manual
INSTRUCTION MANUAL
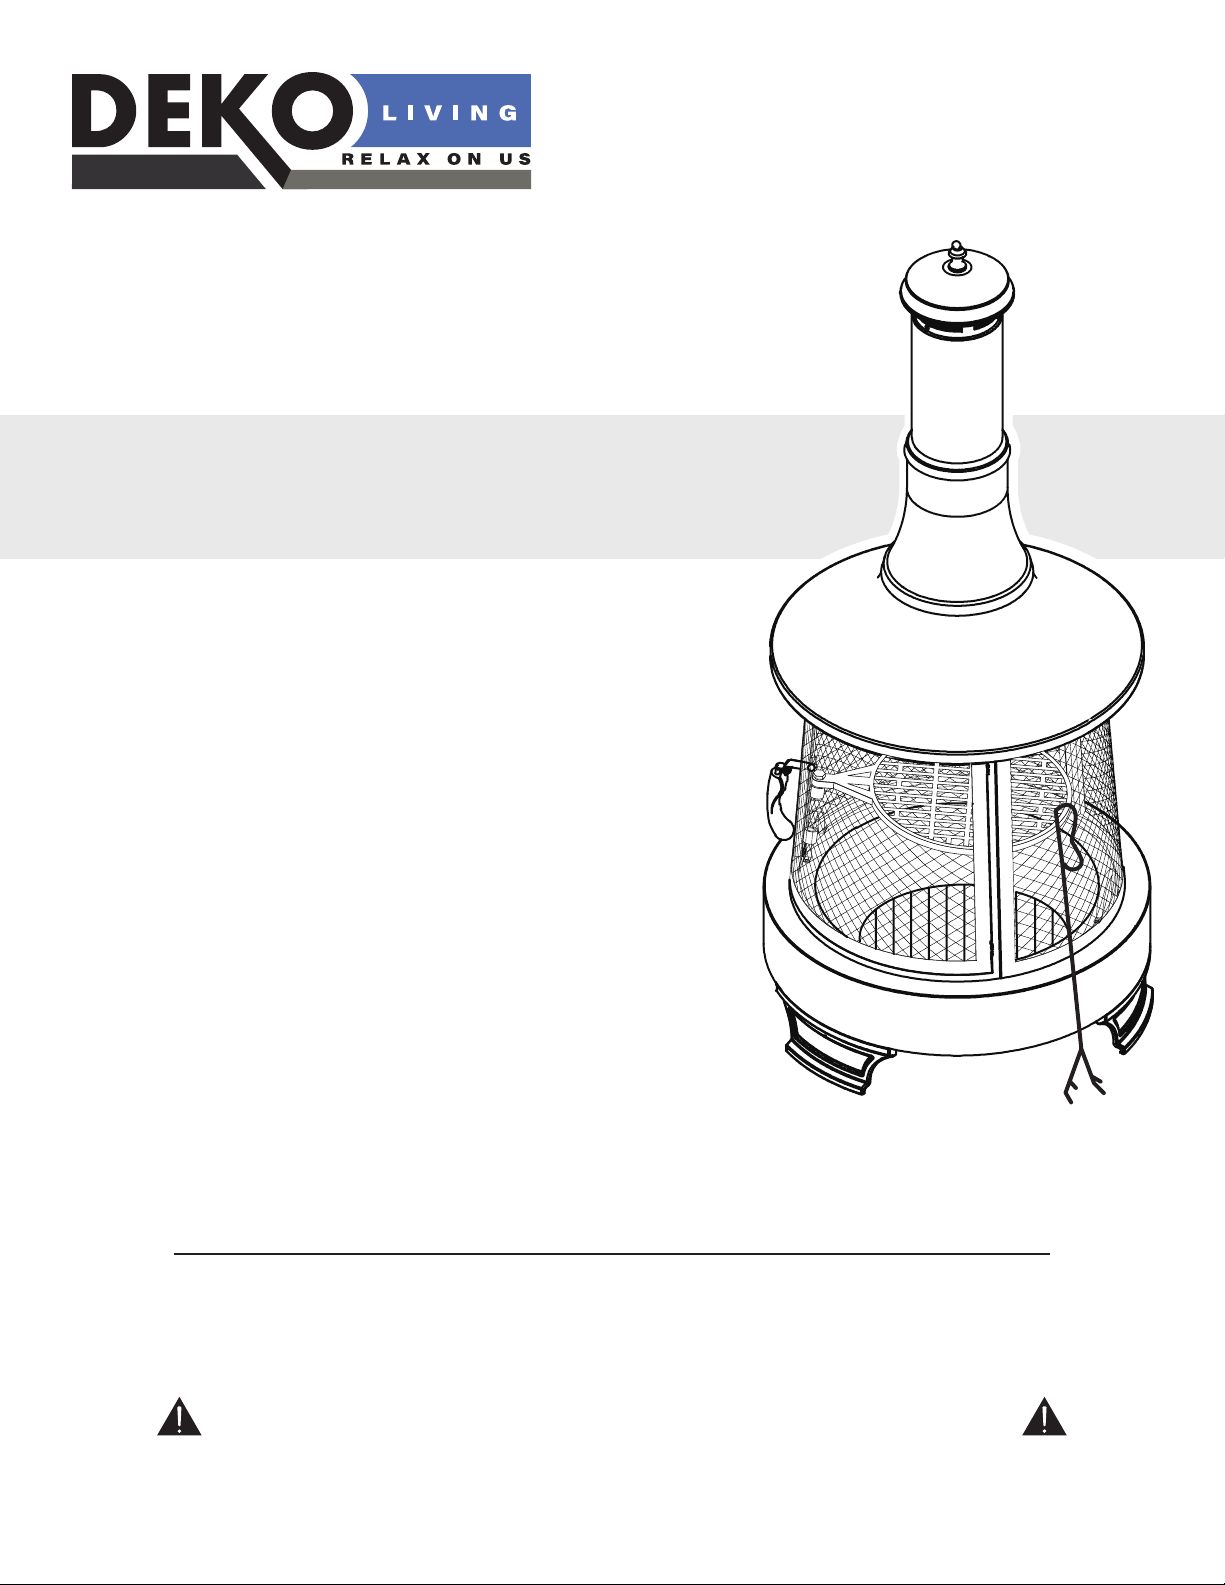
WOOD BURNING CHIMNEY FIRE PIT
MODEL NUMBER: COB10503
DO NOT RETURN THIS WOOD BURNING CHIMNEY FIRE PIT TO THE STORE
06/2023
IMPORTANT, RETAIN FOR FUTURE REFERENCE: READ CAREFULLY
Should you encounter problems after following all the steps herein contained please contact our
Customer Support: Call 1-866-231-8893 or email: info@ctm-inter.com.
Kindly provide the model #, place and date of purchase and a short description of the problem.
Thank you for purchasing your new
Wood Burning Chimney Fire Pit.
2
For Outdoor Use Only
(outside any enclosure)
WARNING
FOR YOUR SAFETY
WARNING
FOR YOUR SAFETY
1) Improper installation, adjustment, alteration,
service or maintenance can cause injury or property
damage.
2) Read the installation, operation, and maintenance
instructions thoroughly before installing or servicing
this equipment.
3) Failure to follow these instructions could result
in re or explosion, which could cause property
damage, personal injury or death.
Installer: Leave these instructions with the
consumer.
Consumer: Keep these instructions for future
reference.
WARNING
FOR YOUR SAFETY
1. This appliance is for outdoor use only.
2. DO NOT use this outdoor re pit in a building, garage,
boats recreational vehicles, or any other enclosed area.
3. This outdoor re pit is not to be operated by children.
4. Always use in accordance with all applicable local, state
and national codes. Contact your local re department
for details on outdoor wood burning Fire Pit.
5. When using this outdoor re pit, exercise the same
precautions you would do with any open re.
6. The use of alcohol, prescription or non-prescription
drugs may impair the consumer’s ability to properly
assemble or safely operate this outdoor re pit.
7. DO NOT use this outdoor re pit without reading the
entire “Owner’s Manual” rst.
8. This outdoor re pit is for use with dry, seasoned
hardwood. It will burn hotter, more completely and
create less smoke. DO NOT burn charcoal briquets ,
lump charcoal, manufactured logs, driftwood, trash,
leaves, paper, cardboard, painted or stained or
pressure treated wood. Avoid using soft wood such as
pine or cedar that can throw sparks.
9. DO NOT use this outdoor re pit until it is completely
assembled. DO NOT alter this re pit in any manner.
10. DO NOT use gasoline or other ammable vapors or
liquids in the vicinity of this or any other appliance.
11. DO NOT use this outdoor Fire pit near automobiles,
trucks, vans, recreational vehicles, electrical cords or
any other combustible objects.
12. Always use this outdoor re pit on a hard, level, non-
combustible surface.
13. The appliance must be inspected before each use.
Always empty the re pit before use. Leave a thin layer
of ash (1/2” thick) to protect the bottom of the re bowl.
14. The safeguard spark screen must be used while
burning.
15. DO NOT use in windy conditions.
16. DO NOT wear ammable or loose clothing when this
outdoor re pit.
17. DO NOT use gasoline, kerosene, diesel fuel, lighter
uid or alcohol to light or relight res.
18. Children and adults should be alerted the hazards of
high surface temperatures and keep a safe distance to
avoid burns or clothing.
19. DO NOT touch any part of the appliance until it is
completely cooled down. Never touch the ashes to see
if they are hot.
20. Use long, sturdy re pit tools to add or move logs,
including to take away the safeguard spark screen and
replace it.
21. Never leave a lit re pit unattended.
22. Children should be carefully supervised where they are
anywhere near the Fire pit.
23. Clothing or other ammable materials should NOT
be hung from the appliance, or place on or near the
appliance.
24. DO NOT attempt to move or store this outdoor re pit
until the appliance is completely cooled down.
25. DO NOT move ashes until they are completely and fully
extinguished.
26. DO NOT add additional rewood until the re burns
down.
27. Burning must be inside the metal bowl.
28. DO NOT put any hot part of the re pit onto combustible
surfaces such as grass, wooden deck or furniture.
29. All above must be exactly followed.
LIMITED WARRANTY
This product has a 1 year Limited Warranty. This warranty is limited to the replacement of defective
parts only. Labor charges and/or damage incurred during installation, repair, replacement as well as
incidental and consequential damages connected with the above are excluded. Any damage to this
product as a result of neglect, misuse, accident, improper installation or use other than the purpose
SHALL VOID THIS WARRANTY.
3
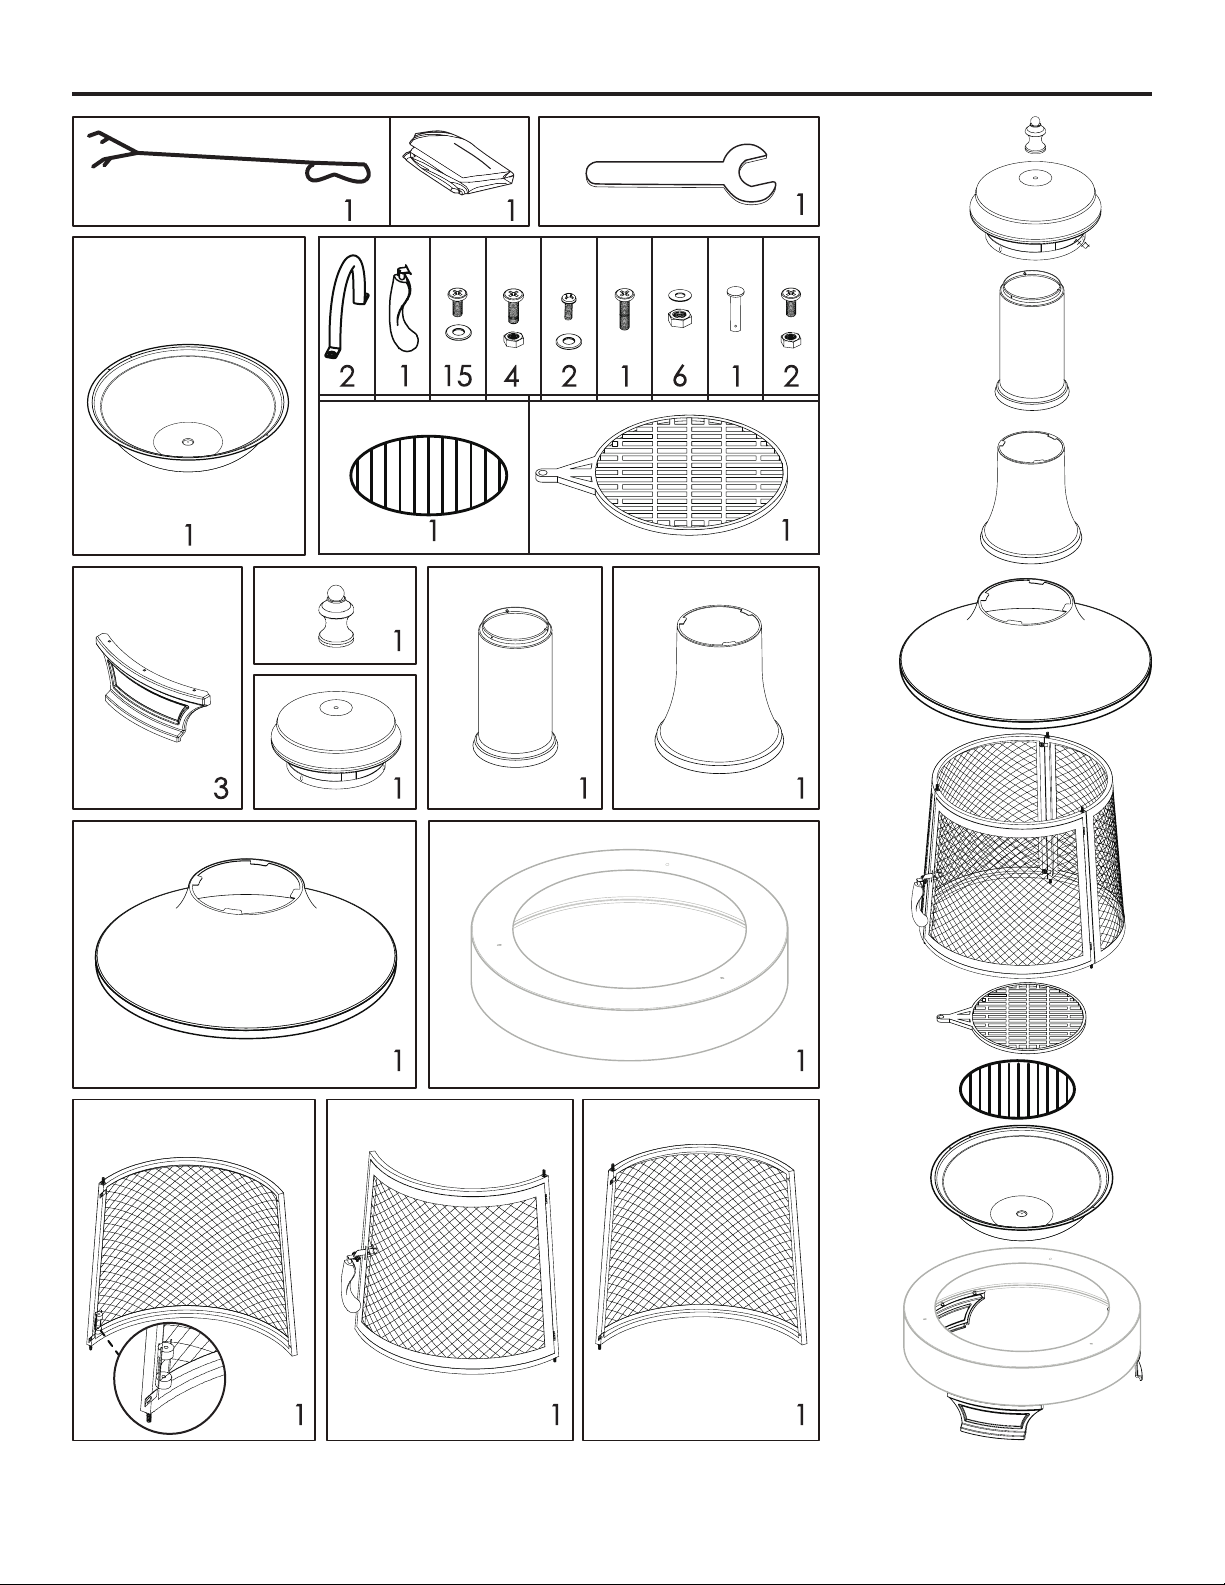
List Of Parts
Carefully check all packaging materials before discarding. DO NOT assemble if there are missing pieces.
A B E F GC D
4
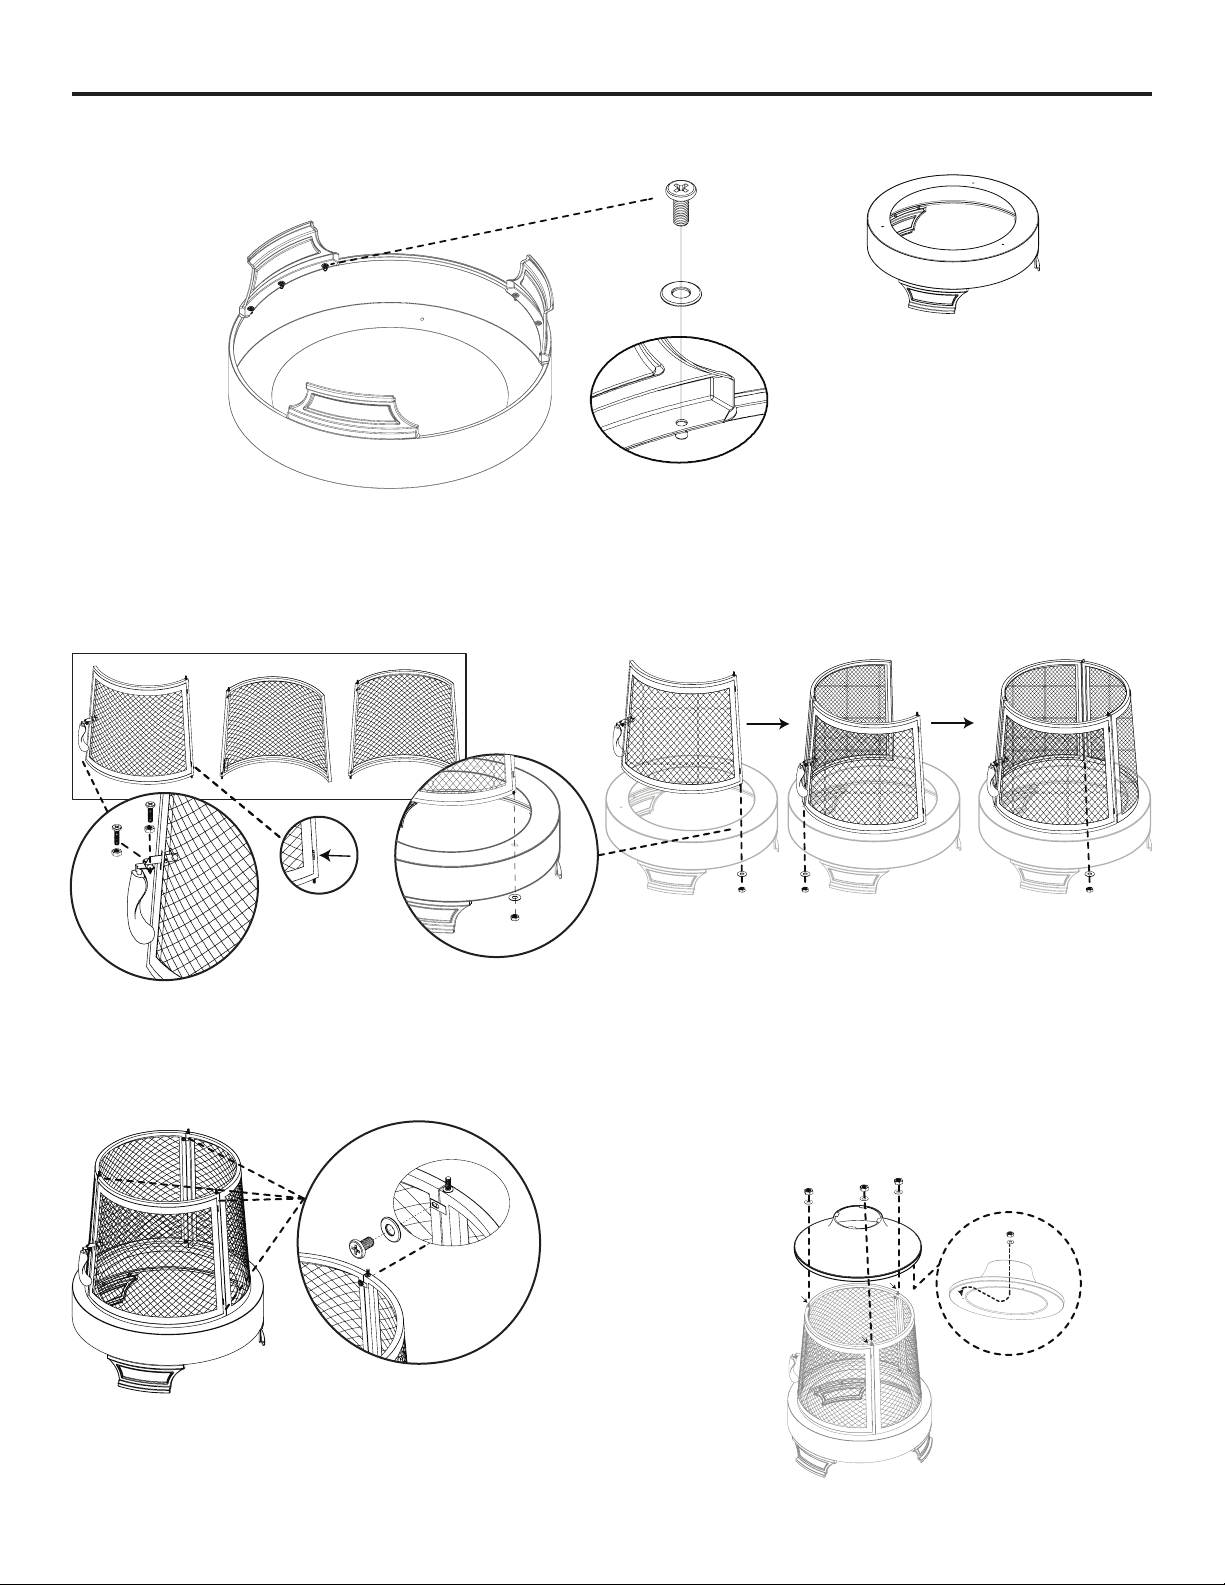
Assembly Instructions
1- Lay the base upside down and connect the feet using 3 screws on each foot.
ATOP
BOTTOM
2- Turn the base over and assemble the upper mesh screens onto the base. Each screen has a
screw that goes in the hole in the base with 2 tabs to connect to the adjacent screen using screws.
The screens can start in any hole, but it is easiest to start with the screen that has the hinge for the
door rst and install the frame with the door last.
1 2 3
EE
1
2
E
3
3- Fasten the screens together with the screws
and washers, be sure to get the top and the
bottom.
A
4- Connect the top heat and smoke shield to
the body. Be careful to not damage the threads
of the bolts when installing. There are three
mounting points. Reach down through the top
and use as washer and nut on each screw to
fasten. EE
E
E
E
G
G
5
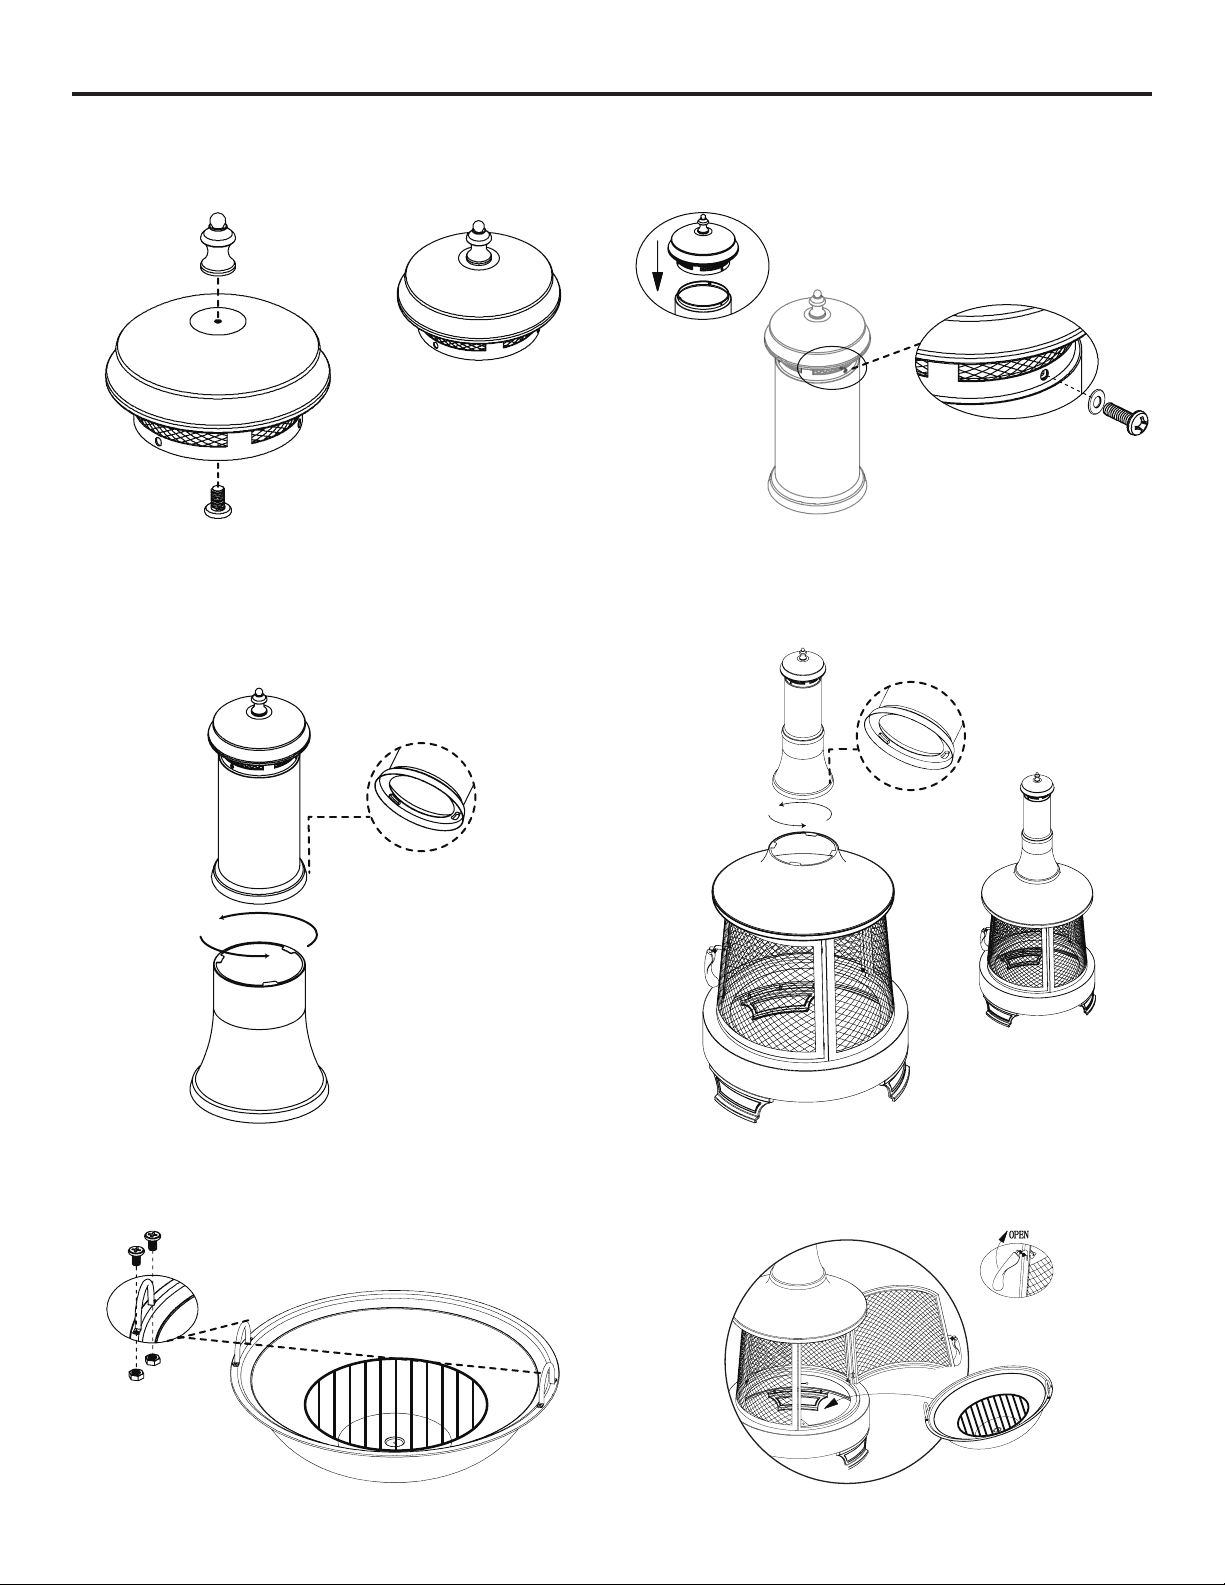
Assembly Instructions (continued)
5- Fasten the decorative cap nial to the cap
using a screw.
6- Mount the spark screen to the upper section
of the smokestack using 2 small screws with
washers.
7 - Assemble the smokestack. Be sure that
all 3 tabs of the upper section lock in place
with the lower section. Be sure to twist
counterclockwise and twist until it locks
securely.
Assemble
D
C
9- Assemble the handles to the bowl using 4
screws, washers and nut sets.
8 - Mount the smokestack to the upper heat and
smoke shield. Fit down snug then slowly twist
counterclockwise until all 4 tabs lock securely in
place.
10- Put the re bowl in place then put the wood
grid into the bowl.
B
Assemble
6
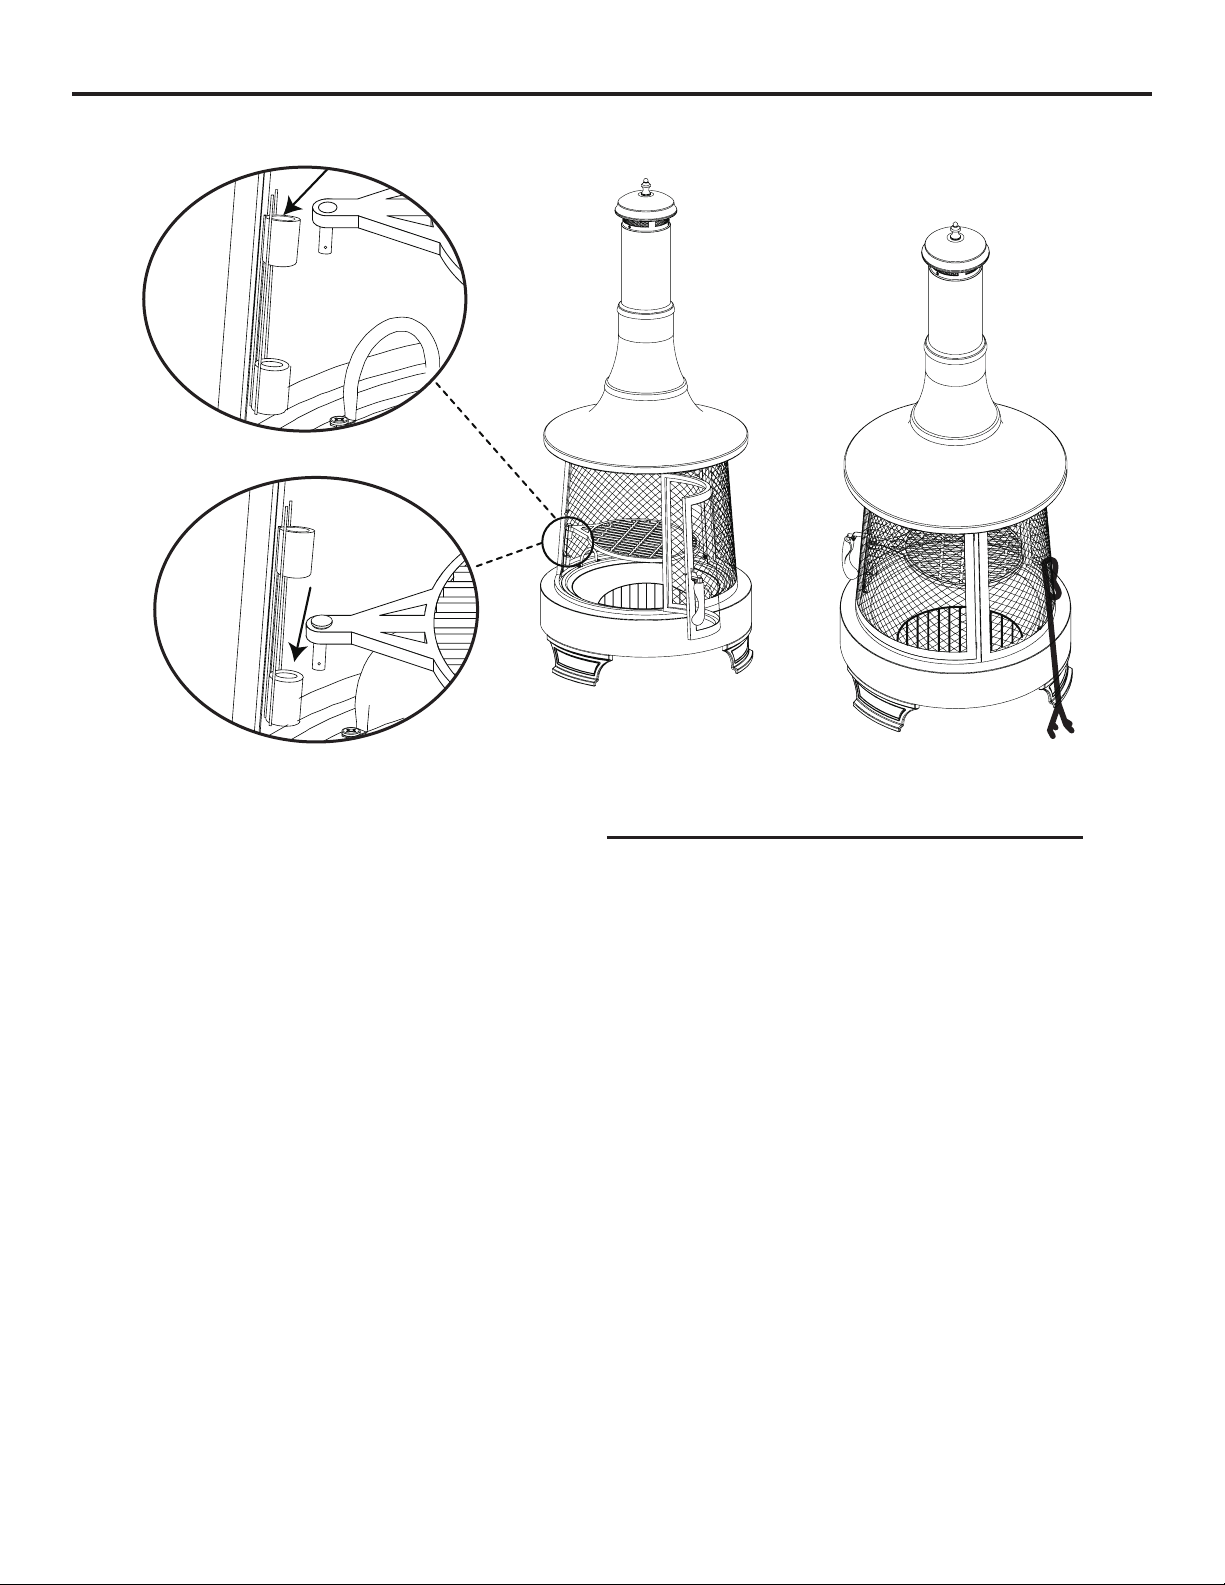
11- Put the cast cooking grill onto the upper or lower section using the bolt and nut. On the top
position the bolt goes down from the top. For the lower section the bolt goes in from the bottom.
Or
*** Be sure to use all safety precautions and keep children away from all hot surfaces.
Assembly Instructions (continued)
F
7
Operating Instructions
WARNING
FOR YOUR SAFETY
Before using this outdoor re pit, make sure you
have read, understood and are following all
information provided on page 1 of this manual.
Failure to follow those instructions can cause
death, serious injury or property damage.
Lighting:
1. Make sure there is only a small amount of ash
(1/2” thick) at the bottom of the metal bowl.
2. Place a layer of dry kindling or a natural restarter
onto the center of the log rack.
3. Place above that layer the dry seasoned hardwood
that is cut to lengths no more than 12”.
4. Use a match to light kindling or restarter.
5. Replace the safeguard spark screen when the
kindling or restarter is lit.
Tending the Fire:
You may need to shift and/or add logs for an ideal
experience.
Reminders:
• Always wear protective gloves
• Wait until glowing woodhas developed before
adding any additional wood.
• DO NOT add gasoline, kerosene, diesel fuel, lighter
uid or alcohol to relight or enhance an existing re.
1. Use a long handled re pit tool to carefully take
away the spark screen.
2. Use the long handled re pit tool to shift the logs to
allow additional airow.
3. If additional wood is required, place wood on top of
the burning log. Be careful not to shift ashes.
4. Replace the safeguard spark screen.
Extinguishing
1. Allow re to burn itself out.
2. DO NOT use water to extinguish as this is
dangerous and can cause damage to this outdoor
re pit.
Inspecting:
This outdoor re pit should be inspected on a regular
basis to ensure product safety and longer product life.
Check all parts to make sure they are secure.
Cleaning:
This outdoor re pit should be cleaned on a regular
basis to promote safer experiences and longer product
life.
Note: After repeated use, discoloration of the nish may
occur.
Reminders:
• DO NOT attempt to clean this outdoor re pit until the
re is COMPLETELY out.
• DO NOT use oven cleaner or abrasive cleaners as
they will damage this product.
• DO NOT clean any part of this outdoor re pit in a
self-cleaning oven as it may damage the nish.
• DO NOT use a vacuum cleaner.
Maintenance Instructions
1. Wipe exterior surfaces of the metal parts with a mild
dishwashing detergent or baking soda.
2. For stubborn surfaces on the metal parts, use a
citrus based degreaser and a nylon scrubbing brush.
3. Rinse clean the metal with water.
4. Use a soft dry brush to wipe away the dust from the re
pit body.
Storage:
Wait for the re pit to cool before covering with the
protective cover.
DO NOT move ore store this outdoor re pit unrill he
re is COMPLETELY OUT.
1. Once the re is out, logs are cold and outdoor re pit
is cool to the touch, remove ashes and properly
dispose.
2. Store assembled in a location away from children
and pets.
Note: If you do not use a cover, store this outdoor re pit
in a dry location free from rain.

Customer Support: Call 1-866-231-8893 or email: info@ctm-inter.com
ww.dekoliving.com
Table of contents
Other DEKO LIVING Outdoor Fireplace manuals


Popular Outdoor Fireplace manuals by other brands


PATIOJOY
PATIOJOY NP10607US manual

PEAKTOP
PEAKTOP HF11501AA-EU Use and care guide

The Haus Co.
The Haus Co. HEX WIDE BASE user manual

Superior Fireplaces
Superior Fireplaces VRE6036 Assembly, installation and operation instructions

Outdoor Escapes
Outdoor Escapes FPW-OE21039 Assembly, use and care manual

Solus
Solus HEMI 36 Installation and operation manual