Delabie SPEEDJET 2 User manual

RU
FR
PT
DE
EN
PL
NL
A
540
320
180
75
Sèche-mains automatique à air pulsé
Air pulse automatic hand dryer
Automatischer Luftstrom-Händetrockner
Automatyczna suszarka do rąk na intensywny wydmuch powietrza
Automatische handendroger met verwarmde lucht
Secador de mãos automático de ar comprimido
Автоматический сушитель для рук с пульсирующим потоком воздуха
SPEEDJET 2 NT 510623
Indice 0
540
320
180
75
CB
+
-+
-

7
236
118
A
F1
E
Ø 7
D
GF2
H I
/
Ø 7

FONCTIONNEMENT
• Le sèche-mains est livré en position « ON ».
• Mise en marche de l’appareil après quelques secondes (réalisation d’un test
interne pour bon fonctionnement).
• Insérer complètement les mains dans la fente : mise en marche automatique
après détection des mains par l’un des capteurs (fig. A).
• En fonctionnement, un décompte des secondes se fait sous forme
de barres (fig. B). La lumière LED rouge s’allume.
• Arrêt automatique au retrait des mains ou après 12 secondes de séchage.
Arrêt automatique si utilisation en continu supérieure à 30 secondes.
La lumière LED bleue s’allume.
• Le sèche-mains est équipé d’un système d’évaporation qui détecte
la présence d’eau et active une résistance l’évaporant.
CARACTÉRISTIQUES TECHNIQUES
• Faible consommation d’énergie : puissance 1 050 W en mode sans chauffage,
1 550 W en mode chauffage.
• 230 V~ / 50 Hz.
• Débit d’air : 61 l/s. Vitesse air : 540 km/h.
• Niveau sonore : 66 dBA.
• Classe II, IP21.
• La sensibilité des capteurs peut être ajustée en réglant les potentiomètres
situés à l’intérieur du sèche-mains (fig. C).
INSTALLATION ET RACCORDEMENT ÉLECTRIQUE
Le raccordement électrique s’effectue avant la fixation du sèche-mains au mur.
• Mettre le produit hors tension avant toute utilisation.
• Retirer le couvercle (fig. D), passer le câble d’alimentation secteur type
H05RNF2 Ø 1,5 mm (non fourni) par le trou (fig. E) et le visser à la fiche
de connexion.
• Visser la pièce de maintien du câble pour éviter l’arrachement dû à la traction.
• L’installation doit être conforme aux normes en vigueur dans le pays
(en France NF C 15100).
Hauteur de pose recommandée (distance entre le sol et le haut de l’appareil) :
A = 95 cm pour les adultes, 85 cm pour les enfants et les personnes
handicapées (fig. F1).
• Percer le mur avant d’installer la plaque support. Fixer la plaque au mur
avec les vis et chevilles fournies (fig. F2). Si besoin, adapter le choix des vis
et chevilles en fonction du matériau du mur.
• Accrocher le sèche-mains sur la plaque (fig. G), retirer le filtre puis installer
les 2 vis sur la partie inférieure, puis remettre le filtre.
• Pour mettre en mode ON / OFF, dévisser les vis ades 2 côtés du sèche-mains
et repositionner le couvercle (fig. H).
• Mettre le produit en marche en le connectant au réseau électrique.
RAPPEL
• Nos produits doivent être installés par des installateurs professionnels
en respectant les réglementations en vigueur, les prescriptions des bureaux
d’études et règles de l’art.
• Éviter les éclaboussures à l’intérieur du mécanisme du sèche-mains.
• Ne pas secouer le sèche-mains.
• En cas de dysfonctionnement, mettre immédiatement le sèche-mains hors
tension et contacter notre service après-vente.
• Ne pas installer le sèche-mains en extérieur ni sur une surface inflammable.
RÉGLAGE
Si lors de la mise en marche du sèche-mains, une détection inadéquate
des mains par les capteurs est observée, il est possible de les régler :
- retirer le couvercle et les vis des 2 côtés du sèche-mains a (fig. H);
- faire glisser le couvercle vers le haut pour l’extraire (fig. H);
- régler la sensibilité des capteurs à l’aide du/des potentiomètre(s) et
en le(s) tournant dans le sens horaire ou anti-horaire selon l’effet désiré (fig. C).
MAINTENANCE FIG. B
Le sèche-mains est équipé d’alarmes pour avertir des éventuelles maintenances
à réaliser :
+ 1 : le filtre HEPA est saturé. Changez le en retirant le couvercle de fixation
du filtre maintenu par 2 vis (fig. I).
+ 2 fixe : la température est trop élevée bloquant automatiquement
le système d’évaporation. Contacter notre service après-vente.
+ 2 intermittent + 4 fixe : le système d’évaporation ne parvient pas
à se refroidir correctement. Contacter notre service après-vente.
+ 2 intermittent + 4 intermittent : un problème de chauffage perturbe le bon
fonctionnement du système d’évaporation. Contacternotre service après-vente.
+ 4 intermittent : le système d’évaporation fonctionne depuis 5 heures.
+ 3 : les charbons du moteur sont en fin de vie et doivent être changés.
Une fois la maintenance effectuée, réinitialiser le compteur du moteur afin
de connaître la date de modification des charbons. Appuyer sur le bouton
de réinitialisation .
Un objet empêche le sèche-mains de s’arrêter et ce, pendant plus de
30 secondes. Le sèche-mains s’arrête automatiquement.
Une fois l’objet retiré, le fonctionnement se réinitialise automatiquement.
Élimination automatique de l’eau résiduelle des mains par évaporation
et stérilisation : système évitant d’avoir à vider un bac récupérateur d’eau
ou la présence d’écoulement sur le mur ou le sol.
ENTRETIEN ET NETTOYAGE
Le sèche-mains est équipé d’alarmes pour avertir des éventuels besoins
d’entretien à réaliser.
• Nettoyer régulièrement à l’aide d’un chiffon doux humide.
Ne jamais utiliser d’abrasifs, de poudre à récurer ou tout autre produit à base
de chlore, d’acide ou d’alcool.
• Nettoyer régulièrement le verre des capteurs infrarouge.
• S’assurer que la canalisation est propre et non obstruée par une substance
ou une impureté.
• Maintenir la zone d’aspiration libre.
• Nettoyer régulièrement et entièrement la fente de passage des mains.
Produit conforme aux Directives Européennes en vigueur.
Service Après-Vente :
Tél.: + 33 (0)3 22 60 22 74 - e.mail : sav@delabie.fr
Notice disponible sur : www.delabie.fr
FR FR

OPERATION
• The hand dryer is supplied in the “ON” position.
• Device is activated after a few seconds (internal test of correct operation
is carried out).
• Insert hands completely in the opening: automatic activation following
detection of hands by sensors (fig. A).
• During operation a countdown of seconds, represented with bars, takes place
(fig. B). The red LED lights up.
• Stops automaticallywhen hands are removed or after 12 seconds of drying.
Stops automatically in the event of continued use longer than 30 seconds.
The blue LED lights up.
• The hand dryer is equipped with an evaporation system which detects
the presence of water and activates an element to evaporate it.
TECHNICAL FEATURES
• Low energy consumption: 1,050W in mode without heating,
1,550W with heating.
• 230V~ / 50Hz.
• Air flow rate: 61 l/s. Air speed: 540 km/h.
• Acoustic level: 66 dBA.
• Class II, IP21.
• The sensitivity of sensors can be adjusted by setting the potentiometers
situated inside the hand dryer (fig. C).
INSTALLATION AND ELECTRICAL CONNECTION
The electrical connection should be carried out before fixing the hand dryer
to the wall.
• Switch offthe product before using.
• Remove the cover (fig. D), pass the mains power supply cable like
H05RN - F2 Ø 1.5mm (not supplied) through the hole (fig. E) and screw
it to the connection lead.
• Fix the cable holding piece to prevent it coming off as a result of pulling.
• The installation must comply with the current regulations and guidelines
of the country of installation.
• Recommended installation height (distance between floor and top of device):
A - 95cm for adults, 85cm for children and disabled people (fig. F1).
• Drill the wall before installing the support plate. Fix the plate to the wall
with the rawl plugs provided (fig. F2). If necessary use different screws
and rawl plugs depending on the wall type.
• Attach the hand dryer to the wall plate (fig. G), remove the filter then fix
the 2 screws to the lower part and put the filter back.
• To put in ON/OFF mode, remove the screws afrom both sides
of the hand dryer and reposition the cover (fig. H).
• Activate the product by connecting it to the electrical network.
REMINDER
• Our products must be installed by professional installers in accordance
with current regulations and recommendations in your country, and the
specifications of the engineer.
• Avoid splashes inside the mechanism of the hand dryer.
• Do not shake the hand dryer.
• In the event of disfunction, immediately turn the hand dryer off and contact
our After Sales Support Team.
• Do not install the hand dryer outside or on a flammable surface.
SETTINGS
If when activating the hand dryer, the detection of hands is deemed to be
inadequate, it is possible to adjust:
- remove the cover and screws from both sides of the hand dryer a(fig. H);
- slide the cover upwards to remove it (fig. H);
- adjust the sensors’ sensitivity using the potentiometers and by turning
clockwise or anti-clockwise to reach the desired setting (fig. C).
MAINTENANCE FIG. B
The hand dryer is equipped with alarms for the notification of required
maintenance:
+1: the HEPA filter is full. Change it by removing the fixing cover of the filter
held by 2 screws (fig .I).
+2 fixed: the temperature is too high, automatically preventing the
evaporation system. Contact our After Sales Support Team.
+2 intermittent +4 fixed: the evaporation system is not able to cool down
correctly. Contact our After Sales Support Team.
+2 intermittent +4 intermittent: a heating problem hinders the correct
functioning of the evaporation system. Contact ourAfter Sales Support Team.
+4 intermittent: the evaporation system has been running for more
than 5 hours.
+3: the carbon from the motor is at the end of its life and must be changed.
Once the maintenance has been carried out, restart the motor counter in
order to knowthe date the carbon will need to be changed. Press the restart
button .
An object prevents the hand dryer from stopping for longer than 30 seconds.
The hand dryer stops automatically.
Once the object is removed, the operation will restart automatically.
Automatic elimination of residual water with evaporation and sterilisation: system
without the need for a water collection tank or water runoff on the floor or walls.
MAINTENANCE & CLEANING
The hand dryer is equipped with alarms for the notification of required servicing.
• Clean regularly using a soft damp cloth. Never use abrasives, scouring powder
or any other chlorine, acid or alcohol-based products.
• Clean the infrared sensors’ glass regularly.
• Ensure the channel is clean and not obstructed by any substances or impurities.
• Keep the suction area clear.
• Clean the opening for hands regularly and completely.
Product conforms to current European Directives.
After Sales Care Support:
The installation guide is available on: www.delabie.co.uk
The installation guide is available on: www.delabie.com
EN EN

FUNKTIONSWEISE
• Der Händetrockner wird im Modus « ON » geliefert.
• Das Gerät startet automatisch nach einigen Sekunden (Durchführung eines
internen Tests auf korrekte Funktionsweise).
• Die Hände vollständig in die Öffnung einführen: Gerät startet automatisch
nach Erfassung der Hände durch einen der Sensoren (Abb. A).
• Während des Betriebs werden die Sekunden heruntergezählt, dargestellt
in Form von Balken (Abb. B). Die rote LED leuchtet auf.
• Automatische Abschaltung nach Entfernen der Hände oder nach 12 Sekunden
Trocknungszeit. Automatische Abschaltung nach einer Laufzeit
von über 30 Sekunden. Die blaue LED leuchtet auf.
• Der Händetrockner ist mit einem Verdampfungssystem ausgestattet, welches
vorhandenes Wasser registriert und einen Heizwiderstand aktiviert, damit es
verdunstet.
TECHNISCHE DATEN
• Geringer Energieverbrauch: 1.050 W Leistung ohne Heizmodus,
1.550 W mit Heizmodus
• 230 V~ / 50 Hz
• Luftdurchsatz: 61 l/s, Luftgeschwindigkeit: 540 km/h
• Geräuschpegel: 66 dBA
• Schutzklasse II, IP21
• Die Empfindlichkeit der Sensoren kann über die Potentiometer im Inneren
des Händetrockners eingestellt werden (Abb. C).
INSTALLATION & ANSCHLUSS AN DIE STROMVERSORGUNG
Der Anschluss an die Stromversorgung erfolgt vor der Befestigung
des Händetrockners an der Wand.
• Stromversorgung des Produkts vor der Installation abschalten.
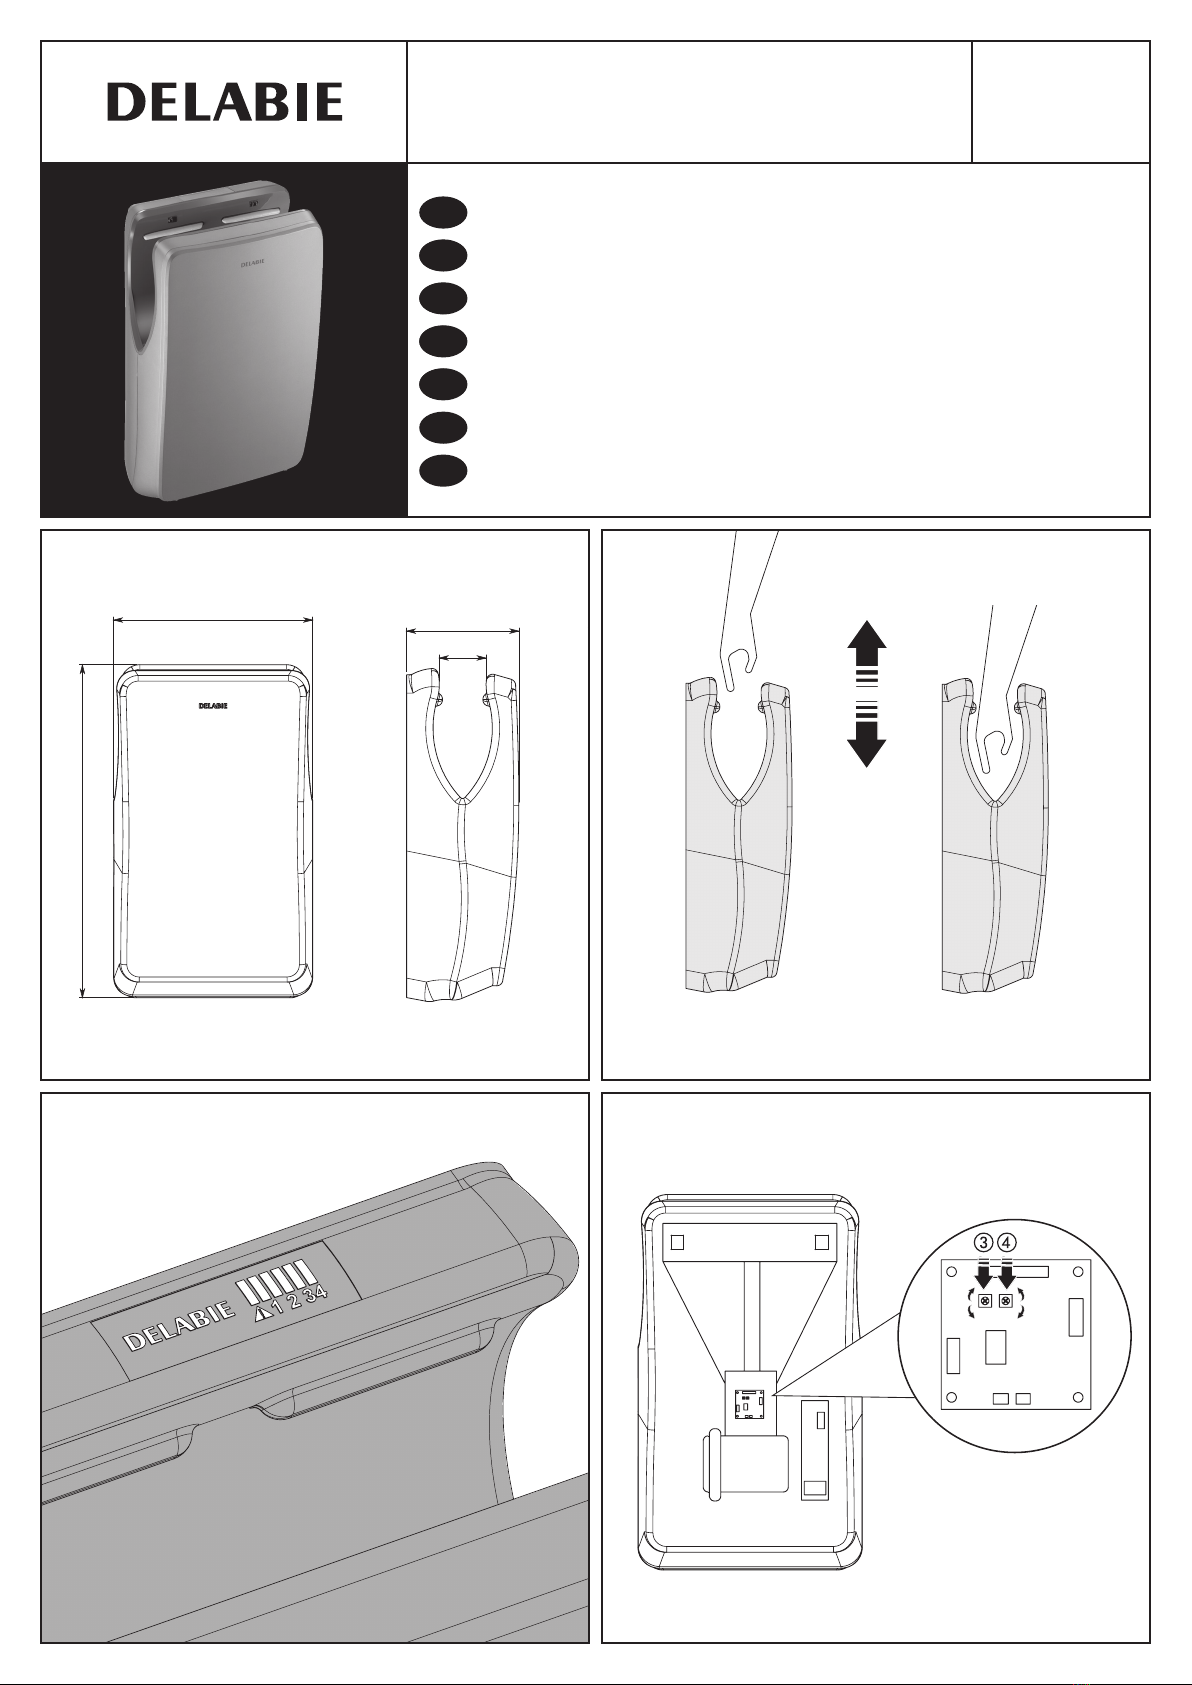
• Die Platte an der Rückseite (Abb. D) abnehmen, das Verbindungskabel
H05RNF2 Ø 1,5 mm (nicht im Lieferumfang) durch den Kabeleingang (Abb. E)
führen und in den Anschlussstecker einschrauben.
• Die Halterung des Kabels festschrauben, um zu verhindern, dass es durch
Ziehen herausgerissen wird.
• Die Installation muss den im jeweiligen Land gültigen Normen entsprechen (in
Frankreich NF C 15100). Empfohlene Befestigungshöhe (Abstand zwischen
Boden und Oberkante des Gerätes): A=95 cm für Erwachsene, 85 cm für
Kinder und bewegungseingeschränkte Menschen (Abb. F1).
• Ein Loch in die Wand bohren, um die Befestigungsplatte zu montieren.
Die Platte mittels der mitgelieferten Schrauben und Dübel an derWand
befestigen (Abb. F2). Gegebenenfalls andere Schrauben und Dübel wählen, je
nach vorhandener Wandart.
• Händetrockner auf der Platte befestigen (Abb. G), den Filter herausnehmen
und die beiden Schrauben an der Unterseite montieren, dann den Filter wieder
einsetzen.
• Um in den ON / OFF Modus zu wechseln, die Schrauben aauf beiden
Seiten des Händetrockners lösen und die Abdeckplatte wieder
aufsetzen (Abb. H).
• Das Produkt an die Stromleitung anschließen, um es in Betrieb zu nehmen.
HINWEIS
• Der Einbau muss von geschultem Fachpersonal unter Beachtung der
anerkannten Regeln der Technik vorgenommen werden.
• Kein Wasser in den Mechanismus des Händetrockners spritzen.
• Den Händetrockner nicht schütteln.
• Bei einer Funktionsstörung Stromversorgung des Händetrockners sofort
abschalten und den technischen Kundendienst kontaktieren.
• Der Händetrockner ist weder für den Außeneinsatz noch für die Montage
auf einer brennbaren Oberfläche vorgesehen.
EINSTELLUNG
Wenn die Hände beim Einschalten des Händetrockners nicht richtig durch
die Sensoren erfasst werden, können sie eingestellt werden:
- Die Abdeckplatte abnehmen und die Schrauben an den beiden Seiten
des Händetrockners lösen a(Abb. H);
- die Abdeckplatte nach oben schieben, um sie abzunehmen (Abb. H);
- die Empfindlichkeit der Sensoren anhand der Potentiometer und
einstellen: im oder gegen den Uhrzeigersinn drehen, je nach gewünschter
Wirkung (Abb. C).
WARTUNG ABB. B
Der Händetrockner ist mit Warnleuchten ausgestattet, um auf mögliche
Wartungsmaßnahmen hinzuweisen:
+ 1: Der HEPAFilter hat seine Aufnahmekapazität erreicht. Tauschen Sie ihn
aus, indem Sie die mit zwei Schrauben befestigte Filterabdeckung abnehmen
(Abb. I).
+ 2 leuchtet: Die Temperatur ist zu hoch, was automatisch das
Verdampfungssystem blockiert. Kontaktieren Sie unseren technischen
Kundendienst.
+ 2 blinkt + 4 leuchtet: Das Verdampfungssystem kühlt sich nicht richtig ab.
Kontaktieren Sie unseren technischen Kundendienst.
+ 2 blinkt + 4 blinkt: Ein Problem mit dem Heizelement stört die korrekte
Funktionsweise des Verdampfungssystems. Kontaktieren Sie unseren
technischen Kundendienst.
+ 4 blinkt: Das Verdampfungssystem ist seit 5 Stunden in Betrieb.
+ 3: Die Kohleelemente des Motors sind abgenutzt und müssen ausgetauscht
werden. Nachdem die Wartungsmaßnahme erfolgt ist, den Zähler des
Motors auf null zurücksetzen, um das Austauschdatum der Kohleelemente
nachvollziehen zu können. Die Reset-Taste drücken .
Ein Objekt hindert den Händetrockner seit über 30 Sekunden daran, sich
abzuschalten. Der Händetrockner schaltet sich automatisch ab.
Nachdem das Objekt entfernt wurde, beginnt das Gerät automatisch wieder zu
arbeiten.
Automatische Beseitigung des von den Händen tropfenden Wassers durch
Verdampfung und Sterilisieren: Kein Entleeren eines Wasserauffangbehälters
nötig, keine Wasserrückstände an Wand oder Boden.
INSTANDHALTUNG & REINIGUNG
Der Händetrockner ist mit Warnleuchten ausgestattet, um auf mögliche
Instandhaltungsmaßnahmen hinzuweisen.
• Regelmäßig mit einem weichen, feuchten Tuch reinigen. Niemals scheuernde,
chlor-, säure- oder alkoholhaltige Reinigungsprodukte verwenden.
• Regelmäßig das Gehäuse der Infrarot-Sensoren reinigen.
• Sicherstellen, dass die Kanalisation sauber und nicht durch Schadstoffe
oderVerunreinigungen verstopft ist.
• Die Ansaugzone freihalten.
• Regelmäßig und vollständig die Öffnung für die Hände reinigen.
Gerät entspricht den gültigen europäischen Normen und Richtlinien.
Technischer Kundendienst:
Anleitung verfügbar unter: www.delabie.de
DE DE

FUNKCJONOWANIE
• Suszarka jest dostarczana w pozycji ON.
• Uruchomienie się urządzenia po kilku sekundach (przeprowadzić test przed
oddaniem do użytkowania, aby sprawdzić poprawne funkcjonowanie).
• Włożyć całkowicie dłonie do otworu: automatyczne uruchomienie się suszarki
po wykryciu dłoni przez jeden z czujników (rys. A).
• Podczas pracy, liczba sekund jest odliczana w postaci pionowych kresek
(rys. B). Zapala się czerwona dioda LED.
• Automatyczne zatrzymanie po wyciągnięciu dłoni lub po 12 sekundach
suszenia. Automatyczne zatrzymanie w przypadku ciągłego użycia przez
ponad 30 sekund. Zapala się niebieska dioda LED.
• Suszarka do rąk jest wyposażona w system odparowywania, który wykrywa
obecność wody i aktywuje rezystor odparowujący wodę.
OPIS TECHNICZNY
• Niskie zużycie energii: moc 1050 W w trybie bez grzania, 1550 Wwtrybie
grzania.
• 230 V~ / 50 Hz.
• Natężenie wydmuchu powietrza: 61 l/s. Prędkość powietrza: 540 km/h.
• Poziom hałasu: 66 dBA.
• Klasa II, IP21.
• Czułość czujników można wyregulować, regulując potencjometry znajdujące
się wewnątrz suszarki do rąk (rys. C).
INSTALACJA I PODŁĄCZENIE ELEKTRYCZNE
Podłączenie elektryczne wykonuje się przed zamocowaniem suszarki do ściany.
• Wyłącz urządzenie przed użyciem.
• Zdjąć tylną płytę (rys. D), przeciągnąć kabel zasilającytypu H05RNF2 Ø1,5 mm
(nie jest dostarczony) przez otwór (rys. E) i przykręć go do wtyczki
przyłączeniowej.
• Przykręć element podtrzymujący kabel, aby zapobiec wyrwaniu przez ciągnięcie.
Instalacja musi być zgodna z normami obowiązującymi w kraju.
Zalecana wysokość montażu (odległość między posadzką a górną częścią
urządzenia): 95 cm dla dorosłych, 85 cm dla dzieci i osób niepełnosprawnych
(rys. F1).
• Wywierć otwory w ścianie przed zamontowaniem płyty montażowej.
Przymocować płytę do ściany za pomocą dostarczonych śrub i kołków
rozporowych (rys. F2). W razie potrzeby należy dopasować śruby i kołki do
rodzaju ściany.
• Zawiesić suszarkę na płycie (rys. G), zdjąć filtr, następnie zamocować 2 śruby
w dolnej części suszarki i założyć filtr.
• Aby włączyć tryb ON / OFF, odkręcić śruby apo obu stronach suszarki do rąk
i zdjąć pokrywę (rys. H).
• Uruchom produkt, podłączając go do sieci elektrycznej.
UWAGA
• Nasze produkty muszą być instalowane przez profesjonalnych
instalatorów, przestrzegając obowiązującego prawa, zapisów biur
projektowych i dobrych praktyk.
• Należy unikać rozprysków wewnątrz mechanizmu suszarki.
• Nie potrząsać suszarką.
• W przypadku niepoprawnego funkcjonowania należy odłączyć suszarkę od
zasilania prądu i skontaktować się z naszym działem posprzedażowym.
• Nie instalować suszarki na zewnątrz budynku oraz na łatwopalnej powierzchni.
USTAWIENIA
Jeśli podczas uruchamiania suszarki do rąk zauważona zostanie nieprawidłowa
detekcja dłoni przez czujniki, możliwa jest ich regulacja:
- zdjąć pokrywę i śruby po obu stronach suszarki a(rys. H);
- przesunąć pokrywę w górę, aby ją wyjąć (rys. H);
- ustawić czułość czujników za pomocą potencjometru(ów) i , przekręcając
go/je zgodnie lub przeciwnie do kierunku ruchu wskazówek zegara,
w zależności od pożądanego efektu (rys. C).
KONSERWACJA RYS. B
Suszarka do rąk jest wyposażona w alarmy powiadamiające o ewentualnych
czynnościach konserwacyjnych, które należywykonać:
+ 1: filtr HEPA jest zapchany. Wymień go, zdejmując pokrywę mocującą filtr,
która jest przytwierdzona 2 śrubami (rys. I).
+ 2 stale: temperatura jest zbyt wysoka, automatycznie blokując system
parowania. Skontaktuj się z naszym serwisem posprzedażowym.
+ 2 okresowo + 4 stale: system parowania nie chłodzi się prawidłowo.
Skontaktuj się z naszym serwisem posprzedażowym.
+ 2 okresowo + 4 okresowo: problem z ogrzewaniem zakłóca prawidłowe
działanie systemu odparowywania. Skontaktuj się z naszym serwisem
posprzedażowym.
+ 4 okresowo: system odparowywania działa od 5 godzin.
+ 3: szczotki węglowe silnika są już prawie zużyte i muszą zostać wymienione.
Po zakończeniu konserwacji zresetuj licznik silnika, aby poznać datę wymiany
szczotek węglowych. Naciśnij przycisk resetowania .
Jakiś przedmiot uniemożliwia zatrzymanie suszarki do rąk przez ponad
30 sekund. Suszarka zatrzymuje się automatycznie.
Po usunięciu przedmiotu, suszarka resetuje się automatycznie.
Automatyczna eliminacja pozostałej wody z rąk poprzez odparowanie
i sterylizację: system zapobiega konieczności opróżniania zbiornika wody lub
wypływowi wody na ścianę lub posadzkę.
OBSŁUGA I CZYSZCZENIE
Suszarka do rąk jest wyposażona w alarmy powiadamiające o ewentualnej
obsłudze, którą należy wykonać:
• Czyścić wodą z mydłem za pomocą wilgotnej, delikatnej szmatki. Nigdy nie
używać środków ścierających, proszku do szorowania lub produktów na bazie
chloru, kwasu lub alkoholu.
• Regularnie czyść szkiełka czujników na podczerwień.
• Upewnić się, że odpływ jest czysty i nie jest zapchany jakąś substancją czy
zanieczyszczeniem.
• Utrzymać obszar ssania wolny.
• Regularnie i całkowicie czyść otwór na dłonie.
Urządzenie zgodne z obowiązującymi Dyrektywami europejskimi.
Serwis posprzedażowy i Pomoc techniczna:
Ulotka jest dostępna na stronie: www.delabie.pl
PL PL

WERKING
• De handendroger wordt geleverd in de « ON » stand.
• Inwerkingstelling van de handendroger na enkele seconden (het systeem
voert een interne test uit voor een goede werking).
• Plaats de handen volledig in de gleuf: automatische inwerkingstelling na
detectie van de handen (fig. A).
• In werking verschijnt er op het display een timer met aftelfunctie die seconden
afbeeldt in de vorm van streepjes (fig. B). Het rode LED brandt.
• Stopt automatisch bij het verwijderen van de handen of na 12 sec. droogtijd.
Stopt automatisch bij ononderbroken gebruik langer dan 30 sec.
Het blauwe LED brandt.
• De handendroger beschikt over een verdampingsysteem dat de aanwezigheid
van water detecteert en vervolgens de verdamping activeert.
TECHNISCHE EIGENSCHAPPEN
• Beperkt energieverbruik: vermogen 1.050 W in modus zonderverwarming,
1.550 W in verwarmingsmodus.
• 230 V~ / 50 Hz.
• Luchtverplaatsing: 61 l/sec. Luchtsnelheid: 540 km/h.
• Geluidsniveau: 66 dBA.
• Klasse II, IP21.
• De gevoeligheid van de sensoren kan geregeld worden door
de potentiometers in de handendroger aan te passen (fig. C).
INSTALLATIE EN ELEKTRISCHE MONOFASE AANSLUITING
De elektrische aansluiting dient te gebeuren alvorens de handendroger
op de muur bevestigd wordt.
• Schakel het product uit voor het eerste gebruik.
• Verwijder het deksel (fig. D). Trek de voedingskabel van het type H05RNF2
x Ø 1,5 mm (niet meegeleverd) door de opening (fig. E) en steek de kabel
in de aansluitstekker.
• Schroef de snoerhouder vast om losrukken te voorkomen.
• De installatie dient te gebeuren volgens de plaatselijk geldende normen
(in Frankrijk NF C 15100). Aanbevolen installatiehoogte (afstand tussen
de grond en de bovenkant van het apparaat): 95 cm voor volwassenen,
85 cm voor kinderen en mindervaliden (fig. F1).
• Maak een boorgat in de muur alvorens de afdekplaat te installeren. Bevestig de
afdekplaat op de muur d.m.v. de meegeleverde schroeven en pluggen (fig. F2).
Indien nodig een ander type schroeven en pluggen kiezen in functie van het
materiaal van de muur.
• Haak de handendrogervast op de plaat (fig. G). Verwijder de filter en installeer
vervolgens de 2 schroeven op de onderkant. Plaats de filterterug.
• Om de ON/OFF modus te activeren dienen de schroeven alangs weerszijden
van de handendroger losgemaakt te worden en het deksel teruggeplaatst
te worden (fig. H).
• Sluit de handendroger aan op het elektriciteitsnet om op te starten.
AANBEVELINGEN
• Onze producten moeten door professionele vaklui geïnstalleerd
worden en dit volgens de plaatselijk geldende reglementering,
de voorschriften van de studieburelen en de “regels der kunst”.
• Vermijd waterspatten op de binnenkant van het mechanisme van de
handendroger.
• Niet schudden aan de handendroger.
• In geval van storingen de handendroger onmiddellijk buiten spanning
zetten en onze naverkoopdienst contacteren.
• De handendroger mag niet buiten of op een ontvlambaar oppervlak geplaatst
worden.
INSTELLING
Indien tijdens het handendrogen een onjuiste handdetectie door de sensoren
wordt waargenomen, is het mogelijk om dit bij te regelen:
- verwijder het deksel en de 2 schroeven aan weerszijden van de handendroger
a(fig. H);
- verschuif het deksel naar boven om het weg te halen (fig. H);
- pas de gevoeligheid van de sensoren aan met behulp van de potentiometer(s)
en door ze in wijzerzin of tegenwijzerzin te draaien, afhankelijk van het
gewenste effect (fig. C).
SERVICE FIG. B
De handendroger is uitgerust met meldingslampjes die waarschuwen
voor mogelijk onderhoud dat uitgevoerd moet worden:
+ 1 brandt: de HEPA filter is verzadigd. Draai de 2 schroeven van de
bevestigingshoes van de filter los om de filterte vervangen (fig. I).
+ 2 brandt: het verdampingssysteem wordt automatisch geblokkeerd
door een te hoge temperatuur. Contacteer onze Dienst Na Verkoop.
+ 2 knippert + 4 brandt: het verdampingssysteem koelt niet voldoende af.
Contacteer onze Dienst Na Verkoop.
+ 2 knippert + 4 knippert: een verwarmingsprobleem verstoort de goede
werking van het verdampingssysteem. Contacteer onze Dienst Na Verkoop.
+ 4 knippert: het verdampingssysteem is reeds 5 uur in werking.
+ 3 brandt: de koolborstels zijn aan het einde van hun levensduur en moeten
worden vervangen. Na vervanging dient de motorteller gereset te worden om
de modificatiedatum van de koolborstels te weten. Druk op de resetknop .
Een object veroorzaakt gedurende meer dan 30 sec. dat de handendroger
in werking blijft. De handendroger stopt automatisch. Eenmaal het object
verwijderd is, wordt de werking automatisch herstart.
Automatische verwijdering van het afgeblazen water door verdamping
en sterilisatie: voorkomt dat een tank met afvalwater geleegd moet worden
of dat water op de muur of grond terechtkomt.
REINIGEN EN ONDERHOUD
De handendroger is uitgerust met meldingslampjes die waarschuwen
voor mogelijk onderhoud dat uitgevoerd moet worden.
• Reinig regelmatig met een zachte, vochtige doek. Gebruik nooit schuurmiddelen
of enig ander product op basis van chloor, zuur of alcohol.
• Reinig regelmatig het glas van de infraroodsensoren.
• Zorg ervoor dat de leiding proper is en vrij van enige substantie of onzuiverheid.
• Houd het aanzuiggebied vrij.
• Reinig regelmatig en volledig de gleuf waarin de handen geplaatst worden.
Apparaat conform aan de van kracht zijnde Europese richtlijnen.
Dienst Na Verkoop en Technische dienst:
Tel.: + 32 (0)2 520 16 76 - e-mail : sav@delabiebenelux.com
Deze handleiding is beschikbaar op www.delabiebenelux.com
NL NL

FUNCIONAMENTO
• O secador de mãos é fornecido na posição «ON».
• Ligar o aparelho após alguns segundos (realização de um teste interno
para o seu correto funcionamento).
• Inserir completamente as mãos na abertura: inicia automaticamente após
a deteção das mãos pelos sensores (fig. A).
• Em funcionamento, a contagem dos segundos é feita através das barras
(fig. B). O LED vermelho acende.
• Para automaticamente ao retirar as mãos ou após 12 segundos de secagem.
Para automaticamente se estiver em utilização contínua por mais
de 30 segundos. O LED azul acende.
• O secador de mãos está equipado com um sistema de evaporação que
deteta a presença de água e ativa uma resistência de evaporação.
CARACTERÍSTICAS TÉCNICAS
• Baixo consumo de energia: potência 1 050 W no modo sem aquecimento,
1 550 W no modo de aquecimento.
• 230 V~ / 50 Hz.
• Caudal: 61 l/s. Velocidade do ar: 540 km/h.
• Nível sonoro: 66 dBA.
• Classe II, IP21.
• A sensibilidade dos sensores pode ser ajustada regulando os potenciómetros,
situados no interior do secador de mãos (fig. C).
INSTALAÇÃO E LIGAÇÃO ELÉTRICA
A ligação elétrica é feita antes da fixação do secador de mãos à parede.
• O aparelho deve estar desligado quando está a ser efetuada a ligação.
• Retirar a tampa (fig. D), passar o cabo de alimentação por corrente tipo
H05RNF2 Ø 1,5 mm (não fornecido) pela furação (fig. E) e aparafusar
à tomada de ligação.
• Aparafusar a peça de retenção do cabo para evitar ser puxado.
A instalação deve ser feita conforme as normas em vigor no país
(em França NF C 15100). Altura de instalação recomendada (distância entre
o pavimento e o topo do aparelho): 95 cm para os adultos, 85 cm para as
crianças e pessoas com mobilidade reduzida (fig. F1).
• Fazer a furação na parede antes de instalar a placa de suporte.
Fixar a placa à parede com os parafusos e buchas fornecidas (fig. F2).
Se necessário, adaptar os parafusos e buchas ao tipo de parede.
• Pendurar o secador de mãos sobre a placa (fig. G), retirar o filtro e, em seguida
colocar os 2 parafusos na parte inferior e a seguir colocar o filtro.
• Para colocar no modo ON / OFF, desaparafusar os parafusos ados 2 lados
do secador de mãos e voltar a colocar a tampa (fig. H).
• Para colocar o produto em funcionamento, ligar à corrente elétrica.
LEMBRESE
• Os nossos produtos devem ser instalados por instaladores
profissionais, respeitando a regras em vigor, as prescrições dos gabinetes
de estudo e as regras de arte.
• Evitar os pingos no interior do secador de mãos.
• Não abanar o secador de mãos.
• Em caso de mau funcionamento, desligar imediatamente o secador de mãos
da corrente e contactar o nosso serviço pós-venda.
• Não instalar o secador de mãos no exterior nem sobre uma superfície
inflamável.
REGULAÇÃO
Se durante o funcionamento do secador de mãos, se verificar uma deteção
inadequada das mãos pelos sensores, é possível fazer a regulação:
- retirar a tampa e os parafusos dos 2 lados do secador de mãos a(fig. H);
- fazer deslizar a tampa para cima para a retirar (fig. H) ;
- regular a sensibilidade dos sensores com a ajuda do/dos potenciómetro(s)
e ao girar no sentido horário ou anti-horário, de acordo com o efeito
desejado (fig. C).
MANUTENÇÃO FIG. B
O secador de mãos está equipado com alarmes para avisar eventuais
manutenções a realizar:
+ 1: o filtro HEPA está saturado. Para o mudar, remover a tampa de fixação
do filtro mantida pelos 2 parafusos (fig. I).
+ 2 fixo: a temperatura está demasiado elevada e bloqueia automaticamente
o sistema de evaporação. Contactar o nosso serviço pós-venda.
+ 2 intermitente + 4 fixo: o sistema de evaporação não arrefece corretamente.
Contactar o nosso serviço pós-venda.
+ 2 intermitente + 4 intermitente: um problema de aquecimento está a
provocar o mau funcionamento do sistema de evaporação.
Contactar o nosso serviço pós-venda.
+ 4 intermitente: o sistema de evaporação está em funcionamento
há 5 horas.
+ 3: as escovas de carbono do motor estão em fim de vida e devem ser
alteradas. Uma vez realizada a manutenção, reiniciar o contador do motor
para saber a data de substituição das escovas de carbono.
Pressionar o botão de reinicializar .
Um objeto impede que o secador de mãos pare durante mais de 30 segundos.
O secador de mãos para automaticamente. Uma vez retirado o objeto,
o seu funcionamento reinicia automaticamente.
Eliminação automática da água residual das mãos por evaporação e
esterilização: o sistema evita de ter de se esvaziar um recipiente de água
ou a presença de drenagem na parede ou pavimento.
MANUTENÇÃO E LIMPEZA
O secador de mãos está equipado com alarmes para avisar eventuais
necessidades de limpeza a realizar.
• Limpar regularmente com um pano suave húmido. Nunca utilizar produtos
abrasivos, pó de arear ou qualquer outro tipo de produto à base de cloro,
ácido ou álcool.
• Limpar regularmente o vidro dos sensores infravermelhos.
• Garantir que a canalização está limpa e sem obstrução por qualquer substância
ou impureza.
• Manter a zona de aspiração livre.
• Limpar regularmente e totalmente a zona de passagem das mãos.
Produto em conformidade com as Diretivas Europeias atuais.
Suporte Técnico e Serviço Pós-Venda:
Esta ficha está disponível em : www.delabie.pt
PT PT

ФУНКЦИОНИРОВАНИЕ
• Сушитель для рук поставляется в позиции « ON ».
• Запуск оборудования через несколько секунд (внутреннее тестирование
на корректную работу).
• Вставить кисти рук полностью в прорезь для сушки: автоматическое
включение при детекции рук (Схема A).
• В процессе работы обратный отсчет секунд осуществляется в виде полос
(Схема В). Загорается красный светодиод.
• Автоматическое отключение при убирании рук или через 12 секунд
сушки. Автоматическое отключение при непрерывном использовании
более 30 секунд. Загорается синий светодиод.
• Сушилка для рук оснащена системой испарения, которая обнаруживает
присутствие воды и активирует испарение.
ТЕХНИЧЕСКИЕ ХАРАКТЕРИСТИКИ
• Слабое потребление энергии : мощность 1 050 Вт в режиме обогрева
1550 Вт в режиме обогрева.
• 230 В~ / 50 Гц.
• Расход воздуха: 61 л/сек. Скорость воздуха : 540 км/ч.
• Уровень шума : 66 дБ.
• Класс II, IP21.
• Чувствительность датчиков можно регулировать, регулируя
потенциометры, расположенные внутри сушилки для рук (Схема С).
УСТАНОВКА И ПОДКЛЮЧЕНИЕ ЭЛЕКТРИЧЕСТВА
Электрическое подключение выполняется до крепления сушилки для рук
к стене.
• Выключить продукт перед использованием.
• Снять крышку (Схема D), проложить кабель питания H05RN-F2 x 1,5 мм
(не входит в комплект) через отверстие (Схема E) и прикрутить его
к соединительной вилке.
• Прикрутить крепежный элемент кабеля, чтобы предотвратить его натяжение.
Установка должна соответствовать действующим нормативам вашей страны.
Рекомендуемая высота установки (расстояние от пола до верхней части
прибора): 95 см для взрослых, 85 см для детей и инвалидов (Схема F1).
• Просверлить стену перед установкой опорной пластины. Закрепить
пластину к стене с помощью винтов и дюбелей, идущих в комплекте
(Схема F2). При необходимости подобрать винты и дюбеля, подходящие
к материалу стены.
• Закрепить сушилку для рук на пластине (Схема G), снять фильтр, затем
установить два винта в нижней части, а затем поставить фильтр на место.
• Чтобы переключить режим ON / OFF, открутить винты aс обеих сторон
сушилки для рук и переставьте крышку (Схема H).
• Запустите продукт, подключив его к электросети.
НАПОМИНАНИЕ
• Наша продукция должна устанавливаться квалифицированными
специалистами с учетом действующих нормативных актов и предписаний
проектных бюро.
• Избегать брызг внутри механизма сушителя.
• Не встряхивать.
• При нарушении функционирования немедленно отключить сушитель
и связаться с технической службой.
• Не устанавливать сушитель для рук на открытом воздухе или вблизи
легковоспламеняющейся поверхности.
РЕГУЛИРОВКА
Если при запуске сушилки для рук наблюдается неправильное обнаружение
рук с помощью датчиков, возможно это отрегулировать:
- снять крышку и винты с обеих сторон сушилки для рук a(Схема H);
- сдвинуть крышку вверх, чтобы извлечь ее (Схема H);
- отрегулировать чувствительность датчиков с помощью потенциометра (ов)
и , поворачивая их по часовой стрелке или против часовой стрелки,
в соответствии с желаемым эффектом (Схема С).
ТЕХНИЧЕСКОЕ ОБСЛУЖИВАНИЕ (СХЕМА B)
Сушилка для рук оснащена сигналом для предупреждения о необходимости
проведения обслуживания:
+ 1: фильтр HEPA переполнен. Заменить его, сняв крышку крепления
фильтра, удерживаемую 2 винтами (Схема I).
+ 2 постоянных: слишком высокая температура автоматически блокирует
систему испарения. Свяжитесь с технической службой.
+ 2 прерывистых + 4 постоянных: испарительная система не может
должным образом охладиться. Свяжитесь с технической службой.
+ 2 прерывистых + 4 прерывистых: проблема с подогревом мешает
нормальному функционированию испарительной системы.
Свяжитесь с технической службой
+ 4 прерывистых: система испарения работает в течение 5 часов.
+ 3: щетки двигателя износились и должны быть заменены. После
завершения технического обслуживания сбросьте счетчик двигателя,
чтобы найти дату модификации щеток. Нажмите кнопку сброса .
Предмет препятствует остановке сушилки для рук более чем на 30 секунд.
Сушилка автоматически останавливается. После удаления объекта
функционирование автоматически продолжается.
Автоматическое удаление остатков воды с рук путем испарения
и стерилизации: система, исключающая необходимость опорожнения
водяного бака или наличия стока на стене или на полу.
УХОД И ЧИСТКА
Сушилка для рук оснащена сигналом для предупреждения о необходимости
очистки.
• Регулярно чистить мягкой влажной губкой. Никогда не используйте
абразивные средства, чистящий порошок или любой другой продукт,
содержащий хлор, кислоту или спирт.
• Регулярно очищайте стекло инфракрасных датчиков .
• Убедитесь, что трубопровод чистый и не содержит никаких веществ или
примесей .
• Держите зону всасывания открытой.
• Регулярно и полностью очищайте щель для рук .
Продукт соответствует действующим Европейским Директивам.
Послепродажное обслуживание и техническая поддержка:
АРБАТ ФРАНС: Тел.: +7 495 787 95 11 / +7 495 787 62 04
RU RU


Other manuals for SPEEDJET 2
1
Table of contents
Languages:
Other Delabie Dryer manuals
Popular Dryer manuals by other brands

Maytag
Maytag W10445417B Use & care guide

Cylinda
Cylinda TVP 5571 user manual

Trotec
Trotec DH 25 S Original instructions

Bosch
Bosch WQG2410H0 User manual and installation instructions

Whirlpool
Whirlpool LER5624BN0 Top and console parts

Miele professional
Miele professional PT 5135 C Operating and installation instructions