Designair CHAND User manual


TABLE OF CONTENTS
1. Introduction 3
2. Safety precaution 3-4
3. Intended use 5
4. Parts supplied 6
5. Installation 7-11
6. Operation 12
7. Maintenance 13
8. Troubleshooting 14
9. Technical data 14
10. Environmental protection 14
1. INTRODUCTION
Thank you for choosing this cooker
hood.
This installation and user’s manual is
designed to provide you with all
required instructions related to the
installation, use and maintenance of the
appliance. In order to operate the
appliance correctly and safety, please
read this installation and user ’s manual
carefully before installation and usage.
Keep this installation and user’s manual
for future use. Should this appliance be
passed on to a third party, then this
installation and user’s manual must be
included.
No liability will be accepted for damage
resulting from improper use or non-
compliance with these instructions.
2. SAFETY PRECAUTION
.Important! Always switch off
the electricity supply at the
mains during installation and
maintenance such as for light
bulb replacement
General
The cooker hood is suitable for
domestic use only.
Children
• Please dispose if the packaging
material carefully.
Packaging material can be dangerous to
children. Danger of suffocation!
• Children should be supervised to
ensure that they do not play with the
appliance.
Installation
• The cooker hood must be installed in
accordance with the installation
instructions and all measurements must
be followed.
• All installation work must be carried
out by a competent person or qualified
electrician.
• When installing the cooker hood,
make sure that the following
recommended distances between the top
of cooker and the lowest part of the
cooker hood are observed:
→Gas cookers: 65cm
→Electric cookers: 65cm
→Coal or oil cookers: 80cm
• Do not install above a cooker with a
high level grill.
• Make sure the ducting has no bends
sharper than 90 degrees as this will
reduce the efficiency of the cooker
hood.
• Pay attention to the sharp edges
inside the cooker hood during
installation.
Electrical safety
• Regularly check the power cord for
damage. If the supply cord is damaged,
it must be replaced by the manufacturer,
its service agent or similarly qualified
persons in order to avoid a hazard.
• The appliance must be placed in
such a way, that the power supply is
accessible at all times.
• Before connecting the appliance to
the power supply, check that the power
supply voltage and current rating
corresponds with the power supply
details shown on the appliance rating
label.
• Never use a damaged appliance!
Disconnect the appliance from the wall
outlet and contact your supplier if it is
damaged.
• Danger of electric shock! Do not
attempt to repair the appliance yourself.
In case of malfunction, repairs are to be
conducted by qualified personnel only.

• To avoid damaging the cord, do not
squeeze, bend or chafe it on sharp
edges. Keep it away from hot surfaces
and open flames as well.
• Lay out the cord in such a way that
no unintentional pulling or tripping over
it is possible.
• Do not open the appliance casing
under any circumstances.
Do not insert any foreign objects into
the inside of the casing.
• Never use accessories which are not
recommended by the manufacturer.
They could pose a safety risk to the user
and might damage the appliance. Only
use original parts and accessories.
• Keep the appliance away from any
hot surfaces and open flames. Always
operate the appliance on a level, stable,
clean and dry surface. Protect the
appliance against heat, dust, direct
sunlight, moisture, dripping and
splashing water.
• Do not place heavy objects on top
of the appliance. Do not place objects
with open flames, e.g. candles, on top of
or beside the appliance. Do not place
objects filled with water, e.g. vases on
or near the appliance.
• This appliance is not intended for
use by persons (including children) with
reduced physical, sensory, or mental
capabilities, or by those who lack
experience and knowledge, unless they
have been given super vision and
instruction concerning the use of the
appliance by a person responsible for
their safety.
Gas safety
• Always put lids on pots and pans
when cooking on a gas cooker.
Operation
Danger of fire!
• Do not flambé under the
cooker hood.
• Do not leave frying pans
unattended during use because
overheated fats or oils might
catch fire.
• Never leave naked flames
under the cooker hood.
• Only fry underneath the
cooker hood when you are in the
kitchen.
• Do not use the cooker hood
without the grease filters, or if
the filters are excessively
greasy!
Caution! Accessible parts may
become hot when used with
cooking appliances.
Exhaust operation
Danger!
• During exhaust operation, the
cooker hood removes air from a room.
If other fire sources that require the
surrounding air for combustion are
being operated in the same room, (e.g.
gas, oil or coal heaters), the oxygen they
require is taken away. Thus flames
could be suffocated and gas could leak
out or the fumes could be drawn back
into the room.
• In order to guarantee a safe
operation, there should be non- closable
openings in doors, windows or in an air
intake wall box to ensure a fresh supply
of combustion air. This will prevent the
combustion fumes from being drawn
back into the room.
• When assessing the measures
necessary, always take the entire
ventilation system of the house into
consideration. In case of doubt, ask your
local chimney sweeper for help.
• Never secure the cooker hood to a
ventilation duct, or a room or exhaust
gas chimney! Do not let the air that is
removed from the room be drawn into a
duct where warm air is circulating. The
extracted air should only be drawn
outdoors through a separate ventilating
duct that is only for the extractor hood.
• When in extraction mode, air in the
room is being removed by the cooker
hood. Please make sure that proper
ventilation measures are being
observed. The cooker hood removes
odours from room but not steam.
• There shall be adequate ventilation of
the room when the range hood is used at
the same time as appliances burning gas
or other fuels (not applicable to

appliances that only discharge the air
back into the room).
• The air must not be discharged into a
flue that is used for removing fumes
from appliances burning gas or other
fuels (not applicable to appliances that
only discharge the air back into the
room).
Cleaning
• There is a fire risk if cleaning is not
carried out in accordance with the
instructions.
• Pay attention to the sharp edges
inside the cooker hood, especially
during cleaning.
• Always disc onnec t t he power
supply prior to c leaning the cooker
hood. If the switched fused connection
unit is difficult to reach, shut off the
power supply by using the
corresponding circuit breaker at the
distribution board.
• Keep the cooker hood clean. Fat
deposits could catch on fire when
exposed to high temperatures.
3. INTENDED USE
• Your cooker hood can only be
operated in recirculated-air operation.
• Recirculated - air: Kitchen fumes are
removed and af ter purification are fed
back into the room through the upper air
outlet openings. The purification takes
place via the grease filters and the
charcoal filter

4. PARTS SUPPLIED
[1] Cooker Hood 1
[2] Ceiling Assembly with wires 1
[3] Luminary 3
[4] Metal & Charcoal Filter 1
[5] Ceiling Screw (6x70) 4
[6] Ceiling Plug Ø10 4
5. INSTALLATION
Important! We recommend that two
people carry out the installation. Pay
attention to the procedure described in
the assembly instructions.
Preparation
• Attention! In order for the cooker
hood to reach optimal performance,
mount it over the middle of the cooking
area.
• Plan the power connection prior to
installation so that a disturbing cable
will not be visible afterwards.
• The following accessories are
required to mount the cooker hood (not
included with the delivery):
→Power drill
→Screwdriver
→Water level
→Cable detector
Electrical connection
• All fittings must be installed by a
qualified electrician in accordance with
current IEE Wiring Regulations
(BS7671) and local building
regulations.
• Important! Always switch off the
electricity supply at the mains during
installation and maintenance. We
recommend that the fuse is withdrawn
or circuit breaker switched off a the
distribution board whilst work is in
progress.
• Prior to drilling holes to secure it to
the ceiling, make sure that no cables or
pipes will become damaged (electric,
gas, water, etc.; test the areas in
question with a cable detector).
• This unit is double insulated and
must not be earthed. If there are any
incoming earth cables, they must be
joined and well insulated with good
quality insulation tape. This is to ensure
earth continuity throughout your
property.
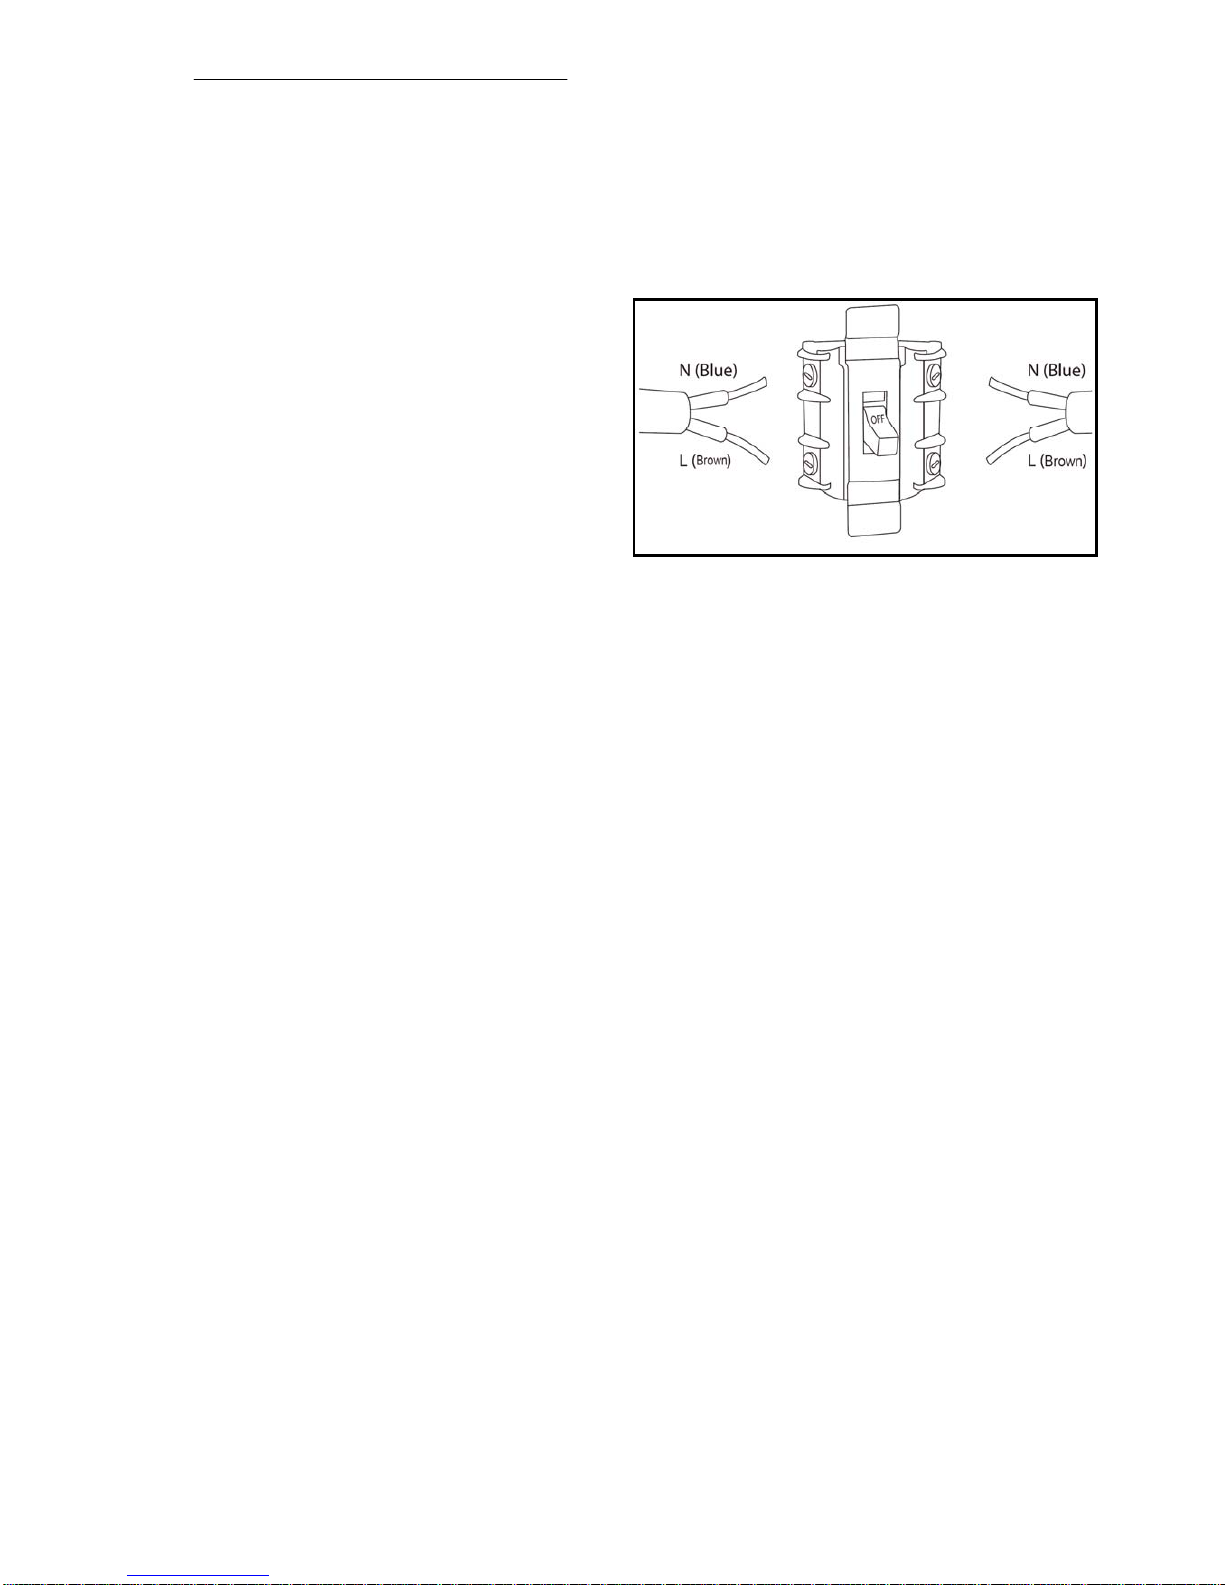
• Means for disconnection must be
incorporated in the fixed wiring in
accordance with the wiring rules. To
achieve this install appropriate switched
fused connection unit.
Note! A switched fused connection unit
having a contact separation of at least
3mm in all poles should be connected in
fixed wiring.
• Connect the incoming positive and
neutral cables to the terminals of the
switched fused connection unit (below
figure ).
Ensure connections are tight
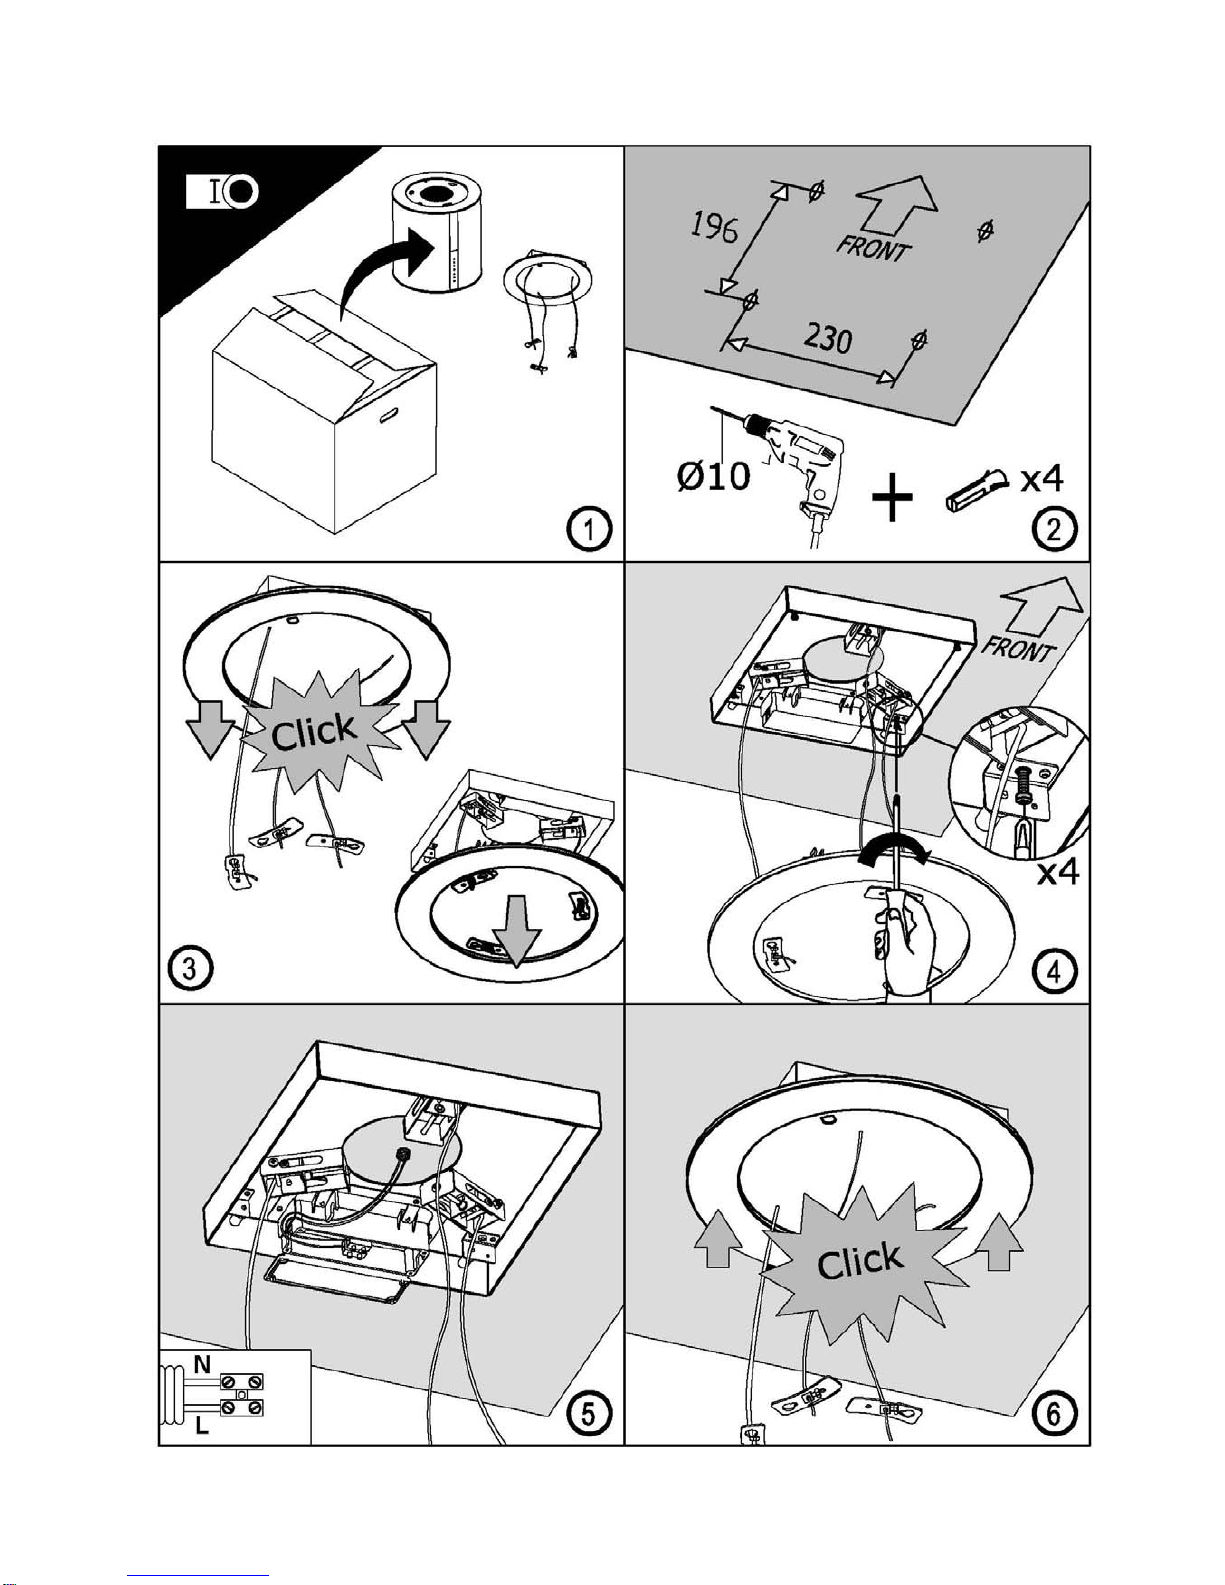
Fixing the appliance to the ceiling


• Using template dimensions(fig2),
mark and drill 4 holes at the ceiling to
hang the Cooker hood (1). Insert the
wall plugs (6).
• Disassemble the glass set from the
ceiling plate (fig. 3).
• Fix the ceiling plate with the screw
(5) in the plugs (fig. 4).
• Connect the Main supply to the
Terminal Block (fig. 5).
• Assemble the glass set to the ceiling
plate (fig. 6)
• Measure the steel cables length
keeping them tight and fix the holding
brackets at the correct height (fig.7).
• Use the packaging box to situate
the Cooker Hood (1) on the top of the
cooking surface (fig 8-9).
• Fix the holding brackets to the hood
and take out the packaging box (fig. 10-
11).
• Check the hood levelling (fig. 12).
• Disassemble the glass set from the
ceiling plate, to level the hood using the
mechanism (fig. 13-14).
• Disassemble the wiring protection
from the glass set. Pass the hood supply
cord through the hole, and connect to
the Terminal Block in the ceiling plate
(fig.15-16).
• Assemble the glass set to the ceiling
plate, and assemble the wiring
protection (fig. 17).
• Remove the protective film (fig. 18)

6. OPERATION
• Switch on the appliance at the switched fused connection unit. The appliance is
ready for operation.
Functions
TOUCH CONTROL PANEL
This panel is located on the front part of the hood and includes:
- Filter cleaning alert indicator/switch (ref. 1).Activated regularly to
alert of the need to clean filters and deactivated with a single
press.
-Button for setting the timer of the motor (ref. 2).The extractor will
operate for 5 minutes at the current speed and 5 minutes at each
of the lower speeds until coming to a complete stop.
-Button for the light (ref. 3).Allows the light to be regulated by
pressing and holding down.
-On/off button of the motor (ref. 4).
- Extractor fan speed - button: speed 1
- Extractor fan speed - button: speed 2
- Extractor fan speed - button: speed 3
To obtain the best results from your cooker hood it is recommended that
you leave it switched on for 15 minutes after you have finished cooking.
Regularly
Use a soft cloth moistened with hand-warm mildly soapy
water or household cleaning detergent. Never use metal
pads, chemical, abrasive material or stiff brush to clean
the appliance.
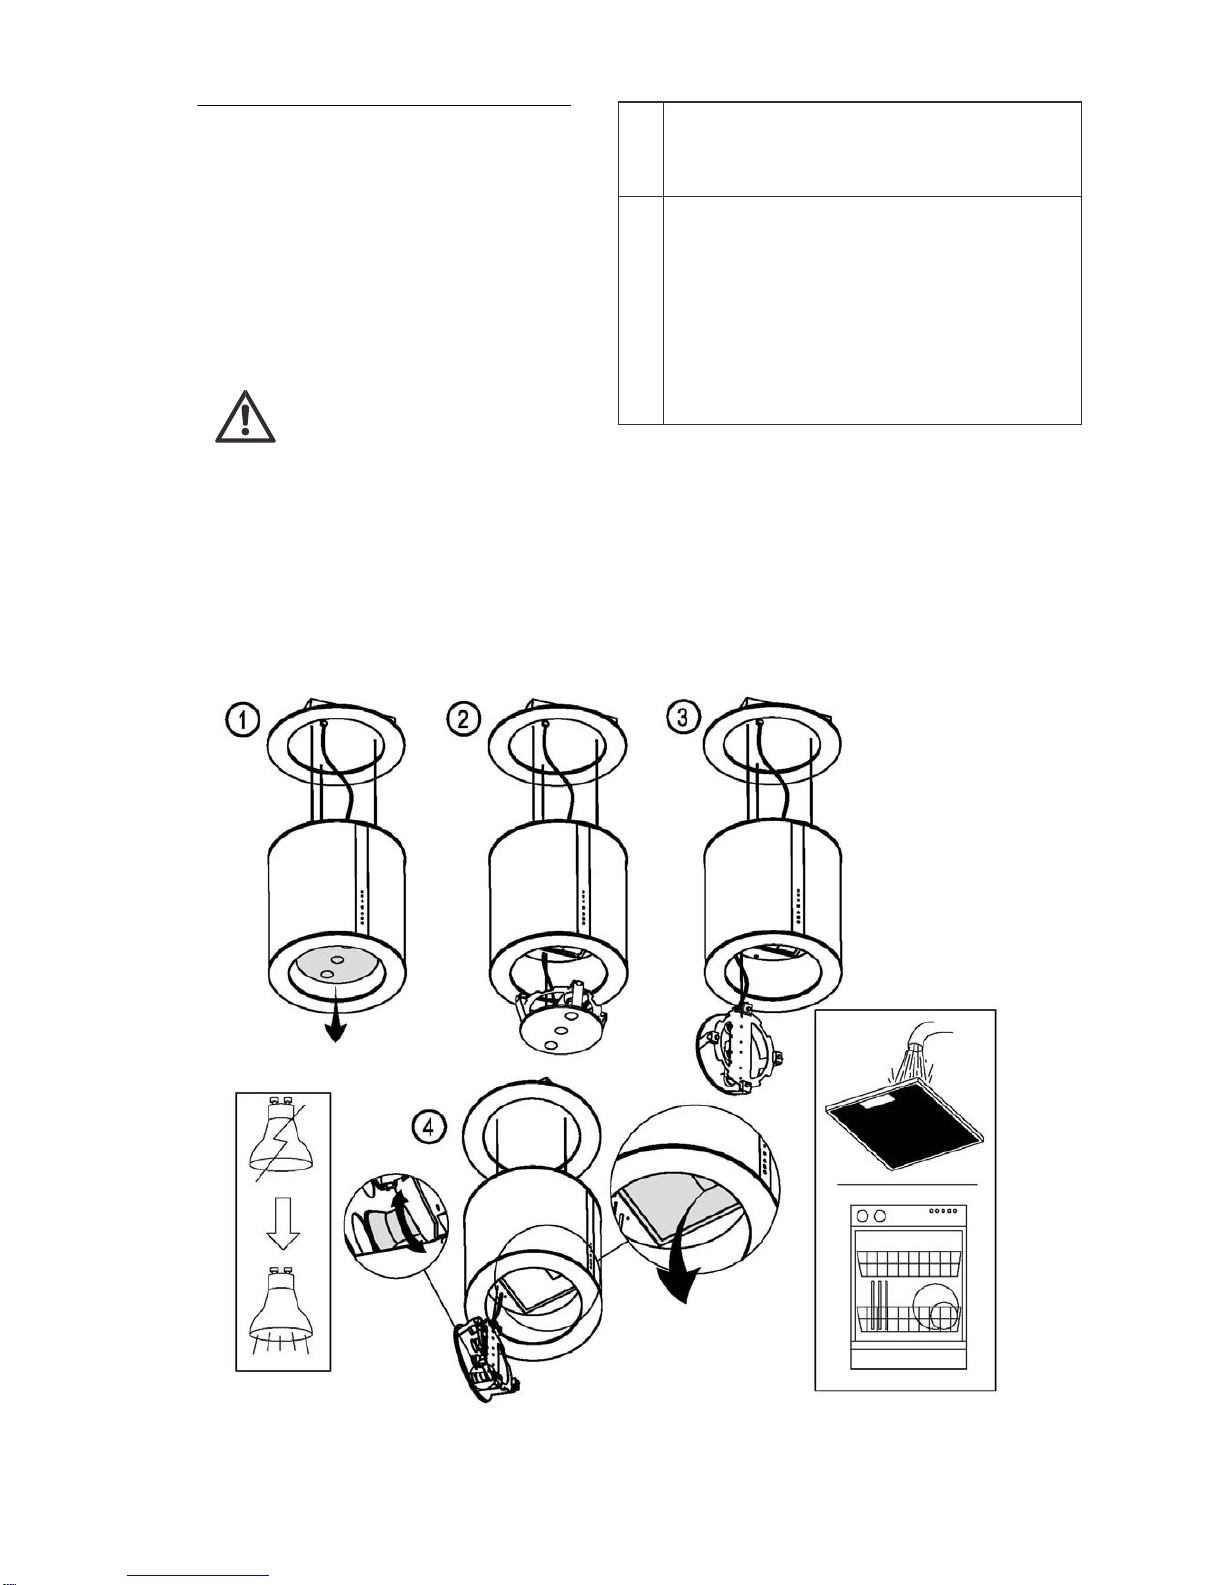
Monthly
Metallic Anti-grease and Charcoal filter: The
filter collects grease, smoke and dust so the filter is
directly affecting the efficiency of the cooker hood. If not
cleaned, the grease
residue (potential flammable) will saturate on the filter.
Clean it with household cleaning detergent.
Important: Clean the filter every month to
prevent risk of fire.
Follow the fig. 11 to disassemble the Filter (4)
7. MAINTENANCE
• Before cleaning, switch the
appliance
off and disconnect the cooker hood
from
power supply.
• Clean the appliance in the following
intervals:
Light bulb replacement
The lighting system fitted to the
hood is just a supportive light. In
any case, it can not substitute
for the main lighting in the
kitchen.
• Switch the appliance off and
disconnect the power supply.
• Screw the light bulb from the holder
and replace by new light bulb of the
same type, max. 35W (GU-10).
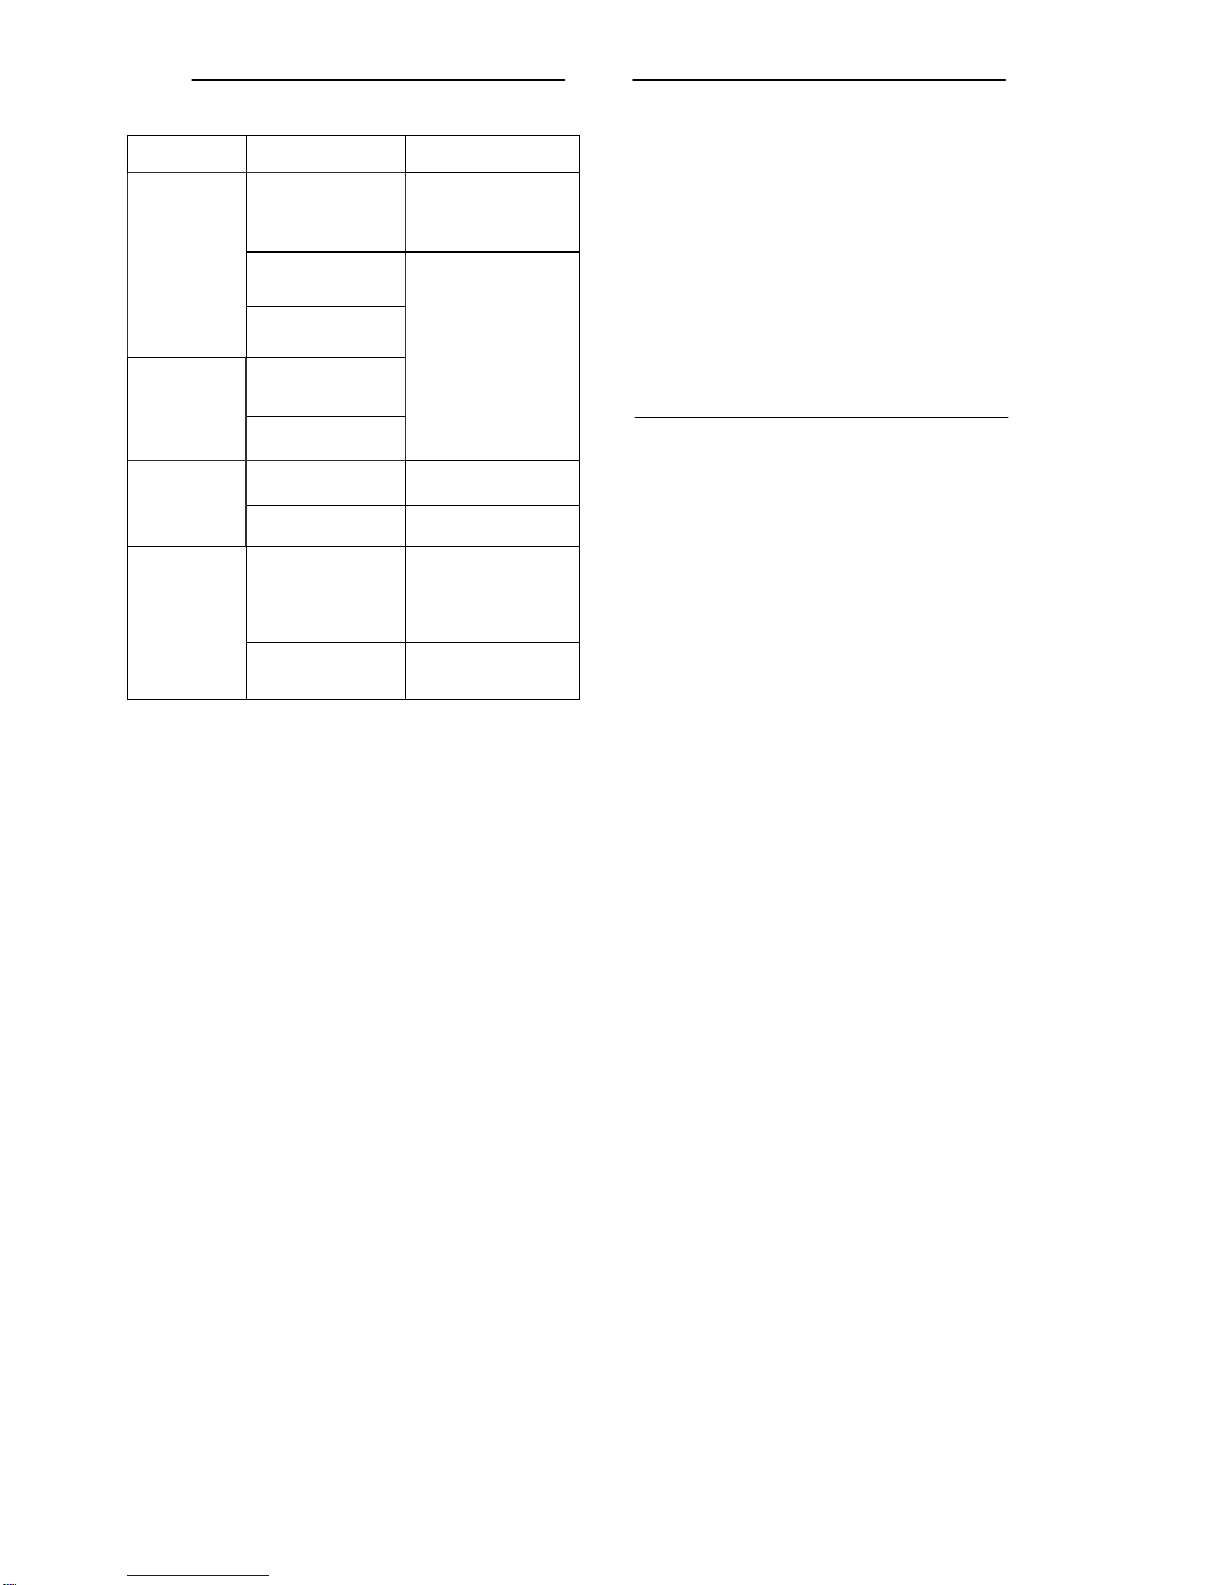
Fault Cause Solution
The appliance is not
hung properly on the
brackets.
Take down the
appliance and check it
is properly fixed.
The fan blade is
damaged.
Excessive
vibration.
The fan motor is not
fixed tightly.
The fan blade is
jammed.
Light on, but fan
does not work. The motor is
damaged.
Switch off the
appliance. Repair to be
carried out by qualified
service personnel only.
Light bulb broken. Replace with a bulb
with correct rating.
Both light and
fan do not work. Power connection
loose.
Check power supply.
Distance between
the appliance and
the cooking place too
large.
Readjust the distance
to:
Gas cookers: 65cm
Electric cookers: 40cm
Coal/oil cookers: 80cm
Suction
performance
not good. Metallic anti-grease
filter is dirty. Clean filters (see
Maintenance chapter).
8. TROUBLESHOOTING
9. TECHNICAL DATA
Power supply : 220-240V~ 50Hz
Power consumption – Fan : 200W
Power consumption – Luminary : 3 x
35W Max
Power consumption – Total : 305W
Protection class : II
Light bulb : Max. 35W (GU-10)
10. ENVIRONMENTAL
PROTECTION
Waste electrical products should not be
disposed of with household waste.
Please recycle where facilities exist.
Check with your Local Authority or
retailer for recycling advice.
60812070.21.06.2012

Guarantee
Manufacturer's Guarantee
This appliance is covered by a full manufacturer's 24 month parts and
labour guarantee and covers all parts and labour costs associated with
the repair of the appliance in a domestic environment We will repair any
defect that arises due to faulty materials or workmanship and use genuine
manufacturers parts.
All daims must be supported with the original receipt or other reasonable
proof of purchase.
lf, during the guarantee period, the appliance becomes irreparable as
agreed by the engineer approved by GAA then we reserve the right, at our
discretion, to exchange the defective product with a replacement appliance
at GAA's sole cost If the same product is no longer available an alternative
will be offered with the same functions as the faulty item.
After an appliance has been repaired or replaced any remaining balance
of the GAA guarantee will be valid and any further call outs during this
prescribed period will be covered by GAA on the replacement appliance.
Should any person other than an authorized engineer modify or attempt to
repair the appliance then the warranty will be invalid.
The guarantee applies to the UK mainland, Scotland, Ireland, ROI and
France but is not transferrable between EU countries.
This guarantee is non-transferrable to any other person or product
The guarantee is covered by UK law and is in addition to and does not
diminish your legal rights.
Exclusions to the guarantee
This guarantee does NOT cover:
Appliances that have been damaged or neglected as a result of failure to
store, assemble, install , use or care of the products in accordance with the
manufacturer's instructions – GAA will not accept responsibility under this
guarantee if a product is damaged or becomes defective due to, misuse,
neglect, wilful or accidental damage or act of god.
Normal wear and tear.
Consumable items such as carbon filters and bulbs.
Guarantee
Exclusions to the guarantee (continued)
Claims arising from nondomestic use or commercial environment
Any gas appliance not fitted by a gas safe qualified installer.
If no fault is found then GAAreserves the right to charge for the call out at
the going rate of £55.00 plus VAT.
In the course ofthe service work carried out it may be necessary to
remove the built in appliance from its fitted position. lfthe appliance is
glued, grouted or tiled in sud-l a manner that it cannot be removed, it is the
responsibility of the customer/installer to remove and reinstall the appliance
to facilitate the repair.
This Guarantee does not affect your statutory rights.
The guarantee is offered by GAALtd, 1301-1303 Lu Plaza,
2Wing Yip St, Kwun Tong, Kowloon, Hong Kong.
Customer Service
To arrange an in guarantee service call, please contact customer services
on the following numbers.
UK and N.Ireland - ISDAL Customer Care Centre
1: 0844 8001128 E: uksupport@cnagroup.hk
www.rnyspareparts.co.uk
Republic of Ireland (ROI) - ISDAL Customer Care Centre
France - SIDEAR Customer Care Centre
Table of contents
Other Designair Ventilation Hood manuals


Popular Ventilation Hood manuals by other brands

Zephyr
Zephyr APEX DAP-M90AMBX installation instructions

BOMANN
BOMANN DU 7600 IX instruction manual

Broan
Broan E54000 Series manual

BLAUBERG Ventilatoren
BLAUBERG Ventilatoren AH-S Series Installation instruction

Dacor
Dacor HRV46 installation instructions

Thermador
Thermador Masterpiece HMCB30WS installation instructions


Hansa
Hansa OTS6226IH operating instructions

Monogram
Monogram ZEM115SFSS quick start guide

Siemens
Siemens LF959RA50 Installation and use instructions and warnings

Whirlpool
Whirlpool RH9330XL installation instructions

ROBINHOOD
ROBINHOOD RCB2AH6WH Installation and operation instructions

FALMEC
FALMEC Lumen island Instruction booklet