DETAIL K2 POWER OPC503(G) User manual

OPC503(G)
3 INCH CHIPPER SHREDDER
OFFROAD TOWING ONLY • EXTRA LARGE FEED CHUTES • 7HP KOHLER ENGINE
ASSEMBLY GUIDE
PARTS AND SERVICE 1 (888) 277-6960 | WWW.DETAILK2.COM
DK2 USA WEST
4301 S VALLEY VIEW BLVD.
SUITE 1011 LAS VEGAS, NEVADA
89103 USA
DK2 USA EAST
3750 SOUTH AVENUE,
NORTH UNIT, TOLEDO, OHIO
43615 USA
DK2 CORPORATE OFFICE
5330 MAINWAY
BURLINGTON, ONTARIO
L7L6A4 CANADA

2 | OPC503(G) man.
TABLE OF CONTENTS
SECTION I: ASSEMBLY ............................................................3
STEP 1: INSPECT THE PACKAGING......................................................4
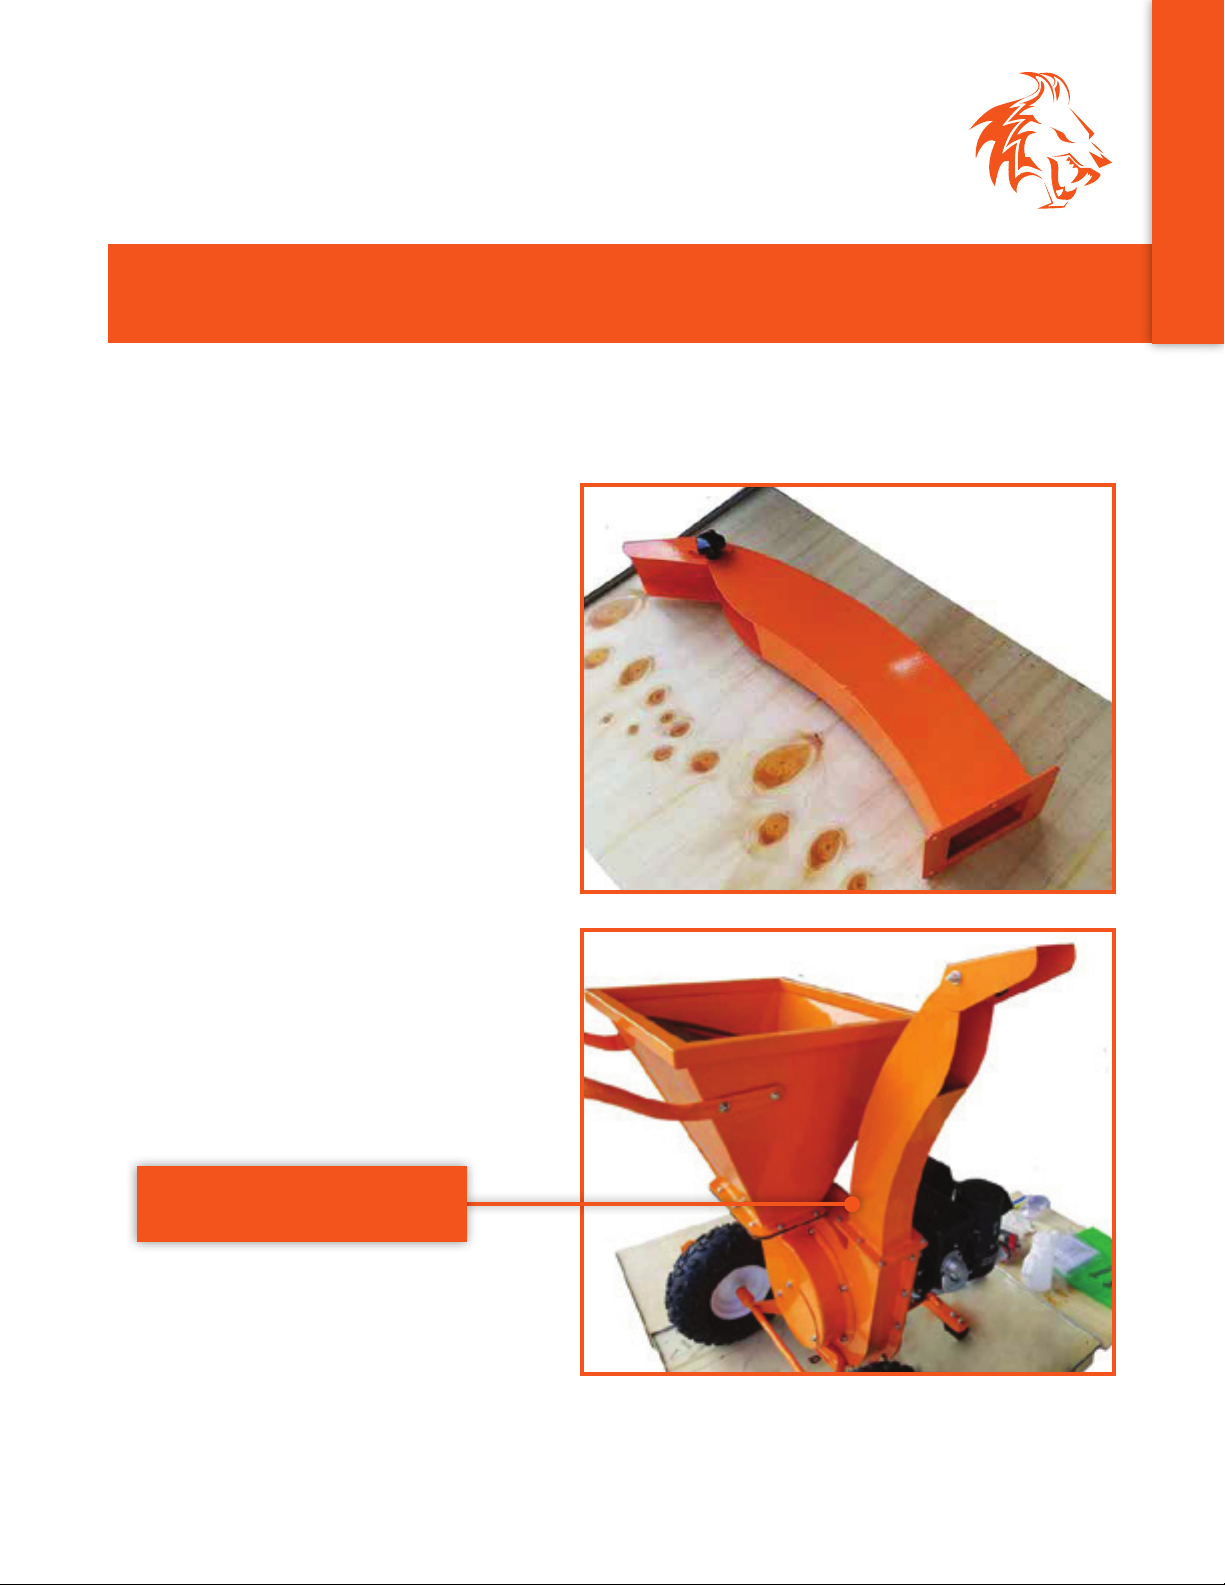
STEP 2: EXPULSION CHUTE ...........................................................5
STEP 3: FEED CHUTE .................................................................6
STEP 4: HANDLE .....................................................................7
STEP 5: TOW BAR ....................................................................8
SECTION II: SAFETY & OPERATION .................................................9
YOUR KOHLER ENGINE ..............................................................10
REVERSING YOUR OEM BLADES .......................................................11
SAFE PRACTICES & GENERAL INFORMATION ..........................................12
QUICK START & TROUBLESHOOTING .................................................13
SECTION III: PARTS & SCHEMATICS ................................................14
SCHEMATICS .......................................................................15
PARTS LIST .........................................................................16
WARRANTY .....................................................................17
ENGLISH

SECTION I
ASSEMBLY

4 | OPC503(G) man.
ASSEMBLY
CHECK THE PACKAGING
STEP 1: INSPECT THE PACKAGING
Open and unpack all items. Leave lots of working space. Inspect all parts.
The Chipper is shipped in a crate. Leave the sides folded down and use as your work space.
NOTE: Upon inspection of parts, if you find any damage or missing parts please call DK2
POWER at 1 (888) 277-6960 or contact us via our website at www.detailk2.com. We will
replace any damaged or missing parts to you for free. Please do not return to the store.
ENGLISH
v.210817 | 5
ASSEMBLY
STEP BY STEP INSTRUCTIONS
STEP 2: EXPULSION CHUTE
1. Remove all hardware from chute mounting holes, take care not to drop hardware down into
the chute opening.
2. Install the chute and the mounting hardware.
INSTALL WITH HARDWARE THAT
IS SUPPLIED WITH THE CHUTE
ENGLISH

6 | OPC503(G) man.
ASSEMBLY
STEP-BY-STEP INSTRUCTIONS
STEP 3: FEED CHUTE
INSTALL WITH NUTS & BOLTS
MOUNTED ON THE UNIT TO
ASSEMBLE THE CHIP CHUTE
MOUNT THE FEED CHUTE
ON TO THE CHIPPER USING
SUPPLIED HARDWARE
ENGLISH

v.210817 | 7
ASSEMBLY
STEP BY STEP INSTRUCTIONS
STEP 4: HANDLE
INSTALL THE HANDLE USING
4 BOLTS PRE-INSTALLED
ON THE CHUTE FOR THE
HANDLE TO BE ASSEMBLED
ENGLISH

8 | OPC503(G) man.
ASSEMBLY
STEP-BY-STEP INSTRUCTIONS
STEP 5: TOW BAR
INSTALL TOW BAR, SECURE
HITCH PIN SPRING LATCH
ENGLISH

SECTION II
SAFETY & OPERATION

10 | OPC503(G) man.
SAFETY & OPERATION
YOUR KOHLER ENGINE
Read the Kohler engine manual supplied with your unit for full engine operation, safety, and
maintenance instruction.
1On / O Key Lock
2Gas - Use Mid Grade or Higher
3Choke - Left is On / Right is O (Run Position)
4Gas On / O Switch - Left is O / Right is On
5Throttle - Rabbit Fast / Turtle Slow
6Pull Starter - Pull Tight - Then Pull Start
7Oil - Fill to mark 10W30, will not start if oil is low, has low oil shuto
protection. Two yellow caps are oil fill caps, use either one to fill oil.
1
2
5
6
7
3
4
ENGLISH

v.210817 | 11
SAFETY & OPERATION
REVERSING YOUR OEM BLADES
HOW TO REVERSE YOUR CHIPPER BLADES
1. Turn your engine key o, remove the key and unplug the spark plug on the engine.
2. Remove the rear cover on the chipper housing.
3. Before removing the bolts that mount the blades, place paper towels in the area opening
under the blade and the drum housing. This will help to catch bolts from dropping into the
bottom of the drum housing.
4. Remove the first bolt.
5. NOTE: Before removing the last bolt be sure to support the blade from sliding down into
the drum.
6. Remove the blade, reverse it to the new sharp edge and re-install it. Use only DK2 POWER
OEM blades.
7. Use Loctite on the bolt threads when replacing bolts.
8. Remove the feed chute to access additional blades.
2 4
8
5
8
ENGLISH

12 | OPC503(G) man.
SAFETY & OPERATION
SAFE PRACTICES & GENERAL INFORMATION
BEFORE TURNING THE KEY AND PULL STARTING ENGINE
• Clear area of all people and property that could be damaged.
• Flying projectiles from operation can cause injury.
• Wear safety glasses, hearing protection, and gloves.
• Do not wear loose fitting clothes that could get stuck in the moving parts of the machine.
• Children should not run this equipment.
• Stay alert of your surroundings and persons that could appear in the area of operation.
THIS UNIT IS DIRECT DRIVE
• There is no clutch to slip or burn up.
• Before starting, make sure all chutes are clear of branches as the cutting wheel will turn as
you pull the recoil starter. Cutter wheel must be free to turn when starting.
PERFORMANCE OPERATION
• Feed larger trees up to 3 inches in diameter slowly into the tubular feed chute, allowing the
cutter wheel to regain speed.
• Forcing a tree into the cutter wheel will stall the machine and damage the cutters or drive
shaft.
• Feed twigs, leaves, and branches up to 1 inch in diameter into the top hopper.
• Wear gloves, as the cutter will grab the branches and pull the into the machine and from
your hands. Never place hands into the top feeder.
• To clear the top feeder, turn the key o, remove it, and unplug the spark plug.
• Be safe, the cutter on this machine is high speed and the blades are very sharp.
SET BOTH OF YOUR WHEEL BRAKE PINS TO STABALIZE MACHINE
DURING OPERATION.
READ AND OBEY ALL WARNING LABELS ON THIS MACHINE
ENGLISH

v.210817 | 13
SAFETY & OPERATION
QUICK START & TROUBLESHOOTING
QUICK START SETUP
• Add 10W30 oil to the engine
• Add Gas
• Pin both wheels into pivot brake holes.
• Turn key on
• Half throttle (choke optional for cold starts)
• Pull start the engine
CHIPPING
• Engine on highest speed
• Feed smaller trees into chute and let go, tree with auto feed.
• Feed trees up to 3 inches in diameter slowly allow cutter wheel to regain RPM between cuts.
• Feed leaves and branches up to 1 inch in diameter through the top hopper.
TROUBLESHOOTING
• ENGINE WON’T START
• Turn key on - check engine oil level - check gas level
• Unplug key switch - if engine starts, replace the key switch
• Follow your Kohler engine manual for further troubleshooting instruction
• UNIT VIBRATES
• Check your chipper for missing or loose blades
• Check your chipper wheel is not obstructed and turns freely
ENGLISH

SECTION III
PARTS & SCHEMATICS

v.210817 | 15
PARTS & SCHEMATICS
SCHEMATICS
Scan here to access the DK2 POWER
Parts Store or open your browser and go to
www.detailk2.com/shop-power-equipment-parts
Your Chipper model is: OPC503(G)
ENGLISH

16 | OPC503(G) man.
PARTS & SCHEMATICS
PARTS LIST
No. Specification No. Specification
1M10 x 70 bolt 34 Gland
2Hitch trailer 35 5/16-24 UNF x 135 bolt
3Washer dia. 10.5 x dia. 22 x 2 36 Main chipper room
4Spring washer dia. 10 37 O-latch dia. 8
5M10 locknut 38 Tire
6M8 x 45 bolt 39 Axle
7Washer dia. 8.4 x dia. 20 x 1.6 40 M8 x 16 bolt
8Rubber pad 41 M6 locknut
9Support feet 42 Spring washer dia. 6
10 M8 locknut 43 Washer dia. 6.4 x dia. 12 x 1.6
11 Spring washer dia. 8 44 Side chipper room
12 Tow bar 45 Side chipper room cover
13 Latch dia. 8 46 M6 x 12 bolt
14 Engine plate 47 M8 x 20 bolt
15 M8 x 60 bolt 48 M8 x 25 bolt
16 Rubber pad dia. 10 49 Rubber pad
17 M8 x 85 bolt 50 Switch key wire
18 U-protection plate 51 Top feed hopper
19 Engine wire 52 Switch stop cover
20 Engine 53 M6 x 16 bolt
21 Protection pipe 54 Switch key
22 Main chipper room cover 55 Handle
23 5/16-24 UNF x 85 bolt 56 Plate for protection sheet
24 M8 x 25 bolt 57 Protection sheet
25 Blade 58 M6 x 20 bolt
26 Key 59 Outlet hopper adjusting plate
27 Blade roller 60 Knob
28 M8 x 20 bolt 61 Outlet hopper
29 Washer dia. 30 x dia. 13 x 4 62 M6 x 35 bolt
30 Straight hammer 63 Side plate for protection sheet
31 L-hammer 64 Side protection sheet
32 Straight sleeve 65 Side feed hopper
33 M8 x 50 bolt
ENGLISH

v.210817 | 17
PLEASE DO NOT RETURN TO THE STORE
YOU HAVE A 1 YEAR WARRANTY AND DK2 WILL REPLACE A DEFECTIVE PART FOR FREE.
CALL US AT 1 (888) 277-6960 FOR FAST WARRANTY PARTS AND QUESTIONS.
WHAT IS COVERED – 3 YEAR ENGINE AND 1 YEAR COMMERCIAL WARRANTY INCLUDED
Detail K2 Inc. warrants to the original purchaser that product will be free and clear of manufacturing defects in
workmanship and materials under normal use and service fora period of one (1) year from the date of the original
purchase. If within one (1) year from the original date of purchase this product fails due to defect inmaterial or
workmanship, Detail K2 will repair, replace, or supply any covered defective part at ouroption. DK2 POWER is 1-year
parts only warranty no labor. Kohler 3 year warranty is PARTS and LABOR.
Upon expiry of one (1) year, Detail K2 will have no further liability related to theproduct. Detail K2 does not authorize
any party, including its authorized distributors ordealers, to oer any other warranty on behalf of Detail K2 Inc.
SERIAL NUMBERS MUST BE REGISTERED ONLINE AT WWW.DK2POWER.COM, WARRANTY NON-
TRANSFERABLE.
KOHLER ENGINES –KOHLER CH SERIES ENGINES COMMERCIAL 3 YR PARTS AND LABOR WARRANTY
KOHLER ENGINES –KOHLER SH SERIES ENGINES RESIDENTIAL 2 YR PARTS AND LABOR WARRANTY
see your Kohler manual for specific warranty.
DK2–1-Year parts only, no labor. 3-year commercial Kohler warranty.
THIS WARRANTY DOES NOT COVER OR APPLY TO:
(a) Damage to the product due to misuse, mishandling and abuse
(b) Improper installation, maintenance and storage
(c) Expendable parts such as nuts and bolts, pins and springs, wiring and switch components, hydraulic hoses and
fittings, cutting teeth, cutting chains, cutting blades, throttles, belts and tires.
(d) Normal wear and tear
(e) Consequential damage & incidental damages such as damage to persons or property
PROCEDURE FOR OUTDOOR POWER EQUIPMENT WARRANTY
Within the one (1) year warranty period, the purchaser of the product can CALL 1 (888) 277-6960 or contact us on
www.DK2Power.com. Notify us of the claimed defect and provide proof of original purchase.At this timethe validity
of the claim will be determined, and if approved replacement parts will be issued. No returned product will be
accepted underwarranty unless accompanied by an RGA# issued by Detail K2 Inc.
DAMAGED FREIGHT
Damage to your product caused by freight mishandling is NOT covered under warranty. If your freight arrives
damaged, REFUSE it. Inspect your product when it arrives, otherwise if you accept it, you will be responsible for
filing any freight claims with the delivery company. DK2 warranty excludes damage to product.
RETURNS BEFORE GAS AND OIL
Follow the return policy from the retailer you purchased the equipment from.
RESOLUTION FOR A DEFECTIVE PRODUCT AFTER GAS AND OIL HAS BEEN ADDED.
Call us at 1 (888) 277-6960 between 8am-4pm Monday to Friday EST.
WARRANTY
3 YEAR ENGINE & 1 YEAR CHASSIS
ENGLISH


OPC503(G)
DÉCHIQUETEUR DE 3 POUCES
REMORQUAGE TOUT-TERRAIN SEULEMENT • GOULOTTES D’ALIMENTATION EXTRA LARGES • MOTEUR KOHLER 7 CV
GUIDE DE MONTAGE
PIÈCES ET SERVICE 1 (888) 277-6960 | WWW.DETAILK2.COM
DK2 USA OUEST
4301 S VALLEY VIEW BLVD.
SUITE 1011 LAS VEGAS, NEVADA
89103 ÉTATSUNIS
DK2 USA EST
3750 AVENUE SUD
UNITÉ NORD, TOLEDO, OHIO
43615 ÉTATSUNIS
SIÈGE SOCIAL DK2 CORPORATIF
5330 MAINWAY
BURLINGTON, ONTARIO
L7L6A4 CANADA

2 | OPC503(G) man.
TABLE DES MATIÈRES
SECTION I : MONTAGE ............................................................3
STEP 1 : INSPECTER L’EMBALLAGE .....................................................4
STEP 2 : GOULOTTE D’EXPULSION.....................................................5
STEP 3 : TRÉMIE D’ALIMENTATION .....................................................6
STEP 4 : POIGNÉE ....................................................................7
STEP 5 : BARRE DE REMORQUAGE .....................................................8
SECTION II : SÉCURITÉ ET FONCTIONNEMENT .......................................9
VOTRE MOTEUR KOHLER ............................................................10
INVERSER VOS LAMES D’ORIGINE .....................................................11
PRATIQUES DE SÉCURITÉ ET INFORMATIONS GÉNÉRALES ..............................12
DÉMARRAGE RAPIDE ET DÉPANNAGE .................................................13
SECTION III : PIÈCES ET SCHÉMAS.................................................14
SCHÉMAS ..........................................................................15
LISTE DES PIECES ...................................................................16
GARANTIE ......................................................................17
FRANÇAIS
Table of contents
Languages:
Popular Paper Shredder manuals by other brands


Martin Yale
Martin Yale papermonster S10 operating instructions

AmazonBasics
AmazonBasics B00TOAK5Q6 instruction manual

Fellowes
Fellowes POWERSHRED DS-500C instruction manual

Lervia
Lervia KH 4405 operating instructions

Opus
Opus CS 2212CD User guide manual

Martin Yale
Martin Yale MY 1000 SC operating instructions