DEWESOFT DS-CAM 600 Product manual

DS-CAM 600
TECHNICAL REFERENCE MANUAL
DS-CAM 600 V20-1
1

DS-CAM 600
TECHNICAL REFERENCE MANUAL
1. Table of contents
1. Table of contents 2
2. About this document 3
2.1. Legend 3
3. Key features 4
3.1. System Requirements 4
3.2. Naming 5
4. Technical data 6
4.1. Specification 6
4.2. Connections 8
4.2.1. Connectors and pinout 8
4.2.2. SIRIUS connection example 9
4.2.3. Connecting to existing DEWETRON systems 9
4.3. Resolutions / Framerates 11
5. Installation 13
5.1. Installation – in DEWESoft X 13
5.2. Installation – in DEWESoft 7.1 13
5.2.1. Required files 13
5.2.2. Step-by-step instruction 14
6. FAQ 19
6.1. Reference list 22
7. Warranty information 23
7.1. Calibration 23
7.2. Support 23
7.3. Service/repair 23
7.4. Restricted Rights 23
7.5. Printing History 24
7.6. Copyright 24
7.8. Trademarks 24
8. Safety instructions 24
8.1. Safety symbols in the manual 24
8.2. General Safety Instructions 24
8.2.1. Environmental Considerations 25
8.2.2. Product End-of-Life Handling 25
8.2.3. System and Components Recycling 25
8.2.4. General safety and hazard warnings for all Dewesoft systems 25
9. Documentation Version 28
DS-CAM 600 V20-1 2/27

DS-CAM 600
TECHNICAL REFERENCE MANUAL
2. About this document
2.1. Legend
The following symbols and formats will be used throughout the document.
Important
It gives you important information about the subject.
Please read carefully!
Hint
It gives you a hint or provides additional information about a subject.
Example
Gives you an example of a specific subject.
DS-CAM 600 V20-1 3/27

DS-CAM 600
TECHNICAL REFERENCE MANUAL
3. Key features
The DS-CAM-600 is a high-speed Gigabit-Ethernet camera with following key data:
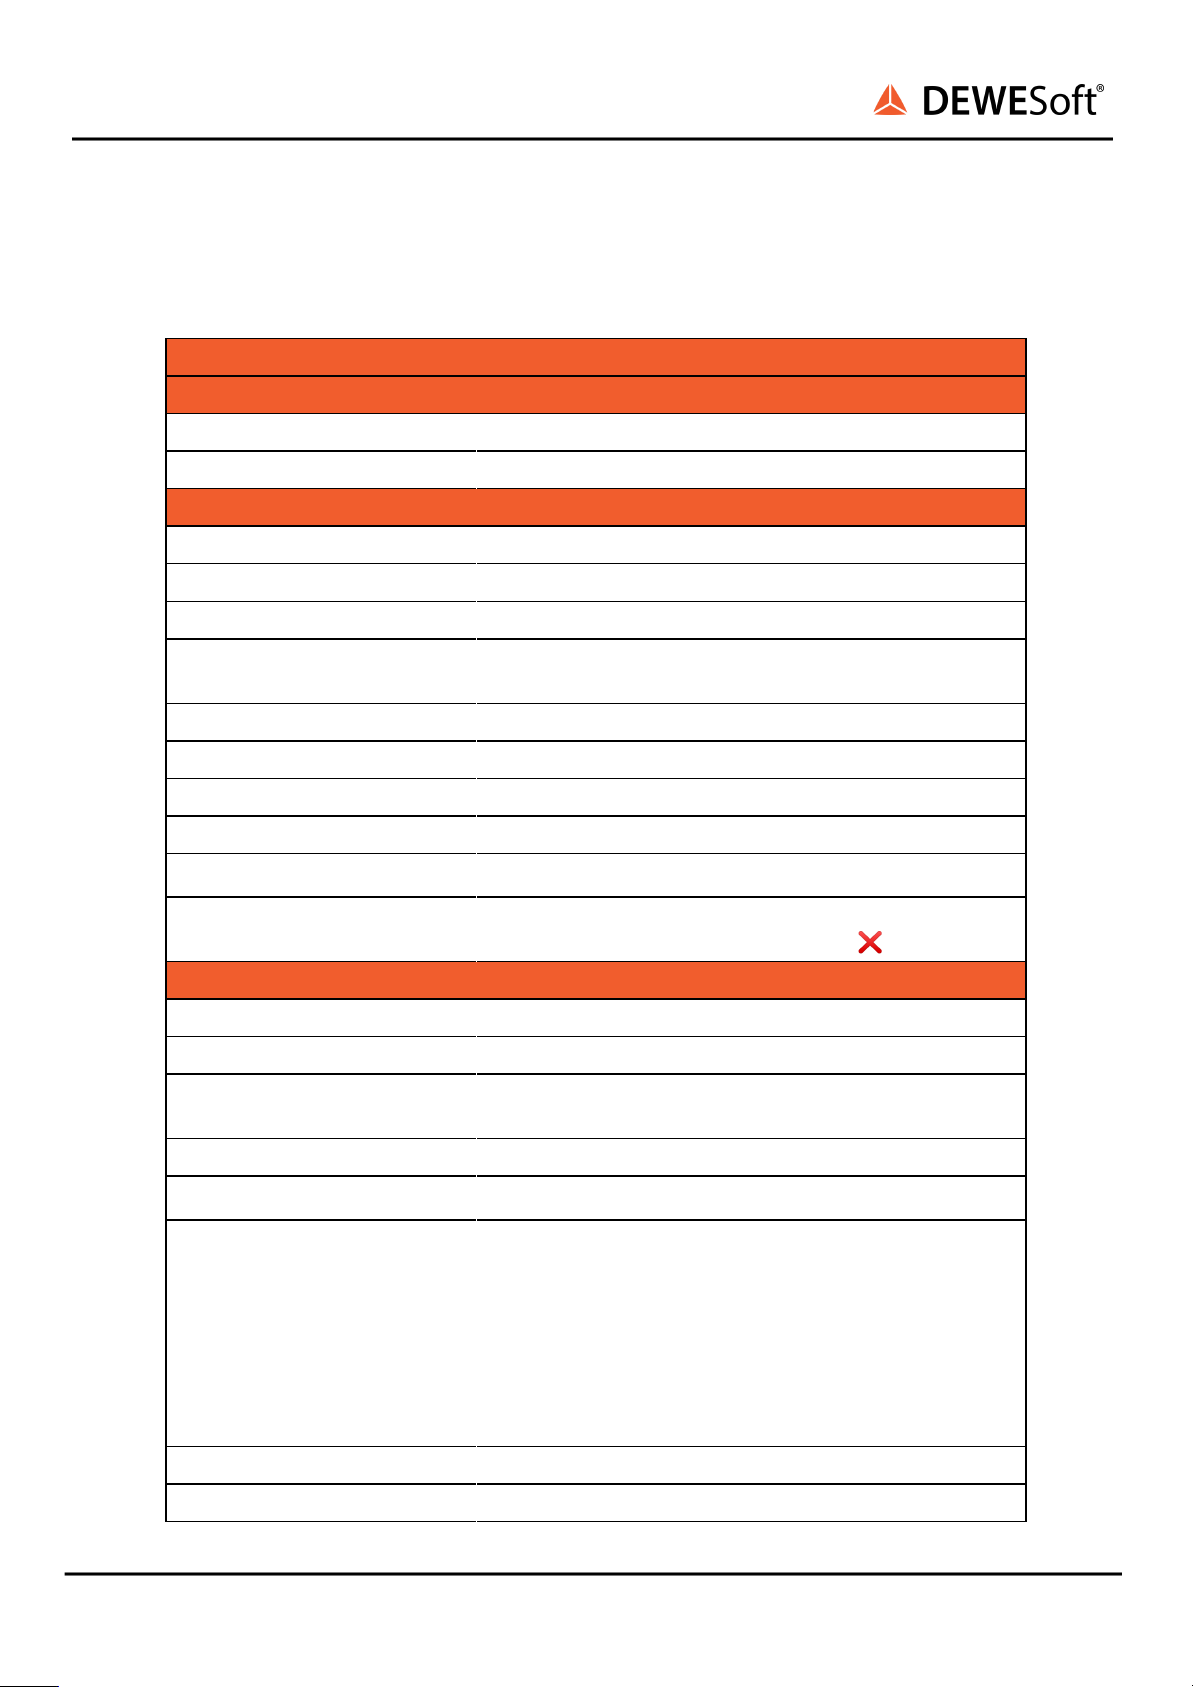
●600fps @ VGA (640x480)
●Full HD resolution 1920x1080
●Real-time data streaming with full resolution
●Monochrome
●Power-over-Ethernet (PoE)
●Real-time JPEG compression
●Sync (Triggered and free-run mode)
●Adjustable shutter time
●Standard C-Mount
●Small compact form factor
●Ruggedized (high-shock and vibration resistant, aluminium housing)
The camera supports the high-performance industrial standard “GigE Vision”. The standard introduced
in 2006 provides a framework for transmitting high-speed video and related control over Ethernet
networks.
The benefits are: high speed data transfer rates up to 1GBit/s (based on 1000Base-T) connectible to every
standard GigE Ethernet port and cable lengths up to 100m.
Dewesoft uses Smartek GigE SDK for communication with cameras that support GigE Vision standard.
Important
For best performance we recommend using a Core i5 CPU or better, 4 GB RAM and SSD for
storing data.
3.1. System Requirements
●1 Gigabit-Ethernet port
●Good PC performance (Core i5 CPU or better recommended, 4 GB RAM)
●DEWESoft X or 7.1
●Smartek GigE Vision SDK 2.6.2
●DEWESoft GigE driver (cdv) 2.0
3.2. Naming
For simplification the camera is called “DS-CAM-600” in this document. The correct name is “DS-CAM
GigE1-600”.
DS-CAM 600 V20-1 4/27

DS-CAM 600
TECHNICAL REFERENCE MANUAL
4. Technical data
4.1. Specification
DS-CAM-600
Color option
Color
✓
Monochrome
-
Optical specifications
Image sensor
CMOSIS CMV2000 2E5M1PP
Sensor type
CMOS
Resolution
VGA 640x480
FPS
300 FPS @ 1920x1080
600 FPS @ 640x480
Optical size
Diagonal 12.7 mm (2/3'')
Pixel size (in μm)
5.5 x 5.5
Dynamic range
60 dB
Shutter
Electronic Global Shutter
Shutter time
210 ns - 90 s
Color correction
Color (DS-CAM-600c):✔
B&W (DS-CAM-600bw):
❌
Mechanical specifications
Operating temperature
0 .. +50°C
Operating humidity
25% - 80% (no condensation)
Dimensions
54 x 40 x 92mm
(2.13 x 1.57 x 3.63in)
Lens mount
C-mount (1'' 32G thread)
Connectors
Gigabit Ethernet: RH45
Conformoty
CE
EN55022, class A
EN61000-4-2
EN61000-4-3
EN61000-4-4
EN61000-4-6
FCC Part 15, class A RoHS
GigE Vision 1.2
Power specifications
Supply voltage
Power-over-Ethernet (42-57V)
DS-CAM 600 V20-1 5/27

DS-CAM 600
TECHNICAL REFERENCE MANUAL
Power-over-Ethernet
✔
Power consumption
6 W
Illustration 1: Mechanical Drawing
DS-CAM 600 V20-1 6/27

DS-CAM 600
TECHNICAL REFERENCE MANUAL
4.2. Connections
4.2.1. Connectors and pinout
On the backside of the camera there are two connectors. For the trigger input there is a 4 pin Lemo 00
(called “IO connector”), for the data transfer an Ethernet connector. The pinout of the Ethernet
connector is according to the standard.
Illustration 2: Connectors
Illustration 3: IO connector pinout
Note that pins 3 and 4 are used for clocking the camera. Pins 1 and 2 are reserved for synching multiple
DEWESoft instruments!
4.2.2. SIRIUS connection example
In this picture you see a typical SIRIUS device consisting of a S-Box unit (integrated PC) on bottom and
one SIRIUS slice on top (from rear side).
DS-CAM 600 V20-1 7/27

DS-CAM 600
TECHNICAL REFERENCE MANUAL
The camera is powered via PoE (Power over Ethernet, via LAN connector), therefore a Power injector is
required (Gigabit-LAN port of computer → PoE injector → camera).
The second cable provides the trigger, connected to the SYNC port of the SIRIUS slice. The camera
frames are now in perfect sync with the analog data acquired by DEWESoftTM.
Note: Even if the camera is connected, synching to other SIRIUS devices is still possible, because there
are different pins used on the Sync-Connector for triggering/synching (see also IO connector pinout).
Illustration 4: SIRIUS S-Box with one SIRIUS on top, connected to the DS-CAM-600 (PoE injector in between)
4.2.3. Connecting to existing DEWETRON systems
The DS-CAM-600 is also compatible with existing DEWETRON systems.
Please consider the system requirements:
●See chapter System requirements
●DEWETRON instruments must not have DI-ISO option (isolated inputs/outputs)! In this case
clocking is not possible, only free-run (the CLK pin is not available on the connector).
Free-run operation (without clocking) is easy, just connect the camera over PoE injector to the GigE LAN
port.
DS-CAM 600 V20-1 8/27

DS-CAM 600
TECHNICAL REFERENCE MANUAL
If you want to trigger the camera, you have to use a special cable for the trigger/clock line. Usually every
DEWETRON instrument is equipped with a 37pin DSUB connector, please see DEWETRON manual for
pinout, here for example is the pinout for the Orion-1622-100 (see Reference List (b)).
●Connect EXT_CLK1 (pin 17) to CLK of the Lemo 00 connector of the camera (pin 3).
●Connect DGND (pin 37) to GND of the Lemo 00 connector (pin 4)
●Set the pin EXT_CLK1 to “Video” in DEWESoft hardware setup
Illustration 5: DEWETRON Orion-1622-100 DSUB 37 pinout
DS-CAM 600 V20-1 9/27

DS-CAM 600
TECHNICAL REFERENCE MANUAL
Illustration 6: Clockout setup of EXT_CLK1 pin in DEWESoft
4.3. Resolutions / Framerates
Sensor type
CMV2000
Active pixels
2048 x 1088
STANDARD RESOLUTIONS
Resolution
Active pixels
MAX. FRAME RATE
Full frame 4.2M
2048 x 2048
N/A
Full frame 2.2M
2048 x 1088
333 FPS
2K
2048 x 1080
336 FPS
HD 1080
1920 x 1080
336 FPS
SXGA
1280 x 1024
355 FPS
XGA
1024 x 768
471 FPS
HD 720
1280 x 720
502 FPS
DS-CAM 600 V20-1 10/27

DS-CAM 600
TECHNICAL REFERENCE MANUAL
SVGA
800 x 600
600 FPS
PAL
768 x 576
625 FPS
WVGA
752 x 480
748 FPS
VGA
640 x 480
748 FPS
QVGA
320 x 240
1460 FPS
Hint
Results (FPS) should be considered only as approximate MAX values. It depends on the system
performance (CPU, JPEG compression, harddisk). We recommend to test cameras with your
setup at about 0.8*max_FPS and higher to find where corrupted image, frame lost or buffer
overrun will occur.
DS-CAM 600 V20-1 11/27

DS-CAM 600
TECHNICAL REFERENCE MANUAL
5. Installation
5.1. Installation – in DEWESoft X
For DEWESoft X all the drivers come with the Fullinstaller, if you select the option “GigE camera driver”
during installation. To check if the drivers are installed, go to Settings → Hardware setup → Video and see
if the checkbox “GigE” is visible. If not, execute the full installer again and reinstall the option.
The last DEWESoft X full installer can be downloaded here:
http://www.dewesoft.com/dewesoft7/developer-downloads
Illustration 7: DEWESoft X – installing GigE camera driver
5.2. Installation – in DEWESoft 7.1
5.2.1. Required files
(a) GigECamera_v2_0_SDK_262 or newer
●Go to http://www.dewesoft.com/download/section/6 and download
GigECamera_v2_0_SDK_262.zip.
●It includes the Smartek GigE SDK 2.6.2 and the DEWESoft driver GigEcamera 2.0.
DS-CAM 600 V20-1 12/27

DS-CAM 600
TECHNICAL REFERENCE MANUAL
(b) Dewesoft 7.1 b82 or newer
●Available from http://www.dewesoft.com/dewesoft7/developer-downloads
(Note that you need to be logged in to download beta software.)
5.2.2. Step-by-step instruction
1. Install Smartek_GigEVisionSDK
Note that you must be administrator, not just user with admin rights! After installation be sure that
“Smartek GigE Vision Filter Driver” is installed (picture 1) under Local area Connection Properties.
Hint
Note that “Filter Driver” filters out all packets that are not GigE on hardware level, so the
camera will work much faster than without the filter.
Illustration 8: Installed Smartek GigE Vision Filter Driver.
2. Connect camera to PC via Ethernet cable and PoE Power Injector in between.
DS-CAM 600 V20-1 13/27

DS-CAM 600
TECHNICAL REFERENCE MANUAL
3. The DS-CAM-600 supports DHCP, so just set your computer's IP address to automatic and wait until
the IP is assigned. To test if the camera is working you can run Smartek GigEVisionClient. By right-click
on the camera you can also set IP to fix, if you prefer.
Illustration 9: OK, cameras can be used, close the GigEVisionClient and start DEWESoft.
4. To enable the camera in Dewesoft copy the file GigECamera.cdv into the Dewesoft Addons folder,
usually located in Dewesoft7\Bin\V7_1\Addons
5. Copy and replace your existing DEWESoft.exe with the one downloaded.
6. Start DEWESoft and go to Settings > Hardware setup > Analog. For triggered mode (DEWESoft is
clocking the camera), check if your device (such as DEWE-43 for example) is set to Standalone or Master:
Illustration 10: Dewesoft > Settings > Hardware setup > Analog: Set device to Master or Standalone
7. Go to the Video tab and check »GigE Vision« and »Use trigger«.
DS-CAM 600 V20-1 14/27

DS-CAM 600
TECHNICAL REFERENCE MANUAL
Illustration 11: DEWESoft: Hardware setup > Video: finds GigE camera(s).
“File types for storing” should be set to “DVI” which is uncompressed DEWESoft video format. The CPU
will not have enough power to additionally do the “live” compression. Depending on the measurement
duration, the video file can get very big. For compression after the measurement set the appropriate
compressor in “AVI file type for compression”. We recommend downloading the XVID codec. In Analysis
mode you can then select your datafile and click “AVI compress”.
Illustration 12: AVI compress after measurement
8. Go to Ch. Setup, click the Video button, click the Unused button to enable the video channel.
DS-CAM 600 V20-1 15/27

DS-CAM 600
TECHNICAL REFERENCE MANUAL
Illustration 13: DEWESoft: Channel setup > Video
HINT
Ensure the firmware version of SIRIUS hardware is at least 4.5.0.16, otherwise please update the
firmware. This is done with the “USB Firmware Upgrade Tool” from
http://www.dewesoft.com/download/section/1. Also the Firmware
File can be downloaded there. Close DEWESoft, start the Upgrade Tool, select “DEWESoft USB”
interface and firmware file and Start. After finished, it is very important to unplug power and USB
cable and reboot the SIRIUS device.
9. Enter the channel setup. By now, already a picture should be shown.
Please look up the “FAQ” section, if you get a NO FRAMES RECEIVED error.
DS-CAM 600 V20-1 16/27

DS-CAM 600
TECHNICAL REFERENCE MANUAL
Illustration 14: DEWESoft: Video settings
●The shutter bar determines the light exposure duration (brightness).
●If the light is too dark, use the gain bar to increase brightness by software.
●The JPEG quality is inversely to the compression. 80% means good quality, low compression.
Illustration 15: poor and good picture quality
●With the HDR option you are able to increase the dynamic from 60 up to 120dB if you have an
image with low dynamic range (e.g. only light grey and dark grey shapes).
●To improve the performance if using the camera on an Ethernet switch, use “Optimize for
switched network”
●Use the “Advanced Setup”, if you want to change specific parameters of the camera, such as the
custom resolution and AOI, area of interest, for instance.
Hint
If you change the frame rate, after typing the value, the input field gets a yellow color; confirm
the value by pressing the Enter key.
DS-CAM 600 V20-1 17/27

DS-CAM 600
TECHNICAL REFERENCE MANUAL
6. FAQ
GigE checkbox in hardware setup missing / Support for 64 bit Windows: For 64-bit Windows all three
Smartek GigE paths need to be set to Win32_i86 in Environment variable PATH. Go to My Computer and
click System properties > Advanced system settings > Advanced tab > Environment Variables > System
variables > select Path > Edit.
Make the following changes:
%GIGE_VISION_SDK_PATH%\bin\Win32
%GENICAM_ROOT_V2_0%\bin\Win32_i86
%GENICAM_ROOT_V2_0%\bin\Win32_i86\GenApi\Generic
Save and reset Windows. Path correctness can be checked by GetEnvironmentVariable('PATH');
No picture shown, “No frames received” error:
If you receive the error “NO FRAMES RECEIVED”, check: •
●Is the Trigger/Sync cable connected?
●Try decreasing the Shutter value
●Check in hardware setup if the DEWESoft USB device is set to Master or Standalone
●Disable Trigger in hardware setup and check if it’s working in free-run mode (cable problem?)
Camera not found (not in GigEVisionClient, not in DEWESoft)
●Check if the status LED on the camera is green, booting takes ABOUT 1 MINUTE!
●If using a GigE-Switch with PoE ports, ensure output power is sufficient, check status LED during
operation
●Check Windows Firewall settings
Camera not found (not found in DEWESoft; yellow mark in GigEVisionClient)
Not able to use the cameras. Most probably the computer and the camera are not in the same subnet.
DS-CAM 600 V20-1 18/27

DS-CAM 600
TECHNICAL REFERENCE MANUAL
Illustration 16: IP address problem
(See also Illustration 8 for a working example.)
Change IP address of the camera
Illustration 17: Change IP address of the camera
If you manually change the IP address, please use the same subnet as the computer, example:
PC: 192.168.1.100, Subnet 255.255.255.0
Camera: 192.168.1.101, Subnet 255.255.255.0
The IP is ok, if the cameras are found with a red mark (see Illustration above), close GigEVisionClient and
start DEWESoft.
DS-CAM 600 V20-1 19/27

DS-CAM 600
TECHNICAL REFERENCE MANUAL
GigEVision client does not start, error message when starting
You can get it working by doing the following: Check if the operating system of your computer is 32bit
or 64bit.
Copy the 64-bit dlls (otherwise take the ones from the 32bit directories) from
C:\Program Files\Smartek\GigEVisionSDK\bin\Win64 and
C:\Program Files\Smartek\GigEVisionSDK\GenICam\bin\Win64_x64 to
\Windows\system32 (respectively \Windows\SysWOW64)
Then start the GigEVisionClient from C:\Program Files\Smartek\GigEVisionSDK\bin\Win64
Cameras not working in DEWESoft
If you followed the step-by-step installation procedure, but still the camera is not working in DEWESoft,
you can try to copy the used dlls manually:
Copy the 32-bit dlls from
C:\Program Files\Smartek\GigEVisionSDK\bin\Win32
and
C:\Program Files\Smartek\GigEVisionSDK\GenICam\bin\Win32_i86
to
DEWESoft’s Addons folder.
Then restart DEWESoft.
Performance improvements (e.g. in case of frames lost or buffer overrun)
A loss of a few frames during a measurement is normal, due to collisions on the Ethernet network.
Here are some useful hints to improve the performance:
●Do not operate the camera in a fully loaded network (e.g. office computers). Just use direct
connection or one switch (with no additional participants).
●Disable all anti-virus, firewall, indexing and synchronization programs running in background.
●Also check if you really have a Gigabit-Ethernet network card, not only 100Mbit/s.
●Check if the LAN cable is at least of CAT5 quality, if you have longer cable lengths it should be
even better.
●For this camera, the main improvement can be done by using a powerful CPU.
●Try to decrease the JPEG compression (e.g. from 80 down to 50%)
●Use the Windows resource monitor (can be found in Task manager) to check for bottlenecks.
●For optimal performance we recommend enabling “Jumbo” frames on your PC network card.
“Jumbo” frames are Ethernet packets larger than 1500 bytes. This way less CPU time is spent for
data reception therefore increasing performance and minimizing data loss. (Control panel ->
network and internet -> view network status and tasks (network and sharing center) -> change
DS-CAM 600 V20-1 20/27
Other manuals for DS-CAM 600
1
Table of contents
Other DEWESOFT Security Camera manuals