DGH DGH 55B User manual

Page 1 of 87 DGH 55B-INS-OMENG Rev: 3
DGH 55B (PACHMATE 2)
ULTRASONIC PACHYMETER
OPERATOR’S MANUAL
For Use with Firmware v3.0.x
And DGH Connect Software v1.1.x
Equipment Manufactured By Authorized Representative
0120
Pachmate
DGH 55B
2
Molenstraat 15
2513 BH, The Hague
The Netherlands
Phone: +31.70.345.8570
EC REP
EMERGO EUROPEDGH TECHNOLOGY, INC.
110 SUMMIT DRIVE
SUITE B
EXTON, PA 19341
USA (610) 594-9100
Molenstraat 15
2513 BH, The Hague
The Netherlands
Phone: +31.70.345.8570
EC REP
EMERGO EUROPEDGH TECHNOLOGY, INC.
110 SUMMIT DRIVE
SUITE B
EXTON, PA 19341
USA (610) 594-9100
Molenstraat 15
2513 BH, The Hague
The Netherlands
Phone: +31.70.345.8570
EC REP
EMERGO EUROPEDGH TECHNOLOGY, INC.
110 SUMMIT DRIVE
SUITE B
EXTON, PA 19341
USA (610) 594-9100
Prinsessegracht 20
2514 AP, The Hague
The Netherlands

Page 2 of 87 DGH 55B-INS-OMENG Rev: 3
This page intentionally left blank.

Page 3 of 87 DGH 55B-INS-OMENG Rev: 3
Table of Contents
TABLE OF CONTENTS............................................................................................................................................3
1. INTRODUCTION..............................................................................................................................................6
1.1 GENERAL DEVICE DESCRIPTION ......................................................................................................................6
1.2 DEVICE CLASSIFICATION .................................................................................................................................6
1.3 INDICATIONS FOR USE .....................................................................................................................................6
2. DESCRIPTION OF SYMBOLS.......................................................................................................................7
3. GENERAL CAUTIONS AND WARNINGS, PRESCRIPTION DEVICE STATEMENT AND
OPERATOR QUALIFICATIONS...................................................................................................................8
3.1 GENERAL CAUTIONS AND WARNINGS..............................................................................................................8
3.2 PRESCRIPTION DEVICE STATEMENT.................................................................................................................8
3.3 OPERATOR QUALIFICATIONS............................................................................................................................8
4. USE OF ULTRASOUND IN OPHTHALMIC MEASUREMENT ...............................................................9
4.1 INTRODUCTION TO ULTRASOUND....................................................................................................................9
4.2 USING ULTRASOUND TO ASCERTAIN CORRECT PROBE ALIGNMENT ...............................................................9
4.3 ULTRASONIC MEASUREMENT ........................................................................................................................10
4.4 PROPER APPLANATION FOR TAKING AMEASUREMENT.................................................................................11
5. ULTRASONIC EXPOSURE AND INTENSITIES ......................................................................................12
5.1 TISSUE EXPOSURE TO ULTRASOUND ENERGY ...............................................................................................12
5.2 ULTRASONIC INTENSITIES..............................................................................................................................12
5.3 BIOMETRIC MEASUREMENT CAPABILITIES ....................................................................................................13
6. PHYSICAL DESCRIPTION ..........................................................................................................................14
6.1 FRONT VIEW ..................................................................................................................................................14
6.2 BACK VIEW....................................................................................................................................................16
6.3 PROBE............................................................................................................................................................17
6.4 CALIBRATION VERIFICATION BOX (CALBOX) ...............................................................................................18
7. PROBE USE AND INDICATORS.................................................................................................................19
7.1 INSERTING AND REMOVING THE PROBE..........................................................................................................19
7.2 HOLDING THE DEVICE....................................................................................................................................20
7.3 ‘CHECK PROBE’ERROR MESSAGE .................................................................................................................21
7.4 ‘PLUG IN PROBE’ERROR MESSAGE ...............................................................................................................21
7.5 ‘PQF FAILED’ERROR MESSAGE....................................................................................................................21
8. VERIFYING PACHMATE 2 CALIBRATION............................................................................................22
8.1 PROCEDURE FOR VERIFYING CALIBRATION...................................................................................................22
9. POWER MODES.............................................................................................................................................24
9.1 MEASUREMENT MODE...................................................................................................................................24
9.2 STANDBY MODE ............................................................................................................................................24

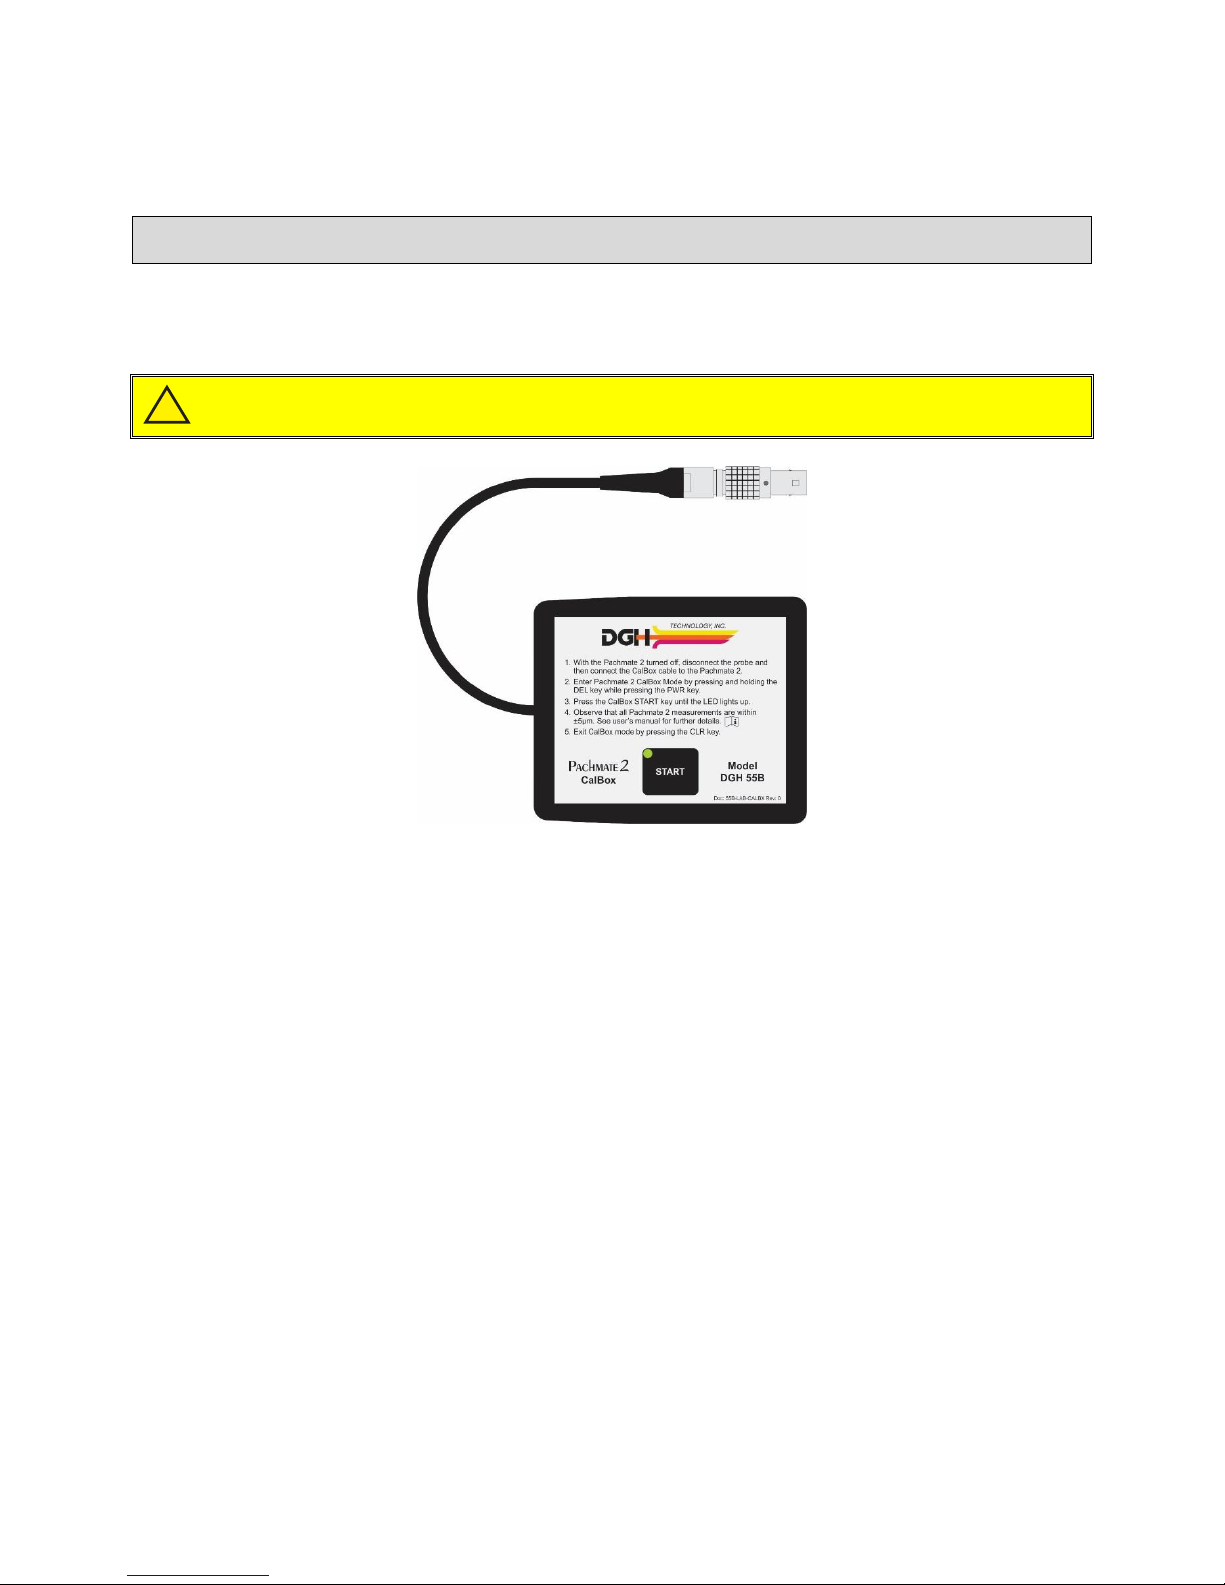
Page 4 of 87 DGH 55B-INS-OMENG Rev: 3
9.3 SLEEP MODE..................................................................................................................................................25
9.4 POWERING DOWN ..........................................................................................................................................25
9.5 CHECKING BATTERY POWER .........................................................................................................................25
10. PATIENT MODES ..........................................................................................................................................26
10.1 SINGLE PATIENT MODE.............................................................................................................................26
10.2 MULTI-PATIENT MODE .............................................................................................................................28
10.3 CHANGING PATIENT MODES .....................................................................................................................30
10.4 ADDING PATIENT IDENTIFICATION INFORMATION.....................................................................................31
10.5 CLEARING PATIENT INFORMATION............................................................................................................32
11. MEASUREMENT MODES............................................................................................................................33
11.1 CONTINUOUS AVERAGING MEASUREMENT MODE....................................................................................33
11.2 MAPPING MEASUREMENT MODE ..............................................................................................................34
11.3 CHANGING MEASUREMENT MODES ..........................................................................................................35
12. TAKING MEASUREMENTS ........................................................................................................................36
12.1 POWER UP SEQUENCE...............................................................................................................................36
12.2 MEASUREMENT IN CONTINUOUS AVERAGING MODE................................................................................37
12.3 MEASUREMENT IN MAPPING MODE ..........................................................................................................40
12.4 VIEWING DATE AND TIME.........................................................................................................................43
13. CONFIGURING THE PACHMATE 2..........................................................................................................44
13.1 ENTERING AND NAVIGATING THE CONFIGURATION MENU .......................................................................44
13.2 PARAMETERS FOR CONTINUOUS AVERAGING MEASUREMENT MODE.......................................................47
13.3 PARAMETERS FOR MAPPING MEASUREMENT MODE .................................................................................48
13.4 GENERAL DEVICE PARAMETERS ...............................................................................................................49
13.5 BLUETOOTH®PARAMETERS ......................................................................................................................51
14. CONFIGURING BLUETOOTH®CONNECTIONS ...................................................................................53
14.1 ENABLING BLUETOOTH®...........................................................................................................................53
14.2 PAIRING WITH A BLUETOOTH®ENABLED PRINTER ....................................................................................53
14.3 SENDING MEASUREMENTS TO A BLUETOOTH®ENABLED WIRELESS PRINTER ............................................55
14.4 PAIRING WITH A BLUETOOTH®ENABLED PC.............................................................................................56
14.5 ADDING COM PORTS................................................................................................................................59
14.6 SENDING AND RECEIVING INFORMATION VIA BLUETOOTH®CONNECTION TO A PC...................................60
14.7 RECALLING PAIRED DEVICE CONFIGURATION............................................................................................61
14.8 CLEARING ASINGLE PAIRED BLUETOOTH®DEVICE .................................................................................61
14.9 CLEARING ALL PAIRED BLUETOOTH®DEVICES........................................................................................62
15. DGH CONNECT SOFTWARE......................................................................................................................63
15.1 SOFTWARE REQUIREMENTS.......................................................................................................................63
15.2 INSTALLING THE SOFTWARE......................................................................................................................64
15.3 CONFIGURING THE SOFTWARE ..................................................................................................................65
15.4 ADDING A DEVICE .....................................................................................................................................67
15.5 EXPORTING PATIENT INFORMATION TO THE PACHMATE 2 ........................................................................68
15.6 INITIATING MEASUREMENT TRANSFER USING THE PC SOFTWARE .............................................................70
15.7 INITIATING MEASUREMENT TRANSFER USING THE PACHMATE 2 ...............................................................72
16. CHANGING BATTERIES .............................................................................................................................75
16.1 CHANGING THE BATTERIES.......................................................................................................................75

Page 5 of 87 DGH 55B-INS-OMENG Rev: 3
17. CARE AND MAINTENANCE.......................................................................................................................76
17.1 CLEANING AND DISINFECTING THE PROBE TIP..........................................................................................76
17.2 CLEANING THE UNIT.................................................................................................................................77
17.3 TRANSPORT AND STORAGE CONDITIONS...................................................................................................77
17.4 OPERATING CONDITIONS...........................................................................................................................77
18. TROUBLESHOOTING GUIDE ....................................................................................................................78
19. SERVICE..........................................................................................................................................................79
19.1 REPAIRS AND CUSTOMER SUPPORT...........................................................................................................79
19.2 VIEWING MODEL AND SERIAL NUMBER....................................................................................................79
19.3 WARRANTY...............................................................................................................................................80
20. MANUFACTURED BY DGH TECHNOLOGY, INC. ................................................................................80
21. AUTHORIZED EUROPEAN REPRESENTATIVE....................................................................................81
22. REGULATORY COMPLIANCE ..................................................................................................................81
22.1 EMI/EMC COMPLIANCE...........................................................................................................................81
22.2 WIRELESS RADIO MODULE REGULATORY COMPLIANCE ..........................................................................83

Page 6 of 87 DGH 55B-INS-OMENG Rev: 3
1. Introduction
1.1 General Device Description
The DGH 55B Ultrasonic Pachymeter (Pachmate 2) is a handheld, battery operated, ultrasonic
device that is used in the ophthalmic field for measuring the thickness of the human cornea.
Cornea thickness measurements are used in the preoperative evaluation of laser vision correction
procedures, and for the evaluation of glaucoma. The DGH 55B is also used as a diagnostic tool
in a variety of clinical situations including the general assessment of corneal health related to
pathologies and in evaluating corneal swelling following surgery or injury.
The general principle of operation of the DGH 55B Ultrasonic Pachymeter (Pachmate 2) is as
follows: The tip of the ultrasonic transducer (probe) is placed in contact with the patient’s cornea
which automatically initiates a measurement cycle. At the start of the measurement cycle, the
electronic circuit board transmits voltage pulses to the ultrasonic transducer (probe). The
piezoelectric element in the transducer converts these voltage pulses into ultrasonic energy,
sending a pulse of a high frequency sound waves (20MHz damped to 13MHz) through the eye,
and reflected pulses (echos) are received back to the transducer and are converted to voltage
pulses. The first echo to be received comes from the anterior corneal surface. If an echo spike
from the anterior corneal surface is received within an anticipated time window, the DGH 55B
then prepares to receive an echo spike from the posterior corneal surface. Only anterior and
posterior echo spikes that fall within specified voltage limits that ensure that the probe tip is
perpendicular to the cornea surface are accepted for processing. The time interval between the
accepted anterior and posterior echo spikes represents the thickness of the cornea. The time
interval is converted to a corresponding distance, or thickness, based on the acoustic velocity
through the cornea, and is displayed on the 16 x 2 LCD in units of microns.
1.2 Device Classification
Device: System, Imaging, Pulsed Echo, Ultrasonic Device: Diagnostic Ultrasonic Transducer
Panel: Radiology Panel: Radiology
Product Code: IYO Product Code: ITX
Device Class: II Device Class: II
Regulation Number: 21 CFR 892.1560 Regulation Number: 21 CFR 892.1570
1.3 Indications For Use
The DGH 55B Ultrasonic Pachymeter (Pachmate 2) is a handheld, battery operated, ultrasonic
device that is used in the ophthalmic field for measuring the thickness of the human cornea.

Page 7 of 87 DGH 55B-INS-OMENG Rev: 3
2. Description of Symbols
This symbol indicates a potentially hazardous situation which, if not avoided, could cause
injury or harm to the equipment, operator or patient.
This symbol indicates the type BF classification and is located on the front and back of
the unit.
This mark indicates that Notified Body 0120 (SGS United Kingdom Ltd) has certified the
management system of DGH Technology, Inc. meets the requirements of Directive
93/42/EEC Annex II (excluding section 4) for ultrasonic pachymeters.
This symbol located on the DGH 55B indicates that the equipment consists of electronic
assemblies and other components that may be subject to Directives 2002/96/EC,
2003/108/EC, and 2002/95/EC of the European parliament, which advises that electrical
and electronic devices must not be disposed of as normal domestic refuse. In order to
prevent environmental risks or endangerments by non-professional disposal, the disposal
of this product, including any accessories, must comply with valid practices as outlined in
Directives 2002/96/EC, 2003/108/EC, and 2002/95/EC and local regulations. All
electronic components and systems should be returned to Original Manufacturer for
disposal.
This symbol instructs the operator to read the operating manual.
This symbol indicates that DGH Technology, Inc. is the manufacturer of the DGH 55B
Pachmate 2 device. The YYYY under the symbol indicates the year the device was
manufactured.
This symbol indicates that Emergo Europe is the European Authorized
Representative for this device.
This symbol indicates that the model number of this device is DGH 55B.
This symbol indicates the serial number of the device. YYYY indicates
the year of manufacture and XXXX indicates the unit number.
!
0120
EC REP
yyyy
REF
SN

Page 8 of 87 DGH 55B-INS-OMENG Rev: 3
3. General Cautions and Warnings, Prescription Device
Statement and Operator Qualifications
3.1 General Cautions and Warnings
WARNING: EXPLOSION HAZARD. Do not use in the presence of flammable
anesthetics, gases or in oxygen-rich atmosphere.
WARNING: ELECTRICAL SHOCK HAZARD. Do not open the unit. Refer servicing to
qualified service personnel.
3.2 Prescription Device Statement
WARNING: The DGH 55B (Pachmate 2) is a prescription device and is only to be used
by, or under the supervision of, a licensed physician.
3.3 Operator Qualifications
This DGH 55B is intended to be used by trained medical professionals. The medical professional
operating the DGH 55B must have a general knowledge of the use of ultrasonic medical devices.
Use of the DGH 55B requires adequate dexterity to position the probe safely. The DGH 55B
uses audio feedback to inform the operator of the scan status.
!
!
!

Page 9 of 87 DGH 55B-INS-OMENG Rev: 3
4. Use Of Ultrasound In Ophthalmic Measurement
4.1 Introduction To Ultrasound
Ultrasound offers a non-invasive method to examine the interior of solid objects. Ultrasonic
pulses consist of sound waves of a frequency level too high to be heard by the human ear. When
a sound impulse strikes an interface, some sound is reflected, and some sound is transmitted.
Because some sound will pass through the surface and be reflected by the next surface, complex
structures can be examined with ultrasound. When ultrasound penetrates an object with several
interfaces, the reflected ultrasound can be observed as a waveform with peaks that are related to
the positions of the interfaces.
The DGH 55B transducer emits ultrasound pulses and detects ultrasound signals that have been
reflected back. The time delay between the echoes is used to calculate distances between
surfaces in the eye.
NOTE: Ultrasound cannot travel through air because air is not dense enough for the high
frequency waves to propagate. Ultrasonic measurements must therefore be performed by direct
contact or through a denser medium such as water.
4.2 Using Ultrasound To Ascertain Correct Probe Alignment
Sound travels in straight lines, so the direction of reflected sound is based solely on its angle of
incidence. Sound hitting an interface perpendicularly will reflect back along the same path that it
approached (Figure 4.2.1). Sound hitting an interface at an angle will reflect at an angle away
from the source (Figure 4.2.2). The transmitted sound will continue on at a lesser amplitude
because of reflected energy lost at the interface.
When reflected ultrasound is shown as a two-dimensional waveform, the peaks are related to the
positions of the interfaces. By comparing the relative height (intensity) of the peaks, one can
determine the angle at which the sound is striking it. Steadily diminishing peaks are an indicator
that the ultrasound is not perpendicular to the interfaces

Page 10 of 87 DGH 55B-INS-OMENG Rev: 3
Fig 4.2.1: Sound hitting an interface perpendicularly. Fig 4.2.2: Sound hitting an interface at an angle
Using these properties of ultrasound, the alignment of an ultrasound beam through the eye can be
determined. Proper alignment is crucial to the accuracy of measurements.
4.3 Ultrasonic Measurement
The speed of sound increases in denser materials. Liquids or substances containing large
amounts of water conduct ultrasound very well; air does not conduct ultrasound. Using the
relationship between the density of a material and the speed of sound, ophthalmic pachymeters
obtain distances in the eye by performing a two-step process.
First, a pulse of sound is timed as it travels through the cornea, reflects off the back of the
cornea, and returns to the transducer.
Second, the thickness is calculated based on the travel time and the speed of sound through the
eye:
distance = velocity × time
2
All thickness measurements are based on a corneal velocity of 1640 m/sec.

Page 11 of 87 DGH 55B-INS-OMENG Rev: 3
4.4 Proper Applanation for Taking A Measurement
Proper applanation is necessary for obtaining an accurate measurement. Proper applanation
occurs when the flat tip of the probe comes into full contact with the cornea perpendicular to the
cornea surface. The user must ensure that pressure against the cornea is minimized.
The diagram below illustrates correct and incorrect alignment of the probe tip to the cornea.
1 and 2: CORRECT: The probe IS perpendicular to the corneal surface.
3 and 4: INCORRECT: The probe IS NOT perpendicular to the corneal surface.
Fig 4.4.1 Correct and Incorrect Applanation
While in Measurement Mode, the Pachmate 4 will automatically take a measurement whenever
the tip of the probe is properly applanated to the cornea.
WARNING: Moving or realigning the probe tip while it is in contact with the cornea or
applying pressure while measuring the cornea may cause damage to the cornea. When
changing position or alignment of the probe, it is necessary to disengage contact, reorient
and then gently re-applanate.
!

Page 12 of 87 DGH 55B-INS-OMENG Rev: 3
5. Ultrasonic Exposure And Intensities
5.1 Tissue Exposure To Ultrasound Energy
The ultrasound energy emitted by the Pachmate 2 is low intensity and will have no adverse
effects on the patient and/or operator. However, the operator is still cautioned to perform
examinations using the principle of ALARA (As Low As Reasonably Achievable). All
examinations should be done so that the patient receives as little ultrasound radiation as possible.
Do not hold the probe against the eye or other tissue with the system activated except when
making a measurement. Do not make unnecessary measurements.
5.2 Ultrasonic Intensities
The Pachmate 2 has only one mode, and ultrasonic intensity settings are not under the control of
the operator. Thus, the values below are the values to be expected for a typical transducer.
Since the DGH 55B Pachmate 2 is not capable of exceeding either a TI of 1.0 or an MI of 1.0 in
any operating mode, the output of the system is reported as shown in the Table below.
The appropriate Thermal Index is the Thermal Index for Soft Tissue, TIS, for the non-scanning
case with a beam aperture of less than 1.0 cm.
Output Summary Table
Transducer Model
(used with DGH
55B)
Ispta.3
TI Type
TI Value
MI
Ipa.3 @ MImax
DGH2006DET
1.0 mW/cm2
TIS non-scan,
Aaprt < 1.0
0.0005
0.052
2.4 W/cm2
The acoustic output values given above are based on a presumed attenuation of ultrasound on
tissue, as developed by the U.S. Food and Drug Administration in 1985, and later incorporated
into other international Standards.
The attenuated intensity in the eye at the transducer focus (corresponding to maximum intensity)
may be calculated according to the formula recommended by the FDA:
zf
wt eII
069.0

Page 13 of 87 DGH 55B-INS-OMENG Rev: 3
where Itis the estimated in situ intensity, Iwis the measured intensity in water at the focus of the
transducer, fis the ultrasonic frequency, and zis the distance from the face of the probe to the
transducer focus, which is the point of measurement (3 millimeter).
The nominal piezoceramic (crystal) frequency of these transducers is 20 MHz. The actual
frequency of a particular transducer may vary from this value. The tissue calculations above
were done with the measured frequency of the transducer used for the tests.
5.3 Biometric Measurement Capabilities
The following table shows the measurement range for the DGH 55B Ultrasonic Pachymeter
(Pachmate 2)
Measurement Option: Standard Unit
Range (µm): 200 –1100 µm
Accuracy (µm): 5µm
Display Resolution (µm): 1 µm

Page 14 of 87 DGH 55B-INS-OMENG Rev: 3
6. Physical Description
6.1 Front View
Pachmate2PWR OD
OS
CLR
DEL CFG
ENT
1 2 3
6
5 8 9 104
7 9 11 12
Fig 6.1.1 The DGH 55B (Pachmate 2) Front View
1 Detachable Probe
Probe can be easily removed for cleaning or replacement.
2 LCD Display
16 x 2 character display used to present measurement data and/or configuration parameters to the
operator.
3 Bluetooth®Wireless Technology Logo
The Bluetooth®Wireless Technology Logo will only appear on the front panel of the unit if the
device has the optional Bluetooth®module installed.
4 DEL Key
Used to erase a single measurement from a group of measurements. Also used in conjunction
with the PWR key to enter the CalBox mode.
5 CFG Key
Used to enter and exit the configuration mode. Also used to display the unit model number,
serial number, software version and option number when the key is pressed and held.
6 CLR Key
This key is used to show the clearing options of the device. The user can clear all measurements,
OD measurements, OS measurements, patient information and paired devices. Pressing and
holding this key will display the date and time.

Page 15 of 87 DGH 55B-INS-OMENG Rev: 3
7 ENT Key
In measurement mode, pressing key will display battery status. In configuration mode, the key is
used to advance to the next configurable parameter. Pressing and holding this key will send
measurements to a PC/Printer (only available with Bluetooth®option installed).
8 OS Key
Press key to review or take measurements of the LEFT eye.
9 / Keys
Used to review measurements or to program options and numerical values presented on the
display.
10 OD Key
Press key to review or take measurements of the RIGHT eye. Also used while in the
configuration menu to confirm some device parameters.
11 PWR Key
Pressing this key turns the Pachmate 2 on. When the Pachmate 2 is on, pressing and holding
this key turns the Pachmate 2 off. Also used in conjunction with the DEL key to enter the
CalBox mode.
12 Lanyard Loop
Allows a point of attachment for a lanyard.

Page 16 of 87 DGH 55B-INS-OMENG Rev: 3
6.2 Back View
Exton PA USA
TECHNOLOG Y, INC. DGH 55B
Pachymeter
0120
!
1 2 3
Fig 6.2.1 The DGH 55B (Pachmate 2) Back View
1 Battery Compartment
A label in the battery compartment will show proper battery alignment. The unit model number
and serial number are also located on the label inside the battery compartment.
•The note “Contains Transmitter Module FCC ID: T7VEBMU / IC: 216QEBMU” will
appear on the battery compartment label in devices that contain a Bluetooth® wireless
module.
2 Model Number
Location of model number used to identify the unit.
3 Device Labels
Refer to Section 2 for descriptions of device classification and attention symbols.

Page 17 of 87 DGH 55B-INS-OMENG Rev: 3
6.3 Probe
1 2 3
Fig 6.3.1 The DGH 55B (Pachmate 2) probe
1 Probe Tip
The portion of the probe energized when taking a measurement
2 Transducer Housing
Contains the transducer and is engraved with a probe serial number.
3 Probe Connector
The probe connector plugs into the Pachmate 2 unit. See section 7.1 for instructions on proper
connection and disconnection of probe.

Page 18 of 87 DGH 55B-INS-OMENG Rev: 3
6.4 Calibration Verification Box (CalBox)
To check Pachmate 2 calibration, an electronic Calibration Verification Box “CalBox” is used
to simulate the thickness of the cornea. Instructions for using the CalBox are given in section 4
and they are also printed on the CalBox label.
WARNING: Calibration verification should be performed daily before using the device.
Fig 6.4.1 The DGH 55B (Pachmate 2) Electronic CalBox
!

Page 19 of 87 DGH 55B-INS-OMENG Rev: 3
7. Probe Use and Indicators
The Pachmate 2’s removable probe contains a piezo-electric element within its transducer
housing (See section 6.3). This element creates an ultrasonic pulse (main bang) that is channeled
through the clear plastic cone and focused to the point of measurement. The pulse exits the cone
and creates a return signal (echo) as it passes through the cornea. The piezo electric element
receives the return signal (echo), and the Pachmate 2 analyzes the magnitude of the return signal
(echo) in order to calculate corneal thickness.
Correct use and maintenance of the probe is essential for collecting accurate measurements. The
operator must ensure that the probe is properly cleaned and connected so that the device can
perform a probe self-test.
The Pachmate 2 automatically performs a self-test to check the functionality of the probe. This
test is done every time the device is put into Measurement Mode. Typically the operator will be
unaware that a self-test is occurring, however the operator must know how to react if an error
message is produced.
7.1 Inserting and Removing the probe
WARNING: Twisting the probe connector while it is being inserted/removed from the
Pachmate 2 can damage both the probe and Pachmate 2.
7.1.1 The probe connector is designed to rotate, allowing the user to rotate the probe out of the
body of the device or position the probe at a comfortable angle for measurement.
!

Page 20 of 87 DGH 55B-INS-OMENG Rev: 3
7.1.2 When inserting the probe, align
the probe connector prong to fit
into the Pachmate 2. The prong
is a half-circle with a small hole
in it.
7.1.3 The connectors are designed to go together
WITHOUT twisting. When inserting or removing
the probe, slide the connectors together without
twisting.
7.2 Holding the Device
While handling the device, try to avoid contact with the probe tip (clear plastic cone) so as to
avoid contamination. Touching the probe tip with ungloved hands may leave a residue that will
cause the device to return an error message when self-testing (See section 7.3).
This manual suits for next models
1
Table of contents
Other DGH Measuring Instrument manuals