Dialogue Technology Flybook V5 User manual

FlyBook V5 User’s Manual
V51BBB

i
Table of Content
PREFACE...................................................................................................................................................III
COPYRIGHT AND SAFETY NOTICES.......................................................................................................... III
ABOUT THIS MANUAL ...............................................................................................................................V
TAKING CARE OF FLYBOOK V5................................................................................................................V
INTRODUCING FLYBOOK V5.................................................................................................................. 1
FRONT-LEFT VIEW..................................................................................................................................... 1
REAR VIEW................................................................................................................................................ 3
USING V5 IN CLAMSHELL MODE AND TABLET MODE................................................................... 5
USING V5 IN CLAMSHELL MODE............................................................................................................... 5
USING V5 IN TABLET MODE...................................................................................................................... 5
GETTING STARTED WITH FLYBOOK V5............................................................................................. 7
BATTERY INSTALLATION............................................................................................................................ 7
CONNECTING ACADAPTER...................................................................................................................... 9
POWERING ON V5 FOR THE FIRST TIME ................................................................................................. 10
LED DESCRIPTIONS............................................................................................................................... 10
USING FINGERPRINT READER ............................................................................................................11
USING FLYBOOK V5 INPUT DEVICES.................................................................................................11
USING POINTING DEVICES .......................................................................................................................11
USING STYLUS ........................................................................................................................................ 12
USING KEYBOARD................................................................................................................................... 12
FLYBOOK CONTROL CENTER............................................................................................................. 15
OPENING CONTROL CENTER .................................................................................................................. 15
USING CONTROL CENTER....................................................................................................................... 16
AUTOMATIC BACKLIGHT CONTROL................................................................................................. 17
CUSTOMIZING V5 DISPLAY.................................................................................................................. 18
CONNECTING DEVICES......................................................................................................................... 18
CONNECTING AUDIO DEVICES ................................................................................................................ 18
CONNECTING USB DEVICES .................................................................................................................. 20
CONNECTING AN EXTERNAL DISPLAY .................................................................................................... 20
CONNECTING TO A TV............................................................................................................................. 21
USING AN EXPRESSCARD....................................................................................................................... 21
SECURING YOUR V5 .............................................................................................................................. 23
BEFORE YOU GO ONLINE....................................................................................................................... 23
INSTALLING A FIREWALL ......................................................................................................................... 24
INSTALLING A SPYWARE BLOCKER......................................................................................................... 24
CONNECTING LOCAL AREA NETWORKS........................................................................................ 24
CONNECTING LAN.................................................................................................................................. 24
CONNECTING A WIRELESS LAN (WLAN).............................................................................................. 25
USING THE BUILT-IN MODEM .............................................................................................................. 25

ii
MAKING A DIAL-UP CONNECTION ........................................................................................................... 25
SENDING AND RECEIVING A FAX ............................................................................................................. 26
USING THE BUILT-IN WWAN MODULE.............................................................................................. 27
INSTALLING SIM CARD ........................................................................................................................... 27
CONNECTING V5 TO A WIRELESS WAN................................................................................................. 28
USING THE BUILT-IN BLUETOOTH MODULE................................................................................... 28
USING THE BUILT-IN WEBCAM........................................................................................................... 29
ENABLING THE WEBCAM ........................................................................................................................ 29
ADJUSTING WEBCAM ORIENTATION ...................................................................................................... 29
MANAGING POWER SYSTEM.............................................................................................................. 30
CUSTOMIZING SYSTEM BIOS.............................................................................................................. 30
ACCESSING BIOS SETUP....................................................................................................................... 31
UPDATING BIOS FIRMWARE................................................................................................................... 31
TROUBLESHOOTING ............................................................................................................................. 31
IDENTIFYING PROBLEMS ......................................................................................................................... 32
GENERAL HARDWARE PROBLEM............................................................................................................ 32
HAVING V5 SERVICED............................................................................................................................. 35
POWER SPECIFICATION ....................................................................................................................... 35
Index……………………………………………………………………………………………………….36

iii
Preface
Copyright and Safety Notices
Please read this section before using your computer. Retain this manual for
future reference.
Copyright
This publication, including all photographs, illustrations and software, is protected
under international copyright laws, with all rights reserved. Neither this manual,
nor any of the material contained herein, may be reproduced without written
consent of the manufacturer.
Disclaimer
The information in this document is subject to change without notice. The
manufacturer makes no representations or warranties with respect to the
contents hereof and specifically disclaims any implied warranties of
merchantability or fitness for any particular purpose. The manufacturer reserves
the right to revise this publication and to make changes from time to time in the
content hereof without obligation of the manufacturer to notify any person of such
revision or changes.
Trademark Recognition
Bluetooth is a trademark of the Bluetooth SIG, Inc. (Special Interest Group). The
Bluetooth trademark is owned by Bluetooth SIG, Inc. USA. BlueSoleil is a
trademark of IVT Corporation. Dialogue Technology Corporation is a registered
trademark. FlyBook is a trademark of the Dialogue Technology Corporation.
Windows is a registered trademark or trademark of Microsoft Corporation in the
United States and/or other countries. All other product names used in this manual
are the properties of their respective owners and are acknowledged.
Federal Communications Commission (FCC)
This equipment has been tested and found to comply with the limits for a Class A
digital device, pursuant to Part 15 of the FCC Rules. These limits are designed to
provide reasonable protection against harmful interference in a residential
installation. This equipment generates, uses, and can radiate radio frequency
energy and, if not installed and used in accordance with the instructions, may
cause harmful interference to radio communications. However, there is no
guarantee that interference will not occur in a particular installation. If this
equipment does cause harmful interference to radio or television reception, which
can be determined by turning the equipment off and on, the user is encouraged
to try to correct the interference by one or more of the following measures:
1 Reorient or relocate the receiving antenna.

iv
2 Increase the separation between the equipment and the receiver.
3 Connect the equipment onto an outlet on a circuit different from that to
which the receiver is connected.
4 Consult the dealer or an experienced radio/TV technician for help.
Shielded interconnect cables and a shielded AC power cable must be employed
with this equipment to ensure compliance with the pertinent RF emission limits
governing this device. Changes or modifications not expressly approved by the
system's manufacturer could void the user's authority to operate the equipment.
Declaration of Conformity
This device complies with part 15 of the FCC rules. Operation is subject to the
following conditions:
1 This device may not cause harmful interference, and
2 This device must accept any interference received, including interference
that may cause undesired operation.
FCC Caution
Any changes or modifications not expressly approved by the party responsible
for compliance could void the user's authority to operate this equipment.
The antenna(s) used for this transmitter must not be colocated or operating in
conjunction with any other antenna or transmitter.
Enabling wireless LAN and wireless WAN simultaneously in one computer is not
allowed . While one is in use, the other will be turned off.
Running wireless devices in the aircraft is prohibited. Make sure all wireless
devices in your computer are turned off during the flight.
FCC Radiation Exposure Statement
This equipment complies with FCC radiation exposure limits set forth for an
uncontrolled environment. This equipment should be installed and operated with
a minimum distance of 20 cm (8 inches) between the radiator and your body.
FCC Wireless Regulation
Due to the FCC regulations, wireless LAN and wireless WAN modules shall not
work in a machine simultaneously. If these two modules are installed in the V5,
while one is in use, the other will be off automatically by the system.
Battery Caution
Danger of explosion if battery is incorrectly replaced. Replace only with same or

v
equivalent type recommended by the manufacturer. Discard used batteries
according to the manufacturer’s instructions.
About This Manual
This User’s Manual provides information to help you operate and get the most
from your FlyBook V5. Read the Quick Start Guide to quickly set up and begin
using your computer. Please read “Copyright and Safety Notices” on page iii
before using your computer.
Taking Care of FlyBook V5
After you unpack your computer, store the packing materials in case you want to
ship the computer or if you have to return it for servicing.
Your notebook computer is a precision instrument that should be handled with
care. Use common sense and follow the guidelines below, and your computer will
last you for many years.
Do’s and Don’ts with FlyBook V5
Do not twist the display counterclockwise.
Do not place heavy objects such as books on the computer.
Do not use FlyBook V5 near water or a heat source such as a radiator.
Do not expose the computer to temperatures above 50° C or below 0° C.
Keep the computer away from direct sunlight or heat sources.
Do not expose the computer to rain or moisture.
Do not spill water or any other liquid on the computer.
Do not place the computer near magnetic fields.
Avoid subjecting your computer to heavy shocks or vibrations.
Do not expose the computer to dusty or dirty environments.
Do not place the computer on uneven surfaces.
Do not cover the air vents around the computer.
Only use the AC adapter that is provided with your computer.
Safety Information
FlyBook V5 has been designed and tested to meet the most recent standards of
safety in notebook technology equipment. To ensure safe use of FlyBook V5,
refer to the following safety instructions and any caution or warning messages on
the equipment or in the user manual.
Read and follow all instructions marked on FlyBook V5 and in the user
manual before operating the
V5. Store all safety information in a secure place for future reference.
Always set FlyBook V5 on a stable surface.
Only operate FlyBook V5 from the type of power source indicated on the

vi
rating label on the AC adapter.
Ensure all ventilation openings are not blocked or covered.
Keep an adequate space (around 6 inches or 15 cm) around FlyBook V5.
Never insert objects of any kind into the ventilation openings.
When using an extension cord with FlyBook V5, ensure that the total ampere
rating on the equipment connected to the cord does not exceed the
extension
cord ampere rating maximum value.
Only use the supplied power cord. Do not place anything on the power cord.
Place the power cord where it will not be in the way of foot traffic.
Always unplug any modem, LAN, or power cables from FlyBook V5 before
you clean it.
When using FlyBook V5 in tablet mode, use the safety strap to avoid
dropping FlyBook V5.
Warning! The safety strap is only to prevent dropping the V5. It is not
designed for carrying the V5.
Contacting Service
Disconnect FlyBook V5 from power and contact qualified service personnel if any
of the following occurs:
The power cord or adapter is damaged.
Liquid has been spilled on FlyBook V5
FlyBook V5 does not operate correctly when operating instructions are
followed.
FlyBook V5 has been dropped, or the case is broken open.
FlyBook V5 performance is seriously degraded.
If service is required, contact a sales representative or a local service center, or
go to http://www.dialogue.com.tw for service information.

vii
Cleaning FlyBook V5
Follow these instructions when cleaning FlyBook V5.
Wipe the display with a clean soft cloth.
If you use a mild glass cleaner to clean the display, spray a little on the cloth
and then wipe the display. Do not spray cleaner directly onto the display.
Clean the outside of the computer case with a soft cloth. You can moisten
the cloth with a non-alkaline detergent.
Use a vacuum cleaner to clean dust from the keyboard.
Warning! Before cleaning the computer, turn it off, unplug the AC
adapter, and then remove the battery.
Caution: Do not wipe the keyboard, pointing device, pointing device
buttons, or fingerprint reader with a damp cloth.
Note: Do not wipe the keyboard, pointing device, pointing device
buttons, or fingerprint reader with a damp cloth.

1
Introducing FlyBook V5
Congratulations on purchasing FlyBook V5!
FlyBook V5 supports both Windows XP and the
newest member of the Windows operating
system family, Windows Vista.
The V5 is a powerful mobile computer which
performs dual duty as a notebook or tablet
computer. Advanced networking features include
WLAN, WWAN, Bluetooth, and even an internal
modem.
FlyBook V5 uses a pointing device with mouse
buttons on both sides of the unit and a clickable scroll bar for added convenience.
The LCD monitor can be rotated and laid flat to enable you to use FlyBook V5 as
a tablet computer. Using the stylus, you can write text and draw on the tablet as
you would on conventional paper.
The built-in webcam enables you to be seen by contacts using Windows MSN or
other messaging software. The camera can be rotated 225 degrees for maximum
flexibility.
The powerful Li-ion rechargeable battery provides more than 3 hours of mobility,
making FlyBook V5 the best choice for people on the go.
Taking a Tour of FlyBook V5
This section describes the major components of your new FlyBook V5.
Front-Left View

2
Status LEDs
– These LEDs display when the AC adapter is connected, when the HDD
is being accessed, or when the WWAN, WLAN, or Bluetooth is
activated.
Pointing device buttons (right)
– These pointing device buttons emulate mouse right and left buttons. The
top button corresponds to a mouse right button. The lower button
corresponds to a mouse left button. Refer to “Using FlyBook V5 Input
Devices” on page 11 for more information.
Scroll bar
– This bar enables you to scroll up and down in web pages or word
processing software. Refer to “Using FlyBook V5 Input Devices” on
page 11 for more information.
Stick pointer device
– The Stick Pointer moves the cursor in the direction of the pressure you
apply with your finger.
RF kill switch
– Wireless transmission uses power. Use this button to disable the
wireless feature of your computer to save power or when instructed to
do so, for example on an aircraft.
Fingerprint reader
– When you set up fingerprint authentication, you can use the fingerprint
reader to turn on the computer. In addition to logging in to the computer,
the fingerprint can control access to some applications.
Power button
– Press and hold the power button for two seconds to turn on the
computer and press it for one second to resume the system from
suspend and hibernate modes.
Left speaker
– Stereo speakers are built into the computer. The right speaker is on the
opposite side of the V5.

3
Pointing device buttons (left)
– These pointing device buttons emulate mouse right and left buttons. The
right button corresponds to a mouse right button. The left button
corresponds to a mouse left button. Refer to “Using FlyBook V5 Input
Devices” on page 11 for more information.
AC power connector
– Connect the AC adapter to this connector.
Middle mouse button
– This button corresponds to the center button on a conventional mouse.
Stereo Microphones
– Use the built-in stereo microphones for recording sound, video
conferencing or video chatting with friends
Webcam and webcam LED
– Use the built-in webcam for video conferencing with friends. The LED
indicates when the camera is active
Ambient light sensor
– This sensor detects ambient light and reduces screen brightness to
adjust for optimum display quality. Refer to “Automatic Backlight
Control” on page 17 for more information.
Stylus slot
– Use the stylus in place of the mouse to interact with FlyBook V5.
Rear View

4
1. RJ-11 modem jack
– Connect a phone line to this jack to use the internal modem.
2. Ethernet connector
– Connect the computer to your home or office network (LAN) with the
Ethernet connector.
3. Monitor (VGA) connector
– Connect an external display or projector to the monitor connector.
4. TV connector
– Connect a TV to this connector to use the TV as an external display.
5. Headphone jack
– Connect headphones or external speakers to the headphone jack.
6. Microphone jack
– Connect a microphone to the microphone jack.
7. USB connectors
– Connect USB devices such as printers or flash drives to the USB
connectors.
8. Air vent
– Air vents help to prevent the interior of the computer from overheating.
Do not block the air vents.
9. Strap slot
– This slot enables you to attach a strap to avoid accidentally dropping the
V5.
10. ExpressCard slot
– Install an ExpressCard in the ExpressCard slot.

5
Using V5 in Clamshell Mode and Tablet Mode
FlyBook V5 can be operated in Clamshell mode as a standard notebook or in
tablet mode, enabling you to use the V5 as you would a tablet computer.
Using V5 in Clamshell Mode
Follow these steps to use the V5 in clamshell mode:
1. Open the display.
2. Adjust the display to a comfortable viewing angle.
Using V5 in Tablet Mode
Follow the steps below to use the V5 as a tablet computer:
1. Open the display.

6
Caution: Take care when adjusting the display not to twist or force
the display to an extreme angle. See “Do’s and Don’ts
with FlyBook V5” on page v.
2. Tilt the display forwards until it is vertical.
Note: You can adjust the tilt of the display to adjust for glare,
sunlight and other environmental factors to provide optimum
viewing.
3. Twist the display clockwise 180 degrees.
Caution: Do NOT twist the display counterclockwise. You will damage
the LCD display.
4. Flip the screen down as shown.

7
FlyBook V5 can now be used as a tablet computer.
Getting Started with FlyBook V5
This chapter explains how to install and charge the battery, how to connect the
AC adapter, and how to power up the V5 for the first time.
Battery Installation
When your FlyBook V5 ships, the battery is not installed. This section explains
how to install the battery.
Using the Battery Lock
There are two latches for securing the battery in place: the battery lock (B) and
the battery release (A).

8
The battery lock must be manually closed. The battery release is spring loaded
and closes automatically when you insert the battery.
Installing the Battery
1. Slide the battery lock to the unlocked position .
2. Align the guides on the sides of the battery with the guides in the bay and
then install the battery.
3. Slide the battery lock to the locked position
Warning! Always close the battery lock after inserting the battery. If
the battery lock is not closed, the battery could fall out
when carrying the computer and cause injury or damage
the battery.

9
Removing the Battery
1. Slide the battery lock to the unlocked position .
2. While holding the battery release in the open position , remove the battery.
Charging the Battery
The first time you charge the battery, you should charge it for eight hours.
Thereafter, the standard charging time is about three hours. To charge the battery,
install it in the computer (see “Installing the Battery” on page 8) and then
connect the AC adapter (see “Connecting AC Adapter” on page 9.)
Connecting AC
Adapter
1. Connect the AC cable (A)
to the AC adapter.
2. Connect the other end of
the AC cable (B) to an
electricaloutlet.
3. Connect the AC adapter (C)
to the AC jack on the
computer.
Once V5 is connected to power by AC adapter, the battery charge LED lights.

10
Powering on V5 for the First Time
For information on turning on FlyBook V5 for the first time, refer to the bundled
booklet Windows® Quick Start Guide.
LED Descriptions
V5 LED indicators function as follows:
1. Battery
(V5 is running.)
– LED off: No battery
– LED on: Battery discharge or battery is charged fully
– LED blink slowly: Battery is charging.
– LED blinks quickly: Battery's capacity is below 10%.
Warning! If no battery is installed, then the battery LED is always
off.
2. Hard Disk Drive
– Red: The hard drive is being accessed.
3. Wireless LAN
– Off: The wireless LAN module is turned off.
– On: The wireless LAN module is turned on.
– Blinking: Data is being transmitted or received.
4. Wireless WAN
– Off: The wireless WAN module is turned off.
– On: The wireless WAN module is turned on.
– Blinking: Data is being transmitted or received.
Note: The wireless WAN module is available only on some V5
models.
11
5. Bluetooth
– Slow blinking: The Bluetooth module is on standby.
– Fast blinking: Data is being transmitted or received.
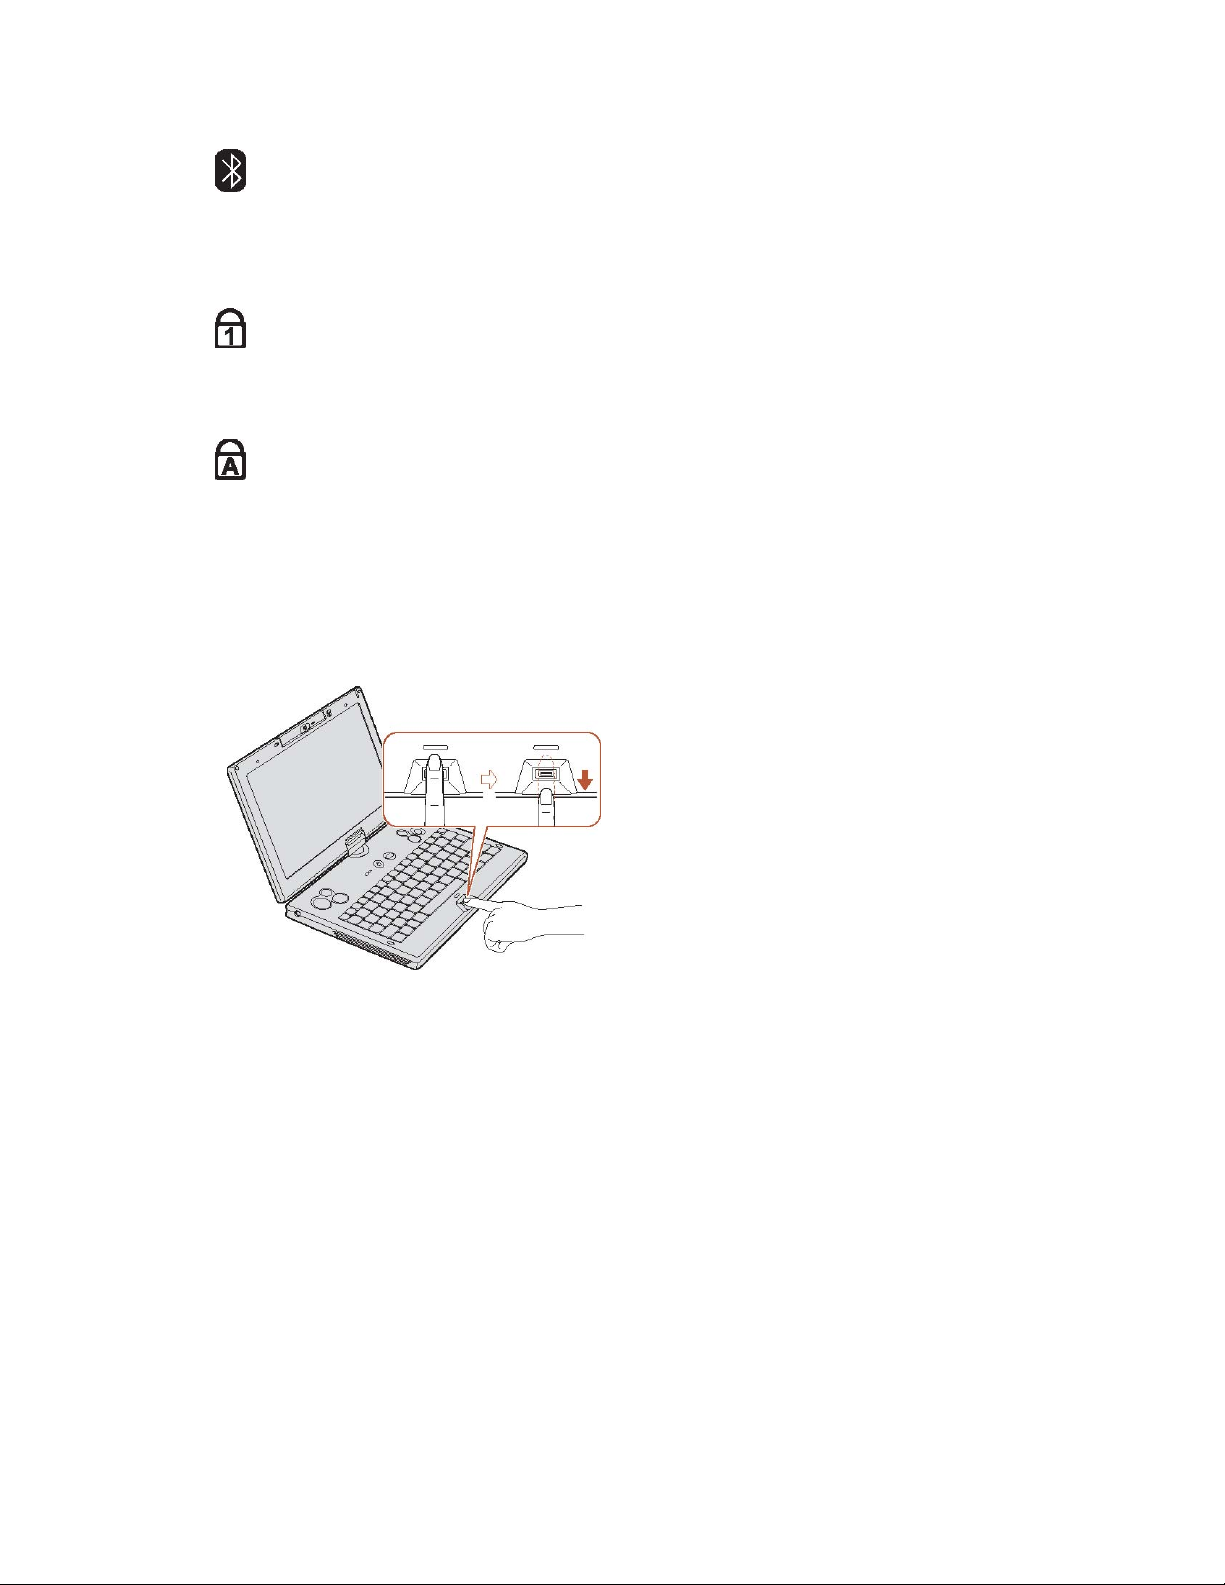
6. Num Lock
-Lights when the numeric keypad is enabled.
7. Caps Lock
-Lights when Caps Lock mode is enabled. When enabled you can type
alphabetic characters without holding the Shift key.
Using Fingerprint Reader
Fingerprint reader allows you to control
access to your computer system and
applications.
To enroll your finger and use the
fingerprint applications, see the bundled
Quick Start Guide and Fingerprint
Reader Utility Guide or the online help
for the fingerprint reader utility.
Using FlyBook V5 Input Devices
FlyBook V5 incorporates several ways to interact with the operating system and
applications. The V5 has a keyboard that emulates a standard keyboard with the
addition of Fn hotkeys. The easy to use pointing device enables you to perform
the same function as a mouse or touchpad. Buttons are located on both the left
and right side of the V5 for easy access. A scroll bar enables you to scroll up and
down in web pages or word processing applications. Finally, the stylus emulates
a mouse when using the V5 as a tablet computer, and also enables you to write
on the screen.
Using Pointing Devices
The pointing device consists of a stick pointer and two sets of dual click-buttons

12
located on the left and right side above the keyboard. The scroll bar emulates a
clickable mouse wheel.
Press the stick pointer in the direction that you want the cursor to move. The left
buttons emulate the left, center, and right buttons of a standard 3 button mouse.
The two right buttons and scroll bar correspond to the two buttons and click
wheel of a clickable wheel type mouse.
To customize the pointing device, click Start | Control Panel and then
double-click the Mouse icon to open the pointing device configuration utility. The
configuration utility lets you customize settings to your preference. Click Help in
the pointing device utility for instructions on changing settings.
Using Stylus
The stylus not only emulates a mouse when the V5 is in tablet mode, it also
enables you to interact with FlyBook V5 as you would with paper and pen. You
can navigate the OS, write, and draw on the screen.
Calibrating the Stylus for the First Time
Before using the stylus with FlyBook V5, you should first calibrate the display.
For calibrating and using the stylus, please refer to the bundled Touch Panel
Utility Guide for further information.
Using Keyboard
The V5 keyboard emulates a standard-sized computer keyboard by incorporating
function keys, a numeric keypad, and the Fn key.
Left mouse
button
Center mouse
button Right mouse
button Right mouse
button
Left mouse
button Scroll bar
Stick
pointer
Other manuals for Flybook V5
1
Table of contents


