Diamond Audio Technology D6 Series User manual

Product Owners Manual
Serial Number____________________________________________________
Date Of Purchase__________________________________________________
REFERENCE AMPLIFIERS
CORPORATE OFFICE:
Diamond Audio Technology, Inc.
410 S. Benson Ln.
Chandler, Arizona 85224 USA
PHONE: (480) 813-6200
FAX: (480) 813-6210
WEB: www.DiamondAudio.com
SERVICE/TECH SUPPORT:
TOLL FREE 1-866-328-2834
TECH SUPPORT EMAIL:
LIMITED AMPLIFIER WARRANTY STATEMENT
HOW TO OBTAIN WARRANTY SERVICE
©2005 Diamond Audio Technology. All Rights Reserved
Diamond Audio Technology, Inc. (DAT) warrants this amplifier to be free from defects in material and workmanship for the lifetime of the
amplifier in its original installation provided the amplifier was purchased from and installed by an authorized DAT retailer. Amplifiers
purchased from but not installed by an authorized DAT retailer carry a one (1) year parts and labor guarantee.
This warranty is not transferable and applies only to the original purchaser of this amplifier in its original installation. Original
purchaser must reside in the United States and register the amplifier with DAT within 30 days of installation. Warranty registration
information can be found at www.diamondaudio.com or by calling 866-328-2834. Original purchaser must be able to provide proof of
purchase and installation with the sales receipt from the authorized DAT retailer that sold and installed the amp.
Should a manufacturing defect occur in the first three (3) years of the above said warranty period, DAT will replace the defective product
with new product of the same or equivalent value and performance. Should the defect occur after the first three (3), DAT will (at its
discretion), repair or replace the defective product or parts with new or remanufactured product for as long as the amplifier is in its original
installation. Damage or failure caused by any of the following is not covered under this warranty policy: negligence, improper use, abuse,
product modification, unauthorized repair attempts, accident, acts of God, misrepresentations by DAT retailers, and improper/inadequate
packaging during return shipping.
Warranty is void if serial numbers have been removed, altered or defaced or if protective seal is broken.
In the event a DAT product should require service, you should visit the authorized DAT retailer you purchased the product from and they
can expedite your claim. All claims must fall into the guidelines listed above and be accompanied by a copy of the original sales and
installation receipt from that authorized DAT retailer.
Product returned for warranty service must be freight-prepaid, properly packaged and clearly marked with the Return Authorization (RA)
number issued by DAT. Any product returned to DAT that is improperly packaged, does not have a RA number clearly marked on the package,
or never received a RA number; may be refused upon delivery. DAT does not assume responsibility for lost or misdirected product.
Repair or replacement under this warranty is the exclusive remedy of the consumer. DAT shall not be liable for any incidental or
consequential damages for breach of any expressed or implied warranty on this product. Some states do not allow the exclusion or
limitation or incidental or consequential damages, or allow limitations on how long an implied warranty lasts, so the above limitations or
exclusions may not apply to you. This warranty gives you specific legal rights and you may also have other rights that may vary from state to
state.
Customers outside the United States should contact their local sales office to obtain information on pricing, exchange unit availability,
instructions, service and warranty/non-warranty replacement or repair.

1 2
SPECIAL THANKS
©2005 Diamond Audio Technology. All Rights Reserved ©2005 Diamond Audio Technology. All Rights Reserved
Thank you for choosing a Diamond Audio D6 reference amplifier. The team here at
Diamond insists that you listen to music as the artist intended, and that's what drives us
to develop and engineer cutting edge audio solutions that are true to any audiophiles
guidelines. Each of Diamonds products are concepted, designed, engineered, tested and
sold by pure audio fanatics. Each one of us on the Diamond team realizes how important
audio performance is to you, because it is equally important to us. So rest assured that
you have purchased an amplifier that truly has no competition.
Thanks Again,
The Diamond Team
CAUTION
Prolonged exposure to sound pressure levels in excess of 100 dB can cause permanent
hearing loss. Diamond Audio D6 amplifiers produce enough power to make most speaker
systems exceed that level. Please exercise restraint and protection during their operation
in order to preserve your ability to enjoy their fidelity for years to come.
CONTENTS
Page 3 - Specifications & RMS Power
Page 4 - Physical Dimensions & Appearance/Features
Page 5 - Professional Installation & Mounting
Page 6 - DC Connections
Page 7 - DC Connections
Power and Ground
Page 8 - DC Connections
Amp Current Draw
Page 9 - DC Connections & Speaker Connections
Turn-on (Remote)
Page 10 - D6 300.4/600.4
Bridging, RCA, Crossovers
Page 11 - D6 300.4/600.4
Crossovers (cont), Gain, Aux. Output, Ch 3/4 Input
Page 12 - D6 300.4/600.4
Gain Bypass, Ch 3/4 Mono, Highpass, Lowpass
Page 13 - D6 300.4/600.4
Crossover Freq. Diagrams
Page 14 - D6 1000.1/1500.1
Remote Gain, Speaker Outputs, RCA
Page 15 - D6 1000.1/1500.1
Crossovers, Gain, Subsonic
Page 16 - D6 1000.1/1500.1
Master/Slave, Phase, Lowpass, Crossover Freq. Diagrams
Page 17 - D6 5.2
Bridging, RCA
Page 18 - D6 5.2
Crossovers, Gain, Gain Bypass
Page 19 - D6 5.2
Highpass, Slave, Subsonic, Lowpass, Sub Inversion
Page 20 - D6 5.2
Crossover Freq. Diagrams
Page 21 - Troubleshooting
Page 22 - System Notes

3 4
©2005 Diamond Audio Technology. All Rights Reserved ©2005 Diamond Audio Technology. All Rights Reserved
PHYSICAL DIMENSIONS
Model
D6 300.4
D6 600.4
D61000.1
D61500.1
D6 5.2
(A)
Length
11.5"
17"
11.5"
17"
17"
(B)
Width
12"
12"
12"
12"
12"
(C)
Height
2.75"
2.75"
2.75"
2.75"
2.75"
Weight
11 lbs
15 lbs
11 lbs
15 lbs
15 lbs
(C)
(B)
(A)
APPEARANCE/FEATURES
Massive Proprietary Heat Sinks - Enhanced for Maximum Thermal Dissipation
Nickel Plated Solid Brass, Circuit Board Mounted Terminals
4 Gauge Direct Power/Ground Terminals
10 Gauge Direct Speaker Terminals - Excepts Banana Plugs
Fully Adjustable Mounting Feet
Fully Adjustable, Full Range Crossovers
Advanced Protection Circuitry
SPECIFICATIONS
Fuse
Rating
60 A
90 A
120 A
160 A
90 A
DC
Range
11 - 14.5 V
11 - 14.5 V
11 - 14.5 V
11 - 14.5 V
11 - 14.5 V
Input
Range
0.2 - 5 V
@ 20k ohms
0.2 - 5 V
@ 20k ohms
0.2 - 5 V
@ 20k ohms
0.2 - 5 V
@ 20k ohms
0.2 - 5 V
@ 20k ohms
Channel
Separation
80 dB
(min.)
80 dB
(min.)
n/a
n/a
80 dB
(min.)
THD
0.03%
0.03%
0.1%
0.1%
0.03%
0.05% (sub)
Signal-to-
Noise Ratio
100 dB
100 dB
80 dB
80 dB
100 dB
Model
D6 300.4
D6 600.4
D6 1000.1
D6 1500.1
D6 5.2
Frequency
Response
10 - 50k Hz
10 - 50k Hz
10 - 500 Hz
10 - 500 Hz
10 - 50k Hz
RMS POWER
2 Ohm
Stereo
75 x 4
150 x 4
n/a
n/a
140 x 2 (sub only)
Model
D6 300.4
D6 600.4
D6 1000.1
D6 1500.1
D6 5.2
1 Ohm
Mono
n/a
n/a
1000 x 1
1500 x 1
n/a
2 Ohm
Mono
n/a
n/a
500 x 1
750 x 1
n/a
4 Ohm
Stereo
37.5 x 4
75 x 4
n/a
n/a
60 x 5
&
70 x 2 (sub)
4 Ohm
Mono
150 x 2
300 x 2
250 x 1
375 x 1
280 x 1 (sub only)

5 6
©2005 Diamond Audio Technology. All Rights Reserved ©2005 Diamond Audio Technology. All Rights Reserved
DC CONNECTIONS
D6 amplifiers need proper power and ground connections to deliver maximum
performance and efficiency. This is typically the least understood part of the installation
process. The D6 power supply is completely defendant on current, not voltage, so it is
truly regulated by nature. Voltage drops due to poor connections or grounding practices
will only cause the amp to pull more and more current to sustain output. This increased
current draw causes unwanted noise, thermal issues, and will eventually make the amp
shut down or cause the vehicles electrical system to fail.
The gauge of the power and ground cables must be capable of handling the current
needed by the entire system. Power and ground cables must be of the same gauge. If the
alternator is not capable of supplying enough power for both the vehicle AND the audio
system, a high output alternator should be installed for best performance.
Batteries and High Output Alternators…
The battery in your car is a chemical storage device for electrical energy generated by the
alternator. It is capable of briefly supplying high currents for cold starting the vehicle as
well as powering other important electrical loads either partially or entirely for a limited
period when the engine is off.
In order to supply the power required for ignition, lighting, large audio systems etc. a car
needs its own efficient, reliable, and constantly available source of energy. When the
engine is stopped, the battery is the vehicle’s energy source. When the engine is running,
the alternator is the on-board “electricity generating plant.” It is the job of the alternator
to supply power to all current-consuming loads (including the audio system).
Alternator output, battery capacity, and power demand of all electrical loads and systems
must be matched as ideally as possible so the entire system is reliable and trouble-free
in operation.
PROFESSIONAL INSTALLATION
To achieve maximum performance and life time warranty coverage (see warranty
statement), Diamond Audio strongly recommends that a factory authorized Diamond
retailer professionally installs your new amplifier. The D6 amplifier is an awesome
component with category leading technology, proper attention must be taken during
installation to ensure optimum performance. The authorized Diamond retailer you
purchased your amplifier from has the training, expertise, and tools for proper
installation. If you decide to install your amplifier yourself, please read this manual
through to become familiar with the amplifiers install and set up procedures.
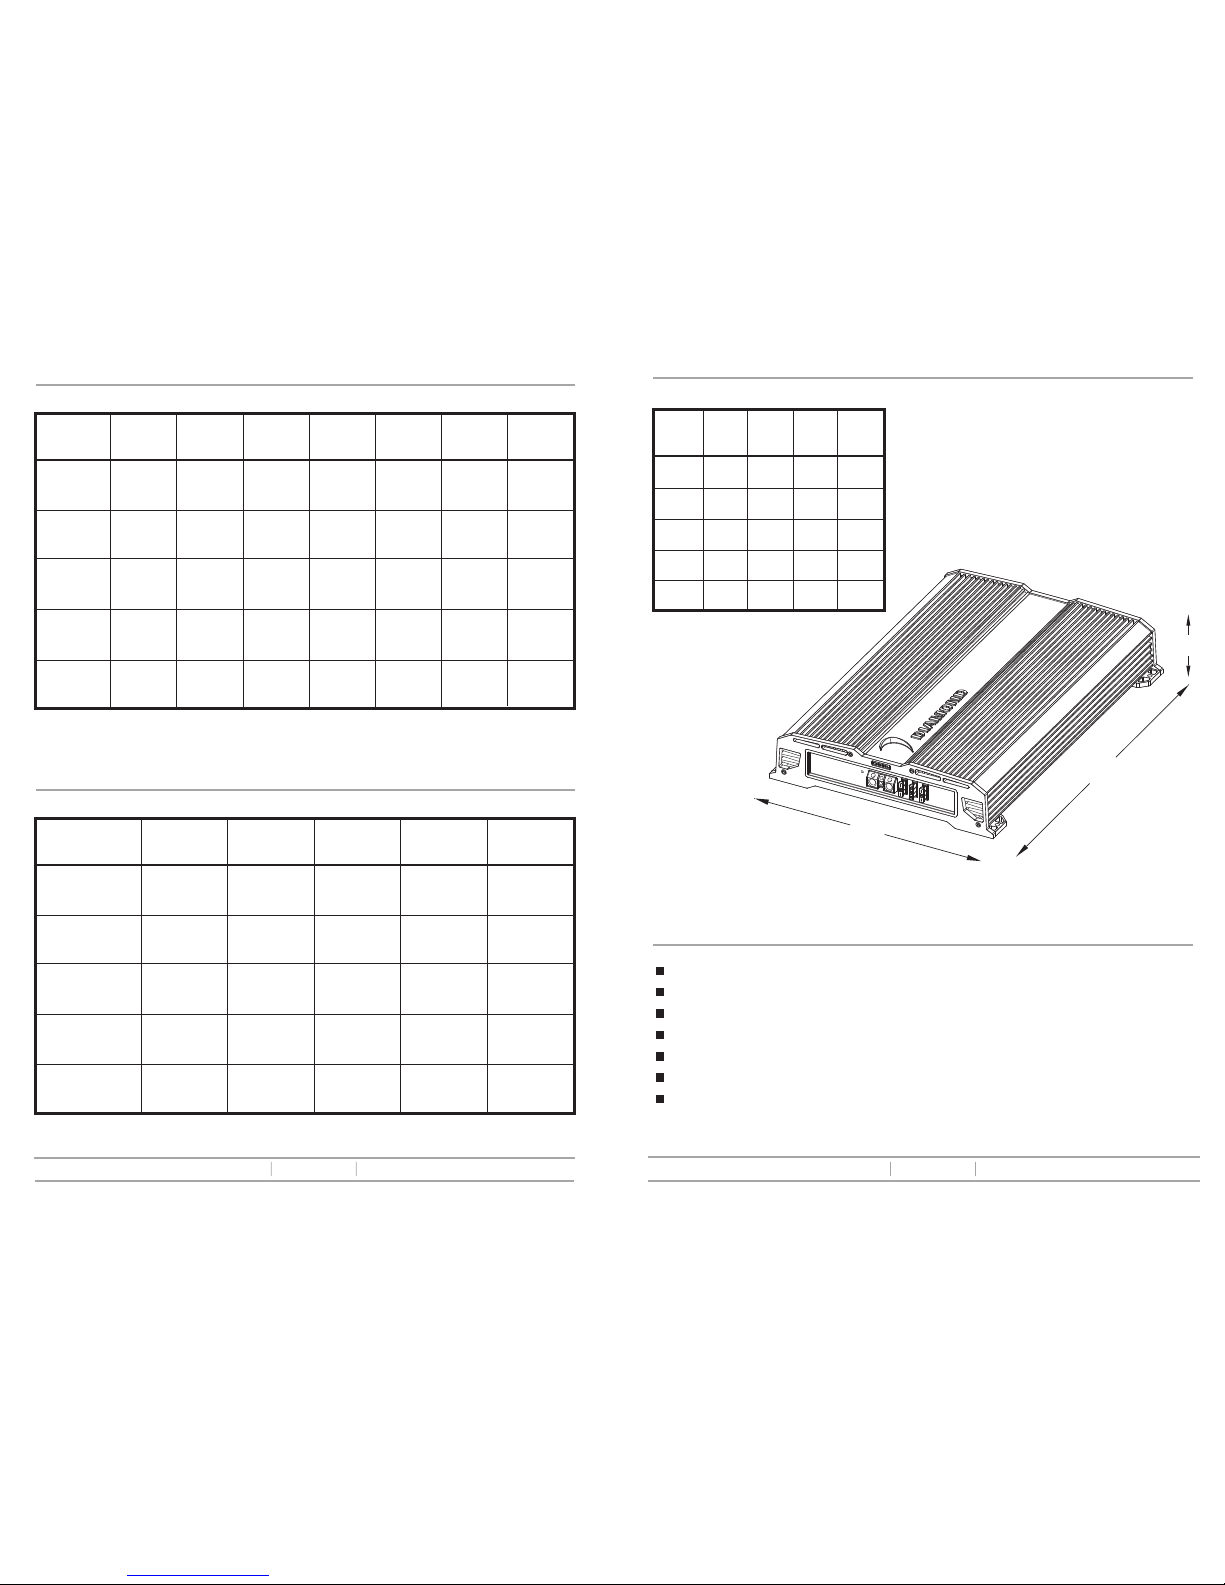
MOUNTING
D6 Reference Amplifiers do not utilize any fan driven cooling system. Care must be taken
to provide a sufficient flow of air around the amplifier for the thermal management
system to operate at peak efficiency. Air should be able the flow over the top and sides of
the amp freely. Adding a fan to your system can be beneficial in keeping your amp cool.
A minimum 2 inches of space around the amplifier is recommended to ensure proper air
flow. Never mount any amplifier where it can get wet. Water damage is not covered
under warranty.
Mounting your amplifier inside an enclosure is not a good idea unless that enclosure is
equipped with ventilation fans to circulate fresh air through the enclosure.
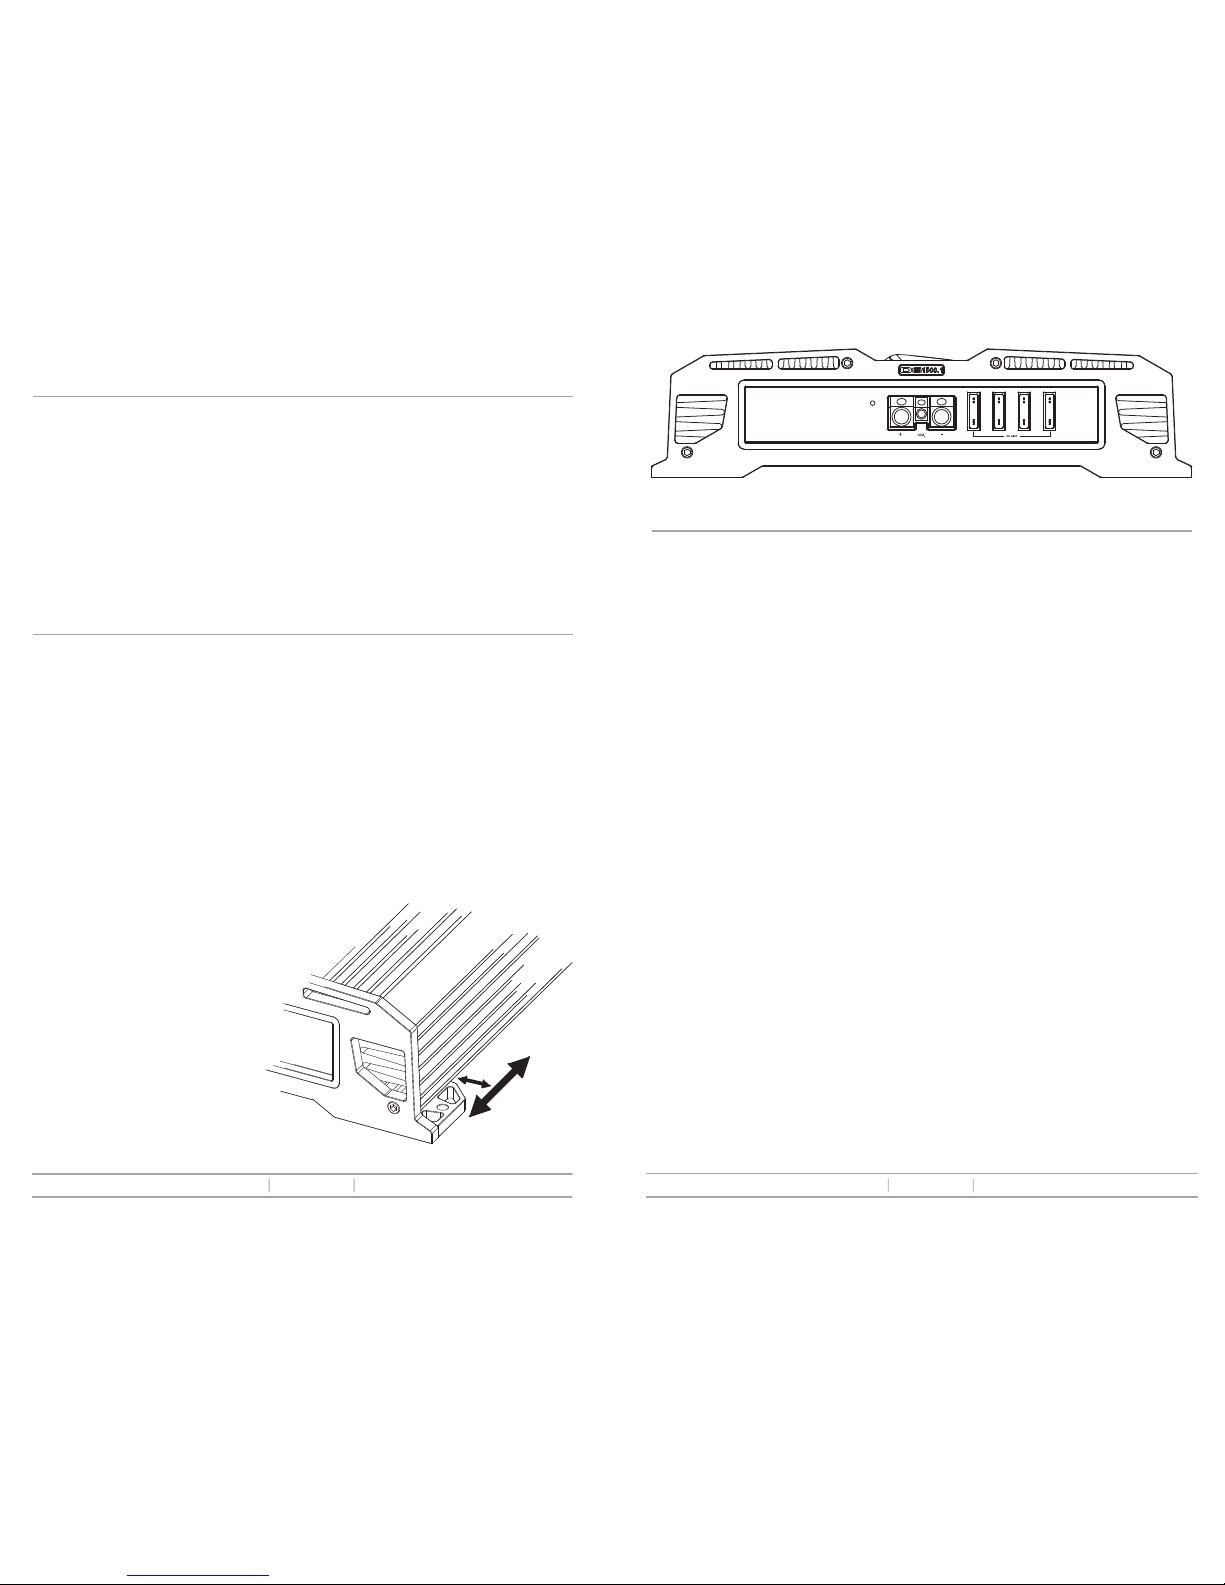
The D6 amplifier features adjustable
mounting flanges. Should they need
to be moved to a different location,
remove the self-tapping screws on
the bottom of each mounting flange.
Move the flange to the desired
location. Carefully tighten the
self-tapping bottom screws.
Warning - Over tighten these screws
will cause stripping of the thread
and/or screw head.

7 8
©2005 Diamond Audio Technology. All Rights Reserved ©2005 Diamond Audio Technology. All Rights Reserved
When using multiple D6 amplifiers, a high output alternator is definitely
recommended.
Strip approximately 1/2 inch of insulation from the end of the power/ground cable going
to the amplifier. Insert the stripped cable into the power block on the end of the amplifier
and tighten the Allen screw. Repeat for each amplifier installed.
Amp Current Draw...
The following basic formula can be used as a quick guide to determine the total
amperage draw of a mobile audio system. This formula is based on a 50% amplifier
efficiency rating. Diamond Audio D6 amplifiers are actually more efficient than that, but
others may be less.
Formula:
Total amplifier rated RMS power x 2 = Total Input Wattage
Total Input Wattage/Battery Voltage = Current Draw (Amps)
Examples:
A D6 600.4 amplifier has 4 channels at 75 Watts per channel RMS into 4 Ohms
totaling 300 Watts. Work the formula as follows:
300 Watts x 2 = 600 W
600 W/14.5 V = 41.4 A Total Current Draw
A D6 1000.1 driven to a 1 ohm mono load has 1000 Watts RMS of output, it's current
draw is figured this way:
1000 Watts x 2 = 2000 W
2000 W/14.5 V = 137.9 A Total Current Draw
Note: If you are installing multiple amplifiers, add up the total current draw for all of
them and choose the appropriate gauge based on the grand total.
In the most basic of terms, this means that car audio is gasoline powered. Extra batteries
are primarily for the extended operation of your audio system when the engine is off, or
for SPL competitions where high sound pressure levels are generated for short periods of
time. In which large battery racks are needed to provide the necessary current demanded
by the many amps used.
D6 Reference Series Amplifiers are capable of reproducing “concert level” volumes with
incredible accuracy. Care must be taken to ensure that your vehicle is capable of
supplying the voltage and current required by such a system.
D6 amplifiers are designed to accept up to 4Êgauge power and ground cable, in some
systems this may be overkill, but bigger is always better when it comes to power and
ground connections.
Power & Ground (12VDC)
Because the D6 power supply is more dependent on current than voltage, greater
attention needs to be taken when installing power and ground connections.
These power supplies need an unrestricted flow of current. The proper valued ANL fuse
is recommended. Maxi fuses and circuit breakers are ok too, but most AGU fuses have
too much resistance under load.
The vehicles factory ground at the battery should be upgraded to match or exceed the
largest power wire in the system.
The amplifier ground must be sufficient to pass the same amount of current as the
power wire. Therefore, self tapping screws through 1/8" of sheet metal will not suffice. A
3/8" bolt, nut, and lock washer on a solid ground is recommended, typically on the floor
board. Remove any paint, glue or padding from the ground and use a ring terminal.
Capacitors - Capacitors can be very beneficial as they charge and discharge very
quickly while holding the voltage steady. But in systems with a lot of current draw, a
battery is a better choice due to its higher capacity for that current. Capacitors virtually
do nothing for D6 performance.

9 10
©2005 Diamond Audio Technology. All Rights Reserved ©2005 Diamond Audio Technology. All Rights Reserved
D6 300.4/600.4
Both pairs of channels on the D6 4-channel amps are capable of being bridged to a
4ÊOhm mono output. Creation of the mono channel is accomplished by using the left
channel positive (+) output connection of the amplifier for the speaker positive and the
right channel negative (-) output connection of the amplifier for the speaker negative.
Note: It is important that a 4 Ohm minimum total speaker impedance load is observed
when bridging the amp! If an impedance load of less than 4 Ohms is used, you will
eventually damage your amplifier and void your warranty.
Bridging
CH 1/2 & 3/4 INPUTS
The RCA cables from your source unit should be inserted here.
AUX. OUTPUT
These RCA outputs are used to provide filtered or unfiltered signals to an outboard
processor or amplifier.
RCA
Diamond D6 4-channel amplifiers feature second-order 12dB/octave and fourth-order
24dB/octave Butterworth filters. These filter networks sum to a flat response at their
-3dB break points. This results in a smooth and seamless transition from one frequency
band to the next. Butterworth filters provide maximally flat frequency responses when
compared to other filter structures.
Crossovers
Turn-on (Remote)
Locate the terminal labeled “REMOTE” between the ground and +12V power connection
points on the end of the amplifier. Your source unit should have a wire in its harness
labeled “REMOTE” or “AMP TURN-ON.” Some source units come equipped with a “Power
Antenna” lead only. This should also work. Run this wire from your source unit to the
amplifiers REMOTE connection. Strip approximately 1/2Êinch of insulation from the wire.
Insert the wire into the terminal, and tighten the Allen screw. D6 amplifiers will accept
remote turn-on wire up to 10Êgauge or banana jacks directly.
SPEAKER CONNECTIONS
Diamond Audio recommends using speaker wire of at least 16Êgauge. Lay out the wire in
the vehicle from the individual speaker locations to the amplifier(s). Observe safe wiring
precautions.
D6 Amplifiers will accept speaker wire up to 10Êgauge directly. Locate the speaker
terminal block on the end of the amplifier. Strip approximately 1/2Êinch of insulation
from the wire, insert the wire into the terminal, and tighten the Allen screw. Repeat for all
speaker wires. Please observe recommended minimum speaker impedances to prevent
possible damage.
Banana Jacks can be inserted into the speaker block. Remove the set screw completely
and insert the Banana Jack into the end of the block.

11 12
©2005 Diamond Audio Technology. All Rights Reserved ©2005 Diamond Audio Technology. All Rights Reserved
Highpass Freq.
Turning this control sets the Highpass crossover point from 15 Hz (fully counterclockwise)
to 1.5 kHz (fully clockwise). This can be used as a subsonic filter if needed.
Highpass On/Off
Pushing this button “IN” engages the Highpass filter. Pushing this button “OUT” will
bypass the filter.
Highpass Multiplier Select
Pushing this button “IN” multiplies the highpass crossover frequencies, 1.5 kHz to 15
kHz. Leaving the button “OUT” uses the highpass filter normally. (see highpass
frequency section above for frequency points)
Lowpass Freq.
Turning this control sets the Lowpass crossover point from 50Hz (fully counterclockwise)
to 5kHz (fully clockwise).
Lowpass On/Off
Pushing this button “IN” engages the Lowpass filter. Pushing this button “OUT” will
bypass the filter.
Gain Bypass Select
Pushing this button “IN” bypasses the gain stage on the amplifier. This is used in
systems with a pre-amp section before the amplifier or to slave the amp to a master
amplifier. Leaving this button “OUT” is the default and uses the amplifiers gains as a
normal input level match.
Ch 3/4 Mono Select
Pushing this button “IN” combines the input signal to create a mono signal of channels
3/4 for use with subwoofer systems. Leaving the button “OUT” defaults the amp to
normal stereo mode.
Gain
This control matches the output voltage of the source unit or processor to the amplifier
inputs. Rotating this control to the “MIN” mark (counterclockwise) configures the D6
amplifier to accept input voltages as high as 5V RMS. This control should be set as low
as possible. The basic procedure for setting input gains is as follows:
1. Adjust all amplifier gain controls to just above the minimum setting (fully
counterclockwise).
2. Using the highest quality source (usually CD) play some music and slowly turn up the
source unit until you can hear distortion. Now turn down the volume until the distortion
stops. This is your maximum source unit level.
3. Turn up the amplifier gain until audible distortion starts. Turn down the gain to the
point JUST BELOW the start of the distortion.
4. Repeat step 3 for all amplifiers in your system.
Aux. Output Select
Leaving this button “OUT” selects the Aux. outputs to use the crossover settings on the
amplifier. Pushing this button “IN” bypasses the crossover and selects the Aux. outputs
to run full range.
Ch 3/4 Input Select
Pushing this button “IN” selects the 2 channel mode, meaning that channels 3/4 use the
channel 1/2 inputs. Leaving this button “OUT” uses the channel 3/4 input in 4 channel
mode.
All crossover controls are mounted on the signal side of the amplifier. The D6300.4/600.4
crossovers are continuously variable, lowpass from 50Hz to 5kHz, highpass from 15Hz to
1.5kHz or 1.5kHz to 15kHz using multiplier button. Each pair of channels has an
individual network that can be configured to Highpass, Lowpass, Bandpass or All-pass
by simple switch selection. When switched off, they are completely out of the audio path.
The Ch 3/4 crossover also features a mono/stereo switch that when pushed in to mono
will series the two crossovers to a fourth-order 24dB/octave filter for subwoofer systems.
Crossovers (cont.)
D6 300.4/600.4 D6 300.4/600.4

13 14
©2005 Diamond Audio Technology. All Rights Reserved ©2005 Diamond Audio Technology. All Rights Reserved
INPUT
The RCA cables from your source unit should be inserted here.
MASTER OUT
This RCA output is used to provide a master signal to slave amplifiers.
SLAVE IN
This RCA input is used to receive signal from a master amplifier.
RCA
D6 1000.1/1500.1
Both D6 mono block amplifiers come with a remote gain output. The remote gain module
(included) plugs into this output to allow for gain control away from the amplifier. When
you plug this module in, it replaces the gain from where it is set on the amplifier. Max
(all the way clockwise) on the module is set to whatever the gain on the amp is set to.
Note: Old D5 600.11200.1 remote gains do not work with D6 amplifiers.
Remote Gain
Although the D6 1000.1 and 1500.1 amplifiers have two sets of outputs, they are
mono-block amplifiers and the outputs can not be bridged. The two sets of outputs are
paralleled inside the amp to a single channel. This gives you ease during the installation
of multiple voice coils or woofers.
Note: It is important that a 1 Ohm minimum total speaker impedance load is
observed! If an impedance load of less than the above minimums is used, you will
eventually damage your amplifier and void your warranty.
Speaker Outputs
Crossover Freq. Diagrams
Highpass (multiplier) Lowpass
D6 300.4/600.4

15 16
©2005 Diamond Audio Technology. All Rights Reserved ©2005 Diamond Audio Technology. All Rights Reserved
Crossover Freq. Diagrams
Subsonic Lowpass
Pushing this button “IN” engages the slave circuitry of the amplifier. The amplifier will
no longer accept signal from it’s main RCA inputs, it will only except signal from a
master D6 mono block amplifier through the SLAVE IN RCA input. This button also
bypasses the gain on the amplifier which is controlled by the master amplifier. When
using multiple amplifiers in a “daisy chain,” all amplifiers after the master must have
this button pushed “IN” for the system to work correctly. With this button “OUT” the
amplifier will run normally alone or as the master amplifier.
Master/Slave
Turning this control sets the Subsonic filter point from 15Hz (fully counterclockwise) to
40Hz (fully clockwise).
Subsonic Freq.
Pushing this button “IN” engages the Phase switch, putting the amp 180 degrees out of
phase. Pushing this button “OUT” keeps the amp in phase. In some vehicles this can
help with the timing and overall response of your system. If your woofers are not in phase
with the rest of the system it can cause bad timing and gaps in the pass band. Unlike
some Class “D” amplifiers, this option does not allow you to use two D5 Class “D’s” as
one channel. Trying this can cause damage to your amplifiers and woofers.
Phase In/Out
Turning this control sets the Subsonic filter point from 50Hz (fully counterclockwise) to
250Hz (fully clockwise).
Lowpass Freq.
The D6 1000.1 and 1500.1 feature fouth-order 24dB/octave lowpass and second-order
12dB/octave subsonic Butterworth filters. These filter networks sum to a flat response at
their -3dB break points. This results in a smooth and seamless transition from one
frequency band to the next. Butterworth filters provide maximally flat frequency
responses when compared to other filter structures.
All crossover controls are mounted on the signal side of the amplifier. The D6 1000.1 and
1500.1 crossovers are continuously variable, lowpass from 50Hz to 250Hz, and a
subsonic from 15Hz to 40Hz. The D6 1000.1 and 1500.1 also feature a phase switch that
when pushed in swaps the amplifier 180 degrees out of phase.
Crossovers
This control matches the output voltage of the source unit or processor to the amplifier
inputs. Rotating this control to the “MIN” mark (counterclockwise) configures your D6
amplifier to accept input voltages as high as 5V RMS. This control should be set as low
as possible.
The basic procedure for setting input gains is as follows:
1. Adjust all amplifier gain controls to just above the minimum setting (fully
counterclockwise).
2. Using the highest quality source (usually CD) play some music and slowly turn up the
source unit until you can hear distortion. Now turndown the volume until the distortion
stops. This is your maximum source unit level.
3. Turn up the amplifier gain until audible distortion starts. Turn down the gain to the
point JUST BELOW the start of the distortion.
4. Repeat step 3 for all amplifiers in your system.
Gain
D6 1000.1/1500.1 D6 1000.1/1500.1

17 18
©2005 Diamond Audio Technology. All Rights Reserved ©2005 Diamond Audio Technology. All Rights Reserved
Pushing this button “IN” bypasses the gain stage on the sub channels only. This is used
in systems with a pre-amp section before the sub channels or to slave those channels to
a master amplifier. Leaving this button “OUT” is the default and uses those channels
gain as a normal input level match.
Gain Bypass Select
The Diamond D6 5.2 amplifier features second-order 12dB/octave Butterworth filters.
These filter networks sum to a flat response at their -3dB break points. This results in a
smooth and seamless transition from one frequency band to the next. Butterworth filters
provide maximally flat frequency responses when compared to other filter structures.
All crossover controls are mounted on the signal input side of the amplifier. The D6 5.2
front and rear high pass crossovers are fixed at 80 Hz while the center highpass is fixed
at 120 Hz. Each of these crossovers has an individual network that can be defeated by
simple switch selection. When switched off, they are completely out of the audio path.
The sub channel crossover features fully selectable and adjustable sub-sonic, 17 - 80
Hz, and lowpass, 60 - 250 Hz, filters. The sub channel crossover also features a 180
degree phase invert and gain bypass.
Crossovers
This control matches the output voltage of the source unit or processor to the amplifier
inputs. Rotating this control to the “MIN” mark (counterclockwise) configures your D6
amplifier to accept input voltages as high as 5V RMS. This control should be set as low
as possible. The basic procedure for setting input gains is as follows:
1. Adjust all amplifier gain controls to just above the minimum setting (fully
counterclockwise).
2. Using the highest quality source (usually CD) play some music and slowly turn up the
source unit until you can hear distortion. Now turn down the volume until the distortion
stops. This is your maximum source unit level.
3. Turn up the amplifier gain until audible distortion starts. Turn down the gain to the
point JUST BELOW the start of the distortion.
4. Repeat step 3 for all channels on your D5 5.2.
Gain
Only the pair of sub channels are capable of bridging on the D6 5.2 Amplifier. All other
channels are designed for single channel use only. Bridging the sub channels is
accomplished by using the left channel positive (+) output connection of the amplifier for
the speaker positive and the right channel negative (-) output connection of the amplifier
for the speaker negative.
Note: It is important that a 4 Ohm minimum total speaker impedance load is observed
on all D6 5.2 front, rear, and center channels and when bridging the sub channels on
the amp! If an impedance load of less than 4 Ohms is used, you will eventually
damage your amplifier and void your warranty.
D6 5.2
CH 1/2 & 3/4 INPUTS
The RCA cables from your source unit or 5.1 processor should be inserted here.
SUB & CENTER CHANNEL INPUTS
The sub channel input is designed for input from your source unit if it is equipped with a
sub output. Otherwise, both the sub and center inputs must come from a 5.1 processors
output.
RCA
Bridging
D6 5.2

19 20
©2005 Diamond Audio Technology. All Rights Reserved ©2005 Diamond Audio Technology. All Rights Reserved
D6 5.2
Pushing this button “IN” inverts the phase of the sub channels by 180 degrees. Pushing
this button “OUT” keeps the sub channels in phase.
Sub Channel Inversion
Crossover Freq. Diagrams
Pushing this button “IN” engages the Highpass filter. Pushing this button “OUT” will
bypass the filter. There is one of these switches for each of the front, rear and center
channels.
Highpass On/Off
It is possible to completely run your D5 5.1 off of only one set or input RCA’s. The rear,
center, and sub channels can all be slaved of the front channels inputs. Simply push the
appropriate button “IN” to slave that channel to those inputs. You can also slave just the
center and sub channels if you have a four channel input.
Slave Select
Pushing this button “IN” engages the sub-sonic filter on the sub channels. Pushing this
button “OUT” will bypass the filter.
Subsonic On/Off
Turning this control sets the sub-sonic filter point from 17 Hz (fully counterclockwise) to
80 Hz (fully clockwise).
Subsonic Freq.
Pushing this button “IN” engages the lowpass filter on the sub channels. Pushing this
button “OUT” will bypass the filter.
Lowpass On/Off
Turning this control sets the lowpass crossover point from 60 Hz (fully counterclockwise)
to 250 Hz (fully clockwise).
Lowpass Freq.
Subsonic Lowpass
D6 5.2

21 22
©2005 Diamond Audio Technology. All Rights Reserved ©2005 Diamond Audio Technology. All Rights Reserved
If the Blue LED is on, your D6 amplifier should be working correctly.
If LED is not on, check all power and remote connections and sources.
If LED is on and there is no sound, check all signal connections and sources.
If there is no sound coming from one channel, check all signal connections and sources
for that channel.
D6 1000.1/1500.1 ONLY - If the Red LED is lit, the amp is in protection, disconnect power
and reset amp. If protection LED lights again, check all connections for shorts, especially
speaker connections.
If the amp still will not work correctly, please return to the authorized Diamond retailer
you bought the amplifier from and have them trouble shoot your system or call Diamond
Tech Support at 1-866-328-2834.
TROUBLESHOOTING SYSTEM NOTES
Other manuals for D6 Series
1
This manual suits for next models
5
Table of contents
Other Diamond Audio Technology Car Amplifier manuals

Diamond Audio Technology
Diamond Audio Technology D7056 User manual

Diamond Audio Technology
Diamond Audio Technology D5 300.4 User manual

Diamond Audio Technology
Diamond Audio Technology D5 300.2 User manual

Diamond Audio Technology
Diamond Audio Technology D7152 User manual

Diamond Audio Technology
Diamond Audio Technology D7054 User manual

Diamond Audio Technology
Diamond Audio Technology D5 5.1 User manual

Diamond Audio Technology
Diamond Audio Technology D7401 User manual

Diamond Audio Technology
Diamond Audio Technology D5 1200.1 User manual