diamond mowers FLAIL MOWER User manual

350 EAST 60TH ST. N. • SIOUX FALLS, SD 57104
800.658.5561 • 605.977.3300
WWW.DIAMONDMOWERS.COM
PARTS 888.960.0361
WARRANTY + SERVICE 888.960.0364
OPERATOR’S MANUAL
350 EAST 60TH ST. N. • SIOUX FALLS, SD 57104
800.658.5561 • 605.977.3300
WWW.DIAMONDMOWERS.COM
PARTS 888.960.0361
WARRANTY + SERVICE 888.960.0364
OPERATOR’S MANUAL
SKID-STEER / COMPACT TRACK LOADER
FLAIL MOWER

PRODUCT INFORMATION
Record the model and serial number of your unit here. When calling for
warranty, service, or parts, you may be asked to provide this information,
in order to ensure fast, accurate service.
MODEL: Flail Mower SIZE: 75”(1905mm) 90”(2286mm) 102”(2591mm)
SERIAL NUMBER: ________________________________________________
©2018 Diamond Mowers, LLC
All rights reserved.
Any failure to read, understand and follow the instructions found in this operator’s
manual could lead to serious injury. Operators who choose to operate this equipment
without following instructions, or who choose to operate this equipment in a manner
inconsistent with the recommendations set forth in this manual, do so at their own
risk and assume the risk of injury. Diamond Mowers will not be liable for an owner
or operator’s loss, damage, or injury due to the misuse of the equipment, failure to
understand the inherent risks, or inability to properly operate the equipment.
FLAIL MOWER OPERATOR’S MANUAL
(circle one)
Provisional Patents: 62/484,363
2

WELCOME!
Thank you for choosing Diamond Mowers, and welcome to your Skid-Steer /
Compact Track Loader Flail Mower. Before you begin operating, we encourage
you to look through this manual to review the proper maintenance and
operating techniques that will keep you, and your equipment, safe — while
ensuring you the most productive flail mower in the market.
We have nothing but respect and admiration for you. Our job at Diamond is
to provide you with the toughest, most reliable and safest equipment that
will allow you to do your job better. That also means being there when you
need us.
CONTACT US:
Parts: 888.960.0361 | [email protected]
Main Office: 800.658.5561 | 605.977.3300
Website: www.diamondmowers.com |Email: info@diamondmowers.com
Your time is important to us.
We guarantee that Genuine Diamond Parts will ship within 72-hours of the
order being placed or the parts and shipping are free.
Your satisfaction is guaranteed.
If you are not completely satisfied with your new Diamond in the first
30-days, we will buy it back. No questions asked.
Thanks again for choosing Diamond.
If at any time your needs are not being met by our team, please feel free
to call me direct.
Tim Kubista
VP Sales & Marketing
651.955.6665

OWNER REGISTRATION
In your welcome packet you should have received a warranty registration
form. Complete and return this form to our main office.
If you’d rather complete this info online, go to:
http://info.diamondmowers.com/register-my-product
Returning your registration information to Diamond will help us process any
warranty claims quickly and efficiently – so you can get back to work, fast.
TRANSFERRED OWNERSHIP
If you have acquired this flail mower from a previous owner, we encourage
you to register your equipment online. By registering your Diamond Mowers
unit, you’ll stay informed on product advancements, offers and service alerts.
Register by going to: http://info.diamondmowers.com/register-my-product
We honor our equipment’s warranty from the date it was put into service,
no matter who’s in charge of running it.
For any questions, contact our Warranty / Service team at:
888.960.0364 or 605.977.3300
warrant[email protected]
FLAIL MOWER OPERATOR’S MANUAL
4


REAR SWING FLAIL OPERATOR’S MANUAL
This attachment is designed to be used for mowing and light brush
management applications.
This includes:
•Cutting grass.
•Mulching light brush.
•Cutting a maximum of 2” (51mm) material continuously.
This attachment should only be used in an area free of obstructions and
bystanders. Any use on non-vegetative material, or in an area that is not
clear of persons and property, is strictly prohibited. Any use outside of the
aforementioned application is considered contrary to its intended use. Any
damage that may occur as a result of misuse will void warranty as stated in
Diamond Mowers’ warranty policy.
INTENDED USE
Do not operate this unit without first reading the safety precautions
and operating instructions in this manual.
6

TAKE A LOOK AROUND
Let’s get started by doing a quick walk around
of the Skid-Steer / Compact Track Loader Flail.
KNIVES
The cutting shaft is equipped with
our heavy duty brush and grass
blades for a smooth, even cut.
BELT DRIVE
All of our heavy duty flails use
a high strength belt with an
automatic self-tensioner; no
manual adjustment needed.
HYDRAULIC MOTOR
Our flail mower is equipped with a
high flow / high efficiency hydraulic
motor matched to your skid-steer /
compact track loader.
HOSES
Shipped with quick couplers and a
case drain line with both male and
female ends.
BEARINGS
For ultimate long life and reliability,
our flail cutting shafts and ground
rollers are equipped with the best
bearings in the industry.
7
GETTING STARTED
FLAIL MOWER OPERATOR’S MANUAL
CONTINUED ON NEXT PAGE
HIGH FLOW MACHINE
Diamond’s flail mower must be used on a
high flow machine capable of 32-45 GPM
(122-171 LPM) and have a case drain.
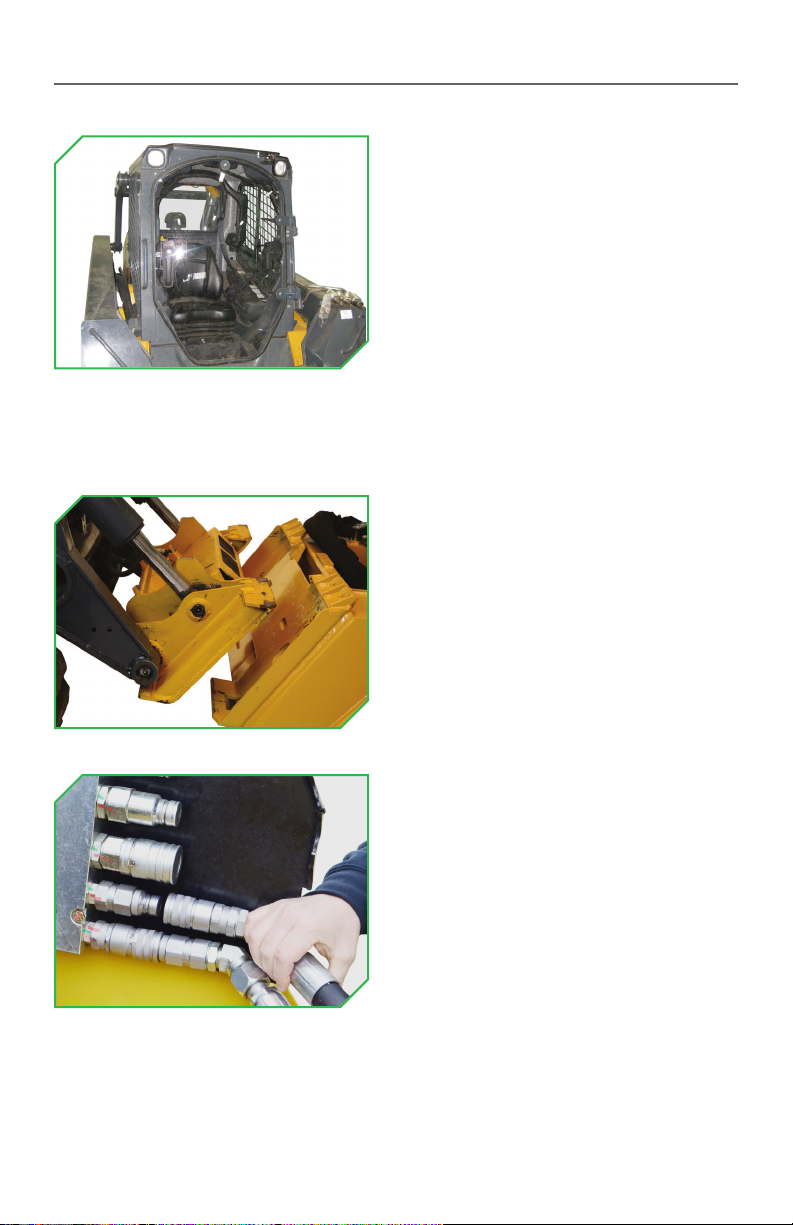
SHATTER RESISTANT ENCLOSURE
A shatter resistant enclosure is
REQUIRED! This product must not be
used without a shatter resistant cab
enclosure. Debris can fly back at the cab
and cause injury.
QD COUPLERS
The case drain line must be properly
connected or you will damage your
hydraulic motor. The case drain line
will come equipped with both male and
female QD couplers.
•Install the QD coupler(s) that
matches the machine.
•Attachment is shipped with 1/2”
flat face connectors, which are a
common size for most skid-steer /
compact track loaders.
QUICK ATTACH
The flail mower will mount onto the front
of the skid-steer / compact track loader
quick attach plate in place of a bucket
or other implements.
8

FLAIL MOWER OPERATOR’S MANUAL
•Clean connections before attaching
to prevent contamination.
•The pressure(1), return(2), and case
drain(3) hoses from your flail mower
are identified in the illustration
at left.
•Make sure the hose length outside
of the bracket(4) is long enough for
the head to make a full range of
motion, but not so long that the
hose can pinch.
•Start machine at low idle and verify
that the cutting shaft is spinning in
“Reverse” rotation.
◦NOTE: “Forward” rotation is
defined as blade rotation the
same as the skid-steer / compact
track loader tires when driving
forward. “Reverse” rotation is
the opposite.
◦If the cutting shaft is spinning in
“Forward” rotation, either inverse
the flow from your machine, or
switch the QD couplers on the
pressure(1) and return(2) hoses.
(4)
(1) (3) (2)
9

FLAIL MOWER OPERATOR’S MANUAL
OPERATING YOUR FLAIL MOWER
Before you operate, note that the primary responsibility for safety on this
equipment falls to the operator. Only trained individuals who have read and
understood this manual should operate this unit.
If any portion of this manual is not understood, contact Diamond Mowers’
Service/Warranty at 888.960.0364 or 605.977.3300.
SAFETY TIPS
Be sure to read all warnings carefully. They are included for your safety,
and for the safety of others working with you.
•Always wear proper safety glasses, goggles, or a face shield
when operating.
•DO NOT operate this unit without a shatter resistant cab enclosure
installed on your skid-steer / compact track loader; this unit will cause
flying debris.
•Block off work area from bystanders, livestock, etc.
•Bystanders must keep a distance of 300’/100m from the unit
when operating.
CONTINUED ON NEXT PAGE
Indicates where MINOR injury COULD result if instructions are
not followed.
Indicates where SERIOUS injury or death COULD result if instructions
are not followed.
Indicates where SERIOUS injury or death WILL result if instructions are
not followed.
Indicates a property damage hazard ONLY, no PERSONAL injury.
10
FLAIL MOWER OPERATOR’S MANUAL
•Knives are always sharp and can cause injury, even when not in motion.
•DO NOT use extremities to dislodge debris from the cutting shaft
or knives.
•Operate only from the operator’s station.
•Hydraulic fluid is hot and will heat any exposed steel, hoses, motor, or
spindle in its proximity.
•Route hoses correctly to ensure a full range in motion.
•Make certain hoses are out of the way of tires, tracks or the ground.
•Be certain the cutting shaft has come to a complete stop before exiting
the cab.
Contact with the cutting shaft and knives while the in motion will cause
serious injury or death. The cutting shaft spins at a very high speed and
can take several minutes to stop. Be sure all personnel are clear of the
machine before engaging the Flail Mower.
CONTINUED ON NEXT PAGE
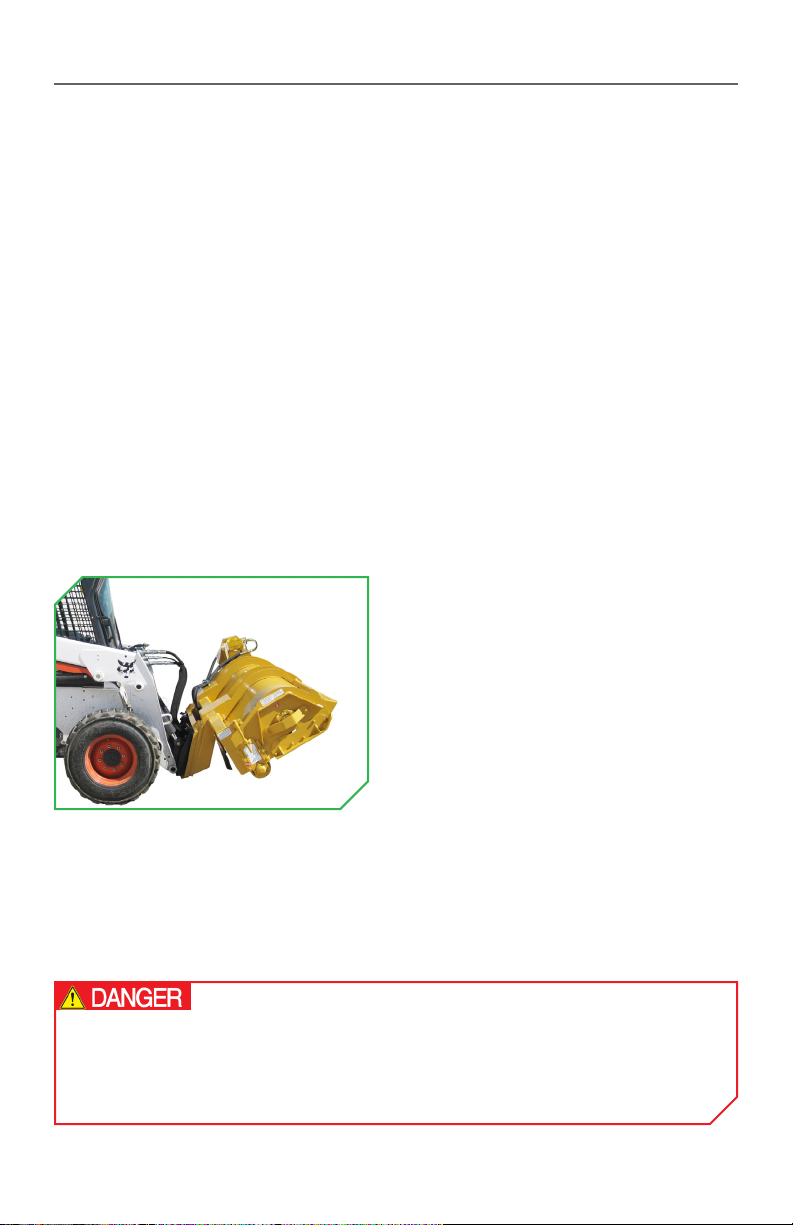
STOWED POSITION
When transporting Diamond’s Flail
Mower between operations, make
sure to protect it from collisions and
accidental damages by placing it in the
stowed position.
Failure to place the head in its stowed
position could result in
structural damage.
11

FLAIL MOWER OPERATOR’S MANUAL
CONTINUED ON NEXT PAGE
GRASS & BRUSH CUT
Use to cut grass or brush.
•Lower the front of the deck slightly to ensure that there is ample room
for exhausted material to be dispersed.
◦If you hear the cutting shaft, or engine slow down, lift up the head
and/or slow your ground speed.
•A second pass may be needed for heavy brush or grass.
◦Complete the initial pass at 12” (305mm) into the material.
◦Complete a second pass at ground level to thoroughly mulch the
remaining material.
OPERATING TECHNIQUES
1
2
2
1
12

FINISHED MOW
Use for a finished look.
•Drive straight into the material keeping the deck low and level, or slightly
pitched forward.
•Maintain speed of the cutting shaft and ground speed.
FLAIL MOWER OPERATOR’S MANUAL
CONTINUED ON NEXT PAGE
OPERATING TECHNIQUES
13
FLAIL MOWER OPERATOR’S MANUAL
CONTINUED ON NEXT PAGE
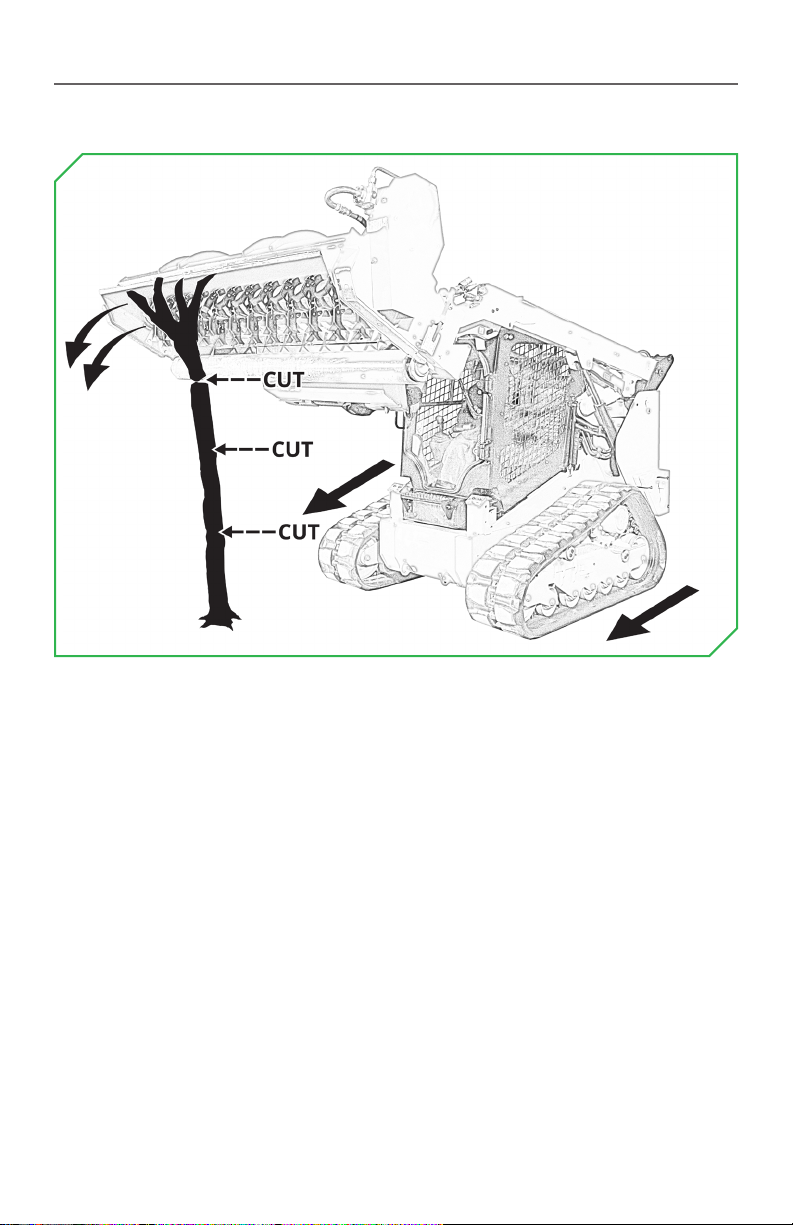
TREE CUT
Use to cut small trees or brush without mulching.
•For small trees, start working at the top and cut the tree in 12” (305mm)
increments.
•With the Flail Mower lifted slightly, drive straight into the material.
•Allow enough time for the tree section to fall away while cutting.
•Use a smooth, quick action to cut the material completely.
◦NOTE: Never drop the mower straight down on trees. Severe damage
will incur. NO PANCAKING!
OPERATING TECHNIQUES
14

NO PANCAKING
DO NOT pancake.
•This machine is not built to drop on top of material for cutting or
mulching. Damage will incur to the cutting shaft and bearings as a result
of driving down (pancaking) on top of the material.
FLAIL MOWER OPERATOR’S MANUAL
OPERATING TECHNIQUES
Dropping the mower straight down (pancaking) on heavy vegetation can
cause severe damage to the cutting shaft and bearings.
For more tips, visit us online at www.DiamondMowers.com
15

FLAIL MOWER OPERATOR’S MANUAL
MAINTENANCE INTERVALS
Regular maintenance will make certain your unit stays productive and retains
a long, operating life. The following chart represents the minimum intervals
recommended for inspection and maintenance.
PROCEDURE 10 HOURS/
DAILY
50
HOURS/
WEEKLY
500
HOURS/
ANNUALLY
AS
NEEDED
Belts & Pulleys Adjust
Cutting Shaft Grease Inspect
Discharge Flap Inspect
Ground Roller Oil
Hydraulic Fittings Inspect
Knives Inspect
Skid Shoes Inspect
When replacing parts, use Genuine Diamond Parts. Guaranteed to ship within
72-hours of your order being placed, or the parts and shipping are free.
Call: 888-960-0361 or 605.977.3300 | Email: [email protected]
Order online: www.diamondmowers.com
CONTINUED ON NEXT PAGE
16

FLAIL MOWER OPERATOR’S MANUAL
CONTINUED ON NEXT PAGE
BELTS AND PULLEYS
Belt Replacement:
•Remove the access cover.
•Push the idler pulley(1) away from
the belt(2) with a wrench, pry bar, or
similar tool to relieve pressure on
the belt.
◦DO NOT damage the idler pulley
or other components when
relieving pressure on the belt.
•Remove the belt from the pulleys.
•Reverse the above instructions to
install the new belt(2).
•Replace the access cover.
Pulley Alignment:
•Use a straight edge(5) to confirm the
cutting shaft(3) and motor(4) pulleys
are in the same plane as the
idler pulley(1).
•If pulley misalignment is found,
correct as follows:
◦Loosen the bolts(6) holding the
tapered collar(7) to the out-of-
alignment pulley(8).
◦With a padded mallet, tap the
pulley(8) backwards or forwards
on its shaft to align it with the
idler pulley(1).
◦With the pulley(8) aligned, tighten
the bolts(6) holding the tapered
collar(7) to the pulley.
◦NOTE: This process may be easier
without the belt installed.
•Replace the access cover.
(1) (2)
(1)
(2)
(3)
(4)
(5)
(7)
(8)
(6)
17
FLAIL MOWER OPERATOR’S MANUAL
CONTINUED ON NEXT PAGE
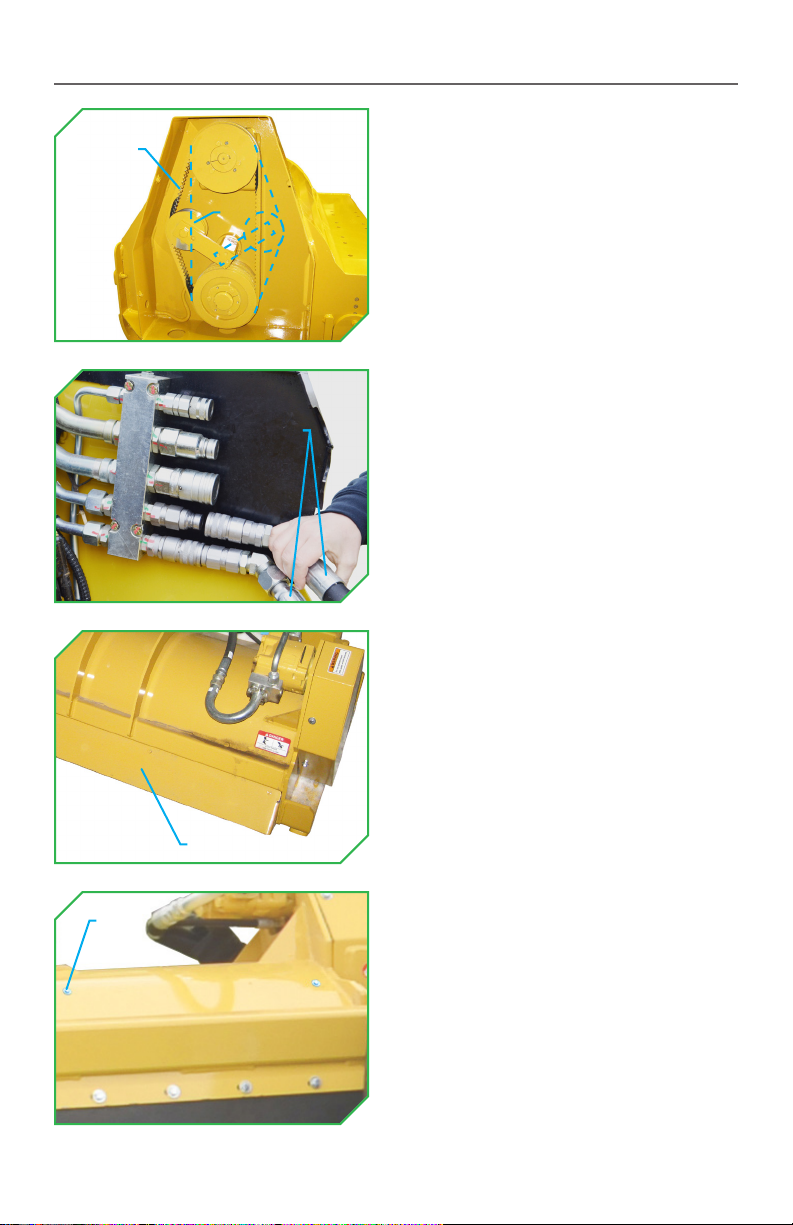
BELTS AND PULLEYS
Reversing Cutting Shaft Rotation:
NOTE: “Forward rotation” is defined as
blade rotation the same as the tractor
tires when driving forward. “Reverse
rotation” is the opposite.
•Remove access cover and belt(2)
from the pulleys as described on the
previous page.
•Remove the idler pulley(1) stop bolt
and main center bolt.
•Reposition the idler pulley(1) as
illustrated (dashed outline).
◦A second location for the idler
position stop bolt will
be exposed.
◦Re-attach the main center bolt to
lock it into position.
•Replace the belt(2) as illustrated
(dashed outline) and access cover.
•Disconnect the pressure(9) and
return(10) hoses from the skid steer /
compact track loader.
◦Clean off dirt and debris prior.
•Swap the pressure(9) and return(10)
QD hose connections, and connect
the hoses to the skid steer /
compact track loader in reverse.
•Install the front shield(11) for reverse
rotation, or remove it for
forward rotation.
•Install the baffle with bolts(12) for
forward rotation, or remove it for
reverse rotation.
◦Reference the parts pages for
additional information.
(1)
(11)
(2)
(12)
(9 OR 10)
18

FLAIL MOWER OPERATOR’S MANUAL
CONTINUED ON NEXT PAGE
CUTTING SHAFT
•Grease the cutting shaft bearing
zerks(1) (1 on each side of the flail)
every 10 hours or daily with #2
lithium based grease from a hand
grease gun until grease purges from
the bearing seals.
•Torque the cutting shaft bearing
bolts(2) to 90ft-lbs (122Nm) on each
side of the flail every 50 hours
or weekly.
◦NOTE: The access covers covering
the pulleys and belt must be
removed to gain access to the
cutting shaft bearing bolts
located underneath the bottom
pulley of the flail.
DISCHARGE FLAP
•Inspect each flail head’s rear
discharge flap(1) every 50 hours
or weekly:
◦Excessive wear
◦Cuts, gouges, excessive damage.
•Replace as needed.
(1)
(2)
(1)
(2)
(1)
19
90-7048
GROUND ROLLER
END CAP
11-2067
THRUST WASHER
11-2065
0.313 X 1.750 SHCS
10-1049
TAPER BEARING
33-0031
SEAL
10-1049
TAPER BEARING 11-2074
CASTLE NUT
21-1136
1
8NPT PLUG
90-7045
GROUND ROLLER
INSERT
10-1050
TAPER BEARING
RACE
10-1050
TAPER BEARING
RACE
11-2006
ROLL PIN
41-1533
GROUND ROLLER SHAFT
24-0273
O-RING
FLAIL MOWER OPERATOR’S MANUAL
CONTINUED ON NEXT PAGE
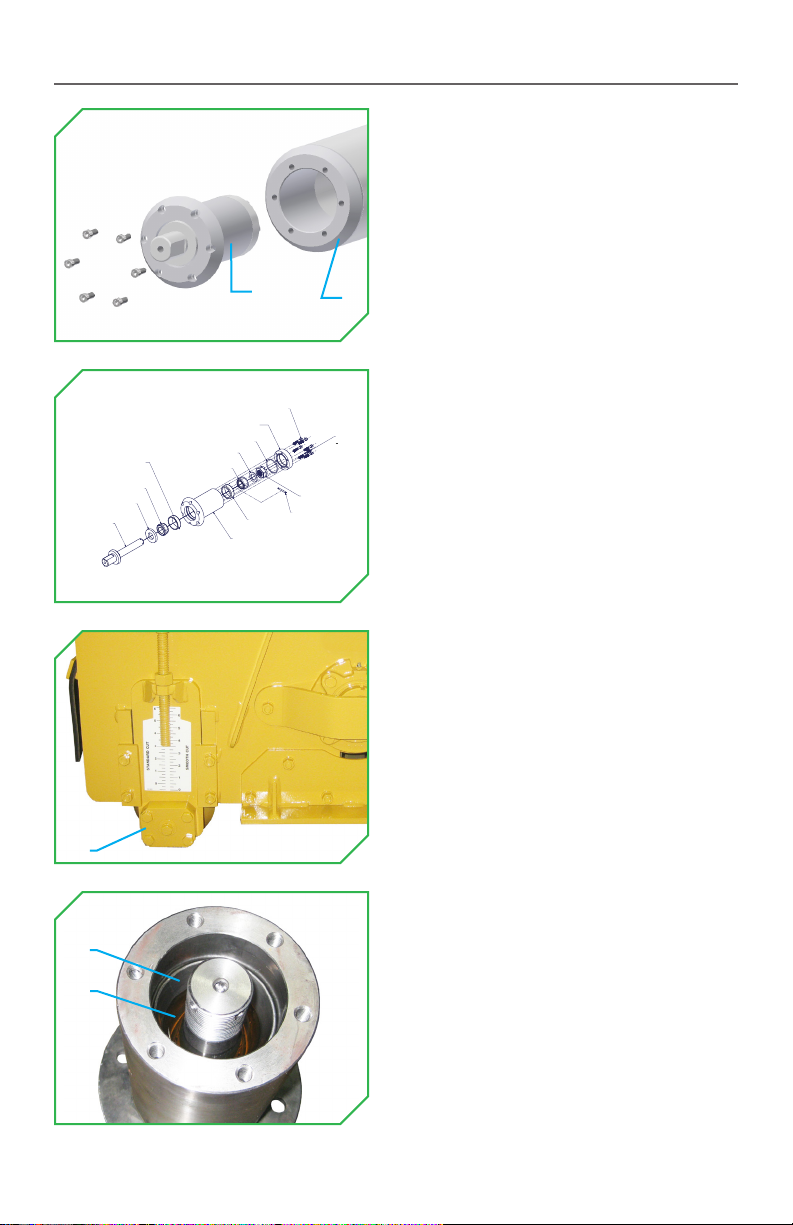
GROUND ROLLER
Bearing Maintenance:
•Each bearing(1) must have the oil and
O-ring replaced once annually with
7-8oz of synthetic 75-90W oil and a
new O-ring.
•Rest the ground roller(1) on
the ground.
Block it from moving.
•Unbolt the bearing blocks(3) from
each side of the flail and
ground roller.
◦DO NOT reassemble the bearing
block hardware from one side of
the flail on the other.
•Lift the flail head for access to the
ground roller.
•Remove the cap screws securing
the bearings(1) to the ground roller(2)
on each side.
•Disassemble each bearing(4)
(Reference page 37):
◦Remove the cap screws, 1/8” NPT
plug, and end cap.
◦Discard the old O-ring.
•Remove the roll pin and castle nut(4).
•Pour out the old oil from the insert(4).
◦Catch and retrieve the thrust
washer and taper bearing.
◦Examine the taper bearing its
race for damage or wear.
-No wear; proceed with the
following steps.
-Wear detected; contact
Diamond Mowers for a rebuild
kit with instruction.
•Pour synthetic SAE 75-90W oil(5) into
the ground roller insert(4) until it just
touches the taper bearing race(6).
(2)
(1)
(3)
(4)
(6)
(5)
20
Other manuals for FLAIL MOWER
1
Table of contents


