Diamond Remote Tomo5 User manual

Remote Tomo5 operation guide for eBIC microscopes
Revision: 2.0.3
Revision date: 27 Jun 2022
Author(s): Kyle Morris
Julika Radecke
Andrew Howe

Document Title:
Remote Tomo5 operation guide for eBIC microscopes
Author(s):
Kyle Morris
JulikaRadecke
Andrew Howe
Version:
2.0.3
Date:
27 Jun 2022
If you have any questions at any point during set-up, please ask your Local Contact for assistance Page 2 of 29
Introduction
This document is intended as a guide for trained eBIC users to assist them in setting up their
data collection session at eBIC on a Krios, K3 and GIF. The guide is principally aimed at the
remote user but is applicable to on-site operation. The level of detail is targeted at a standard
eBIC operator. The user is ultimately responsible for their use of eBIC and Diamond systems. If
you are in doubt about an action you need to perform or are unable to progress, then please
reach out to the eBIC Local Contact assigned to your session for assistance. Additionally, please
report any errors in this guide to your Local Contact or kyle.morris@diamond.ac.uk.
Please consult the following documentation for guidance on remote microscope access, data
analysis and transfer: “Remote access and analysis”
Information box colour key
User and local contact expectations
Please consolidate your grids into the minimum number of autogrid boxes. We standardly
load grids from autogrid boxes in the number order they are present and follow the numbering
written on the boxes. The local contact (LC) will load the microscope and take an inventory of
the grids in the autoloader before handover.
Ahead of your session, please inform your local contact (LC) of your:
Target pixel size and target total dose
Grid type (UAu, QF, Cflat or Lacey) and number of grids
Your LC requires this information to complete energy filter tuning, camera gain preparation and
grid loading. The gain will be found in your visit processing directory. Your LC will complete
essential alignments (beam shift, pivot points, aperture centring) prior to your session,
but the user will complete Image Shift Calibrations and Auto Function alignments prior
to starting collection.
Please consult with your LC to decide on a plan if you wish to recover grids from your session.
Grids can be recovered from the cassette, but not the microscope column.
Getting prepared
Establish contact with the Local Contact for your session via yours and your LC’s preferred
choice of communication i.e. Teams, Mail, Notepad, etc.
Refer to the ‘Remote access and analysis’ guide to access the microscope via NoMachine
Information boxes are presented in
green
Optional action are presented in yellow
Lamella specific instructions are in pink

Document Title:
Remote Tomo5 operation guide for eBIC microscopes
Author(s):
Kyle Morris
JulikaRadecke
Andrew Howe
Version:
2.0.3
Date:
27 Jun 2022
If you have any questions at any point during set-up, please ask your Local Contact for assistance Page 3 of 29
Contents
Contents ............................................................................................................................................3
1Preparation ................................................................................................................................4
1.1 Communication..................................................................................................................4
1.2 Remote connection ...........................................................................................................4
1.3 Quick start guide ...............................................................................................................4
1.4 Reasonable session timings............................................................................................4
2User interface summaries........................................................................................................5
3Microscope setup and screening ...........................................................................................8
3.1 Grid loading, Atlas and Presets.......................................................................................8
3.1.1 Initial checks and start up ..........................................................................................................................8
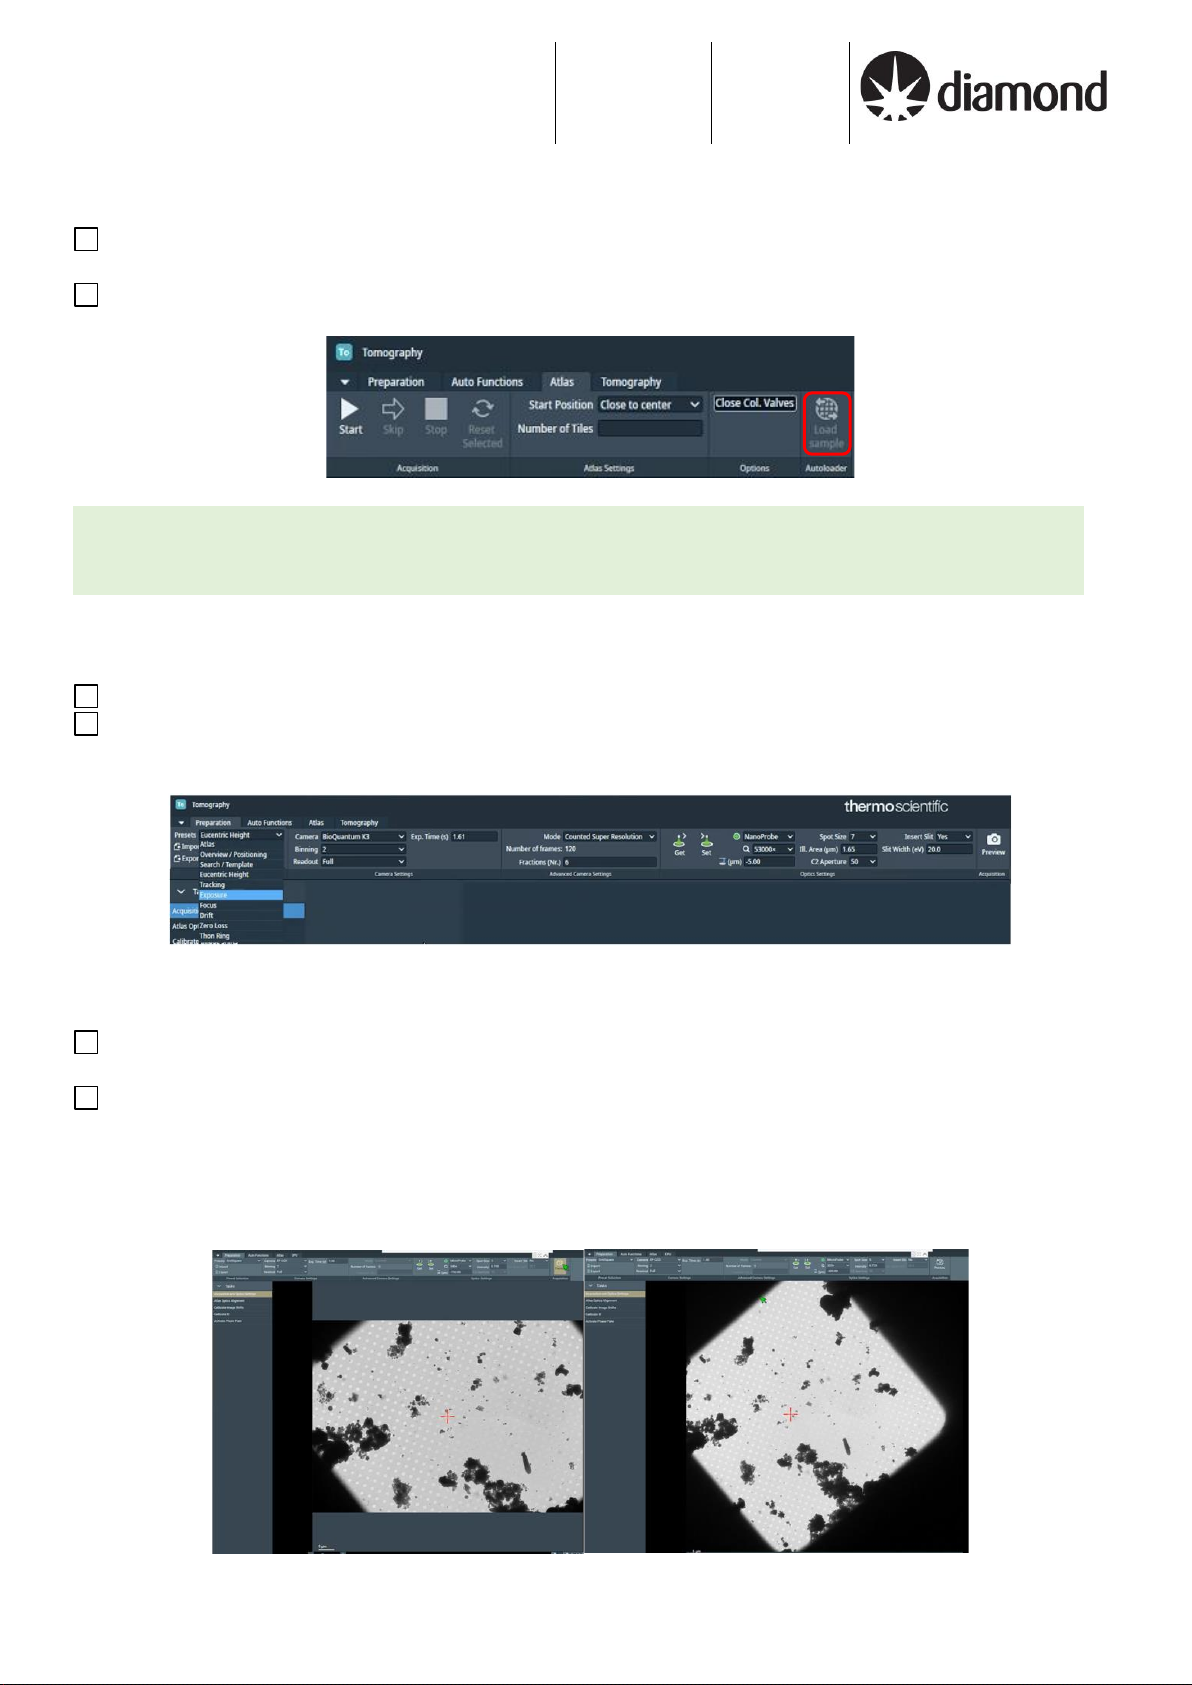
3.1.2 Collect your Atlas.......................................................................................................................................8
3.1.3 Inspect your Atlas.....................................................................................................................................10
3.1.4 Check your imaging condition Presets ....................................................................................................10
3.1.5 Dose calculation.......................................................................................................................................12
3.2 Image Shift Calibrations .................................................................................................13
3.2.1 Prepare for image shift calibrations .........................................................................................................13
3.2.2 Find eucentric height................................................................................................................................13
3.2.2.1 Automatic eucentric height troubleshooting _________________________________________ 13
3.2.2.2 Image Filter Settings troubleshooting ______________________________________________ 14
3.2.2.3 Manual eucentric height troubleshooting ___________________________________________ 14
3.2.3 Target a feature for Image Shift calibrations............................................................................................15
3.2.4 Calibrate the Image Shifts........................................................................................................................16
4Tomography setup..................................................................................................................17
4.1 Setup .................................................................................................................................17
4.1.1 Session setup...........................................................................................................................................17
4.1.2 Identify tomography targets .....................................................................................................................18
4.1.2.1 Overview (identify square or lamella) ______________________________________________ 18
4.1.2.2 Lamella tilt correction (if applicable) _______________________________________________ 18
4.1.2.3 Search Maps –medium mag montaging (identify hole or cellular targets)__________________ 19
4.1.3 Acquisition setup......................................................................................................................................20
4.1.3.1 Set up batch position___________________________________________________________ 20
4.1.3.2 Validate batch position _________________________________________________________ 22
4.1.3.3 Add batch position_____________________________________________________________ 22
4.1.4 Eucentric height refinement strategy .......................................................................................................23
4.1.4.1 Refine target positions__________________________________________________________ 23
5Final checks and data collection ..........................................................................................24
5.1 Auto Functions and alignment ......................................................................................24
5.1.1 Alignments via Autofunctions...................................................................................................................24
5.1.2 Beam centring..........................................................................................................................................25
5.1.1 Objective aperture....................................................................................................................................25
5.1.2 Zero-loss peak .........................................................................................................................................25
5.2 Start automated acquisition...........................................................................................26
5.2.1 Check your tomography acquisition parameters .....................................................................................26
5.2.2 Start tomography acquisition ...................................................................................................................27
5.2.3 Plan to request your dewar return ...........................................................................................................27
5.2.4 Monitor your data collection.....................................................................................................................28
5.2.5 Final steps................................................................................................................................................29

Document Title:
Remote Tomo5 operation guide for eBIC microscopes
Author(s):
Kyle Morris
JulikaRadecke
Andrew Howe
Version:
2.0.3
Date:
27 Jun 2022
If you have any questions at any point during set-up, please ask your Local Contact for assistance Page 4 of 29
1 Preparation
1.1 Communication
Prior to your session, please reach out to your local contact with the following information about
your session and the grids you have shipped.
1) Target pixel size:
2) Target total dose:
3) Grid type & mesh size:
4) Grids are clipped (y/n):
5) Number of grids:
6) Any loading instructions (if required):
1.2 Remote connection
Prior to your session, please check you can log in on NoMachine as described in the Remote
access and analysis guide. You will not see an instrument until your session is scheduled but you
should check you can successfully log in to nx-cloud.diamond.ac.uk via NoMachine.
1.3 Quick start guide
1) Make your Atlas session
2) Atlas your grids
3) Check your Presets
4) Check Image Shift Calibrations
5) Make your Tomo session
6) Batch position setup
7) Position refinement
8) Perform AutoFunction alignments in EPU
9) Start data collection
1.4 Reasonable session timings
TBA

Document Title:
Remote Tomo5 operation guide for eBIC microscopes
Author(s):
Kyle Morris
JulikaRadecke
Andrew Howe
Version:
2.0.3
Date:
27 Jun 2022
If you have any questions at any point during set-up, please ask your Local Contact for assistance Page 5 of 29
2 User interface summaries
Team Viewer
To switch between the virtual monitor hosting the TEM user interface and TFS Tomo, use the Team
Viewer Monitor buttons.
TEM Control Pads Simulator –user interface
The Control Pads Simulator provides access to the microscope controls you would find at the
instrument itself. It is in general becoming less necessary to use these controls but for some
operations later in the guide it is useful to be aware of where to find them.
Do not put the microscope into diffraction mode
Take care not to accidentally press this button

Document Title:
Remote Tomo5 operation guide for eBIC microscopes
Author(s):
Kyle Morris
JulikaRadecke
Andrew Howe
Version:
2.0.3
Date:
27 Jun 2022
If you have any questions at any point during set-up, please ask your Local Contact for assistance Page 6 of 29
TEM User Interface (TUI) –user interface
It is in general becoming less necessary to use TUI but for some operations later in the guide you
will need to access this interface.

Document Title:
Remote Tomo5 operation guide for eBIC microscopes
Author(s):
Kyle Morris
JulikaRadecke
Andrew Howe
Version:
2.0.3
Date:
27 Jun 2022
If you have any questions at any point during set-up, please ask your Local Contact for assistance Page 7 of 29
Thermo Fisher Scientific Tomo software –user interface
You can generally understand navigation through the tomography workflow via working left to right
through the ‘Workflow tabs’, and top to bottom through the ‘Workflow tasks’ operations. For
example, your imaging conditions (Presets) are first configured under the Acquisition and Optics
Settings.
This guide presents a suggested sequence through the tomography workflow.

Document Title:
Remote Tomo5 operation guide for eBIC microscopes
Author(s):
Kyle Morris
JulikaRadecke
Andrew Howe
Version:
2.0.3
Date:
27 Jun 2022
If you have any questions at any point during set-up, please ask your Local Contact for assistance Page 8 of 29
3 Microscope setup and screening
3.1 Grid loading, Atlas and Presets
3.1.1 Initial checks and start up
Your Local Contact will have loaded and inventoried the autoloader cassette
Note you may find the previous sessions grid on the column or unloaded to cassette position 1
If Tomo5 is not loaded, begin by starting this software from the TEM PC
3.1.2 Collect your Atlas
Session setup:
We find it can help with set up to have a grid Atlas to navigate, so collect one first
Start a new session for taking an Atlas (Atlas > New Session > Session Setup)
-Naming convention: Supervisor_YYYYMMDD_XXXXXX_visit-ID_Atlas
oDo not edit Supervisor_YYYYMMDD_XXXXXX prefix created by Tomo
oWe strongly suggest adding the visit ID and Atlas suffix
-Image format: MRC
oThese are the Atlas and Atlas tile image formats
oUsing MRC is recommended to retain the extended MRC header information
-Use the default SSD storage folder path: H:\DATA or G:\DATA or D:\DATA
oNever use C:\
Session set-up can then be controlled by users directly through the Tomo interface. Changes to beam settings
should all be controlled directly through the Tomo Preparation presets and navigation around the grid can be done
via right-click options over the images in Preparation, Atlas and Tomo image windows.
If you are returning to this section to re-acquire an Atlas after Image Shift Calibration:
oSelect the grid(s) > Reset Selected
oSkip Session setup

Document Title:
Remote Tomo5 operation guide for eBIC microscopes
Author(s):
Kyle Morris
JulikaRadecke
Andrew Howe
Version:
2.0.3
Date:
27 Jun 2022
If you have any questions at any point during set-up, please ask your Local Contact for assistance Page 9 of 29
Atlas collection:
Collect an Atlas of the chosen grid(s)
Atlas > Screening
Select the checkbox of each grid you want to acquire an Atlas of and select Close Col Valves
-If acquiring more than one Atlas, go to autoloader and switch the turbo to “Always On”.
oWait for the Turbo to reach 100 %
oCheck Turbo status on the microscope PC
▪TEM Life Science Autoloader Vacuum control
-Switch turbo to “Auto Off” once you have finished taking Atlas maps of your grids.
-Select “Close Col. Valves” if you leave the microscope unsupervised
Click the ‘Start’ button

Document Title:
Remote Tomo5 operation guide for eBIC microscopes
Author(s):
Kyle Morris
JulikaRadecke
Andrew Howe
Version:
2.0.3
Date:
27 Jun 2022
If you have any questions at any point during set-up, please ask your Local Contact for assistance Page 10 of 29
3.1.3 Inspect your Atlas
Inspect your single or multiple Atlases for targets by clicking on the grid in the left panel
-Left-click drag to move around, middle scroll to zoom in-out
When you have chosen your grid for target setup, select it and click ‘Load Sample’ in Tomo
3.1.4 Check your imaging condition Presets
Navigate to a square in your Atlas, right-click > Move stage here
In the Preparation tab > Acquisition and Optics Settings, you may select the Preset parameters
and adjust to suit your experiment.
Check your low magnification Presets using your loaded grid
Take a Preview using the Atlas Preset
-If necessary, re-centre on the square
Take a Preview using the Overview Preset
-If necessary, re-centre on the square and reacquire the Preview
-Adjust the magnification to fill the field of view with the grid square
-For lamella, the Overview preset should be adjusted to fill the field of view with one
lamella
Important: Only load grids from inside Tomo, any shifts and rotations that occur to the grid during
loading and unloading will be measured and accounted for automatically. If you notice navigation on the
Atlas places you in the incorrect area this may have failed and you will need to reacquire your Atlas.
Overview - 540 X
Overview - 320
X

Document Title:
Remote Tomo5 operation guide for eBIC microscopes
Author(s):
Kyle Morris
JulikaRadecke
Andrew Howe
Version:
2.0.3
Date:
27 Jun 2022
If you have any questions at any point during set-up, please ask your Local Contact for assistance Page 11 of 29
Take a Preview using the Search Preset
-Search is used in the Tomography tab to setup positions. Make sure the magnification
is adequate to show your feature of interest and to fit both the Exposure and the
Tracking/Focus area in the field of view.
-For lamella, the Search preset should be adjusted so the targets location is
recognisable
-Eucentric height and Search preset should be the same, hence when finished setting
up Search, select the Eucentric Height preset and click Get.
Check your high magnification Presets
Copy the image acquisition (Exposure) parameters to all other high mag Presets:
-Select the Exposure Preset from the drop down
-Press “Set” to send Exposure parameters to the microscope
-Select each high magnification Preset (Tracking, Focus, Drift, Zero Loss, Thon Ring)
-Press “Get” to retrieve the Exposure parameters from the microscope and copy into the
currently selected high magnification Preset
-Repeat for each high magnification Preset
-Adjust exposure times, especially for Focus and Tracking to give a reasonable number
of counts also considering the thickness at 60 degrees.
-For dose calculation for the Exposure preset see section 3.1.5
-Adjust the ZLP Preset to use a brighter spot size, as ZLP needs higher dose
oSmaller number i.e., drop 2 spot sizes for K3, 1 for Falcon 4
oYou may also select binning 2 to help with increasing signal to noise in this
Preset
Your Exposure magnification will have been set by your Local Contact based on prior communication with
you and calibrations made by your Local Contact will be dependent on this magnification, do not adjust
the Exposure magnification.

Document Title:
Remote Tomo5 operation guide for eBIC microscopes
Author(s):
Kyle Morris
JulikaRadecke
Andrew Howe
Version:
2.0.3
Date:
27 Jun 2022
If you have any questions at any point during set-up, please ask your Local Contact for assistance Page 12 of 29
3.1.5 Dose calculation
Set calculated exposure time in Preparation > Presets > Exposure
In this example, there are a few considerations to keep in mind:
-The dose per tilted image is 3.20 e-/Å2, 3.0 to 3.5 is reasonable for sub-tomogram averaging
-‘Fractions (Nr.)’are set to 6 for a tilt movie with ~0.5 e-/Å2per fraction, sufficient for motion
correction
Your LC will have told you the physical pixel dose rate over vacuum. Follow the example calculation below to
calculate and enter your target exposure time based on your desired target dose per tilt or in total (e-/Å2). You may
find these online dose calculators helpful.
Example exposure time calculation with
parallel illumination targeting optimal dose
per tilt
Example exposure time calculation with
parallel illumination targeting total dose
Physical pixel dose rate: 5.281 e-/px/sec
Pixel size (magnified): 1.63 Å/px
Pixel area (magnified): 2.66 Å2/px
𝒆−/𝒑𝒙/𝒔𝒆𝒄
Å𝟐/𝒑𝒙 =𝒆−/Å𝟐/𝒔𝒆𝒄
Dose per tilt (target): 3.2 e-/Å2
Dose rate: 1.988 e-/Å2/sec
𝒆−/Å𝟐
𝒆−/Å𝟐/𝒔𝒆𝒄 =𝒔𝒆𝒄
Exposure time per tilted image (sec): 1.61
Physical pixel dose rate: 5.281 e-/px/sec
Pixel size (magnified): 1.63 Å/px
Pixel area (magnified): 2.66 Å2/px
𝒆−/𝒑𝒙/𝒔𝒆𝒄
Å𝟐/𝒑𝒙 =𝑒−/Å2/𝑠𝑒𝑐
Dose rate: 1.988 e-/Å2/sec
Total dose (target): 131 e-/Å2
Tilt range (°): -60 to +60
Tilt step (°): 3
Tilt image number: 41
Dose per tilt = 131 / 41
= 3.2 e-/Å2
𝒆−/Å𝟐
𝒆−/Å𝟐/𝒔𝒆𝒄 =𝒔𝒆𝒄
Exposure time per tilted image (sec): 1.61
From your calculation, will each tilt receive sufficient dose for the imaging and tracking to work? If you are unsure,
later during set up, you could move to an unused area to acquire data acquisition images at zero and increasing
tilts that reflect your collection.

Document Title:
Remote Tomo5 operation guide for eBIC microscopes
Author(s):
Kyle Morris
JulikaRadecke
Andrew Howe
Version:
2.0.3
Date:
27 Jun 2022
If you have any questions at any point during set-up, please ask your Local Contact for assistance Page 13 of 29
3.2 Image Shift Calibrations
3.2.1 Prepare for image shift calibrations
Continue to use the Atlas > Screening tab to navigate your loaded grid
Find an identifiable feature which will be recognisable at all magnification Presets
Move to that square
-Right-click > Move stage to Grid Square
3.2.2 Find eucentric height
Navigate to centre on a square
Set Tomo to use the Overview Preset under the Preparation tab
-Preparation > Acquisition and Optics Settings > Preset: Overview > Preview
-If necessary, recentre the square
-If not done so already, adjust magnification to suit your grid square size
Find eucentric height by using the auto-eucentric by stage tilt under Auto Functions
-Auto Functions > Auto-eucentric by stage tilt > Presets: Eucentric Height > Start
3.2.2.1 Automatic eucentric height troubleshooting
If Tomo fails to automatically find eucentric height, there are a few things to try:
-A courser search can help: Re-run ‘Auto-eucentric by stage tilt’with ‘Presets: Overview’
for courser eucentric optimisation. If this succeeds, subsequently re-run ‘Auto-eucentric
by stage tilt’with ‘Presets: Eucentric Height’to increase precision.
-Re-run Auto-eucentric by stage tilt with a smaller stage tilt of 5 deg, and step up to 15
deg.
-Check to see that a strong cross-correlation peak is found. If not, then proceed to
troubleshoot the Image Filter Settings.
-If using quantifoil grids: the repeating pattern of holes may be preventing detection of a
single cross-correlation peak. Try changing the Eucentric Height Preset to a smaller
The stage must be at eucentric height to correctly apply Image Shift Calibrations.

Document Title:
Remote Tomo5 operation guide for eBIC microscopes
Author(s):
Kyle Morris
JulikaRadecke
Andrew Howe
Version:
2.0.3
Date:
27 Jun 2022
If you have any questions at any point during set-up, please ask your Local Contact for assistance Page 14 of 29
defocus offset (-25 to -50 µm) and/or a shorter exposure time to decrease cross-
correlation from hole patterns.
-If using lacey grids or lamella: there may not be enough signal for a strong cross-
correlation peak. Try changing the Eucentric Height Preset to a larger defocus offset (-
50 to -75 µm) and/or a longer exposure time to improve the cross-correlation peak.
3.2.2.2 Image Filter Settings troubleshooting
Select the Preset you want to optimise the Image Filter Settings for:
i.e. Low SA (euc. height / overview tracking)
High SA (Focus, Tracking)
With stage set to 0°, Acquire Image 1
With stage set to 5°, Acquire Image 2
Click compare
Look for reliably found cross-correlation peak
In the case of not finding a cross-correlation peak, try:
-Longest wavelength (nm) –¼ of the scale bar
-Shortest wavelength (nm) –1/40 of the scale bar
-Systematically try using different filters
-Try adjusting the Tapering value
3.2.2.3 Manual eucentric height troubleshooting
Tomography grids vary more than SPA grids (regular hole pattern versus cells on a grid), so there is no general
image filter that can be applied when calculating a cross-correlation. If there is not a good cross-correlation peak
when finding eucentric height, then the Image Filter may need to be adjusted for your current grid. The Image
Filter Settings are available to the user under the Preparation tab.

Document Title:
Remote Tomo5 operation guide for eBIC microscopes
Author(s):
Kyle Morris
JulikaRadecke
Andrew Howe
Version:
2.0.3
Date:
27 Jun 2022
If you have any questions at any point during set-up, please ask your Local Contact for assistance Page 15 of 29
If Tomo still fails to automatically find eucentric height, you can use manual eucentric height
calibration:
-Centre over a reasonably large ice crystal in Overview mag in the Tomo preparation
tab, then switch to the ‘Set’ flap out tab in the Stage control of the Microscope User
Interface.
-Set alpha to -30 deg and adjust z-value to re-centre the crystal using the flu screen
image.
-Selecting “high resolution” and “high contrast” settings in the Microscope User Interface
will make this easier (buttons at the bottom of the Flu Screen window).
3.2.3 Target a feature for Image Shift calibrations
Centre the stage on the feature
-Collect a preview using the Atlas Preset: Preparation > Preset: Atlas > Preview
-Right click on feature > Move stage here
Check the feature is aligned at higher magnification Presets
1) Collect a preview using the Overview Preset
Preparation > Preset: Overview > Preview
2) Check the feature remains centred, right-click > Move stage here, if necessary
3) Collect a preview using the Search Preset
Preparation > Preset: Search > Preview
4) Check the feature remains centred, right-click > Move stage here, if necessary
5) Collect a preview using the Exposure Preset
Preparation > Preset: Exposure > Preview
6) Check the feature remains centred, right-click > Move stage here, if necessary
Prior to performing Image Shift Calibrations we systematically target a feature at low and up to high
magnification. This will ensure that your feature is identifiable at all magnifications, provide indication of whether
the Image Shift Calibrations need to be performed and importantly, centre a target feature at high magnification
ready for Image Shift Calibrations.
If you struggle to recentre the feature because it is out of a current field of view, one strategy is to take an image
using your current Preset, and then subsequently take a new image using the GridSquare Preset as in (1). The
charging mark introduced will be evident in the GridSquare image and indicate what the true stage position is
versus where the stage thinks it is. You can then appropriately reposition the stage on the GridSquare image.

Document Title:
Remote Tomo5 operation guide for eBIC microscopes
Author(s):
Kyle Morris
JulikaRadecke
Andrew Howe
Version:
2.0.3
Date:
27 Jun 2022
If you have any questions at any point during set-up, please ask your Local Contact for assistance Page 16 of 29
3.2.4 Calibrate the Image Shifts
Iteratively align lower magnifications to the feature centred at exposure magnification
-Preparation > Calibrate Image Shifts > Start Calibration
-Double left-click > Re-acquire: to calibrate the image shift between the Presets
-At Exposure magnification the stage will be shifted, for subsequent magnifications
Image Shifts will be recalibrated
-Click Proceed to move to the next pair of Presets
If you found the feature remained centred during targeting, then you may choose to skip image shift calibrations
If you needed to recentre the feature during targeting, you should calibrate the Image Shifts. With the feature now
centred at Exposure Preset, proceed to 3.2.4
Important: If you applied a significant Image Shift at Atlas magnification during this calibration, please be sure to
re-acquire your Atlas as in 3.1.2 after you have completed the Image Shift Calibration.

Document Title:
Remote Tomo5 operation guide for eBIC microscopes
Author(s):
Kyle Morris
JulikaRadecke
Andrew Howe
Version:
2.0.3
Date:
27 Jun 2022
If you have any questions at any point during set-up, please ask your Local Contact for assistance Page 17 of 29
4 Tomography setup
4.1 Setup
4.1.1 Session setup
Tomography > New session > Session setup
-Naming convention: Supervisor_YYYYMMDD_XXXXXX_visit-ID_autoloader-#_Tomo
oDo not edit the Supervisor_YYYYMMDD_XXXXXX prefix created by Tomo
oWe strongly suggest adding the visit ID, autoloader position and Tomo as a suffix
-Sample type: Slab-like
-Options: Select Batch & Low Dose
-Dose fraction output format: Tiff Lzw Non-Gain normalized
oThese are the raw movie stacks from the detector
oUsing Tiff LZW non-gain normalized is required by eBIC
-Storage folder: D:\DATA, G:\DATA or H:\DATA
oNever use C:\
Click Apply

Document Title:
Remote Tomo5 operation guide for eBIC microscopes
Author(s):
Kyle Morris
JulikaRadecke
Andrew Howe
Version:
2.0.3
Date:
27 Jun 2022
If you have any questions at any point during set-up, please ask your Local Contact for assistance Page 18 of 29
4.1.2 Identify tomography targets
4.1.2.1 Overview (identify square or lamella)
Move to a square of interest
-Tomography tab > Batch position
-Click on the tab for Atlas
-Navigate to a region of interest with Right click > Move Stage Here
Identify a good position for eucentric height adjustment, then do:
-Tomography > Auto Eucentric
-Tomography > Acquire Overview
4.1.2.2 Lamella tilt correction (if applicable)
If working with lamella, before acquiring Search images to identify targets, the specimen tilt due to milling angle will
need to be corrected. The milling angle is known from the FIB-SEM experiment, at eBIC this is typically 13 °,
however the loading orientation of the lamella is not known. The schematic below shows the two possible ‘Loaded
orientations #1 & #2’. In the ‘Positive and Negative tilt test’ the lamella long axis will either stay the same or appear
narrower, depending on the loaded orientation. If the lamella long axis narrows in the ‘Positive tilt test’, apply a
negative correction. If the lamella long axis narrows in the ‘Negative tilt test’, apply a positive correction.

Document Title:
Remote Tomo5 operation guide for eBIC microscopes
Author(s):
Kyle Morris
JulikaRadecke
Andrew Howe
Version:
2.0.3
Date:
27 Jun 2022
If you have any questions at any point during set-up, please ask your Local Contact for assistance Page 19 of 29
Tilt the stage to 2X the known milling angle using a positive tilt, by using ‘Set Tilt (°)’ and ‘Set’
Acquire an Overview image and note any change in the long axis of the lamella
Tilt the stage to 2X the known milling angle using a negative tilt, by using ‘Set Tilt (°)’ and ‘Set’
Acquire an Overview image and note any change in the long axis of the lamella
-If the lamella appearance change is not obvious, try tilting to a higher angle i.e. +/- 40°
Apply the appropriate Tilt Correction, by using ‘Set Tilt (°)’ and ‘Set’
Acquire a new Overview with the Tilt Correction applied
4.1.2.3 Search Maps –medium mag montaging (identify hole or cellular targets)
Inspect the Overview: move to a region of interest
To inspect a large area at Search magnification, acquire a Search Map
-Right click > Move Stage Here > Acquire Search Map
-The Search Map Options may be adjusted from the Acquisition drop-down
If your feature of interest is difficult to see, you may first acquire a Search Map image which will proceed to
collect a montage of Search images for further inspection.
If you can see your feature of interest on the Overview image, you may target and collect a single Search image.

Document Title:
Remote Tomo5 operation guide for eBIC microscopes
Author(s):
Kyle Morris
JulikaRadecke
Andrew Howe
Version:
2.0.3
Date:
27 Jun 2022
If you have any questions at any point during set-up, please ask your Local Contact for assistance Page 20 of 29
Inspect Overview or Search Map: move to a region of interest and take Search image
-Right click > Move Stage Here > Acquire Search
Inspect Search image, move stage to target and setup collection (described below)
Reposition if required: Right click →Move Stage Here and Acquire Image
Repeat if region of interest is not centred
Enter ‘Name’ for desired tomogram naming convention
Enter ‘Defocus’ to set desired defocus value for each tomogram
Set Tilt (°): 0.00 to define starting angle of tomogram.
-Can be any other value between -60 and 60°
4.1.3 Acquisition setup
4.1.3.1 Set up batch position
Adjust your imaging areas (exposure, tracking and focussing)
-Pay attention to the tilt axis relative to your target for acquisition
-Left-click to drag the tracking and focus areas (yellow and blue circles)
-Preferably, move both to the same position
Table of contents
Other Diamond Microscope manuals