Digicom GALILEO PLUS User manual

GALILEO
PLUS
&
GALILEO
USB
USER'S MANUAL
rev. 2.0 04/98
Plus-UsbCP.pm6 4/17/98, 18:371
III
GALILEO PLUS & USB
INDEX
PRECAUTIONARY MEASURES III
1. GENERAL REMARKS 1.1
1.1. PRODUCT DESCRIPTION 1.1
1.2. INSTALLATION 1.3
1.3. UPGRADE 1.4
DECLARATION OF CONFORMITY V
PRECAUTIONARY MEASURES
All rights reserved; no part of this publication may be reproduced, stored in a retrieval
system, or trasmitted in any form or by any means, electronic, otherwise, without the prior
written permission of DIgicom S.p.A..
The contents of this booklet may be modified without prior permission.
Every possible care has been taken in testing and putting together all the documentation
containedinthisbooklet,howeverDigicomcannottakeanyresponsabilitybroughtbythe
use of this booklet.
The following instructions must be followed during installation, in order to
guarantee the users safety and ensure good working of the product:
Required Environmental Conditions:
Room Temperature Relative Humidity
from -5 to +45 °C
from 20% to 80% non condensing.
Avoid rapid changes in temperature and humidity (0,03°C/min.)
The product and all cables must be installed in a place free of:
lDust, humidity, high temperatures and direct exposure to sunlight.
lLiquids or corrosive chemical substances
The product and cables must not be placed close to:
lObjects emitting heat. Such heat may damage the box or cause other
problems.
lObjects generating a strong electro-magnetic field (e.g. Hi-Fi speakers
etc.)
To clean the box use a dry, soft cloth. Dampen the cloth with water to remove
any stains.
Never use insecticides or chemical products such as gasoline.
Take care to avoid subjecting the product to heavy vibrations or crashes.
Plus-Usb0x.pm6 4/17/98, 18:373

GALILEO PLUS & USB
General Remarks and Installation
1
1. GENERAL REMARKS
This user’s manual describes the
functioningof thevideo-conferencing and
video-telephonysystem GALILEO, when
used with a computer running Windows
95 and NT.
Galileo’s applications are countless,
includingbothpersonal andbusinessuse.
Itis a solutionwithin thereach of everybody
to achieve videocommunication through the In-
ternet or other means such as point-to-point
connections on the PSTN or ISDN, Local or Wide Area
Networks with TCP/IP protocol.
Galileo allows connectivity to one of the above networks, i.e. an analog
modem, an isdn modem or terminal adapter, or an ethernet card or token
ring card or similar for connection to a LAN.
1.1. PRODUCT DESCRIPTION
Inside Galileo's package you will find the following:
a) a high definition colour digital camera to be connected to your pc parallel
port (Galileo Plus) or USB port (Galileo USB).
Note:
Note that the parallel port must be bi-directional. (for some years personal computers
have been thus equipped.) If the parallel port is already used by a printer you should
purchase an additional parallel port card, configure it as LPT2 and connect the printer
to it. Such cards are low in cost and are available from most computer re-sellers.
b) a CD ROM with the software drivers for Windows 95 and NT enabling a
frame captured by the camera to be used by application programs in
conformity with Video For Windows standards.
c) inside the CD you will find Microsoft NetMeeting. This software allows the
management of video-conferencing or video-phone applications, and it
complies with the following means of communication:
lconnectionsthrough Internet in dial-up mode with SLIPor PPPprotocol
via modem or ISDN
Plus-Usb01.pm6 4/17/98, 18:371

2
GALILEO PLUS & USB
General Remarks and Installation
lconnections through Internet in leased line mode with routers
lconnections through Internet in ISDN mode with ISDN routers
llocal area networks with TCP/IP protocol inside business buildings
and in a campus environment
lwide area networks consisting of LANs interconnected withTCP/IP
protocol geographically, with bridges/routers on different lines. (These are
usually already installed for normal business data transmission.
d) acable touse powerfrom themouse portof thePC forthe camera.(Galileo
plus version only).
e) another cable for the alternative use of the keyboard port for the same
purpose.(Galileo Plus version only).
f) an USB cable to connect the videocamera to the USB port.
g) astereo audio headsetwith microphone incorporatedto beused if required.
It is foreseen that most frequently Galileo will be used in conjunction with
external speakers and a microphone or with multimedia video monitors.
These devices are usually supplied with audio cards and are inexpensive.
The headset with microphone included with Galileo is not just for
convenience. It allows a much greater degree of privacy. In addition, for
users operating with SVD modems (simultaneous voice & data for
applications such as tele-maintenance or tele-instruction to closed user
groups, etc...) the headset with microphone can be a useful and practical
device.
All the hardware components of Galileo can be used with other software
applications managing digitalized images in Video For Windows format
with the input/output device on a parallel port, for example Microsoft
NetMeeting, Intel VideoPhone, CuSeeMe, Enhanced CuSeeMe...
Plus-Usb01.pm6 4/17/98, 18:372
GALILEO PLUS & USB
General Remarks and Installation
3
1.2. INSTALLATION
To install Galileo proceed as follows:
1) Turn off the PC and disconnect from the power supply socket.
2) Open the box of Galileo and remove the components from their packaging.
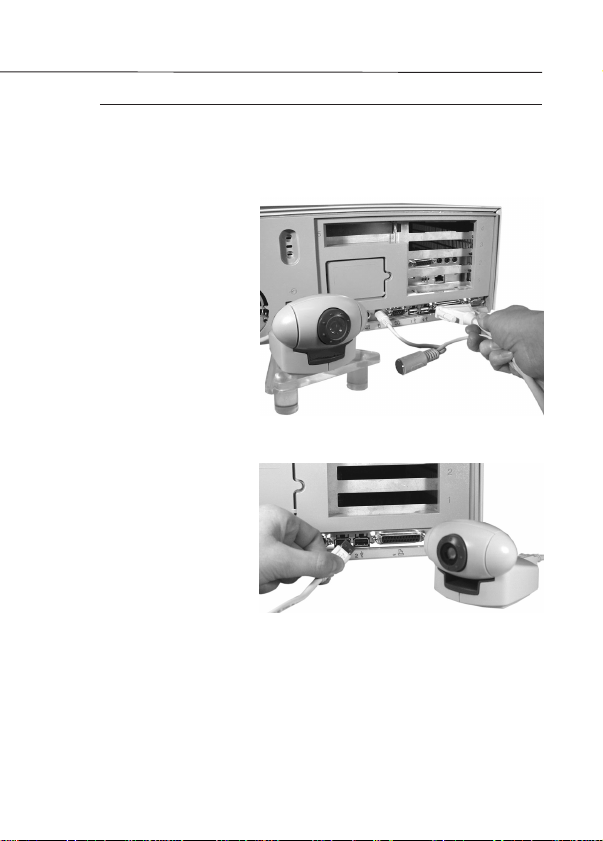
3) If your pc has a mouse bus
port (the one with a microdin
connector) use this one for
thepowersupply ofthedigital
camera, otherwise use the
keyboard port and use the
appropriate cable adapter
provided. Connect the
adapteryouchose to yourPC
port These two adapters are
equipped with a male
connector to be inserted into
thepc jack and with a female
connector to re-connect the mouse or the keyboard. Use this female connector to re-
connect the chosen device.
4) Connect the videocamera to
your PC USB port using the
special cable supplied into
the package.
5) Put the camera on the
monitor of your PC.
6) Open the lens of the camera
and turn the camera upwards.
7) Take the cable of Galileo’s digital camera and connect the parallel port adapter to the
parallel port of your PC. This parallel port must be bi-directional EPP(enhanced parallel
port) or ECP (enhanced capabilities port).
If the parallel port is used for connection of a printer, it is necessary to buy a parallel port
switch or an additional parallel port card configured as LPT2, in order to connect the
printer again. (Do not use an electronic double of LPTxx port to avoid any possible
contentionof IRQand I/O addresses and software/hardwareincompatibility witha double
electronic switch.
Plus-Usb01.pm6 4/17/98, 18:373

4
GALILEO PLUS & USB
General Remarks and Installation
8) Now you can switch on your personal computer to install the camera drivers and the
software. Be sure that the audio device (Sound Blaster or similar) is installed and in
workingorder and thespeakers andmicrophone or theheadset withmicrophone supplied
with Galileo are connected to it. At this point the hardware installation of GALILEO is
completed.
9) Insert the DRIVER diskette into the floppy drive and
selectthedirectory ofyourproduct andoperatingsystem
(Win95 or NT). Run the program stored on the diskette.
At this point, follow the procedure to install the drivers.
10)Youare ready to install thevideoconferencing software.
Follow the installation instructions you find into the
software inside the package.
Note: Galileo Plus and Galileo USB can be used with the videconferencing software
using the Video for Windows format for the management of the videocamera. (i.e.
Microsoft NetMeeting, VDOPhone, VideoLink, ecc.)
1.3. UPGRADE
For any information concerning new drivers, you can connect to our web site
at http://www.digicom.it
As for upgrades concerning the videoconferencing software, connect to the
software manufacturer website.
Plus-Usb01.pm6 4/17/98, 18:374
GALILEO PLUS & USB
Declaration CE of Conformity
V
DECLARATION OF CONFORMITY
Digicom S.p.A. via Alessandro Volta 39 21010 Cardano al Campo -Varese-
declares that this product satisfies the basic requirements of
Electromagnetic Compatibility and Safety of the below indicated Directive:
l
89/336/EEC of 3 may 1989 with subsequent modifications (Directive 92/31/EEC of april
28, 1992, Directive 93/68/EEC of july 22,1993 and Directive 93/97/EEC of 29 october
1993).
WARRANTY
WARRANTY CLAUSES
l
The equipment has a warranty which covers manufacturing and operating faults for the
period indicated on the inside back cover of the user's manual.
l
The warranty is to be considered freight forward and the goods must reach the address
indicated below at customer's expences.
l
Warranty means the substitution or repairing of fault products. Working hours used for
repairing included in the warranty.
l
The estetic and the separable parts are not included in the warranty.
l
The warranty is not extended to equipments which have been subject to misuse, improper
installation, electric discharge or repaired by unauthorized staff.
Plus-UsbCE.pm6 4/17/98, 18:375

http://www.digicom.it
Plus-UsbCP.pm6 4/17/98, 18:372
This manual suits for next models
1
Table of contents


