Digital audio ACHAPELL AUDIO 992EG User manual

1266 Park Road
Chanhassen, MN 55317
952-401-7700
suppor[email protected]
www.digitalaudio.com
LACHAPELL AUDIO 992EG USER GUIDE
Vacuum Tube Preamplifier for Microphones and Instruments
Version 1.2
June 2017

LACHAPELL AUDIO MODEL 992
SAFETY INSTRUCTIONS
TO REDUCE THE RISK OF ELECTRIC SHOCK, DO NOT REMOVE COVER. NO USER SERVICEABLE PARTS
INSIDE. CONTACT DIGITAL AUDIO LABS FOR SERVICING.
The lightning flash with arrowhead symbol, within an equilateral triangle, is intended to alert the user
to the presence of uninsulated and/or potentially dangerous voltage within the products enclosure
that may be of sufficient magnitude to constitute a risk of electric shock to persons.
The exclamation point within an equilateral triangle is intended to alert the user to the presence of
important operating and maintenance (servicing) instructions in the literature accompanying the
appliance.
POWER CORD NOTICE FOR INTERNATIONAL OPERATION
Please call Digital Audio Labs Support at 952-401-7700.
IMPORTANT SAFETY INSTRUCTIONS
1. Read and understand this entire manual.
2. Keep this manual available for reference.
3. Heed all warnings and precautions in this manual and notices marked on the product.
4. Do not use this product near water or damp environments.
5. Do not block any ventilation openings. Install in accordance with the manufacturer’s instructions.
6. Provide for proper airflow around product. Do not install near products that produce high levels
of heat. Do not expose the unit to direct sun light or heating units as the internal components’
temperature may rise and shorten the life of the components.
7. Do not defeat the safety purpose of the polarized or grounding-type plug. A polarized plug has two
blades with one wider than the other. A grounding type plug has two blades and a third grounding
prong.
8. Protect the power cord from being walked on or pinched particularly at plugs, convenience
receptacles, and the point where they connect to the product. Do not use the unit if the electrical
power cord is frayed or broken.
9. Only use attachments/accessories specified by the manufacturer.
10. Unplug this product during lightning storms or when unused for long periods of time.
11. Refer all servicing to qualified service personnel. There are no user serviceable components inside
the product.
12. The product shall not be exposed to moisture. Do not touch the unit with wet hands. Do not handle
the unit or power cord when your hands are wet or damp.
13. The product should be connected to a power supply only of the type described in the operating
instructions or as marked on the product.
CARE
• From time to time you should wipe off the front and side panels and the cabinet with a dry soft
cloth. Do not use rough material, thinners, alcohol or other chemical solvents or cloths since this may
damage the finish or remove the panel lettering.
• The manufacturer cannot be held responsible for damages caused to persons, personal possessions,
or data due to an improper or missing ground connection.

LACHAPELL AUDIO MODEL 992 1
DIGITAL AUDIO LABS LIMITED WARRANTY
Digital Audio Labs warrants their products against defects in material and workmanship for a period of two years
from date of purchase. During this period, Digital Audio Labs will, at its option, repair the defective unit or replace
it with a new or rebuilt one.
The warranty does NOT cover:
• Damage due to abuse, misuse, or accident.
• Damage due to operation contrary to the instructions in the product instruction manual.
• Units on which the product serial number has been removed or altered.
• Units that have been serviced by unauthorized personnel.
All implied warranties, including warranties on merchantability and fitness, are limited in time to the length of
this warranty. Some states do not allow time limitations on implied warranties, so this limitation may not apply
to you. Digital Audio Labs’ liability is limited to the repair or replacement of its product. Digital Audio Labs shall
in no way be held liable for incidental or consequential damages resulting from the use of their product or
its software, including, without limitation, damages from loss of business profits, business interruption, loss of
business information or other pecuniary loss. Some states do not allow the exclusion or limitation of incidental or
consequential damages, so the above limitation or exclusion may not apply to you.
REPAIR POLICY
Please do not return the product without obtaining an RMA number first. Contact Digital Audio Labs at support@
digitalaudio.com to acquire an RMA number. Do not return the product to the place of purchase. Please write
the RMA number on the outside of the shipping carton. Any product sent to us without a valid RMA number will
be refused. Include the following with the product: a brief description of the problem, your name, return shipping
address, phone number and the RMA number. Do not include any accessories. DAL is not responsible for any
damage to or loss of the product during transit. We recommend that customers obtain a receipt and tracking
number for all packages shipped to us. Turnaround time on repairs is generally ten business days. If you live
outside of the United States, please contact your local distributor for warranty service.
Please return product to:
Digital Audio Labs
Attn: RMA Number
1266 Park Road
Chanhassen, MN 55317
USA
WARRANTY SERVICE
You will be required to pay the shipping charges when you ship your product to DAL. DAL will pay for return
shipping via UPS ground. We reserve the right to inspect any product that may be the subject of any warranty
claim before repair is carried out. For warranty service, we may require proof of the original date of purchase if
you have not registered your product with DAL. Final determination of warranty coverage lies solely with Digital
Audio Labs.
NON-WARRANTY SERVICE
If it is determined that the product does not meet the terms of our warranty, you will be billed for labor, materials,
return freight and insurance. There is a $80 USD minimum charge for materials and labor. Appropriate shipping
charges will be applied. We require payment in advance of repair by credit card; we accept Visa and Master
Card. In the event the charges are over the minimum charge, DAL will contact you and inform you of the cost of
the repair before any work is completed.

LACHAPELL AUDIO MODEL 992
CONTENTS
SAFETY INSTRUCTIONS.................................................................................................................................................................II
IMPORTANT SAFETY INSTRUCTIONS.............................................................................................................................II
CARE...........................................................................................................................................................................................II
DIGITAL AUDIO LABS LIMITED WARRANTY........................................................................................................................1
REPAIR POLICY.......................................................................................................................................................................1
WARRANTY SERVICE ...........................................................................................................................................................1
NON-WARRANTY SERVICE...............................................................................................................................................1
INTRODUCTION...............................................................................................................................................................................3
TARGET APPLICATION..................................................................................................................................................................3
BEFORE YOU GET STARTED........................................................................................................................................................3
SAFETY PRECAUTIONS ................................................................................................................................................................4
HOOKUP.............................................................................................................................................................................................5
CONTROLS ........................................................................................................................................................................................5
CHANNEL SPECIFIC TOGGLES .......................................................................................................................................6
GETTING STARTED ..........................................................................................................................................................................7
LACHAPELL AUDIO 992 SPECIFICATIONS ..........................................................................................................................8
LACHAPELL AUDIO SUPPORT...................................................................................................................................................8

LACHAPELL AUDIO MODEL 992 3
INTRODUCTION
TheLaChapell Audio 992EG is our flagship fully balanced pure class-A vacuum tube preamplifier and
instrument input amplifier. LaChapell Audio has gone to great lengths in making sure this preamp not
only deliver world class performance specifications but more importantly, deliver them with warmth
and character while using only the finest components.
TARGET APPLICATION
The 992EG can easily accommodate virtually any recording requirement. The 992 EG utilizes a Jensen
input transformer with dual ECC83 vacuum tubes per channel. With incredible noise performance and
>74dB of internal gain, the 992 closes the gap for those using ribbon mics, recording distant or faint
sound sources and/or passive hi-Z instruments.
BEFORE YOU GET STARTED
Stated below are a few areas that you must take the time to read before you power up and use the
992. You as the owner/user are responsible for completely understanding how to operate this device
safely and properly.
• UNPACKING: Inspect thoroughly! Although we take extreme care at final assembly and packing,
things can happen during transit. It is very important that you contact Digital Audio Labs if there is
anything broken or damaged upon receipt of package. . Included in every package should be:
(1) Model 992 preamplifier, (1) AC power cord, (1) packet of mounting screws, (1) owner’s manual
w/registration card. It is a good idea for you to retain the packaging (box, foam caps and plastic
bag) in case there is a need to return the unit for service or repair at a later date.
• MOUNTING: Always allow for plenty of ventilation around the sides and top of preamp. Unlike
most 2-channel vacuum tube units, the 992 uses a total of eight tubes; this generates a lot of heat.
It is also important to NOT mount this unit above other sources that generate heat such as power
amplifiers or other tube gear. Always provide at least 1U (1 rack space) of clearance above
the 992. Mounting in travel racks in not recommended. Keep in mind that the vacuum tubes
are mounted in sockets and on rare occasions can shake lose if subjected to prolonged rough
handling. Finally, the 992 should never be mounted or placed in areas that would expose it to any
form of moisture.

LACHAPELL AUDIO MODEL 992 4
• SERVICE/REPAIR - WARNING: With the exception of tube replacement (see below) the user should
NOT attempt to service this unit. Due to the risk of electrical shock and the presence of lethal
voltages inside the chassis. Only Digital Audio Labs or other highly qualified personnel are to
perform maintenance and service activities.
Tube replacement: Turn the unit off, disconnect the power cord and let the unit stand for at
least 20 minutes. Vacuum tubes run very hot, replacing them when they’ve had enough time
to cool to room temperature is recommended. It is also VERY important that enough time is
given to allow power supply voltages to drain. After 20 minutes has past remove the top panel
using a standard Phillips type driver.
To remove the tubes apply a slight circular/rotating motion as you pull it away from the socket.
DO NOT pull strait up as it will stress the PC board and the tube. It is important to replace tubes
with the same type of tube! When new tubes are installed double, triple check that you’ve
inserted the correct tubes into the V1~V4 sockets BEFORE you powerup.
NOTE: Each tube socket has a designation (V1 to V4) silk-screened onto the P.C. board of
each channel. V1 & 2 are the input tubes (12AX7/ECC83 or 6072), V3 & 4 are the output tubes
12AU7/ECC82/6189 . We recommend that you send the unit back for tube replacement as
there will likely be the need for grid balancing.
WARNING: Warranty may rendered void if tubes other than those listed above have been
used at any time.
Rear Main Fuse replacement (1amp slow-blow): Located within the rear power entry module (PEM)
are the two main AC fuses. To replace these fuses make sure the rocker power switch is turned off then,
disconnect the AC cord. Locate the two small slots along the top edge of the PEM; place your screw
driver in one of these slots and pull back on the housing door. Do not attempt to pry back the PEM from
the rear panel itself! The housing door will rotate back and expose the red sub-module. Note the fuse
orientation inside this module before you remove the fuses. Re-insert the housing back into the PEM
making sure the 115v/230v text is correctly oriented. Always replace fuses with same type from factory.
See International Power Settings below.
Contact Digital Audio Labs for any other servicing questions.
SAFETY PRECAUTIONS
• Never operate the 992 with the top panel removed. The top panel’s perforations provide more than
enough ventilation for cooling. The top panel also plays an important role in maintaining good
signal to noise ratio performance.
• Always provide a source to ground (earth.) Never under any conditions should a power cord that
has the 3rd prong for ground missing or defeated be used.
• Do not place the 992 in an area where there is a potential for fluids to fall, spill into or come in
contact with the 992. If you notice fluids or moisture present inside the 992 DO NOT turn power on!
Although there are plenty of safety measures built into the unit for the protection of the user, it is best
if you contact Digital Audio Labs for direction.
LACHAPELL AUDIO MODEL 992 5
HOOKUP
AC PEM: Double check the power setting on the power entry
module (PEM) is correct. In the USA it should always read 115v
on the red voltage indicator located just above the rear power
rocker switch. As stated above, use only a 3 prong detachable
AC power cord. See the SERVICE/REPAIR section for replacing the
fuse(s).
• XLR INPUT: Located on the rear panel are the balanced
Microphone XLR inputs. The pin orientation is standard.
• XLR OUTPUT: Above the XLR inputs are the balanced
XLR outputs. These outputs are to be connected to your
recording/broadcast console, recorder, or other devices that
can accommodate a balanced line level signal.
• Hi-Z INPUT: Located on the front panel are the auto-switching
Hi-Z instrument inputs. This Hi-Z stage is placed in front of the
balanced microphone input stage and utilizes a Cinemag
transformer for signal balancing.
INTERNATIONAL POWER
SETTINGS:
At this time power settings other
than 115v are only available as
a factory modification.
DO NOT attempt to use the
red voltage fuse sub module
for voltage adjustments. If
this modification has been
performed you will see the
corresponding check box
marked on the rear panel
accordingly. Contact Digital
Audio Labs if you have any
questions.
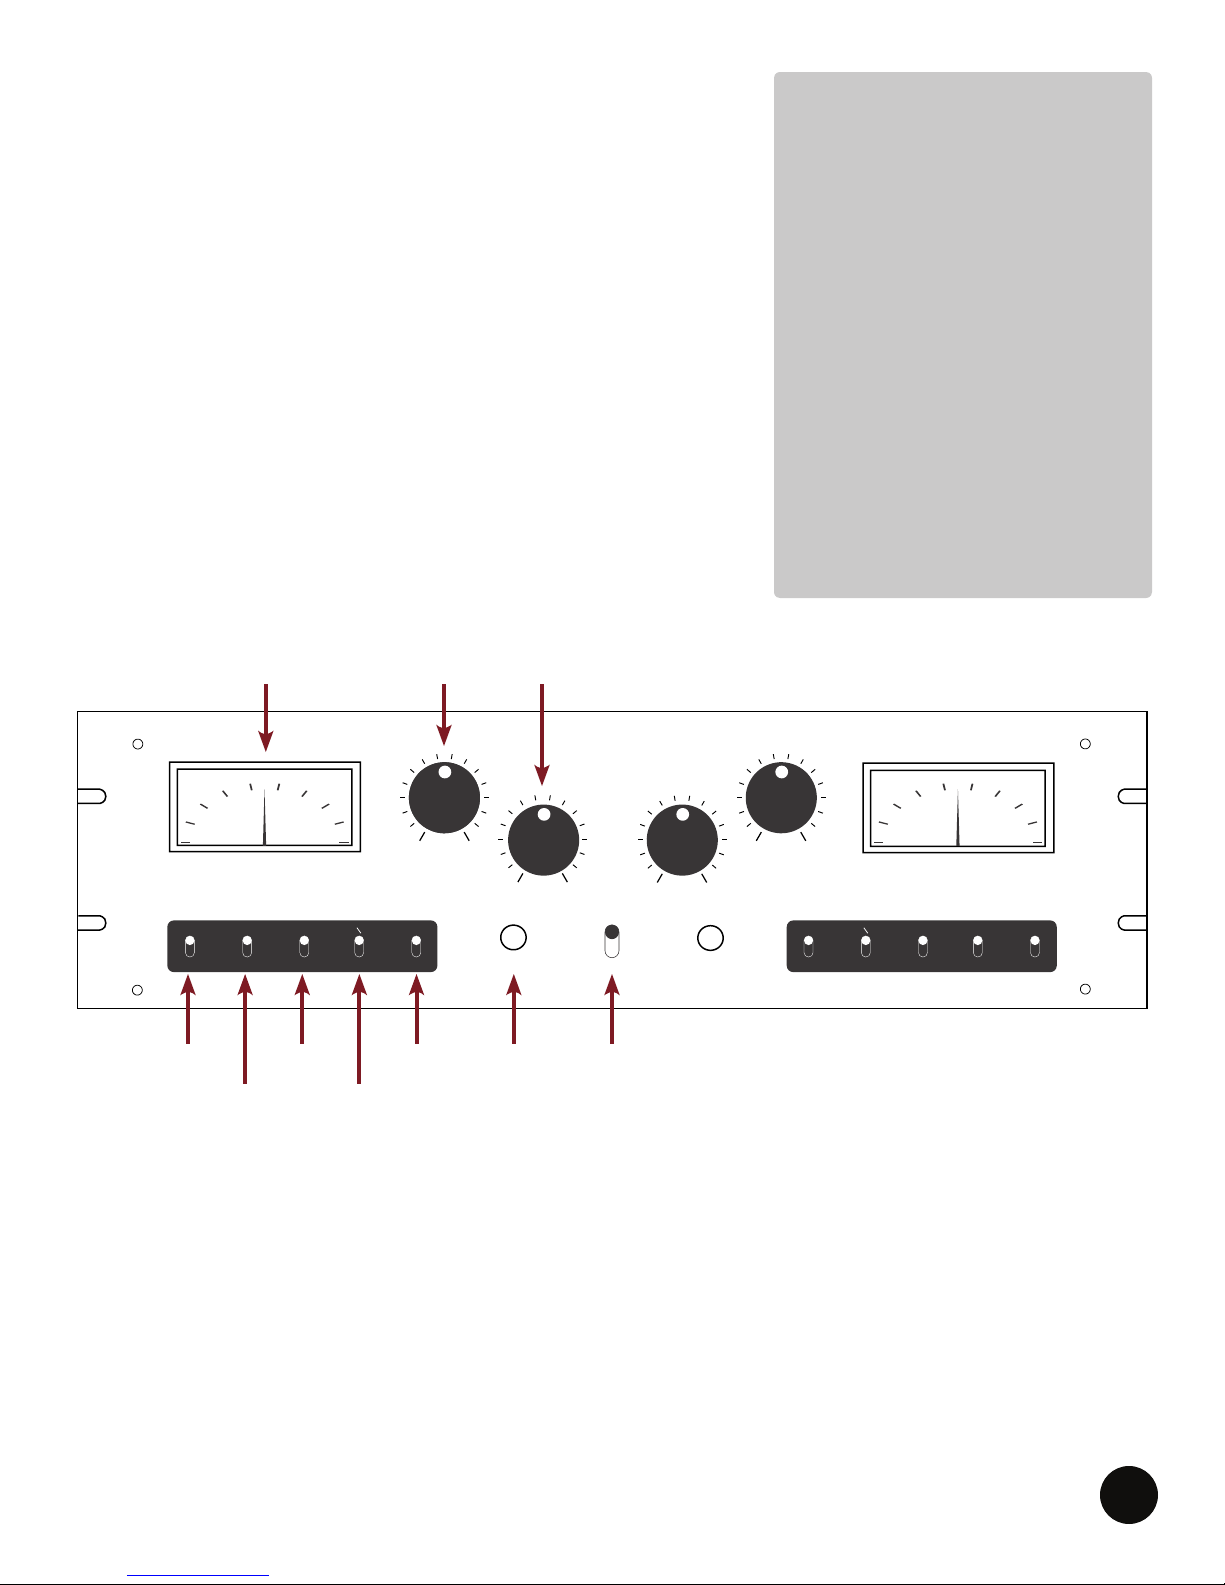
FIGURE 2.1 The five LED tipped toggles on channel 1 are (from left to right) Meter, 48v, -20db, Polarity Reverse and Mute.
The two lower knobs on the inside are for input gain and the two upper knobs are for output gain.
CONTROLS
• TUBE DRIVE / INPUT GAIN: The INPUT controls how much of the source signal is fed to the first stages
of the vaccuum tube. Higher levels will drive the tube harder and result in more harmonics. Think
of this control as your anount of tube coloration/harmonics (distortion).
MuteMute -20 48v Meter
OffOffOffNormChl OnNormOffOffOff
-2048vMeter
Input Gain
Input Gain
LaChapell Audio
Model 992: Two Channel Fully Balanced Vacuum
Tube Preamplifier
Hi-Z Hi-Z
Power
Off
Chl On
Output GainOutput Gain
0 0
METER
TOGGLE
PHANTOM
POWER
-20 dB
INPUT PAD
POLARITY
REVERSE
CHANNEL
MUTE
HI-Z
INPUT
POWER
TOGGLE
METER
OUTPUT
GAIN
TUBE DRIVE
INPUT GAIN

LACHAPELL AUDIO MODEL 992 6
• OUTPUT GAIN: OUTPUT GAIN: Provides variable control over line level signal strength. Think of this
control as your source for clean gain. Typically, this control is used to establish the desired line
level after the input gain has been set but it can work interactively with the INPUT for a wide array
of tonal possibilites. The pot is placed between the last input tube and the first 12AU7 output tube
and provides all remaining amounts of gain from the input stage.
• POWER TOGGLE: Controls the on/off power and is slave
to the rear main rocker switch.
CHANNEL SPECIFIC TOGGLES
• METER: The VU meter is buffered from the audio path
using high impedance precision isolation amplifiers.
Use of a meter isolation amplifier is important for
maintaining consistent gain and eliminating IMD
regardless of the meter status (on/off). However, it is
strongly recommended that the user switch off the
meter when it becomes ‘pegged’, overdriven. This
prolongs the life and accuracy of the meter.
• 48V (Phantom): 48 volts are available for condenser microphones. Each 992 is calibrated to
exactly 48 volts at the input jacks at final assembly. It is important that you NOT engage the
front panel 48v toggle with microphones that do not require it: ribbon, dynamic, and tube mics.
Applying 48v from any source (not just this preamp) to some of these microphones can damage
or destroy them.
• -20dB: If needed the user can pad the microphone inputs using the -20db attenuator. This
adjustment takes place before the first input tube. This function is defeated while the Hi-Z inputs are
engaged.
• POLARITY REVERSE: Some of the more common reasons to use this would be to reduce feedback
in a live environment, enhance the stereo image of certain content or to assist in eliminating
headphone signal bleed through during a recording session.
• MUTE: Each channel is equipped with its own mute function. The LED indicates the mute function
is engaged; output signal is completely cut. However, the meter will still monitor the output level
whether mute is engaged or not (unless it too is switched off.)
CREATIVE TIP:
For near transformer-less sound,
consider engaging this pad function
and compensate for the loss of gain
by increasing the input gain control.
This approach effectively minimizes
the gain coming from the Jensen
input transformer while drastically
increasing the character of the
vacuum tube (this is only possible
with the microphone path).

LACHAPELL AUDIO MODEL 992 7
GETTING STARTED
-20 dB PAD
ON
OFF
-20 dB PAD
ON
OFF
-20 dB PAD
ON
OFF
CLEAN GAIN, HIGH HEADROOM
With the Dual Drive knobs set at INPUT around 25%,
OUTPUT around 75%, and the PAD off, you will get
a very clean and pristine sound. The distortion is
very low with no added harmonics and there is a
ton of headroom. This is a great starting position for
those wanting a clean tube sound regardless of the
microphone type.
TUBE HARMONICS AND COMPRESSION
With the Dual Drive knobs set at INPUT around 75%,
OUTPUT around 25%, and the PAD off, you will get
increadible tube harmonics and that natural tube
compression. This would be a great starting position for
those wanting to hear what the 992’s harmonics are all
about. It’s also a great place to start when using ribbon
or dynamic mics that need a liitle 992 harmonic color.
HEADROOM AND WARMTH
The 992 provides great sonic versatility. With the -20
dB PAD engaged and the INPUT set to around 50%
you will hear a rich roundness and warmth. With these
settings, the mid-range will move forward and the input
headroom is increased as well.

LACHAPELL AUDIO MODEL 992 8
LACHAPELL AUDIO SUPPORT
Phone Support: 952-401-7700
Toll Free: 844-DAL-INFO
Website: www.digitalaudio.com/support
DIGITAL AUDIO LABS
1266 Park Rd
Chanhassen, MN 55317
LACHAPELL AUDIO 992 SPECIFICATIONS
Internal Gain >74dB 992EG
Max output gain +24dBu (1% THD+N)
Frequency Response 10Hz - 50kHz @ - 3dB
THD+N
(18 dBu 1kHz input) <.25% (@50db gain, 0dBu out)
S/N Ratio (30dB gain) >91dB (Rg=150, 22hz – 20khz)
Input Impendence 1.4kohm 992EG
140 Kohm Hi-Z
Tube Complement (4) ECC83, (4) 12AU7
NOTE: Stated specifications are typical measurements but subject to change without notice due to individual traits unique to
each tube. All measurements taken while driving a 40kohm load and using a 1khz tone.

® 2014, 2015 Digital Audio Labs. ™ & © 2017 Digital Audio Labs.
Patents pending.
Table of contents
Other Digital audio Amplifier manuals


