Digital Dream L'espion Xtra User manual

User Manual

Copyright © 2002Copyright © 2002
Copyright © 2002Copyright © 2002
Copyright © 2002
All rights reserved.
TrademarksTrademarks
TrademarksTrademarks
Trademarks
Macintosh®andApple®areregisteredtrademarksofAppleComputerInc.
Windows®isatrademarkofMicrosoftcorporation. Adobe®,Acrobat®,and
Photoshop are registered trademarks of Adobe Systems Incorporated. Ulead®
PhotoExpress®is a registered trademark of Ulead Systems Inc.
ImportantImportant
ImportantImportant
Important
Picturesyoumayacquirefromanyofthebundledsoftwareand/orPictures,or
Documentsyouscanmaybeprotectedundercopyrightlaw. Theunauthorizeduseof
suchmaterialscould beaviolationofthe rightsofthe copyrightholder.

Package ContentsPackage Contents
Package ContentsPackage Contents
Package Contents ..................................................................................................................................................................................
..................................................................................................................................................................................
.........................................................................................44
44
4
FeaturesFeatures
FeaturesFeatures
Features ............................................................................................................................................................................................................
............................................................................................................................................................................................................
......................................................................................................55
55
5
Camera ComponentsCamera Components
Camera ComponentsCamera Components
Camera Components ........................................................................................................................................................................
........................................................................................................................................................................
....................................................................................66
66
6
Loading the batteryLoading the battery
Loading the batteryLoading the battery
Loading the battery ............................................................................................................................................................................
............................................................................................................................................................................
......................................................................................77
77
7
Mode Function Display and SequenceMode Function Display and Sequence
Mode Function Display and SequenceMode Function Display and Sequence
Mode Function Display and Sequence ..........................................................................................................
..........................................................................................................
..................................................... 8-118-11
8-118-11
8-11
Connecting the camera to your PCConnecting the camera to your PC
Connecting the camera to your PCConnecting the camera to your PC
Connecting the camera to your PC ..........................................................................................................................
..........................................................................................................................
............................................................. 1212
1212
12
Utility Software InstallationUtility Software Installation
Utility Software InstallationUtility Software Installation
Utility Software Installation..................................................................................................................................
..................................................................................................................................
.................................................................13 – 1413 – 14
13 – 1413 – 14
13 – 14
A. Installing Digital Camera Driver ...............................................................13
B. InstallingotherBundledSoftware .............................................................14
Using the l'espion Xtra as a Digital CameraUsing the l'espion Xtra as a Digital Camera
Using the l'espion Xtra as a Digital CameraUsing the l'espion Xtra as a Digital Camera
Using the l'espion Xtra as a Digital Camera
l'espion Xtra Digital Camera Interface........................................................ 15
Zoom .......................................................................................................... 15
Acquire ....................................................................................................... 15
Acquire All.................................................................................................. 15
Download................................................................................................... 15
AVI .............................................................................................................. 15
Exit............................................................................................................... 15
Downloading Images to your PCDownloading Images to your PC
Downloading Images to your PCDownloading Images to your PC
Downloading Images to your PC................................................................................................................................
................................................................................................................................
................................................................ 1616
1616
16
Using the l'espion Xtra as a PC/WUsing the l'espion Xtra as a PC/W
Using the l'espion Xtra as a PC/WUsing the l'espion Xtra as a PC/W
Using the l'espion Xtra as a PC/Web Cameb Cam
eb Cameb Cam
eb Cam........................................................................................................
........................................................................................................
.................................................... 17
A.SelectCamera Source .................................................................................17
B.SendaVideoMail .......................................................................................18
Table of Contents

1
l'espion Xtra
digital camera
Special USB cable
l'espion Xtra Quick Reference
and other inserts
Digital Camera CD-R M
(Contains digital camera software and user's
manuals)
Camera Safety Strap
Package Contents
AAA Battery
(Alkaline recommended)

2
Features
••
••
•Compact and lightweightCompact and lightweight
Compact and lightweightCompact and lightweight
Compact and lightweight
Size: 60 x 40 x 15mm Weight: approx. 44g (without battery)
••
••
•Easy to operateEasy to operate
Easy to operateEasy to operate
Easy to operate
Fixedfocuswithonlythree-button(functionmode,Selectmode,andshutter)
operation
••
••
•Three choices of picture taking modesThree choices of picture taking modes
Three choices of picture taking modesThree choices of picture taking modes
Three choices of picture taking modes
AVI(AudioVideoInterleaved)recording.
Self-timermode(10secondsdelay)
Hi ,Hi ,Lo ,Lo 4 image recording mode
••
••
•Instant image frames erasureInstant image frames erasure
Instant image frames erasureInstant image frames erasure
Instant image frames erasure
Allimagescanbecleared instantlytostartanew picturetakingsession.
••
••
•Low power consumption with auto energy-save modeLow power consumption with auto energy-save mode
Low power consumption with auto energy-save modeLow power consumption with auto energy-save mode
Low power consumption with auto energy-save mode
Cameraautomatically entersinto “Sleep”(energy-saving)mode whenitremains
inactivefor30seconds.
••
••
•Supports USB interfaceSupports USB interface
Supports USB interfaceSupports USB interface
Supports USB interface
WithUSB,downloadofimagestoyourPCisaccomplishedathigherspeed.
••
••
•Software package bundleSoftware package bundle
Software package bundleSoftware package bundle
Software package bundle
UleadPhotoExpress(Digital Stillcamerasoftware)
EyeStar Mail (PC/Web camera software)
AdobeAcrobatReader(Softwareforreadingtheuser’smanual)

3
Camera Components
Mode Button
Select
Button
LCD Display
Panel
Key Ring Hole
View Finder
LENS
Shutter
USB
Port
Battery Cover

4
A. Loading the Battery
(1XAAAsizebattery)
1Open the battery compartment cover,by slightly pushing the bottom of the
battery cover, and then smoothly pushing the cover away from the rail.
2Insert a battery into its chamber making sure that the positive (+) and negative (-)
endsisproperlyorientedwiththepolarityindicatedonchamber.
3Close and slide the battery compartment cover back to its original position.
WARN NG
: When the LCD Panel displays , it indicates that the battery power is
low. Icon will keep blinking for 5 seconds then power off "automatically"

5
Mode Function Display and Sequence
M:Mode Button ; Select:Button
Power On/Off
PowerOn:Pressandholdthe buttonforasecond.
PowerOff:Pressthe buttontwiceandthenpresstheshutterbutton.
1.Default (Still Mode)
TheLCDpanelwilldisplaythispicturewhenyoufirsttimeturnthecameraon.
1. Press the mode button to cycle through the options.
2. Press the select button to select the required mode.
3. Press the shutter button to use the selected mode.

6
2. Self-Timer:
Press the MM
MM
M buttononce andthenpressthe
button toselect theself timer
mode.Pressthe shutterbuttonto startthecountdown.
On:
Press the MM
MM
M button four times and then the button to select the
image quality.
Good image quality.
Normal image quality.
4. Quality:
3. Resolution
Press the MM
MM
M buttontwice andthen pressthe buttonto select Highor Low
resolution.
High resolution 800 x 600 image size.
Low resolution 400 x 300 image size.
: High-resolution800x 600 pixels
: Good Quality image
: Battery Power.
: Counterwillshowthenumberofremainingshotsavailable

7
5. Delete one orDelete all:.
6.VideoMode:
Press the button once to enter the video mode. Press the shutter to start
recordingandpressagaintostoprecording.
7.USB:
8.Battery:
:Fullpower
:LowPower
Press the MM
MM
M button 4 times to select or press the MM
MM
M button 5 times to
select .Pressthe buttontoselectandthenpresstheshutter
button to delete one or all the images.
Plug The USB cable into the PC USB port for image transfer.
Pleaseturn the camera onbeforeplugging the USBcablein to PC.

8
9.BUSY: 1.Whenyouturnthecameraonbusywillbedisplayed.
2.WhentheUSBcableispluggedin.
3.WhenrecordinganAVIvideoclip.
10.Resolutionandphotonumber:
Busyon:
Thereare4kindsofimageresolutionsandphotonumbersinstillandvideomode
asfollows.
Hi, Highresolution&high quality,
Stillmode:169 pic
Videomode:21-secrecording,framerate:15/sec.
Highresolution& normalquality,
Stillmode:200 pic
Videomode:29-secrecording,framerate15/sec.
Lowresolution&highquality.
Stillmode:217 pic
Videomode:17-secrecording,framerate30/sec.
Lowresolution&normalquality.
Stillmode:492 pic
Videomode:26-secrecording,framerate30/sec.
Thephotonumber aboveisbased onatest standard.Theexact photo
numberwilldependonthesaturationofcolourintheimagestaken.
Hi,
Lo,
Lo,
9
NOTE
: It is assumed that you have already installed the bundled software into your
computer. If not, install software as instructed in the section on “Utility Software
Installation” of this manual.
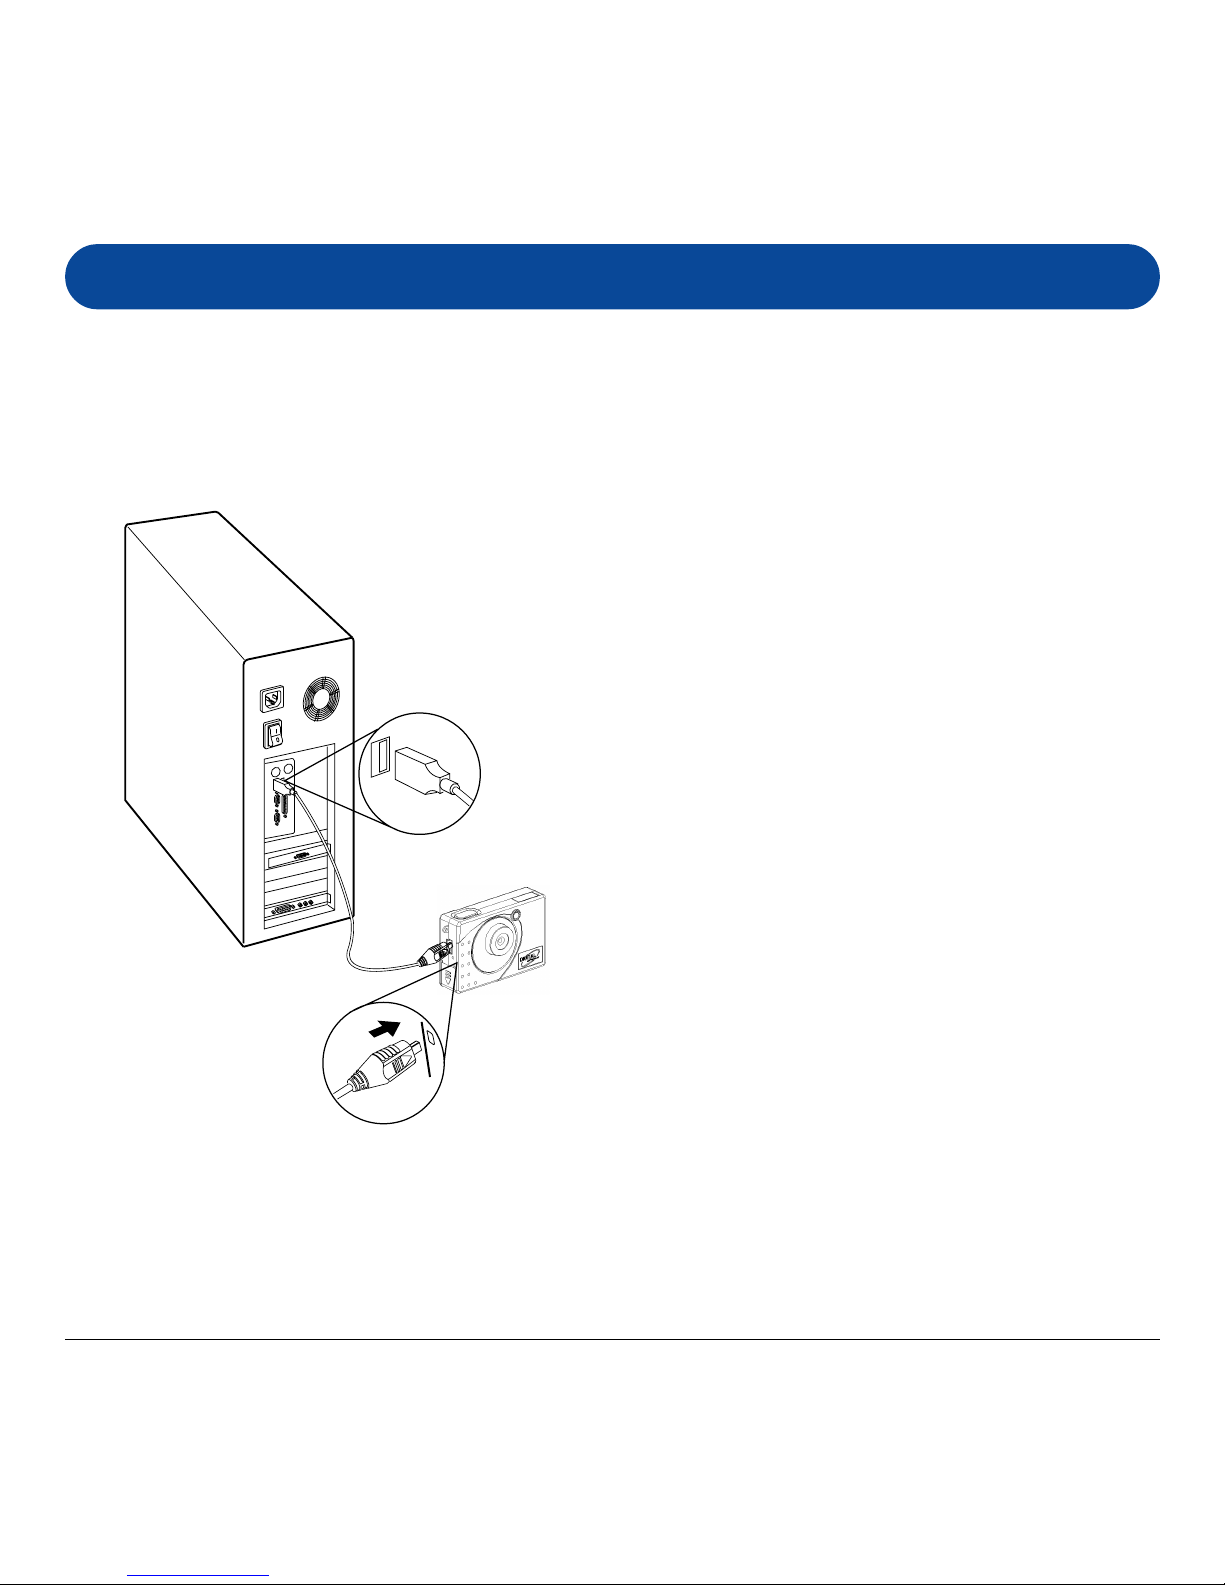
Connecting the Camera to PC
Totransfer(download)theimagesdata
from the camera to your PC, connect the
cameratoyour PCwiththesuppliedUSB
cable.
1Insert the smaller terminal of the
USB cable into the camera's USB
port.
2Plug the other end of the USB
cable into the USB port of your
computer.
3Perform downloads to your
computer by referring to the
section on “Downloading images”
later in this manual.
4Operate the camera as web
camera by referring to the EyeStar
Mail section later in this manual.
13
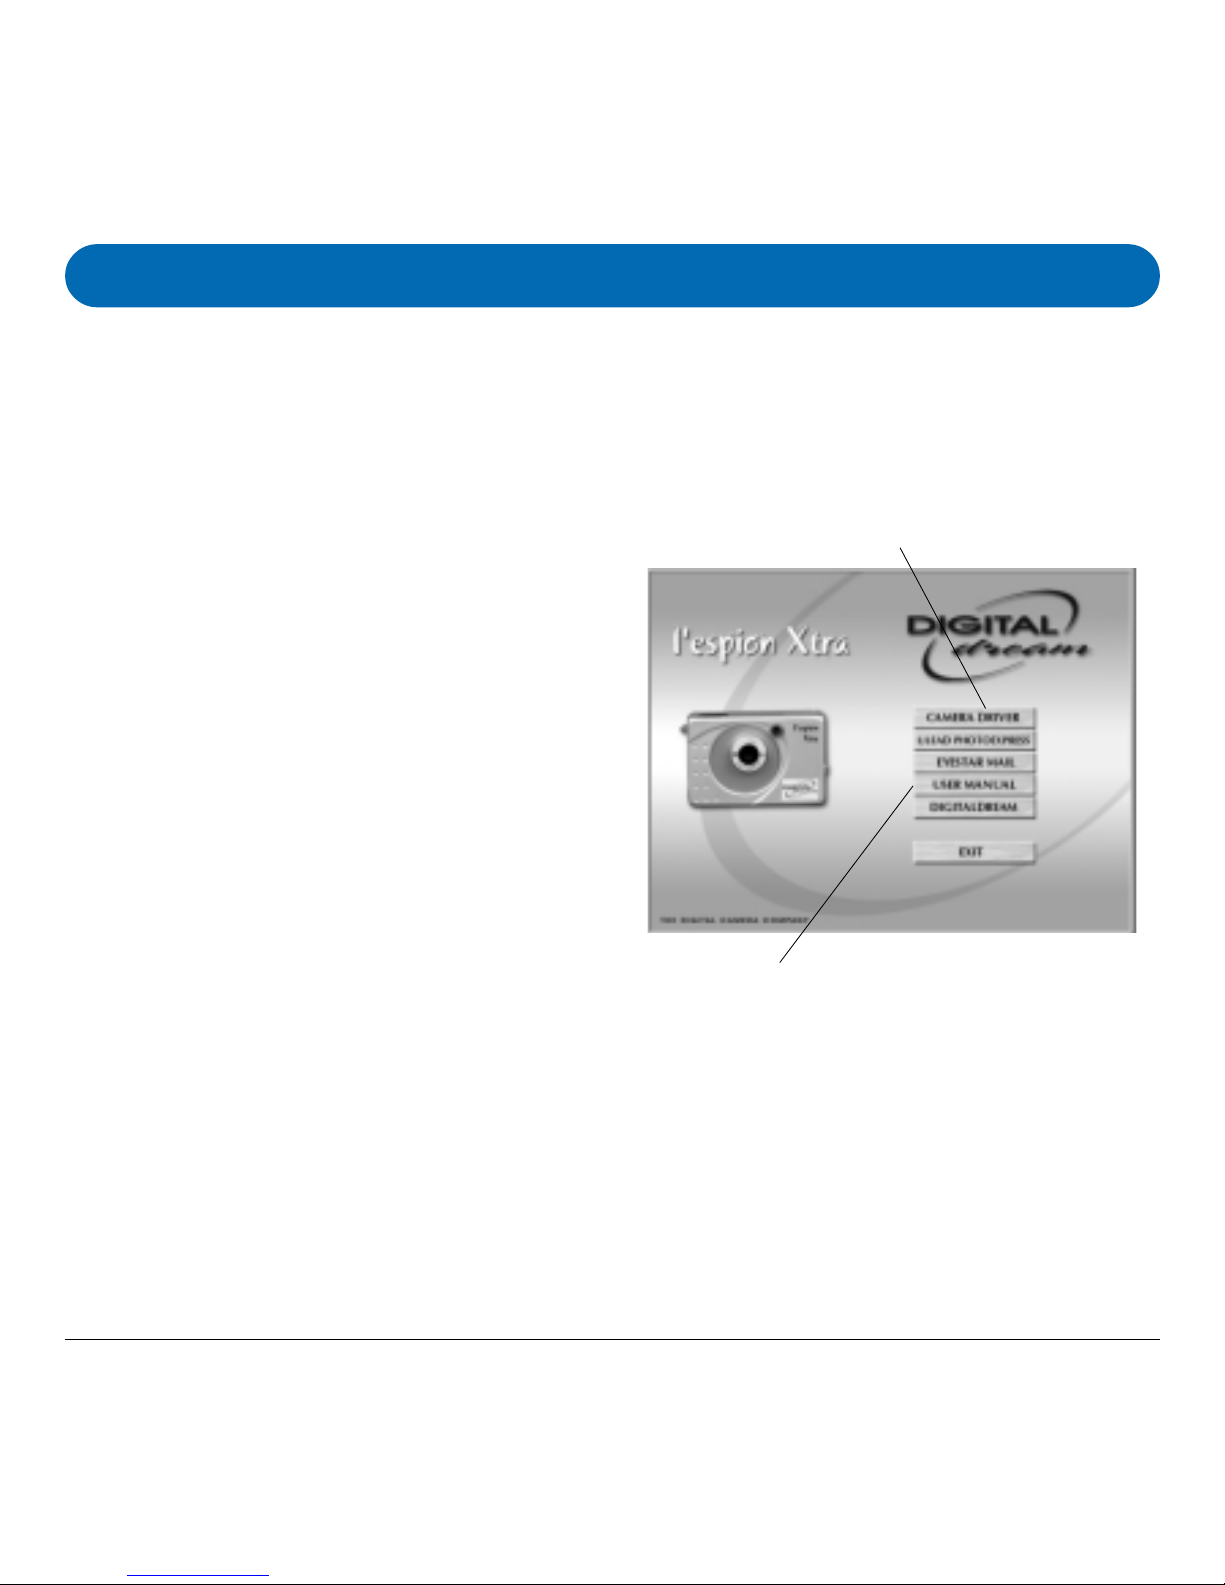
The Utility CD that accompanies your camera contains the Xtra Digital Camera
Driverbundledwithvaluableimage-editingsoftware.
Utility Software Installation
A. Installing Digital Camera Driver
1Insert the utility CD into the CD-
ROM drive.
NOTE
: If the installer screen does
not automatically display, click
Start button, then click Run from
Windows Start menu, and execute
the file cdsetup.exe from the CD.
2When the l’espion Xtra Software
Installer screen appears, select the
language you wish to use, then
select and click Camera DriverCamera Driver
Camera DriverCamera Driver
Camera Driver on
the screen. Follow the on-line
instructions to complete the driver
intallation.
NOTE
::::
: You may be prompted to
restart the computer at this point. Do
not restart your computer until all the
software has been installed.
3Install all the other software as set on
the next page.
4Once you have installed the software
then please restart your computer.
Once your computer has restarted
then please connect the camera to
your PC.
Click the User Manual button to open the file
for the Xtra User Manual to view
Click to start camera driver
installation
14
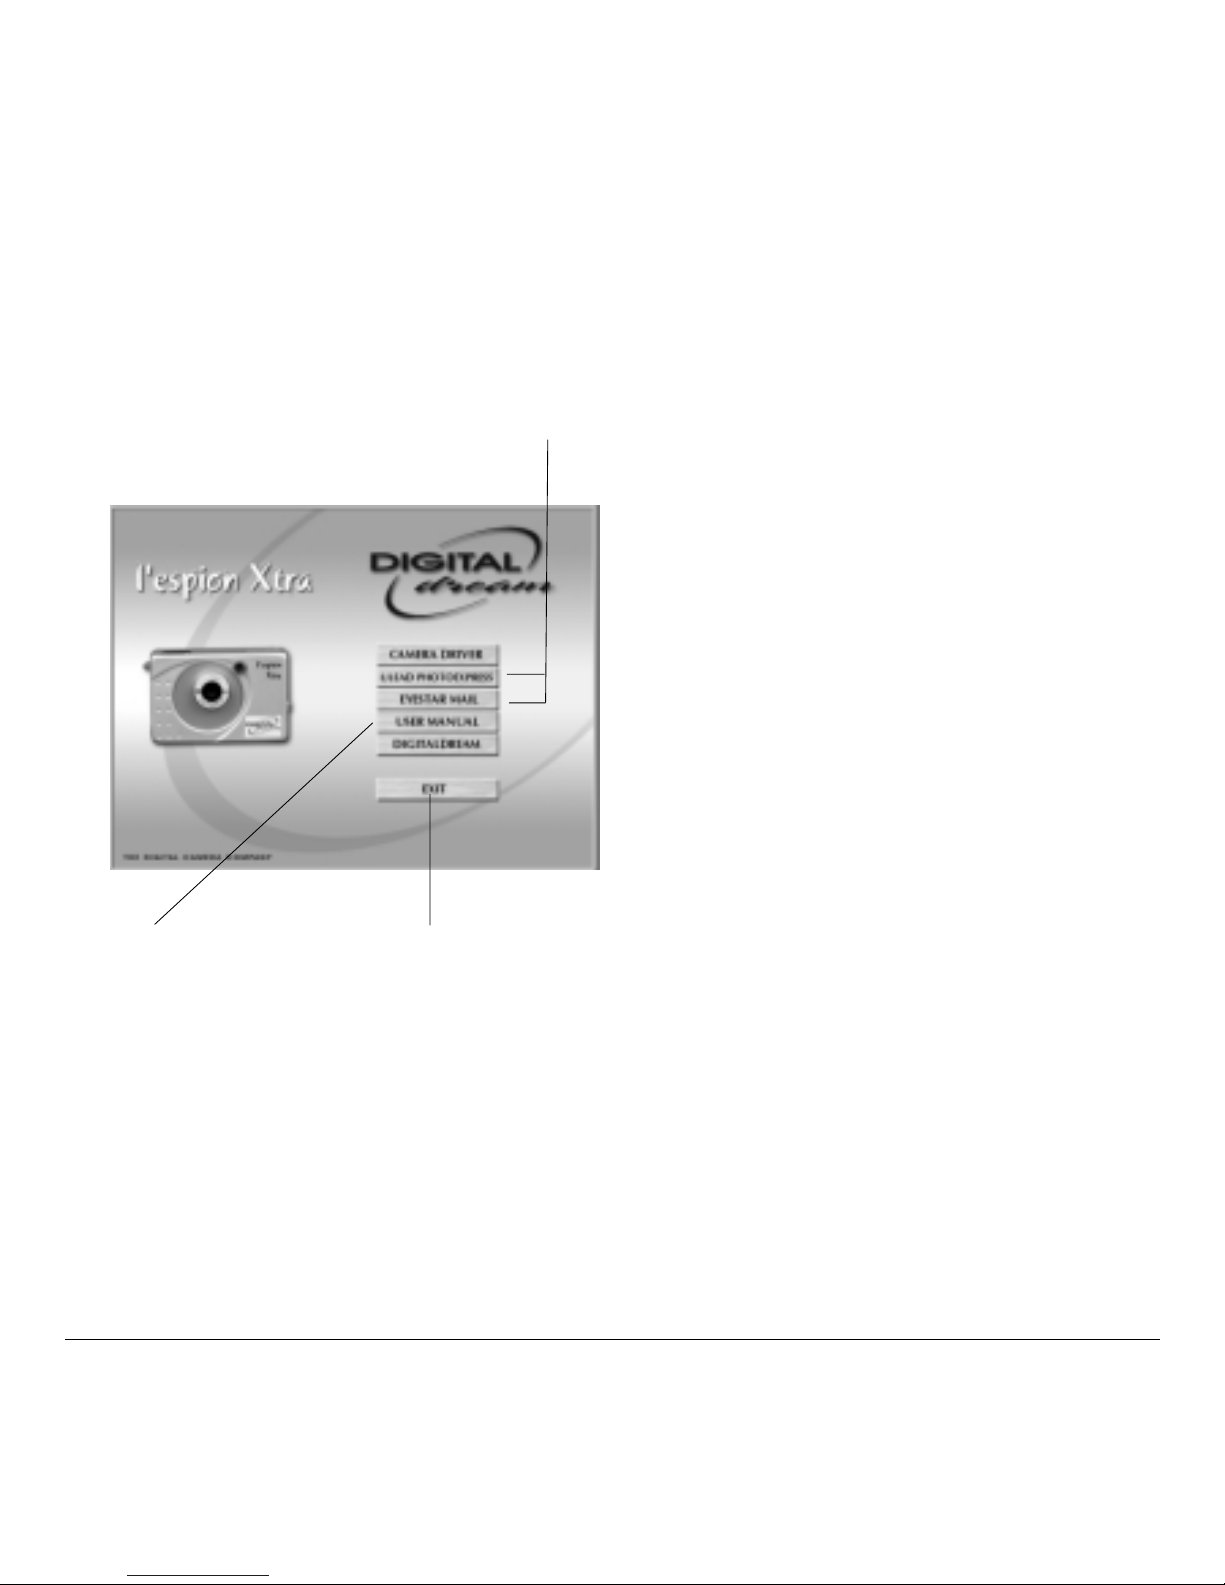
. Installing Other undled Software
Click the Exit button to
abort installation or to
close the Installer
pro ram
Click the software
components to start
the installation
Click the User
Manual button to
open the file for
the manual that
you wish to view
1From the Xtra Software Installer
screen, click each software in the
order that it appears on the screen,
follow the on-line instructions to
complete the installation of all
software components:
Ulead Photo ExpressUlead Photo Express
Ulead Photo ExpressUlead Photo Express
Ulead Photo Express
This is your Image-editing software
for creating digital photo albums,
cards etc.
EyeStar MailEyeStar Mail
EyeStar MailEyeStar Mail
EyeStar Mail
ThisisyourPCand/orWebCamera
software.
2Adesktopshortcutof theprogramis
automatically created after successful
installation. Restart your computer
when you have finished installing all
of the above software.
15
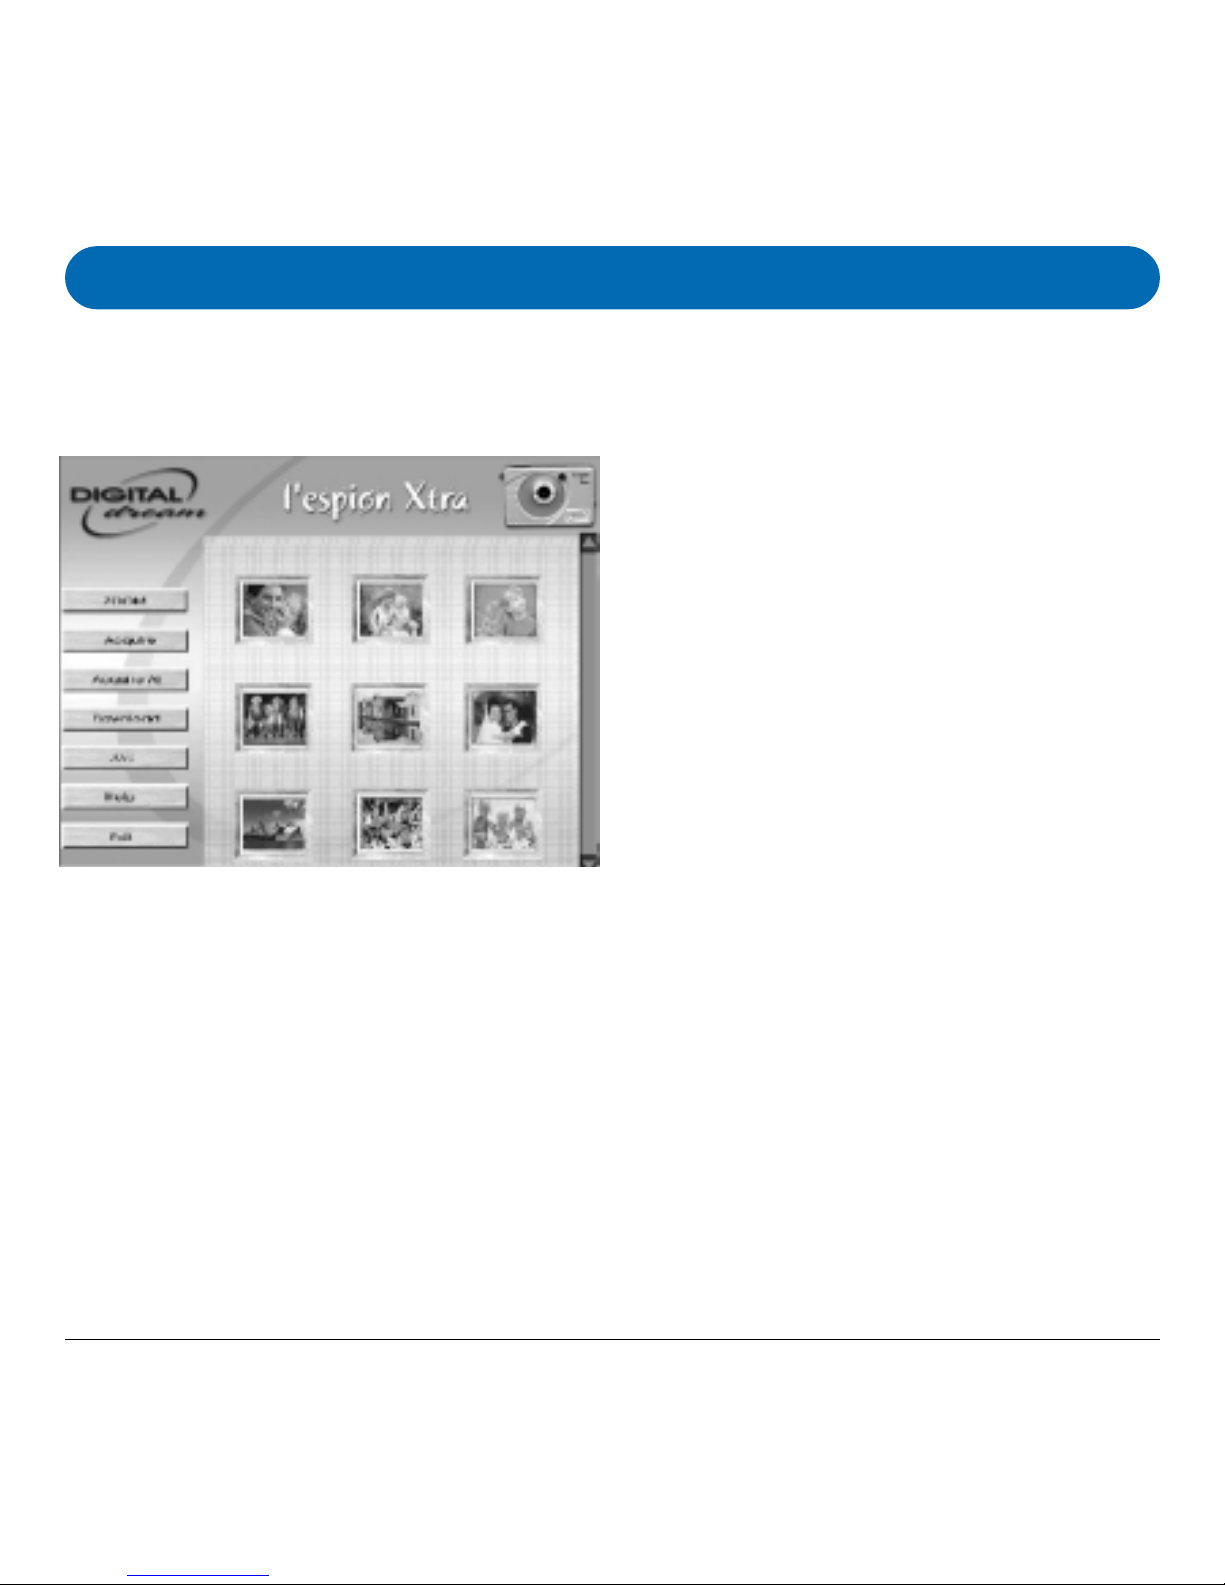
Zoom
Click ZoomZoom
ZoomZoom
Zoomtoenable/disableimage
interpolationapplicationfordownloaded
images.
Acquire
Double-click the image that you wish to
sendandprocesstoanimage-editing
software,andthenclickthe AcquireAcquire
AcquireAcquire
Acquire
button.
Using the l’espion Xtra as a Digital Camera
The Xtra Digital CameraXtra Digital Camera
Xtra Digital CameraXtra Digital Camera
Xtra Digital Camera interface will be launched, when you start
downloading images from your digital camera to any of your image-editing
software. Acquire All
Click the Acquire AllAcquire All
Acquire AllAcquire All
Acquire Allbutton to send
andprocessallthethumbnailimageson
thepaneltoaselectedapplication.
Download
Click the DownloadDownload
DownloadDownload
Downloadbutton totransfer
and/ordownloadanothersetofimages
from your enigma Camera. Existing
imageswill beoverwritten.
AVI
SelectAVIfile among thumbnail
pictures,thenclickAVIbutton,the
videotakenbyuserwilldisplay.
Exit
Click the ExitExit
ExitExit
Exitbuttontoclose/quit
enigma Digital Camera Interface.

16
Installation Under Windows 98
Using Ulead Photo Express
1Launch Photo ExpressPhoto Express
Photo ExpressPhoto Express
Photo Expressbydoing the
followinginsuccession:Start,Programs
--PhotoExpress.
2Click the Photo modePhoto mode
Photo modePhoto mode
Photo mode tab from the
left side bar of the screen. The Photo
mode
window
will appear.
3From the Toolbar, click the Camera
icon -- the Select Data Source dialog
box will appear, choose DigitalDigital
DigitalDigital
Digital
CameraCamera
CameraCamera
Camera from the list, and then click
the AcquireAcquire
AcquireAcquire
Acquire button.
4The Xtra Digital Camera interface
appears. Double-clicktheimage(s)you
wishtotransferto PhotoExpressfrom
thepanel.
5Click ExitExit
ExitExit
Exitwhen youare readyto return
toPhotoExpresstofurtherenhancethe
selected image(s).
Formoredetailsonhowtoenhance/add
specialeffects to yourimages, or create
digitalalbums;greeting cardsetc.,
pleaserefer tothe Helpmenu ofPhoto
Express.
Downloading Images to your PC

17
A. Select Camera Source
1Launch EyeStar Mail by:
a)Double-clickingtheEyeStar MailEyeStar Mail
EyeStar MailEyeStar Mail
EyeStar Mailicon
onyourdesktop;or
b)FromWindowsTaskbar,
double-clickthefollowinginsuccession:
Start, Programs, EyeStar Mail, EyeStar
Mail.
2When the EyeStar Mail panel
appears, click the videovideo
videovideo
video options
button, and then select l’espion Xtral’espion Xtra
l’espion Xtral’espion Xtra
l’espion Xtra
Digital CameraDigital Camera
Digital CameraDigital Camera
Digital Camera from the camera
source list.
3To send a video mail, follow the steps
as described on the next page.
NOTE
::::
:The EyeStar MailEyeStar Mail
EyeStar MailEyeStar Mail
EyeStar Mail is required only when the camera is used as a PC camera.
The EyeStar MailEyeStar Mail
EyeStar MailEyeStar Mail
EyeStar Mailisacompleteconsumervideopackageforrecordingaudioand
videoclipsthatyoucansendtoyourfamilyandfriends.Thispackageincludesallthe
softwareyouwillneedforcapturing,creatingpersonalizedcards,andsending
messageson-line.
CAUTION:Besuretodownload imagestoany image-editingsoftware(Ulead
PhotoExpress,Ulead PhotoExplorer,TrellixWebetc.)fromthecamerabeforeusing
it as a PC/Web cam under EyeStar Mail. Otherwise, you will lose all the images you
havetaken.
Using the l’espion Xtra as a PC/Web Cam

18
. Send a Video Mail
1Launch your
EyeStar Mail, and adjustyour camera to thedesiredview that you
wanttocapture.
2Click RecordRecord
RecordRecord
Record to start capturing video and audio data.
3Click StopStop
StopStop
Stop to end recording.
4Click Send MailSend Mail
Send MailSend Mail
Send Mail to run the
Send Mail program with the captured data in
order to automatically attach the video image to your E-mail message.
2
4
3
Table of contents
Other Digital Dream Digital Camera manuals

Digital Dream
Digital Dream quantum 3.2 User manual

Digital Dream
Digital Dream MINIATURE HIGH PERFORMANCE DIGITAL CAMERA User manual

Digital Dream
Digital Dream epsilon 2.1 User manual

Digital Dream
Digital Dream sportsman User manual

Digital Dream
Digital Dream L'espion User manual

Digital Dream
Digital Dream L'espion mini User manual


