ARH CAM S1 User manual


S1 USER MANUAL 2.00.01
Page 1/27
ARH CAM S1 USER MANUAL
Version: 2.02.00
Document version: 2020.03.23.
Table of Contents
INTRODUCTION ................................................................................................................................................................... 2
SETUP ARH CAM S1 ........................................................................................................................................................... 3
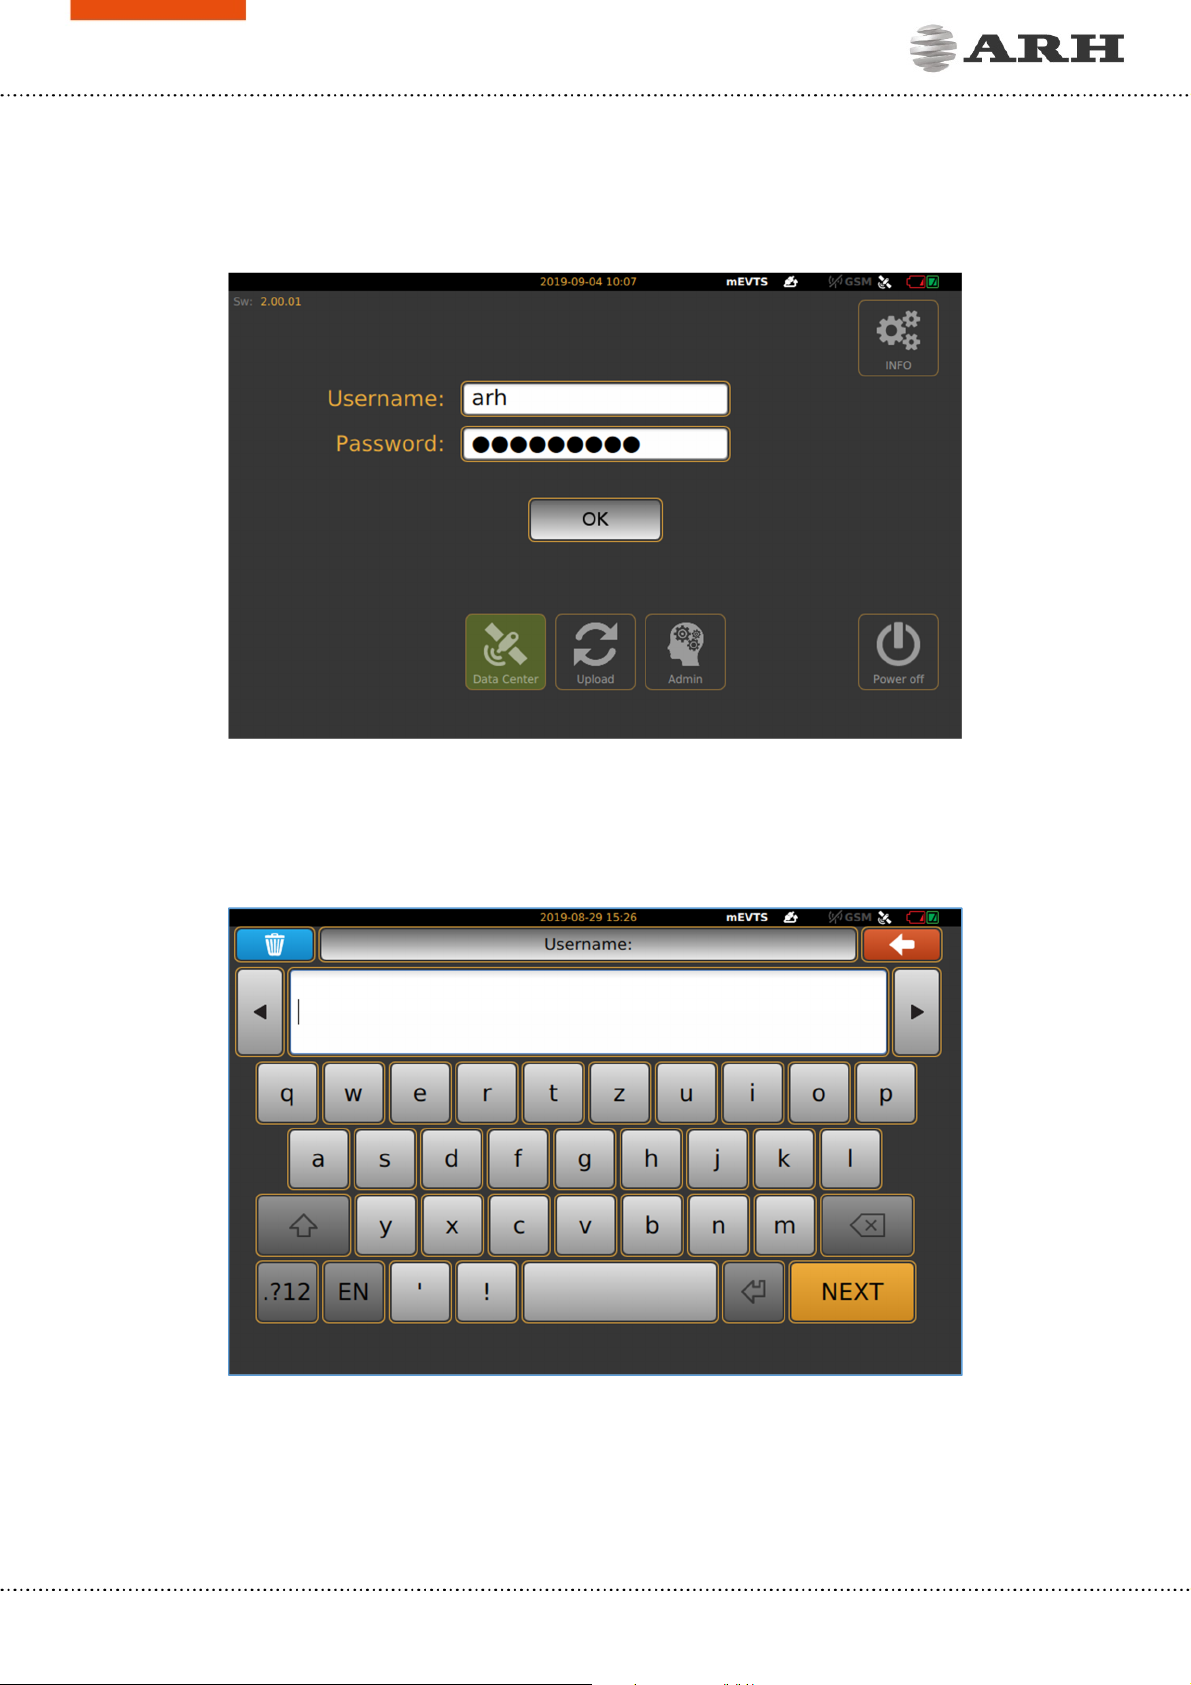
LOGIN ....................................................................................................................................................................................... 4
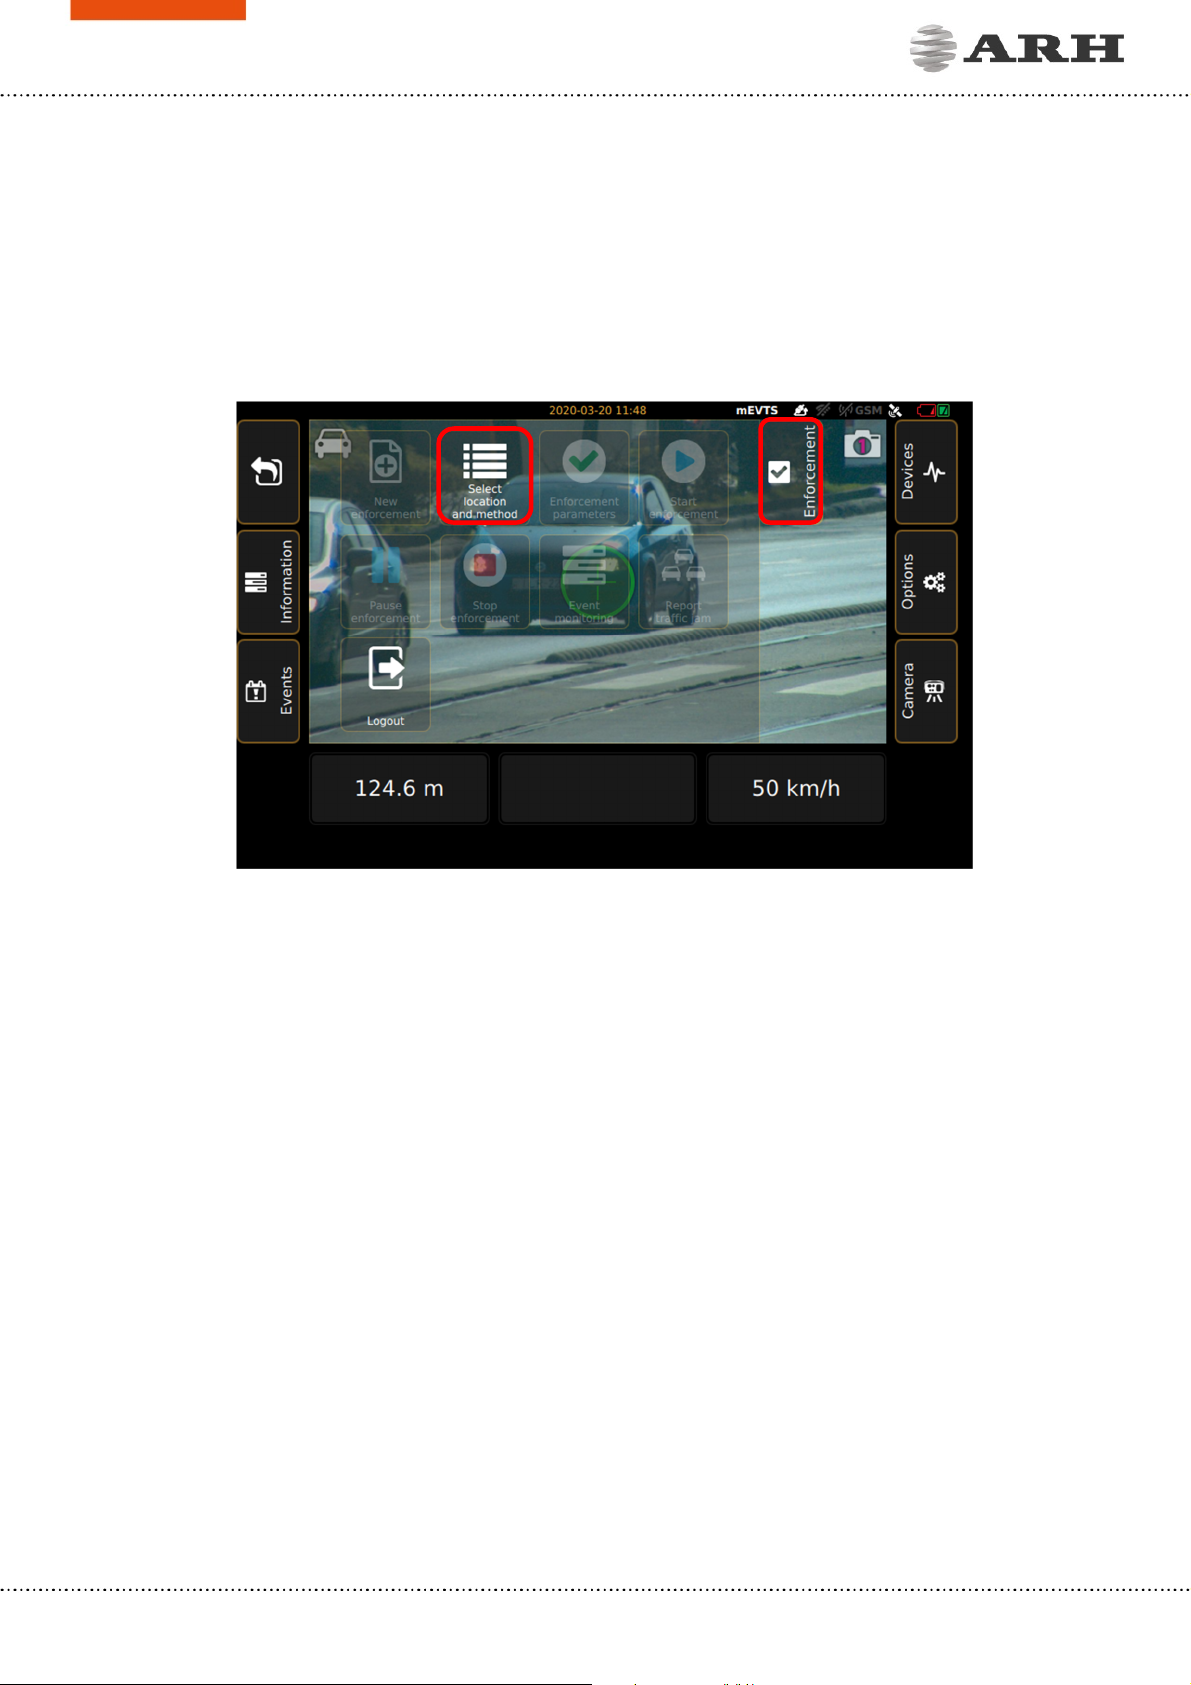
SETUP ENFORCEMENT ...................................................................................................................................................... 5
STOP ENFORCEMENT ........................................................................................................................................................ 8
INTRODUCTION TO THE MAIN SCREEN .................................................................................................................. 9
1. BOTTOM INFORMATION BAR ....................................................................................................................... 10
2. UPPER INFORMATION BAR ............................................................................................................................. 10
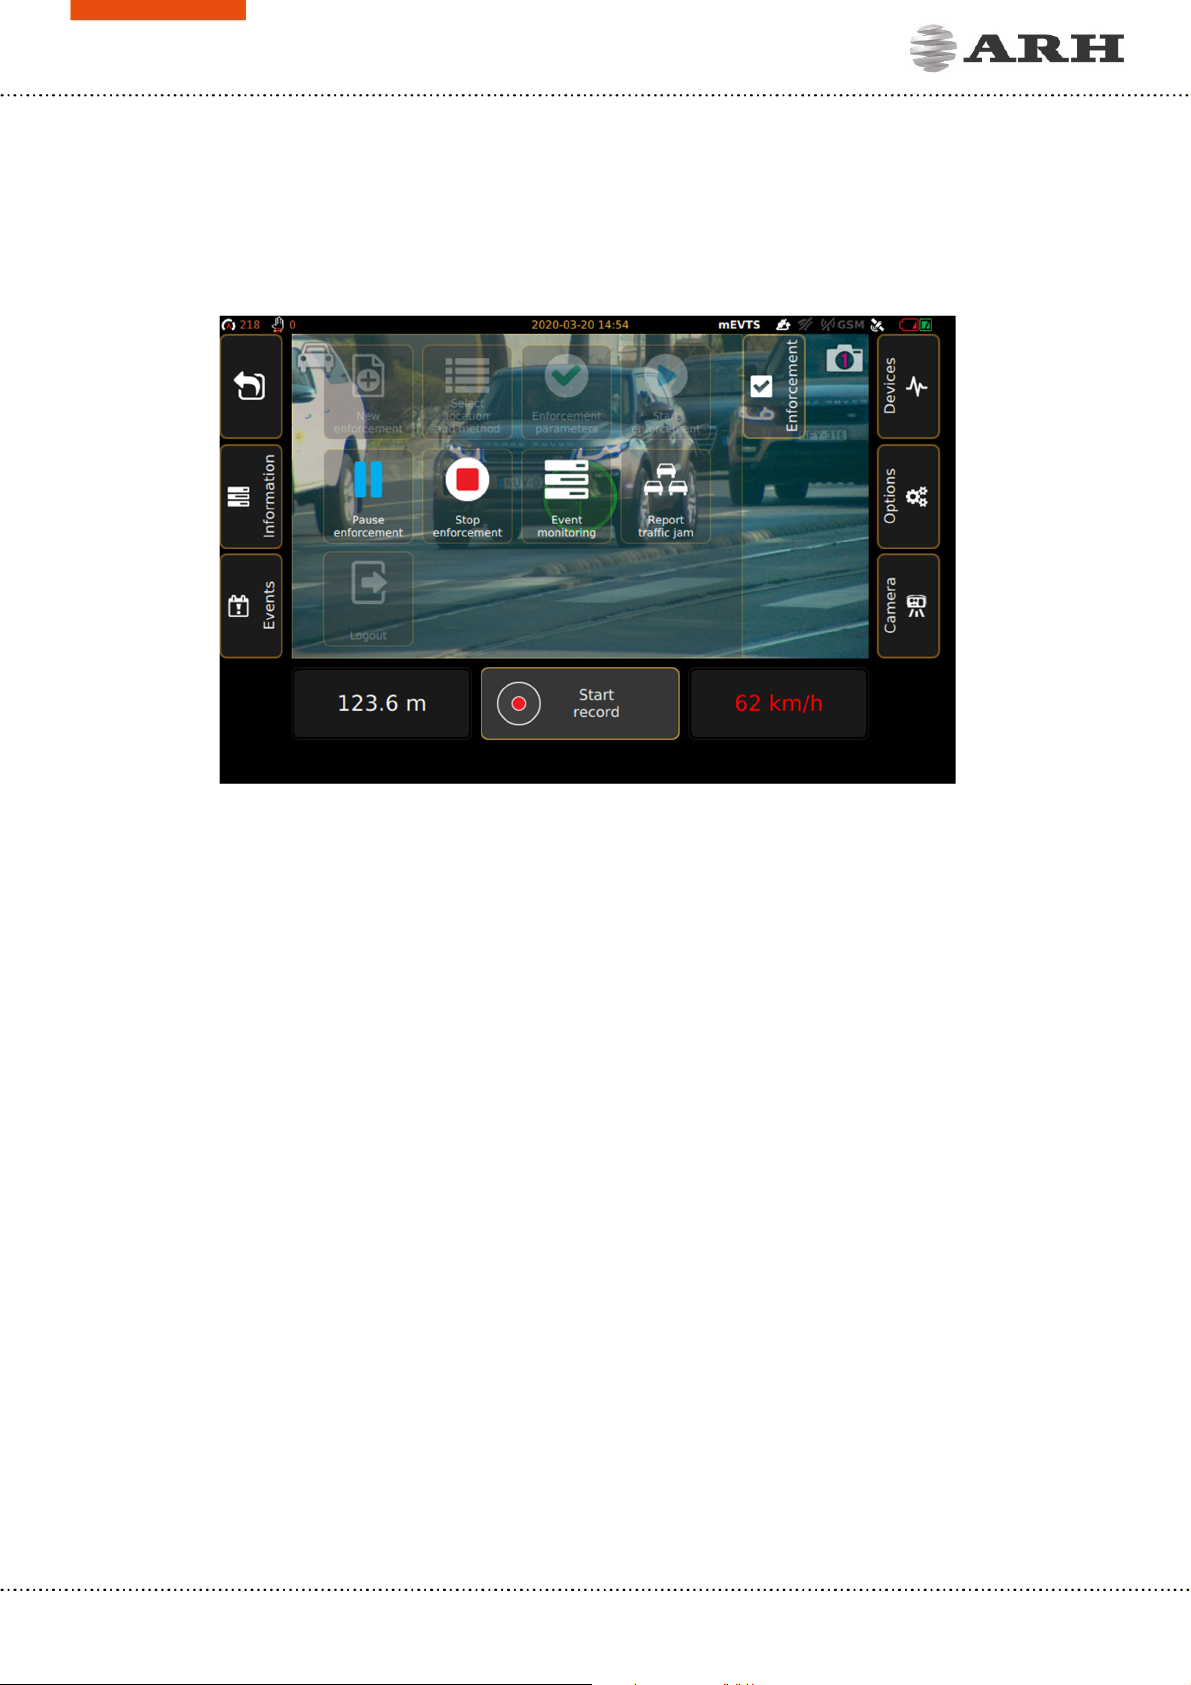
3. ENFORCEMENT MENU ...................................................................................................................................... 12
4. INFORMATION MENU ....................................................................................................................................... 13
5. EVENTS MENU ...................................................................................................................................................... 14
6. DEVICES .................................................................................................................................................................... 14
7. OPTIONS .................................................................................................................................................................. 15
8. CAMERA ................................................................................................................................................................... 16
DETAILED DESCRIPTION OF THE SPEED MEASUREMENT .............................................................................. 17
CONTROL FUNCTIONS PAIRING ................................................................................................................................ 21
USAGE OF TRIPOD ............................................................................................................................................................ 22
1. SET UP OF TRIPOD ............................................................................................................................................. 22
2. FOLD UP OF TRIPOD ......................................................................................................................................... 25
CONTACT INFORMATION ............................................................................................................................................. 27

S1 USER MANUAL 2.00.01
Page 2/27
INTRODUCTION
S1 is a mobile no-staff speed and traffic enforcement camera with on-board ANPR. It is capable
of spotting a violator from 1200 meters (4000 feet) away and returning certified speed
measurement result from 600 meters (2000 feet) away. The unique high-precision built-in laser
technology reaches as far as no other speed monitoring camera on the market.
The S1 speed camera is extremely portable: setup takes less than two minutes. Afterwards, no
human interaction is required: the camera measures speed and uploads every passing vehicle’s
data – or, depending on user-defined settings, just the violators – via a secured and encrypted
channel. The uploaded results include license plate data, the vehicle’s speed, exact location (via
GPS) and time stamp as well as other selectable parameters. The result files are encrypted and
cannot be altered.
This guide is going to show you the functions of the app and the methods of the use.
Structure of the Manual is the following:
•First, accessing to the camera and the operation of the device will be discussed.
•Next, a closer look will be taken at the menu overview.
•Moreover, the user will be guided through the sections of the features.
•Finally, usage of the tripod will be shown.

S1 USER MANUAL 2.00.01
Page 3/27
SETUP ARH CAM S1
1. Connect external battery to ARH CAM S1.
2. Turn on external battery.
3. Turn on the device by pressing and holding (approx. 1-2 seconds) the power switch of
the device, located on the left side of the display. If the power switch is on, the green
LED on the button indicates it.
4. After turning the device on, it starts the installed software. During the start-up
procedure the starting screen will appear with a progress bar, indicating the start.
Power cable plug has a red straight sign to show the proper way of connecting to the
camera. It must be on the top.
If external battery is discharged, green light is flashing on power switch of the camera.

S1 USER MANUAL 2.00.01
Page 4/27
LOGIN
After the start-up process, the Login screen will appear.
On the Login screen, select “Data Center” icon, type in Username and Password (click in to the
empty field, touch-screen keyboard will pop-up, enter necessary characters, then press “Next”
button), press OK, “Main” screen will appear.

S1 USER MANUAL 2.00.01
Page 5/27
SETUP ENFORCEMENT
1. Position camera properly so as to the white or green circle with cross must be in the level
of the number plates. Hereinafter we call it marker. On the “Main” screen, click on
“Enforcement” floating menu, located on the upper left side of the screen. “Enforcement”
menu contains “Select location and method” icon, click on it.
2. Submenu will appear with measurement points and enabled control functions for that
position, after selection, click on “Next” icon.
3. “Description” can be given to the measurement, after it is done, press “Next” icon.
4. In the “Define measuring limits” window, set measurement limits, then tap “Next” icon.
For measurement above the lane (bridge, overpass), the value of "Offset from lane
center" should be 0 [m]. In case of measurement next to the lane, the middle of the
inspected lane and the distance from the device must be set. The "Offset from lane
center" value also defines the minimum value of "Minimum distance" (10 times the
offset from lane center)

S1 USER MANUAL 2.00.01
Page 6/27
5. “Enforcement” floating menu will appear, where “Enforcement parameters” can be
chosen, click on that icon to go further.
6. In the “Enforcement parameters”, optional control function can be chosen (selected
functions appear in green highlight). The basic function of the device is "Automatic speed
measurement", for which other control functions can be chosen. Clicking on “Next”
button to step on “Speed limits”.
7. The "Automatic Speed Control - Speed Limits" window is the next step where you can
set speed limit values (the speed limit set for the road type and the documented speed
limit for recording a violation) per vehicle category. Actual speed limit values can be given
with virtual keyboard by clicking into the numeric field or tapping the up and down
button next to numeric field, when it is done, press “Next”.
8. 3 options are available to choose from: use one of the 2 sensors in the camera separately
or using 2 sensors at the same time. In the second case, you are able to choose between
the sensors during measurement.
To exactly measure the "Offset from lane center", touch the ruler icon to help you accurately
measure the distance from the center of the lane. Point the device at the center of the lane,
then touch the ruler icon next to field A to insert the measured distance. You will see that the
value of A is the same as the distance displayed in the lower left corner of the screen. When
youare done, touch the "Next" icon.
2 sensor operating mode only available at “Automatic speed control”!

S1 USER MANUAL 2.00.01
Page 7/27
9. In case of 2 sensors enforcement, it needs to setup 1. and 2. sensor individually. Zoom
and Focus can be easily adjusted for the proper setting.
10. “Locking camera” will appear to remind to tighten tilt lock knob and tap “Next”.
11. After finished setting of all measurement function and parameters, it will change to “Main”
screen again with the “Enforcement” floating menu, and “Start enforcement” icon is
become active.
12. By clicking on “Start enforcement” icon, the screen will guide you to the “Check of
location parameters” to verify all values, if it is correct, press “Accept” and start
enforcement. If need more adjustment or correction during the setup, you can clear all
setup until now and go back to the main window.
13. ARH CAM S1 device is started measurement. First, split window will appear with the live
view on the left side and 3 small windows with the last 3 detected events. By tapping on
the left live view image, it will guide you back to the main window.

S1 USER MANUAL 2.00.01
Page 8/27
STOP ENFORCEMENT
If you have finished the measurement, click on “Stop enforcement” icon, then “Log out” icon
and finally tap “Power off” icon on the Login window to switch off the device.

S1 USER MANUAL 2.00.01
Page 9/27
INTRODUCTION TO THE MAIN SCREEN
After login, the Main screen will appear. The live view is situated in the center of the screen with
the information bar.
•Marker in the middle of live view shows:
a. Red cross - no reflected signal or targeted object is outside of the adjusted
parameters. It is closer or further off
b. White circle – reflected signal, but no speed value
c. Green circle – reflected signal and speed value is also detected
The functions and settings of the device can be accessed through the floating menus by clicking
the icons on both sides of the screen.
Exit from the displayed floating menu: tap again the icon of the menu or with the back sign on
the initial position of the menu.

S1 USER MANUAL 2.00.01
Page 10/27
1. BOTTOM INFORMATION BAR
In the bottom information bar, you can see the vehicle’s data which was reached by the laser
beam: speed, direction, distance.
By tapping on “Start recording”, you can record a 15 second video from the enforcement. It
will guide you next to the “Setting of manually recorded event” window, where you can give
vehicle class for the event and playback the video as well. After you have chosen the vehicle
class, press “Next” and it will jump to the “Feature selection” window, where event type settings
are available. Choose one from them and tap “Save” button. The video is available in the “Events”
menu.
2. UPPER INFORMATION BAR
The small icons on the upper left corner show the active enforcement functions.
Example:
According to the example, the current measurement registered 57 passing vehicles. The
automatic speed measurement function recorded 32 presumptive infringement data, the traffic
count registers 1 vehicle and with the manual speed measurement 15 presumptive infringement
data was recorded on the device.

S1 USER MANUAL 2.00.01
Page 11/27
The date and the current time can be seen on the upper edge of the screen:
* The software version, containing the test and educational profiles, are developed in case of occasional usage!
Signal strength of the data connection (signal strength): weak, good,
excellent
Speed of the data connection: 2G, 3G, 4G
GPS connection indicator, white if it is connected, grey if it is not.
Wired network connection is established.
Satellite GPS connection indicator: if there is a connection it is white, if there is not, it is
gray
Battery status (external, internal) *
* The battery status indicator on the screen is only indicative. The actual battery level of the
external battery has to be checked on the indicator on the battery!
Display examples:
External power supply / battery is disconnected, internal battery is discharged
External power supply / battery is disconnected, internal battery is good
External power supply / battery is connected, but it is discharged, internal battery is good
External power supply / battery is connected and it is good, internal battery is good
Note: • The charged external battery does not charge from the internal battery!
• If the internal battery is discharged, it is advisable to charge it, because it may cause
malfunction to the device (the external battery will also discharge during use).

S1 USER MANUAL 2.00.01
Page 12/27
3. ENFORCEMENT MENU
Select, add and edit all measurement function which is crucial for the enforcement.
•New enforcement: start adding new measurement parameters after a finished
enforcement.
•Select location and method: enter related location and task data to the measurement
method.
•Enforcement parameters: display the optional control functions.
•Start enforcement: start measurement.
•Pause enforcement: you can interrupt the enforcement.
•Stop enforcement: switch off measurement.
•Event monitoring: during measurement, the last three events displayed on the right side
of the window.
•Report traffic jam: During the measurement, the congestion reporting functions can be
used by tapping the icon.
•Log out: quit from the main window to the login screen.

S1 USER MANUAL 2.00.01
Page 13/27
4. INFORMATION MENU
•Enforcement information: Parameters and settings of the actual measurement can be
seen
•Start/End of Enforcement,
•GPS coordinates,
•Distance and speed data,
•Status informations

S1 USER MANUAL 2.00.01
Page 14/27
5. EVENTS MENU
Entering this menu will list the data stored in the device's memory since the last upload:
•some previous measurement events are listed
•events recorded during the selected measurement session are listed
•recordings (pictures, videos) and data are listed for the selected events
6. DEVICES
•ARH CAM S1: camera data is displayed
•INFO: status of the device is displayed

S1 USER MANUAL 2.00.01
Page 15/27
7. OPTIONS
•Image on display can be adjusted according to the environment light conditions. During
night measurement, brightness reduction of display is advisable to not be disturbing.
•License plate detection area can be set for more accurate setup (green light indicates it’s
working)
During night measurement, it is recommended to reduce brightness of the display to
not be disturbing.

S1 USER MANUAL 2.00.01
Page 16/27
8. CAMERA
•Focus: set focus to the required sharpness with automatic focus button, or with the
manual focus setting, and the vehicles license plate seen on the livestream should be
readable
•Focus fine tuning: adjust focus with finer scale.
•“Set focus”: Tap to see live stream in full picture with important settings button (Zoom,
Focus, Snapshot, Trigger signal, Live view enlargement, License plate recognition)
•Zoom: Zoom out and Zoom in icons serve for cropping setting of the image
•Camera mode:
oDay: in day mode, you can adjust brightness according to the pace of the traffic:
Slow: inside of built-up area
Normal: outside of built-up area
Fast: on Freeway and Highway
oNight: you can set 3 fix Infra values
•Brightness: In day and night modes, if the image is too dark or too light (not able to
read license plates), the automatic brightness control can be fine-tuned.
•Sensor: if you set both sensors, you are able to switch between sensor 1 and 2
o1. sensor: for licence plate reading
o2. sensor: for image processing when using additional functions
•Save: after set all parameters, you can save all changes
Recommended to set Zoom first and adjust Focus achieve sharper image for proper
license plate reading.

S1 USER MANUAL 2.00.01
Page 17/27
DETAILED DESCRIPTION OF THE SPEED
MEASUREMENT
There are two measurement versions:
•Automatic speed measurement: there is no need for the operator during the
measurement.
•Manual speed measurement: this function requires an operator. In addition, the camera
must not be fixed, since the purpose of this type of speed measurement is that the
camera must be point to the target vehicle in order to track the vehicles passing by. In
case of follow-up tracking, the vehicle must be within 180 meters in order to read the
license plate.

S1 USER MANUAL 2.00.01
Page 18/27
Marker: follow-up tracking, a green frame is displayed around the marker during
continuous targeting.
Category: before targeting, it must be set to the appropriate vehicle category. The
followed-up vehicle being tracked and judged by the category indicated on the
button.
Interrupt follow-up: This button will appear if the target vehicle speed has
exceeded the documentation speed limit for the selected category. Touching this
button will stop the current follow-up. The maximum duration of follow-up is 30
seconds. The button indicates the remaining time. The button disappears when tracking
is interrupted.

S1 USER MANUAL 2.00.01
Page 19/27
•Vehicle monitoring: creating an event of all passing vehicle with number plate, nationality,
vehicle class, speed and distance.
•Vehicle counting: counting all passing vehicle. It can only be used together with
“Automatic speed measurement” and “Vehicle monitoring” function.
•ADR: recognizes trucks which transport of hazardous materials
•Prohibited entry: monitoring vehicles driving in a restricted area. Controlled traffic
direction and vehicle class have to be chosen during the setup of the function.
•Prohibited overtaking: monitoring prohibited barrage lane crossing. To set controlled
lane, move crosshair to the “A” point as it shown on the figure and press button next to
“A” point to measure distance. Move camera to the “B” point and press button next „B”
point.
Other manuals for CAM S1
1
Table of contents
Other ARH Digital Camera manuals