Digizoid ZO Guide

digiZoid®
zo™
personal subwoofer
SMART START
ALL RIGHTS RESERVED
zo personal subwoofer
innovation
zo™, SmartVector™, and
LightScale™are trademarks of
digiZoid, inc.
digiZoid, inc REV
2.0
© 2010
SmartVector™and LightScale™
are patent pending technologies
of digiZoid, inc
digiZoid®
SMART START

input environmental
power
physical
output
frequency response
technical parameters
32 ≤°F ≤95
-4 ≤°F ≤115
5 ≤% ≤95
2.75 ×1.5 ×0.38 in
1.2 oz
3.5 mm Stereo
2.0 V (max)
15 kΩ
connection
voltage
impedance
operating temp
storage temp
relative humidity
3.5 mm Stereo
190 mA @ 3.7 V
0.2 Ω
connection
current
impedance
run time
rapid charge
full charge
charge cycles
dimensions
weight
20 Hz - 20 kHz ± 0.25 dB
(green contour level)
14 hrs
1 hr
2 hrs
> 700
zo and SmartVector technology
The digiZoid®zo™is unlike any other audio enhancement
device you’ve experienced before. It’s not your conventional
headphone amplifier, equalizer, or artificially produced 3D
sound effect. Instead, the zo defines a new category of
sound system – an electronic subwoofer.
Knowing the human ear does not perceive all frequencies of
sound with equal loudness, and that people have different
listening preferences, we’ve applied isophonic science to
solve these problems.
The result is the zo personal subwoofer, featuring digiZoid®
SmartVector™technology – a first of its kind, user-controlled
sound contouring system, which delivers optimum
sound reproduction from any speaker with matched
acoustic response to the human ear.
Blow your mind.
Not your ears.

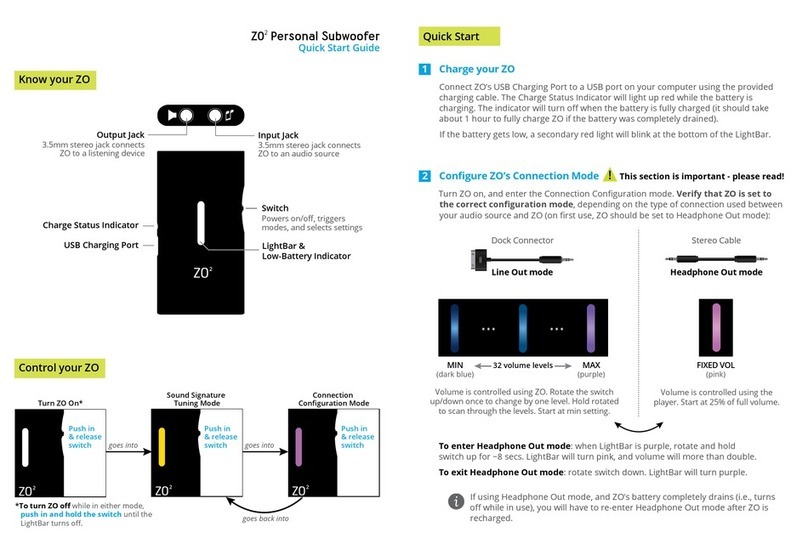
know your zo
LightScale™Indicator
visual representation of the
SmartVector contour level
SmartVector™Controller
power button & subwoofer
contour level adjustment
Charge Status
Indicator
USB Charging Port
Input Jack
Output Jack
warranty & return policy
warnings
Adjust the volume of the audio source to a safe level before putting on
headphones or earbuds.
Even though SmartVector technology optimizes audio signals to the ear’s
sensitivity, potential hearing damage may occur if listening at high volume
levels from your audio source for extended periods. If you experience ringing in
your ears, reduce the volume level of your audio source to prevent permanent
damage.
Do not connect zo to a mono channeled system.
Do not make repairs to the zo yourself.
digiZoid offers a 60-day return policy, as well as a one year warranty on parts and
labor from the date of purchase. To obtain more information on returns and our
warranty policy, please visit www.digiZoid.com.

troubleshooting
If you continue to have problems, please visit our support
site at www.getsatisfaction.com/digiZoid or consult the
full product manual found at www.digiZoid.com
⌖
⌖
⌖
⌖
⌖
⌖
⌖
⌖
If your zo does not turn on, ensure …
the battery is charged.
If no sound is heard or the audio is distorted, ensure …
the connections are correct;
the cables are not damaged;
the cables are fully inserted into the jacks (a faint snap should be heard);
the audio source is playing and the volume setting is not at zero;
the audio source equalizer settings are properly neutralized.
If the battery does not charge, ensure …
a USB 2.0 port is being used;
your computer is not turned offor in sleep mode.
accessories
charge your zo
USB Charging Cable
Used for recharging the internal battery,
or directly powering zo without draining
its battery.
3.5 mm Stereo Cables
These cables connect your zo to an audio source.
The shorter length is ideal when you need zo on
the go.
⌖
⌖
⌖
Connect the mini-end of the supplied USB Charging Cable to zo’s Charging Port,
and the other end to your computer’s USB port.
When in charging mode, the Charge Status Indicator light will glow blue.
Once zo is fully charged (about 2 hours), the light will automatically deactivate.

neutralize your audio source
When initially connecting your zo to any audio source, it is important
to start with neutral source equalizer settings as recommended
below…
For portable media devices, turn off all built-in equalizer settings
which are typically found in the device’s main menu .
For computers, turn off all software-related equalizers, which are
normally accessed through the audio player’s main menu. If it is
accessible, turn off any equalizer functions which may be associ-
ated with the comptuer’s sound card.
When connecting to a car stereo, set the bass and treble to its
neutral setting (between min and max).
If you are connecting zo through an aftermarket car stereo, turn off
all sound effect functions and set the equalizer to the “flat” preset.
For optimum audio performance,
this section should NOT be skipped.
connect your zo
zo →Audio Source
Ensure the output from the audio source
has a 3.5 mm jack size. Using the Stereo
Cable provided, connect the output of the
audio source to the input jack of your zo.
Listening Device →zo
Connect the stereo jack of the listening
device to the output of your zo.
Audio SourceListening Device
Input
zo
Output

insider secrets
Stepwise vs. Continuous SVC Feature
The SVC can change the 32 contour levels in
steps or continuous mode. When rotated
briefly (less than 1 sec), contour changes by
one level. When held rotated, zo activates its
continuous mode, changing four levels per
second.
zo’s Memory
zo retains your last SVC setting in memory
eliminating the need to re-adjust after being
turned off.
zo’s Bypass Function
When zo is turned off, circuitry automatically
connects the listening device to the audio
source. This feature temporarily “bypasses”
zo without the need to disconnect and
reconnect cables.
Final Tweaking
When connection and adjustment of
your zo has been completed, additional
fine tuning can then be accomplished
by tweaking your audio source equalizer,
or treble and bass settings to preference.
‼
Try using the bypass function to
obtain a full appreciation of zo’s
sound enhancement capabilities.
control your zo
Powering On/Off
To turn your zo on, push in & release the SVC. When on, the LightScale indicator will
illuminate.
To turn your zo off, push in & release the SVC.
Changing contour level with the SVC
When your zo is turned on for the first time, the SVC will be set at the median contour
level, and the LightScale indicator will illuminate an amber color.
To decrease the contour level, rotate the SVC downwards. When the contour level
reaches the minimum setting, the LightScale will transition to green.
To increase the contour level, rotate the SVC upwards. When the contour level reaches
the maximum setting, the LightScale will transition to red.
med
minmax
increases
contour
decreases
contour
⌖
⌖
⌖
⌖
⌖
Other manuals for ZO
2
Table of contents
Other Digizoid Subwoofer manuals
